EMERGENCY 2990
3
2
1
TECHNICAL SPECIFICATION
- Supply voltage: 220÷240VAC/50÷60Hz, 175÷275VDC, 24VDC
- Insulation class: II or III
- Protection level: IP40
- Time of operation in emergency mode : 1, 2 or 3h
- Light source: 1W, 2W, 3W LED
- Battery charging time : up to 24h
- Ambient temperature : 0÷+40°C
- Viewing distance: 30m
MAIN FEATURES:
- Battery charging indication by LED
- Electronic protection against total battery discharge
- Self-test function (optional)
- Operation in emergency or mains and emergency mode available
- Using to Rubic system available
- Using to central battery available
- Surface assembly, optional recessed
- Assembly indoors to flat surface
- Polycarbonate body, plexi glass
- The luminaire can be powered maintained or non maintained
- Controlgear supplied within this luminaire performs the function of
changeover operation from normal to emergency mode
RECOMMENDATIONS FOR USE:
The following rules must be observed to ensure the correct and reliable
operation of the fitting:
- Battery packs must be compatible with emergency modules
- Installation of fitting should be made by appropriate person which is
authorized for such works
- After installation of fitting, the formatting of battery must be made while
continuous charging for a period of 24 hours and fully discharging it
through lighting
- Three full formatting cycles must be performed to achieve maximum
battery capacity
- Technical inspection of the fitting and, in particular, of the battery must
be performed once a year
- It is important to maintain temperature parameters for battery packs, i.e.
from 0 to + 55°C
- It is forbidden to make any changes in electronic system design
- If the fitting does not withstand its rated operation time, the battery must
be renewed
- It is recommended by the manufacturer to renew the battery every 4 years
- The light source contained in this luminaire shall only be replaced by the
manufacturer or his service agent or a similar qualified person
- Rated luminous flux in emergency mode amounts to 100%.
TERMS AND CONDITIONS OF WARRANTY:
The condition to acknowledge the warranty is:
- No mechanical damage
- No evidence of changes made by third party in fitting design and, in
particular, emergency module
- Proper use, as recommended
- Proper connection of supply voltage and battery pack (attention must be
paid to the polarity of the battery and converter terminals).
TESTING THE FITTING (optional):
It is possible to test the fitting using test button placed in the housing (option). At the
time when the supply voltage is connected to the fitting, the green LED lights up
indicating the emergence of voltage in the electronic system and thus the battery
charging. By pressing the button, the test of fitting is activated through an open
circuit, and by this the decay of mains voltage is simulated and the switching over by
electronic system to the emergency operation mode is caused. During emergency
operation, the LED is no longer lit, the fitting is powered from the battery. When the
button is released, the mains voltage returns and the fitting is operated in mains mode,
charging process is started.
AUTOTEST FUNCTION (optional):
Test A is run automatically every 28 days. During test A a conversion kit is switched
to emergency mode for 1 minute and the following parameters are checked: control
of battery power discharge, control of battery. Test B is run automatically every 364
days. During test B a conversion kit is switched to emergency mode for all duration time
and the following parameters are checked: control of battery power discharge,
control of minimum battery voltage .
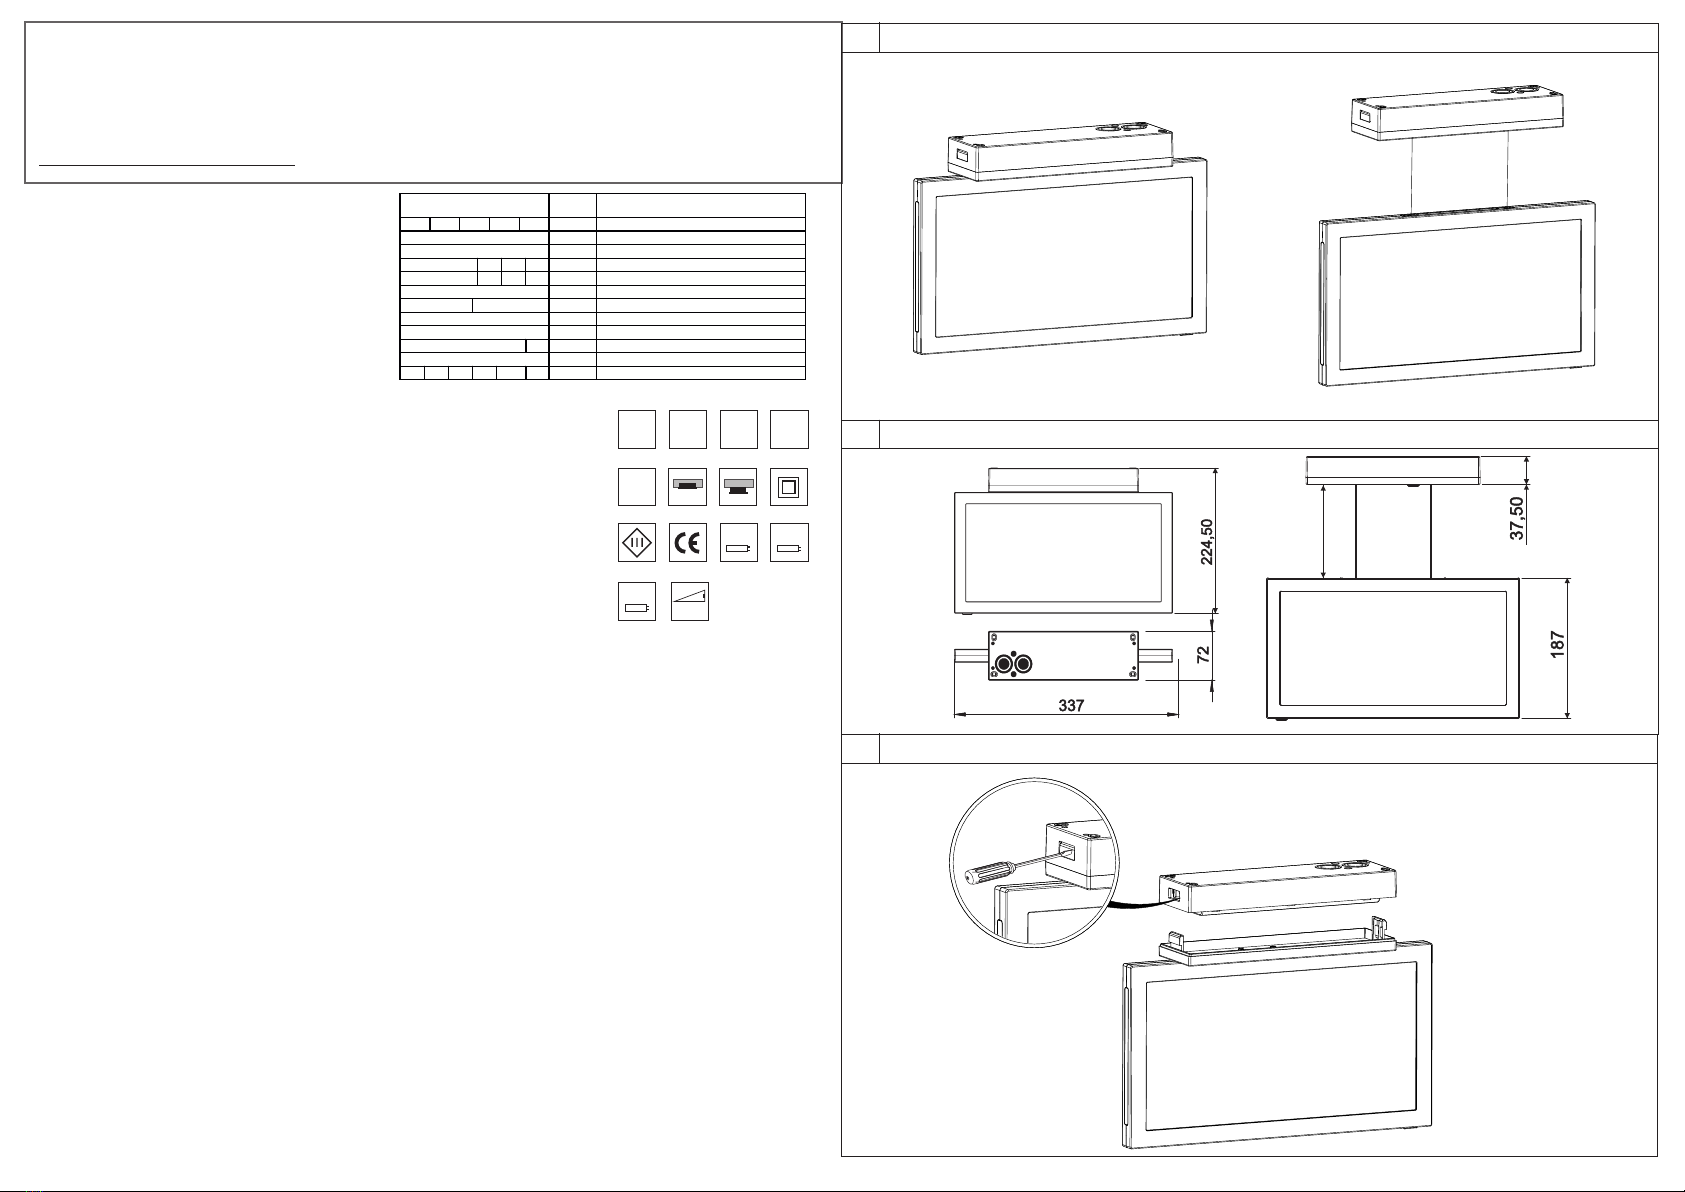
DIMENSION
OPENNING
LED
24V
DC
Ni-Cd
Ni-MH
IP40
175-275V
DC
220-240V
AC
50-60Hz
d=30m
LiFePO4
ASSEMBLY INSTRUCTIONS
max. 750
OMS a.s.
906 02 Dojč,419
Slovakia
www.omslighting.com
Color of LED indicator shining (blinking),
G – Green, R - Red
Light
source Description
any Confirmation of the reset of timer or errors (only AT)
shining Emergency mode
not shining Standby mode
any Communication error (only RS), no battery
any Communication error (only RS), connected battery
any Battery error
any Light source or electronics error
Error indication or not shining
shining Performing test or network mode
Error indication or not shining
any No battery
not shining Battery loading
not shining Standby mode (battery full)
not shining Too much output power for this battery capacity


