oneConcept Clean Master User manual

Clean Master
Zyklon-Staubsauger
Cyclonic vacuum cleaner
Aspiradora Cyclonic
Aspirateur cyclonique
Aspirapolvere ciclonico
10033030
10033031


3
DE
English 11
Français 21
Español 29
Italiano 37
Technische Daten 3
Konformitätserklärung 3
Sicherheitshinweise 4
Geräteübersicht 5
Zusammenbau 6
Reinigung 7
Fehlerbehebung 9
Hinweise zur Entsorgung 10
Sehr geehrter Kunde,
wir gratulieren Ihnen zum Erwerb Ihres Gerätes.
Lesen Sie die folgenden Hinweise sorgfältig durch und
befolgen Sie diese, um möglichen Schäden vorzubeugen.
Für Schäden, die durch Missachtung der Hinweise und
unsachgemäßen Gebrauch entstehen, übernehmen wir
keine Haftung. Scannen Sie den QR-Code, um Zugriff
auf die aktuellste Bedienungsanleitung und weitere
Informationen rund um das Produkt zu erhalten:
INHALTSVERZEICHNIS
TECHNISCHE DATEN
Artikelnummer 10033030
Stromversorgung 220-240 V ~ 50/60 Hz
Leistung (Watt) 700 W
Zubehör: Filter (Artikelnummer) 10033031
KONFORMITÄTSERKLÄRUNG
Hersteller:
Chal-Tec GmbH, Wallstraße 16, 10179 Berlin,
Deutschland.
Dieses Produkt entspricht den folgenden
Europäischen Richtlinien:
2014/30/EU (EMV)
2014/35/EU (LVD)
2013/666/EU (ErP)
2011/65/EU (RoHS)

4
DE
SICHERHEITSHINWEISE
• Lesen Sie sich alle Hinweise vor der Benutzung sorgfältig durch und
bewahren Sie die Anleitung zum späteren Nachschlagen gut auf.
• Lassen Sie das Gerät nicht unbeaufsichtigt, während es in Betrieb ist.
• Benutzen Sie das Gerät nicht in Räumen, in denen sich entzündliche
Materialien oder explosive Stoffe benden.
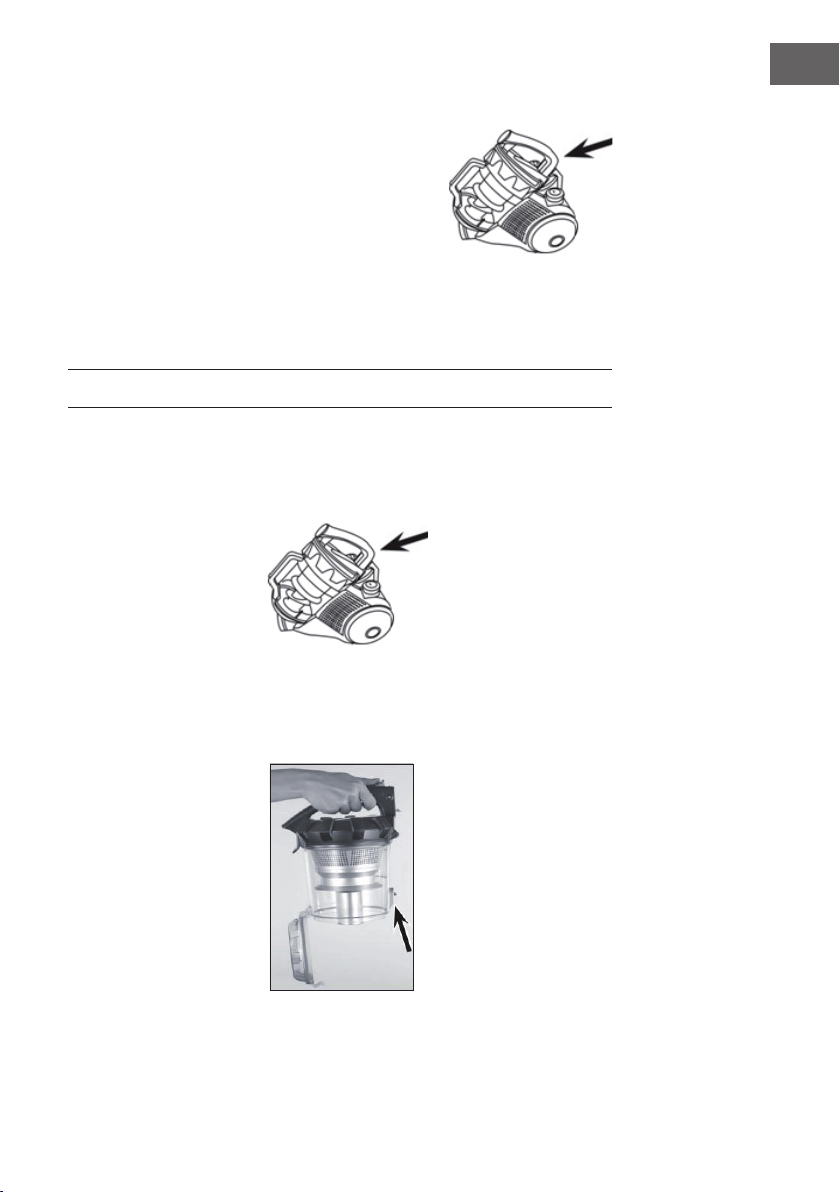
• Ziehen Sie immer den Stecker, bevor Sie die Tankabdeckung abnehmen.
• Achten Sie darauf, dass Kinder nicht mit dem Gerät spielen. Benutzen Sie
das Gerät in Anwesenheit von Kindern nur unter Aufsicht.
• Benutzen Sie das Gerät genau wie in der Anleitung beschrieben.
Benutzen Sie nur Zubehör, das vom Hersteller ausdrücklich empfohlen
wird.
• Benutzen Sie das Gerät nicht, wenn Netzkabel, Stecker oder andere
Geräteteile beschädigt sind.
• Reparaturen dürfen nur von Fachpersonal ausgeführt werden und sind
erforderlich, wenn das Gerät beschädigt wurde, Netzkabel oder Stecker
beschädigt sind, Flüssigkeiten darauf ausgelaufen oder Objekte darauf
gefallen sind, wenn das Gerät Nässe oder Feuchtigkeit ausgesetzt oder
fallen gelassen wurde oder nicht ordnungsgemäß funktioniert.
• Funken im Inneren des Motors können entzündliche Dämpfe oder Staub
entzünden. Um das Brand- oder Explosionsrisiko zu verringern, benutzen
Sie das Gerät nicht in der Nähe von brennbaren Flüssigkeiten, Gasen,
Stäuben, Benzin oder anderen Brennstoffen, üchtigen Flüssigkeiten,
Reinigungsmitteln, Öllacken, Erdgas, Kohlenstaub, Magnesiumstaub oder
Aluminiumstaub.
• Ziehen und tragen Sie das Gerät nicht am Kabel. Schließen Sie keine
Türen, durch die das Kabel verläuft und verlegen Sie das Kabel nicht
entlang scharfer Kanten.
• Ziehen sie den Stecker nicht am Kabel aus der Steckdose, sondern halten
Sie ihn beim Abziehen mit der Hand fest.
• Fassen Sie das Gerät und den Stecker nicht mit nassen Händen an.
• Stecken Sie keine Gegenstände in die Lüftungsöffnungen. Benutzen Sie
das Gerät nicht wenn die Lüftungsöffnungen verstopft sind. Halten Sie die
Öffnungen frei von Schmutz, Haaren oder ähnlichem.
• Halten Sie Ihre Haare, Kleidung, Finger und andere Körperteile vom Gerät
fern, solange es in Betrieb ist.
• Schalten Sie das Gerät aus, bevor Sie den Stecker ziehen.
• Seien Sie vorsichtig, wenn Sie Treppen reinigen.
• Saugen Sie keine brennbaren oder explosiven Flüssigkeiten auf.
• Saugen Sie keine heißen Objekte, wie Zigaretten oder heiße Asche auf.
• Benutzen Sie das Gerät nicht ohne Filter.
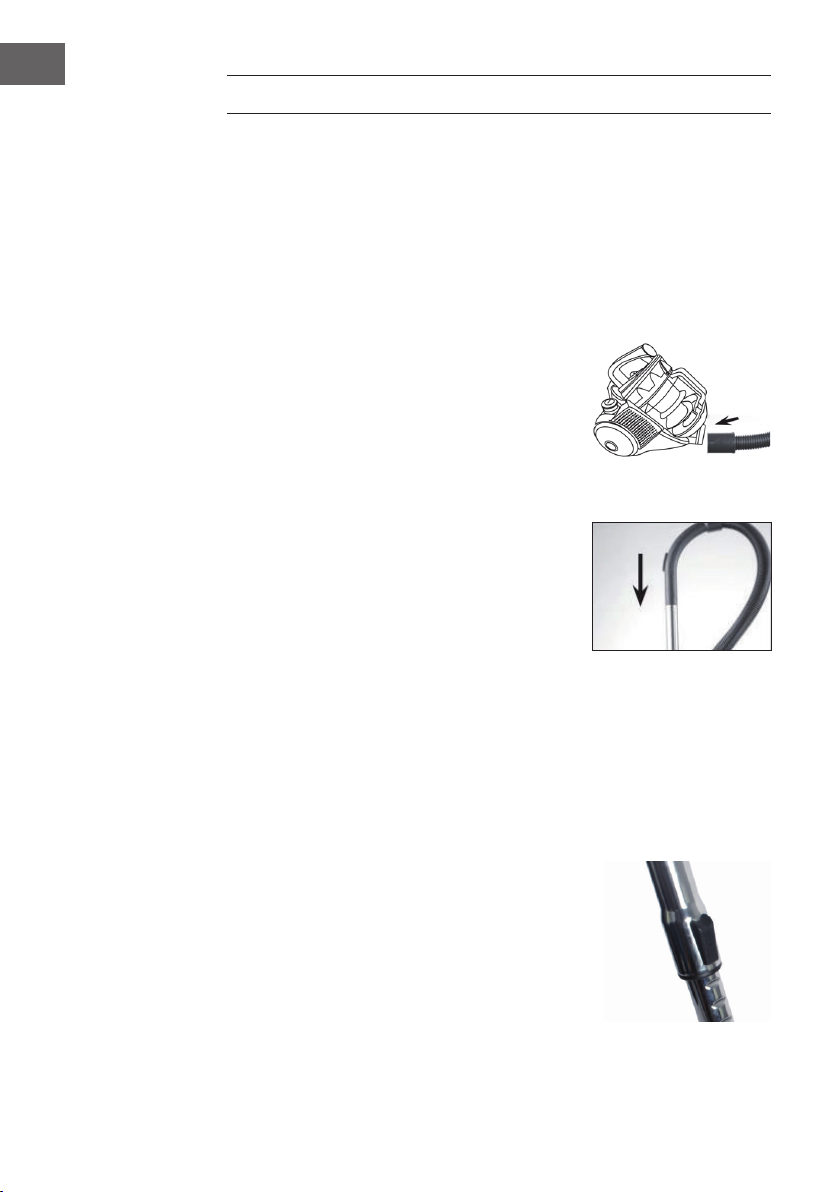
• Ziehen Sie den Stecker aus der Steckdose, bevor Sie Schläuche, Düsen
oder Zubehör anbringen oder auswechseln.
• Verstauen Sie das Gerät an einem trockenen Ort. Verstauen Sie es nach
jedem Saugen, damit niemand darüber fällt.

5
DE
GERÄTEÜBERSICHT
Saugdüsen
Hinweis: Schalten Sie immer zuerst den Staubsauger aus, bevor Sie die
Saugdüsen wechseln.
1/Bodendüse
Die Bodendüse ist sowohl für Teppiche als
auch für glatte Fußböden geeignet, mit dem
Fußschalter können Sie zwischen Boden und
Teppich wechseln. Für glatte Böden wird eine
Bürste am Geräteboden eingesetzt.
2/Fugendüse und Bürste
Klappen Sie das Endstück in Pfeilrichtung um, um
die Fugendüse in eine Bürstendüse umzuwandeln.
Die Fugendüse eignet sich für die Reinigung von
Polstern, Fahrzeuginnenräumen und für alle Ecken
und Kanten, die mit den anderen Düsen nicht
erreichbar sind. Die Bürstendüse eignet sich für
alle unebenen Gegenstände, Möbel, Lampen,
Leisten, Sockelleisten, Fensterbänke, etc.
Fugendüse
Tragegriff
Taste zur
Kabelaufwicklung
Obere Abdeckung
Abdeckungsverriegelung
Staubbehältergriff
Staubbehälter
Untere Abdeckung
Saugschlauchanschluss
Basis
Ein-/Aus-Schalter
(auch Saugstärkeregler)
Luftaustrittsplatte
Rad
Metall-Teleskoprohr
Saugschlauch Bodendüse

6
DE
ZUSAMMENBAU
Auspacken der Packungsinhalte
• Packen Sie alle Teile aus und vergewissern Sie sich, dass der Lieferumfang
vollständig ist.
• Wenn Sie Schäden an den Einzelteilen feststellen, verwenden Sie diese
nicht.
• Entfernen Sie ggf. Papier, Aufkleber etc. aus dem Staubbehälter.
Den Schlauch einsetzen/entfernen
• Stecken Sie den Saugschlauchanschluss in
die Saugöffnung am Gerät (siehe Pfeil). Er
muss hörbar einrasten.
• Um den Saugschlauch zu entfernen, drücken
Sie den Knopf am Anschluss und ziehen Sie
den Saugschlauch heraus.
Einstecken/Entnehmen des Teleskoprohres
• Das offene Ende des Griffes in die
entsprechende Öffnung am Teleskoprohr
einführen. Drehen Sie dabei den Griff etwas
hin und her. Überprüfen Sie, ob die Verbindung
sicher ist.
• Um das Teleskoprohr zu entfernen, ziehen Sie
es aus dem Griff.
Einstellen der Länge des Teleskoprohres
• Schieben Sie den Schieber am Teleskoprohr nach unten und stellen Sie die
gewünschte Länge ein.
• Lassen Sie den Schieber los und bewegen Sie das Rohr nach vorne, bis es
einrastet.
Ein-/Ausbau der Saugdüsen
• Stecken Sie das offene Ende des Teleskoprohres
bis zum Anschlag in eine der beiliegenden
Saugdüsen. Drehen Sie die Düse dabei leicht hin
und her.
• Für mehr Flexibilität können die Saugdüsen
auch ohne Teleskoprohr direkt am Saugschlauch
befestigt werden.
• Um eine Saugdüse zu entfernen, ziehen Sie diese
ganz einfach raus.

7
DE
Entfernen/Einsetzen des Staubbehälters
• Entfernen: Drücken Sie den Entriegelungsknopf
am Staubbehälter und nehmen Sie ihn am Griff
aus dem Gerät.
• Einsetzen: Nehmen Sie den Staubbehälter
am Griff und legen Sie zuerst den Boden des
Behälters in das Gerät (der Boden zeigt nach
unten und der Griff nach oben). Drücken Sie
dann den Griff gegen das Gerätegehäuse, bis
der Staubbehälter hörbar einrastet. Halten Sie das Gerät am Griff und
heben Sie es an, um zu prüfen, ob der Staubbehälter richtig sitzt.
REINIGUNG
Den Staubbehälter entleeren
1 Drücken Sie den Entriegelungsknopf am Staubbehälter und ziehen Sie ihn
am Griff aus dem Gerät.
2 Halten Sie den Staubbehälter über einen offenen Mülleimer. Der
Staubbehälter sollte so nah wie möglich am Mülleimer sein, damit der
Staub aus dem Mülleimer nur in den Mülleimer fällt und nicht in der
Umgebung verteilt wird.
3 Drücken Sie die Taste, um den Staubbehälter zu öffnen. Der Boden des
Staubbehälters öffnet sich und der Schmutz fällt heraus.

8
DE
4 Schließen Sie den Boden des Staubbehälters wieder. Der Verschluss muss
hörbar einrasten.
5 Setzen Sie den Staubbehälter in den Staubsauger ein: Halten Sie ihn
am Griff und setzen Sie den Boden des Behälters zuerst in das Gerät
ein. Drücken Sie dann den Griff gegen das Gerätegehäuse bis der
Staubbehälter hörbar einrastet. Halten Sie das Gerät am Griff und heben
Sie es an, um zu prüfen, ob der Staubbehälter richtig sitzt.
Reinigung des Staublters
Der Staublter bendet sich im Staubbehälter.
1 Entfernen Sie den Saugschlauch aus dem Staubbehälter.
2 Drücken Sie den Entriegelungsknopf am Staubbehälter und ziehen Sie ihn
am Griff aus dem Gerät.
3 Drehen Sie den Staubbehälterdeckel, um ihn zu entfernen.
Hinweis: Auf dem Deckel und dem Staubbehälter benden sich
Orientierungsmarkierungen für das Entfernen und Platzieren des Deckels.
Sie können die Abdeckung entfernen, wenn die Markierung auf dem
Staubbehälter auf das offene Schloss-Symbol auf der Abdeckung zeigt.
4 Ziehen Sie den Staubbehälterdeckel mit dem Staublter heraus.
5 Öffnen Sie den Staubbehälterdeckel, indem Sie ihn mit dem Hebel nach
oben drücken.
6 Nehmen Sie den Staublter und den Schaumstoffstaublter heraus.
Falls erforderlich, spülen Sie den Schaumstoffstaublter gründlich mit
sauberem, lauwarmem Wasser aus.
Hinweis: Den Filter auf keinen Fall in der Waschmaschine oder
Geschirrspülmaschine reinigen! Schütteln Sie dann das restliche Wasser
ab und lassen Sie den Filter vollständig trocknen, bevor Sie ihn wieder
einsetzen.
7 Setzen Sie den Staublter wieder in den Staubbehälterdeckel ein und
schließen Sie ihn. Der Hebel muss hörbar einrasten.
8 Setzen Sie den Staublterdeckel mit dem Staublter wieder in den
Staubbehälter und drehen Sie ihn bis er fest angezogen ist. Der Deckel ist
richtig angebracht, wenn die Markierung auf dem Staubbehälter auf das
geschlossene Schloss-Symbol auf dem Deckel zeigt.
Hinweis: Setzen Sie nur trockene Filter in das Gerät ein.

9
DE
FEHLERBEHEBUNG
Hinweis: Sollte Ihr Gerät nicht mehr einwandfrei funktionieren, Schäden
aufweisen oder ein Ersatzteil benötigen, wenden Sie sich bitte an den
Kundendienst. Führen Sie zu Ihrer eigenen Sicherheit keine Reparaturen
selbst durch.
Die folgende Tabelle gibt Ihnen Tipps, wie Sie kleinere Probleme selbst lösen
können.
Problem Mögliche Ursache Lösungen/Tipps
Die Saugkraft ist
schwach.
Ist das Zusatzluftventil am
Griff offen?
Schließen Sie es.
Ist der Staubbehälter zu voll? Leeren Sie den
Behälter.
Sind die Filter stark
verunreinigt?
Reinigen Sie die Filter.
Ist die Düse, das Teleskoprohr
oder der Saugschlauch
verstopft?
Schalten Sie das
Gerät aus, ziehen Sie
den Netzstecker aus
der Steckdose und
entfernen Sie das
störende Hindernis.
Der Staubsauger
hat keine
Saugkraft.
Ist der Netzstecker nicht
richtig mit der Steckdose
verbunden?
Korrigieren Sie die
Netzsteckerposition.
Ist die Steckdose defekt? Probieren Sie eine
andere Steckdose aus.
Hat die Sicherung ausgelöst
oder ist defekt?
Überprüfen Sie die
Sicherung für Ihren
Netzanschluss.
Sind die Filter verstopft? Reinigen Sie
den Staub- und
Absauglter.
Das Gerät gibt
beim Saugen
Staub ab.
Wurde der Staubbehälter
nicht richtig verschlossen
und/oder ist er nicht (richtig)
in das Gerät eingesetzt?
Korrigieren Sie dies.

10
DE
Problem Mögliche Ursache Lösungen/Tipps
Das Netzkabel
kann nicht
vollständig
aufgewickelt
werden.
Das Kabel wurde nicht richtig
im Gerät aufgewickelt.
Ziehen Sie das Kabel
etwas heraus und
drücken Sie dann den
Knopf zum Einrasten
des Kabelaufrollers
erneut.
Beim
Staubsaugen
entsteht ein
unangenehmer
Geruch.
Benutzen Sie das Gerät zum
ersten Mal?
Beim ersten Einsatz
neuer Geräte entsteht
oft ein Geruch.
Der Geruch sollte
verschwinden, wenn
Sie das Gerät einige
Male benutzt haben.
HINWEISE ZUR ENTSORGUNG
Bendet sich die linke Abbildung (durchgestrichene
Mülltonne auf Rädern) auf dem Produkt, gilt die
Europäische Richtlinie 2012/19/EU. Diese Produkte
dürfen nicht mit dem normalen Hausmüll entsorgt
werden. Informieren Sie sich über die örtlichen
Regelungen zur getrennten Sammlung elektrischer und
elektronischer Gerätschaften. Richten Sie sich nach
den örtlichen Regelungen und entsorgen Sie Altgeräte
nicht über den Hausmüll. Durch die regelkonforme
Entsorgung der Altgeräte werden Umwelt und
die Gesundheit ihrer Mitmenschen vor möglichen
negativen Konsequenzen geschützt. Materialrecycling
hilft, den Verbrauch von Rohstoffen zu verringern.

11
EN
TECHNICAL DATA
Item number 10033030
Power supply 220-240 V ~ 50/60 Hz
Power (Watt) 700 W
Accessories: lter (item number) 10033031
DECLARATION OF CONFORMITY
Producer:
Chal-Tec GmbH, Wallstraße 16, 10179 Berlin,
Germany.
This product is conform to the following European
Directives:
2014/30/EU (EMC)
2014/35/EU (LVD)
2013/666/EU (ErP)
2011/65/EU (RoHS
Dear Customer,
Congratulations on purchasing this equipment. Please
read this manual carefully and take care of the following
hints to avoid damages. Any failure caused by ignoring
the items and cautions mentioned in the instruction
manual is not covered by our warranty and any liability.
Scan the QR code to get access to the latest user
manual and other information about the product:
CONTENT
Technical Data11
Declaration of Conformity11
Safety Instructions12
Product Overview13
Assembly14
Cleaning15
Troubleshooting17
Hints on Disposal18

12
EN
SAFETY INSTRUCTIONS
• Read all instructions before using the vacuum cleaner and save for
future reference. To reduce the risk of personal injury or damage to your
vacuum, use only recommended accessories.
• Do not leave vacuum unattended when it is plugged in and/or operating.
Unplug unit when not in use.
• Never operate this unit when ammable materials or when vapors are
present because electrical devices produce arcs or sparks that can cause
a re or explosion.
• Always disconnect the plug from the wall outlet before removing the tank
cover.
• Do not allow to be used as a toy. Close attention is necessary when
vacuum is in use by or near children.
• Use only as described in this manual. Use only manufacturer’s
recommended attachments.
• Do not use with a damaged cord, plug, or other parts.
• If your vacuum is not working as it should, has missing parts, has been
dropped, damaged, left outdoors, or dropped into water, call customer
service.
• Sparks inside the motor can ignite ammable vapors or dust. To reduce
the risk of re or explosion, do not use near combustible liquids, gases,
dusts, gasoline or other fuels, lighter uid, cleaners, oil-based paints,
natural gas, coal dust, magnesium dust, grain dust, aluminum dust or gun
powder.
• Do not pull or carry the appliance by cord, close a door on cord, or pull
cord around sharp edges or corners.
• Do not unplug by pulling on cord. To unplug, grasp the plug rmly.
• Do not handle plug or appliance with wet hands.
• Do not put any object into ventilation openings. Do not vacuum with any
ventilation openings blocked; keep free of dust, lint, hair, or anything that
can reduce air ow.
• Keep hair, loose clothing, ngers, and all parts of body away from
openings and moving parts.
• Turn off the control before unplugging.
• Use extra care when cleaning stairs.
• Do not use to pick up ammable or combustible liquids such as gasoline
or use in areas where they may be present.
• Do not pick up anything that is burning or smoking, such as cigarettes,
matches, or hot ashes.
• Do not use without lters in place.
• Always unplug this appliance before connecting or disconnecting vacuum
hose.
• Store the vacuum indoors. Put the vacuum away after use to prevent
tripping accidents.

13
EN
PRODUCT OVERVIEW
Suction Nozzles
Note: Always turn off the vacuum cleaner rst before changing the
nozzles.
1/Floor nozzle
The oor nozzle is suitable both for carpets
and smooth oors, with the foot switch; you
can switch between oor and carpet. A brush
is deployed on the device bottom for smooth
oors.
2/Crevice and brush nozzle
Fold over the end piece in the direction of
the arrow to convert the crevice nozzle into a
brush nozzle. The crevice nozzle is suitable for
upholstery, cleaning the inside of cars and for all
nooks and crannies that cannot be reached with
the other nozzles. The brush nozzle is suitable
for all uneven objects, furniture, lamps, proles,
and skirting boards, window ledges, etc.
Crevice nozzle
Carrying handle
Cable rewind button
Upper cover
Cover lock
Dust bin handle
Dust bin
Lower cover
Suction opening
Basis
On/Off switch
(also suction regulator)
Air outlet plate
Wheel
Metal telescopic tube
Suction hose Floor nozzle

14
EN
ASSEMBLY
Unpacking the product contents
• Unpack all parts and make sure that the scope of delivery is complete and
check for any damages from transport.
• If you identify damages to the components, do not use them .
• If necessary, remove any piece of paper or sticker etc. from the dust bin.
Inserting /removing the hose
• Insert the suction hose connector into the
suction opening on device (see arrow). It
must audibly lock into place.
• To remove the suction hose push the knob
on the connector and pull the suction hose
out.
Inserting/removing the telescopic tube
• Insert the open end of the handle into the
corresponding opening on the telescoping
tube. In the process, turn the handle back and
forth somewhat. Check to make sure that the
connection is secure.
• To remove the telescoping tube pull it off of the
handle.
Adjusting the length of the telescopic tube
• Push the slider on the telescoping tube down and set the desired length.
• Release the slider and move the tube forward until it locks into place.
Mounting/removing suction nozzles
• Insert the open end of the telescoping tube in
one of the enclosed suction nozzles up to the
stop. Turn the nozzle back and forth slightly in the
process.
• The suction nozzles can also be attached directly
to the suction hose without the telescoping tube
for more exibility.
• To remove a suction nozzle pull it off.

15
EN
Removing/inserting the dust bin
• Removal: Push the release button on the dust
bin and take it out of the device by the handle.
• Insertion: Take the dust bin by the handle and
rst place the bottom of the bin in the device
(the bottom is facing down and handle is facing
up). Then push the handle against the device
housing until the dust bin audibly locks into
place. Hold the device by the handle and lift it
to check whether the dust bin is properly seated.
CLEANING
Emptying the dust bin
1 Push the release button on the dust bin and pull it out of the device by
the handle.
2 Hold the dust bin over an open garbage bin. The dust bin should be as
close as possible to the garbage bin so that dust from the dust bin only
falls into the garbage bin and is not dispersed in the surrounding area.
3 Push the button to open the dust bin. The bottom of the dust bin will
open and the dirt will fall out.

16
EN
4 Shut the bottom of the dust bin again. The fastener must audibly lock into
place.
5 Insert the dust bin in the device: Take hold of it by the handle and insert
the bottom of the bin in the device rst. Then push the handle against the
device housing until the dust bin audibly locks into place. Hold the device
by the handle and lift it to check whether the dust bin is properly seated.
Cleaning the dust lter
The dust lter is located in the dust bin.
1 Remove the suction hose from the dust bin.
2 Push the release button on the dust bin and pull it out of the device by
the handle.
3 Turn the dust bin cover to remove it.
Note: Orientation marks for the removal and placement of the cover are
provided on the cover and dust bin. You can remove the cover when the
mark on the dust bin is pointing towards the open lock symbol on the
cover.
4 Pull the dust bin cover with the dust lter out.
5 Open the dust bin cover by using the lever to push it up.
6 Take out the dust lter and the foam dust lter. If necessary, rinse the
foam dust lter out thoroughly with clean, lukewarm water.
Note: Do not in any case clean the lter in the washing machine or
dishwasher! Then shake off any remaining water and let the lter air dry
completely before reinstalling it.
7 Place the dust lter back in the dust bin cover and close it. The lever must
audibly lock into place.
8 Place the dust lter cover with the dust lter back in the dust bin and turn
it until rmly tightened. The cover is properly in place when the mark on
the dust bin is pointing towards the closed lock symbol on the cover.
Note: Insert only dry lters into the unit.

17
EN
TROUBLESHOOTING
Note: If your device no longer functions properly, exhibits damages or
requires a spare part, please contact the customer service. For your own
safety, do not perform any repairs yourself.
The following table gives you tips on how to resolve minor problems yourself.
Problems Potential causes Solutions/tips
The suction
power is weak.
Is the auxiliary air valve on
the handle open?
Close it.
Is the dust bin too full? Empty the bin.
Are the lters very dirty? Clean the lters.
Is the nozzle, telescoping tube
or suction hose plugged?
Turn the device off,
pull the mains plug
out of the socket
and remove the
obstruction.
The vacuum
cleaner has no
suction power.
Is the mains plug not correctly
connected with the socket?
Correct the position of
the mains plug.
Is the socket defective? Try another socket.
Has the fuse blown or is it
defective?
Check the fuse
for your mains
connection.
Are the lters plugged? Clean the dust and
exhaust lter.
The device emits
dust when
vacuuming.
Has the dust bin not been
closed properly and/or is it
not (properly) inserted in the
device?
Correct this.
The power cord
cannot be wound
up completely.
The cord has not been
properly wound up in the
device.
Pull it out somewhat
and then push the
button for engaging
the cord winder again.
An unpleasant
odour develops
when vacuuming.
Are you using the device for
the rst time?
An odour often
develops when using
new devices for the
rst time. The odour
should disappear once
you have used the
device a few times.

18
EN
HINTS ON DISPOSAL
According to the European waste regulation 2012/19/
EU this symbol on the product or on its packaging
indicates that this product may not be treated as
household waste. Instead it should be taken to the
appropriate collection point for the recycling of
electrical and electronic equipment. By ensuring this
product is disposed of correctly, you will help prevent
potential negative consequences for the environment
and human health, which could otherwise be caused
by inappropriate waste handling of this product. For
more detailled information about recycling of this
product, please contact your local council or your
household waste disposal service.

19
FR
Fiche technique 19
Déclaration de conformité 19
Consignes de sécurité 20
Aperçu de l‘appareil 21
Assemblage 22
Nettoyage 23
Résolution des problèmes 25
Informations sur le recyclage 26
Chère cliente, cher client,
Toutes nos félicitations pour l’acquisition de ce nouvel
appareil. Veuillez lire attentivement et respecter
les instructions de ce mode d’emploi an d’éviter
d’éventuels dommages. Nous ne saurions être tenus
pour responsables des dommages dus au non-respect
des consignes et à la mauvaise utilisation de l’appareil.
Scannez le QR-Code pour obtenir la dernière version du
mode d‘emploi et à d‘autres informations concernant le
produit :
SOMMAIRE
FICHE TECHNIQUE
Numéro d'article 10033030
Alimentation 220-240 V ~ 50/60 Hz
Puissance (watts) 700 W
Accessoire : ltre (Numéro d'article) 10033031
DÉCLARATION DE CONFORMITÉ
Fabricant :
Chal-Tec GmbH, Wallstraße 16, 10179 Berlin,
Allemagne.
Ce produit est conforme aux directives européennes
suivantes :
2014/30/UE (CEM)
2014/35/UE (LVD)
2013/666/UE (ErP)
2011/65/UE (RoHS)

20
FR
CONSIGNES DE SÉCURITÉ
• Lisez attentivement toutes les instructions avant utilisation et conservez-
les pour référence ultérieure.
• Ne laissez pas l‘appareil en fonctionnement sans surveillance.
• N‘utilisez pas l‘appareil dans des pièces contenant des matériaux
inammables ou des explosifs.
• Débranchez toujours la che avant de retirer le couvercle du réservoir.
• Assurez-vous que les enfants ne jouent pas avec l‘appareil. En présence
d‘enfants, n‘utilisez l‘appareil que sous surveillance.
• Utilisez l‘appareil exactement comme décrit dans les instructions. Utilisez
uniquement les accessoires recommandés par le fabricant.
• N‘utilisez pas l‘appareil si le câble d‘alimentation, la che ou d‘autres
parties de l‘appareil sont endommagés.
• Les réparations ne peuvent être effectuées par du personnel qualié
et sont nécessaires lorsque l‘appareil a été endommagé, si le cordon
d‘alimentation ou la prise est endommagé, si des liquides ou des objets ont
été renversés dessus, si l‘appareil a été exposé à l‘eau ou à l‘humidité, s‘il a
fait une chute ou ne fonctionne pas correctement.
• Des étincelles à l‘intérieur du moteur peuvent enammer des vapeurs
ou des poussières inammables. Pour réduire le risque d‘incendie ou
d‘explosion, ne pas utiliser l‘appareil en présence de liquides inammables,
de gaz, de poussières, d‘essence ou d‘autres combustibles liquides
volatils, détergents, peintures à l‘huile, gaz naturel, poussière de charbon,
poussière de magnésium ou poudre d‘aluminium.
• Ne tirez pas ou ne portez pas l‘appareil par le câble. Ne fermez pas les
portes à travers lesquelles le câble passe et ne faites pas passer le câble
sur des arêtes vives.
• Ne débranchez pas la che de la prise en tirant le câble, mais tenez-la en
main pour la retirer.
• Ne touchez pas l‘appareil et la che avec les mains mouillées.
• N‘insérez pas d‘objets dans les ouvertures de ventilation. N‘utilisez pas
l‘appareil si les ouvertures de ventilation sont bouchées. Gardez les
ouvertures exemptes de saleté, cheveux ou similaires.
• Tenez vos cheveux, vêtements, doigts et autres parties du corps éloignés
de l‘appareil pendant son utilisation.
• Éteignez l‘appareil avant de le débrancher.
• Soyez prudent lors du nettoyage des escaliers.
• Ne pas aspirer de liquides inammables ou explosifs.
• N‘aspirez pas d‘objets chauds tels que des cigarettes ou des cendres
chaudes.
• N‘utilisez pas l‘appareil sans ltre.
• Débranchez la prise secteur avant de xer ou de remplacer les tuyaux, les
buses ou les accessoires.
• Rangez l‘appareil dans un endroit sec. Rangez-le après chaque utilisation
pour que personne ne trébuche dessus.
This manual suits for next models
2
Table of contents
Languages:
Other oneConcept Vacuum Cleaner manuals

oneConcept
oneConcept XL-618 Clean Free User manual

oneConcept
oneConcept Duster User manual

oneConcept
oneConcept TurboBuddy User manual

oneConcept
oneConcept 10030672 User manual

oneConcept
oneConcept Duster User manual

oneConcept
oneConcept 10029100 Installation instructions

oneConcept
oneConcept Clean Turbo User manual

oneConcept
oneConcept Clean Tower User manual

oneConcept
oneConcept 10032222 User manual

oneConcept
oneConcept 10032234 User manual