Stirling EE-9248 User manual
Robot Vacuum Cleaner
Model Number EE-9248
INSTRUCTION MANUAL
AFTER SALES SUPPORT
MODEL: EE-9248 PRODUCT CODE: 49631 06/2015
1800 898 750

Contents
AFTER SALES SUPPORT
MODEL: EE-9248 PRODUCT CODE: 49631 06/2015
1800 898 750
1 Welcome
2 Warranty Details
3 General Safety Instructions
6 Product Overview
8 Getting Started
14 Instructions
23 Other Useful Information
35 Repair and Refurbish Notice

Welcome
Congratulations on choosing to buy a Stirling®product.
All products brought to you by Stirling®are manufactured to the highest
standards of performance and safety and, as part of our philosophy of customer
service and satisfaction, are backed by our comprehensive 3 Year Warranty. We
hope you will enjoy using your purchase for many years to come.
Welcome
1
AFTER SALES SUPPORT
MODEL: EE-9248 PRODUCT CODE: 49631 06/2015
1800 898 750

The product is guaranteed to be free from defects in workmanship and parts for a period
of 36 months from date of purchase. Defects that occur within this warranty period,
under normal use and care, will be repaired, replaced or refunded at our discretion,
solely at our option with no charge for parts and labour. The benefits conferred by this
warranty are in addition to all rights and remedies in respect of the product that the
consumer has under the Competition and Consumer Act 2010 and similar state and
territory laws.
Our goods come with guarantees that cannot be excluded under the Australian
Consumer Law. You are entitled to a replacement or refund for a major failure and for
compensation for any other reasonably foreseeable loss or damage. You are also
entitled to have the goods repaired or replaced if the goods fail to be of acceptable
quality and the failure does not amount to a major failure.
Robot Vacuum Cleaner
AFTER SALES SUPPORT
YEAR WARRANTY
3
MODEL: EE-9248 PRODUCT CODE: 49631 06/2015
1800 898 750
2

General Safety Instructions
Proper use
The appliance is designed to automatically vacuum dust, dirt and crumbs. It is
intended for private domestic use only and is not suitable for commercial purposes.
Dark or highly reflective surfaces may confuse the device’s programming.
Please note that the warranty is invalid if not used strictly according to the
instructions.
•Unpack your robot vacuum cleaner. Remove all packaging materials and
literature from the inside of the gift box.
• Keep the packaging materials in case the robot vacuum cleaner may need to
be transported in future.
• When the robot vacuum cleaner is not in use, store it in a secure place out of
the reach of children. Ensure the robot vacuum cleaner is in safe working order
prior to storage and re-use.
•Do not modify the device.
•Use only spare parts and accessories which have been supplied or listed in
this manual.
•Follow all the instructions in this instruction manual, especially the safety
information. Any other use is deemed improper and can cause personal injury
or damage to the product.
•Do not use the device in extreme environmental conditions.
•The appliance is not intended for use by persons (including children) with
reduced physical, sensory or mental capabilities, or lack of experience and
knowledge, unless they have been given supervision or instruction concerning
use of the appliance by a person responsible for their safety.
• Young children should be supervised to ensure they do not play with the
appliance. Close supervision is necessary when any appliance is used by or
near children.
Ensure accessibility of the mains power socket
•Connect the power adaptor of machine only to a power socket (100-240 V ~
50/60 Hz) that is easily accessible and close to the place where you have set
up the device.
Keep the plug free of obstructions so that the plug can be pulled out easily.
•When disconnecting the device from the mains supply, always pull on the
plug rather than on the cable. Do not kink or crush the mains cable.
•If the plug, power cable or the device is damaged or if liquids or foreign
bodies enter the device, remove the plug immediately from the socket.
•To avoid the risk of tripping, please avoid using extension cables.
3
AFTER SALES SUPPORT
MODEL: EE-9248 PRODUCT CODE: 49631 06/2015
1800 898 750
•If the plug, cable or device itself is damaged, disconnect the device from the
mains immediately.
CAUTION! To avoid risks, never try to open and/or repair the device yourself.
There is a risk of electric shock. In the event of a fault, contact our Service
Centre or another suitable professional repair workshop.
•If the mains cable on the device is damaged it must be replaced by the
manufacturer, its customer service agent or other suitably qualified person.
This is to avoid causing damage to the device.
Danger of injuries from other causes
•Never use the device near flammable materials. Do not use it to vacuum
sharp-edged or flammable objects or liquids, e.g. matches or hot ashes.
Do not use the device to gather up small objects.
•Use the device only to vacuum small amounts of dust, dirt and crumbs.
Empty the dust container after every use.
Handling the rechargeable battery safely
The device requires a rechargeable battery block. Please note the following:
•Keep children away from batteries.
•Do not throw rechargeable batteries into a fire, do not short-circuit them and
do not dismantle them.
•Please note the polarity (+/-) when inserting the battery block.
•Remove the battery block if the unit will not be used for long periods.
•Remove defective batteries from the device immediately! There is an
increased risk of leakage.
•Never expose the batteries to excessive heat such as direct sunlight, fire or
similar. There is an increased risk of leakage.
•In the event of leakage, remove the batteries from the device immediately.
Clean the contacts before inserting new batteries. There is a risk of skin
irritations from battery acid!
•If battery acid has leaked out, under no circumstances allow it to come into
contact with the skin, eyes and mucous membranes! Leaked battery fluid can
cause skin irritations. If the acid does come into contact with skin,
immediately rinse the affected areas with plenty of clear water and consult a
doctor immediately.
General Safety Instructions Cont.
4
AFTER SALES SUPPORT
MODEL: EE-9248 PRODUCT CODE: 49631 06/2015
1800 898 750
WARRANTY NOTE: The Ni-MH battery is a consumable part. If the robot
vacuum is used frequently it is normal for the battery to decrease in
performance. The battery is covered under a 1 year warranty.

If you do not use your vacuum for more than a week you must turn it off
from the main on/off switch on the side of the robot.
NOTE: If you are experiencing problems with your battery or the
performance of the robot, or if the robot is beeping:
1. Take out the battery from the unit and wipe the contact plates.
2. Replace the battery and allow the robot to recharge overnight.
3. If problem still exists please contact the after sales service company.
Carpets or hard floors
•Before vacuuming your flooring, rugs and carpets, check the manufacturer’s
recommended cleaning instructions.
• The underside brushes and wheels can damage certain carpet types and
floors. Please check your carpet prior to using your robot vacuum for any
loose threads which might get caught in the air vent, wheels or brushes.
• Before vacuuming highly polished floors, such as wood or lino, first check
that the underside of the main brush and rubber brush are free from foreign
objects that could cause marking.
General Safety Instructions Cont.
5
AFTER SALES SUPPORT
MODEL: EE-9248 PRODUCT CODE: 49631 06/2015
1800 898 750
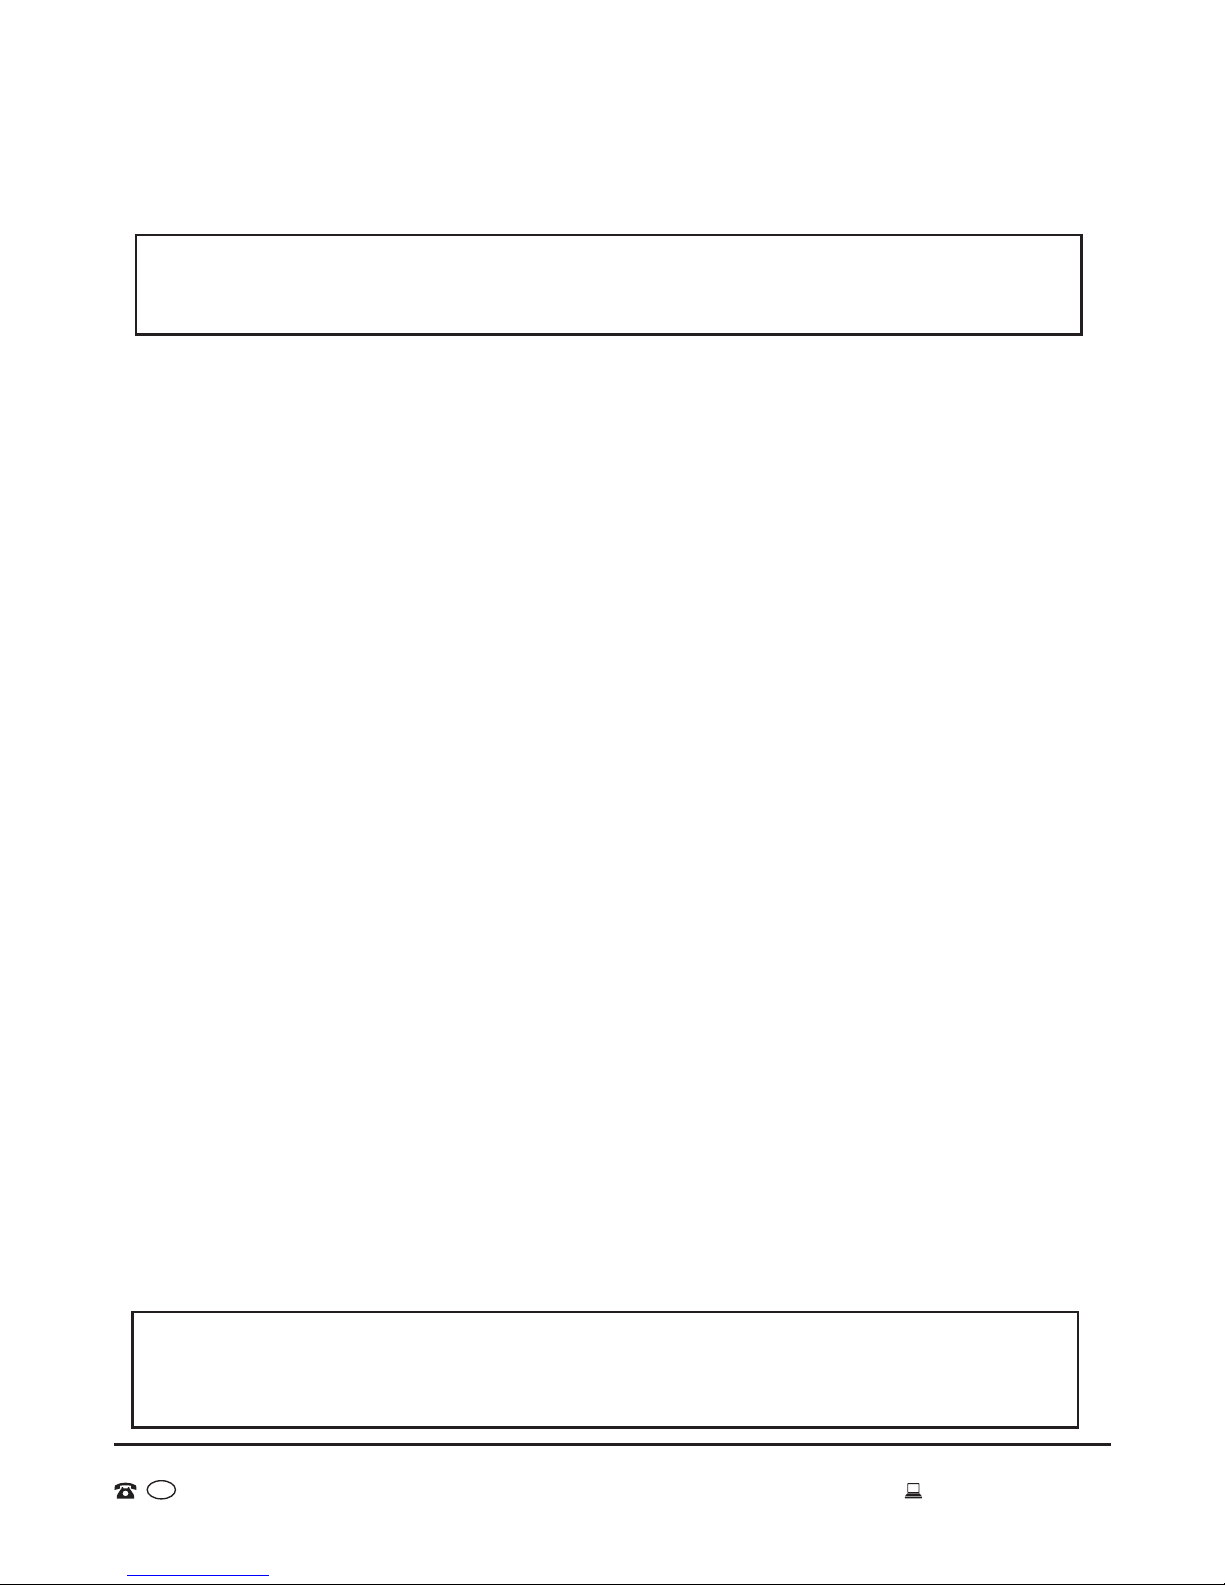
Product Overview
Use the following diagrams and explanations to familiarise yourself with the
components of the robot vacuum cleaner and its accessories:
Top view
1 Infrared signal receiver
2 Display screen
3 Front bumper
4 Touch buttons
5 Dustbin release key
6 Air outlet release key
7 Air outlet
8 Dustbin
9 DC socket
10 Power switch
6
AFTER SALES SUPPORT
MODEL: EE-9248 PRODUCT CODE: 49631 06/2015
1800 898 750
Menu Display:
1. select the desired cleaning
day / days of the week
2. Wheel rotation/speed display
3. “EM” Engineering Mode
4. “Auto” cleaning display
5. “Spot” cleaning display
6. “Current” week
7. Malfunction display
8. Charging display
9. Battery life display
10. Time display
Touch Buttons:
11. Engineering Mode (refer page 13)
You are able to activate the below
cleaning modes without using the
remote control.
EM
12. Auto cleaning
13. Spot cleaning
1
3 4
5
10
9
7
2
6 8
E.M
11 13
12
3
5
6
7
8
1
2
4
9
10
1
2
3
4
9
10
11
12
13
14
5
6
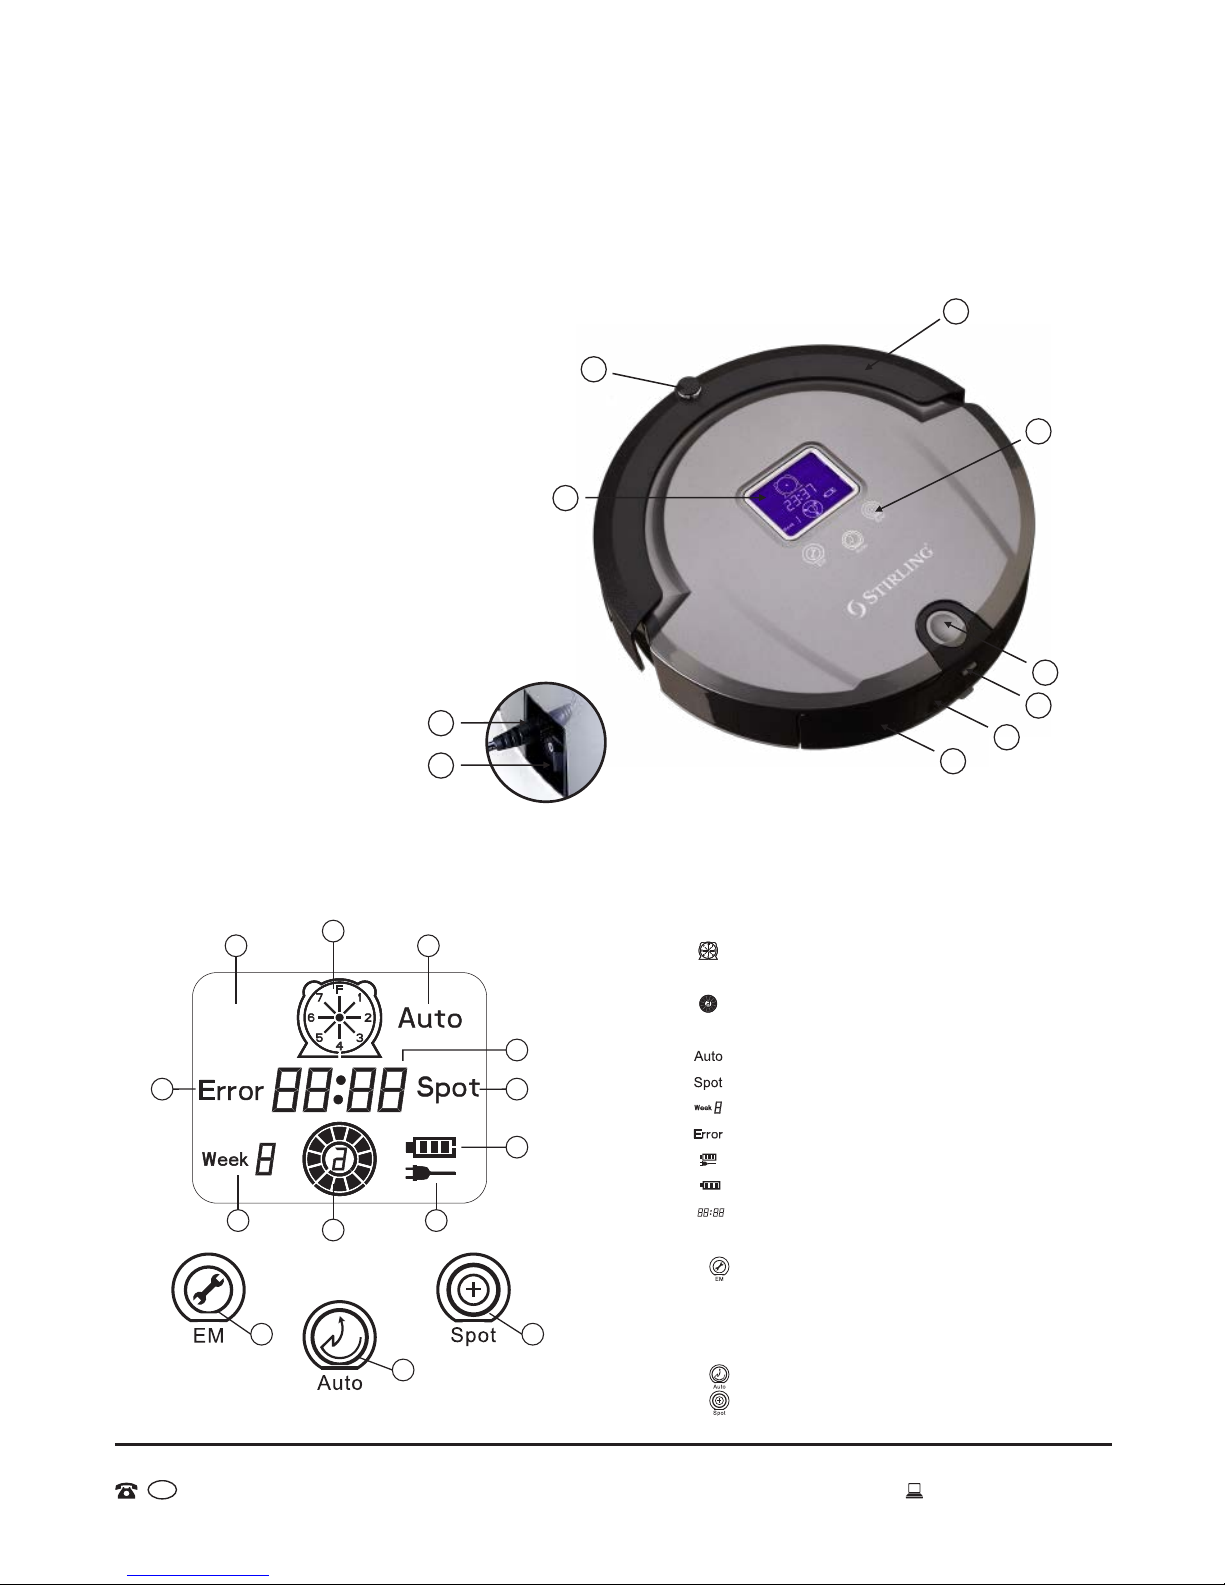
Bottom view
Accessories
15 Power adaptor
16 Space isolator
17 Docking station
18 Remote control
19 Cleaning brush
20 Brush rubber
cover
21 DD battery for
space isolator
22 AAA battery for
remote control
23 Ni-MH battery for
vacuum cleaner
Not shown:
• Instruction manual
• Warranty card
• Quick Start Guide
1 Right wheel
2 Rubber brush
3 Main brush
4 Rubber dust bar
5 Dust filter bracket
6 HEPA dust filter
7 Velcro mop base
8 Mop pad
9 Right side cleaning brush
10 Front wheel
11 Ground detection sensor
12 Battery cover
13 Left side cleaning brush
14 Left wheel
Product Overview Cont.
7
AFTER SALES SUPPORT
MODEL: EE-9248 PRODUCT CODE: 49631 06/2015
1800 898 750
7
8
15
18
17 19
20
21
22
23
16

For first time use, make sure the robot vacuum cleaner battery has been
fully charged for 12 hours for best performance.
Normal charge time will take within 4-5 hours before the battery is full again.
Getting Started
Setting the Remote Control
The remote control comes with two AAA batteries. Ensure these are correctly
loaded in the remote controller before getting started.
***The following steps are very important, or the remote control may fail.
You should check the code of the remote control and vacuum so that they can
function together.
1. Check that the remote control and cleaner have enough power. Turn off the
cleaner, press ENTER on the remote control for more than 4 seconds, and
then turn on the vacuum without releasing ENTER on the remote control. After
the cleaner beeps twice, release ENTER, then the code check set is finished.
2. If you fail to hear a beep during the code check, just repeat the above
process.
8
AFTER SALES SUPPORT
MODEL: EE-9248 PRODUCT CODE: 49631 06/2015
1800 898 750
Standby
Charge 1 Schedule2
EM 4
Full Go
Spot 6
ENTER
Clock 3
Speed 7
Auto 5
Getting Started Cont.
Your robot vacuum cleaner is equipped with many practical functions that
allow it to clean wooden floors, short-pile carpet/rugs, tiles and vinyl flooring.
Ensure carpets/rugs are in good condition before use.
The device uses artificial intelligence (AI) to adjust to its environment and
reliably clean its working area. The device is equipped with three level
sensors that recognise staircases and other dips to ensure that it will not fall.
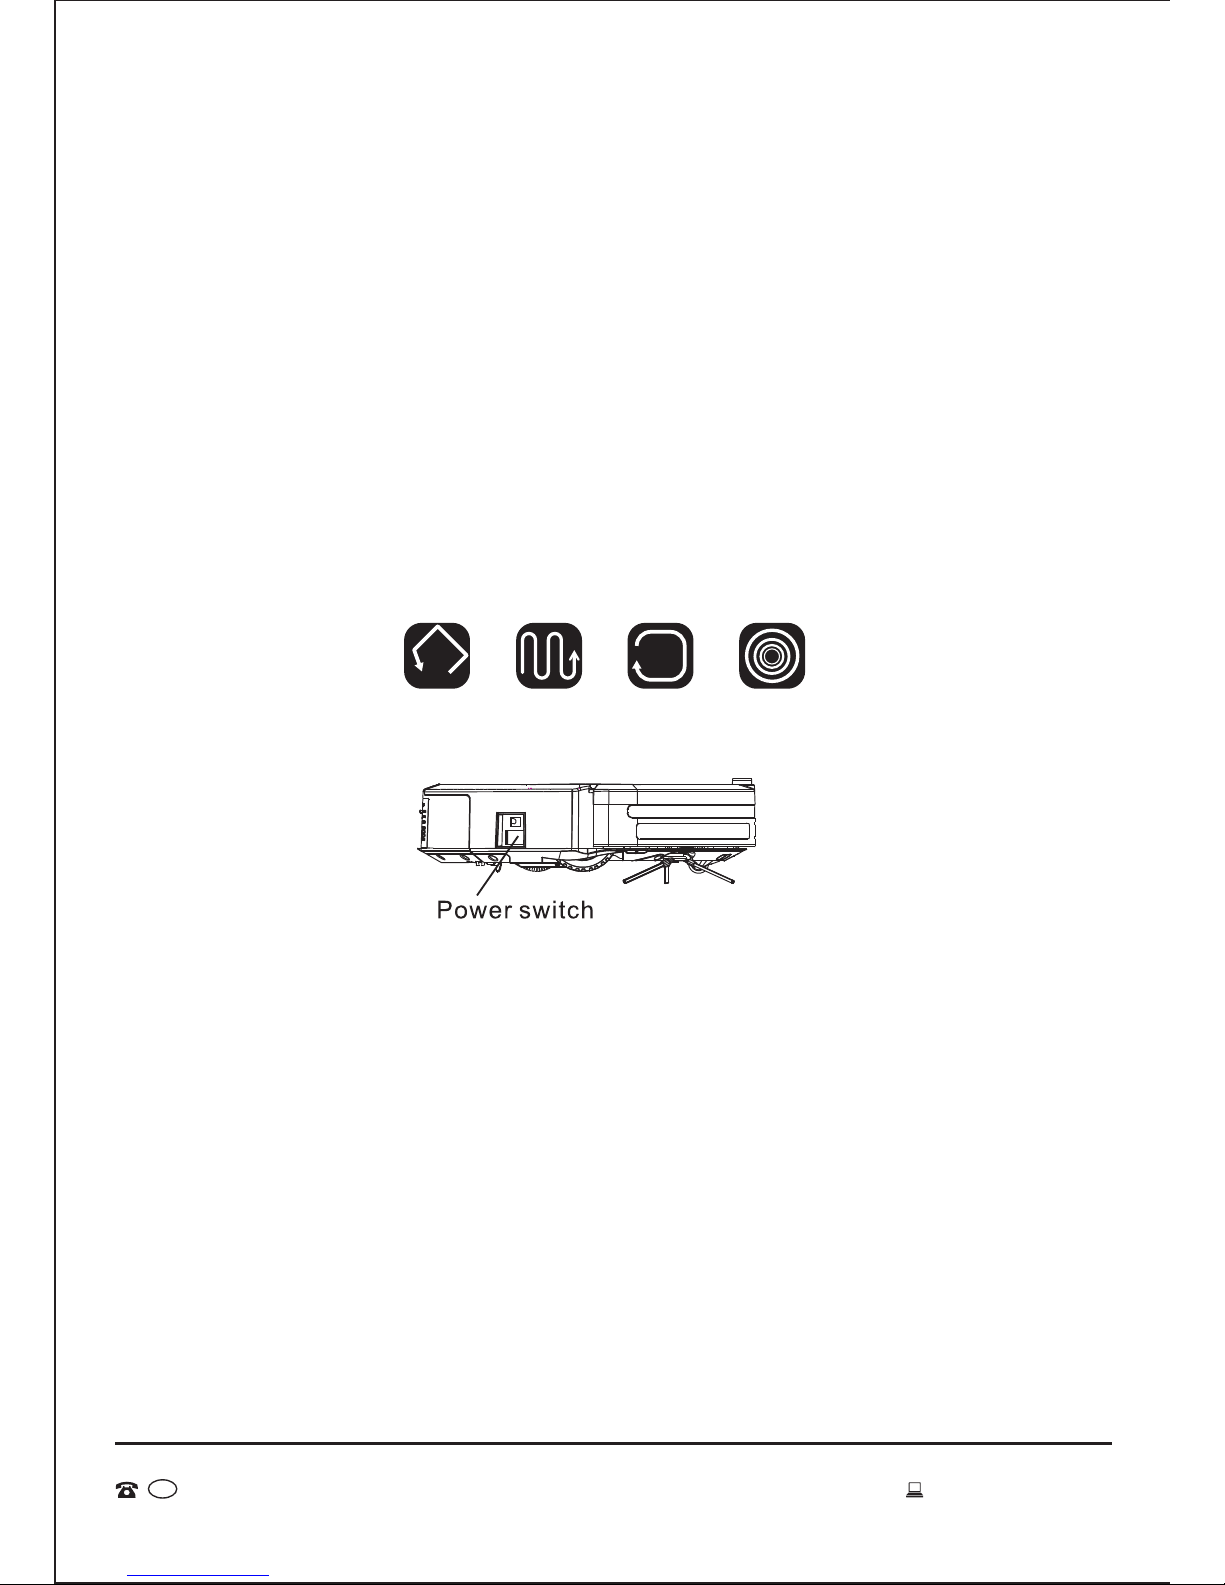
The robot vacuum cleaner works in 4 cleaning programmes: random, spiral,
along the wall and spiral again. This enables it to automatically tackle several
cleaning scenarios. The battery will last between 90 to 120 minutes and will
cover 250 to 280 square metres assuming it has been fully charged. During
this time the vacuum cleaner will work through these programmes in an
arbitrary sequence depending on the enviroment.
Turn on the power switch at the right side of the robot (See Fig. 1).
The LCD display will begin to flash.
Charging Your Vacuum
Before you first use your vacuum cleaner charge the battery overnight for 12
hours. It is also recommended that the battery is flat before you recharge for
the first 2 or 3 times. Alternatively, if the battery is very low the robot vacuum
will automatically return to the docking station to charge. Do not use again
until the full charge has completed.
Using Your Vacuum Cleaner
Auto Cleaning
The vacuum cleaner will start working through the 4 programmes for as long
as the battery will last. When the battery becomes low, it will automatically
return to the docking station to re-charge. It will stay there until you wish to
use it again.
Fig. 1
9
AFTER SALES SUPPORT
MODEL: EE-9248 PRODUCT CODE: 49631 06/2015
1800 898 750
Random Spiral Along the wall Spiral again
To do this:
1. Press the “AUTO” button on the vacuum cleaner or remote control.
2. The vacuum will start cleaning. When the battery is low it will return to the
docking station to recharge and the Auto cleaning function is complete.
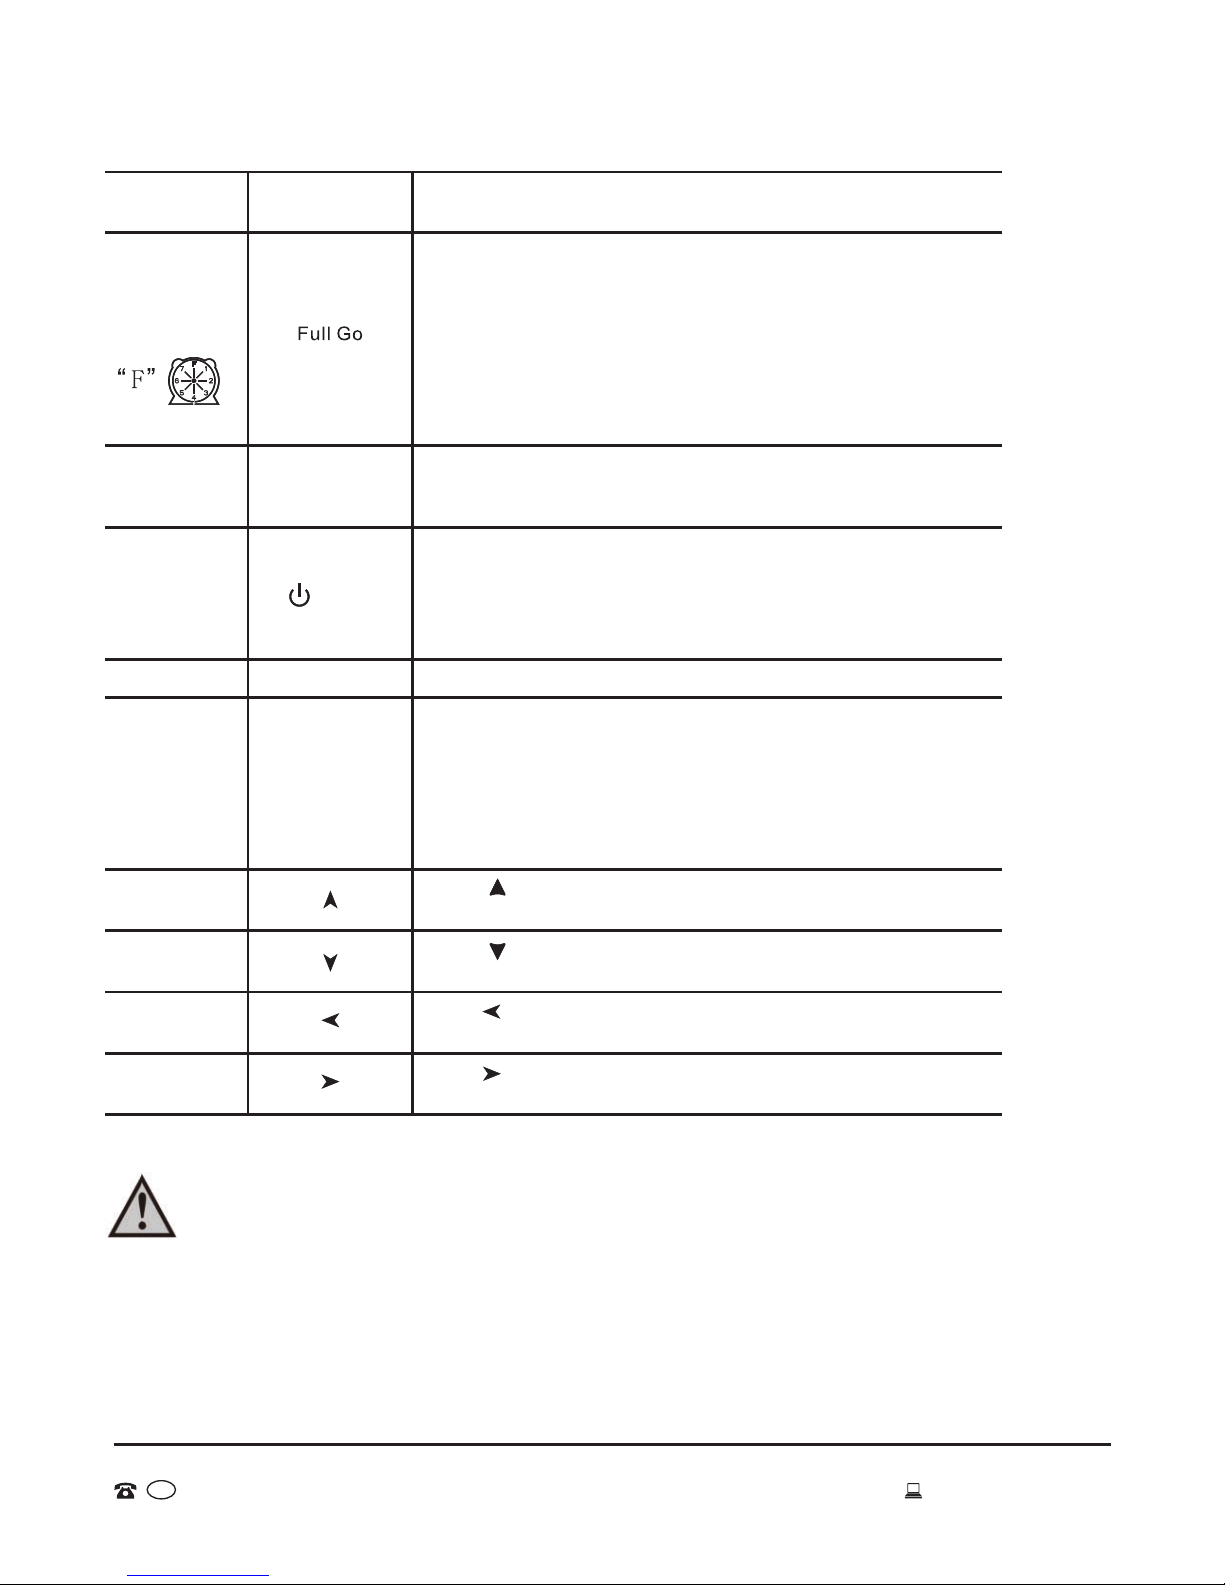
Full Go Cleaning
The vacuum cleaner will start working through the 4 programmes after the battery
has been fully charged. It will work continuously through the cleaning
programmes and re-charging cycle. This function is suitable for a large house
where one full charging cannot clean all the rooms. This way the vacuum will
continue to function until you stop it. It will return to the docking station to
re-charge every time the battery gets low.
To do this:
1. Press the “schedule” button on the remote control, then press “Full Go”.
After finishing Full Go setting, press “ENTER” to save it.
2. “F” in the “ ” icon on the LCD screen will flicker, and the vacuum will start
cleaning automatically when the battery is charged (4-5 hours charging).
Spot Cleaning
This function will clean a specific area about the size of 1 square metre.
Speeds
Fast speed moves more quickly than slow speed. The vacuum cleaner will clean
the area faster, but will not be as detailed as when working under the slow speed.
Slow speed is suggested if an area is dirtier than usual and requires extra
attention.
Cleaning System
The brushes on the side of the device sweep dust and dirt towards the suction
opening. Subsequently, the dirt particles are sucked into the dustbin. The HEPA
filter ensures that dirt particles remain on the floor of the dustbin so that only
clean air is expelled from the device.
The dustbin unit consists of the dustbin, air outlet, dust filter bracket and HEPA
dust filter. The unit can be removed without any tools.
Please refer to the Cleaning and Care sections in this manual.
Getting Started Cont.
10
AFTER SALES SUPPORT
MODEL: EE-9248 PRODUCT CODE: 49631 06/2015
1800 898 750

Getting Started Cont.
11
AFTER SALES SUPPORT
MODEL: EE-9248 PRODUCT CODE: 49631 06/2015
1800 898 750
Sensors
Various sensors are integrated into the vacuum cleaner which provide it with
certain useful traits.
•Level sensors recognise staircases and other dips to ensure that the device
will not fall. These categorise any height difference of more than 10 cm as a
dangerous depression. If such a drop is recognised, the vacuum cleaner turns
around to avoid falling.
•Anti-fall sensors are also located on the main wheels. If a wheel loses contact
with the floor – i.e. moves over a hole – the device reverses to prevent any
incident. If both wheels lose contact with the floor, the device stops
immediately.
•The bumper is located at the front of the device. If the bumper comes into
contact with anything, the device reverses to move around the obstacle.
•Due to the sensitivity of the integrated anti-fall sensors, dark or highly glossy
floor surfaces may cause the device to malfunction.a

Using the Mop Function
1. The mop is only to be used indoors on tiles, vinyl, lino or wooden floorboards.
Do not use the mop on carpet or uneven ground.
2. The mop function is not to be used with water. When the mop pad connects
with the surface of the floor it is able to pick up finer and smaller dust particles.
3. The velcro mop base is clicked onto the right & left hinges on the bottom of the
dust filter bracket (refer Fig.1).
4. You can then attach one mop pad to the velcro (refer Fig. 2).
5. To remove, unclick the velcro mop base from the right and left hinges on
the dust filter bracket (refer Fig. 3).
Do not use the mop function on carpet or uneven ground.
Fig. 3
Fig. 2
Do not use the vacuum cleaner or the mop function with water.
Getting Started Cont.
12
AFTER SALES SUPPORT
MODEL: EE-9248 PRODUCT CODE: 49631 06/2015
1800 898 750
Fig. 1

Remote Key Description:
Turn off/cancel1
Automatic recharging key/MondayCharge 12
Time set key/WednesdayClock 33
Speed selection key/SundaySpeed 74
Automatic cleaning key/FridayAuto 55
Timing key/TuesdaySchedule 26
EM/Thursday7
8The Full Go function is similar to the Auto function. The
difference is that once the battery has re-charged, it will
automatically start cleaning again. It will continue this
cycle indefinitely.
Furthermore, the first step is for the vacuum cleaner to
fully re-charge rather than start cleaning. It will only start
cleaning on a full battery.
The vacuum cleaner will work automatically after the
battery is full. It will work continuously through the
cleaning programmes and re-charging cycle until you
stop it. It will return to the docking station to re-charge
every time the battery gets low.
This function is suitable for a large house where one full
charging can not clean all the rooms.
No. Key Display Key Information
Standby
Remote Control
Instructions
13
AFTER SALES SUPPORT
MODEL: EE-9248 PRODUCT CODE: 49631 06/2015
1800 898 750
5
4
3
2
1
10
11
6789
14
12
13
EM 4

Remote Key Description:
No. Key Display Key Information
Forward key10
Turn left key11
Turn right key13
Back key14
Remote Control
Instructions Cont.
14
AFTER SALES SUPPORT
MODEL: EE-9248 PRODUCT CODE: 49631 06/2015
1800 898 750
Confirmation key12 ENTER
Spot cleaning key/SaturdaySpot 69

Instructions Cont.
Once the current time is set, you can schedule cleaning times.
Cleaning settings for the Week:
1. Turn on the vacuum. You can pre-program up to 7 day settings at
one time.
2. Press Schedule 2 button - the icon on the LCD screen of the
vacuum will flicker.
3. Press the desired day/s which you would like the vacuum to clean
during the week. Once selected the day/s will flicker. In ,
1 means Monday, 2 means Tuesday, accordingly, 7 means Sunday.
4. If you want to cancel any setting day or days, just press the day/s
button again.
5. After you set the clean day of each week, it is possible to set the
starting time of cleaning.
Cleaning time setting:
1. Press to enter the cleaning time setting, the Icon in the LCD
screen of the cleaner will flicker.
2. Press or to select the timing cleaning hour.
3. Press again will flicker
4. Press or to set the timing cleaning minute.
5. After finishing Week & Time Setting, press “ENTER” to save it.
When the vacuum is connected to the docking station, at the set
time it will start cleaning automatically (when the battery is fully
charged); when the cleaning is finished or the battery is low, the
vacuum will go back to the docking station automatically. You can
only pre-program one cleaning session (that is, set a cleaning
function and a cleaning time); the robot will automatically start cleaning
at that time using th defined cleaning function.
This is used to set the current time on your vacuum cleaner.
1. Turn on the vacuum.
2. Press Clock 3 on the remote control, the icon in the LCD screen
of vacuum will flicker.
3. Press the day of the week button (MON/TUE.../SUN), the icon will
display , 1 means Monday, 2 means Tuesday, accordingly,
7 means Sunday.
4. After setting the correct day, then you can set the time.
5. Press to enter time setting, the Icon in the LCD screen of
the vacuum will flicker.
6. Press or to set the correct hour.
7. Press again will flicker.
8. Press or to set the correct minute.
9. After finishing Week & Time Setting, press “ENTER” to save it.
Press the key, the vacuum will clean in the auto cleaning mode;
press the key again, the vacuum cleaner will stop running.
Press the key, the vacuum will clean in the spot mode;
Press the key again, the vacuum will stop running.
Auto
Cleaning
Function Button on
remote control Instructions
Spot
Cleaning
Current
Week and
Time
Setting
Cleaning
Schedule
Setting
15
AFTER SALES SUPPORT
MODEL: EE-9248 PRODUCT CODE: 49631 06/2015
1800 898 750
Auto 5
Spot 6
Clock 3
Schedule 2
Instructions Cont.
1. You should use the remote control within 10 metres (radio
signal scope), or you may fail to control the vacuum.
2. The vacuum may fail to find the docking station due to an
obstacle, decreased battery power or other conditions.
Press the Speed 7 key repeatedly. To choose fast speed select 1
and to choose slow speed slelect 2. Once you have made your
selection the vacuum will store this information until you change it.
Speed selection
Press “ ”, the vacuum will run forward and it will stop after
you release the key.
1. Press this key to turn on/off the vacuum.
2. You can stop the running mode by pressing this key.
3. You can delete and return to the original setting.
4. Press the key for more than 5 seconds to delete all settings and
memory and return to the initial status.
You must press “ENTER” to save any setting.
Engineering Malfunction Key
The “EM 4” key is used to provide error codes during use. If you
suspect there may be a problem, turn off machine and turn it on again.
When the LCD display flickers press EM and Spot buttons
simultaneously. Then the LCD display will show an error code, eg:
E***. Turn off after the code displays. Please provide this code to
After Sales Support; they will deal with your problem.
Turn off/
cancel/
stop
ENTER key
EM key
Press and release till the vacuum turns left to the direction you
want. It will stop automatically in obstacles.
Forward key
Backward key
Turn left key
Turn right key
Press “ ”, the vacuum will run backward and it will stop after
you release the key.
Press and release till the vacuum turns right to the direction you
want. It will stop automatically in obstacles.
Function Button on
remote control Instructions
16
AFTER SALES SUPPORT
MODEL: EE-9248 PRODUCT CODE: 49631 06/2015
1800 898 750
ENTER
EM 4
Speed 7
Standy
1. Press the “schedule 2” button on the remote control, then press
“Full Go”.
2. “F” in the icon “ ” on the LCD screen will flicker, the vacuum will
start cleaning automatically when the battery is charged (4-5 hours
charging). After finishing Full Go setting, press “ENTER” to save it.
This function is suitable for a large house where one full charging can
not clean all the rooms.
Remark:
You can set timing cleaning and full go function at the same time!
Full Go
Function
Setting
Instructions Cont.
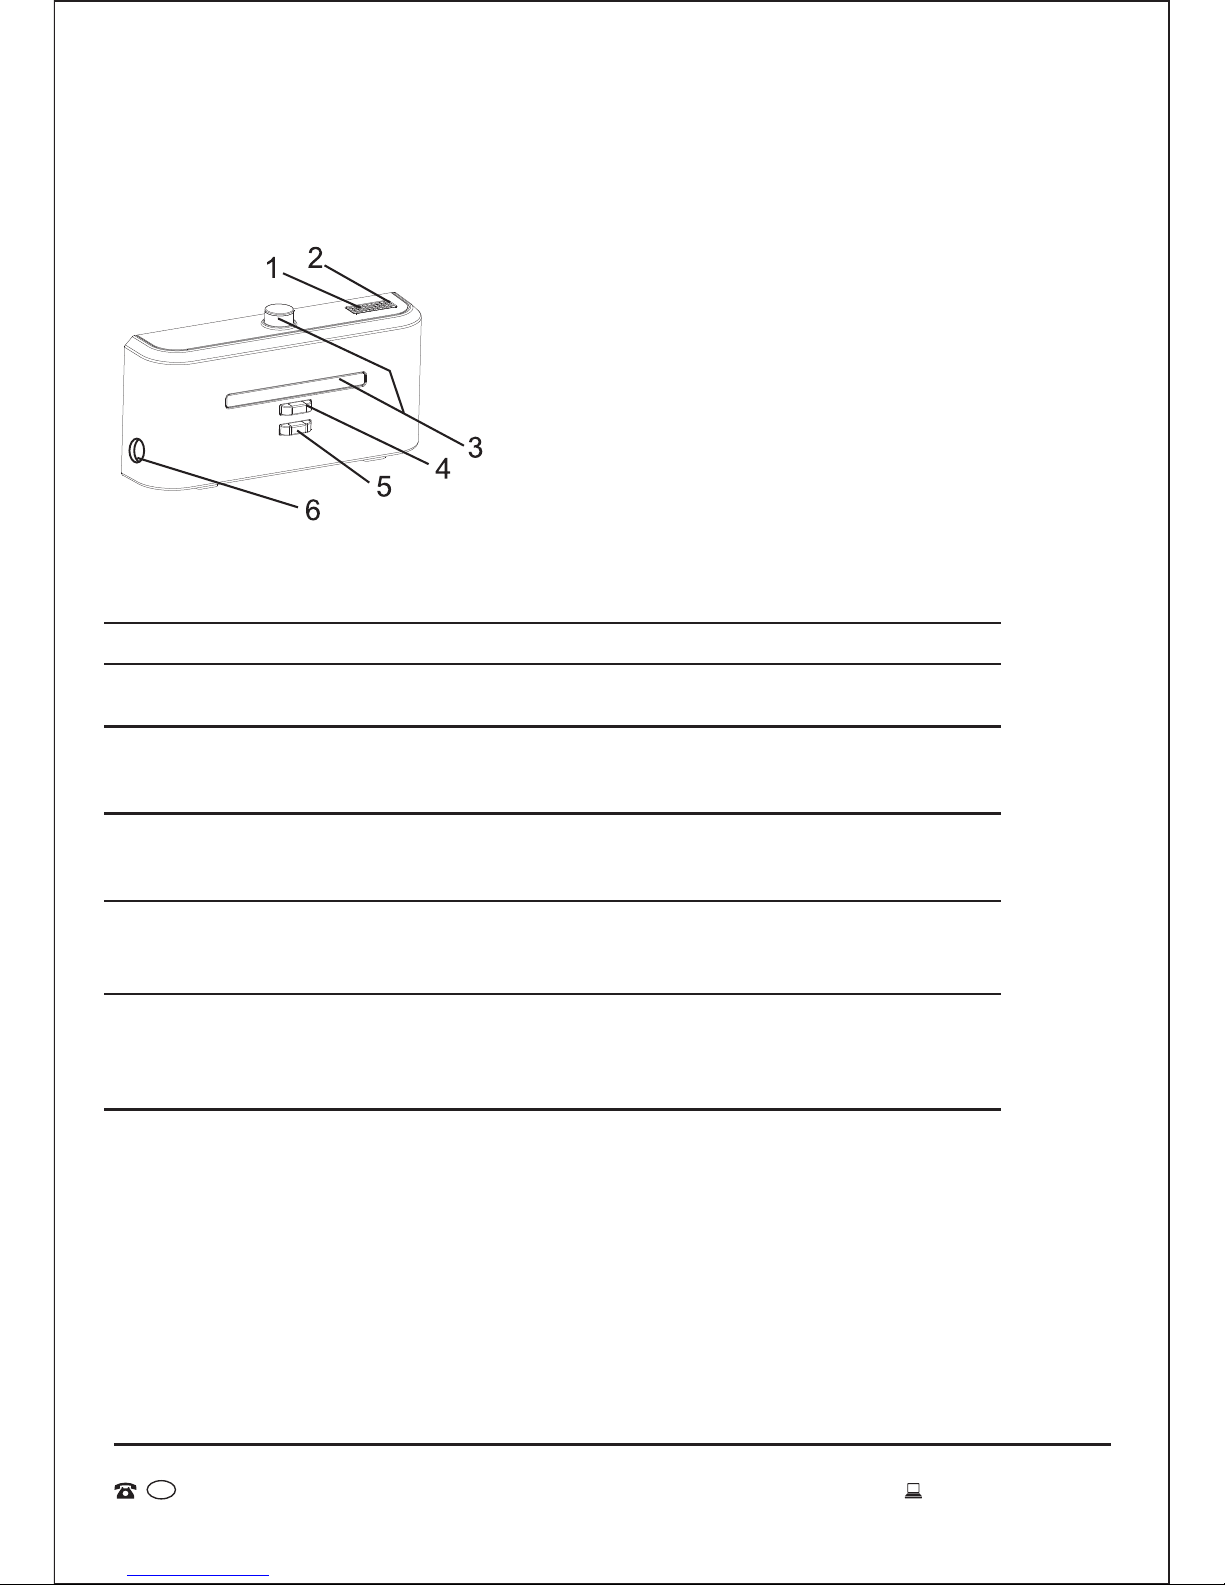
Docking Station Overview
The LED indicator will signal red when connected to
power.
The indicator will flicker blue while recharging or
connected to the dock. It will continue to flicker blue even
after charging is complete.
The transmitting signal is the only way to lead the vacuum
to return to the docking station for charging, so the signal
transmitter position should be clear of any obstacles.
The positive & negative electrodes on the docking station
connect to those of the vacuum. Ensure there are no
obstacles to impact charging.
The power DC socket is used to connect the output
terminal DC24V adaptor. The docking station should be
placed against the wall firmly and the adaptor cable
should be placed out of the vacuums cleaning space.
1 Power indicator
2 Charging indicator
3 Signal transmitter
4-5 Charging positive &
negative electrode
6Charging power DC
socket
No. Function Guide Function Information
1. Power indicator
2. Charging indicator
3. Signal transmitter
4. Charging positive electrode
5. Charging negative electrode
6. Charging power DC socket
17
AFTER SALES SUPPORT
MODEL: EE-9248 PRODUCT CODE: 49631 06/2015
1800 898 750

1m
1m
2m
Fig. 1
Charging
1. Install the docking station on flat ground and firmly against a vertical
wall.
2. Ensure there are no obstacles or hollow areas 2m away from the docking
station or 1m on the right and left (Refer Fig. 1).
3. The vacuum cannot search for the docking station to charge if the infra-red
transmitting signal is covered.
4. Connect the output terminal of the adaptor with the DC socket of the
docking station (Refer Fig. 2).
Please place the power cord of the adaptor along the wall, as it may
interfere with the brush or wheels on the vacuum.
Fig. 2
Instructions Cont.
18
AFTER SALES SUPPORT
MODEL: EE-9248 PRODUCT CODE: 49631 06/2015
1800 898 750
Other manuals for EE-9248
1
Table of contents
Other Stirling Vacuum Cleaner manuals

Stirling
Stirling IA0978 User manual

Stirling
Stirling IA0850 User manual

Stirling
Stirling KB-9008 User manual

Stirling
Stirling VC-460 Specification sheet

Stirling
Stirling VC435 User manual

Stirling
Stirling SVS-268 User manual

Stirling
Stirling VC-460 User manual

Stirling
Stirling VC-001 User manual

Stirling
Stirling A320 User manual

Stirling
Stirling KB-8005 User manual


