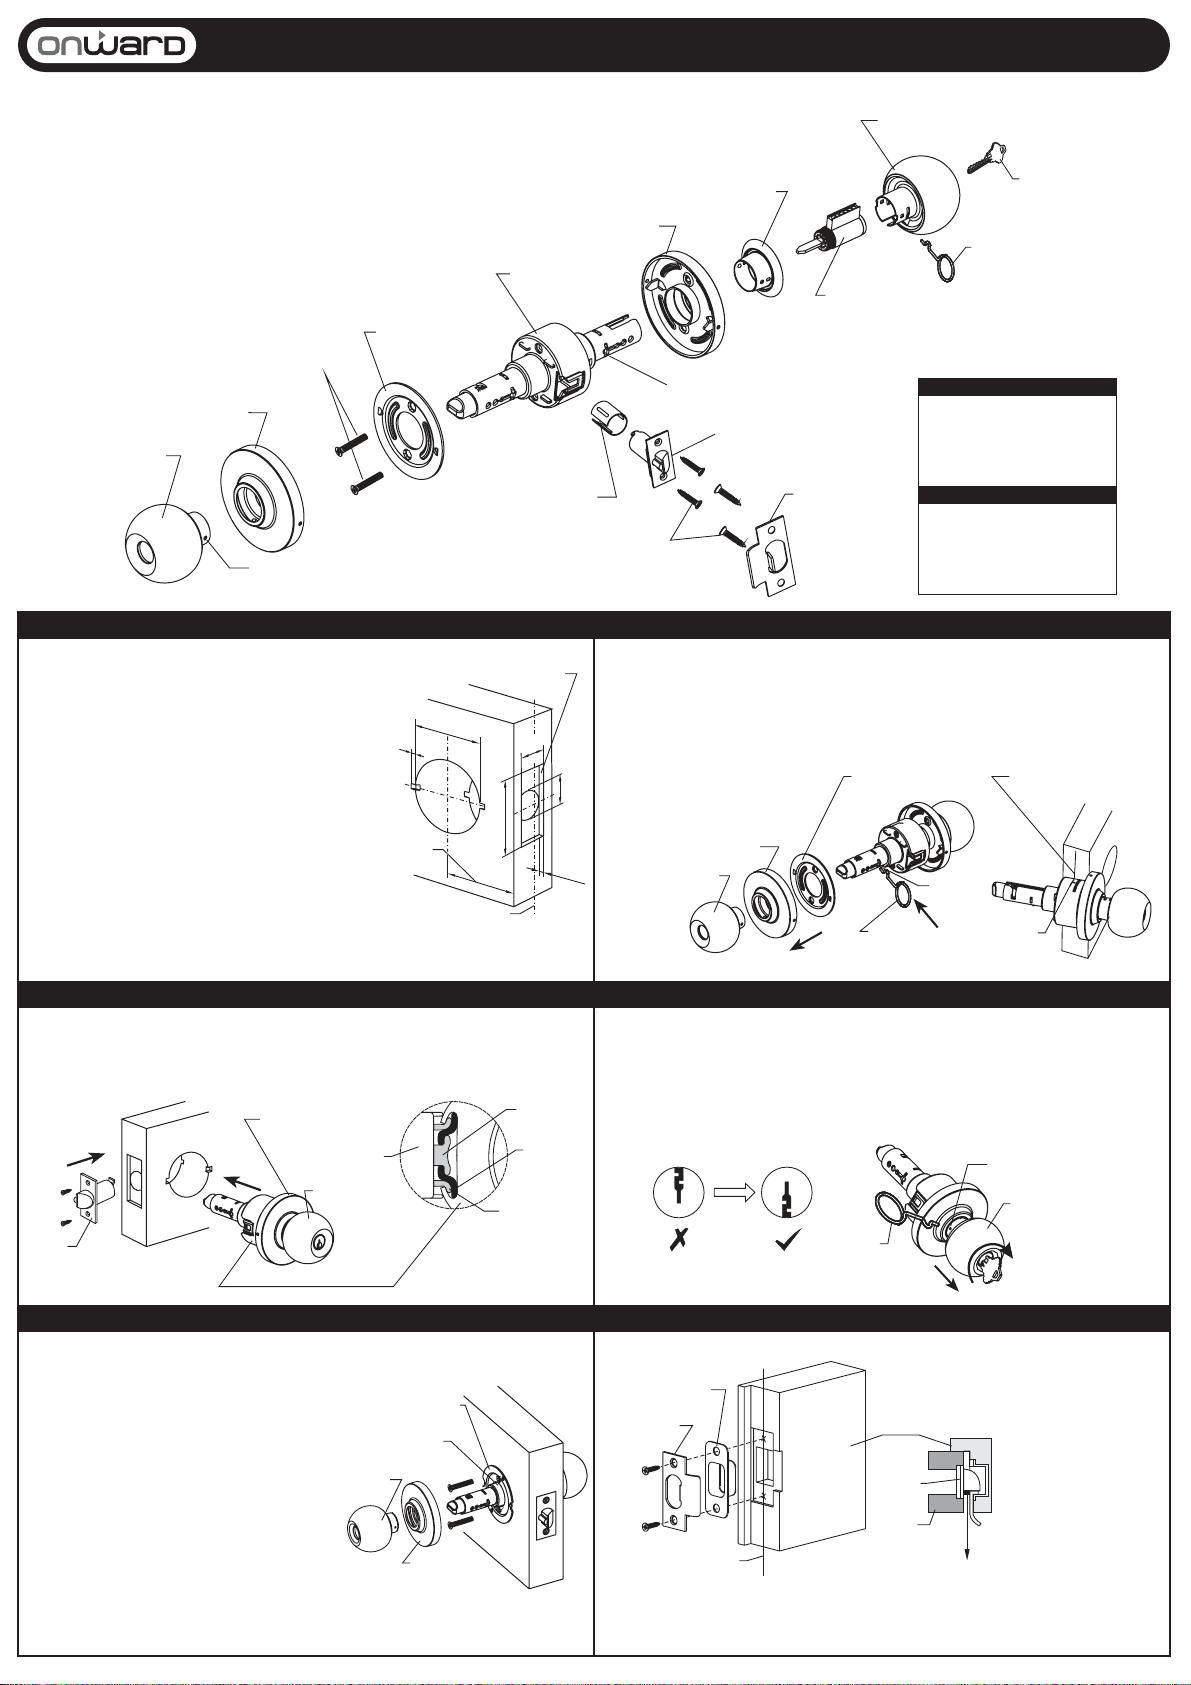
Inside rose /
Rosette
Mounting plate /
Plaque de montage
Lock body /
Mécanisme principal
Outside rose /
Rosette extérieure
Key /
Clé
Strike /
Gâche
Latch /
Loquet
Inside knob /
Poignée intérieure
Inside knob cover /
Inside knob cover
Mounting screws /
Vis de montage
Outside knob cover /
Outside knob cover
Outside knob /
Poignée extérieure
Push pin /
Push pin
Cylinder assembly /
Cylinder assembly
Catch (retainer) /
Catch (retainer)
Sleeve (For 1" (25 mm) hole) /
Sleeve (For 1" (25 mm) hole)
Combination screw /
Combination screw
Instructions for Installation or Replacement of Commercial Lockset
For use on doors 1-3/8" to 1-3/4" (35 mm to 45 mm) thick
Instructions pour l'installation ou le remplacement de serrures à usage commercial
Pour portes de 1-3/8 po à 1-3/4 po (35 mm à 45 mm) d'épaisseur
Tools Required
• 1 Phillips head screwdriver
• 1 hole saw - 2-1/8" (54 mm)
• 1 drill bit - 1" (25.4 mm)
• 1 drill bit - 5/32" (4 mm)
• 1 chisel
1. New door preparation / New door preparation
a. Fold template over edge of door and
mark holes.
b. Drill 2-1/8" (54 mm) hole through face
of door. Drill from both sides to avoid
damaging door.
c. Drill a 1" (25 mm) hole in edge of door.
d. Drill 5/32" (4 mm) notches on the 2-1/8"
(54 mm) hole on both sides of door.
e. Mortise latch unit front 2-1/4" x 1-1/8"
x 1/8" (57 mm x 25.4 mm x 4 mm).
a. Fold template over edge of door and
mark holes.
b. Drill 2-1/2" (54 mm) hole through face
of door. Drill from both sides to avoid
damaging door.
c. Drill a 1" (25 mm) hole in edge of door.
d. Drill 5/32" (4 mm) notches on the 2-1/8"
(54 mm) hole on both sides of door.
e. Mortise latch unit front 2-1/4" x 1-1/8"
x 1/8" (57 mm x 25.4 mm x 4 mm).
2. Remove inside trim and adjust / Remove inside trim and adjust
a. Use push pin to depress knob catch and pull off inside knob. Then remove inside rose and
mounting plate.
b. Turn outside rose to adjust center line of lock body to match the center line of the door.
a. Use push pin to depress knob catch and pull off inside knob. Then remove inside rose and
mounting plate.
b. Turn outside rose to adjust center line of lock body to match the center line of the door.
3. Install lock body / Install lock body
a. Install latch and secure with provided screws.
b. Slide lock body into door and ensure that latch prongs engage lock body.
a. Install latch and secure with provided screws.
b. Slide lock body into door and ensure that latch prongs engage lock body.
Changing direction of keyway / Changing direction of keyway
→
Keyway direction is normally in down position. To change the direction:
a. Turn key 75° clockwise, insert push pin into catch hole to depress knob catch. Pull outside
knob off of spindle.
b. Turn knob 180° and then reinstall knob.
Keyway direction is normally in down position. To change the direction:
a. Turn key 75° clockwise, insert push pin into catch hole to depress knob catch. Pull outside
knob off of spindle.
b. Turn knob 180° and then reinstall knob.
Mortise /
Mortaise
25 mm
25 mm
4 mm
Center line /
Ligne centrale
54 mm
Notch / Notch
4 mm wide / wide x
4 mm high / high x
4 mm deep / deep
57 mm
Backset / Écartement
70 mm
Inside rose /
Rosette
Mounting plate /
Plaque de montage
Inside knob /
Poignée intérieure
Push pin /
Push pin
Catch /
Catch
Center line /
Ligne centrale
Center line of the door /
Center line of the door
Latch /
Loquet
Outside rose /
Rosette extérieure
Outside knob /
Poignée extérieure
Latch /
Loquet
Latch prongs /
Latch prongs
Latch tail /
Latch tail
Slide /
Slide
Body / Body
Outside knob /
Poignée extérieure
Catch hole /
Catch hole
Push pin /
Push pin
1
2
1
2
1
2
3
4. Install inside knob / Install inside knob
a. Install mounting plate and secure with
mounting screws.
b. Screw inside rose onto spindle until
hand tight.
c. Push inside knob all the way onto
spindle until it clicks into catch hole.
d. Auto-release turn button is standard.
Deadlock turn button also available (press
the turn button and rotate 90° clockwise).
5. Install strike / Install strike
Mounting plate /
Plaque de montage
Lock body /
Mécanisme principal
Inside rose /
Rosette
Inside knob /
Poignée intérieure
Strike /
Gâche
Strike box /
Strike box Jamb /
Jamb
Latch /
Loquet
Door /
Porte
Center line /
Ligne centrale After door is closed, deadlocking plunger is retracted /
After door is closed, deadlocking plunger is retracted
Outils requis
• 1 Phillips head screwdriver
• 1 hole saw - 2-1/8" (54 mm)
• 1 drill bit - 1" (25.4 mm)
• 1 drill bit - 5/32" (4 mm)
• 1 chisel


