Siemens Codoor CD3500 Instruction Manual

Codoor CD3500
Codoor CD4000
Installation & User Manual
Building Technologies
Fire Safety & Security Products

Book contents
ENGLISH........................................... 3
DEUTSCH ....................................... 23
FRANÇAIS...................................... 43
SVENSKA ....................................... 63

CD3500 & CD4000 Installation and User manual 3
ENG
ENGLISH
Data and design subject to change without notice. / Supply subject to availability.
© 2009 Siemens Building Technologies, Fire & Security Products GmbH & Co. oHG
We reserve all rights in this document and in the subject thereof. By acceptance of the
document the recipient acknowledges these rights and undertakes not to publish the
document nor the subject thereof in full or in part, nor to make them available to any third
party without our prior express written authorization, nor to use it for any purpose other than
for which it was delivered to him.

4 CD3500 & CD4000 Installation and User manual
ENG
Contents
About this manual...........................................................5
Codoor - General.............................................................5
Setting the programming code ......................................6
How to change an existing programming code............7
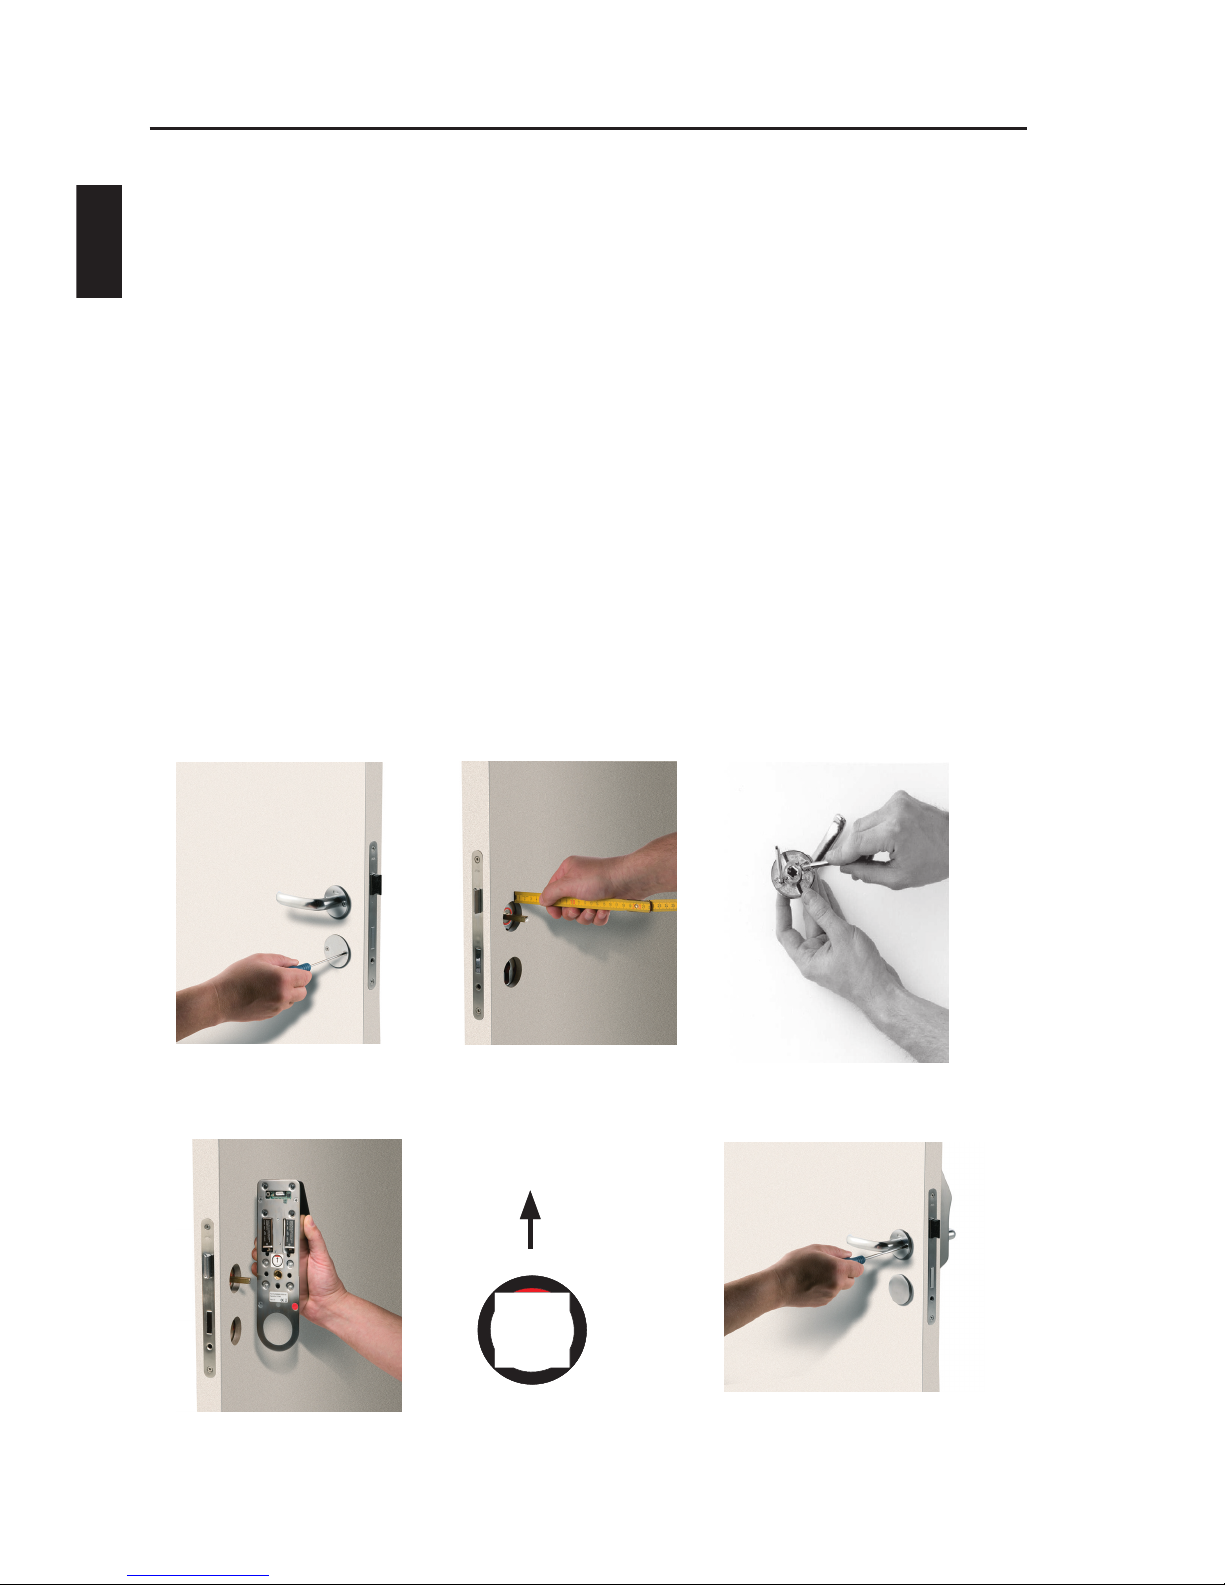
Codoor Installation kit ....................................................8
Fitting CD3500 to door .................................................9
Fitting CD4000 to door ...............................................10
Setting codes.................................................................11
Delete code ................................................................11
Deactivation function....................................................12
Return to locked position............................................12
Disconnect the deactivation function..........................13
Buzzer.............................................................................13
Using Codoor.................................................................14
Access ........................................................................14
Leaving the premises .................................................14
Automatic resetting.....................................................14
Access blocking..........................................................14
Testing............................................................................15
Test Mode...................................................................15
Entering test mode .....................................................15
Test modes .................................................................15
Backup power supply ...................................................17
Changing the batteries .................................................17
Erase memory................................................................18
Troubleshooting ............................................................19
Where can Codoor be fitted?.......................................20
CD3500.......................................................................20
CD4000.......................................................................21
Technical specifications ...............................................22

CD3500 & CD4000 Installation and User manual 5
ENG
About this manual
This manual covers both the Scandinavian style (CD3500) and the
International style (CD4000) of the Codoor. In the scope of this
manual we will use the name Codoor (unless notified.)
Codoor - General
The Codoor, a complete code lock suitable for fitting to a single
door, incorporates an electronic code lock, a mechanical locking
device and a power unit in the same housing. Codoor may be fitted
on most doors with handle operated locks. See page 20-21 for
more information. When Codoor is fitted; the outside door handle is
disengaged and may be pressed down without opening the door. To
open the door, a 4-digit code has to be entered. The handle on the
inside of the door is not affected by Codoor, and works normally for
people leaving the premises.
All programming, except for setting of the programming code, is
entered via the keypad (see figure). Besides the keys, the keypad
includes two LEDs, one green and one red.
GREEN -In programming mode, the green LED indicates
that codes etc. have been entered correctly. It also
confirms each key press in programming mode.
RED - In operating mode, the red LED confirms each key
press. In programming mode, the LED flashes slowly
until a command is entered. Then the LED flashes
quickly.
321
654
#0
987
1
2

6 CD3500 & CD4000 Installation and User manual
ENG
Codoor also incorporates a buzzer, both to confirm each key press
(if required) and to indicate “battery low” by sounding a low tone (see
section Backup Power Supply). Otherwise, the buzzer sounds to
confirm successful programming.
The programming code must be set before the unit is fitted to
the door
Setting the programming code
When Codoor is delivered, the memory is completely empty. The first
thing you have to do is to set a programming code, before you fit
Codoor to a door. To set the programming code for the first time,
connect the batteries and proceed as follows:
Press the reset button on the rear of Codoor and
hold it down as you press the #button for at least 2
seconds.
The red LED will flash quickly, accompanied by simultaneous
sounding of the buzzer
While buzzer sound - press ,
then enter the desired 6-digit programming code. Finish by
pressing .
The green LED is lit for 2 seconds. A rising tone from the buzzer
confirms that the programming code has been set.
NOTE! Programming must be done while the red LED flashes
and the buzzer sounds. Do not forget to write to down the
chosen digits.
Programming
Code
Note! The first 4 digits
in the programming
code must never be
used for any of the 9
access codes.
Code 1: Code 4: Code 7:
Code 2: Code 5: Code 8:
Code 3: Code 6: Code 9:
1.
2.
3.
4.
R+#
R+#

CD3500 & CD4000 Installation and User manual 7
ENG
How to change an existing programming code
Proceed like this:
Press , then enter the existing
programming code (6 digits). Finish
by pressing .
The red LED will flash slowly, accompanied by simultaneous
sounding of the buzzer.
Enter 99 . The red LED will flash quickly.
Press then enter the new
programming code (6 digits). Finish
by pressing . The green LED is lit for
2 seconds.
Finish programming by entering 00 . As a
confirmation, a rising tone sounds from the buzzer.
Having set the programming code, Codoor can be fitted to the door
in accordance with the accompanying installation instructions. Do not
forget to make a note of the programming code.
1.
2.
3.
4.
5.
0 0
0 0
9 9
9 9

8 CD3500 & CD4000 Installation and User manual
ENG
Codoor Installation kit
Make sure you have the following tools handy:
Cross-head screwdriver for door handle and cylinder ring screws.
Hack saw for trimming lever handle spindle.
The following parts are supplied:
1 Codoor (batteries excluded).
4 extension sleeves for handle nipples (use only one pair, M4 or
M5).
1 Reinforcing spring.
1 Reinforcing spring holder.
•
•
•
•
•
•
CD4000CD4000
CD3500CD3500

CD3500 & CD4000 Installation and User manual 9
ENG
Fitting CD3500 to door
Remove the cylinder ring and the door handle from the door by
loosening the four screws. See figure 1.
Ensure that the handle spindle does not project more than 20
mm on the outside of the door. If the spindle is too long, push it
through into the handle on the inside. If this cannot be done, cut
the spindle to the right length. See figure 2.
Prepare the handle by extending the screws with the supplied
extension sleeves (M4 or M5). See figure 3.
Make sure that the red mark on the follower points downwards.
See figure 4.
Place the CD3500 on the outside of the door with the handle
attached, and pass the lever handle spindle through the square
hole. See figure 4.
Tighten, not too hard, the four previously loosened screws to the
nipples (the screws for the handle first). See figure 5.
Figure 1 Figure 2 Figure 3
RED
Figure 4, CD3500 Figure 5
1.
2.
3.
4.
5.
6.

10 CD3500 & CD4000 Installation and User manual
ENG
Fitting CD4000 to door
Remove the cylinder ring and the door handle from the door by
loosening the four screws. See figure 1.
Ensure that the handle spindle does not project more than 20
mm on the outside of the door. If the spindle is too long, push it
through into the handle on the inside. If this cannot be done, cut
the spindle to the right length. See figure 2.
Prepare the handle by extending the screws with the supplied
extension sleeves (M4 or M5). See figure 3.
Make sure that the red mark on the follower points upwards. See
figure 4.
Place the CD4000 on the outside of the door with the handle
attached, and pass the lever handle spindle through the square
hole. See figure 4.
Tighten, not too hard, the four previously loosened screws to the
nipples (the screws for the handle first). See figure 5.
Figure 1 Figure 2 Figure 3
Figure 4, CD4000 Figure 5
1.
2.
3.
4.
5.
6.
REDRED

CD3500 & CD4000 Installation and User manual 11
ENG
Setting codes
With Codoor you can program up to 9 different codes (codes 01-09).
Follow these steps:
Press then enter the 6-digit
programming code. Finish by
pressing . The red LED will flash
slowly, accompanied by simultaneous sounding of the buzzer.
Press then enter the code number (01-09) you
want to program. Finish by pressing . The red
LED will flash faster.
Press then enter the desired 4-digit
code. Finish by pressing . The green LED
will come on for 2 seconds. To enter any
additional codes, repeat steps 3 and 4.
Exit programming mode by entering 00 . The
buzzer sounds a rising tone to confirm.
NOTE! The unit automatically switches out of programming mode
into operating mode if no key is pressed within 10 seconds.
Programming must be done while the red LED flashes and
the buzzer sounds.
Delete code
Proceed like this:
Press then enter the 6-digit
programming code. Finish by
pressing . The red LED will flash
slowly, accompanied by simultaneous
sounding of the buzzer.
Press #, then enter the code (01 - 09) you wish
to delete. Finish by pressing #. The green LED will
come on. If you wish to delete more than one code, repeat step 3
for each code.
Exit programming mode by entering 00 . The
buzzer sounds a rising tone to confirm.
1.
2.
3.
4.
1.
2.
3.
0 0
0 0
# ## #
0 0
0 0

12 CD3500 & CD4000 Installation and User manual
ENG
Deactivation function
The ninth code may be used as a “deactivation” code, by which
Codoor may be set manually in the unlocked
position. Follow these steps:
Press then enter code 9 (4 digits).
Finish by pressing .
The red LED will flash slowly, accompanied by simultaneous
sounding of the buzzer.
Press 1. The green LED will come on. The
buzzer sounds a rising tone to confirm the code has
been entered.
After 4 seconds the lock will open. It will then open automatically
each time the door handle is used. Codoor will remain unlocked
until reset to the locked position.
NOTE! If the Codoor fails to open the lock (i.e. the handle is held
own), it will attempt to open the lock 10 times. It will try a
further 10 times if a button is pressed at least 10 seconds
after Codoor has tried unsuccessfully to unlock the door.
Return to locked position
Proceed like this:
Press then enter code 9 (4 digits).
Finish by pressing .
Enter 0. The green LED will come on. The
buzzer sounds a rising tone to confirm the code has
been entered.
Press the door handle down once to re-lock the door.
Of course, code 9 works as a normal code if is not entered before
and after the code.
1.
2.
3.
4.
1.
2.
3.
1
1
0
0

CD3500 & CD4000 Installation and User manual 13
ENG
Disconnect the deactivation function
Proceed like this:
Press , and then enter the 6-digit
programming code. Finish by
pressing .
The red LED will flash slowly, accompanied by
simultaneous sounding of the buzzer.
Enter 68 . The red LED will flash faster.
Enter 0. The green LED will come on.
Exit programming mode by entering 00 . The
buzzer sounds a rising tone to confirm.
If you want to reconnect the deactivation function, repeat steps 1 to
5, but enter 1 instead of 0 in step 4.
Buzzer
In operating mode, Codoor’s buzzer may be programmed to sound
as each key is pressed, or to remain silent. At delivery, the buzzer is
programmed to sound. However, if silent
operation is required, proceed as follows:
Press , then enter the 6-digit
programming code. Finish by
pressing .
The red LED will flash slowly, accompanied by simultaneous
sounding of the buzzer.
Enter 65 . The red LED will flash faster.
Enter 0. The green LED will come on.
Exit programming mode by entering 00 . The
buzzer sounds a rising tone to confirm.
If you wish to reactivate the buzzer, follow steps 1 to
5, but press 1 instead of 0 in step 4.
1.
2.
3.
4.
5.
1.
2.
3.
4.
5.
0 0
0 0
6 8
6 8
0
0
0
0
0 0
0 0
6 5
6 5

14 CD3500 & CD4000 Installation and User manual
ENG
Using Codoor
Access
Enter any of the programmed codes (without pressing ) and
without touching the door handle. At each key press, an audible
signal is sounded (if the buzzer is enabled) and the red LED on
the keypad flashes once.
A click sound confirms that the code has been correctly entered.
The door must be opened within 4 seconds.
Leaving the premises
Codoor’s mechanical locking device only affects the outside door
handle. The door can always be opened from the inside as usual.
Automatic resetting
Codoor has two separate resetting systems to return the lock to the
locked position after a code has been entered.
Mechanical: the lock is reset each time the door handle is used
during access.
Electronically: the lock is reset if the handle is not used within 4
seconds of a code being entered.
This provides security against unauthorised access, since Codoor
can never be left in the unlocked position. However, it is important
to remember that Codoor should not be left in the deactivated mode
(see section Deactivation function).
Access blocking
To thwart attempts to obtain an access code by trial and error,
Codoor incorporates a blocking function to disable the unit after 16
false key presses (four successive incorrect 4-digit codes). The unit
remains blocked until 2 correct codes are entered successively. This
means that further instructions to users are not required.
1.
2.
3.
•
•

CD3500 & CD4000 Installation and User manual 15
ENG
Testing
It must always be possible to open the door from the inside.
The handle on the outside should not be disengaged, and should
not open the door until the correct code is entered.
When the correct code is entered, the handle on the outside
should activate the lock, but only once. As the handle is
released, it should again disengage.
The handle on the outside must not be jammed in any position,
and should spring back up completely after being pressed down.
If the code is entered, Codoor should automatically reset to the
disengaged position after about 4 seconds.
Test Mode
A test mode is implemented primarily to test and set up the unit,
and also for field service. The unit will remain in test mode until the
appropriate command is given to leave it. It is not necessary to put
the processor into SLEEP mode other than by specific function.
Entering test mode
Test mode is entered by holding the button in at the rear of the unit
and pressing * for at least 2 seconds. The buzzer will give a short
beep and the green LED will be lit continuously, unless otherwise
stated, to indicate test mode. Each time a key is pressed the buzzer
should be sounded and the red LED lit as per normal operation.
Pressing one of the keys as follows then enters each test.
Test modes
Button 1 Flashes the green and red LEDs simultaneously with
the sounding of the buzzer. This will continue until an-
other key is pressed.
Button 2 Checks the RAM of the processor. If successful a
conrm tone is given or if unsuccessful an error tone is
given. The unit returns to test mode with the green LED
continuously lit.
•
•
•
•
•

16 CD3500 & CD4000 Installation and User manual
ENG
Button 3 Checks the non-volatile memory (non destructively). If
successful a conrm tone is given or if unsuccessful an
error tone is given. The unit returns to test mode with
the green LED continuously lit.
Button 4 Fires the solenoid in and out every 4 seconds, the
status of reed switch sensor is given on the LEDs, with
contact locked given by the green LED and unlocked
given by the red LED.
Button 5 Puts the unit into sleep mode to enable the current con-
sumption of the unit to be measured. The unit will come
out of this function when any key is pressed.
Button 6 Only shows the status of the position sensor. Red LED
– unit locked (solenoid un-engaged), green LED - unit
unlocked (solenoid engaged).
Button 7 Puts the unit into an unlocked state with the status of
the position sensor shown on the LEDs as previously
stated.
Button 8 Shows the status of the low battery input. Low battery
detected the red LED will show. If the battery voltage is
OK the green LED will show.
Button 9 Does nothing except beep and light the red LED.
Button * Does nothing except beep and light the red LED.
Button 0 Does nothing except beep and light the red LED.
Button # Exits test mode with a conrm tone, leaving all the data
intact in the non-volatile memory.
Reset but-
ton on rear
By pressing and holding the reset for 2 seconds the
Codoor’s memory is cleared back to factory settings:
No programming code set.
No access codes set.
Buzzer enabled.
Deactivation function enabled.
•
•
•
•
NOTE! The reset function can only be used when in test mode!

CD3500 & CD4000 Installation and User manual 17
ENG
Backup power supply
When the batteries are running low, Codoor will operate with the
buzzer sounding a low tone. The lock has a backup power supply
sufficient for a limited number of openings once the batteries have
run down.
In order not to jeopardise security, the backup power supply
is restricted to 50 openings, after which the backup function is
terminated to conserve the remaining battery power. However, to
allow battery replacement to be carried out by the person in charge,
the programming code is not disabled, to allow the door to be
opened.
Changing the batteries
When the unit’s batteries run out, Codoor will stop working. The lock
has a backup power supply that will allow the door to be opened a
limited number of times, but the batteries should be replaced as soon
as they fail. Follow these steps:
Remove Codoor from the door.
Remove the batteries from the rectangular shaped holes on the
lower part of the back of the unit.
Always change both batteries. Changing only one battery will
dramatically reduce the life of the new battery. The batteries
should be lithium type (2 batteries type U9VL). See Technical
Specifications.
Re-fix the housing.
1.
2.
3.
4.

18 CD3500 & CD4000 Installation and User manual
ENG
Erase memory
In cases where the Codoor is moved to another door (with new
users), you should be sure that no old codes remains. The best way
is to erase the memory. Proceed as follows:
Remove Codoor from the door.
Press and hold the reset button on the rear of Codoor
and -button simultaneously - until the green LED
lit.
Release both buttons simultaneously.
Press the reset button once again for 2 seconds.
As a confirmation, a rising tone sounds from the buzzer.
1.
2.
3.
4.
5.
RR
R+
R+

CD3500 & CD4000 Installation and User manual 19
ENG
Troubleshooting
Symptom Remedy
Lock does not open
when code us entered.
• Check that the right code has been entered.•
Make sure the handle is not pressed down as
the code is entered.
•
Check that the handle is not sagging.•
Check that the time limit for automatic reset has
elapsed.
•
Check that Codoor is fitted exactly vertical.•
Check that the lock is not fitted too tightly to
the door, in which case the handle could be
jammed.
•
Check that the red mark on the follower for the
lever handle spindle is pointing downwards.
•
Codoor is in unlocked
position.
• Set Codoor to locked position (if required)
according to the instructions in section
Deactivation function.
•
Codoor does not sound
following key presses.
• Activate the buzzer (see section Buzzer)
Frequent use requires frequent change of
batteries. The batteries last up to 150,000
openings (lithium-type) and 50.000 openings
with alkaline-type.
•
•
Batteries are rapidly
discharged.
• Check the batteries and change any discharged
batteries.
•
Lock does not open even
though backup power.
• The blocking counter is activated. See section
Access blocking. Enter the programming code
(skip before and after the code).
The batteries may be bad and should be
changed immediately.
The batteries are completely discharged and
should be changed immediately.
•
•
•

20 CD3500 & CD4000 Installation and User manual
ENG
Where can Codoor be fitted?
Codoor is suitable for most doors with handle-operated mortice locks.
Check suitability by simply measuring your the distance between the
center of the handle follower and the center of the cylinder.
NOTE! Codoor is only for internal fitting and operation and
should not be specified for back to back installation.
CD3500
CD3500 is suitable for most doors with ASSA Modular locks. Check
suitability by simply measuring your own lock. The backset should
normally be 70 mm.
The CD3500 can be used with many types of locks, like e g ASSA
8561 or 565 etc.
5 -
116 mm
01
8x8 mm
8
3
-
0
3
"ACKSETMM
Basic needs are the following:
The distance between the centre of the handle and the centre of
the cylinder should be between 105 – 116 mm.
Latchbolt function.
The handle must have an 8 mm square spindle.
The handles fixing holes 30-38 mm (diagonal).
•
•
•
•
Other manuals for Codoor CD3500
1
This manual suits for next models
1
Table of contents
Languages:
Other Siemens Door Lock manuals