OPGAL ThermApp MD User manual

User Manual
This document discloses data in which Opgal Inc. has proprietary rights. Neither the furnishing, receipt, nor possession thereof
confers upon or transfers any right to reproduce or disclose the document, any part thereof, or any information therein except
by written permission from, or written agreement with, Opgal Inc.

Therm-App MD User Manual
-------------------------------------------------------------------------------------------------------------------------------------------------------------------------
------------------------------------------------------------------------------------------------------------------------------------------------------------
Page 2 of 25
Table of Contended
1Overview ............................................................................................................................................... 3
2Disclaimer.............................................................................................................................................. 3
3Hardware Connection ........................................................................................................................... 4
4Installation ............................................................................................................................................ 5
4.1 Installing the Application .............................................................................................................. 5
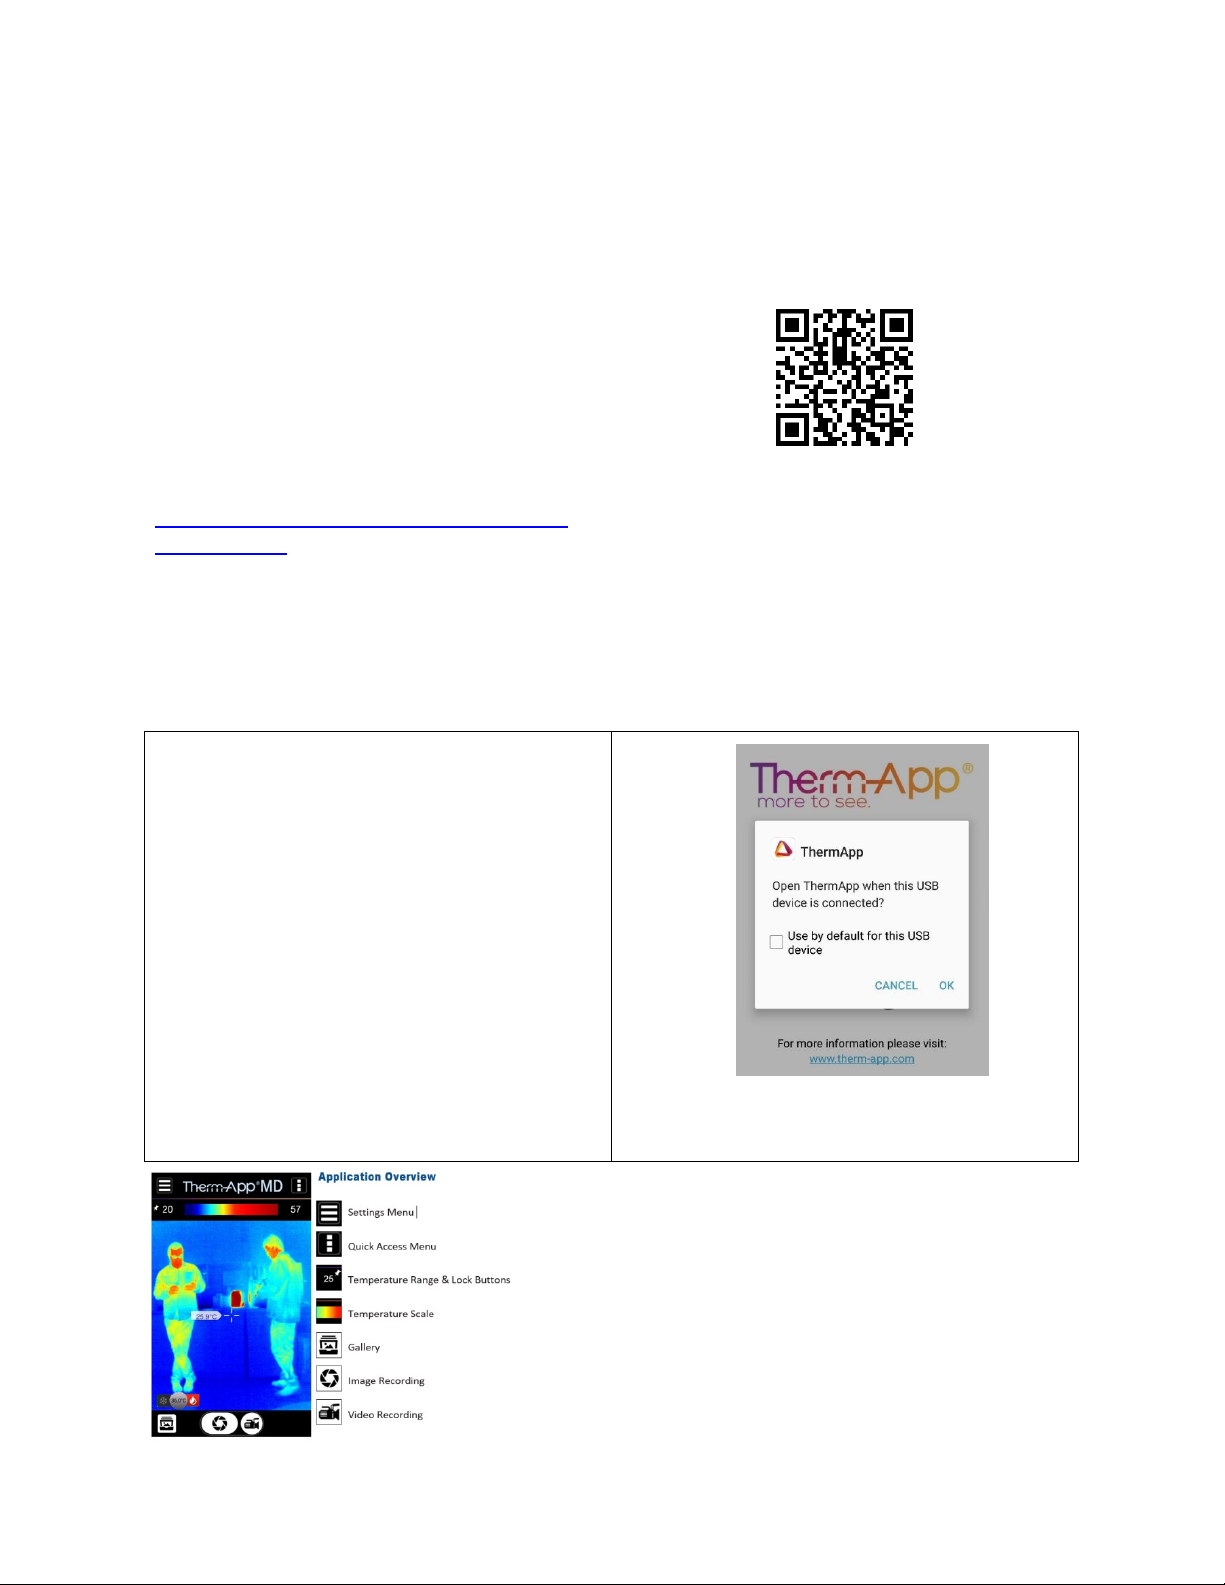
5Application Operation........................................................................................................................... 5
5.1 Initialization................................................................................................................................... 5
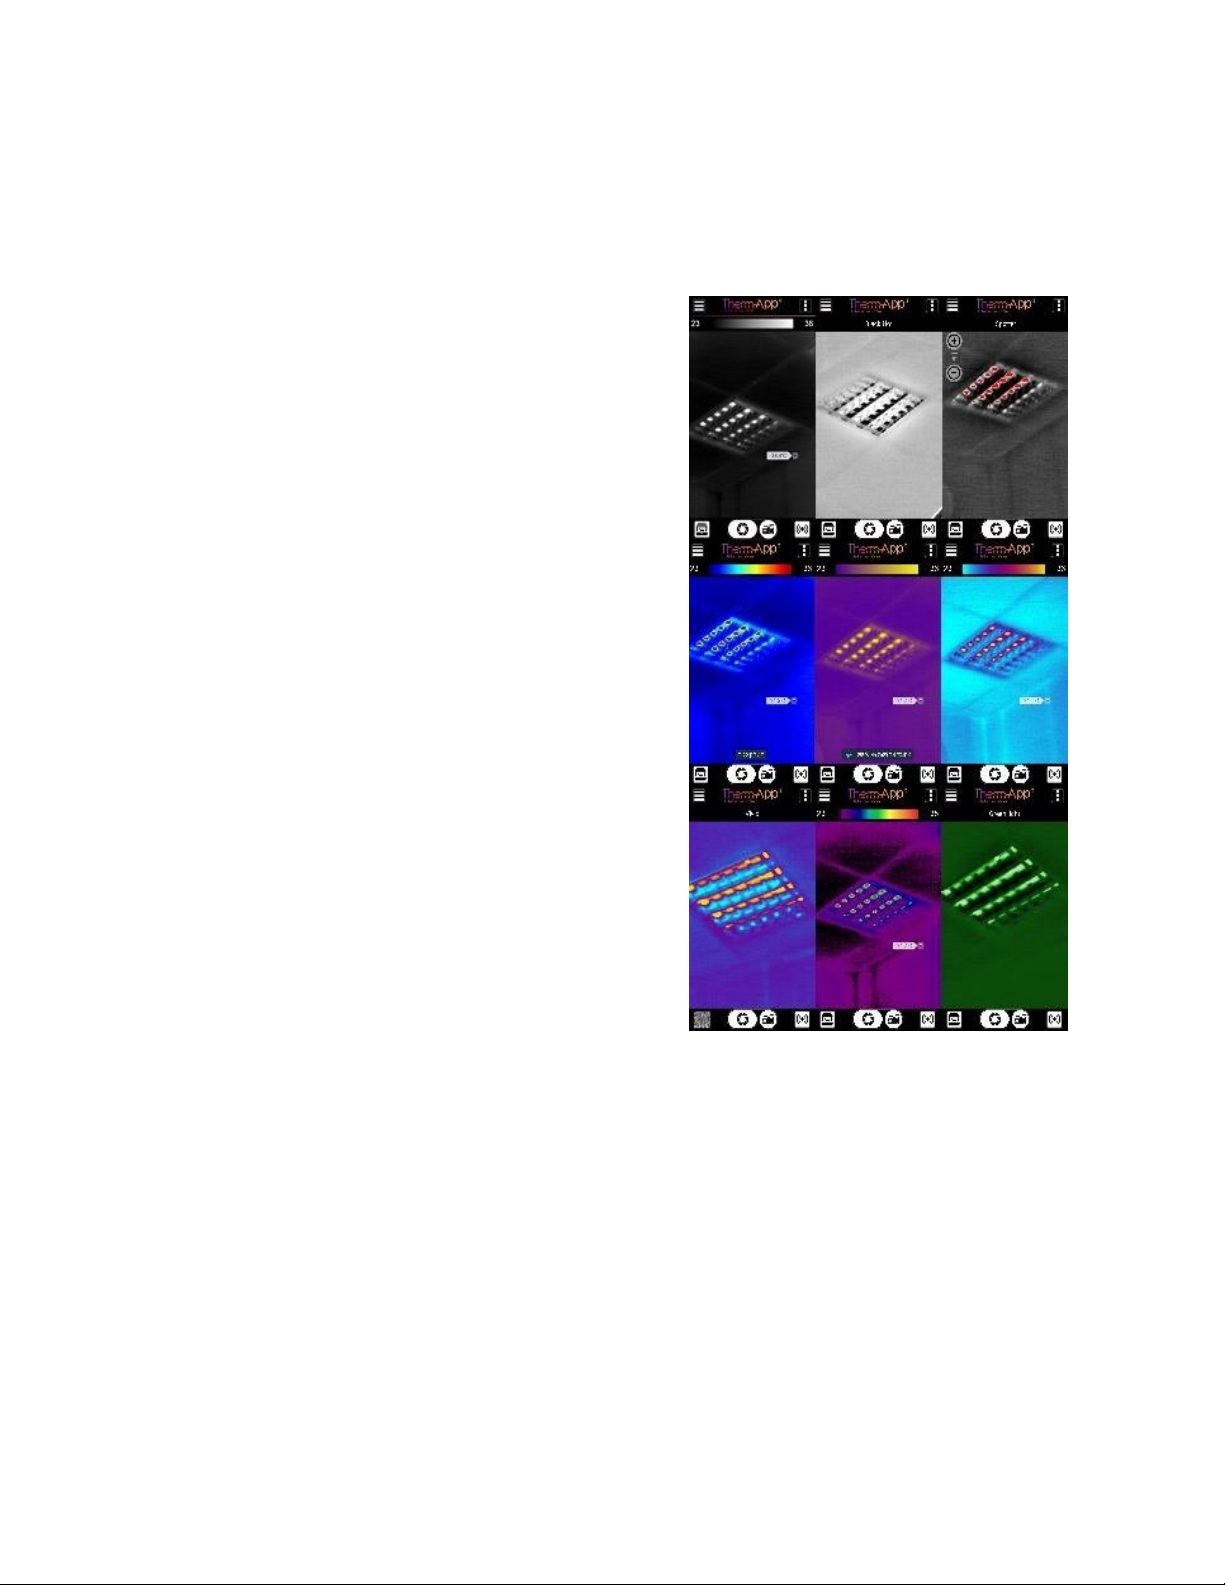
5.2 Selecting Night Vision / Thermography Color Palettes................................................................. 6
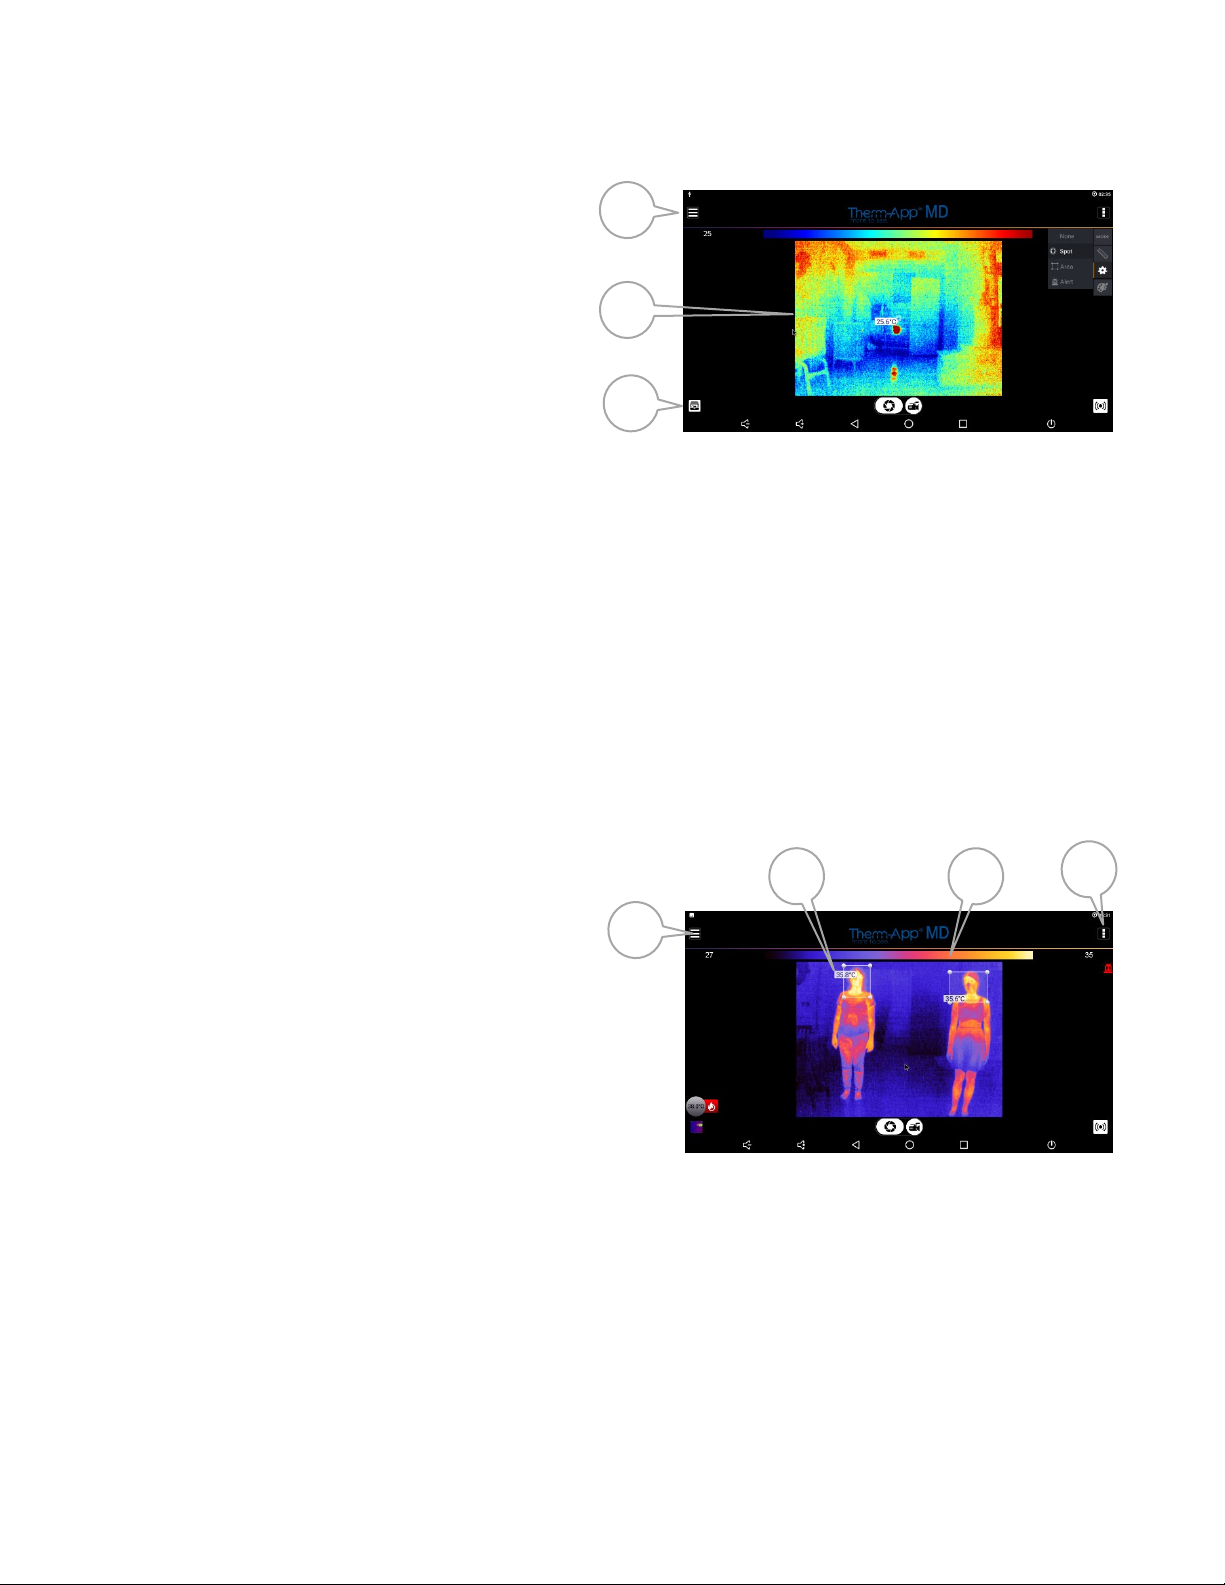
5.3 App Screen Layout ........................................................................................................................ 7
5.4 Upper Toolbar............................................................................................................................... 7
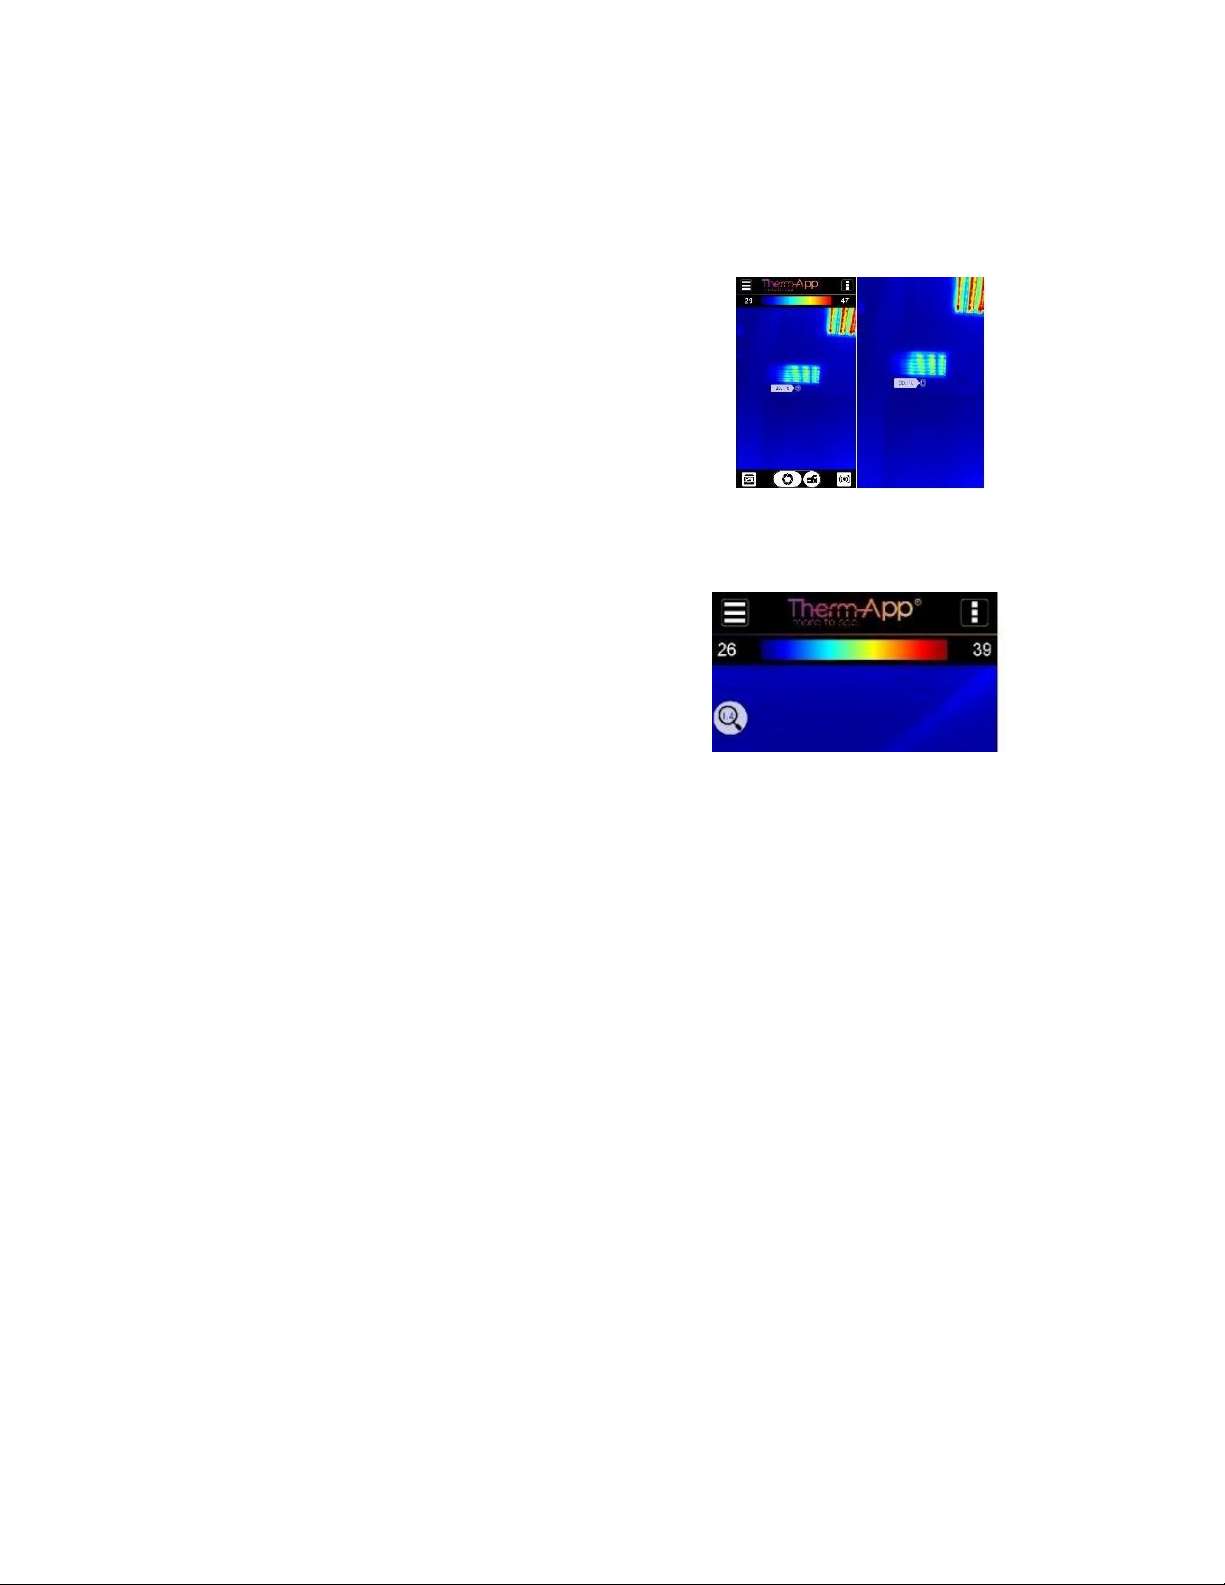
5.5 Image Display................................................................................................................................ 8
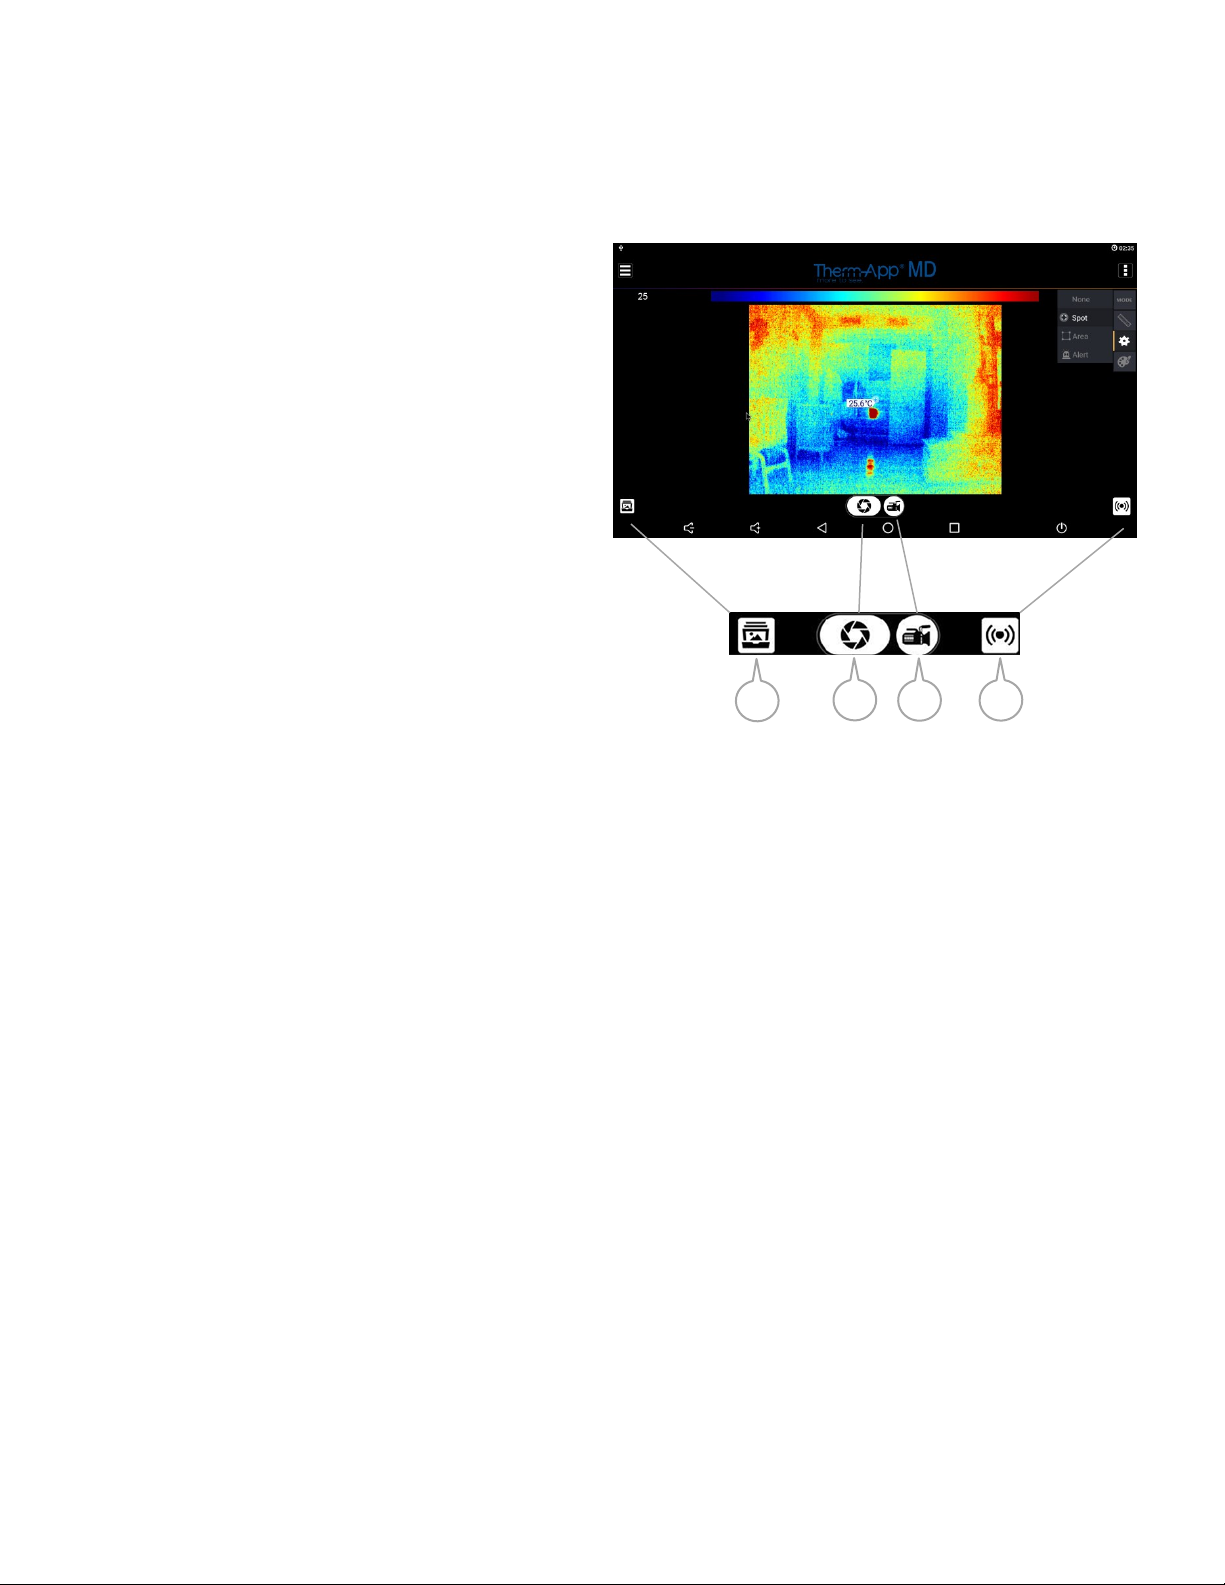
5.6 Lower Toolbar ............................................................................................................................... 9
6Settings................................................................................................................................................ 10
6.1 Preparation .................................................................................................................................10
6.2 Quick Access Menu ..................................................................................................................... 11
6.3 Main Therm-app®Settings Menu................................................................................................ 12
6.4 Main Menu Options ....................................................................................................................13
6.5 Thermography Settings............................................................................................................... 14
6.6 General Settings.......................................................................................................................... 15
6.7 Maintenance ...............................................................................................................................19
7Help ..................................................................................................................................................... 20
8About................................................................................................................................................... 20
9FAQ and Troubleshooting ...................................................................................................................21
10 Terms and Conditions .....................................................................................................................22

Therm-App MD User Manual
-------------------------------------------------------------------------------------------------------------------------------------------------------------------------
------------------------------------------------------------------------------------------------------------------------------------------------------------
Page 3 of 25
Congratulations!
You are now the owner of a new Therm-App® MD world-class thermal imaging device which includes
hardware and software components (the “Product”).
1Overview
Therm-App® MD is an Android-supported thermographic imaging device for elevated body temperature
(EBT) measurement, specifically calibrated to measure temperature. The Therm-App sensor is based on
α- Si bolometer 17µ 384x288 pixels.
2Disclaimer
Therm-App MD does not detect fevers or illness in any way. It is not a medical diagnostic tool and has
not been approved by a medical professional. Any individual tested and flagged should be double-
checked using an approved medical device.
Notes:
1) The measurement should not be solely or primarily relied upon to diagnose or exclude a
diagnosis of COVID-19, or any other disease.
2) Elevated body temperature in the context of use should be confirmed using secondary
evaluation methods (e.g., an NCIT or clinical grade contact thermometer)

Therm-App MD User Manual
-------------------------------------------------------------------------------------------------------------------------------------------------------------------------
------------------------------------------------------------------------------------------------------------------------------------------------------------
Page 4 of 25
3Hardware Connection

Therm-App MD User Manual
-------------------------------------------------------------------------------------------------------------------------------------------------------------------------
------------------------------------------------------------------------------------------------------------------------------------------------------------
Page 5 of 25
4Installation
4.1 Installing the Application
5Application Operation
5.1 Initialization
When first connecting Therm-App® to the
Android device, proceed as follows:
Select Use by default for this USB device
checkbox and tap OK. The Therm-App®
application will automatically start and display
the Terms and conditions screen.
Review and accept the Terms and Conditions.
The application will download the calibration files
(a download progress bar will appear on the
screen).
While operating Therm-App®, you can change
modes between Night Vision and Thermography.
Visit the Opgal website to download the latest
Therm-App MD update for free.
https://www.opgal.com/products/therm-app-
MD-customers
Scan the QR code to link directly to
the Opgal website.
The operating system (OS) of the Android device
should be installed with the latest official version of
Android. The Therm-App application is compatible
with the last three official Android releases. The
device must support USB On-The-Go (OTG).

Therm-App MD User Manual
-------------------------------------------------------------------------------------------------------------------------------------------------------------------------
------------------------------------------------------------------------------------------------------------------------------------------------------------
Page 6 of 25
5.2 Selecting Night Vision / Thermography Color Palettes
On each imaging mode, the Therm-App® device
image can be displayed using one of several
palettes.
To change the selected palette, swipe your finger
or select by the mouse across the image on the
main screen:
Available palettes:
Spotter
Black, White, Red (Available using Night Vision)
Rainbow
Blue, Green, Yellow, Red
(Available using Thermography and Night Vision)
Iron
Purple, Yellow (Available using Thermography and
Night Vision)
Vivid
Purple, Aqua, Pink, Yellow
(Available using Thermography and Night Vision)
PSY
Purple, Blue, Green, Yellow, Red
(Available using Thermography and Night Vision)
Lava
Black, Blue, Red, Yellow
(Available using Thermography and Night Vision)
Green Light
Black, Dark Green, Bright Light Green (Available
using Thermography and Night Vision)

Therm-App MD User Manual
-------------------------------------------------------------------------------------------------------------------------------------------------------------------------
------------------------------------------------------------------------------------------------------------------------------------------------------------
Page 7 of 25
5.3 App Screen Layout
5.4 Upper Toolbar
◼
Upper toolbar [1]
◼
Image display [2]
◼
Lower toolbar [3]
Settings button [1] –For configuring
Therm-App® settings
Temperature bar (Thermography mode)
[2] –Presents the range of temperatures
currently being viewed. The minimum and
maximum temperatures are displayed on both
sides of the bar.
Temperature reading (Thermography
mode) [3] –Displays the temperature at the
selected point on the screen (marked by a little
box).
Quick Settings Menu [4] –Allows
selection of mode, emissivity, temperature alerts,
and palette.
1
2
3
1
2
4
4

Therm-App MD User Manual
-------------------------------------------------------------------------------------------------------------------------------------------------------------------------
------------------------------------------------------------------------------------------------------------------------------------------------------------
Page 8 of 25
5.5 Image Display
◼
Full Screen Mode
By tapping the screen twice quickly, you can
switch between standard and full screen modes.
Please Note: Only available in for portrait mode.
The screen mode allows landscape configuration
for use of HDMI screens.
◼
Digital Zoom & Pan
By making a pinching motion on the screen, the
image will zoom in or out. In zoom mode, a
magnifying glass with the zoom level appears on
the top left corner of the thermal image. While
zooming, the image can be panned up, down,
left, or right.
(Only available in touch screen)

Therm-App MD User Manual
-------------------------------------------------------------------------------------------------------------------------------------------------------------------------
------------------------------------------------------------------------------------------------------------------------------------------------------------
Page 9 of 25
5.6 Lower Toolbar
◼
Gallery [1] –Displays pictures stored on the
Android device using the default album
application.
◼
Snapshot [2] –Takes a snapshot of the image
displayed on the screen.
◼
Video Recording [3] –Records a video
stream of the image displayed on the
screen.
◼
Live Video Streaming [4] –Stream the video
of the image displayed on the screen.
2
3
4
1

Therm-App MD User Manual
-------------------------------------------------------------------------------------------------------------------------------------------------------------------------
------------------------------------------------------------------------------------------------------------------------------------------------------------
Page 10 of 25
6Settings
6.1 Preparation
For best performance, the ambient room temperature should be 25°c (77°F).
For optimal performance wait 40 minutes or more from start-up, to allow the Therm-App to reach an
initial steady temperature state.
In order to establish a baseline temperature, have 3 healthy people with regular temperatures pass in
front of the camera. Calculate from the highest temperature of the 3 people and set the Compensation
to bring the temperature to be 36.5°c (97.7°F). For example, if the highest temperature is 34°c (93.2°F)
set the compensation to be 2.5°c (4.5°F).
Set the temperature dial to the temperature you want to start getting alerts, for example 38°c (100.4°F)
(see Configuring the Alert for instructions).
Note:
Changing the compensation does not affect the threshold. The threshold should be determined by the
temperature after the compensation. For example, if you want to be alerted at 38°c (100.4°F) and above,
you set the threshold to 38. If over time, you change the compensation, for example, because of the
weather warming during the day, you do not have to change the threshold.

Therm-App MD User Manual
-------------------------------------------------------------------------------------------------------------------------------------------------------------------------
------------------------------------------------------------------------------------------------------------------------------------------------------------
Page 11 of 25
6.2 Quick Access Menu
This menu allows you to quickly select:
◼
Imaging Mode [1] –Thermography or Night Vision mode.
◼
Emissivity and Reflected Temperatures [2]
(see thermography settings).
◼
Turn on Temperature alerts [3]
◼
Palette [4]
◼
Configure Temperature Alerts [5]
After you have turned on temperature alerts [3], you can set a
threshold for Therm-App® to start flash a red alert when measuring
temperature above this threshold (flame icon)
In the example on the right side, the temperature threshold has been
set to 38 °c (100.4°F).
Click on Alert
◼
Two boxes will appear on the screen with small circles on each
corner.
◼
Click and drag the boxes to the region of interest. Each box can be
dragged to any position on the screen.
◼
Click and drag the corners of the boxes to resize the area of
interest.
◼
In case of overlap between the boxes, the alert will function
mutually in the overlapped area.
◼
To cancel alerts, press the NONE option.
2
3
4
1
5

Therm-App MD User Manual
-------------------------------------------------------------------------------------------------------------------------------------------------------------------------
------------------------------------------------------------------------------------------------------------------------------------------------------------
Page 12 of 25
6.3 Main Therm-app®Settings Menu
Tap the Settings button located on the upper toolbar.
The settings screen includes:
◼Imaging Mode –Switches between "Night Vision"
and "Thermography" modes.
◼Thermography Settings –Enables selection of
temperature units, emissivity, reflected
temperature, and camera output options (available
only when in "Thermography mode").
◼General Settings –See page 12 for full menu
description.
◼Export/Save Option –Select how photos and videos
will be saved. (See page 12 for full walkthrough).
◼Maintenance –Performs bad pixel repair and resets
all parameters to default.
◼Help –Link to User Manual, Therm-App® Support,
and Terms of Use.
◼About –General application and device version
information.

Therm-App MD User Manual
-------------------------------------------------------------------------------------------------------------------------------------------------------------------------
------------------------------------------------------------------------------------------------------------------------------------------------------------
Page 13 of 25
6.4 Main Menu Options
Imaging Mode
◼Night Vision –This mode maximizes the difference
between hot objects and their surrounding and is used for
night-time detection of various targets. Imaging Mode –
switches between "Night Vision" and "Thermography"
modes.
◼Thermography –Image pixels are colored in relation to
their temperature. On the default rainbow palette, blue
indicates the coldest measured temperature and red
represents the hottest temperature measured. This mode
is used for searching for temperature differences on the
scanned scene.

Therm-App MD User Manual
-------------------------------------------------------------------------------------------------------------------------------------------------------------------------
------------------------------------------------------------------------------------------------------------------------------------------------------------
Page 14 of 25
6.5 Thermography Settings
◼Units –select between Celsius and Fahrenheit.
◼Emissivity –Emissivity is the ability of the surface of a
material to emit energy as thermal radiation. The
emissivity value (0 –1) represents the ratio of energy
radiated by the observed material to the energy
radiated by a black body at the same temperature.
Typical emissivity for human skin is: 0.98.
To adjust the emissivity ratio:
1. Tap the EMISSIVITY option on the screen.
2. Scroll to the correct emissivity ratio and tap the
SET button
◼Reflected Temperature –Reflected temperature
represents the energy emitted by the surrounding
objects and reflected by the measured surface.
To adjust the reflected temperature:
•Tap the Reflected Temperature option on
the screen.
•Scroll to the correct temperature and tap
the SET button
◼Scale Truncation –Within every image frame, the
temperature span is calculated and displayed on
the top of the thermography image. Use this
parameter to define the minimum number of
pixels (defined by percentage) required to affect
the temperature span calculation.
◼To adjust the truncation value:
•Tap the Scale Truncation option on the
screen.
•Scroll to the correct temperature and tap
the SET button.

Therm-App MD User Manual
-------------------------------------------------------------------------------------------------------------------------------------------------------------------------
------------------------------------------------------------------------------------------------------------------------------------------------------------
Page 15 of 25
6.6 General Settings
◼Disable Screen Timeout –Allows the device’s default screen
timeout to be disabled to enable ongoing use of Therm-App® (only
valid when Therm-App® is connected and image is shown).
◼Gain Limit Mode -Therm-App® is using noise filter by averaging
frames for temporal noise reduction.
◼Alert Mode Settings –Allows you to configure Alert Mode settings.
➢Action - Allows you to define Snapshot, Video Recording, Video
Streaming, Vibrate and Play Alert.
oSnapshot - A snapshot is taken every time a measured
temperature is met or above the preset temperature
threshold
oVideo Recording: Will record video for as long as a
measured temperature is met or above the preset
temperature threshold. (recordings are stored under date
and time file name).
oVideo Streaming: Will stream to a preset location for as long
as the temperature is met or above the preset temperature
threshold.
oVibrate: Will vibrate every time a measured temperature is
met or above the preset temperature threshold (This option
is available only for a mobile device).
oPlay alert: Plays an audio file alert every time a measured
temperature is met or above the preset temperature
threshold.
Note: for best performances, it is recommended to activate not
more than three alert actions simultaneously.
➢Advanced Parameters:
oDetection Duration (Seconds): Sets how long the object
needs to be in the set field to trigger the alert.
oAlert Delay (Seconds): How long Therm-App® should wait to
send consecutive alerts after the first alert is triggered (time
between alerts).
oRecording Time After Detection: How long you want to
continue recording after the person or object leaves the
field of view.
oObject Size: Sets the minimum size of the object that will
trigger the alert:
(“Small”- 4x4 pixels, “Medium small”- 8x8 pixels, “Medium
big”- 16x16 pixels, or “Big”- 32x32 pixels).
oTone Frequency: Allows you to select one of five different
alarm tone.

Therm-App MD User Manual
-------------------------------------------------------------------------------------------------------------------------------------------------------------------------
------------------------------------------------------------------------------------------------------------------------------------------------------------
Page 16 of 25
General Settings (continue)

Therm-App MD User Manual
-------------------------------------------------------------------------------------------------------------------------------------------------------------------------
------------------------------------------------------------------------------------------------------------------------------------------------------------
Page 17 of 25
◼Video Snapshot Orientation –This lets you choose your
viewing orientation, both while using the device and while
viewing onscreen (on a display).
oLive Screen Position: Allows you to set the viewing
orientation for the live screen.
oVideo/Snapshot Orientation: Allows you to set the
viewing orientation for videos or snapshots.
oFixed Video: Blocks screen rotation (if supported by the
device).
◼Record and stream - This mode will allow you to record IR Image
or the Screen. In addition to video recording it is possible to add
Audio recording (only for devices that have built in microphone).
Recordings files will be stored in hard disc with date and time
files names.
➢Stream Mode: Share just the image, or your full screen.
-IR Image (just the thermal image).
-Screen (thermal video, app screen details, and temperature
reading).
➢Record and Stream Audio:Check box to record audio with
video *only works if android unit has a microphone
Video streaming means that live video will be sent over an Internet
connection from the android device to any other device (SBC,
Tablet, Smartphone) connected to The Internet. Multiple devices
can view the stream from a single Therm-App®. A solid Internet
connection is required to obtain good video quality.
The ThermApp application with use the default email App on your
device. If there is no email app device installed, make sure to
download one of your choice, install it and connect the account to
the device.
To activate streaming:
◼On your Therm-App® application, click the icon on the
bottom right side.
◼Select the email option
◼Select email addresses to send a link to the stream
◼To watch the live stream on a computer, tablet, or
smartphone, click the link.
* Note that some browsers will have problem showing the
video since an add-on is required.
* Note that the email address you selected will be activate
until new email address will be selected
◼Alternatively, go to http://live.therm-app.com and in the
room number field, enter your device serial number
(appears on the settings menu).

Therm-App MD User Manual
-------------------------------------------------------------------------------------------------------------------------------------------------------------------------
------------------------------------------------------------------------------------------------------------------------------------------------------------
Page 18 of 25
General Settings (continue)
◼Language –Select your preferred interface language (Match
Device, English, Chinese, Thai, German, French, Russian, or
Spanish). Match phone is the default. If this feature is selected,
the Therm-App® application will detect the language on your
device and attempt to match it.

Therm-App MD User Manual
-------------------------------------------------------------------------------------------------------------------------------------------------------------------------
------------------------------------------------------------------------------------------------------------------------------------------------------------
Page 19 of 25
6.7 Maintenance
Under the maintenance menu you will find the following
settings:
◼BAD PIXELS REPAIR –Following extensive operation of
the thermal sensor, or due to mechanical shock, some
pixels may need digital repair. Bad pixels are observed
as pixels that are darker or brighter than their
surroundings. To eliminate these "bad pixels" press
Run Bad Pixel Repair > Start, and then follow the
onscreen instructions.
Note: Perform ONLY when bad pixels are observed.
◼Restore Factory Settings –This will restore the
application to the factory default factory settings.
◼Customization
oUse Custom images: By checking the checkbox:
This will allow you to display your logo above the
live video window.
In order to load a logo file please copy your file to
ODROID-XU4 > ThermApp > Customimages folder.
The file format must be PNG. The PNG file name
must be “main_logo.png”.
The PNG file size must be 324x77 pixels.
oShow Alert Dial: This option allows you to select
the Threshold Temperature settings methods by
typing the temperature or by rolling the
temperature scale.
oAdditional typing option is available in the settings
menu > Threshold > Threshold.

Therm-App MD User Manual
-------------------------------------------------------------------------------------------------------------------------------------------------------------------------
------------------------------------------------------------------------------------------------------------------------------------------------------------
Page 20 of 25
7Help
8About
In the About section you will find information
about the device, including serial number,
application version, firmware version, and
hardware version.
In the Help heading you will find options for:
◼Manual
◼Therm-App® support
◼Terms of use
Table of contents