manuals.online logo
Brands
  1. Home
  2. •
  3. Brands
  4. •
  5. Optibike
  6. •
  7. Bicycle
  8. •
  9. Optibike Pioneer Allroad User manual

Optibike Pioneer Allroad User manual

This is the Quick Start Guide for the Optibike
Pioneer Allroad electric bicycle. The Guide provides
for basic information required to ride the Allroad. It
is not intended to be an extensive manual. It is
recommended that you always ride your Allroad with
a helmet and observe all traffic regulations.
The Pioneer Allroad is considered an electric bicycle
by Federal Guidelines.
It can be operated where electric bicycles are legal.
Laws for electric bicycles vary by town and state.
Generally, electric bicycles are allowed on all bicycle
lanes on streets.
Their use on dedicated bike paths or off road trials
varies.
Consult your local municipality for their regulations.
In general electric bicycles are subject to the same
regulations as regular bicycles.
If you plan to ride at night, a headlight and taillight
are required and should be purchased at your local
bicycle shop.
Electric bikes travel faster than conventional
bikes.
Car drivers may think you are going slower than
you are and pull out in front of you.
This may happen when they pull out from a side
street or have just passed you and turning right.
Use Hand Signals
Be Aware!
Be Courteous to pedestrians and other cyclists.
The following riding gear is recommended:
◦Properly fitted helmet
◦Bicycle Gloves
◦Eye Protection
◦Bright Clothing
In areas with rapidly changing weather
conditions, be sure to bring extra clothing.
It is highly recommended that you carry a spare
inner tube, basic tool kit, and tire pump when
you ride.
A water bottle for hydration is also a good idea.
Use Sun Screen if riding in sunny areas.
Check the tires for proper inflation
and wear (35 psi is a good pressure)
Be sure the brakes are in good
working order and adjusted
Make sure the chain is lubricated
Have the battery charged
Check the throttle for free operation,
prior to turning on the bike.
The seat should be adjusted for each rider. It
is easily adjusted be rotating the lever on the
seat clamp. Adjust the seat to your desired
height and then retighten clamp.
Place the battery in
the frame mount.
Turn the green switch
on the right lower side
of the battery to “1”.
Hold down the “MENU”
button on the keypad
until the display turns
on.
There are two ways to check the charge
level of the battery.
1. The charge level is shown on the display
in the form of a small battery. When the
last segment of the battery is flashing,
the battery is nearly empty.
2. Push the button on the battery and the
led will light up. There are five LED. As
the battery is drained, each LED will go
off. The LED are not as accurate as the
display for battery charge level.
On the Pioneer Allroad, there are two ways to
engage the motor.
1. Thumb Throttle
2. By Pedaling (Pedalec)
The thumb throttle is located on the right
handlebar. Push the thumb throttle forward to
engage the motor.
Alternatively, you can just start pedaling
and the motor will engage. Both methods have
their advantages.
It is nice to use the throttle when
accelerating from a stop, while the pedal
activation is nice when you are riding down a
longer street.
When you stop pedaling the motor will
stop. It will take a second for the power to stop.
If you desire to stop quicker, pull the Rear Brake
lever (located on the right handlebar) and this
will instantly stop the motor.
Pulling on the brake lever will always stop
the motor instantly.
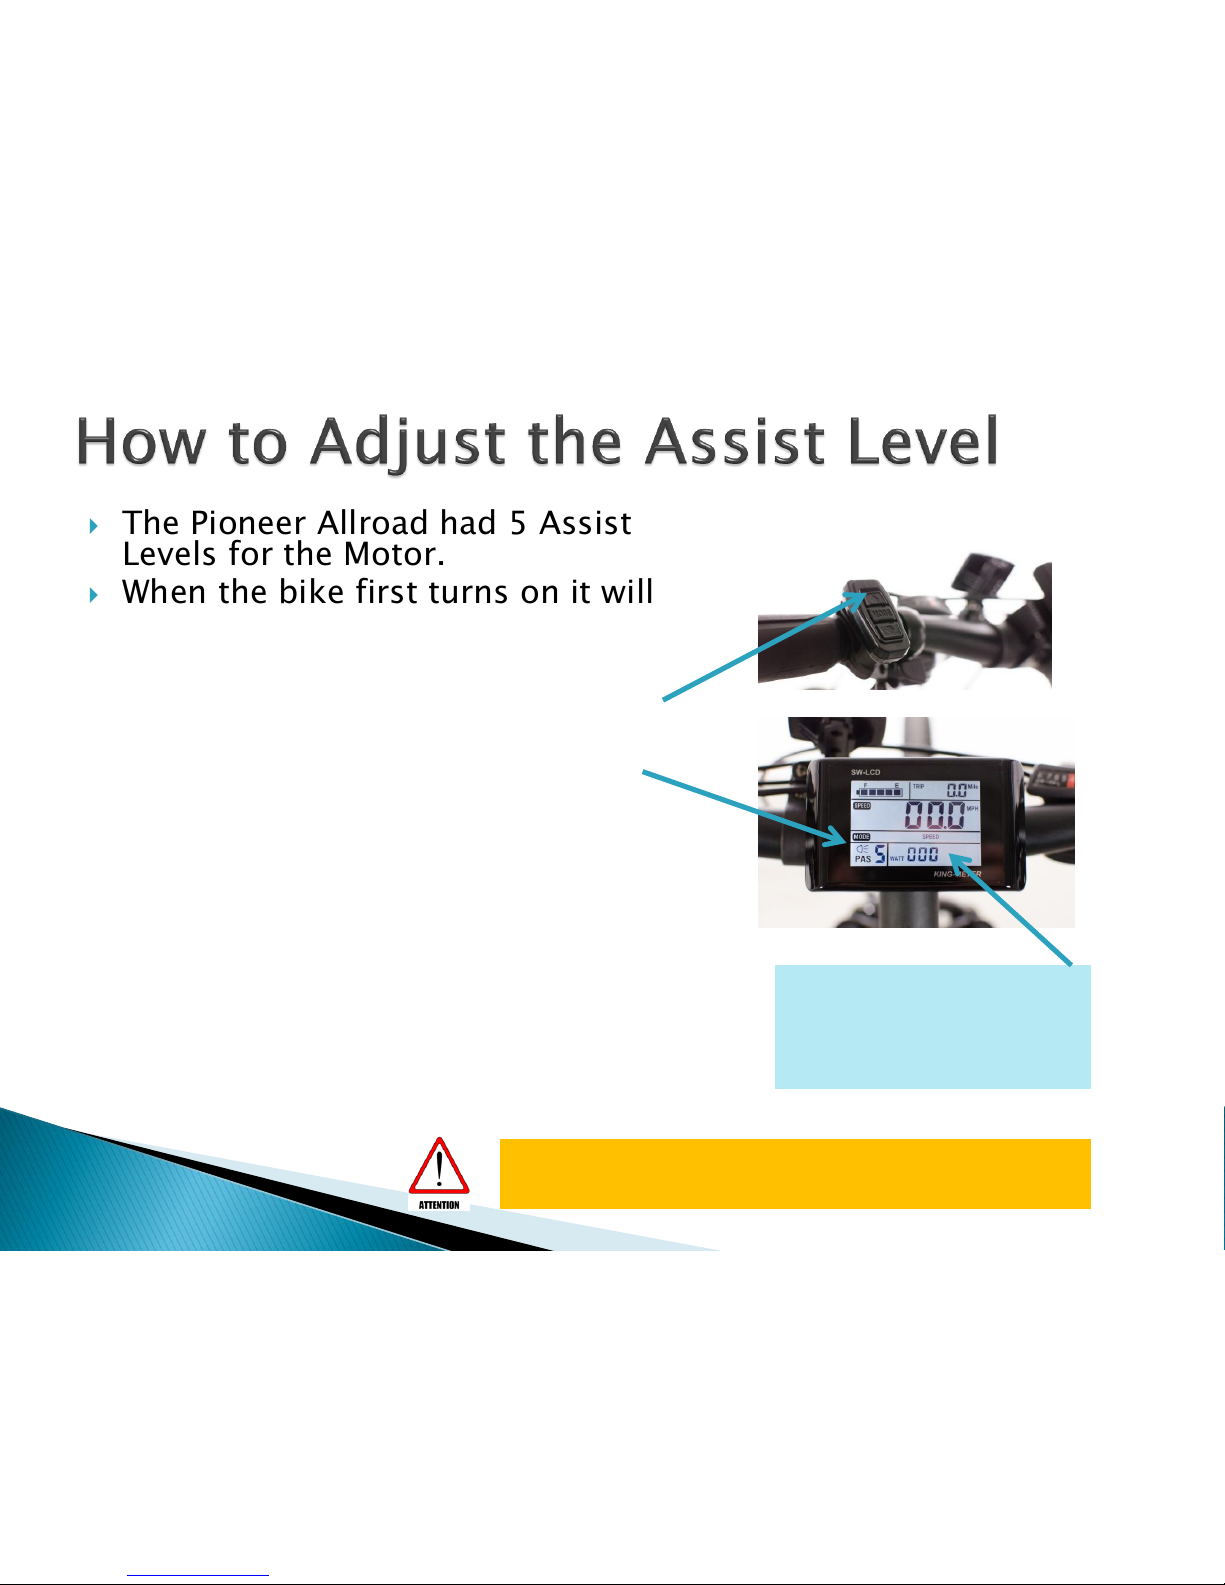
The Pioneer Allroad had 5 Assist
Levels for the Motor.
When the bike first turns on it will
be in Assist Level 1, which is lowest
power level.
To increase the Assist level, push
the “+” Button on the keypad.
The Assist Level is shown on the
display.
Level 5 is the highest level of assist.
To reduce the level, push the “-“
button on keypad.
To turn off the pedal assist, keep
pushing the “-“ button until the “0”
level is displayed
When the Power Assist is at “0”, the
Thumb throttle will also not work.
The motor power,
in watts, is
displayed here
Riding in higher assist levels will increase speed,
but reduce the run time of the battery.
The display has multiple
screens that can display
different data.
On start up, the display will
show the speed.
To change display, press the
MENU button. You can cycle
through the following
options:
◦Speed
◦Average Speed
◦Max Speed
◦Odometer (Total miles on bike)
◦Trip Distance
◦Trip Time
To reset the Trip Time and Distance
1. Hold the “+ “and “ –” buttons for
two seconds.
2. Press the + button once.
3. Press and hold MENU button.
If you get mixed up, turn the switch
on battery off and try again.
When riding in Assist Level “5”, without stopping,
the bike will run for about 35 minutes. In Assist
Level “1” the bike will run for over 2.5 hours.
Like regular bicycles the Allroad
has front and rear brakes.
The brakes are disk brakes and
offer good stopping ability.
Stopping ability is reduced in
wet or slippery conditions. In
this conditions, plan for extra
time to stop.
The rear brake is actuated with
the lever on the right handlebar,
and should always be used first.
The rear brake helps stabilize
the bike.
The front brake is actuated with
the lever on the left handlebar,
and should always be used after
the rear brake has been applied.
The front brake accounts for
75% of the stopping ability.
Always apply rear brakes first.
Rear Brake Lever
Front Brake Lever
To be a safe rider, good braking skills are
essential
It is recommended that you practice braking in a
vacant parking lot.
◦Begin by braking gently and increase braking power as
your skill level improves.
◦Always start with rear brake and then apply front brake.
◦You are braking too hard when your wheel begins to
skid.
◦Skidding can be dangerous, as it results in the bike
losing traction.
◦If you find yourself skidding, release pressure on the
brake slightly and shift your weight slightly to the
skidding wheel.
◦This is definitely a skill where practice makes perfect.
The front and rear brakes
can be adjusted with the
adjuster located on the
lever assembly.
Adjust the brakes so they
engage fully before the
lever touches the grip.
Some people like to adjust
the rear brake (right lever)
so it engages sooner than
the front brake (left lever).
Be sure to firmly tighten the
lock nut on the adjuster
when done.
Brake
Adjuster
Lock
Nut
The Pioneer Allroad has a 24 speed
Shimano Microshift Derailleur gear shifting
system. There are front and rear Derailleurs.
With the Microshift system, each click of the
lever, shifts one gear.
There are 8 gears on the rear wheel
cassette, which are shifted by the levers on
the right handlebar. This is the rear derailleur
system.
There are 3 front chain rings on the cranks
which are shifted by the levers on the left
handlebar. This is the front derailleur system.
The rear Derailleur is easier and quicker
to shift and is used for making small changes
in gearing, such as riding around town.
The front Derailleur system, is slower to
shift, and makes big changes in the gearing.
These gears would be changed when you
need a large overall change in gearing.
Rear Derailleur System
Front Derailleur System
It is recommended that you start riding with the front chain ring in the middle
and the rear gear also in the middle. Then adjust the gears as necessary for
your terrain.
There are 8 gears on the rear
wheel cassette, which are
shifted by the levers on the
right handlebar. This is a
Microshift system, so each click
of the lever will shift one gear.
There are two levers on right
side for shifting.
The upper lever will shift to a
higher gear, for more speed.
The lower lever will shift into
a lower gear (bigger sprocket,
better hill climbing)
You must be pedaling when shifting
gears.
There are 3 front chain rings on the cranks
which are shifted by the levers on the left
handlebar. This is the front derailleur system.
There are two levers on left side for
shifting the front derailleur, one to shift into
a higher gear and one to shift into a lower
gear.
The upper lever will shift into a lower gear
(smaller sprocket, better hill climbing)
The lower lever will shift to a bigger
sprocket (higher gear) for more speed.
The front derailleur takes time to shift, so
have patience.
You must be pedaling when shifting
gears.
The battery can be
charged on the bike or
taken off the bike to
charge in another
location. This is handy if
your bike is stored in
the garage and you wish
to charge indoors.
To remove the battery,
insert the key and
rotate. The battery will
slightly pop up. Pull the
battery back slightly
and remove from the
frame. There are no
connectors to take
apart. The battery and room
temperature must be above
40 degrees to charge the
battery.
Select a dry area
Plug the charger into a AC wall outlet.
The charger is automatically compatible with
voltages from 100-230 volts.
Plug the small round charge connector into the
port on the lower left side of the battery.
When the bike is charging, the rectangular LED
on the charger will change from Green to Red.
When the bike is charged, the LED will be Green
again.
Charging of a battery will take up to 6 hours.
The bike can be
turned off two ways.
◦Turn the green switch
on the battery to “0”
◦Or push and hold the
“MENU” button on the
keypad until display
turns off.

Other manuals for Pioneer Allroad

1

Other Optibike Bicycle manuals

Optibike Elite R8C User manual

Optibike

Optibike Elite R8C User manual

Optibike Essex User manual

Optibike

Optibike Essex User manual

Optibike Argon User manual

Optibike

Optibike Argon User manual

Optibike Pioneer Allroad User manual

Optibike

Optibike Pioneer Allroad User manual

Optibike Elite Series User manual

Optibike

Optibike Elite Series User manual

Optibike R Series User manual

Optibike

Optibike R Series User manual

Popular Bicycle manuals by other brands

Btwin ELOPS 900E user manual

Btwin

Btwin ELOPS 900E user manual

Betzold 97869 quick start guide

Betzold

Betzold 97869 quick start guide

Kettler Speedy 12.5 manual

Kettler

Kettler Speedy 12.5 manual

Magnum Nomad manual

Magnum

Magnum Nomad manual

Radio Flyer EZ Fold Stroll 'N Trike Deluxe instructions

Radio Flyer

Radio Flyer EZ Fold Stroll 'N Trike Deluxe instructions

ARGENTO Piuma-S user manual

ARGENTO

ARGENTO Piuma-S user manual

CRUSSIS e-Full 10.9 user manual

CRUSSIS

CRUSSIS e-Full 10.9 user manual

X-mini III user manual

X-mini

X-mini III user manual

Trek Bicycle Computer owner's manual

Trek

Trek Bicycle Computer owner's manual

PIAGGIO Fly 50 4t 4v manual

PIAGGIO

PIAGGIO Fly 50 4t 4v manual

Fresh Breeze X-ONE 4T manual

Fresh Breeze

Fresh Breeze X-ONE 4T manual

RooDog Avatar 2.0 user manual

RooDog

RooDog Avatar 2.0 user manual

Fisher-Price Barbie Free Spirit Trike 72639 instructions

Fisher-Price

Fisher-Price Barbie Free Spirit Trike 72639 instructions

Giant BRASS 1 datasheet

Giant

Giant BRASS 1 datasheet

Prodeco Technologies Storm 2013 user guide

Prodeco Technologies

Prodeco Technologies Storm 2013 user guide

Stevens E-Triton Translation of the original operating instructions

Stevens

Stevens E-Triton Translation of the original operating instructions

Accell Currie Tech IZIP Tricruiser Replacement guide

Accell

Accell Currie Tech IZIP Tricruiser Replacement guide

Giant SUEDE DX W datasheet

Giant

Giant SUEDE DX W datasheet

manuals.online logo
manuals.online logoBrands
  • About & Mission
  • Contact us
  • Privacy Policy
  • Terms and Conditions

Copyright 2025 Manuals.Online. All Rights Reserved.