Optimum OK-4140 User manual

Odkurzacz bezworkowy OK-4140
Multi Cyclon
PL INSTRUKCJA OBSŁUGI . . . . . . . . . . . . . . . . . . . . . . . . . . . . . . . . . . . . . . . . . 5
UK OPERATING INSTRUCTIONS. . . . . . . . . . . . . . . . . . . . . . . . . . . . . . . . . . . . . . 9
DBEDIENUNGSANLEITUNG. . . . . . . . . . . . . . . . . . . . . . . . . . . . . . . . . . . . . . . . 13
RU . . . . . . . . . . . . . . . . . . . . . . . . . . . 17
RO INSTRUCŢIUNI DE FOLOSIRE . . . . . . . . . . . . . . . . . . . . . . . . . . . . . . . . . . . . . 21
BG . . . . . . . . . . . . . . . . . . . . . . . . . . . . . . . . . . . 25
CZ INSTRUCŢIUNI DE FOLOSIRE . . . . . . . . . . . . . . . . . . . . . . . . . . . . . . . . . . . . . 29
SK NÁVOD NA OBSLUHU . . . . . . . . . . . . . . . . . . . . . . . . . . . . . . . . . . . . . . . . . . 33
UA . . . . . . . . . . . . . . . . . . . . . . . . . . . . . 37
OK4140_ver200.qxp 2007-11-28 11:18 Page 1 (Black plate)

2
ODKURZACZ BEZWORKOWY OK-4140
01-585 Warszawa, ul. Próchnika 4
DZIAŁ HANDLOWY W MIŃSKU MAZOWIECKIM:
tel. (0-25) 759 18 81, fax (0-25) 759 18 85
[email protected], http://hoho.pl
Dystrybutor:
KARTA GWARANCYJNA
NR..............
Ważna wraz z dowodem zakupu
Sprzęt przeznaczony wyłącznie do użytku domowego
Nazwa sprzętu: ODKURZACZ BEZWORKOWY
Typ, model: . . . . . . . . . . . . . . . . . . . . . . . . . . . . . . . . . . .
Nr fabryczny: . . . . . . . . . . . . . . . . . . . . . . . . . . . . . . . . . . .
Data sprzedaży: . . . . . . . . . . . . . . . . . . . . . . . . . . . . . . . . .
Rachunek nr: . . . . . . . . . . . . . . . . . . . . . . . . . . . . . . . . . . .
. . . . . . . . . . . . . . . . . . . . . . . . . . . .
pieczątka i podpis sprzedawcy
SERWIS CENTRALNY
Zakład Produkcyjny, ul. GROBELNEGO 4
05-300 MIŃSK MAZOWIECKI
INFOLINIA: (025) 759-18-89
LISTA PUNKTÓW SERWISOWYCH: www.arconet.pl
OK4140_ver200.qxp 2007-11-28 11:18 Page 2 (Black plate)

3
WARUNKI 24 MIESIĘCZNEJ GWARANCJI
1. Sprzedawca ponosi odpowiedzialność za wady fizyczne przedmiotu w okresie 24 miesięcy od
daty sprzedaży. Gwarancja dotyczy wyrobów zakupionych w Polsce i jest ważna na terytorium
Rzeczypospolitej Polskiej. Ujawnione w tym okresie wady będą usuwane bezpłatnie przez
wymienione w karcie gwarancyjnej zakłady serwisowe w terminach nie dłuższych niż 14 dni
od daty dostarczenia sprzętu do zakładu serwisowego (na podstawie prawidłowo
wypełnionej przez punkt sprzedaży niniejszej karty gwarancyjnej). W wyjątkowych przypad-
kach termin ten może być wydłużony do 21 dni - jeżeli naprawa wymaga sprowadzenia części
od producenta.
2. Reklamujący powinien dostarczyć sprzęt do punktu przyjęć najlepiej w orginalnym opakowa-
niu fabrycznym lub innym odpowiednim do zabezpieczenia przed uszkodzeniami. Dotyczy
to również wysyłki sprzętu. Jeżeli w pobliżu miejsca zamieszkania nie ma punktu przyjęć,
reklamujący może wysłać pocztą sprzęt do naprawy w centralnym punkcie serwisowym
w Mińsku Mazowieckim, na koszt gwaranta.
3. Zgłoszenie wady lub uszkodzenia sprzętu przyjmowane są przez punkty serwisowe.
4. Nabywcy przysługuje prawo wymiany sprzętu na nowy lub zwrot gotówki tylko w przypad-
ku gdy:
• w serwisie stwierdzono wadę fabryczną niemożliwą do usunięcia
• w okresie gwarancji wystąpi konieczność dokonania 3 napraw, a sprzęt nadal wykazuje
wady uniemożliwiające eksploatację zgodną z przeznaczeniem.
5. W przypadku wymiany sprzętu, okres gwarancji dla sprzętu liczy się od daty jego wymiany.
6. Pojęcie ”naprawa” nie obejmuje czynności przewidzianych w instrukcji obsługi (np. bieżąca
konserwacja, odkamienianie), do wykonania których zobowiązany jest Użytkownik we
własnym zakresie.
7. Gwarancją nie są objęte:
a) elementy szkalne (np. dzbanki, talerze), sznury przyłączeniowe do sieci, wtyki, gniazda,
żarówki, noże, elementy eksploatacyjne (np. filtry, worki, misy, blendery, noże, tarki, wirów-
ki, pokrywy, uchwyty noża),
b) uszkodzenia mechaniczne, termiczne, chemiczne i wszystkie inne spowodowane działaniem
bądź zaniechaniem działania przez Użytkownika albo działaniem siły zewnętrznej (przepię-
cia w sieci, wyładowania atmosferyczne, przedmioty obce, które dostały się do wnętrza
sprzętu, korozja, pył, etc.),
c) uszkodzenia wynikłe wskutek:
• samodzielnych napraw
• przeróbek i zmian konstrukcyjnych dokonywanych przez użytkownika lub osoby trzecie
• okoliczności, za które nie odpowiada ani wytwórca ani sprzedawca, a w szczególności na
skutek niewłaściwej lub niezgodnej z instrukcją instalacji, użytkowania, braku dbałości
o sprzęt albo innych przyczyn leżących po stronie użytkownika lub osób trzecich
d) celowe uszkodzenia sprzętu,
e) czynności konserwacyjne, wymiana części posiadających określoną żywotność (bezpieczniki,
żarówki, etc.),
f) czynności przewidzianych w instrukcji obsługi, do wykonania których zobowiązany jest
Użytkownik we własnym zakresie i na własny koszt np. zainstalowanie, sprawdzenie
działania, etc.
8. Towar o wadze do 10 kg Użytkownik dostarcza własnym staraniem do zakładu serwisowego
lub punktu przyjęć.
9. Samowolne zmiany wpisów w karcie gwarancyjnej powodują utratę gwarancji. Karta
gwarancyjna bez wpisanej nazwy urządzenia, typu, nr fabrycznego, dołączonego dowodu
zakupu, wpisania daty sprzedaży oraz czytelnej pieczątki sklepu jest nieważna.
10. W przypadku nieuzasadnionego wezwania serwisu lub wysłania przesyłki, Użytkownik pokry-
wa koszt dojazdu serwisu wg cennika warsztatu serwisowego lub koszt przesyłki.
11. Sprzęt przeznaczony jest wyłącznie do użytku domowego, w przypadku innego użytkowania
traci gwarancję.
12. Gwarancja na sprzedany towar konsumpcyjny nie wyłącza, nie ogranicza ani nie zawiesza
uprawnień kupującego wynikających z niezgodności towaru z umową.
OK4140_ver200.qxp 2007-11-28 11:18 Page 3 (Black plate)

4
NAPRAWA 1 . . . . . . . . . . . . . . . .
Karta gw. nr . . . . . . . . . . . . . . . .
Sprzęt . . . . . . . . . . . . . . . . . . . . .
Typ . . . . . . . . . . . . . . . . . . . . . . .
Data sprzedaży . . . . . . . . . . . . . .
Pieczątka sklepu
Rodzaj naprawy . . . . . . . . . . . . .
. . . . . . . . . . . . . . . . . . . . . . . . . .
Wymienione części . . . . . . . . . . .
. . . . . . . . . . . . . . . . . . . . . . . . . .
NAPRAWA 2 . . . . . . . . . . . . . . . .
Karta gw. nr . . . . . . . . . . . . . . . .
Sprzęt . . . . . . . . . . . . . . . . . . . . .
Typ . . . . . . . . . . . . . . . . . . . . . . .
Data sprzedaży . . . . . . . . . . . . . .
Pieczątka sklepu
Rodzaj naprawy . . . . . . . . . . . . .
. . . . . . . . . . . . . . . . . . . . . . . . . .
Wymienione części . . . . . . . . . . .
. . . . . . . . . . . . . . . . . . . . . . . . . .
NAPRAWA 3 . . . . . . . . . . . . . . . .
Karta gw. nr . . . . . . . . . . . . . . . .
Sprzęt . . . . . . . . . . . . . . . . . . . . .
Typ . . . . . . . . . . . . . . . . . . . . . . .
Data sprzedaży . . . . . . . . . . . . . .
Pieczątka sklepu
Rodzaj naprawy . . . . . . . . . . . . .
. . . . . . . . . . . . . . . . . . . . . . . . . .
Wymienione części . . . . . . . . . . .
. . . . . . . . . . . . . . . . . . . . . . . . . .
NAPRAWA 4 . . . . . . . . . . . . . . . .
Karta gw. nr . . . . . . . . . . . . . . . .
Sprzęt . . . . . . . . . . . . . . . . . . . . .
Typ . . . . . . . . . . . . . . . . . . . . . . .
Data sprzedaży . . . . . . . . . . . . . .
Pieczątka sklepu
Rodzaj naprawy . . . . . . . . . . . . .
. . . . . . . . . . . . . . . . . . . . . . . . . .
Wymienione części . . . . . . . . . . .
. . . . . . . . . . . . . . . . . . . . . . . . . .
Lp. Data zgł. Data wyk. Opis wykonywanych czynności oraz wymienione części Nazwisko montera Pieczątka zakładu
Adnotacje o przebiegu napraw
OK4140_ver200.qxp 2007-11-28 11:18 Page 4 (Black plate)

Uwaga: Przed przystąpieniem do użycia produktu prosimy
uważnie przeczytać niniejszą instrukcję.
Ostrzeżenie na temat bezpieczeństwa
1. Należy upewnić się, że zastosowanie odkurzacza jest
zgodne z opisanym w niniejszej instrukcji; stosować
akcesoria dostarczone przez producenta.
2. Prosimy nie pozostawiać włączonego odkurzacza.
Należy wyłączyć odkurzacz za pomocą dźwigni i wyjąć
wtyczkę zasilania z gniazda sieciowego, gdy odkurzacz
nie jest w użyciu.
3. Prosimy nie ciągnąć kabla zasilającego i nie przenosić
za jego pomocą odkurzacza oraz unikać przycięcia pod-
czas zamykania drzwi; należy również unikać pozostawia-
nia urządzenia na przewodzie zasilającym.
4. Prosimy nie udostępniać urządzenia dzieciom w charak-
terze zabawki i zwrócić szczególną uwagę, gdy pracujące
urządzenie znajduje się w ich pobliżu.
5. Prosimy nie korzystać z urządzenia w przypadku, gdy
kabel zasilający lub wtyczka są uszkodzone. Należy
odesłać urządzenie do wyznaczonego centrum ser-
wisowego. Prosimy nie odłączać urządzenia poprzez
pociąganie za kabel lub wtyczkę. W celu odłączenia
urządzenia należy chwycić wtyczkę, nie przewód.
6. Nigdy nie należy ciągnąć na wtyczkę zasilającą lub
korzystać z urządzenia, gdy ma się mokre ręce.
7. Podczas korzystania z urządzenia, należy uważać, aby
kłęby włosów lub inne odpadki nie zatkały wlotu powietrza
(włączając w to przewód), w przeciwnym razie może
dojść do uszkodzenia silnika urządzenia lub innych
urządzeń domowych. W przypadku, gdy wystąpi taka
sytuacja, należy zatrzymać urządzenie czyszczące
poprzez wyjęcie wtyczki z gniazda zasilającego i usunąć
zator.
8. Podczas korzystania z urządzenia, nie zatykać wylotu
powietrza ręcznikiem lub innymi sposobami, w przeci-
wnym razie wydajność pochłaniania kurzu zmniejszy się
oraz powstanie ryzyko spalenia silnika urządzenia.
9. Nigdy nie należy korzystać z urządzenia na nierównej
podłodze lub podłożu oraz należy zachować szczególną
uwagę podczas czyszczenia schodów, aby uniknąć
upuszczenia urządzenia.
10. Nie wolno zasysać tlących się niedopałków, w przeciwnym
razie silnik może zostać uszkodzony.
11. Urządzenie należy przechowywać z dala od źródeł ciepła
(takich jak centralne ogrzewanie, piecyk itd.) w celu
uniknięcia odkształcenia się plastikowych elementów
i konsekwencji takiego odkształcenia.
12. Przed przystąpieniem do korzystania z urządzenia,
prosimy usunąć duże i ostre przedmioty z podłogi w celu
uniknięcia uszkodzenia plastikowych części, powłoki fil-
tra lub silnika.
13. Pod żadnym pozorem nie wolno za pomocą tego
urządzenia zasysać wody lub innych płynów, w przeciwnym
razie spowoduje to uszkodzenie silnika.
Instrukcja obsługi
Odkurzacz bezworkowy OK-4140 Multi Cyclon
5
PL
1
2
3
5
6
7
8
9
10
11
12
4
OK4140_ver200.qxp 2007-11-28 11:18 Page 5 (Black plate)

6
1. Wtyczka zasilania
2. Dźwignia zwijania kabla zasilającego
3. Cyklonowy zbiornik na kurz
4. Przycisk odblokowujący zbiornik na kurz
5. Elastyczny wąż
6. Wspornik na akcesoria
7. Uchwyt
8. Suwak regulacji siły ssania
9. Chromowana rura teleskopowa
10. Dźwignia włączenia urządzenia
11. Kratka wylotu powietrza
12. Głowica dywanowo-podłogowa
Akcesoria:
1. Wąska ssawka
2. Szczotka kombinowana
Instrukcja montażu
1. Przed przystąpieniem do montażu urządzenia, prosimy
upewnić się, że wszystkie elementy urządzenia zostały
dostarczone zgodnie z listą części i komponentów.
2. Prosimy pamiętać o odłączeniu zasilania przed montażem.
Montaż rury
Jak pokazano na rysunku (3), wsadzić rurę do otworu wlo-
towego obudowy urządzenia w pozycji poziomej. Prosimy
zwrócić uwagę na dopasowanie obu części.
Po dociśnięciu rury, przekręcić ją w prawo do momentu
usłyszenia odgłosu wyzwolenia zatrzasku, który sygnalizuje
prawidłowe zamocowanie rury.
Montaż i demontaż zbiornika na kurz
Jak pokazano na rysunku (4), umieścić podstawę zbiornika
na kurz na wystającej części z przodu urządzenia
i docisnąć go. W momencie, gdy haczyk z przodu
zostanie do końca wprowadzony do odpowiedniego
otworu, odgłos wyzwolonego zatrzasku zasygnalizuje
właściwe umieszczenie zbiornika. W celu usunięcia
zbiornika na kurz, należy nacisnąć przycisk odblokowujący
zbiornik na kurz znajdujący sie na uchwycie zbiornika.
Montaż akcesoriów:
1. Rysunek (5) przedstawia wspornik na akcesoria. Należy
umieścić szczotkę kombinowaną i płaską ssawkę
w odpowiednich uchwytach zgodnie ze wskazówkami
umieszczonymi na wsporniku.
Montaż rury teleskopowej i szczotki podłogowej
Nałożyć końcówkę uchwytu rury na rurę teleskopową jak
pokazano na rysunku (6); następnie wsunąć drugi koniec
rury teleskopowej do otworu w szczotce i dopasować
odpowiedni kierunek. W tym momencie montaż całego
urządzenia jest ukończony.
Jak uruchomić urządzenie
1. Najpierw należy wyciągnąć kabel zasilania do odpowiedniej
długości; włożyć wtyczkę do gniazdka sieciowego
i nacisnąć palcem lub stopą dźwignię włączania; w ten
sposób można włączać i wyłączać urządzenie.
2. Żółty znak na przewodzie oznacza jego pożądaną
długość. Nigdy nie należy wyciągać przewodu poza czer-
wony znak.
Kontrola siły ssania
Rys. 3
Rys. 4
Rys. 5
Rys. 6
Rys. 7
OK4140_ver200.qxp 2007-11-28 11:18 Page 6 (Black plate)

W przypadku, gdy otwór ssący został zatkany materiałem,
ponieważ siła ssąca była zbyt duża, można ją dopasować
poprzez przesunięcie suwaka znajdującego się na uchwycie
rury, jak pokazano na rysunku (7).
Urządzenia chroniące silnik
1. Urządzenie jest wyposażone w czujnik kontroli temperatury
sinika, który może automatycznie odciąć źródło zasilania
chroniąc silnik przed przegrzaniem. W przypadku, gdy
rura wlotu lub wylotu powietrza jest przepełniona lub
zablokowana, podnosi się temperatura silnika, a wtedy
czujnik temperatury odcina automatycznie zasilanie
umożliwiając ochłodzenie silnika i zapobiegając tym samym
uszkodzeniu urządzenia czyszczącego.
2. W przypadku, gdy czujnik temperatury jest odłączony,
należy natychmiast wyłączyć urządzenie i odłączyć kabel
zasilający. Ochłodzić urządzenie, sprawdzić i usunąć
kłęby włosów i innych odpadów, które blokują przepływ
powietrza (włączając w to rurę i końcówkę) oraz wymienić
filtr HEPA lub powłokę filtra jeśli to konieczne.
3. Po ochłodzeniu silnika przez ok. 30 min., należy wsadzić
wtyczkę do gniazda zasilania i sprawdzić czy czujnik tem-
peratury zresetował się. W przypadku, gdy nie zostało
odłączone zasilanie, czujnik temperatury nie wyzeruje się
nawet w przypadku, gdy silnik ochłodzi się.
Konserwacja urządzenia czyszczącego
1. Wszystkie czynność obsługowe i naprawy powinny być
wykonywane po odłączeniu urządzenia z zasilania.
2. Należy często usuwać zanieczyszczenia ze zbiornika na
kurz w celu uniknięcia nieprawidłowej pracy urządzenia.
3. Nigdy nie należy przecierać powierzchni urządzenia ben-
zyną lub oleistym płynem. Należy to robić z wykorzys-
taniem wody i neutralnego detergentu.
Uwaga: Należy się upewnić, że szmatka, która ma
posłużyć do przetarcia urządzenia jest sucha; pod
żadnym pozorem nie można dopuścić, aby woda prze-
dostała się do elektrycznych elementów urządzenia.
4. Podczas przechowywania, urządzenie nie powinno znaj-
dować się w wilgotnym miejscu oraz być wystawione na
bezpośrednie działanie promieni słonecznych.
Przechowywanie urządzenia czyszczącego
1. Po ukończeniu pracy z urządzeniem, należy je wyłączyć,
wyjąć wtyczkę ze źródła zasilania, a następnie całkowicie
zwinąć kabel zasilający poprzez przyciśnięcie dźwigni
zwijania. Zawiesić szczotkę podłogową na uchwycie.
2. Umieścić urządzenie w suchym pomieszczeniu.
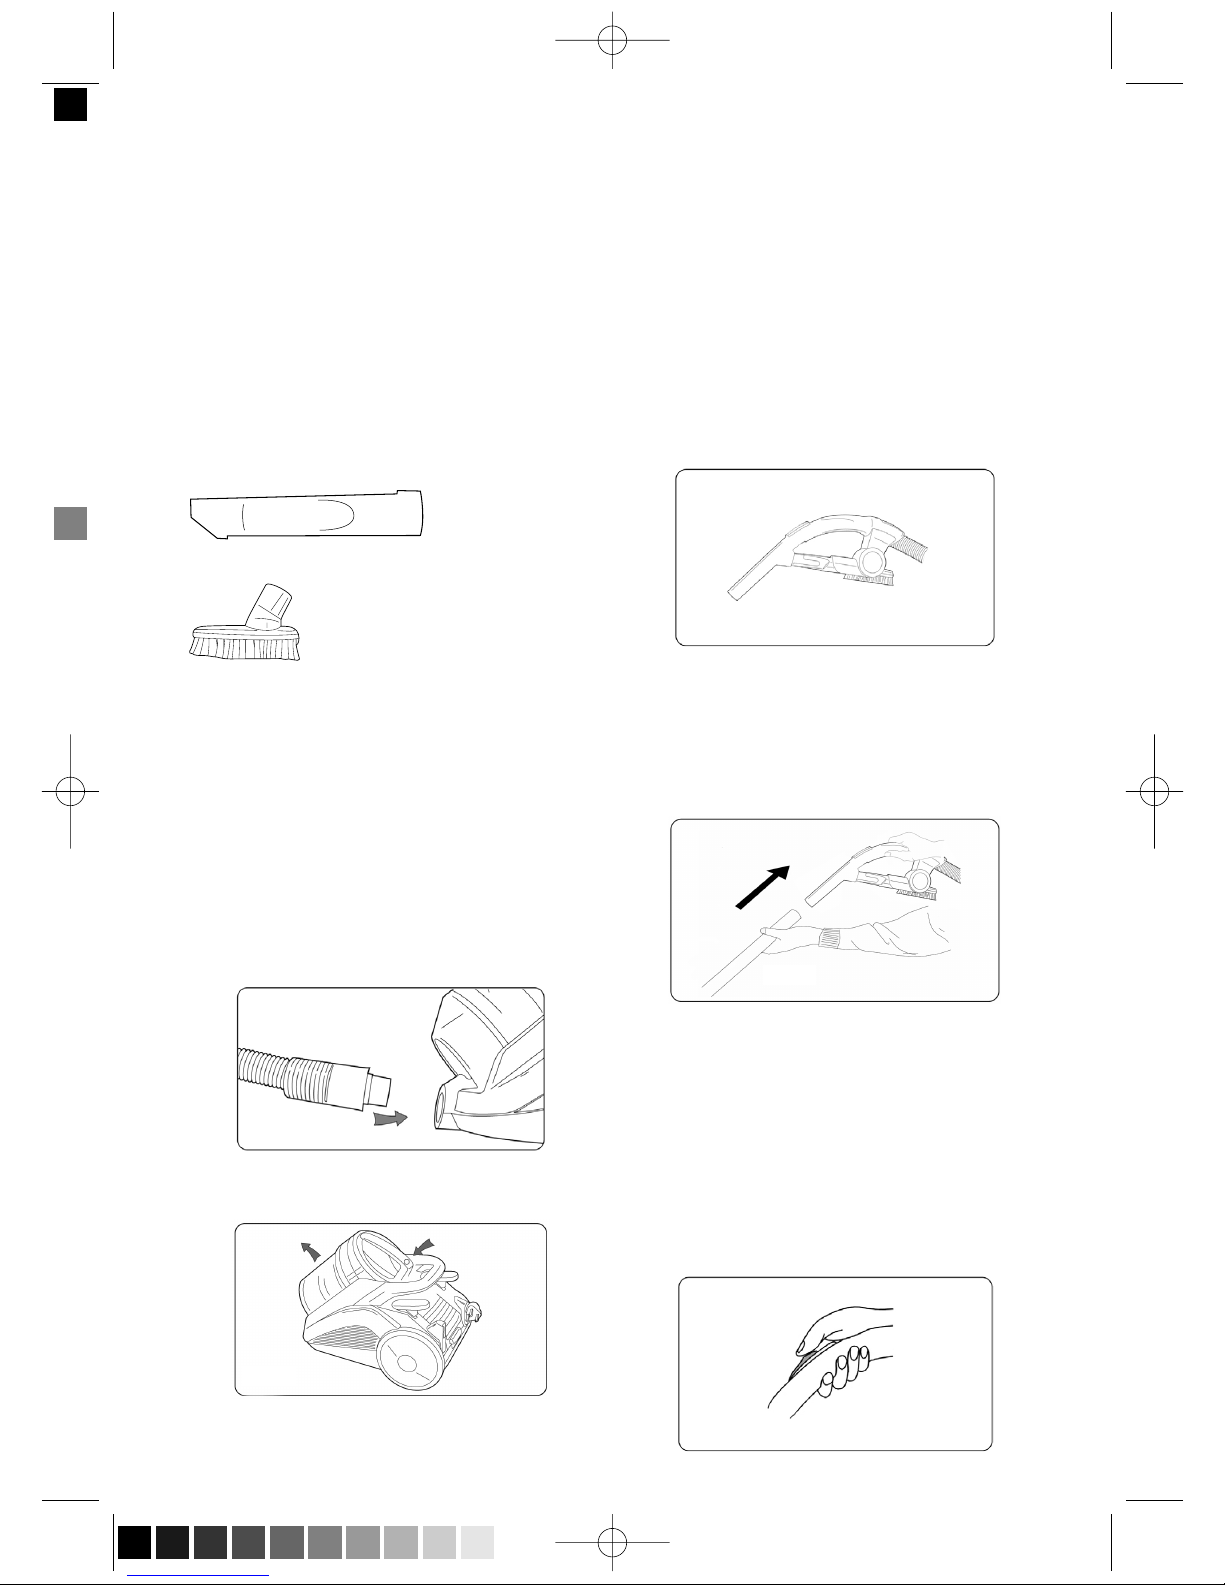
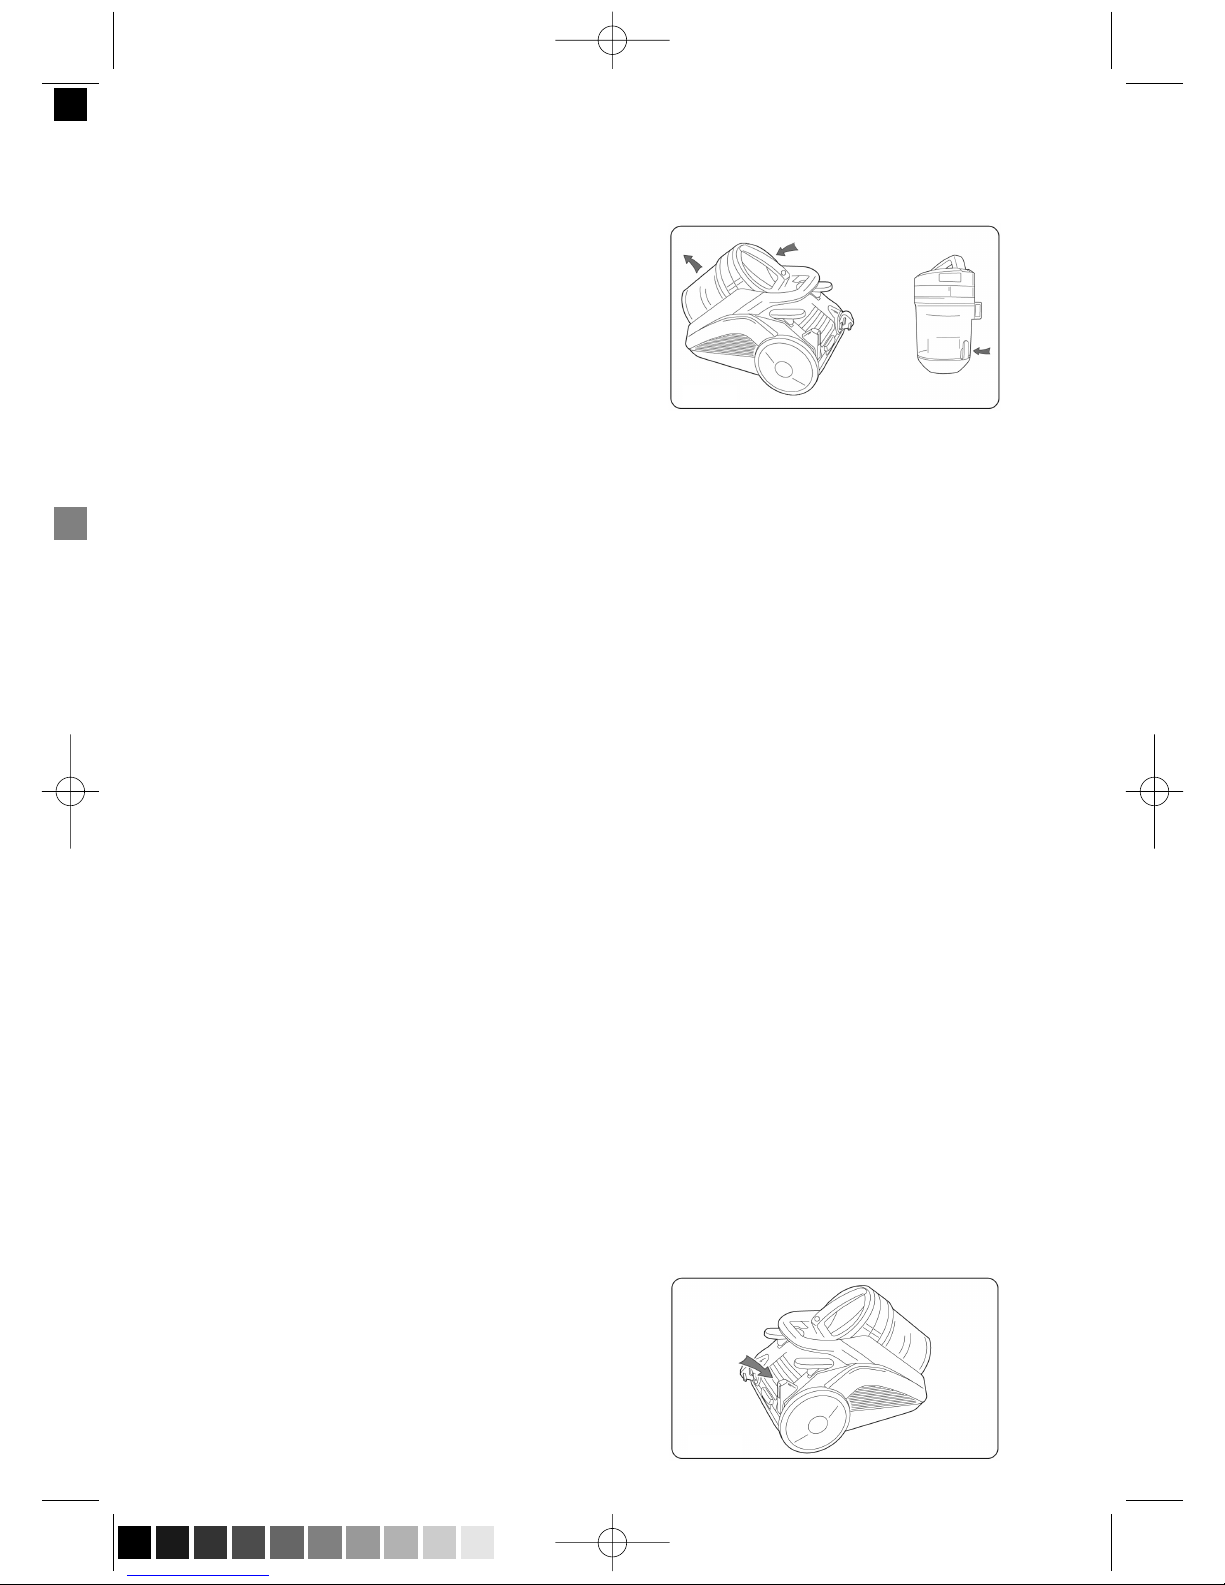
Czyszczenie zbiornika na kurz
Należy często usuwać zanieczyszczenia z pojemnika na
kurz w celu uniknięcia uszkodzenia urządzenia.
1. Zbiornik na kurz czyścić tylko wtedy, gdy kabel zasilający
urządzenia jest odłączony.
2. Umieścić zbiornik na kurz nad koszem (workiem na śmieci)
i nacisnąć przycisk zwalniający pojemnika. Dno zbiornika
automatycznie rozłączy się i zbiornik zostanie opróżniony
tak jak pokazano na rysunku (8).
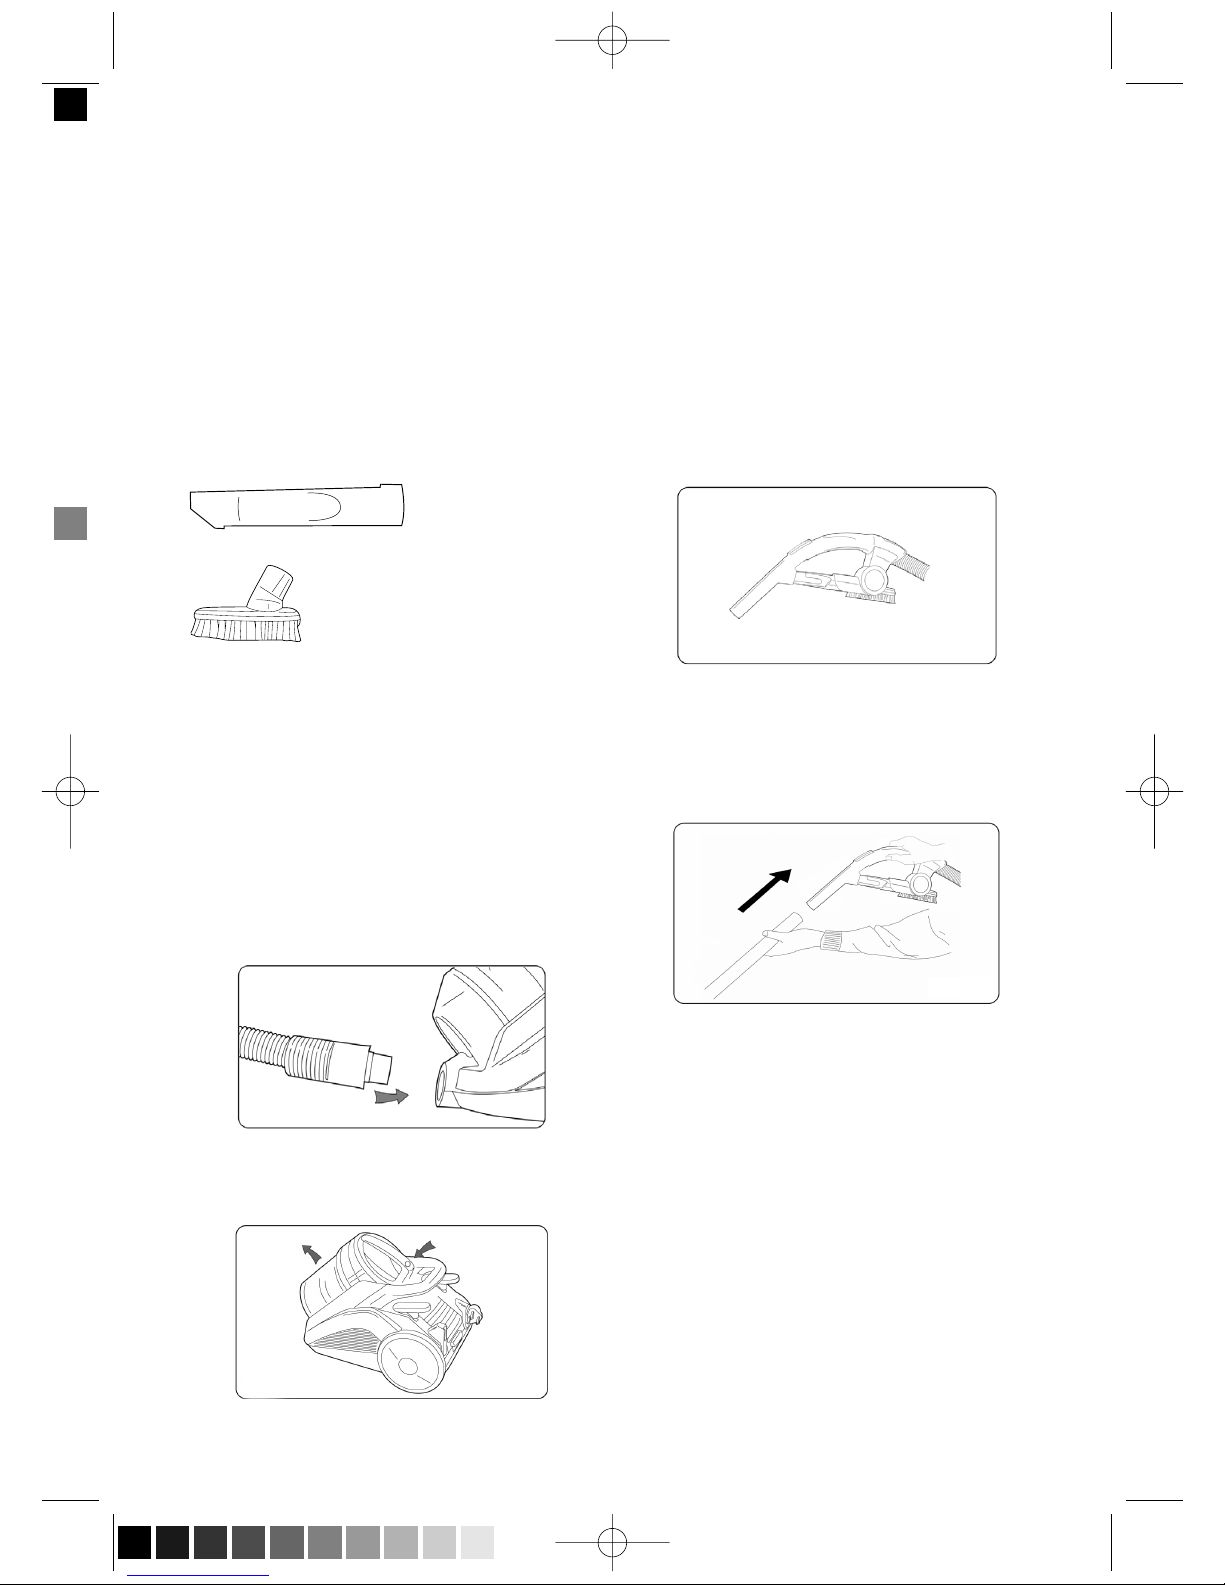
Czyszczenie filtra przedniego silnika
Ostrzeżenie: Przed przystąpieniem do wykonywania podanych
poniżej czynności prosimy upewnić się, że urządzenie jest
wyłączone:
1. Wyjąć wtyczkę kabla zasilającego z gniazdka sieciowego.
2. Nacisnąć w dół uchwyt zbiornika na kurz w celu usunię-
cia zbiornika i zdjąć zewnętrzną pokrywę przedniego fil-
tra silnika. Następnie wyczyścić filtr silnika szczotką
(gąbkę i powłokę kompozytową filtra) lub pod strumie-
niem wody.
Uwaga:
Zjawiskiem normalnym jest zmiana koloru środkowego,
białego filtra znajdującego się w zbiorniku na kurz i nie
wpływa to na jego wydajność filtrowania. W przypadku, gdy
otwór lub filtr nie dają się łatwo oczyścić, zalecamy przemyć
je wodą; jednakże, prosimy upewnić się, że elementy zostały
pozostawione co najmniej na 24 h w suchym miejscu przed
przystąpieniem do ponownego użycia.
Kluczowe uwagi
Prosimy zapamiętać: w przypadku, gdy zbiornik zbierający
kurz lub pokrywa filtra nie są właściwie zamocowane,
funkcjonowanie urządzenia będzie niewłaściwe i urządze-
nie będzie pozbawione zdolności pochłaniania kurzu.
Uwaga: dbać o to, aby droga przelotowa nie była zatkana,
w przeciwnym razie silnik może zostać uszkodzony lub prze-
grzany.
Wymiana tylniego filtra silnika
Tylni filtr silnika jest zainstalowany za siatką wylotu powietrza
i nie może być myty ze względu na materiały zastosowane
do jego produkcji. W przypadku, gdy powierzchnia jest
poważnie zatkana kurzem, filtr powinien zostać wymieniony
na nowy w celu zapewnienia wystarczającej siły ssącej.
Rys. 8
Rys. 9
7
OK4140_ver200.qxp 2007-11-28 11:18 Page 7 (Black plate)

8
Zazwyczaj konieczność czyszczenia i wymiany filtrów silnika
jest konieczna po okresie 6-12 miesięcy użytkowania.
Prosimy pamiętać, aby upewnić się, że wszystkie filtry
zostały właściwie zainstalowane do urządzenia przed
ponownym włączeniem.
Kluczowe uwagi
Urządzenie musi zostać odłączone z zasilania przed
przystąpieniem do wymiany filtrów!
Uszkodzenia i naprawa
W przypadku niewłaściwego funkcjonowania produktu
prosimy postępować w sposób opisany poniżej; w przypad-
ku, gdy urządzenie czyszczące w dalszym ciągu nie pracuje
właściwie, prosimy skontaktować się z punktem, w którym
dokonano zakupu urządzenia lub z autoryzowanym punktem
serwisowym.
Serwis posprzedażowy
W przypadku wystąpienia nieoczekiwanych problemów lub
usterek podczas korzystania z urządzenia, prosimy skontak-
tować się z określonym punktem serwisowym w celu kon-
sultacji i naprawy.
Parametry techniczne:
Zasilanie: 1400W 220-240V 50Hz
Przewód zasilający: 7,5 m
Poziom hałasu: 77dB/A/
Waga: 7,2 kg
Wymiary: 29cm x 34cm x 48cm
Przyczyna Działanie
Urządzenie nie włącza się 1. Sprawdzić czy wtyczka zasilająca jest właściwie włożona;
Wyciągnąć wtyczkę i włożyć ponownie do gniazda zasila-
nia;
2. Sprawdzić czy w gniazdku jest zasilanie;
3. Sprawdzić czy przełącznik na urządzeniu znajduje się
w pozycji “ON”
Siła ssania jest zmniejszona 1. Sprawdzić czy szczotka podłogowa, otwór lub rura są
zatkane i natychmiast usunąć zator;
2. Sprawdzić czy powłoka filtra wlotu powietrza nie jest
zakurzona; często usuwać śmieci lub wymieniać filtry
wlotu i wylotu powietrza HEPA (lub powłoki);
Odgłos pracy silnika odbiega od odgłosu właściwej pracy 1. Natychmiast zatrzymać pracę urządzenia;
2. Sprawdzić czy szczotka podłogowa, otwór lub rura jest
zatkana i usunąć natychmiast zator;
Ekologia – Ochrona Środowiska
Symbol „przekreślonego pojemnika na śmieci”
umieszczony na sprzęcie elektrycznym lub opako-
waniu wskazuje na to, że urządzenie nie może być
traktowane jako ogólny odpad domowy i nie powinno być
wyrzucane do przeznaczonych do tego celu pojemników.
Niepotrzebne lub zużyte urządzenie elektryczne powinno
być dostarczone do specjalnie wyznaczonych do tego celu
punktów zbiorczych, zorganizowanych przez lokalną admini-
strację publiczną, przewidzianych do zdawania elektrycznego
sprzętu podlegającego utylizacji.
W ten sposób każde gospodarstwo domowe przyczynia się
do zmniejszenia ewentualnych negatywnych skutków wpły-
wających na środowisko naturalne oraz pozwala odzyskać
materiały z których składa się produkt.
Waga: 7,2kg e
OK4140_ver200.qxp 2007-11-28 11:18 Page 8 (Black plate)

OPERATING INSTRUCTIONS
OK-4140 Multi Cyclon
9
UK
Caution: Please read this manual carefully before using
this product
Safety Warning
1. Be sure to use the cleaner in compliance with the con-
tents of this manual, and use the fittings designated by
the manufacturer.
2. Please do not leave the cleaner when it is powered on.
Turn off the power switch and pull out the power plug
when not using or before maintenance.
3. Please do not pull or carry the cleaner by the power
cord, or nip it when closing a door; keep the cord free
from the press of the cleaner.
4. Please do not let children take the cleaner as a toy, and
close attention is necessary when the cleaner
approaches children.
5. Please do not use the cleaner when its power cord or
plug is damaged. Send it to the appointed service cen-
ter. Please do not unplug by pulling the cord or plug. To
unplug, grasp the plug, not the cord.
6. Never pull the power plug or use the cleaner with wet
hands.
7. When using the cleaner, pay attention to prevent any
hair roll or other rubbish block up the air inlet (including
the hose and the spile), otherwise motor failure and
housing distortion may be caused. If the matters
absorbed in forms a blockage, stop the cleaner by
pulling out the power plug immediately to clean the
blockage.
8. When using the cleaner, don’t plug up the air outlet by
towel or other matters, otherwise the efficiency of dust
absorbance will be influenced, and the motor will be at
high risk of being burnt out.
9. Never use the cleaner at uneven floor or ground; and be
very careful when cleaning stairs to prevent the cleaner
from falling down.
10. Never absorb live stumps with the cleaner, otherwise
the motor may be damaged.
11. The cleaner should be kept far away from heat sources
(such as central heating, oven, etc) to avoid the distor-
tion of plastic parts as well as the influence caused by
such distortion.
12.Before using the cleaner, please remove big and sharp
matters on the floor to avoid damaging the plastic parts,
filter gauzes and motor.
13. Never absorb water or other liquid with this cleaner,
otherwise, the motor will be damaged.
1
2
3
5
6
7
8
9
10
11
12
4
OK4140_ver200.qxp 2007-11-28 11:18 Page 9 (Black plate)

10
1. Power plug
2. Cord reeling pedal
3. Cyclone dust barrel
4. Dirt container release button
5. Hose
6. Accessory bracket
7. Handle
8. Air escape pushbutton
9. Metal telescopic tube
10. Switch Pedal
11. Air outlet grid
12. Ordinary floor brush
Accessories:
1. Flat nozzle
2. Combination brush
1. Before assembling the cleaner, please confirm all parts
and components for the cleaner are received by referring
to Parts and Components List.
2. Please remember to cut off the power supply before
assembly.
Assembly of hose
As is shown in Figure (3), insert the hose into the duct inlet
of the machine body in horizontal direction. Please pay
attention to the alignment of two projecting parts. Turn the
hose right when it is pushed into the bottom, a click of
inserting sound may be heard, i.e. the hose is assembled
into the machine body completely.
Assembly and Removal of dust barrel
As is shown in Figure (4), place the bottom of the dust
barrel on the projecting part at the front end of the machine
body, and press down the dust barrel. When the front-end
hook is entered into the corresponding part of the machine
body completely, and a click of inserting sound is heard,
which indicate that the dust barrel is assembled in place.
To remove the dirt container, press the dirt container
release button and lift the dust container up and out of the
appliance using the handle.
Assembly of accessories
1. Figure (5) is the accessory bracket. Get the flat nozzle
and the combination brush stuck in the corresponding
clips according to the accessory installation indication
shown on the accessory bracket.
Assembly of metal extension pipe and floor brush
Insert the front end of the hose handle into the metal exten-
sion pipe according to Figure (6); then insert the other end
of the metal extension pipe into the rounded inlet of the
floor brush, and adjust to the proper direction. At this time,
the assembly of the whole machine is completed.
How to start
1. First of all, pull out the power cord from the cord reel to
the needed length; insert the power cord plug into the
power socket, and press down the power switch button
with finger or step on it with foot; then you can control the
start and stop of the cleaner.
2. The yellow mark on the power cord indicates its desired
length. Never pull out the power cord to the length
exceeding the red mark.
Control of suction force
When the suction inlet is jammed by some cloth due to the
over-large suction force, you can adjust the air escape push-
button on the hose handle to control the suction force at the
suction inlet, as is shown in Figure (7).
Figure (3)
Figure (4)
Figure (5)
Figure (6)
OK4140_ver200.qxp 2007-11-28 11:18 Page 10 (Black plate)

Protective devices of motor
1. There is a temperature controller designed in the body
of cleaner motor, which can automatically cut off the
power supply of motor to prevent overheating. When the
air-inlet or air-outlet pipe is overloaded or blocked, the
temperature of motor rises, then the temperature con-
troller cuts off the power supply of motor automatically
to make the motor cool, preventing the cleaner from
being damaged.
2. If the temperature controller is cut off, stop the cleaner
immediately and pull out the power plug to make the
cleaner cool, and check and remove the hair roll or
other roll-like rubbish blocking the air inlet (including the
hose and the spile), and replace the filter HEPA or filter
gauze when necessary.
3. After cooling the motor for 30mins, plug in the power
plug and check whether the temperature controller has
been reset. If the power supply of the cleaner hasn’t
been cut off, the temperature controller of the motor
won’t be reset even when the motor has become cool.
Maintenance of the Cleaner
1. All the day-to-day maintenance and repair jobs should
be done after the power plug has been pulled out.
2. Frequently remove the rubbish from the dust barrel, so
as to avoid the failure of the cleaner.
3. Never wipe the surface of the cleaner with gasoline or
oily liquid. Wipe it with water or neutral detergent.
Caution: be sure to wring out the wiping cloth dry for
wiping, it is prohibited for water to infiltrate into electrical
elements of the cleaner.
4. When the cleaner is placed idle not in use, it should not
be put directly in the sun or in a damp place.
Storage of the Cleaner
1. Upon the completion of the operation of the cleaner, turn
off its power supply, and pull the power plug out of the
power socket, then step on the cord reeling button to reel
in the power cord fully. Hang the floor brush onto the floor
brush hook.
2. Place the cleaner in the dry indoor environment.
Cleaning of the Dust Barrel
Remove the rubbish in the dust barrel frequently to avoid
the failure of the cleaner.
1. Clean the dust barrel only after the power plug of the
cleaner has been pulled out;
2. Put the dust barrel over the rubbish bin (bag), press down
the releasing button of the dust barrel, the bottom cover
of the dust barrel will automatically fall down, and clear
and empty the dust barrel, as is shown in Figure (8).
Cleaning of front filter for motor:
Warning: please make sure the power supply of the clean-
er has been cut off before carrying out the following steps:
1. Pull out the power cord plug of the cleaner from the
power socket.
2. Press down the handle of the dust barrel to remove the
dust barrel, and remove the cover of the front filter for
motor, and then use the brush to clean the filter (sponge
and filter gauze with composite coating) or place it
under the cock to clean.
Caution:
It is normal that the white central filter in the dust barrel
may change color, which cannot affect its filtration
performance. If the hose and the central filter are difficult
to clean, we recommend that you use water to flush them;
however, please be sure to place them in the dry air for at
least 24 hours after they are flushed by water.
Key Points:
Please note: when the dust collecting barrel or the filter
cover is not installed in place, the operation status will be
invalid, and the cleaner will have no dust absorption capacity.
At this time, you need to check carefully whether the dust
collecting barrel and the filter cover have been installed in
place.
Caution: please keep the suction passage unobstructed,
otherwise the motor may become overheating or even be
damaged.
Replacement of rear filter for motor
The rear filter for motor is installed behind the air outlet
grid, which cannot be washed due to the materials used.
When the surface is jammed seriously by dust, the filter
should be replaced by a new one to maintain enough
suction force. (Figure 9).
Figure (8)
Figure (9)
11
Figure (7)
OK4140_ver200.qxp 2007-11-28 11:18 Page 11 (Black plate)

12
It is usually necessary to clean and replace the filters for
motor only after they have been used for 6 months to 12
months. Please remember to confirm that all filters have
been correctly installed into the machine before turning on
the cleaner to use.
Key Points:
The power supply of the cleaner must be cut off before
replacing any filter!
Faults and repair
In case of abnormality with this product, please treat it in
the way as stated hereinafter; if the cleaner still refuses to
work normally, please contact the stop from where this
product was bought or with the appointed service point.
After-sale service
When abnormalities or problems are found with the product
in use, please contact the appointed service point for con-
sultation or repair.
Technical parameters:
Power: 1400W 220-240V 50Hz
Power Cable Length: 7.5m
Noise level: 77dB/A/
Weight: 7.20kg
Dimensions (depth x height x width): 29cm x 34cm x 48cm
Fault Treatment
The cleaner cannot operate 1. Check whether the power plug is inserted securely;
pull out the plug and then reinsert it in the power socket;
2. Check whether the power socket is electrified;
3. Check whether the switch of the cleaner is in “ON” posi-
tion.
The suction force is reduced 1. Check whether the floor brush, the hose and the spile
are jammed, and remove any blockage immediately;
2. Check whether the air-inlet filter gauze is dusty;
frequently clean rubbish or replace air-inlet and air-out-
let HEPA (or filter gauze);
There is abnormal sound when the motor is under operation 1. Stop the cleaner immediately;
2. Check whether the floor brush, the hose and the spile
are jammed, and remove any blockage immediately
Ecology – Environmental Protection
The “crossed-out trash bin” symbol on electrical
equipment or packaging indicates that the device
cannot be treated as general household waste
and should not be disposed of into containers for such
waste.
Obsolete or broken-down electrical device should be
delivered to special designated collection points, organized
by local public administration, whose purpose is to collect
recyclable electrical equipment.
This way, each household helps reduce possible negative
effects influencing natural environment and allows the rec-
laiming of materials which the product is made of.
Weight: 7,20kg e
OK4140_ver200.qxp 2007-11-28 11:18 Page 12 (Black plate)

Hinweis: Vor dem Gebrauch des Produktes bitten wir
aufmerksam die vorliegende Anleitung durchzulesen!
Warnung zum Thema Sicherheit
1. Es ist sich davon zu überzeugen, dass die Anwendung
des Staubsaugers gemäß der Beschreibung in der vor-
liegenden Anleitung erfolgt und nur das vom Hersteller
gelieferte Zubehör verwendet wird.
2. Den Staubsauger nicht eingeschaltet zurücklassen. Der
Staubsauger ist mit Hilfe eines Hebels auszuschalten
und den Stecker aus der Netzsteckdose zu ziehen,
wenn der Staubsauger nicht mehr gebraucht wird.
3. Wir bitten Sie, nicht am Stromversorgungskabel zu
ziehen, den Staubsauger nicht mit seiner Hilfe zu tragen
und Knickstellen beim Schließen der Türen zu vermei-
den; das Abstellen des Gerätes auf der Stromver-
sorgungsleitung ist ebenfalls zu vermeiden.
4. Das Gerät darf für Kinder im Charakter eines Spielzeugs
nicht zugänglich sein. Des weiteren ist besondere
Aufmerksamkeit geboten, wenn der Staubsauger in
ihrer Nähe arbeitet.
5. Wir bitten Sie das Gerät nicht zu benutzen, wenn das
Stromversorgungskabel oder der Stecker beschädigt
sind. Das Gerät ist dann einer dafür bestimmten
Servicewerkstatt zu übergeben. Das Abschalten des
Gerätes darf nicht durch Ziehen am Kabel oder Stecker
erfolgen. Zwecks Abschaltung des Gerätes ist stets der
Stecker zu ergreifen und nicht die Leitung.
6. Am Netzstecker nicht mit nassen Händen ziehen bzw.
dann auch nicht das Gerät benutzen.
7. Während der Nutzung des Gerätes ist darauf zu achten,
dass keine Haarknäuel oder andere Abfälle den
Lufteinlass verstopfen (die Leitung und Öffnung mit ein-
bezogen), andererseits kann es sonst zu einer
Beschädigung des Gerätemotors oder anderer
Haushaltsgeräte kommen. Wenn eine solche Situation
auftritt, ist das Reinigungsgerät durch Herausziehen
des Steckers aus der Netzsteckdose anzuhalten und
der Stau zu beseitigen.
8. Während der Nutzung des Gerätes ist der Luftaustritt
nicht mit einem Handtuch oder anderen Methoden zu
verstopfen; andererseits verringert sich die Saugleistung
und es erhöht sich das Risiko eines Motorbrandes des
Gerätes.
9. Auf unebenen Boden oder Untergrund ist das Gerät
nicht zu benutzen und während der Treppenreinigung
ist besonders darauf zu achten, dass das Gerät nicht
fallen gelassen wird.
10. Es ist verboten, glimmende Zigarettenstummel aufzusaugen,
da sonst der Motor beschädigt werden kann.
11. Das Gerät ist weit entfernt von Wärmequellen aufzube-
wahren (und zwar solchen wie Zentralheizung, Ofen
usw.), um Verformungen der Kunststoffelemente und
die Konsequenzen einer solchen Verformung zu vermei-
den.
12. Vor Beginn des Staubsaugens bitten wir scharfe und
große Gegenstände von Fußboden zu entfernen, um
Beschädigungen der Kunststoffteile, der Filterbeläge
und des Motors zu vermeiden.
13. Unter keinen Umständen dürfen mit diesem Gerät
Wasser oder andere Flüssigkeiten aufgesaugt werden,
andererseits führt das zu einer Beschädigung des
Motors.
Bedienanleitung
Staubsauger ohne Beutel OK-4140 Multi Cyclon D
13
1
2
3
5
6
7
8
9
10
11
12
4
OK4140_ver200.qxp 2007-11-28 11:18 Page 13 (Black plate)

14
Bezeichnung der Teile und Komponenten
1. Netzstecker
2. Hebel zum Aufwickeln des Stromversorgungskabels
3. Zyklonbehälter für den Staub
4. Entriegelungstaste für Staubbehälter
5. Elastischer Schlauch
6. Zubehörkonsole
7. Griff
8. Schieber zur Regelung der Saugkraft
9. Verchromtes Teleskop-Saugrohr
10. Hebel zum Einschalten des Gerätes
11. Gitter des Luftaustritts
12. Teppich- und Fußbodenaufsatz
Zubehör:
1. Fugendüse
2. Kombinierte Hartbodendüse mit Bürsten
Montageanleitung
1. Vor Beginn der Montage des Gerätes bitten wir Sie, sich
zu vergewissern, dass alle Elemente des Gerätes
gemäß der Teile- und Komponentenliste angeliefert wur-
den.
2. Wir bitten daran zu denken, dass vor der Montage das
Stromversorgungsnetz abgeschaltet wird.
Montage des Saugrohres
Wie in der Abbildung (3) gezeigt wird, wird das Saugrohr in
die Sauganschlussöffnung des Gehäuses des Gerätes in
horizontaler Lage eingesetzt. Bitte achten Sie auf die
Anpassung beider Teile. Nach dem Andrücken des Rohres
ist es nach rechts zu drehen bis zu dem Moment, wo der
Schnappverschluss ein deutliches Geräusch freigibt, welch-
es das richtige Befestigen des Saugrohres signalisiert.
Montage und Demontage des Staubbehälters
Nach Abbildung (4) wird die Bodenplatte des Staubbehälters
auf den herausstehenden Teil, vorn am Gerät, gestellt und
auf den Behälter gedrückt. In dem Moment, wenn der
vordere Haken bis zum Ende in die entsprechende Öffnung
geführt wurde, signalisiert das durch den Schnappverschluss
ausgelöste Geräusch die richtige Anordnung des Behälters.
Zum Entfernen des Staubbehälters drücken Sie die
Entriegelungstaste für den Staubbehälter und heben Sie
den Staubbehälter am Griff nach oben aus dem Gerät.
Montage des Zubehörs:
1. Abbildung (5) stellt eine Zubehörkonsole dar. Die kom-
binierte Hartbodendüse mit Bürsten und die Fugendüse
sind in den entsprechenden Halterungen gemäß den
Anzeigen auf der Konsole unterzubringen.
Montage des Teleskoprohres und der Fußbodenbürste
Das Ende der Rohrhalterung ist, wie in der Abbildung (6)
gezeigt wird, auf das Teleskop- Saugrohr stecken; danach
ist das andere Ende des Teleskop-Saugrohres in die Öff-
nung in der Bürste zu schieben und die entsprechende
Richtung anzupassen. In diesem Moment ist die Montage
des gesamten Staubsaugers beendet.
Inbetriebnahme des Gerätes
1. Zuerst muss man das Stromversorgungskabel bis auf
die entsprechende Länge herausziehen, den Stecker in
die Netzsteckdose stecken und mit dem Finger oder der
Fußsohle den Einschalthebel drücken; auf diese Art und
Weise kann man das Gerät ein- und ausschalten.
2. Das gelbe Zeichen auf der Leitung bedeutet ihre gewün-
schte Länge. Die Leitung ist niemals bis außerhalb des
roten Zeichens herauszuziehen.
Kontrolle der Saugkraft
In dem Fall, wenn die Saugöffnung durch Material verstopft
wurde, weil die Saugkraft ziemlich hoch war, kann man sie
durch Betätigen des Schiebers, der sich an der Rohrhalterung
befindet, anpassen, wie in der Abbildung gezeigt wird (7).
Abbildung (3)
Abbildung (4)
Abbildung (5)
Abbildung (6)
OK4140_ver200.qxp 2007-11-28 11:18 Page 14 (Black plate)

15
Schutzeinrichtungen für den Motor
1. Der Staubsauger ist mit einem Messfühler für die
Kontrolle der Temperatur des Motors ausgerüstet, der
die Stromversorgung bei einer Überhitzung des Motors
automatisch abtrennt. In dem Fall, wenn das Rohr des
Luftein- und auslasses überfüllt oder blockiert ist, dann
erhöht sich die Temperatur des Motors und der
Temperaturmessfühler trennt automatisch die
Stromversorgung ab, wodurch die Kühlung des Motors
ermöglicht wird und man dadurch einer Beschädigung
des Reinigungsgerätes vorbeugt.
2. Wenn der Temperaturmessfühler abgeschaltet ist,
muss man auch sofort das Gerät ausschalten und vom
Stromversorgungskabel trennen. Danach ist das Gerät
zu kühlen, auf Haarknäuel und andere Abfälle zu über-
prüfen und sie ggfs. zu beseitigen, da sie den Luftstrom
blockieren (Saugrohr und Endstück mit einbeziehen).
Ebenso sind der Filter HEPA oder der Filterbelag auszu-
tauschen, insofern das notwendig ist.
3. Nach dem der Motor sich ca. 30 Min. abkühlte, ist der
Stecker in die Netzsteckdose zu stecken und zu über-
prüfen, ob der Temperaturmessfühler sich wieder
zurückstellte. Wenn die Stromversorgung nicht abge-
trennt wurde, geht der Temperaturmessfühler sogar
dann nicht in die Nullstellung zurück, wenn sich der
Motor abgekühlt hat.
Wartung des Reinigungsgerätes
1. Bei allen Bedienungs- und Reparaturtätigkeiten ist das
Gerät vom Stromversorgungsnetz zu trennen.
2. Die Verunreinigungen im Staubbehälter sind oft zu
beseitigen, um Unregelmäßigkeiten während des
Betriebes des Staubsaugers zu vermeiden.
3. Die Oberfläche des Gerätes darf man nicht mit Benzin
oder einer öligen Flüssigkeit abwischen., sondern nur
mit Wasser und einem neutralen Waschmittel.
Achtung: Man muss sich vorher davon überzeugen, ob
der Lappen zum Abwischen des Gerätes ausgewrungen
wurde und trocken ist; unter keinen Umständen ist
zuzulassen, dass Wasser an die elektrischen Elemente
des Gerätes gelangt.
4. Der Staubsauger darf nicht an einer feuchten Stelle
gelagert werden und direkt den Sonnenstrahlen ausge-
setzt sein.
Lagerung des Reinigungsgerätes
1. Nach Beendigung der Arbeiten mit dem Gerät ist es
auszuschalten, den Stecker aus der Netzsteckdose zu
ziehen und anschließend das Stromversorgungskabel
durch Drücken des Hebels für die Kabelaufwicklung
vollständig aufzuwickeln. Die Fußbodenbürste sollte man.
2. Das Reinigungsgerät ist in einem trockenen Raum
unterzubringen.
Reinigung des Staubbehälters
Damit das Gerät nicht beschädigt wird, sind oft die
Verunreinigungen aus dem Staubbehälter zu beseitigen.
1. Den Staubbehälter reinigt man nur dann, wenn die
Stromversorgungsleitung des Gerätes abgetrennt ist.
2. Der Staubbehälter ist über einen Korb (oder
Abfallbeutel) zu bringen und die Taste zu drücken, die
den Behälter freigibt. Der Boden des Behälters öffnet
sich automatisch und er wird entleert so wie in der
Abbildung (8) dargestellt.
Reinigung des vorderen Filters des Motors:
Warnung: Vor Ausführung der unten angegebenen
Tätigkeiten hat man sich zu überzeugen, ob das Gerät aus-
geschaltet ist:
1. Den Stecker des Stromversorgungskabels aus der
Netzsteckdose nehmen.
2. Den Griff des Staubbehälters nach unten drücken, den
Behälter entfernen und den äußeren Deckel des
vorderen Motorfilters abnehmen. Danach ist der
Motorfilter (den Schwamm und den kompositiven Belag
des Filters) mit einer Bürste oder unter einem
Wasserstrahl.
Hinweis:
Eine ganz normale Erscheinung ist die Farbänderung des
mittleren, weißen Filters, der sich im Staubbehälter befindet,
wobei dies die Leistungsfähigkeit der Filtrierung nicht
beeinflusst. Wenn die Öffnung oder der Filter nicht leicht zu
reinigen sind, empfehlen wir, sie mit Wasser abzuwaschen;
jedoch sollte man sich davon überzeugen, ob die Elemente
vor dem erneuten Gebrauch mindestens 24 h an einem
trockenen Ort gelagert wurden.
Wichtige Hinweise
Bitte daran denken, in dem Fall, wenn der Staubbehälter
oder die Abdeckungen des Filters nicht richtig befestigt
Abbildung (7)
Abbildung (8)
OK4140_ver200.qxp 2007-11-28 11:18 Page 15 (Black plate)

16
sind, kann das Gerät nicht richtig funktionieren und wird
nicht in der Lage sein, den Staub aufzusaugen.
Achtung: Es ist dafür zu sorgen, dass der Durchgangsweg
nicht verstopft wird, andererseits kann dadurch der Motor
beschädigt oder überhitzt werden.
Austausch des hinteren Motorfilters
Der hintere Motorfilter wird hinter dem Ausblasgitter der
Luft installiert und kann in Bezug auf die für seine
Herstellung verwendeten Materialien nicht gewaschen wer-
den. Wenn seine Oberfläche sehr stark mit Staub belegt ist,
muss der Filter gegen einen neuen zwecks Absicherung der
ausreichenden Saugkraft ausgetauscht werden. (Abbildung 9).
Im Allgemeinen ist die Reinigung und der Austausch der
Motorfilter nach einem Nutzungszeitraum von 6-12
Monaten notwendig. Denken Sie bitte daran, dass man sich
vor dem erneuten Einschalten überzeugen muss, ob alle
Filter im Gerät richtig installiert wurden.
Wichtiger Hinweis
Vor dem Austausch der Filter muss der Staubsauger vom
Stromversorgungsnetz getrennt werden!
Beschädigungen und Reparatur
Bei nicht richtiger Funktion des Produktes bitten wir wie
nachstehend beschrieben zu verfahren; wenn das
Reinigungsgerät weiterhin nicht richtig arbeitet, kontak-
tieren Sie sich bitte mit Ihrer Verkaufsstelle oder mit einer
autorisierten Vertragswerkstatt.
Service nach dem Verkauf
Wenn unerwartete Probleme oder Mängel während der
Nutzung des Gerätes auftreten, bitten wir Sie, sich mit einer
bestimmten Vertragswerkstatt zwecks Konsultation und
Reparatur in Verbindung zu setzen.
Technische Parameter:
Stromversorgung: 1400W 220-240V 50Hz
Lärmpegel: 77dB/A/
7,5 m Stromversorgungsleitung
Gewicht: 7,2 kg
Abmessungen: 29cm x 34cm x 48cm
Abbildung (9)
Ursache Maßnahme
Das Gerät schaltet sich nicht ein. 1. Überprüfen, ob der Netzstecker richtig steckt;
Stecker herausziehen und erneut in die Netzsteckdose stecken;
2. Prüfen, ob in der Netzsteckdose Strom anliegt;
3. Prüfen, ob der Schalter am Gerät sich in der Position “ON” befindet;
Die Saugkraft ist verringert. 1. Es ist zu überprüfen, ob die Fußbodenbürste, die Öffnung oder das
Saugrohr verstopft sind und ggfs. den Stau sofort beseitigen;
2. Prüfen, ob der Belag des Filters für den Lufteintritt nicht verstaubt ist;
öfter den Schmutz beseitigen oder die Einlass- und Ausblasfilter der
Luft HEPA austauschen (oder die Beläge);
Das Betriebsgeräusch des Motors weicht von
dem Geräusch bei richtiger Funktion ab.
1. Sofort den Betrieb des Gerätes einstellen;
2. Es ist zu prüfen, ob die Fußbodenbürste, die Öffnung oder das Saugrohr
verstopft sind und ggfs. sofort den Stau beseitigen.
Ökologie - Umweltschutz
Das auf einem Elektrogerät oder seiner Verpackung
angebrachte Symbol eines gestrichenen Müllcon-
tainers weist darauf hin, dass das Gerät nicht als
Hausmüll gehandhabt und in Hausmüllcontainer hineinge-
schmissen werden darf.
Nicht mehr benötigte oder verbrauchte Elektrogeräte
sind speziellen Sammelstellen zuzuführen, die von den ört-
lichen Behörden eingerichtet und zur Entgegennahme recy-
celbarer Elektrogeräte bestimmt werden. Auf diese Weise
trägt ein jeder Haushalt der Herabsetzung eventueller nega-
tiver Einflüsse auf die Umwelt bei und ermöglicht es,
Werkstoffe, aus welchen das jeweilige Produkt hergestellt
wurde, wieder zu erhalten.
Gewicht: 7,20kg e
OK4140_ver200.qxp 2007-11-28 11:18 Page 16 (Black plate)

17
«OK-4140 Multi Cyclon»
: , ,
.
,
1. ,
,
.
2. .
, .
3.
,
;
.
4.
,
.
5. ,
.
.
.
, .
6.
,
.
7.
,
(
),
. ,
,
.
8. ,
,
,
.
9.
,
, .
10. ,
.
11.
( ,
. .)
.
12. ,
,
, .
13.
,
.
RU
1
2
3
5
6
7
8
9
10
11
12
4
OK4140_ver200.qxp 2007-11-28 11:18 Page 17 (Black plate)

18
1.
2.
3.
4.
5.
6.
7.
8.
9.
10.
11.
12. -
:
1.
2.
1. , ,
,
.
2. ,
.
!
(3),
.
.
, ,
.
!
(4),
. ,
,
.
,
.
! :
1. (5) -
.
-
,
.
! "
, (6);
.
.
#
1.
;
;
.
2.
.
.
#
,
,
(3)
(4)
(5)
(6)
OK4140_ver200.qxp 2007-11-28 11:18 Page 18 (Black plate)

,
,
, (7).
$ %
1.
,
, .
,
, ,
,
, ,
.
2. ,
,
. ,
,
(
), «HEPA»
, .
3. 30
,
,
[reset]. ,
,
,
.
&
1. ,
,
.
2.
.
3.
.
.
: , ,
,
;
,
.
4.
,
.
' %
1.
,
,
.
.
2. .
( "
.
1. ,
.
2. (
) ,
. ,
,
(8).
( ) % %
: ,
, ,
:
1.
.
2.
.
(
) .
:
,
. ,
,
; ,
, ,
, ,
, 24 .
(7)
(8)
19
OK4140_ver200.qxp 2007-11-28 11:18 Page 19 (Black plate)

20
#
: , ,
,
,
.
: ,
,
.
* % ) %
,
,
.
,
( 9).
6-12
. ,
,
.
#
, ,
!
,
;
, -
,
,
,
.
,
.
& :
: 1400 , 220-240 , 50
7,5
: 77 //
: 7,2
: 29 x 34 x 48
(9)
+
. 1. ,
.
.
2. , .
3. , «ON».
. 1. , , ,
;
2. ,
;
«HEPA» ( );
.
1. ;
2. , , ,
.
-% – /
“ ”,
,
.
-
,
,
, -
.
,
.
: 7,2 e
OK4140_ver200.qxp 2007-11-28 11:18 Page 20 (Black plate)
Other Optimum Vacuum Cleaner manuals

Optimum
Optimum OK-2090 User manual

Optimum
Optimum OK-1643 User manual

Optimum
Optimum OK-1420 User manual

Optimum
Optimum OK-1655 User manual

Optimum
Optimum OK-2033 User manual

Optimum
Optimum OK-1640 User manual

Optimum
Optimum OK-1844 User manual

Optimum
Optimum OK-1580 User manual

Optimum
Optimum OK-1690 User manual

Optimum
Optimum OK-3000 User manual