Optoma Optoma EP585 User manual

English
1
Usage Notice
Precautions .......................................................................................... 2
Introduction
About the Product................................................................................. 3
Package Overview ............................................................................... 4
Installation
Product Overview ................................................................................. 5
Start Your Installation............................................................................ 7
Powering On/Off the Projection Display................................................ 9
Adjusting the Image Size ...................................................................... 10
User Controls
User Control Overview ......................................................................... 11
Function Descriptions........................................................................... 13
Appendices
Troubleshooting .................................................................................... 17
Maintenance ......................................................................................... 19
Specifications ....................................................................................... 22
Compatibility Modes............................................................................. 23
Table of Contents

English
2
Precautions
Follow all warnings, precautions and maintenance as recommended in this
user’s manual to maximize the life of your unit.
Do:
qTurn off the product before cleaning.
qUse a soft cloth moistened with mild detergent to clean the display housing.
qDisconnect the power plug fromAC outlet if the product is not being used for a
long period of time.
Don’t:
qBlock the slots and openings on the unit provided for ventilation.
qUse abrasive cleaners, waxes or solvents for your cleaning.
qUse under the following conditions:
- Extremely hot, cold or humid environment.
- In areas susceptible to excessive dust and dirt.
- Near any appliance generating a strong magnetic field.
- Place in direct sunlight.
Warning- Do not look into the lens. The bright light may hurt your eyes.
Warning- To reduce the risk of fire or electric shock, do not expose this
product to rain or moisture.
Warning- Please do not open or disassemble the product as this may cause
electric shock.
Warning- When changing the lamp, please allow unit to cool down and follow
all changing instruction.
Warning- This product will detect the life of the lamp itself. Please be sure to
change the lamp when it shows warning messages.
Warning- After changing a new lamp, please reset the lamp life timer from
OSD menu.
Warning- Before switching off the product, please keep the cooling fan
running for a few minutes.
Usage Notice

English
3
About the Product
This product, designed with a high-powered metal halide lamp, is an SVGA data/
video portable projection display. The outstanding feature of it are listed as follows:
q10.34lbs (4.7 kg) lightweight compact design
q330-watt user replaceable metal-halide lamp
qSingle panel 6.4” TFT LCD projection system
q800 x 600 addressable pixels
qCompression for 1024 x 768 XGA computer image
q16.7M (24-bit) displayable colors
qXGA/ SVGA/ VGA/ VESA/ Mac/ NEC PC-98/ Fujitsu FM Towns compatible
qNTSC / NTSC 4.43/ PAL / SECAM composite video & S-Video
qRemote control with mouse function
qAutomatic image adjustment function
qMultilingual OSD menu adjustments
qAdvanced functions--
keystone correction/ zoom/ freeze/ pointer
Introduction

English
4
Package Overview
This projection display comes with all the items shown below. Check to make
sure your unit is complete. Contact your dealer immediately if anything is
missing.
LCD Projection Display
Soft Bag
S-Video Cable RCA Audio/ Video Cable Audio-in Cable for
Computer
Battery x 3
Remote Mouse Package:
Remote Receiver Cable Remote Mouse
PC PS/2 Remote Adapter PC PS/2 Mouse Adapter
Mac Remote Adapter Mac Mouse Adapter
User’s Manual
Warranty Card
Power Cord VGA Cable

English
5
Product Overview
wMainUnit
Installation
Rear Connection Ports
Panel Control Buttons
Keystone Correction
Lens Latch
Lamp Door
Carrying Handle
Elevator Foot
Lamp Latch
Lens
Power Switch
Power
Connector
Fuse
Monitor Loop-
through Connector
Computer Input
Connector
Audio Inputs for
Computer
Audio Outputs
S-Video Connector
Composite Video
Connector
Audio Inputs
for Video
Remote Receiver
Connector

English
6
wRemoteControl
Directional Select Keys ZoomIn/ZoomOut
* For more detailed information, please refer to “Function Descriptions”
on page 13.
Curtain
Source Selection
Volume
Enter/Pointer
Poweron/Standby
On-ScreenMenus
FREEZE
CURTAIN
ON
STANDBY
ZOOMINZOOMOUTSOURCE
ENTER
POINTER
MENU
MUTE
VOLUME
DRAG
R
L
Freeze
LIGHT
Mouse Left ButtonDown
Right Mouse Button/
Backlight Function
Left Mouse Button
Joystick
(Mouse Cursor Function)

English
7
StartYourInstallation
wConnectingtheProjectionDisplay
Monitor Cable
VGA Signal Cable
Audio Cable
Audio Cable
S-Video Cable
RCAAudio/ Video
Cable
Power Cord
Remote Receiver Cable
Computer
MousePort

English
8
Follow regular setup procedures. Make sure you have a 100% compatible Microsoft
Mouseand aMicrosoft Mousedriverinstalled.
4Setting Up Procedure:
1. Turn off your computer.
2. Unplug the mouse from your computer.*
3. Connect the remote receiver cable to the computer and the projection display.
4. If you need an external mouse, connect the mouse with the other end of the
receiver cable.
5. Turn on your projection display first and then your computer.
6. Begin your presentation.
* If you have a Mac or PC PS/2 mouse, use the matching adapters as shown in
the drawing.
Remote Receiver Cable
(Microsoft Mouse Connection)
Mac or PC PS/2 Mouse
(Mac or PC PS/2 Mouse Connection)
Remote Receiver Cable
Microsoft Mouse
Mac or PC PS/2 Mouse Adapter *
*
Mac or PC PS/2 Remote Adapter
wRemote ControlConnections

English
9
uu
uu
uPowering On the ProjectionDisplay.
44
44
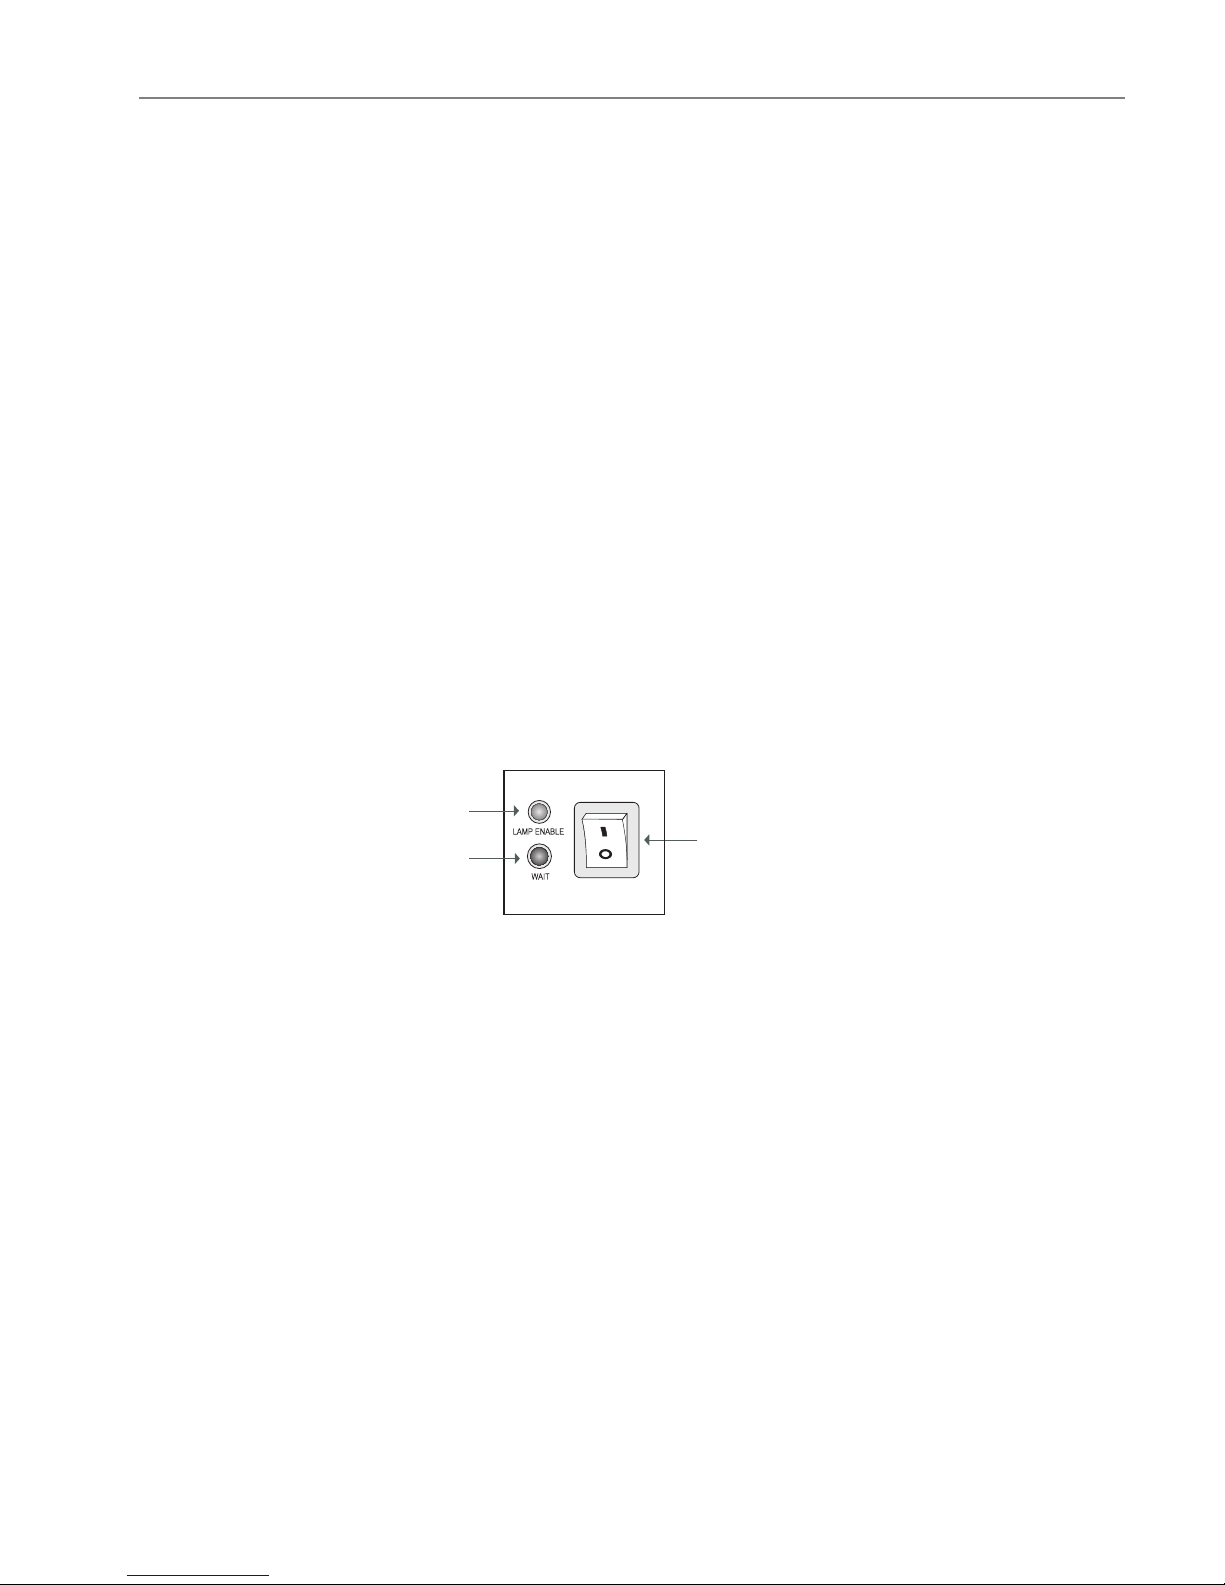
4Switch on the power; then turn on the lamp by pressing “STANDBY”
button.
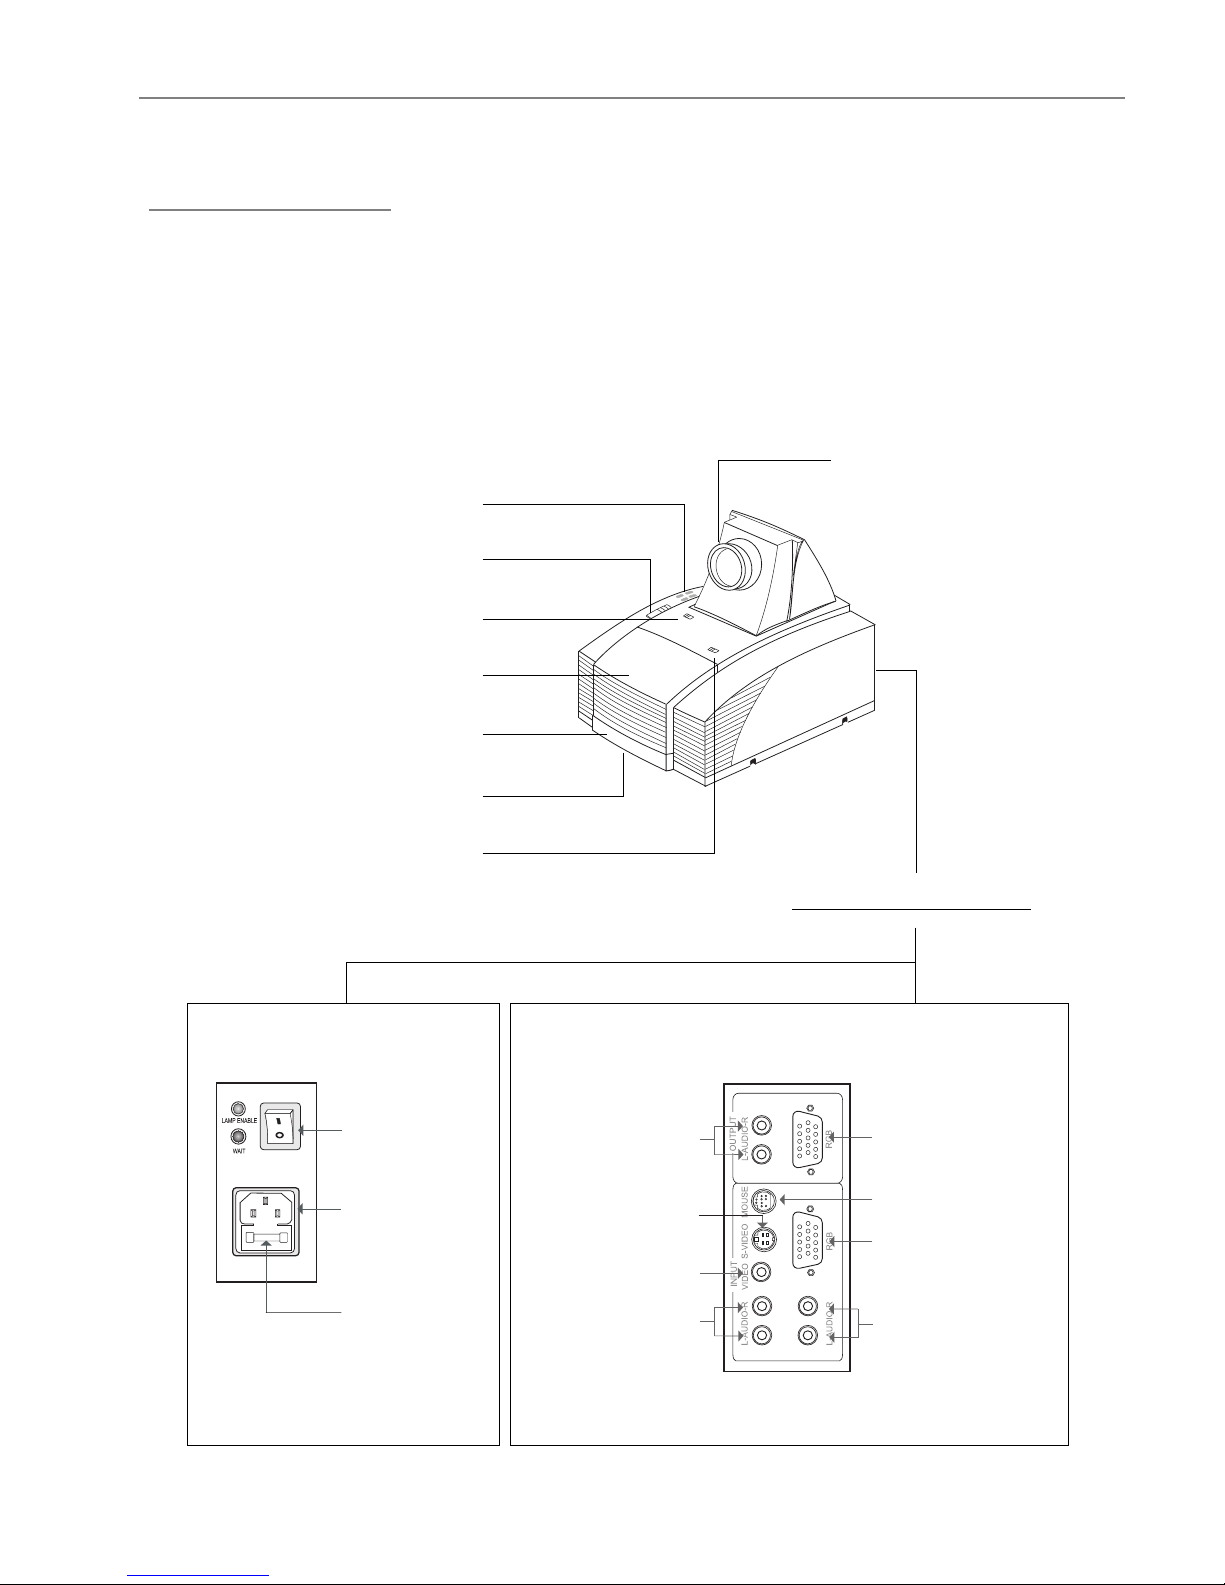
Press the “ I ” sign of the power switch to turn on the projection display. After a
few seconds, press the “Power on/Standby” button to power on the projection
lamp. At this time, the “Power on/Standby” indicator (the Green Light, see follow-
ing figure) will be illuminated.
*If you wish to turn off the projection display for a short period of time, press
the “Power on/Standby” button. The Amber Light will illuminate. This indi -
cates the projection lamp is powered off and is cooling down.
*If you want to turn on the projection lamp again, you must wait at least 1
minute until the Amber Light is OFF. Be sure the Amber Light is in OFF status
so that you can press the “Power on/Standby” button to turn on the projection
lamp.
uu
uu
uPowering Offthe Projection Display
44
44
4Turn off lamp power first for three minute and then switch off the power.
Press “Power On/Standby” button to make the display in “Standby” mode first and
wait for three minutes, then you can switch off the power.
* After pressing the “Power on/Standby” button , you will see a message-
“Power off the lamp?”. Press the “Power on/Standby” button again to turn
off the lamp. Otherwise the message will disappear itself 5 seconds later.
*The projection display will automatically shut down when the lamp is powered
off and is not turned back on within 5 minutes. Please switch off the
power if this occurs.
*Always remember to turn off the projection lamp first and allow it to cool for a
few minutes before switching off the power.
Powering On/Off the ProjectionDisplay
Power Switch
Green Light
Amber Light

English
10
qPositioning the projection display
(projection distance and image size)
qSlide the lens latch and pop up the projection lens. Switch on the power and
press the “Power on/Standby” button. See “Powering On/Off the Projection
Display” on page 9 for more information.
qAdjusting the screen image.
1. Rotate the projection lens to focus the image.
2. Slide the keystone correction button to adjust image shape.
3. Adjust the elevation:
(1) Pull out the carrying handle.
(2) Lift the projection display to the desired angle.
(3) Press down on the elevator node to loosen the elevator foot.
Keystone Correction
Carrying Handle
Power Switch
Power on/
Standby Buttons
Lens Latch
ElevatorNode
Lens
Adjusting the Image Size
Projection
Distance 5 ft.
(1.5 m) 6.5 ft.
(2 m) 9.5 ft.
(3 m) 13 ft.
(4 m) 20 ft.
(6 m)
Image Size
(diagonal)
40"
(1.01m)
(min.)
60"
(1.52m) 80"
(2.03m) 110"
(2.79m) 160"
(4.06m)
(max.)

English
11
User Control Overview
Thereare two ways foryou tocontrol thefunctions: panelcontrol andremotecontrol.
wPanelControl
POWERON
STANDBY RESET
MENU ENTER
4 Directional Keys
wRemoteControl
Zoom in/Zoom out
Source Selection
Volume
Enter/Pointer
Poweron/Standby
On-ScreenMenus
Directional Select Keys
FREEZE
CURTAIN
ON
STANDBY
ZOOMINZOOMOUTSOURCE
ENTER
POINTER
MENU
MUTE
VOLUME
DRAG
R
L
Freeze
LIGHT
Mouse Left ButtonDown
Right Mouse Button
/Backlight Function
Left Mouse Button
The Joystick
(Mouse Cursor Function)
Curtain
User Controls

English
12
wOSDMenus
TheOSD(On-ScreenDisplay) menus willallow youto easilyadjustthedisplay
functions. Pressthe “MENU”button for theOSD menuoptions.
4When in computer sources,
the OSD will be:
Language
Contrast
Tracking
Frequency
Custom Memory
Audio
Source
Rear Projection
Ceiling Projection
Auto Image
Lamp Reset
Lamp Warning
Exit
4When in video sources,
the OSD will be:
Language
Contrast/Brightness
Color/Tint
Audio
Source
Rear Projection
Ceiling Projection
Lamp Reset
Lamp Warning
Exit

English
13
FunctionDescriptions
4Power On/Standby Press the “Power On/Standby” button to turn on the
projection lamp.
Press “Menu” button to pop up the OSD menu.
Press “Reset” to return the display parameters of the
current mode to its factory default settings.
“Enter” is used for confirming your selection.
(1)Use 5or6button to select items. Use 3or4to make
adjustments for your selection.
(2)Use 5or6button to change vertical positioning of the
image; and 3or4button to change the horizontal
positioning of the image.
Choose “Language” item to select your choice of English,
French, German, Spanish, Italian, Japanese and Chinese.
(1)Volume adjustments: “+”, “-”, “Mute”
(2)Audio adjustments: Bass, Treble, Balance, Volume, 4
sound modes.
Use “ Source” control to choose between video and com-
puter source.
Choose this function from OSD menu for a rear projection.
4Menu
4Reset
4Enter
4Four Directional
Select Keys
4Audio
4Source
wBasicFunctions:
4Language
4Rear Projection

English
14
Choose this funtion from OSD menu for a ceiling mounted
projection.
After changing a new lamp, reset the lamp life timer from
OSD menus.
Choose this function to show or hide the warning
message.
Choose “Exit” item to leave OSD menu.
4Exit
4LampWarning
4Lamp Reset
4Ceiling Projection
4Contrast
Press the “Pointer” button to show a hand shape pointer.
Use5,6,3or4button to move pointer around the
projected image.
Press the “Freeze” button to still the screen image.
Press “Curtain” button to cover all the screen, then use
5or6to pull up or down the curtain.
Press “Zoom In” button to enlarge the projected image,
“Zoom Out” to resume the image.
Choose this function from OSDmenu to adjust contrast of
the image.
4Curtain
4Zoom In/Zoom Out
4Freeze
wPresentation Functions - computer source
4Pointer

English
15
Choose “Tracking” item to synchronize the signal timing
of the display to that of the graphic card. When you
experience an unstable or flickering image, use this
function to correct it.
“Frequency” is for changing the display data frequency
to match the frequency of your computer’s graphic card.
When you experience a vertical flickering bar, use this
function to make an adjustment.
This function enables you to save your current settings
for the computer source. To use this function, first
choose “Custom Memory” from OSD menus, and go to
the custom group you need (such as “Custom 3”), then
select “Save” and press “Enter” to save your current
settings; or choose “Open” and press “Enter” to load
your preset settings. There are six groups of custom
memories for your use.
If you want to come back to RGB standard source, go to
the “RGB Standard” mode located before “Custom 1” in
Custom Memory OSD menus.
* When opening your preset custom setting, you may
experience a “Invalid” message appearing on the
screen. This means the computer you connected or
the current setting is the wrong one, not what you
preset in the projection display.
* The “Reset” function of this projection display
only works in RGB Standard mode.
Choose “Auto Image” from OSD menus to obtain an
optimum quality for your projected image.
* “Auto Image” function will not support 1024 x
768 resolution.
* This feature could not perform well in case of
input weak signal from VGA cable.
4Auto Image
4Tracking
4Frequency
4Custom Memory
Language
Contrast
Tracking
Frequency
Custom Memory
Audio
Source
Rear Projection
Ceiling Projection
Auto Image
Lamp Reset
Lamp Warning
Exit

English
16
wPresentation Functions -- video source
To adjust the contrast or brightness of the image, select
“Contrast/Brightness” from OSDmenus.
To adjust the color or tint of the image, select “Color/
Tint” from OSD menus.
Press the “Freeze” button to still the screen image.
4Contrast/Brightness
4Color/Tint
4Freeze

English
17
Troubleshooting
If you are experiencing trouble with the projection display, refer to the follows. If the
problem persists, please contact your local dealer or our service center.
Problem: No image appears on screen.
4Press “Power on/Standby” button.
4Ensure all the cables and power connections are correctly and securely connected
as described in the “Installation” section.
4Ensure the pins of connectors are not crooked or broken.
4Check if the projection lamp has securely installed. Please refer to the “Changing
the lamp” section.
4Ensure the cooling fan is on. If not, you may need to change the fuse. Please refer
to the “Changing the fuse” section.
Problem: Partial, scrolling or incorrectly displayed image.
4If you are using a PC:
Resolution of your computer is higher than 800x600. Follow the steps outlined
below to reset the resolution.
For Windows 3.x:
1. In the Windows Program Manager, click the “Windows Setup” icon in the Main
group.
2. Verify that your Display resolution setting is less than or equal to 800x600.
For Windows 95:
1. Open “My Computer” icon, the “Control Panel” folder, and then double click the
“Display” icon.
2. Select the “Setting” tab.
3. In the “DesktopArea” you will find the resolution setting. Verify that the
resolution setting is less than or equal to 800x600 resolution.
If the projection display is still not projecting the whole image, you will need
to also change the monitor display you are using. Refer to the following steps.
4. Follow above steps 1~2. Click on the “Change Display Type” button.
5. Select the “Change” button under the “Monitor Type” box.
Appendices

English
18
4If you are using a Notebook PC:
1. You are required to implement above steps of resolution setting of computer first.
2. Switch the Notebook PC display to the “external display only” or “CRT only”
mode.
4If you are using an Apple Macintosh or Apple PowerBook:
1. Insert a Mac signal adapter and change the mode into Macintosh 13” of 640 x
480 resolution.
2. Change the adapter into VGA mode for IBM PC 640 x 480, 800 x 600, or 1024
x 768 display settings.
4If you are experiencing difficulty in changing resolutions or your monitor freezes,
restart all the equipment and the projection display.
Problem: The screen of the Notebook or PowerBook computer is not display-
ing your presentation.
4If you are using Notebook PC:
Some Notebook PCs may deactivate their own computers’ screens when a
second display device is in use. Each of them has different way to be reactivated.
Refer to your computer’s documentation for detailed information.
4If you are using an Apple PowerBook:
In Control Panels, open the PowerBookDisplay to select Video Mirroring “On”.
Problem: Image is unstable or flickering
4Use “Tracking” to correct it.
4Change the monitor color setting from your computer.
Problem: Image has vertical flickering bar.
4Use “Frequency” to make an adjustment.
4Check and reconfigure the display mode of your graphic card to make it compatible
with the product.
6. Under “Manufacturers”, select “Standard monitor types”
7. Verify that the resolution setting of the monitor display is less than or equal to
800x600.

English
19
Maintenance
wChangingtheLamp
The projection display will detect the lamp life itself. It will show you a warning
message when the lamp is used over working hours. When you see this message,
change the lamp as soon as possible.
Make sure the projection display has cooled for at least 30 minutes before
change the lamp.
Warning: Lamp compartment is hot! Allow it to cool before changing
lamps!
* We suggest you a Professional Engineer to change the projection lamp
module.
Lamp Changing Directions:
1. Use a cross screwdriver to remove the screw of the lamp latch.
Open the lamp door.
2. Remove the screws on the metal protection cover and then open this metal cover.
Lamp Latch Screw
Metal Cover
Screws
Lamp Door
Lamp Metal Cover

English
20
Warning: Never touch the glass or white powder of the lamp as finger
oil, dust or water will damage the lamp.
5. Replace a new lamp.
Hold the new lamp by its base (we suggest you to put gloves on) and then push it
firmly into the usage position. Remember to push the bottom of the lamp back to its
position first and then the head. Tighten the screws.
3. Unscrew the two screws on the bottom of the lamp module.
Then release the head screw of the lamp module.
4. Take out the used lamp from the usage position. Take out the head of the lamp first
and then the bottom. Be careful of the hot lamp.
Lamp Base
Lamp Base
Lamp
6. Close the metal cover and then tighten the screws.
Close the lamp door and then tighten the screw beside the lamp latch.
Bottom Screws
Head Screw
Bottom Lamp
Head Lamp
Table of contents
Other Optoma Projector manuals

Optoma
Optoma ZU606Te User manual

Optoma
Optoma EX7155e User manual

Optoma
Optoma DV10 MovieTime User manual

Optoma
Optoma EP729 Technical manual

Optoma
Optoma w313 User manual

Optoma
Optoma EP680 User manual

Optoma
Optoma TX800 User manual

Optoma
Optoma PRO260X User manual

Optoma
Optoma TW762 User manual

Optoma
Optoma Pico PK102 Technical manual

Optoma
Optoma EP1690 User manual

Optoma
Optoma Optoma EP1691 User manual

Optoma
Optoma PRO8000 User manual

Optoma
Optoma TX700 User manual

Optoma
Optoma ThemeScene HD65 User manual

Optoma
Optoma EP719 User manual

Optoma
Optoma TX665UTI-3D User manual

Optoma
Optoma EP770 User manual

Optoma
Optoma X400LVe User manual

Optoma
Optoma Pico PK301+ User manual