Orbic Wonder User manual

User guide.

2 3
TABLE OF CONTENTS
GETTING STARTED
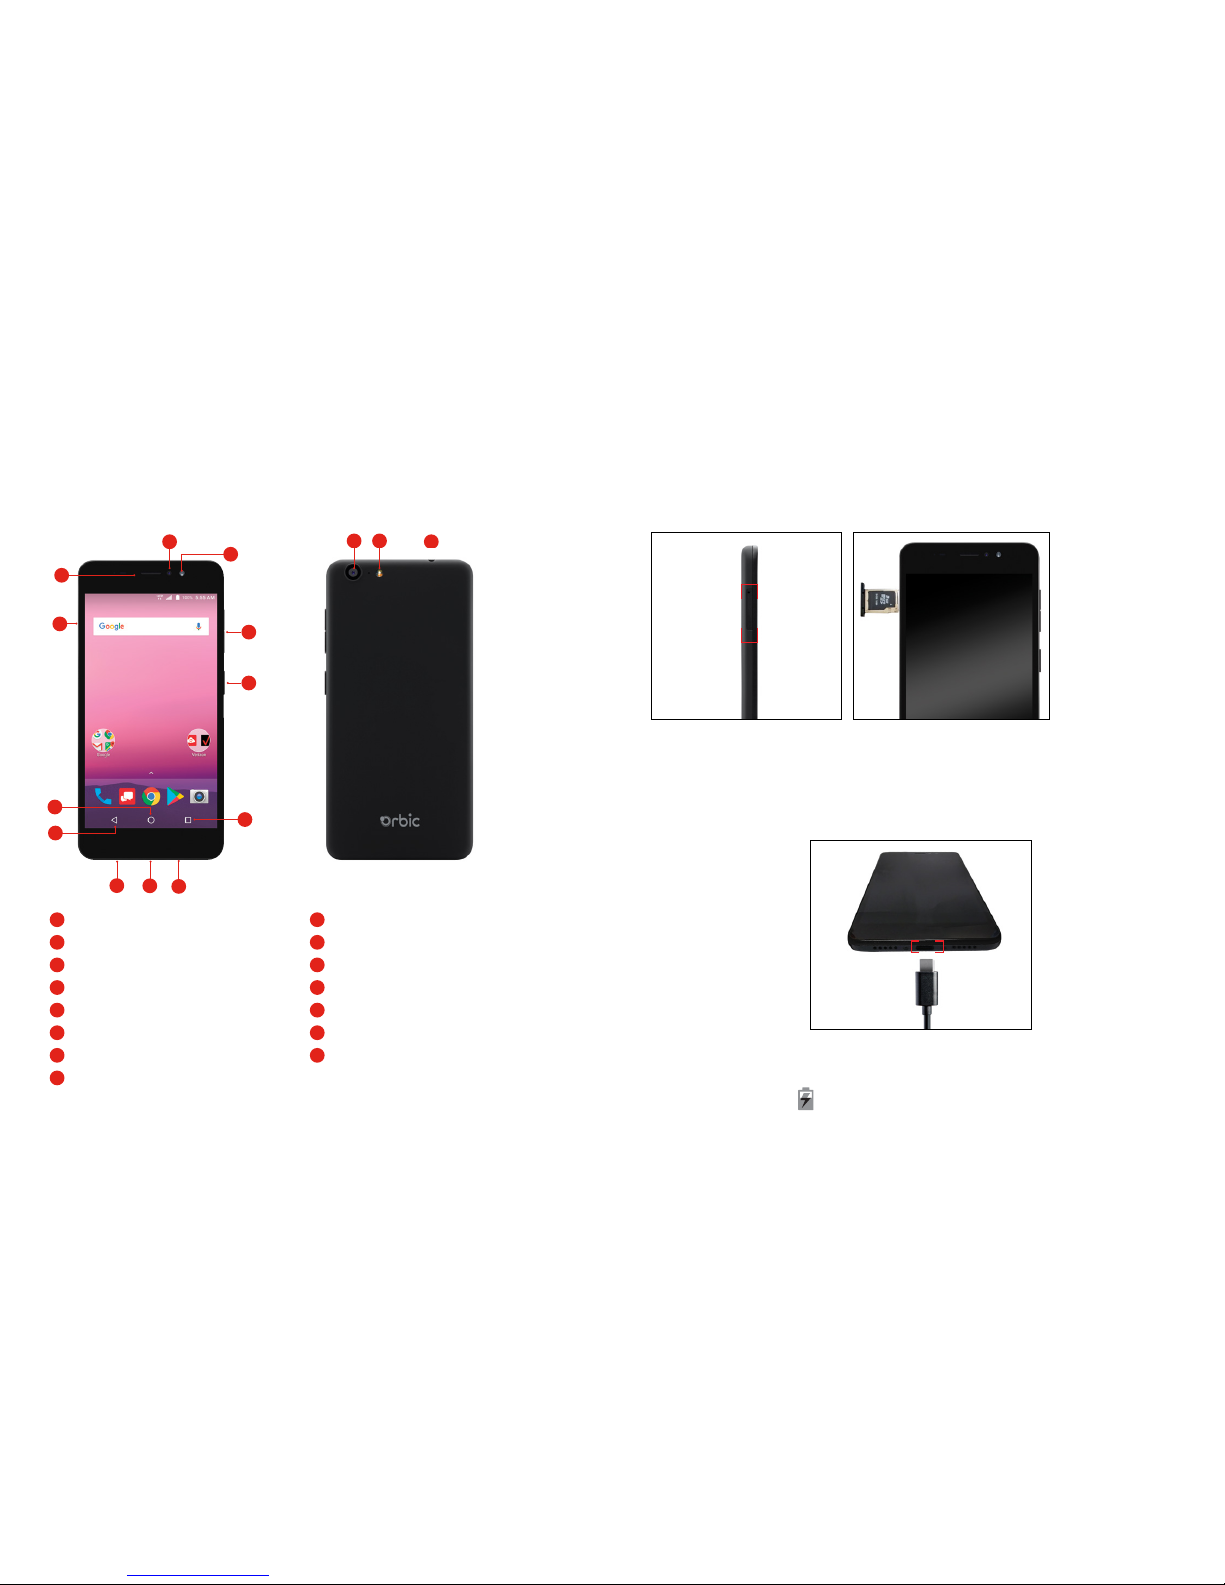
Buttons and Ports .........................................................................................................6
Installing the SIM Card and micro SD Card.............................................................7
Charging the Battery...................................................................................................7
Turning Your Phone On/Off .......................................................................................8
Setting Up Your Phone Out of the Box ......................................................................8
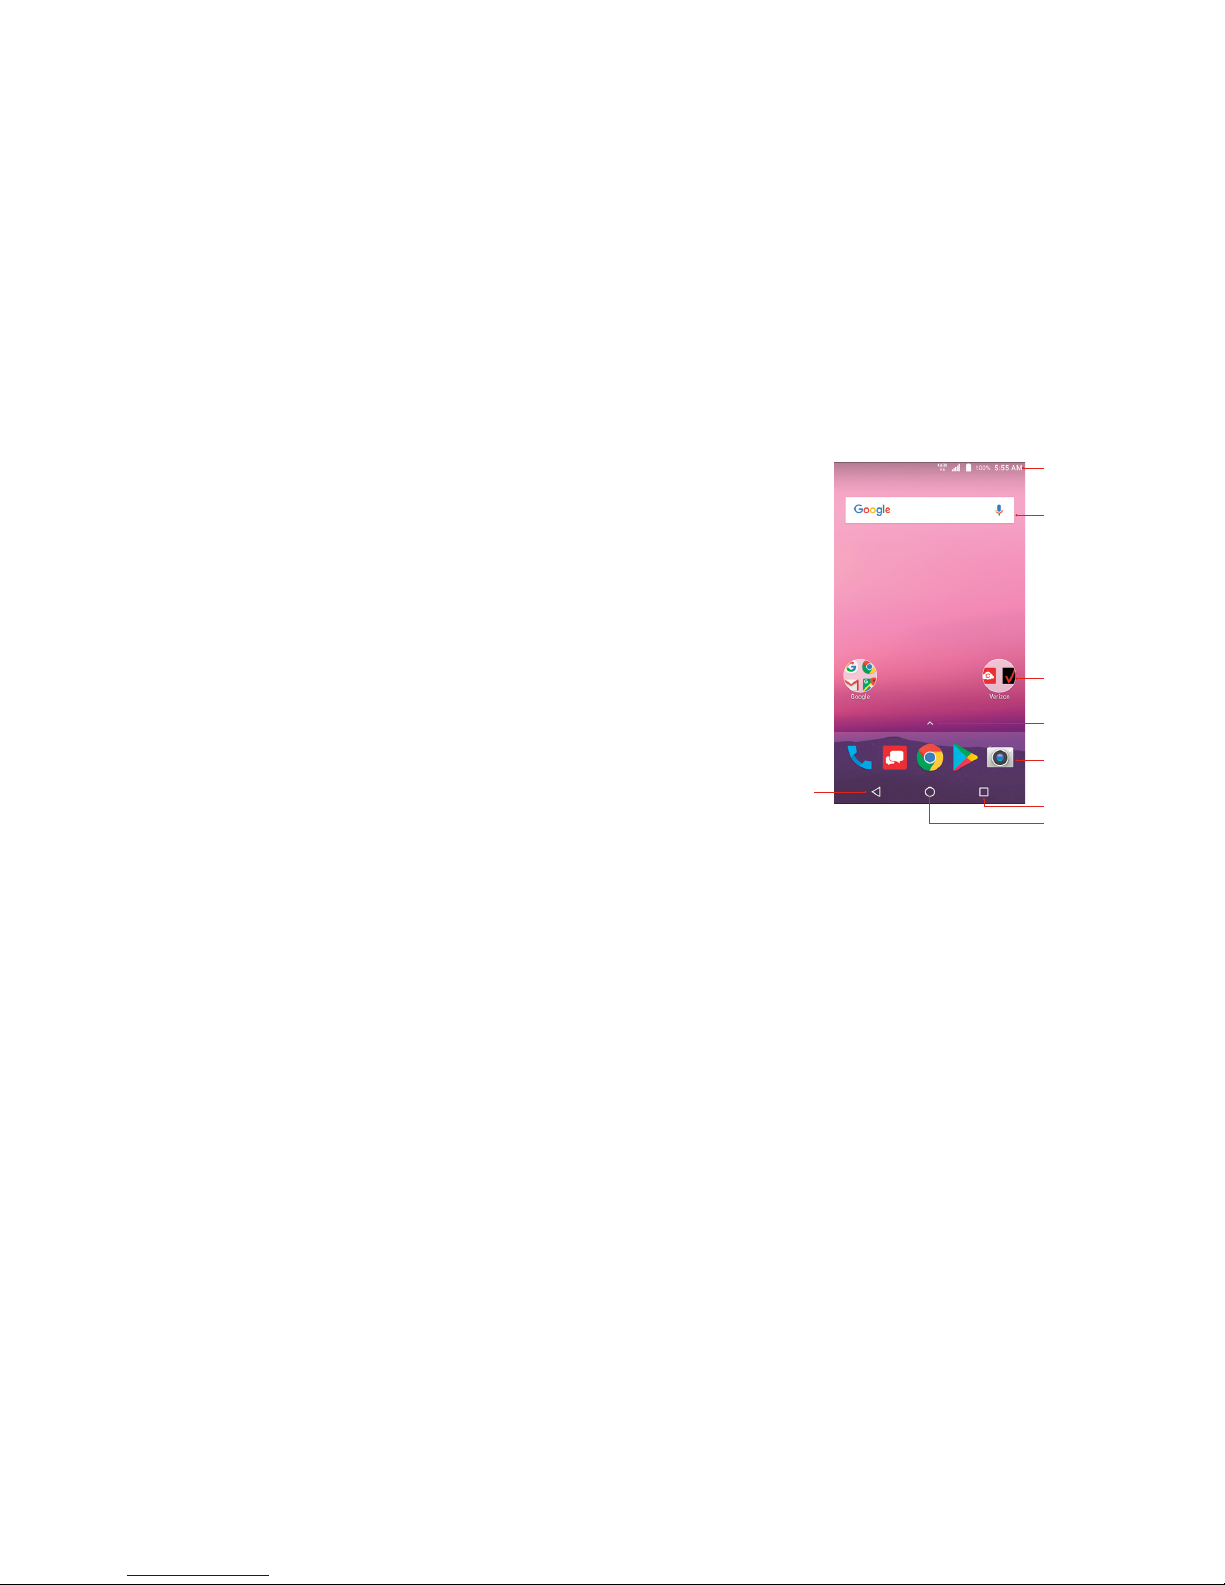
Home Screen ...............................................................................................................9
Using the Touch Screen...............................................................................................9
PERSONALIZING YOUR PHONE
Changing the System Language ............................................................................. 10
Setting Date and Time.............................................................................................. 10
Ringtone, Notification and System Sounds ............................................................ 10
Volume Adjustment/Silent and Vibrate Modes ......................................................11
Do Not Disturb...........................................................................................................11
Wallpaper ................................................................................................................. 12
Brightness .................................................................................................................. 12
Screen Locks.............................................................................................................. 13
Screen Pinning .......................................................................................................... 13
THE BASICS
Status Bar .................................................................................................................. 14
Shortcuts and Widgets............................................................................................. 16
Folders and Organization ....................................................................................... 16
Primary Shortcuts...................................................................................................... 16
Entering Text.............................................................................................................. 16
Keyboard................................................................................................................... 17
Glide Typing.............................................................................................................. 18
Google Voice Typing ............................................................................................... 18
Using Applications.................................................................................................... 18
GETTING CONNECTED
Connect to a Wireless Network.............................................................................. 19
Add a Wi-Fi Network............................................................................................... 19
Forgetting a Wi-Fi network.......................................................................................20
Connecting to Bluetooth Devices ............................................................................20
Forgetting a Bluetooth Device ................................................................................. 21
Connecting to a Computer ...................................................................................... 21
Using micro SD Card for Storage........................................................................... 21
Sharing Your Phone’s Data Connection .................................................................23
MAKING PHONE CALLS
Place a Call by Dialing............................................................................................ 24
To End a Call.............................................................................................................24
Answering or Rejecting a Call.................................................................................25
Call History ...............................................................................................................25
Placing a Call from your Contacts List .................................................................... 26
Checking Voice Mail................................................................................................26
In-Call Options..........................................................................................................26
Managing Multi-party Calls .................................................................................... 27
Switching Between Current Calls............................................................................ 27
Set up a Three Way Call ......................................................................................... 27
Call Settings .............................................................................................................. 27
Voicemail...................................................................................................................28
CONTACTS
Adding a New Contact............................................................................................29
Favorites ....................................................................................................................29
Edit a Contact ...........................................................................................................29
EMAIL
Adding an Email Account........................................................................................30
Removing an Account .............................................................................................. 30
Responding to Email.................................................................................................30
Composing and Sending an Email ......................................................................... 31
Add a Signature to Email......................................................................................... 31
Email Settings............................................................................................................ 31

4 5
MESSAGING
Sending a Message .................................................................................................32
Replying to a Message............................................................................................32
Forwarding a Message............................................................................................33
Deleting a Message or Thread ...............................................................................33
Message Settings......................................................................................................33
CALENDAR
Creating an Event..................................................................................................... 33
Calendar Settings .....................................................................................................34
INTERNET BROWSER - GOOGLE CHROME
Open a web page....................................................................................................34
CAMERA
Taking a Photo ..........................................................................................................34
Recording A Video ...................................................................................................35
Camera Setting.........................................................................................................35
GOOGLE PHOTOS
Share Albums, Photos or Videos .............................................................................35
Delete Albums, Photos or Videos ............................................................................36
Editing Photos............................................................................................................36
Create an Animation or Collage.............................................................................36
Playing Videos ..........................................................................................................36
MUSIC
Copying Music Files to Your Phone ........................................................................ 36
View Your Music Library .......................................................................................... 37
VIDEOS
Managing Video Files.............................................................................................. 37
Delete a Video.......................................................................................................... 37
OTHER APPS
Calculator..................................................................................................................38
Clock..........................................................................................................................38
Google Apps ............................................................................................................39
SETTINGS
Wireless & Network.................................................................................................39
Apps and Notifications ............................................................................................40
Battery ....................................................................................................................... 41
Display....................................................................................................................... 41
Sound......................................................................................................................... 41
Storage...................................................................................................................... 41
Security & location ................................................................................................... 41
Users & accounts ...................................................................................................... 41
Accessibility............................................................................................................... 41
Google ......................................................................................................................42
System........................................................................................................................ 42
TROUBLESHOOTING
....................................................................................................................................42
SOFTWARE UPDATES
....................................................................................................................................44

6 7
GETTING STARTED
Buttons and Ports
1Home Button
2Back Button
33.5 mm Headset Jack
4USB/Charging Port
5Microphone
6Recent Apps Button
7Front Camera
8Front Flash
9Earpiece
10 Flash
11 Back Camera
12 Power/Lock Key
13 Speaker
14 Volume Keys
15 SIM/Micro SD card slot
1
2
4
5
6
7 3
8
9
1011
12
14
13
15
Installing the SIM Card and micro SD Card
Phone should be powered off before installing or removing SIM or micro
SD card.
Charging the Battery
While your phone’s battery should have enough juice out-of-the box to
power on, find a signal and even make a few calls, you should fully charge
the battery as soon as possible.
Connect the included USB cable to both the phone and wall charger. Plug
the wall charger into a standard electrical outlet. If the phone is on, you will
see a charging icon in the status bar.

8 9
If the battery is extremely low, you may not be able to power on the phone.
Wait 20 minutes and try again.
WARNING! Use only an approved charging accessory to charge your
phone. Improper handling of the charging port, and use of an incompatible
charger, may cause damage to your device and void the warranty.
TIP: Extend your battery’s life:
Conserve battery power by adjusting the settings on select applications:
Lower Screen brightness.
Reduce Backlight time.
Turn Bluetooth and Wi-Fi off when not in use.
Disable GPS when not in use.
Enable the battery saver feature.
Turning Your Phone On/Off
To turn your phone on, press and hold the power/lock key. Follow the
prompts.
Setting Up Your Phone Out of the Box
When you turn on your phone for the first time (or after a reset to factory
settings), you will need to set it up before use. Select your language
preference and follow the prompts.
Home Screen
Using the Touch Screen
Your phone’s touchscreen allows you to control actions to move around the
screen, open menus, select items like apps, zoom in and out of websites,
take photos and more with a variety of touch gestures.
Swipe or Slide – quickly drag your finger across the screen horizontally
or vertically.
Drag – Touch and hold your finger on an item to move it into a new
position.
Pinch – Place two fingers on the screen simultaneously and pinch them
together to zoom out or spread your fingers apart to zoom in.
Rotate the Screen – Rotate your phone sideways to rotate the screen
from portrait to landscape.
Note: The auto rotate function must be turned on for this to work. Touch
Back
Home Key
Recent Apps
App Shortcuts
Apps List
Folders
Google
Search Bar
Status Bar

10 11
the Home screen > swipe up for apps > Settings > Display > When
Device Is rotated > tap Rotate contents of screen.
PERSONALIZING YOUR PHONE
Changing the System Language
Touch the Home key > swipe up for apps > Settings > Languages &
Input > Languages.
To add a system language, touch Add a Language and select a language.
Touch and hold the language and drag it to the top.
Setting Date and Time
Touch the Home key > swipe up for apps > Settings > Date & Time.
Date & time and time zone are set automatically to network-provided
time. To set manually:
• Touch Automatic Date & Time to turn Off.
• Set the date and time manually.
• Touch Automatic Time Zone to turn Off.
• Select a time zone.
• Touch Use 24-hour format to turn On/Off.
Ringtone, Notification and System Sounds
Touch Home > swipe up for apps > Settings > Sound.
Select a Phone Ringtone
• Touch Phone Ringtone.
• Scroll the list and select a ringtone.
• Touch OK.
Turn Alarm Sounds On/Off
• Touch the Home key > swipe up for apps > Settings > Sound.
Touch Default alarm ringtone.
• Touch None to turn it Off or select a Ringtone > Ok to turn it On..
Turn Other sounds On/Off.
• Touch the Home key > swipe up for apps > Settings > Sound.
• Scroll down to and touch Other sounds.
• Touch the icon next to each option to turn It On or Off.
Volume Adjustment/Silent and Vibrate Modes
To adjust volume:
Touch the Home key > swipe up for apps > Settings > Sound.
Drag slider below Media Volume, Alarm Volume, Ring Volume to adjust.
To set Silent and Vibrate Modes:
Touch Home key > swipe up for apps > Settings > Sound.
Drag sliders to left to turn Silent ON. Ring volume will automatically go to
vibrate.
Or, lower the Volume Keys on the side of the phone until you feel the phone
vibrate. Touch it again to enter Silent Mode.
Do Not Disturb
Use Do Not Disturb Mode to limit interruptions.
Touch the Home key > swipe up for apps > Settings > Sound >
Do Not Disturb.
Priority Only Allows – only notifications marked Priority will work.
Touch next to each option to turn it On/Off.
Block visual disturbances:

12 13
• Touch next to each option to turn it On/Off.
• Automatic Rules - schedule when notifications are on or off.
• Touch Weekend, Weeknight, Event or +Add rule.
• Add rule > Event rule > enter rule name > Ok.
Set days, start time and end time, and preferences to set specific time
periods during which Do Not Disturb mode is on.
Touch to delete a rule.
Wallpaper
You can customize the wallpaper on the home screen and lock screen.
• Touch and hold an “empty” space on the home screen.
• Touch WALLPAPERS.
• Swipe left/right to select an image.
• For Gallery images, touch My photos, select picture, move, pinch or
spread to choose the part of the image you want to use.
• Touch SET WALLPAPER.
Choose Home screen, Lock screen or Home screen and lock screen.
Brightness
• Touch the Home key > swipe up for apps > Settings >
Display > Brightness Level.
• Slide your finger to adjust the brightness.
You can also select ADAPTIVE Brightness and your phone will automatically
adjust the brightness level.
Screen Locks
You can secure your phone by using a screen lock. When enabled, you
will use your finger to draw a pattern or enter a PIN number password to
unlock your phone’s screen.
• Touch the Home key > swipe up for apps > Settings >
Security > Screen lock.
• Touch None, Swipe, Pattern, PIN or Password.
• Touch None to disable screen lock.
• Touch Swipe to enable and allow unlocking by swiping black area
on the screen.
• Touch Pattern to create a pattern that you will draw on the screen to
unlock it.
• Touch PIN or Password to create a PIN or Password that must be
entered to unlock the screen.
• For Pattern, PIN or Password, select your preference for notifications
and their contents to show the phone is locked. Press Done.
Note: It is important to remember your Pattern, PIN or Password. If you
forget it, you will have to reset your phone to factory state, this process will
erase all data stored In your phone.
Screen Pinning
You can use Screen pinning to keep an app in view and prevent others from
switching to another app or screen, or accessing any personal information.
• Touch the Home key > swipe up for apps > Settings >
Security > Screen Pinning.
• Touch the On/Off Switch .
Note: If you have a screen lock set up, you can require an unlock pattern/

14 15
PIN/Password to unpin a screen.
THE BASICS
Status Bar
The Status Bar on the top of the screen provides both phone and service
status icons.
/ 2G Service
3G Service
LTE Service
Do Not Disturb mode (Alarms or
Priority Only)
Do Not Disturb mode (Total
Silence)
Vibration Mode
Silent Mode
/ Battery Low
Battery Full
/ Battery Charging
No Signal
Signal Strength
Airplane Mode
Bluetooth On
Connected to Wi-Fi Network
Wi-Fi In Use
Speaker On
Phone Mic Off
GPS on
Portable Wi-Fi Hotspot Active
Alarm Set
New SMS/MMS
/ New Gmail Message
/ New Email Message
Missed Call
Call in Progress
Call On Hold
Low Battery
Upcoming Event
New Wi-Fi Network Detected
/ Downloading/Sending data
USB Connected

16 17
Music Playing
Shortcuts and Widgets
• To create an app shortcut touch and hold any preloaded or down-
loaded app and drag it to the home screen.
• To select a Widget, touch any empty area on the Home Screen and
select Widgets.
• Touch and hold a widget or application to drag it to the home screen.
• To move an application or widget, touch and hold and drag it to the
desired location.
• To remove a widget or shortcut to an application, touch and drag it
to “Remove”.
Folders and Organization
Create folders on your home screen to organize shortcuts to your apps.
Touch and drag an application on top of another application to create a
folder. Once a folder is created, you can name it and drag other
applications into it. You can move folders in the same manner as you move
applications.
Primary Shortcuts
On the bottom of the home screen is a customizable area for your primary
applications. You can keep up to five applications here. Drag applications
in or out of this area to customize.
Entering Text
Enter text using the onscreen keyboard. Most applications open it
automatically. In others, you can open the keyboard by touching where you
wish to type. Touch the Back key to hide the on screen keyboard. Or, use
Google voice to enter text via speech.
To enable additional keyboards:
• Touch the Home key > swipe up for apps > Settings >
Languages & Input > Virtual Keyboard > Manage Keyboards.
• Select a keyboard in the list by touching it to enable/disable it.
Keyboard
The Google board is similar in layout to a computer keyboard. Touch a
letter to enter it.

18 19
As you type, suggested words will appear. Touch one to select it.
To use upper case touch . Double tap to lock upper case. Touch it
again to return to lower case.
Touch the back key to delete text .
Touch for numbers and symbols. Touch for symbols.
Touch to access emojis.
Gesture Typing
The Google keyboard allows you to slide across the screen to type.
To enable Glide Typing:
• Touch and hold the comma (,) > Google Keyboard settings >
Gesture Typing.
• Touch Enable Gesture Typing to turn On/Off.
• Slide your finger from letter to letter to spell a word. Do not lift your
finger until you have completed spelling a word.
Google Voice Typing
Use voice recognition to convert speech to text. You must be connected to
mobile data or Wi-Fi.
• Touch the microphone on the keyboard.
• When “Try saying something” appears, speak what you want to type.
• Tap the microphone again to end recording.
Using Applications
Select applications are preinstalled on your phone. There are many more
available in the Play Store.
PlayStore
PlayStore is the application store for Android phones.
Browse through to find Applications. When you find an app you want,
download it and follow the installation instructions. You can also uninstall,
update and manage your downloaded apps.
Open an App
Simply touch an app to open it.
Uninstall an App
• Touch and hold an app icon.
• Touch the App Info window that appears.
• Touch UNINSTALL. Touch OK or CANCEL.
Note: Many preinstalled apps cannot be uninstalled.
Getting Connected
Connect to a Wireless Network
Wi-Fi allows you to connect to the internet when you are not within range of
a wireless network or when you want to conserve your wireless data.
• Touch the Home key > swipe up for apps > Settings > Wi-Fi.
• Touch the switch to turn Wi-Fi On/Off .
• When Wi-Fi is on, you will see a list of available Wi-Fi networks.
• Touch a network to connect. If the network you select is secure, you
will be prompted to enter a password. Touch Connect.
Add a Wi-Fi Network
You can manually add a Wi-Fi network when it does not appear in the list
of available networks.
• Touch the Home key > swipe up for apps > Settings > Wi-Fi.
• Make sure Wi-Fi is ON.

20 21
• Touch Add Network.
• Enter the network SSID and other required network information.
• Touch Save.
Forgetting a Wi-Fi network
• Touch the Home key > swipe up for apps > Settings > Wi-Fi.
• Then drag the app to the top of the screen where it says “Remove”
and let go off the app to uninstall it
Connecting to Bluetooth Devices
Connect with other Bluetooth devices that are located within a distance
of approximately 30 feet. Bluetooth devices must be paired in order to
connect.
• Touch the Home key > swipe up for apps > Settings >
Bluetooth.
• Touch the switch to turn Bluetooth On/Off.
• When Bluetooth is ON, the will appear in the status bar.
Pairing Your Phone with Another Bluetooth Device:
• Make sure Bluetooth is turned ON.
• To easily identify your phone, you can change the name.
• Touch Home > swipe up for apps > Settings > Bluetooth.
• Touch (;) > Rename this device .
• Enter a name and touch RENAME to continue.
• Your phone will scan for and display the names of all available
Bluetooth devices in the area. Touch > Refresh if you want your
phone to scan again.
• Touch the name of the device you want to pair with.
Note: The Bluetooth passkey, if required, may be fixed for some devices.
Try 0000 or 1234, or refer to the instructions that came with the device.
Forgetting a Bluetooth Device
• Touch the Home key > swipe up for apps > Settings >
Bluetooth.
• Touch the Setting icon next to the device you want to forget.
• Touch FORGET.
Connecting to a Computer
Using the supplied USB cable, connect your phone to a computer to share
files such as music, photos and other data.
• Connect your phone and computer via a USB cable.
• Touch Home > swipe up for apps > Settings > Connected
Devices > USB.
• Select one of the following options:
• Charge this device
• Transfer files
• USB Tethering
• Transfer Photos (PTP)
• Use device as MIDI
Note: Before using MTP, be sure Windows Media Player 11 or higher is
installed on your computer.
Using micro SD Card for Storage
You can use portable storage via a micro SD card to store media and other
data.
When you install a new micro SD card, the phone will mount the card as
portable storage.

22 23
To install, locate the card slot on the side of the phone. Carefully insert the
card into the slot and replace the back cover.
To set up the card for storage:
• Touch the Home key > swipe up for apps > Settings >
Storage.
• Touch the SD card name in the PORTABLE storage section.
• You can choose to “Use as Portable Storage” or “Use as Internal
Storage”
• If you Select “Use as Portable Storage” then you can select next and
then select done
• If you Select “Use as Internal Storage” then select next and then click
“Erase and Format”
WARNING! The formatting procedure erases all data on the micro SD
card. Once erased, data cannot be retrieved.
You will be prompted to move your photos, files and other data from the
phone’s internal storage to the SD card. Select MOVE NOW or MOVE
LATER and touch next. Follow onscreen instructions to continue.
Move Data Between SD card and Internal Storage
• Touch the Home key > swipe up for apps > Settings >
Storage.
• Touch PHONE or the SD card name.
• Touch Migrate Data.
• Touch Move.
Note: When you move data between the phone’s internal memory and
external SD card, the destination becomes the default for new apps and
other data like photos and videos.
To remove an SD Card from Your Phone:
It is important to properly remove an SD card for safe removal.
• Touch Home > swipe up for apps > Settings > Storage.
• Touch SD card Name under Device Storage.
• Touch Remove SD Card.
IMPORTANT! Before removing, be sure you move data and apps to the
phones internal storage.
• Touch Eject.
• When the screen indicates the card is safely ejected, you can
physically remove it from the phone.
To reformat your SD Card as Portable Storage:
Before reformatting, be sure you move data and apps to the phones
internal storage.
• Touch Home > swipe up for apps > Settings > Storage.
• Touch the name of the SD Card.
• Touch Format as Portable.
• Touch Format.
IMPORTANT! The reformatting process will erase all data on the micro
SD card. This data cannot be retrieved.
Sharing Your Phone’s Data Connection
You can share your phone’s mobile data connection with a computer via
a USB connection or with up to eight devices via a Wi-Fi hotspot. Data
charges may apply.
To share Via Bluetooth Tethering:
• Connect your phone to a computer via a USB cable.
• Touch the Home key > swipe up for apps > Settings >
“Wireless & networks”>More>Tethering & Mobile Hotspot
• Turn on bluetooth Tethering. A new network connection will be
established on your computer.

24 25
To share Via USB:
• Connect your phone to a computer via a USB cable.
• Touch the Home key > swipe up for apps > Settings >
Wireless & Network > More > Tethering & Mobile Hotspot.
• Turn on USB Tethering.
• A new network connection will be established on your computer.
To Share Via a Wi-Fi Hotspot:
• Touch the Home key > swipe up for apps > Settings >
Wireless & Network > More > Tethering & Mobile Hotspot.
• Turn the slider to ON - for the option that says “Mobile Hotspot” and
then follow the onscreen prompts to setup the external devices to use
the available mobile hotspot.
• On another device, locate your phone on the list of available Wi-Fi
networks and connect to use your phone’s mobile data.
• To disconnect, switch to the OFF position.
Making Phone Calls
Place a Call by Dialing
• Touch > .
• Enter the phone number.
• Touch below the keyboard to dial.
To End a Call
• Touch to end the call.
Answering or Rejecting a Call
When you receive a call, the incoming call screen opens, displaying the
caller ID information for the call. You can:
Answer the call:
• If the Phone Screen is active, press ANSWER.
• If the Phone screen is locked, touch and slide to right.
Reject the Call:
• If the phone screen is active, press Dismiss.
• If the phone screen is locked, slide left.
Reject the Call with a Text message:
You can reject the call and send either a preset or custom text message.
• If the phone Screen is active, touch call number to access full options”
then “Slide” to .
• If the Phone screen is locked, Slide” up to .
Call History
Call History is a list of all calls placed and received, including missed calls.
It offers a convenient way to dial a number, return a call or add a number
to your Contacts.
• Touch > > Call History.
• Or, touch > in the tab at the top of the screen.
To place a call from Call History:
• Open Call History.
• Touch the number for information about the call or touch to call
the number.
To add a Contact from Call History:
• Open Call History.
• Touch in front of the number.
• Touch at the top right on the screen to create new contact.
• Touch to Create new Contact.

26 27
• To add the number to an existing contact, touch a contact in the list.
Placing a Call from your Contacts List
• Touch > at the tab at the top of the screen.
• Touch a contact to place a call.
• Or place a call from contacts in the FAVORITES tab.
Checking Voice Mail
• Touch > .
• Touch and hold the “1” key on the keypad. When prompted, enter
your voicemail password.
• Follow the voice prompts to listen to messages and manage your
mailbox.
In-Call Options
While on a call, there are a number of options available:
• Touch to put a call on hold.
• Touch to make a second call, while placing the first call on hold.
• Touch to go to contacts.
• Touch to go to keypad for when you need to enter a number (for
example, a PIN number for your voicemail).
• Touch to mute or unmute the microphone.
• Touch to turn the speaker On/Off.
• Touch to put current call on hold and switch to another call that is
already on hold.
• Touch to merge separate calls into a single conference call.
• Touch to end current call.
Managing Multi-party Calls
With Call Waiting and Three-way Calling, you can switch between two
calls or set up a conference call.
Note: Call Waiting and Three Way calling are network supported services.
Options may vary. Additional charges may occur. Contact your service
provider for additional information.
Switching Between Current Calls
When on a call, your phone screen will alert you that another call is
coming in and display Caller ID detail on the screen.
• Swipe right to answer the call. This action puts the first call on
hold.
• To switch between the calls touch phone number on screen to switch
between calls.
• Touch on the call you are on to end it.
• To Reject SWIPE left.
• Swipe up to reject the incoming call and send a preset message
to the caller.
Set up a Three Way Call
• While on a call, touch and dial the second number. The first call
will be placed on hold.
• When the second party answers, touch to connect both parties.
• To end, touch .
Call Settings
You can set the order in which your contacts are displayed.
• Touch > > Settings > Display Options.
• Touch SORT BY or NAME FORMAT to customize.

28 29
Sound and Vibrations
• Touch > > Settings > Sounds and Vibration.
• Touch Phone ringtone to select the desired ringtone.
• Touch Also Vibrate for Calls to turn On/Off.
• Touch Dialpad tones to turn On/Off audible sounds when you
touch the keypad.
• Touch Dialpad tone Length and then select either, “Normal or Long.”
Voicemail
• Press Home > > > Settings > Calls > Voicemail >
Advanced Settings.
• SERVICE is your carrier.
• Tap SETUP > Voicemail Number to edit/view the voicemail number.
• Tap > > Settings > Voicemail > Notifications to set up a
notification ringtone for new voicemails.
• Check Vibrate to enable for voicemail notification.
Contacts
Add new contacts and synchronize them with your Google account and
other accounts.
To access contacts:
Touch the Home key > swipe up for apps > Contacts .
Adding a New Contact
• Touch the Home key > swipe up for apps > Contacts .
• Touch the sign on the lower right.
• Enter the contact name, phone numbers and email addresses, etc.
Touch SAVE to create the contact.
Favorites
You can designate frequently used contacts as FAVORITES and find them
quickly.
To add a Contact to Favorites:
• Touch the Home key > swipe up for apps > Contacts .
• Select a Contact and tap the at the top of the screen.
To remove a Contact from Favorites:
• Touch the Home key > swipe up for apps > Contacts .
• Select a Contact and tap the at the top of the screen.
Edit a Contact
• Touch the Home key > swipe up for apps > Contacts .
• Tap a contact and then touch .
• Edit the contact and touch .
To set a Ringtone for a Contact:
• Touch the Home key > swipe up for apps > Contacts .
• Touch a Contact then touch .
• Tap the .
• Touch SET RINGTONE.
• Scroll through and select your preferred ringtone.
• Touch OK.
To delete a Contact:
• Touch the Home key > swipe up for apps > Contacts .
• Touch the contact you want to remove.
• Tap the .
• Touch DELETE.
• You will be prompted to confirm by touching DELETE.

30 31
EMAIL
You can add multiple email accounts to your Orbic phone.
Adding an Email Account
• Touch the Home key > swipe up for apps > Settings >
Accounts > Add Account.
• Tap the type of account you want to add.
• Follow on screen prompts to enter information about the account.
Most accounts require user name and password. You may have to
obtain some information from your system administrator or IT support.
Removing an Account
• Touch the Home key > Settings > Accounts.
• Tap the Account you wish to remove.
• Tap
• Touch REMOVE ACCOUNT.
• You will be prompted to confirm by touching REMOVE ACCOUNT.
Or touch CANCEL to keep the account.
Responding to Email
You can reply to or forward an email you receive. You can also delete
email messages.
• Touch Home > .
• Touch an email to respond to or forward.
• To reply to sender, tap .
• To Reply All tap and select Reply All.
• To Forward, tap and select Forward.
• Compose your message and hit .
Composing and Sending an Email
• Touch Home > .
• Touch .
• If you have more than one email address set up, tap the sender line
to select the account you wish to send from.
• Enter a contact name or email address in the To field.
• To send to multiple recipients, separate each with a comma.
• You can also touch to add recipients from your Contacts.
• To send a copy or blind copy, touch the to open cc/bcc fields
and enter contacts.
• Enter email subject and compose the email.
• Tap to attach files, images or other content.
• Tap to send the email message.
Add a Signature to Email
You can add plain text, such as your name and contact information, as a
signature for every email you send.
• Touch Home > .
• Tap > Settings .
• Tap an email account > Mobile Signature.
• Enter the information and touch OK.
Email Settings
Customize your email settings.
Note: Settings apply to all email accounts you have set up.
• Touch Home > .
• Tap > Settings > General Settings.

32 33
• Customize based on your preferences and tap when complete.
MESSAGING
Messaging allows you to exchange text messages (SMS) and multimedia
messages (MMS).
• Touch Home > .
You can compose a new message, open an existing message thread or
search for a message.
• Tap to compose a new SMS or MMS.
• Tap an existing message thread to open a conversation.
• Tap to search for a message using keywords.
Sending a Message
• On the messaging screen Tap .
• Touch the To field to add recipients:
• Enter a recipients number or contact name.
• Touch to add recipients from your contacts.
• Touch > to create new group.
• Type your message in the text message field. If you want to send a
MMS, tap +and scroll down to select an attachment.
• Tap to send your message.
Replying to a Message
• On the messaging screen, tap the message you wish to respond to.
• Type your message in the text field. If you want to send a MMS, tap
+and scroll down to select an attachment.
• Tap to send your response.
Forwarding a Message
• In the messaging app, touch and hold a message.
• Tap forward message and click arrow in top right corner.
• Tap on a recipient, or touch NEW MESSAGE.
• Edit the content, if necessary.
• Tap to send.
Deleting a Message or Thread
• On the messaging screen, tap and hold a message or thread you
want to delete.
• Select delete message and tap .
Message Settings
• From the message screen, Tap and select Settings. Customize
based on your preferences.
Calendar
The calendar on your phone works with both Google Calendar™ and
Microsoft Exchange Active Sync.
To open calendar:
• Touch the Home key > swipe up for apps > Calendar .
Creating an Event
• Touch the Home key > swipe up for apps > Calendar .
• Tap .
• Tap Event and enter the details for your event.
Deleting and Sharing an Event
• Select the event you want to delete or share.
• Tap on it to open the details screen.

34 35
• Tap .
• Tap Delete or Forward to share.
Calendar Settings
• Touch the Home key > swipe up for apps > Calendar .
• Tap on upper left of the screen.
• Scroll down and tap Settings.
• Make your selections to customize the calendar.
Internet Browser - Google Chrome
Use Google Chrome to view web pages and search for information on the
internet.
• Touch Home > Chrome .
The last web page you viewed will be displayed. Google Chrome will also
open when you tap a web link, for instance, in an email or text message.
Open a web page
• Tap the address bar on the screen.
• Enter the web address (aka URL) or, enter terms you want to search.
• Tap to open a web page or search results.
Camera
Taking a Photo
• Touch Home > .
• Aim the camera at the subject. Tap the area of the screen where you
want the camera to focus, or allow the camera to autofocus on the
center of the image.
• Tap to take the picture. You can also use the volume keys to take
a photo.
Note: Pinch or spread out your fingers to zoom in/out.
WARNING! Keep a safe distance when using the flash. Do not point the
flash toward the eyes of people or animals.
Recording A Video
You can record videos using either the front or rear camera.
• Touch Home > .
• Tap the camera icon on the lower right to switch to video mode .
• Touch the red button to start/stop recording.
Note: Pinch or spread out your fingers to zoom in/out before or during the
recording.
Camera Setting
Before capturing a photo or video, you can adjust the camera settings,
based on your preferences.
• Touch Home > Camera > Settings .
Google Photos
Your photos and videos are stored in the Google Photos app. Sign in to
your Google account to use these features.
• Touch the Home key > swipe up for apps > Photos .
• Tap Assistant for help creating albums, photo books, and collages.
• Tap Albums to view photos and videos within an Album.
Share Albums, Photos or Videos
• Tap an Album, Photo or Video to select it.
• Tap and select how you want to share the items.

36 37
Delete Albums, Photos or Videos
• Press and hold an Album, Picture or Video to select it.
• Tap on other items you want to delete.
• Tap > Remove to Trash.
Editing Photos
• Tap a photo to view it in full screen.
• Tap .
• Select from list for available options to edit selected picture.
Create an Animation or Collage
Open the photo gallery and tap > Animation or Collage.
Tap the images you wish to include.
Tap Create.
Note: For a Collage, select 2–9 photos. For an Animation, select 3–50
photos.
Playing Videos
• From your gallery, tap the thumbnail of a video and it will begin
playing.
• Tap the video to view playback controls.
Music
Touch the Home key > swipe up for apps > Play Music .
Copying Music Files to Your Phone
• Connect your phone to your computer via a USB cable.
• If prompted, Tap Media Device (PTP) as the connection type.
• Copy music files from your computer to the phone’s storage of a
micro SD card.
You can also download music files using Google Play Music (a subscription
is required).
View Your Music Library
• Touch the Home key > swipe up for apps > Files .
• Tap > Audio.
• If you subscribe to Google Play Music, tap Home > swipe up for
apps > Play Music > > Music library.
Videos
With Google Play Movies & TV, you can buy or rent videos. You must be
signed into your Google account.
• Touch the Home key > swipe up for apps > Play Movies .
Managing Video Files
• Touch the Home key > swipe up for apps > Play Movies .
• Tap Library.
• Tap Movie or TV Shows.
Delete a Video
You can remove a video from your device, without deleting it from your
account.
• Touch the Home key > swipe up for apps > Play Movies .
• Tap Library.
• Tap Movies or TV Shows.
• Select the video you wish to remove.
• Tap > Remove from Device.

38 39
Other Apps
Calculator
• Touch the Home key > swipe up for apps > Calculator .
• While in portrait mode, tap or swipe left on the blue side bar for
more options. Or, turn the phone to landscape view.
Clock
With the Clock app, you can set times, set alarms and check the time for
destinations around the world.
• Touch the Home key > swipe up for apps > Clock .
Setting an Alarm
• Touch the Home key > swipe up for apps > Clock .
• Tap .
• Tap .
• Select alarm options and OK.
Using World Time
• Touch the Home key > swipe up for apps > Clock .
• Tap .
• Touch the Globe icon and enter a location in the search bar.
Stopwatch and Countdown Timer
Stopwatch allows you to record lap times and Countdown allows you to set
a timer and countdown to zero.
• Touch the Home key > swipe up for apps > Clock .
• Tap for stopwatch.
• Tap for countdown timer.
Google Apps
Many of these apps can be found in the Google folder on the home screen
.
Chrome™ – Use Chrome to browse the Internet.
Drive – Store files on Google Drive. with up to 15GB of free storage.
Access your files from other devices. Sign in with your Google account.
Duo – Make high quality video calls.
Gmail™ – Send and receive email.
Google – Use Google search to get all of the information you need.
Maps – Find the best route to get wherever you are going.
Photos – Manage photos on your phone and your Google account.
Play Movies and TV – Purchase/Rent, download and watch the latest
movies and TV shows.
Play Music – Listen to music on your phone and your Google account.
Play Store – Find and download apps, games and more.
YouTube™ – View video clips or upload your own.
Settings
You can access tools needed to customize and configure your phone.
• Touch the Home key > swipe up for apps > Settings .
Wireless & Network
Wi-Fi
Turn Wi-Fi On/Off and configure settings.
Advanced Calling
Toggle advanced calling (HD Voice) on/off
Mobile Network
Table of contents
Other Orbic Cell Phone manuals

Orbic
Orbic Q10 User manual

Orbic
Orbic JOY User manual

Orbic
Orbic JOY User manual

Orbic
Orbic maui User manual

Orbic
Orbic JOURNEY X User manual

Orbic
Orbic Q10 Installation instructions

Orbic
Orbic JOURNEY V User manual

Orbic
Orbic FUN+ User manual

Orbic
Orbic Verizon Journey User manual

Orbic
Orbic SLIM User manual