Orbic FUN+ User manual


2
Table 0f Contents
Getting Started............................................................3
Phone Features ...........................................................3
Inserting a SIM card
and Micro SD Card......................................................5
Charging the Battery.................................................6
Turning your Phone ON/OFF................................7
Using On-Screen Gestures....................................8
Locking and Unlocking your Phone................9
SettingUpE-mailAccounts.................................10
Making and Receiving a Call................................11
Sending a Text Message.......................................11
Camera............................................................................12
Google™ Play Store.................................................14
Installing the Apps...................................................14
Uninstalling the Apps.............................................15
Improving Accessibility.........................................16
Connecting to Wi-Fi................................................16
Specific Absorption Rate
(SAR) Safety.................................................................17
5GHz WiFi Notice......................................................18
For our European Customers............................19
Support and More....................................................21
3
Getting Started
Thank you for choosing the Orbic FUN+.
This guide helps you to get started with your
device for the first time.
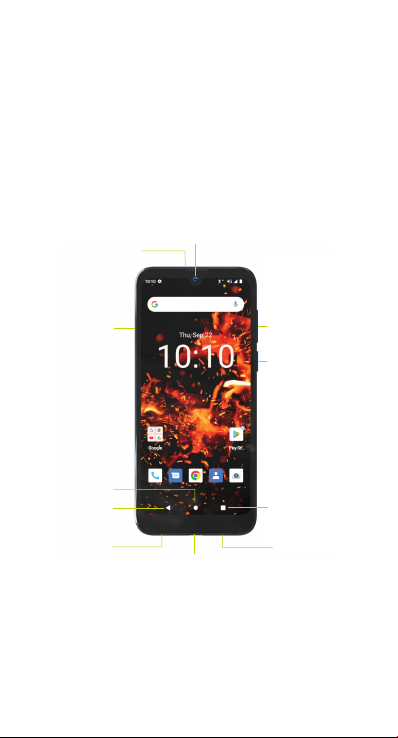
Phone Features
NOTE : The screen images and icons here
are for reference only since the software
constantly evolves.
Volume Keys
Receiver
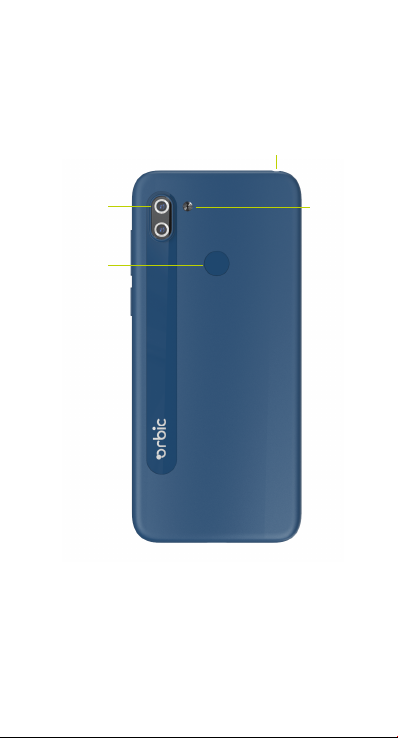
SIM/Micro SD
Card Slot
Home Button
Back Button
Microphone Speaker
Recent Apps
Button
USB/Charging
Port
Power/Lock
Key
Front Camera
4
Back Camera
Headset Jack
Fingerprint
Reader
Flash

5
Inserting SIM Card and
MicroSD Card
Insert the SIM tool in the SIM pinhole to
release the tray (as shown in the figure
below). Place the SIM card in the slot with the
gold contacts facing down and close the tray.
Your device is now ready to be used.
The SIM tray also has a slot for microSD
card that can be inserted following the
steps mentioned above.
NOTE : The microSD card is sold seperately.

6
Charging the Battery
Before using your device, Orbic
recommends to fully charge the battery
(100%).
1. Insert the smaller end (USB Type-C)
into the device and the larger end (USB
Type-A) into the charger adapter.
2. Plug the charger into an electrical
outlet that is close to the device and is
easily accessible.
Warning! Use only approved chargers with
your device. Incompatible chargers that are
tampered with may damage the device and
void the warranty.

7
Turning your Phone ON/OFF
To Power ON/OFF Your Device
To turn ON,
• Press and hold the Power/Lock key.
To turn OFF,
• Press and hold the Power/Lock key and
follow the prompts.

8
Using On-screen Gestures
Use the on-screen gestures to move
around the screen, open menus, select
items, zoom in or out on web pages, and
more.
• Tap - To open an app, select a menu
item, press an on-screen button, or to
enter a character using the keyboard
on the screen, tap it with your finger.
• Touch and hold - Touch and hold an
item or the screen for more than 2
seconds to access available options.
• Drag - To move an item, touch and hold
it and drag it to the target position.
• Double-Tap - Double-tap on a web
page or image to zoom in. Double-tap
again to return.
• Swipe - Swipe to the left or right
on the screen to scroll left or right.
Swipe upwards or downwards to scroll
through a web page or a list of items.
• Spread and Pinch - Spread two
fingers apart on a web page, map, or
image to zoom in on a part. Pinch to
zoom out.

9
Locking and Unlocking the
Phone
To Lock the Screen
• Press the Power/Lock key. This action
prevents the accidental keypress.
To Unlock the Screen
• Press the Power/Lock key and swipe
up on the screen.

10
Setting Up Email Accounts
1. Tap the Home key > swipe up for
apps > Settings > Passwords &
accounts > Add account.
2. Tap the type of account you want to
add.
3. Enter your email address and
password.
4. Follow the on-screen instructions to
set up your email account.
Other manuals for FUN+
1
This manual suits for next models
1
Table of contents
Other Orbic Cell Phone manuals


