Orbit ORBITX305 User manual

OrbitX305 Assembly Instrucons
OrbitX305

Spare part list 3
4
5
6-7
8-10
Spare part list
Spare part list
Assembly(1)
Assembly(2)
Assembly(3)
Assembly(4)
Assembly(5)
11-12
13-14
15-16
17-18
19-20
21-22
23-24
25-26
27-29
Assembly(6)
Assembly(7)
Assembly(8)
Assembly(9)
Assembly(10)
Table of Contents
Owner’s Manual Orbit X305
C
AUTION:
E
xercise of a strenuous nature, as is customarily done on this equipment, should not be undertaken
w
ithout first consulng a physician. Nospecific health claims are made or implied as they relate to
t
he equipment. Measurements made by the equipment are believed tobe accurate, but only the
m
easurements of your physician should be relied upon.
I
MPORTANT:
R
ead all instrucons carefully before using this product. Retain this product owner's manual for
future reference.
Warranty Card................................................................................................ ................................

Spare parts list
3
No. Descripon Note Qty.
1 connecon tube 1
2 upright frame le1
3 upright frame right 1
4 bending tube le1
5 bending tube right 1
6 upper connecon tube 1
7 upper bending tube right 1
8 upper bending tube le1
9 hexagon bolt M10x75 54
10 lock nut M10 100
11 washer Φ10 210
11 washer Φ10 1
12 chin up bar 4
13 upper plate 1
14 pulley frame tube right 1
15 pulley frame tube le2
16 upright tube 1
17 tube with hole right 1
18 tube with hole le4
19 lower plate 1
20 sliding tube right 1
21 sliding tube le2
22 foot tube cover 2
23 end tube 14
24 hexagon bolt M10x80 2
26 upper base 2
27 guide rodΦ25x1850 2
28 lock sleeve 2
29 sliding sleeve 2
30 rubber pad with groove Φ60xΦ26x45 2
31 safety hook right 1
32 safety hook le1
33 hexagon bolt M10x90 8
34 socket set screw M8x10 2
35 end cap 2

4
Spare parts list
No. Descripon Note Qty.
36 check ring 2
37 pipe
Φ
2
38 buon head socket screw M12x40 2
39 spring washer Φ12 2
40 washer Φ12 2
41 barbell rod 1
42 inner pipe
Φ
2
43 rubber pad Φ60xΦ26x25 2
44 rubber pad Φ60xΦ26x42 4
45 guide rod hollowΦ25x1955 4
46 reinforcing plate 4
47 weight stack 2
48 hexagon bolt M10x20 8
49 wire Φ5x2745mm 2
50 pulley Φ95 20
51 pulley plate 4
52 hexagon bolt M10x45 14
53 hexagon bolt M10x50 4
54 hexagon bolt M10x25 7
55 weight 2
56 wire Φ5x4095mm 2
57 ”-“ shape pulley frame 2
58 pulley spacer sleeve
Φ
16
59 pulley Φ50 6
60 wire 2
61 barbell plate holder 6
62 connecon strap 1
63 shield le1
64 shield right 1
65 hexagon bolt M6x16 10
66 washer Φ6 10
67 hook 4
68 “+"sloed countersunk head bolt M4x12 8
69 lock nut M4 8
70 hexagon bolt M8x20 12

Spare parts list
5
0 1 6 7 8 9 10 11 12 13 14 152 3 4 5
Bolt length measurement ruler
cm
71 washer Φ8 12
72 core trainer 1
73 powder metallurgy sleeve 2
74 barbell rod cup 1
75 big washer Φ25x10x2.0 1
76 hexagon bolt M10x95 2
77 dip bar le1
78 dip bar right 1
79 barbell rod holder right 1
80 barbell rod holder le1
81 barbell rod holder short le1
82 barbell rod holder short right 1
83 long bar 1
84 ship rod 1
85 hand belt 2
86 pull lidevice 1
87 T shape pin Φ10x100 1
88 leg curl tube 1
89 barbell clamp collar 2
90 selector rod 2
91 weight pin 2

Assembly step(1)explosion drawing
6
8
2
6
4
1
5
3
7
9
10
11
9
9
10
9
9
9
10 11
10
10
9
10
9
9
10
11
No. Descripon Note Qty.
1 connecon tube 1
2 upright frame le1
3 upright frame right 1
4 bending tube le1
5 bending tube right 1
6 upper connecon tube 1
7 upper bending tube right 1
8 upper bending tube le1
9 hexagon bolt M10x75 16
10 lock nut M10 16
11 washer Φ10 32

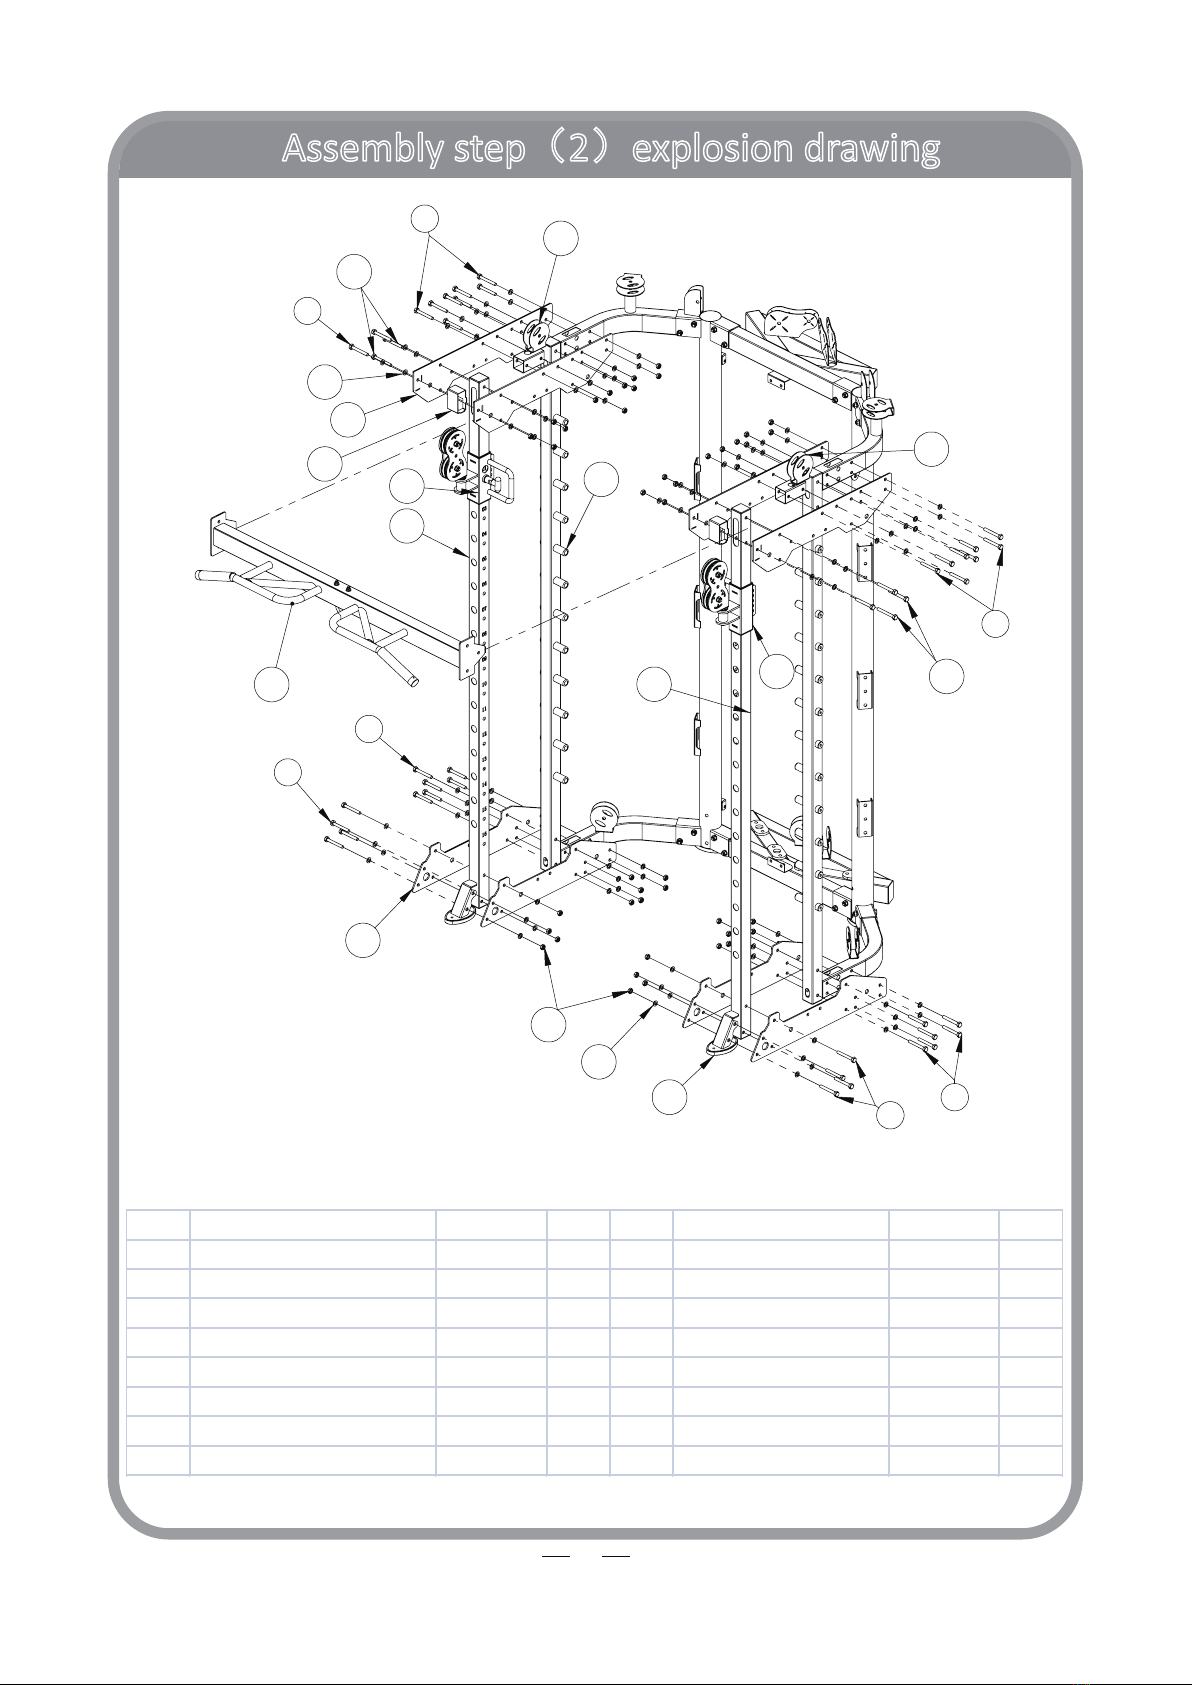
Assembly step(1)drawing
7
Assembly step(1)assembly instrucon
1Fix bending tube le-4 fastening on upright frame le-2 using M10x75 hexagon bolt-9, Φ10
washer-11 and M10 lock nut-10
2Fix bending tube right-5 fastening on upright frame right-3 using M10x75 hexagon bolt-9, Φ
10 washer-11 and M10 lock nut-10
3Fix connecon tube-1 fastening with bending tube le-4, bending tube right-5 using
M10x75 hexagon bolt-9, Φ10 washer-11 and M10 lock nut-10
4Fix upper connecon tube-6 fastening on upright frame using M10x75 hexagon bolt-9, Φ10
washer-11 and M10 lock nut-10
5Fix upper bending tube le-8 fastening on upright frame le-2 using M10x75 hexagon bolt-
9, Φ10 washer-11 and M10 lock nut-10
6Fix upper bending tube right-7 fastening on upright frame right-3 using M10x75 hexagon
bolt-9, Φ10 washer-11 and M10 lock nut-10

Assembly step(2)explosion drawing
8
12
13
15
14
16
18
17
19
21
20
22
9
11
10
11
23
9
24
9
9
9
9
9
24
No. Descripon Note Qty. No. Descripon Note Qty.
9 hexagon bolt M10x75 38 17 tube with hole right 1
10 lock nut M10 44 18 tube with hole le1
11 washer Φ10 88 19 lower plate 4
12 chin up bar 1 20 sliding tube right 1
13 upper plate 4 21 sliding tube le1
14 pulley frame tube right 1 22 foot tube cover 2
15 pulley frame tube le1 23 end tube 2
16 upright tube 2 24 hexagon bolt M10x80 6

Assembly step(2)Enlarged View
9
9
924
24
24
23
14
9
9
10
22
19
19
17
11

Assembly step(2)drawing
10
Assembly step(2)assembly instrucon
1
Fix sliding tube le-21 on tube with hole le-18
2
Fix sliding tube right on tube with hole right-17
3Fix upright tube-16 and tube with hole le-18 fastening on assembly step-1 using M10x75
hexagon bolt-9, Φ10 washer-11, M10 lock nut-10, upper plate-13 and lower plate-19
4Fix pulley frame tube right-14 and pulley frame tube le-15 fastening on upper plate-13
using M10x75 hexagon bolt-9, Φ10 washer-11 and M10 lock nut-10
5Fix end tube-23 fastening on upper plate-13 using M10x75 hexagon bolt-9, Φ10 washer-11
and M10 lock nut-10
6Fix foot tube cover-22 fastening on lower plate-19 using M10x75 hexagon bolt-9, Φ10
washer-11 and M10 lock nut-10
7
Fix chin up bar-12 fastening on upper plate-13 using M10x80 hexagon bolt-24, Φ10 washer-
11 and M10 lock nut-10

Assembly step(3)explosion drawing
11
33 11
26
34
10
36
42
37
35 40
39 38
25
25
27
29
28
30
31
32
29
41
33
33
38
33
43
43
30
10 11
89
No. Descripon Note Qty. No. Descripon Note Qty.
10 lock nut M10 8 34 socket set screw M8x10 2
11 washer Φ10 16 35 end cap 2
25 lower base 2 36 check ring 2
26 upper base 2 37 pipe Φ50x310xT0.5 2
27 guide rodΦ25x1850 2 38 buon head socket screw M12x40 2
28 lock sleeve 2 39 spring washer Φ12 2
29 sliding sleeve 2 40 washer Φ12 2
30 rubber pad with groove Φ60xΦ26x45 2 41 barbell rod 1
31 safety hook right 1 42 inner pipe Φ48x298x2.5T 2
32 safety hook le1 43 rubber pad Φ60xΦ26x25 2
33 hexagon bolt M10x90 8 89 barbell clamp collar 2

Assembly step(3)drawing
12
Assembly step(3)assembly instrucon
1Fix lower base-25 fastening on lower plate using M10x90 hexagon bolt-33, Φ10 washer-11
and M10 lock nut-10
2
Fix upper base-26 fastening on upper plate using M10x90 hexagon bolt-33, Φ10 washer-11
and M10 lock nut-10
3Guide rod in turn through lock sleeve-28, sliding sleeve-29, rubber pad-43, safety hook le-
32 and rubber pad with groove-30 fastening on base using M8x10 socket set screw-34
4
Barbell rod-41 in turn through sliding sleeve-29, check ring-36, inner pipe-42, pipe-37 and
end cap-35 fastening using M12x40 buon head socket screw-38, Φ12 spring washer-39
and Φ12 washer-40, then fit on barbell clamp collar-89
5Guide rod in turn through lock sleeve-28, sliding sleeve-29, rubber pad-43, safety hook right-
31 and rubber pad with groove-30 fastening on base using M8x10 socket set screw-34

Assembly step(4)explosion drawing
13
45
47
44
48
11
46
90
91
No. Descripon Note Qty.
11 washer Φ10 8
44 rubber pad Φ60xΦ26x42 4
45 guide rod hollowΦ25x1955 4
46 reinforcing plate 4
47 weight stack 2
48 hexagon bolt M10x20 8
90 selector rod 2
91 weight pin 2

14
Assembly step(4)drawing
Assembly step(4)assembly instrucon
1
Fix weight pin-91 fastening on selector rod-90
2
Guide rod hollow-45 in turn through rubber pad-44, weight stack-47 and fastening on
reinforcing plate-46 using M10x20 hexagon bolt-48, Φ10 washer-11 and M10 lock nut-10

Assembly step(5)explosion drawing
15
49
54
11
10
52
53
54
53
50
51
Wire port
outside of
sliding sleeve
51
53
53
51
10
55
No. Descripon Note Qty.
10 lock nut M10 6
11 washer Φ10 14
49 wire Φ5x2745mm 2
50 pulley Φ95 6
51 pulley plate 4
52 hexagon bolt M10x45 2
53 hexagon bolt M10x50 4
54 hexagon bolt M10x25 2
55 weight 2

16
Assembly step(5)drawing
Assembly step(5)assembly instrucon
1
Connect wire-49 with weight-55, put them intoupring frame
2Fix pulley-50 fastening on upper bending tube using M10x50 hexagon bolt-53, pulley plate-
51, Φ10 washer-11 and M10 lock nut-10
3Fix pulley-50 fastening on upper bending tube using M10x45 hexagon bolt-52, Φ10 washer-
11 and M10 lock nut-10
4Fix wire-49 fastening on sliding sleeve outside using M10x25 hexagon bolt-54, Φ10 washer-
11 and M10 lock nut-10

Assembly step(6)explosion drawing
17
56
54
11
10
24
24 54
24
58
24
52
57
50
50
Wire needs to keep vertical
52
10
11
No. Descripon Note Qty.
10 lock nut M10 8
11 washer Φ10 16
24 hexagon bolt M10x80 4
50 pulley Φ95 6
52 hexagon bolt M10x45 2
54 hexagon bolt M10x25 2
56 wire Φ5x4095mm 2
57 ”-“ shape pulley frame 2
58 pulley spacer sleeve Φ20x10.5xL20.5 8

18
Assembly step(6)drawing
Assembly step(6)assembly instrucon
Internal wire schematic
1
As the shown in the figure fix pulley-50 fastening on upper plate using M10x80 hexagon
bolt-24, Φ10 washer-11 and M10 lock nut-10 and pulley spacer sleeve-58
2
Fix pulley-50 fastening on ”-“ shape pulley frame-57 using M10x45 hexagon bolt-52, Φ10
washer-11 and M10 lock nut-10
3
As the shown in the figure put the wire-56 using M10x45 hexagon bolt-52, Φ10 washer-11
and M10 lock nut-10 fastening on bending tube, careful tokeep the wire vercal

Assembly step(7)explosion drawing
19
52
58
50
9
11
10
59
54
60
50
59
52
10
11
58
9
10
52
9
52
52
52
52
9
52
52
10
No. Descripon Note Qty.
24 hexagon bolt M10x80 4
10 lock nut M10 16
11 washer Φ10 32
50 pulley Φ95 8
52 hexagon bolt M10x45 10
54 hexagon bolt M10x25 2
58 pulley spacer sleeve Φ20x10.5xL20.5 8
59 pulley Φ50 6
60 wire 2

20
Assembly step(7)drawing
Assembly step(7)assembly instrucon
Internal wire schematic
1Fix pulley-50 fastening on ”-“ shape pulley frame-57 using M10x45 hexagon bolt-52, Φ10
washer-11 and M10 lock nut-10
2Fix pulley-50 fastening on lower plate using M10x80 hexagon bolt-24, Φ10 washer-11 and
M10 lock nut-10 and pulley spacer sleeve-58
3Fix pulley-50 fastening on lower bending tube using M10x45 hexagon bolt-52, Φ10 washer-
11 and M10 lock nut-10
4
As the shown in the figure put the wire-60 on the machine
Table of contents
Other Orbit Home Gym manuals