Orca 40 CL Manual

ORCA 40 CL
KABELLOSER POOLREINIGER / CORDLESS POOL CLEANER / ROBOT DE PISCINE SANS FIL /
PULITORE PER PISCINA SENZA FILI / LIMPIAFONDOS DE PISCINA INALÁMBRICO / ROBÔ DE
PISCINA SEM CABO / DRAADLOZE ZWEMBADREINIGER / ASPIRATOR FĂRĂ FIR PENTRU BAZA
BAZINULUI / SLADDLÖS BOTTENSUG / BEZDRÁTOVÝ BAZÉNOVÝ VYSAVAČ / BEZDRÔTOVÝ
BAZÉNOVÝ VYSÁVAČ / BREZŽIČNI ČISTILEC ZA BAZEN
BEDIENUNGS- UND WARTUNGSANLEITUNG / OPERATING AND MAINTENANCE
INSTRUCTIONS /NOTICE D’UTILISATION ET D’ENTRETIEN / ISTRUZIONI D’USO E
MANUTENZIONE / INSTRUCCIONES DE FUNCIONAMIENTO Y MANTENIMIENTO
/ INSTRUÇÕES DE OPERAÇÃO E MANUTENÇÃO / GEBRUIKS- EN
ONDERHOUDSINSTRUCTIES / INSTRUCȚIUNI DE OPERARE ȘI ÎNTREȚINERE / DRIFTS-
OCH UNDERHÅLLSINSTRUKTIONER / NÁVOD K POUŽITÍ A ÚDRŽBĚ / NÁVOD NA
POUŽITIE A ÚDRŽBU / NAVODILA ZA UPORABO IN VZDRŽEVANJE
RO SLSKCZNLESIT SWDE PTEN FR

2
COMPOSITION DU COFFRET
WICHTIGE VORSICHTSMASSNAHMEN ............................................................................. S. 3
EINFÜHRUNG .......................................................................................................................S. 4
ERSCHEINUNGSMERKMALE & AUFBAU ............................................................................S. 4
SPEZIFIKATIONEN ............................................................................................................... S. 5
BEDIENUNGSANLEITUNG ..............................................................................................S. 6-14
FEHLERBEHEBUNG .............................................................................................................S. 15
SUMMER .............................................................................................................................S. 15
PACKLISTE...........................................................................................................................S. 16
GARANTIE ...........................................................................................................................S. 17
INHALTSVERZEICHNIS

3
COMPOSITION DU COFFRET
1. Bitte lesen Sie diese Anleitung sorgfältig durch und verwenden Sie den Reiniger
entsprechend der Anleitung. Wir haften nicht für Schäden oder Verletzungen, die
durch unsachgemäßen Gebrauch verursacht werden.
2. Verwenden Sie nur das vom Hersteller empfohlene oder verkaufte Zubehör.
3. Dieses Modell ist vor allem für Schwimmbecken mit flachem Boden geeignet.
4. Bitte gestatten Sie Kindern nicht, darauf zu fahren oder damit zu spielen.
5. Verwenden Sie nur den originalen und zugelassenen Netzadapter.
6. Wenn die Ladeleitung beschädigt ist, muss sie von einem zertifizierten Fachmann
ersetzt werden.
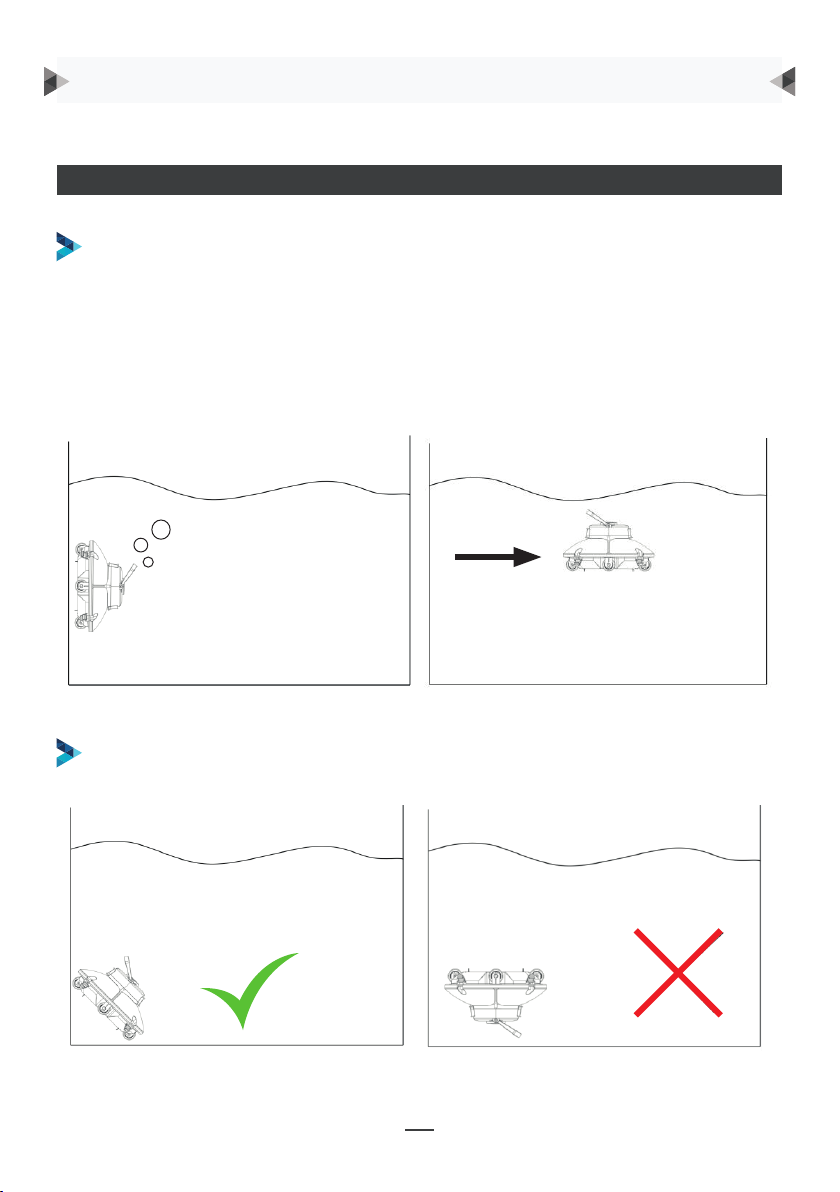
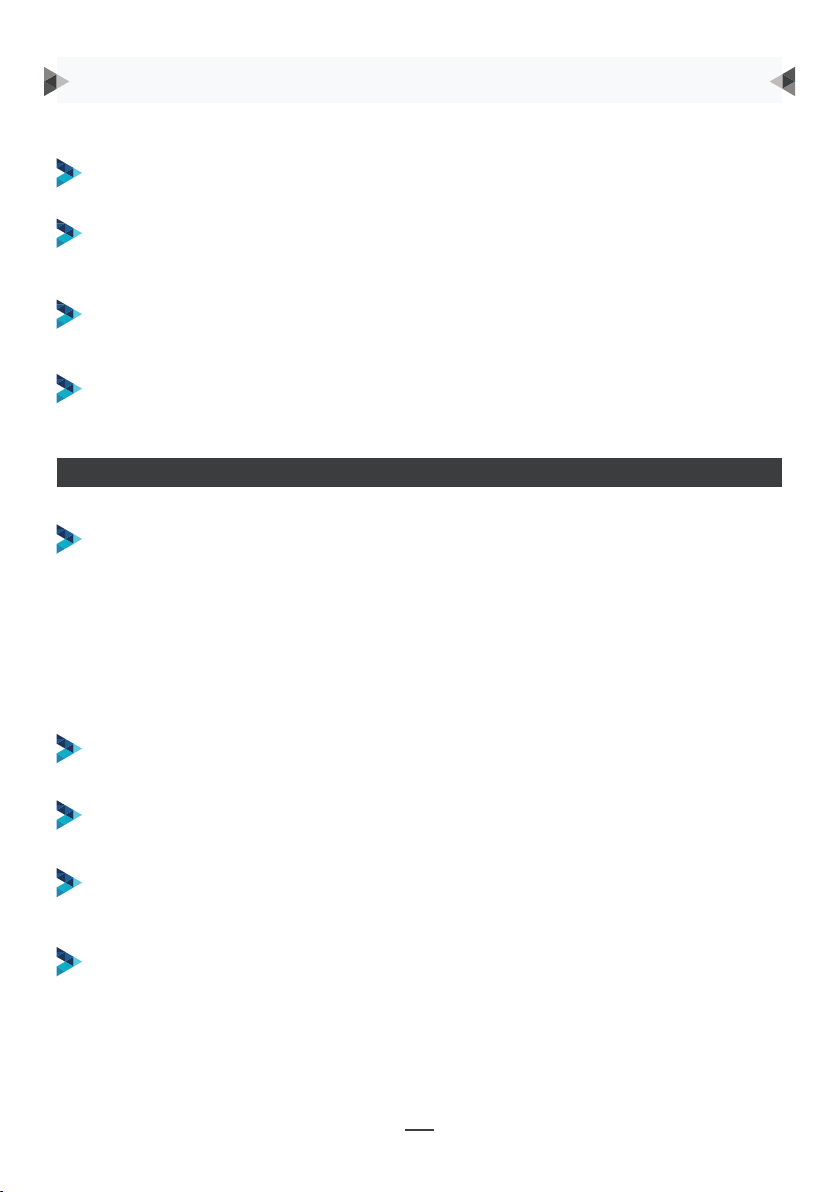
7. Schalten Sie den Reiniger nicht ein, wenn er nicht im Wasser liegt.
8. Die Ladeleitung muss während des Aufladens an eine geschützte und geerdete
Steckdose angeschlossen werden.
9. Betreiben Sie den Reiniger nicht, wenn sich Personen im Schwimmbecken befinden.
10. Waschen Sie die Filterschale nach jedem Gebrauch aus.
11. Schalten Sie den Reiniger während der Wartung, Reinigung oder bei Nichtbenutzen
aus.
12. Der Reiniger sollte an einem kühlen und gut belüfteten Ort gelagert werden. Vor
direkter Sonneneinstrahlung schützen.
13. Der Reiniger sollte während des Aufladens an einem kühlen Ort gelagert und nicht
abgedeckt werden, um eine Beschädigung der internen elektrischen Komponenten
durch Überhitzung zu vermeiden.
14. Der versiegelte Antriebssatz des Reinigers darf nur von Fachleuten zerlegt werden.
15. Betreiben Sie den Reiniger nicht, wenn der Schwimmbadfilter läuft.
16. Die Öldichtungen des Motors enthalten Fett, das bei Austritt zu
Wasserverschmutzung führen kann.
17. Aufgrund der begrenzten Batteriekapazität ist der Reiniger nur für kleine
Schwimmbecken geeignet, da sonst die Reinigungswirkung beeinträchtigt würde.
18. Der Reiniger sollte alle drei Monate aufgeladen werden, wenn er für längere
Zeit gelagert werden muss, damit sich die Batterie nicht vorzeitig abnutzt. Bitte
Verwenden Sie nur den originalen und zugelassenen Netzadapter. Wenn der
Reiniger lange Zeit nicht aufgeladen wird, sinkt die Batteriespannung aufgrund der
Selbstentladung der Batterie unter die Überentladungsschutzspannung, was zu
irreversiblen Schäden führen kann. Bitte achten Sie darauf.
19. Verwenden oder lagern Sie den Reiniger nicht in der Nähe einer Wärmequelle.
20. Es ist verboten, die Schale des Reinigers mit Nägeln oder anderen scharfen
Gegenständen zu durchbohren. Es ist verboten, auf den Reiniger zu hämmern, zu
schlagen oder Gegenstände darauf zu werfen.
21. Vergewissern Sie sich, dass der Ladeanschluss trocken ist, bevor Sie ihn aufladen.
WICHTIGE VORSICHTSMASSNAHMEN

4
UTILISATION
4
INSTALLATION
2
I. Introduction
The ORCA 40 CL robotic pool cleaner HJ1101J is a new type of rechargeable automatic cleaner that
will filter the pool water and gets rid of suspended particles without replacing the pool water. It’s
totally environmental-friendly.
Please read this user manual carefully before use.
II. Appearance characteristics & structure
Swing handle
Top cover
Filter tray
Chassis
Hook Charger
a mis en forme : Barré
ERSCHEINUNGSMERKMALE & AUFBAU
Der Poolreinigungs-Roboter ORCA 40 CL ist ein neuartiger, wiederaufladbarer
automatischer Reiniger, der das Poolwasser filtert und von Schwebstoen befreit, ohne
dass das Poolwasser ausgetauscht werden muss.
Bitte lesen Sie diese Bedienungsanleitung vor dem Gebrauch sorgfältig durch.
Schwenkbarer Gri
Haken
Obere Abdeckung
Filterschale
Fahrgestell
Ladegerät
EINFÜHRUNG

5
UTILISATION
5
INSTALLATION
1. Bezeichnung: Reiniger
2. Modell: ORCA 40 CL
3. Betriebsspannung: 12,6 V
4. Leistung: 30 W
5. Lebensdauer der Batterie: Max. 60 Minuten pro Zyklus
6. Nenneingangsspannung des Adapters: 100 Volt AC - 240 Volt AC
7. Eingangsleistung des Adapters: 47 Hz - 63 Hz
8. Nennausgangsstrom des Adapters: 1 A
9. Nennausgangsspannung des Adapters: 12,6 V
10. Aufladezeit: 3-4 Std.
11. Ladekapazität der Batterie: 2600 mAh
12. Maximale Reinigungsfläche: 30 m²
13. Filterkapazität: ca. 42 l/Min.
14. Filterungsfähigkeit: 180 μm
15. Wassertemperatur im Becken: 10-35 °C
16. Fahrgeschwindigkeit: ca. 16 m/Min.
17. IP-Grad: IPX8
18. Umgebungstemperatur beim Laden: 0-45 °C
19. Max. Wassertiefe: 2 m
20. Größe: 330 (L) * 330 (B) * 180 (H) mm
21. Gewicht: 3,5 kg
22. Lagerungsbedingungen: 5-35 °C
SPEZIFIKATIONEN

6
UTILISATION
6
INSTALLATION
VORSICHTSMASSNAHMEN
BEIM EINSETZEN DES REINIGERS IN DAS SCHWIMMBECKEN SOLLTE DIE LUFT IM
INNEREN DES REINIGERS WIE NACHFOLGEND BESCHRIEBEN ABGELASSEN WERDEN:
DEN REINIGER MIT DEM BODEN DES REINIGERS ZUR WAND HIN IN DAS
SCHWIMMBECKEN EINSETZEN ODER AUS DEM BECKEN HERAUSHEBEN, UM
MÖGLICHE KRATZER IM SCHWIMMBECKEN ZU VERMEIDEN.
1. Halten Sie den Reiniger fest und tauchen Sie ihn 5-6 Sekunden lang senkrecht in das
Wasser ein, bis keine Blasen mehr austreten (Abb. 1).
2. Drücken Sie den Einschaltknopf, um den Reiniger einzuschalten, und drehen Sie ihn um
90 Grad.
3. Tauchen Sie ihn anschließend waagerecht zum Beckenboden, bis eine große Anzahl
von Blasen aus der Düse austritt (Abb. 2).
BEDIENUNGSANLEITUNG
4
IV. Operating instruction
4.1. Precautions
a. When putting the cleaner into the pool, the air inside the cleaner should be discharged as follow:
①Hold the cleaner and submerge it vertically for 5-6 seconds until no bubbles come out (Fig. 1).
②Press the switch button to power on and rotate the cleaner 90 degrees.
③Submerge it horizontally into the pool floor until a large number of bubbles are discharged from
the nozzle (Fig. 2).
Fig. 1 Fig. 2
b. Put into or lift out of the pool with the cleaner bottom towards the wall to avoid any possible
scratches to the pool.
C. Please ensure that the top cover of the cleaner is tightly assembled to its chassis.

7
UTILISATION
7
INSTALLATION
VERGEWISSERN SIE SICH, DASS DIE OBERE ABDECKUNG DES REINIGERS FEST MIT
DEM GEHÄUSE VERBUNDEN IST.
UM ZU VERHINDERN, DASS DIE SCHWENKPLATTE ZERDRÜCKT WIRD, IST ES BEIM
AUFLADEN STRENGSTENS VERBOTEN, DIE UNTERSEITE NACH OBEN ZU RICHTEN.
ACHTEN SIE BEI DER BEFESTIGUNG DER
OBEREN ABDECKUNG UND DES GEHÄUSES
AUF DIE EINBAURICHTUNG, WIE IN
DER ABBILDUNG UNTEN DARGESTELLT:
DIE PFEILPOSITION IN DER NÄHE DES
VERSCHLUSSES DER OBEREN ABDECKUNG
SOLLTE MIT DER LOCHPOSITION IN
DER NÄHE DES VERSCHLUSSES DES
FAHRGESTELLS ÜBEREINSTIMMEN.
BEDIENUNGSANLEITUNG
5
dd. When fastening the top cover and chassis, please focus more on the installation direction as
shown in the below figure: the arrow position near the buckle of top cover should be aligned with
the hole position near the buckle of chassis.
e. When charging, it is strictly forbidden to face the bottom up to prevent the swing plate from
being crushed.

8
UTILISATION
SCHALTEN SIE DEN REINIGER NACH GEBRAUCH AUS.
LEGEN SIE DEN REINIGER INS WASSER UND LASSEN SIE IHN 5-6 SEKUNDEN
LANG WAAGERECHT STEHEN, DAMIT DIE LUFT IM INNEREN ENTWEICHEN KANN.
DRÜCKEN SIE DEN SCHALTER, UM DEN REINIGER EINZUSCHALTEN.
BERÜHREN SIE NICHT DIE WAND, WENN SIE DAS GERÄT IN DAS SCHWIMMBECKEN
EINSETZEN ODER HERAUSHEBEN, DA ES ANSONSTEN ZU KRATZERN AN DER WAND
ODER BESCHÄDIGUNGEN DES REINIGERS KOMMEN KANN.
DER REINIGER WENDET BEI BERÜHRUNG DER WAND AUTOMATISCH.
HALTEN SIE DEN REINIGER 10-15 SEKUNDEN LANG AUF DIE WASSEROBERFLÄCHE,
BIS ER SICH ENTLEERT HAT, BEVOR SIE IHN AUS DEM BECKEN NEHMEN.
NACH BEENDIGUNG DES ARBEITSZYKLUS HÖRT DER REINIGER AUF ZU LAUFEN. DER
SCHWIMMENDE GRIFF KANN MIT EINEM HAKEN MITHILFE EINER VERLÄNGERTEN
ZUGSTANGE EINGEHAKT WERDEN, UM DEN REINIGER AN DEN BECKENRAND ZU ZIEHEN.
GREIFEN SIE DEN SCHWIMMENDEN GRIFF UND ZIEHEN SIE AN DEM SEIL, UM IHN
AUF DIE WASSEROBERFLÄCHE ZU HEBEN, UND ZIEHEN SIE IHN DANN AM GRIFF AUS
DEM BECKEN.
AUSSCHALTEN: BEIM HERAUSHEBEN AUS DEM SCHWIMMBECKEN ERTÖNT EIN
AKUSTISCHES SIGNAL. DRÜCKEN SIE DEN SCHALTER AUF „AUS“; DER REINIGER
WIRD ABGESCHALTET. REINIGEN SIE DIE FILTERSCHALE NACH JEDEM GEBRAUCH.
SCHNELLE BEDIENUNG
SCHLIESSEN SIE DEN REINIGER MIT DEM MITGELIEFERTEN ADAPTER UND DEM
LADEKABEL ANS NETZ AN, UM DEN AKKU ZU LADEN.
• Schalten Sie den Reiniger vor dem Aufladen aus.
• Reinigen Sie den Ladeanschluss vor dem Aufladen.
• Die rote Ladeanzeige zeigt an, dass der Akku geladen wird.
• Die grüne Ladeanzeige zeigt an, dass der Ladevorgang abgeschlossen ist.
BEDIENUNGSANLEITUNG

9
UTILISATION
6
f. Power off the cleaner after use.
h. Do not touch the wall to avoid scratching the wall or damaging the cleaner when putting into or
lifting out of the pool.
g. Hold the cleaner on the water surface for 10-15 seconds until it empties before removing from
the pool.
h. Grab the floating handle and pull at the rope for lifting it on the water surface, and then grasp
its handle to remove it from the pool.
4.2 Quick operation
a. Plug in the cleaner using the supplied adapter and charging line to charge the battery.
* Power off the cleaner before charging.
* Clean the charging port before charging.
* Red charging indicator indicates the battery is charging.
* Green charging indicator indicates charging is finished.
b. Put the cleaner into water and let it stand horizontally for 5-6 seconds to discharge the air inside
it. Press the switch to power on the cleaner.
c. It will automatically reverse when it touches the wall.
d. The cleaner will stop running after completing the working cycle. The floating handle can be
hooked by a hook with a lengthened connecting rod, and the cleaner is pulled to the edge of the
pool.
e. Power-off operation: the buzzer will be alarming when lifting out of the pool. Press the switch
to OFF and the cleaner will be shut down. Always clean the filter tray after use.
4.3 Functions and adjustment of wheels
There are 4 wheels on the cleaner, of which the left and right wheels are fixed. The front and back
wheels can be selectively adjusted according to different conditions so as to adjust the running path
of the cleaner.
a. Setting wheel angle and running path
EINSTELLUNG VON RADWINKEL UND LAUFWEG
FUNKTIONEN UND EINSTELLUNG DER RÄDER
Der Reiniger verfügt über vier Räder, von denen das linke und das rechte Rad feststehen.
Die vorderen und hinteren Räder können je nach den unterschiedlichen Bedingungen
selektiv eingestellt werden, um den Laufweg des Reinigers anzupassen.
A, B, C sind auf der Rille des Radbegrenzungspfahls des Fahrgestells aufgedruckt.
Standardmäßig werden auf C (links) und A (rechts) Radbegrenzungspfähle installiert.
Rillen für Radbegrenzungspfähle
BEDIENUNGSANLEITUNG
7
Groove for wheel limit piles
A, B, C are printed on the groove of the wheel limit pile of the chassis. Wheel limit piles will be
installed by default on C (left) and A (right).
Wheel buckle
Wheel limit pile
As shown in the figure, push the wheel buckle, pull down the wheel components, and remove them.

10
UTILISATION
7
Groove for wheel limit piles
A, B, C are printed on the groove of the wheel limit pile of the chassis. Wheel limit piles will be
installed by default on C (left) and A (right).
Wheel buckle
Wheel limit pile
As shown in the figure, push the wheel buckle, pull down the wheel components, and remove them.
Radwinkel
Laufweg
ES WERDEN VIER EINSTELLUNGEN FÜR DIE RÄDER EMPFOHLEN:
Einstellung 1: Standardeinstellung: C-A, für die meisten Schwimmbecken geeignet
Radschnalle
Radbegrenzungspfahl
Drücken Sie, wie in der Abbildung gezeigt, auf die
Radschnalle, ziehen Sie die Radkomponenten nach
unten und entfernen Sie diese.
Bauen Sie anschließend den Begrenzungspfahl wieder in das Fahrgestell ein, um die
unterschiedlichen Laufwege zu realisieren.
BEDIENUNGSANLEITUNG
8
Then re-install the limit pile into chassis to realize the different running paths.
b. Four settings for wheels are recommended:
Setting 1: default setting: B-C, for most of pools
Wheel Angle
Running path
9
Setting 2: C-A, when the turning angle is too large
Wheel
Angle
Running
path
9
Setting 2: C-A, when the turning angle is too large
Wheel
Angle
Running
path
9
Setting 2: C-A, when the turning angle is too large
Wheel
Angle
Running
path

11
ENTRETIEN
Radwinkel
Laufweg
Radwinkel
Laufweg
Einstellung 2: B-C, wenn der Wenderadius zu groß ist
Einstellung 3: C-C, bei Schwimmbecken von großer Länge und Breite
BEDIENUNGSANLEITUNG
8
Then re-install the limit pile into chassis to realize the different running paths.
b. Four settings for wheels are recommended:
Setting 1: default setting: B-C, for most of pools
Wheel Angle
Running path
9
Setting 2: C-A, when the turning angle is too large
Wheel
Angle
Running
path
10
Setting 3: C-C, when the length and width of the swimming pool are large
Wheel Angle
Running route
10
Setting 3: C-C, when the length and width of the swimming pool are large
Wheel Angle
Running route

12
UTILISATION
12
INSTALLATION
Hinweis: Dies sind die empfohlenen Einstellungen. Für Ihr Schwimmbecken können
ggf. abweichende Einstellungen besser geeignet sein.
Radwinkel
Laufweg
Einstellung 4: B-A, für runde Becken
BEDIENUNGSANLEITUNG
11
Setting 4: B-A, for round pools
Wheel Angle
Running route
Note: These are the recommended settings. Different settings may work better for your pool.
11
Setting 4: B-A, for round pools
Wheel Angle
Running route
Note: These are the recommended settings. Different settings may work better for your pool.

13
UTILISATION
13
INSTALLATION
REINIGUNG DER FILTERSCHALE
NEHMEN SIE DIE FILTERSCHALE HERAUS
REINIGEN SIE DIE FILTERSCHALE UND DAS GEHÄUSE
BEDIENUNGSANLEITUNG
ÖFFNEN SIE DEN REINIGER, INDEM SIE DIE DAFÜR VORGESEHENEN KLAMMERN
LÖSEN
12
4.4 Cleaning the filter tray
a. Open the cleaner by the clips
b. Take off the filter tray
c. Clean the filter tray and chassis
12
4.4 Cleaning the filter tray
a. Open the cleaner by the clips
b. Take off the filter tray
c. Clean the filter tray and chassis
12
4.4 Cleaning the filter tray
a. Open the cleaner by the clips
b. Take off the filter tray
c. Clean the filter tray and chassis
12
4.4 Cleaning the filter tray
a. Open the cleaner by the clips
b. Take off the filter tray
c. Clean the filter tray and chassis

14
UTILISATION
14
INSTALLATIONBEDIENUNGSANLEITUNG
BAUEN SIE DEN REINIGER WIEDER ZUSAMMEN
BRINGEN SIE DIE KLAMMERN WIEDER AN
13
d. Reassemble the cleaner
e. Clap on the clips
13
d. Reassemble the cleaner
e. Clap on the clips

15
UTILISATION
15
INSTALLATIONFEHLERSUCHE
SUMMER
Problem Mögliche Ursache Lösung
Die Summer bleibt stumm oder
das Laufrad dreht sich nach dem
Einschalten
Schwache Batterie Batterie aufladen
Interner Fehler Kundendienst kontaktieren
Der Summer gibt immer noch Alarm
oder das Laufrad dreht sich nicht,
nachdem der Reiniger vollständig
in das Wasser eingetaucht ist
Interner Fehler Kundendienst kontaktieren
Die Ladegerätanzeige funktioniert
nicht Der Adapter ist beschädigt Kundendienst kontaktieren
Status Beschreibung
Einschalten
Summt, solange der Reiniger nicht vollständig ins Wasser eingetaucht
ist; hört auf zu summen, wenn der Reiniger vollständig ins Wasser
eingetaucht ist
Ausschalten Summer stoppen
Der Reiniger fährt nicht über die
gesamte Bodenfläche
Falscher Radwinkel
Radposition einstellen (siehe
Funktionen und Einstellung der
Räder)
Ungewöhnliche Beckenform
Radposition einstellen (siehe
Funktionen und Einstellung der
Räder)
Das Wasserzirkulationssystem des
Schwimmbeckens ist eingeschaltet System abschalten

16
UTILISATION
16
INSTALLATION
Artikel Bezeichnung Modell MENGE
(Stk.) Anwendung Bemerkung
1Gehäuse des
Reinigers ORCA 40CL 1 Im Karton
2 Adapter 1 Im Karton
3 Benutzerhandbuch 1 Im Plastikbeutel
4 Haken 1 Im Plastikbeutel
PACKLISTE

17
UTILISATION
17
INSTALLATION
Umweltprogramme, Europäische EEAG-Richtlinie
Dieses Produkt hat alle Qualitäts- und Sicherheitstests der technischen Abteilung im
Herstellungswerk bestanden.
Informationen zur Garantie:
1. Die Garantie gilt für 24 Monate (auf die Batterie und den Motor) ab dem Datum des
ursprünglichen Kaufs.
2. Diese Garantie erlischt, wenn das Produkt verändert, missbraucht oder von nicht
autorisiertem Personal repariert wurde.
3. Die Garantie erstreckt sich nur auf Fabrikationsfehler und deckt keine Schäden ab, die
durch unsachgemäße Handhabung des Produkts durch den Besitzer entstanden sind.
4. Der Kaufbeleg muss bei jeder Reklamation oder Reparatur während der Garantiezeit
vorgelegt werden.
Wenden Sie sich bei Garantiefragen bitte an Ihren lokalen Händler.
Bitte beachten Sie die Vorschriften der Europäischen Union und tragen
Sie zum Schutz der Umwelt bei.
Geben Sie nicht mehr funktionstüchtige Elektrogeräte bei einer von
Ihrer Gemeinde autorisierten Sammelstelle ab, die elektrische und
elektronische Geräte ordnungsgemäß recycelt. Entsorgen Sie diese
nicht im unsortierten Restmüll.
Bei Geräten mit herausnehmbaren Batterien sind diese vor der
Entsorgung des Geräts zu entfernen.
GARANTIE
16
VIII. Warranty
This product has passed all quality control and safety tests, conducted by the technical department
of the factory.
Warranty information:
1. The warranty is covered for 12 months (on battery & motor) from the date of its original purchase.
2. This warranty is void if the product has been altered, misused, or has been repaired by
unauthorized personnel.
3. The warranty extends only to manufacturing defects and does not cover any damage resulting
from mishandling of the product by the owner.
4. The sales invoice must be presented for any claim or repair during the warranty period.
Please contact your local dealer for any warranty issues.
Environmental Programmes, WEEE European Directive
Please respect the European Union regulations and help to protect the
environment.
Return non-working electrical equipment to a facility appointed by your
municipality that properly recycles electrical and electronic equipment.
Do not dispose them in unsorted waste bins.
For items containing removable batteries, remove batteries before
disposing of the product.

18
COMPOSITION DU COFFRET
IMPORTANT PRECAUTIONS...............................................................................................p. 19
INTRODUCTION................................................................................................................. P. 20
APPEARANCE CHARACTERISTICS & STRUCTURE .......................................................... P. 20
SPECIFICATIONS ................................................................................................................P. 21
OPERATING INSTRUCTION ......................................................................................... P. 22-30
TROUBLE SHOOTING..........................................................................................................P. 31
BUZZER INFORMATION...................................................................................................... P. 32
PACKING LIST..................................................................................................................... P. 32
WARRANTY ........................................................................................................................ P. 33
TABLE OF CONTENTS

19
COMPOSITION DU COFFRET
1. Please read the manual carefully, and use the cleaner according to the manual. We
are not held liable for any loss or injury caused by improper use.
2. Use the accessories recommended or sold by the manufacturer only.
3. This model mainly applies to swimming pools with a flat floor.
4. Please do not allow children to ride on it or play with it as a toy.
5. Use the original and authorized power adapter only.
6. If the charging line is damaged, it must be replaced by a certified professional.
7. Do not power on the cleaner when it is out of the water.
8. The charging line must be connected to a leakage protected and earthed socket
when charging.
9. Do not operate the cleaner when there are people in the pool.
10. Always clean and wash the filter tray after use.
11. Power o the cleaner when maintaining, cleaning or not using it.
12. The cleaner should be stored in a cool and ventilated place, away from direct
sunshine.
13. The cleaner should be stored in a cool place when charging, and not covered
with anything to prevent the damage of internal electrical components caused by
overheating.
14. Only professionals can disassemble the sealed driving kit of the cleaner.
15. Do not operate the cleaner while pool filter is running.
16. Oil seals for motor contain grease, which may cause water pollution if grease leaks
occur.
17. Due to the limitation of battery capacity, the cleaner is only suitable for small
swimming pools, otherwise it will aect the cleaning eect.
18. The cleaner should be charged every three months if it needs to be stored for a long
time to maintain battery life. Please use the original and authorized power adapter
only. If the cleaner is not charged for a long time, the battery voltage will be lower
than the over-discharge protection voltage due to the self-discharge of the battery,
which may cause fatal damage. Please pay more attention to it.
19. Do not use or store the cleaner near any heat source.
20. It is forbidden to pierce the shell of the cleaner with nails or other sharp objects. It is
forbidden to hammer, impact or throw the cleaner.
21. Make sure the charging port is dry before recharging.
IMPORTANT PRECAUTIONS

2020
2
I. Introduction
The ORCA 40 CL robotic pool cleaner HJ1101J is a new type of rechargeable automatic cleaner that
will filter the pool water and gets rid of suspended particles without replacing the pool water. It’s
totally environmental-friendly.
Please read this user manual carefully before use.
II. Appearance characteristics & structure
Swing handle
Top cover
Filter tray
Chassis
Hook Charger
a mis en forme : Barré
APPEARANCE CHARACTERISTICS & STRUCTURE
The ORCA 40 CL robotic pool cleaner is a new type of rechargeable automatic cleaner
that will filter the pool water and gets rid of suspended particles without replacing the
pool water.
Please read this user manual carefully before use.
Swing handle
Hook
Top cover
Filter tray
Chassis
Charger
INTRODUCTION
Table of contents
Other Orca Swimming Pool Vacuum manuals
Popular Swimming Pool Vacuum manuals by other brands

Bestway
Bestway 58304 manual

Pentair Pool Products
Pentair Pool Products Legend II installation guide

Hayward
Hayward NAVIGATOR POOLVAC V-Flex owner's manual

Raptor
Raptor HJ3110 user manual

Pentair
Pentair PROWLER 930W Installation and maintenance guide

Pentair Pool Products
Pentair Pool Products Great White GW9500 Installation and user guide