Orca HJ1103J User manual

BATTERY POWERED POOL FLOOR CLEANER
HJ1103J
For SWIMMING POOL OF FLAT FLOOR
USER MANUAL
Subject to update by manufacturer wit out prior notice

Important Precautions
1. Strictly pro ibit using t e cleaner beyond its operating conditions. Please read t e
manual carefully, and use it according to t e manual. We ave no responsibility for any
loss or injury caused by improper use.
2. Use t e accessories recommended or sold by t e manufacturer only.
3. T is model mainly applies to swimming pools wit flat floor.
4. T e cleaner s ould not be used by c ildren under t e age of 8 or people wit mental
disorders. Please do so under t e supervision of t e guardian if necessary. Please do not
allow c ildren to ride on it or play as a toy.
5. Use t e original and aut orized adapter only.
6. It must be replaced by t e after-sale professionals if t e power line is damaged.
7. Do not power on t e cleaner w en it is outside of t e water.
8. T e power line must be connected to a leakage protective and eart ed socket w en
c arging.
9. Do not operate t e cleaner w en t ere are people in t e pool.
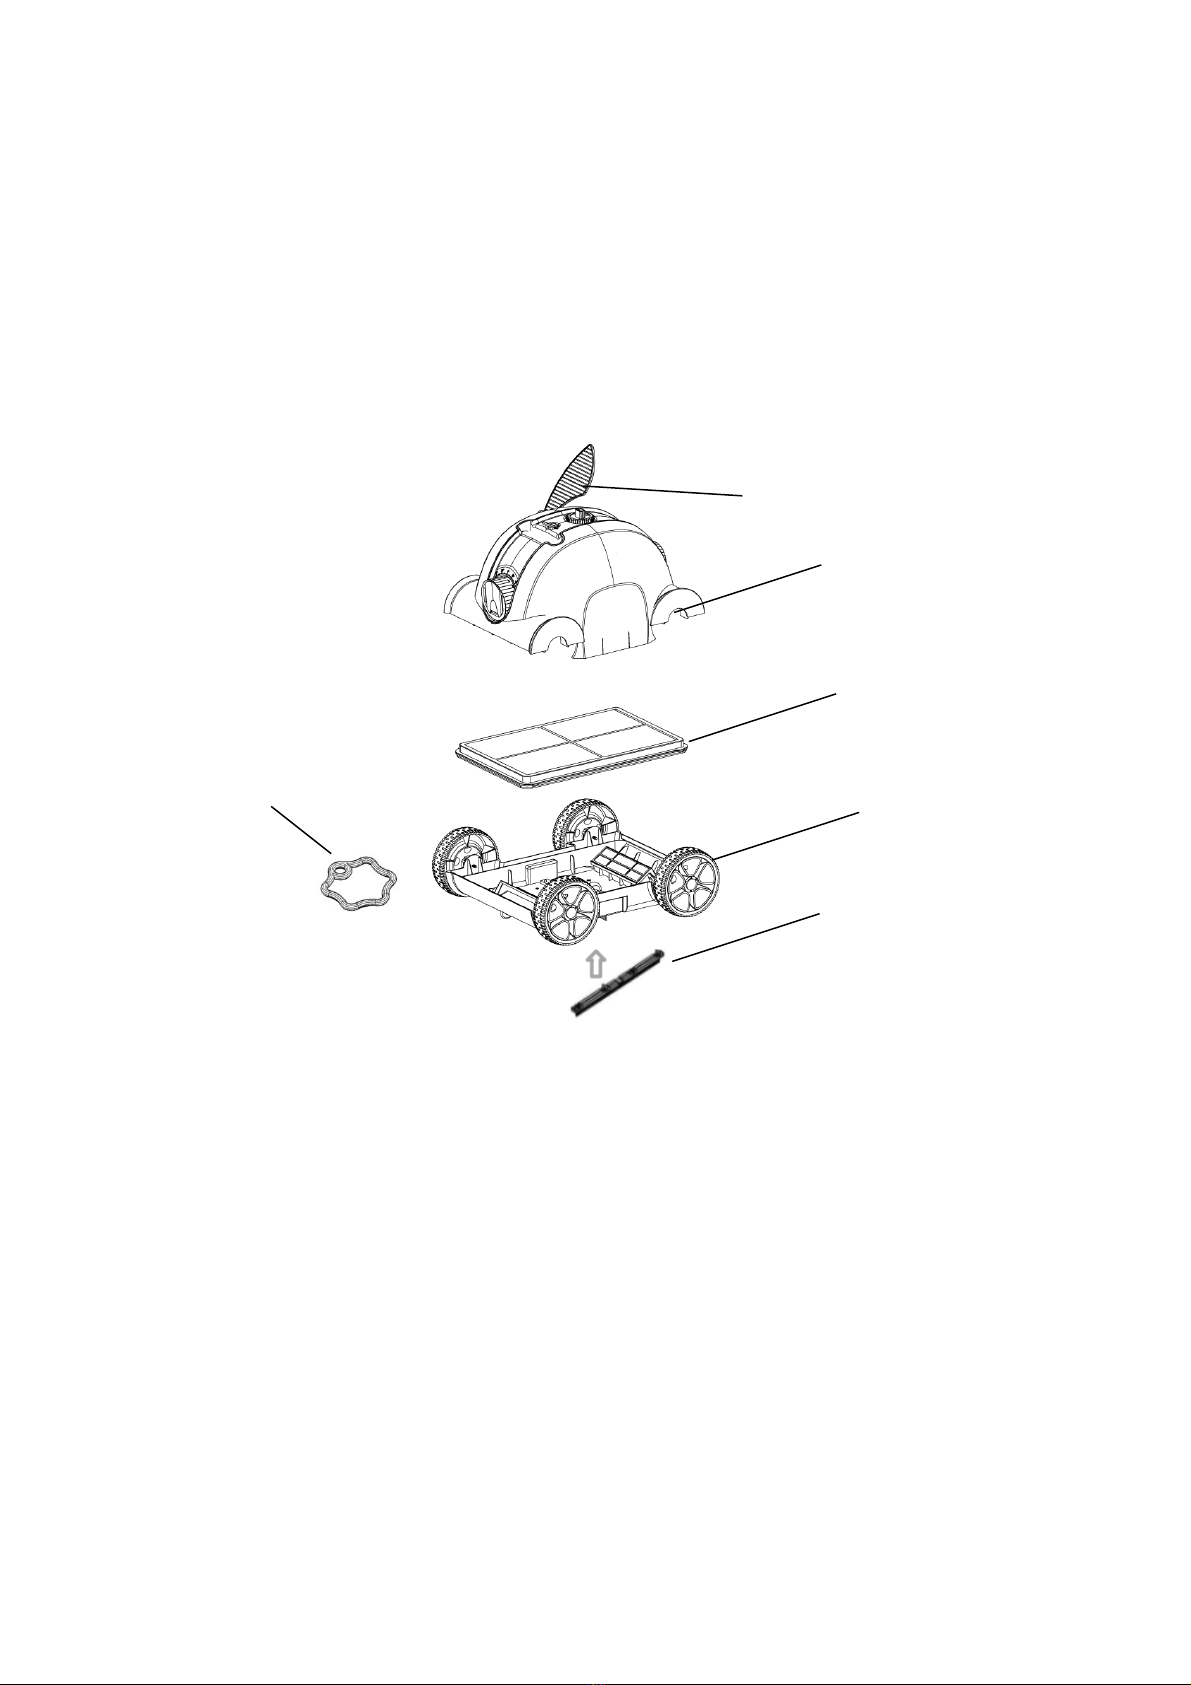
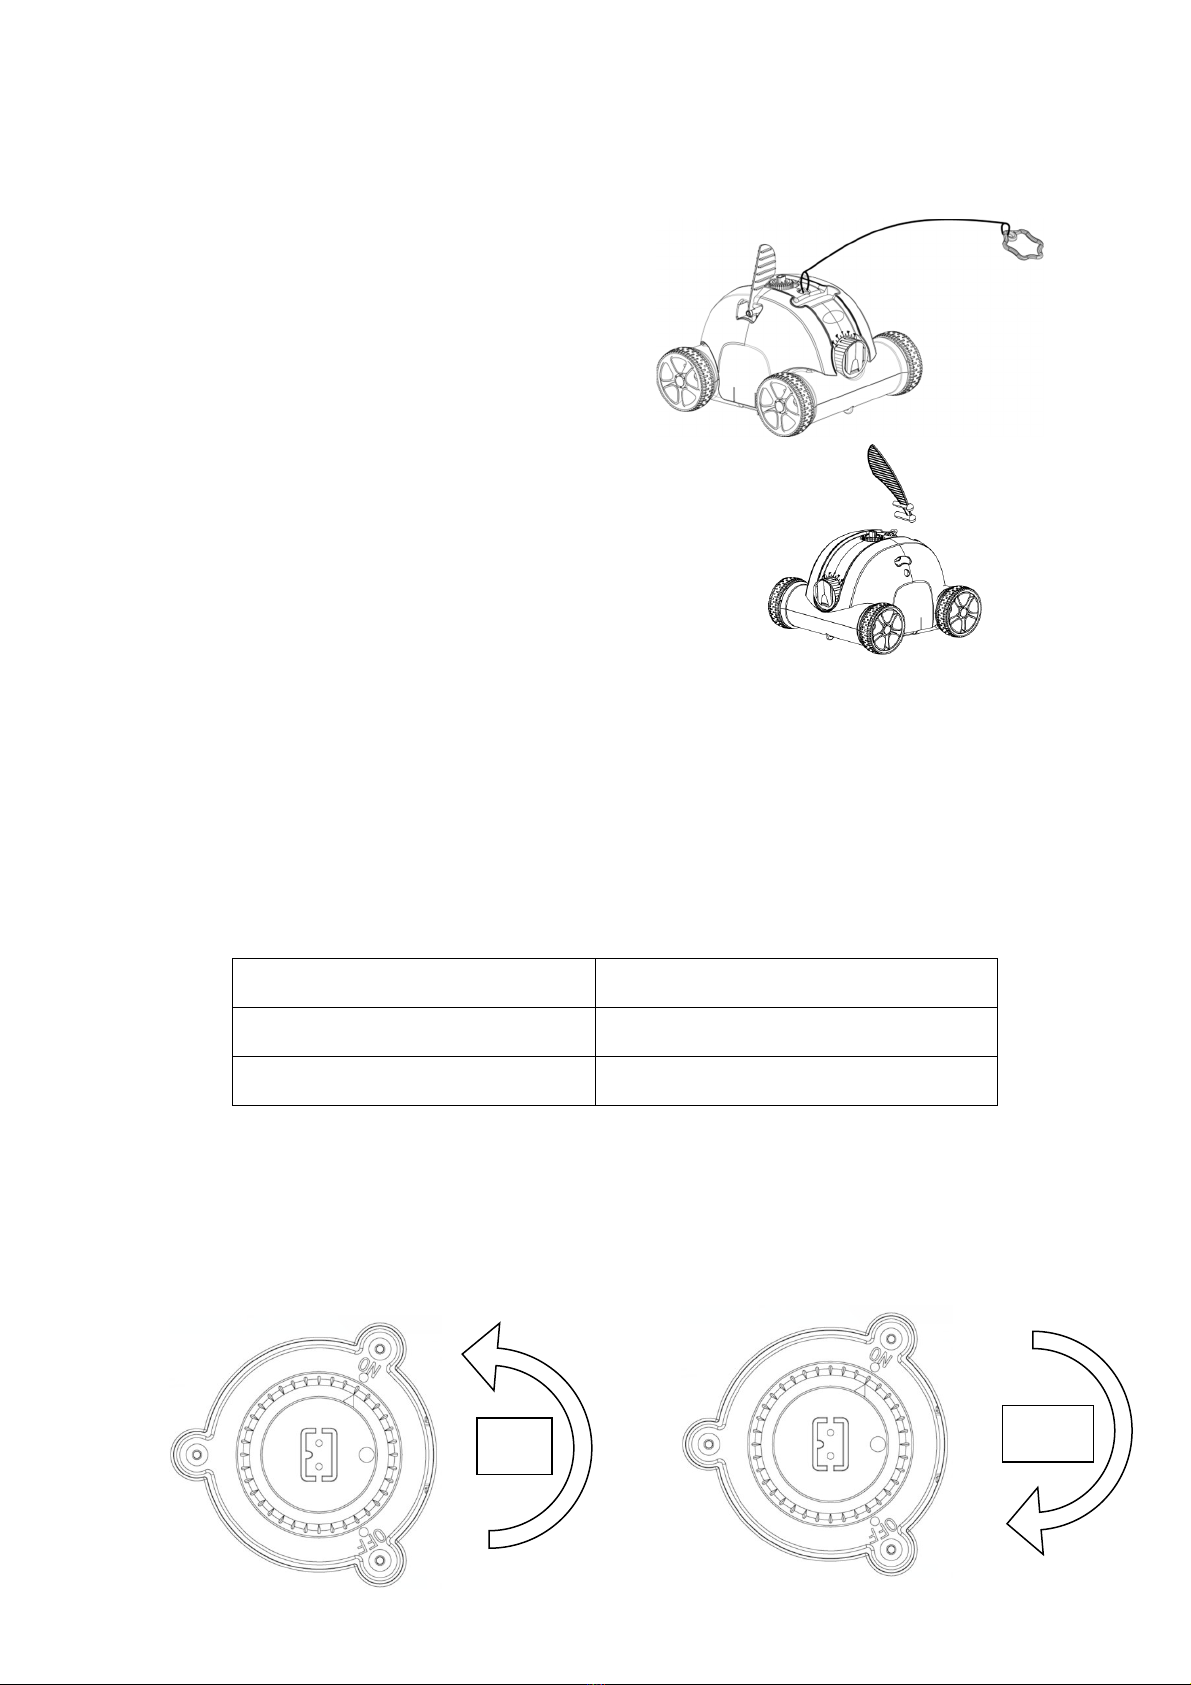
10. Always clean and was t e filter tray after use.
11. Power off t e cleaner w en maintaining, cleaning or not using it.
12. T e cleaner s ould be stored in a cool and ventilated place, away from direct
suns ine.
13. C arge t e battery under t e permitted condition. T e cleaner s ould be stored in a
cool place w en c arging, meanw ile do not place or be covered wit anyt ing to prevent
t e damage of internal electrical components caused by over eating of t e power unit.
14. Only professionals can disassemble t e sealing drive assembly of t e cleaner.
15. Close t e pool filtration system before use.
16. Slig tly water pollution mig t occur in case grease in motor oil seal leaks.
17. T e cleaner is only suitable for small pools limited by battery capacity; ot erwise it will

affect t e cleaning effect.
18. T e cleaner s ould be c arged every t ree mont s if it needs to be stored for a long
time. Please use t e original and aut orized adapter only to ensure t at t e battery power
is maintained at 40%-60%. T e battery voltage will be lower t an t e over-disc arge
protection voltage due to t e self-disc arge of battery if not c arging t e battery for a long
time, w ic will lead to fatal damage to t e battery if continuing too long. Please be
careful.
19. Pro ibit c arging t e battery under t e condition of fire or extreme eat. Do not use or
store t e cleaner near t e eat source.
20. Pro ibit piercing t e cleaner s ell wit nails or ot er s arp objects, and pro ibit
ammering, impacting and t rowing t e cleaner.


1
C ntents
I. Intr ducti n ................................................................................................................... 1
II. Appearance characteristics & structure .................................................................... 1
III. Specificati ns ............................................................................................................. 1
IV. Operati n instructi n ................................................................................................. 2
V. Tr uble Sh ting ....................................................................................................... 11
VI. Packing list ................................................................................................................ 12
VII. Warranty ................................................................................................................... 12


1
I. Intr ducti n
T e robotic pool cleaner HJ1103J is a new type of rec argeable automatic
cleaning equipment for pools wit t e function of automatic beac ing.
Please read the manual carefully bef re use s that y u can use it c rrectly.
II. Appearance characteristics & structure
III. Specificati ns
1. Working voltage: 12.6V
2. Power: 50W
3. Working cycle: 60 min
4. Rated input voltage of adapter: 100Vac-240Vac
5. Input power of adapter: 47Hz-63Hz
6. Rated output current of adapter: 1.8A
7.. C arging time: 3-4
8. Battery capacity: 5000mA
Top cover
Filter tray
Chassis
Swing plate
Floating handle
Brush

2
9. Max. cleaning surface:80 ㎡
10. Filter capacity: 10m³/
11. Filter capability: 180µm
12. Pool water temperature: 10℃-35℃
13. Moving speed: appr. 16m/min
14. IP Grade: IPX8
15. C arging environment temperature: 0℃-45℃
16. Max. water dept : 2.0m
17. Size: 400(L)*360(W)*270(H)mm
18. Weig t: 5.5kg
19. Storage condition:
S ort term (less t an 1 mont ): -20℃-60℃,≤75%RH
Medium term (less t an 3 mont s): -20℃-45℃,≤75%RH
Long term (more t an 3 mont s): -20℃-20℃,≤75%RH
20. Swimming pool slope: max. 15°
IV. Operati n instructi n
1. Precauti ns
a. Put into or lift out from pool wit t e cleaner bottom toward t e wall to avoid any
possible scratc to t e pool.

3
b. Install t e brus before use to avoid possible dirt leaks.
c. Please ensure t at top cover of t e cleaner is tig tly assembled wit its c assis.
d. Power off t e cleaner after use.
e. Do not touc t e wall to avoid scratc ing t e wall or damaging t e cleaner w en
putting into or lift out from pool.
f. It is necessary to stay on t e water surface for 10-15 seconds until water flows
out from t e cleaner to t e pool before being placed on t e ground.

4
g. Lift t e andle or clips of t e cleaner out from t e pool.
2. Quick perati n
a. Install t e floating andle
*Adjust t e tow rope according to
t e swimming pool dept .
*Tie t e floating andle to t e cleaner
In t e place indicated in t e fig.
b. Install t e swing plate
Insert t e swing plate in t e place
Indicated in t e fig.
c. Connect t e cleaner and ome power wit adapter and c arging line to c arge
t e battery.
* Clean t e c arging port before c arging.
* Red c arging indicator lig t indicates t e battery is c arging.
* Green c arging indicator lig t indicates c arging is finis ed.
* Turn t e switc knob to OFF before c arging.
Adaptor indicator Statut
Red C arging
Green C arging finis ed
d. Turn t e switc knob to ON after putting it into water t en t e cleaner is power-on
and t e indicator lig t is steady blue. T e cleaner begins to work about 15
seconds later w ile t e blue lig t flas es.
ON
OFF

5
e. T e blue lig t flas es t ree times after completing t e working cycle and t en t e
cleaner stops to run about 2 minutes later w ile t e indicator lig t is steady blue.
Statut Cleaner indicator
Working Indicator blue flas es
Work finis ed Indicator blue steady
Fault Indicator blue flas es quickly
f. Power-off operation: turn t e switc knob to OFF and t e blue lig t turns off,
w ile t e cleaner is power-off. Please timely clean t e filter tray after use.
3. Functi ns and adjustment f n zzles
T ere are two nozzles on t e cleaner, one of t em opens once t e ot er closes.
Water flows out t roug t e open nozzle to t rust t e cleaner to move forward.
Adjust t e nozzle by turning it to control t e moving route.
a. Settings of nozzle angle and moving route
Sketc : t e nozzles of t e cleaner are marked wit angles (0°—40°).
T e cleaner moves in an approximately straig t line w en t e nozzle angle is 0°.
T e cleaner moves in a more curved line at a larger angle from 0°- 40°.

6
b. Recommended t ree CYCLEs and nozzle settings
Setting One: default setting: 0°——20°, f r m st f p ls.
N zzle
angle
M ving
r ute

7
Setting Tw : 0°——40°, when the cleaner d es n t have a full c verage f p l.
N zzle
angle
M ving
r ute

8
Setting Three : 20°——20°, f r r und p ls.
N zzle
angle
M ving
r ute
Note: above are recommended settings and different settings mig t apply to specific pools. So t e
operator can set according to t e principle of nozzle settings and t e actual situation of t e pool
.

9
4. Clean the filter tray
a. Open the cleaner by clips
.
b. Take ff the filter tray
c. Clean the filter tray and chassis

10
d. Reassemble the cleaner
e. Push the clips n
5. Installati n and rem val f swing plate
The swing plate can be rem ved by p king the base buckle upwards and
installed by inserting it int the base.

11
V. Tr uble sh ting
Sympt m P ssible reas n S luti n
T e cleaner does not
work and t e
indicator lig t slowly
flas es.
Low remaining battery
capacity C arge t e battery
T e cleaner does not
work and t e
indicator lig t rapidly
flas es.
Internal fault Contact after-sale service
T e cleaner does not
work and t e
indicator lig t does
not work.
Battery protection
C arge t e battery and power on t e
cleaner to watc w et er t e indicator
lig t is on. If not, contact after-sale
service.
T e adapter
indicator lig t does
not work.
Adapter damage Contact after-sale service
T e cleaner does not
ave a full coverage
of pool.
Unsuitable nozzle
angle Adjust nozzle angle
Special pool s ape Adjust nozzle to increase
angle of
deflection
Pool water filtration
system is open. Turn off water filtration system

12
VI. Packing list
Item Name M del QTY(pc) Applicati n Remark
1
Cleaner body
HJ1103J 1 In carton
2 Adapter XSG1261800
1 In carton
3
User manual &
certificate
1 In plastic bag
4 Brus 1 In plastic bag
5 Tow rope 1 In plastic bag
6 Floating andle 1 In plastic bag
Ⅶ
Warranty
T is product as gone t roug various quality and safety tests carried out by t e tec nical
department of t e factory.
Warranty Information:
1. T e warranty period is 24 mont s of use on t e motors and electrical parts from t e
date of purc ase and establis ed under t e terms of t e Consumer Code and t e legal
guarantee against idden defects and vices in any case applies in t e conditions of t e
articles in t e country of purc ase.
2. T e warranty is void if t e product is andled or repaired by foreign nonqualified person
in unaut orized repair services.
3. Broken parts are not covered by t e warranty.
4. T e warranty only covers factory defects, it does not cover damage caused by misuse
of t e article.

13
5. Any claim made or repair made during t e warranty period will be subject to mandatory
presentation of t e invoice.
Table of contents
Other Orca Swimming Pool Vacuum manuals
Popular Swimming Pool Vacuum manuals by other brands

Dolphin
Dolphin 2x2 Gyro operating instructions

Maytronics
Maytronics MTC6 DELUXE 5 operating instructions

Zodiac
Zodiac Pacer owner's manual

Pentair Pool Products
Pentair Pool Products GW8000 LIL SCHARK Installation and operating instructions

Pentair
Pentair POOLSHARK owner's manual

Pentair Pool Products
Pentair Pool Products Legend II installation guide

Aquabot
Aquabot RKA80C operating instructions

WaterTech
WaterTech Pool Blaster iVac 250 Installing and upgrading

Garten Meister
Garten Meister 82 63 64 instruction manual

WaterTech
WaterTech VOLT Operator's manual

Hayward
Hayward Navigator Pro MANUEL D’INSTALLATION

Pentair Pool Products
Pentair Pool Products Kreepy Krauly manual