Fuller Brush 56002 User manual

DE
GB
FR
We reserve the right to modify the product, packaging or enclosed documentation at any time in conjunction with our policy of continuous development.
Nos reservamos el derecho de modicar el producto, el embalaje o documentación adjunta en cualquier momento en relación con nuestra política de
desarrollo continuo.
Customer Service:
The Fuller Brush Company, 860 Kaiser Road, Suite D,
Napa, CA 94558, U.S.A.
Toll Free phone number: (800) 522-0499 & (888) 280-7707
Servicio de Atención al Cliente:
The Fuller Brush Company, 860 Kaiser Road, Suite D,
Napa, CA 94558, U.S.A.
Número telefónico gratuito: (800) 522-0499 & (888) 280-7707
Steam Mop
with UV light
Mopa a Vapor
con Luz UV
Instruction Manual
Manual de Instrucciones
Model No./Modelo nº: 56002
TABLE OF CONTENTS
ÍNDICE
US
ES
Medidas de seguridad importantes .......................................................................................................12
Medidas adicionales..............................................................................................................................14
Enchufe polarizado ........................................................................................................................ 14
Baterías.......................................................................................................................................... 14
Uso previsto ................................................................................................................................... 14
Peligro de lesión ............................................................................................................................ 15
Limpieza y cuidado ....................................................................................................................... 16
Partes ....................................................................................................................................................17
Funcionamiento.....................................................................................................................................18
Antes del primer uso ...................................................................................................................... 18
Inserción y extracción de las baterías .......................................................................................... 18
Llenar el depósito de agua ............................................................................................................ 18
Limpiador a vapor manual ............................................................................................................. 19
Limpiador a vapor de piso ............................................................................................................. 21
Limpieza ................................................................................................................................................23
Filtro antical ................................................................................................................................... 23
Almacenamiento ............................................................................................................................ 23
Eliminación ............................................................................................................................................24
Solución de problemas..........................................................................................................................24
Datos téchnicos.....................................................................................................................................24
Parts ........................................................................................................................................................1
Important safeguards...............................................................................................................................2
Additional safeguards..............................................................................................................................3
Polarized plug .................................................................................................................................. 3
Batteries........................................................................................................................................... 3
Danger of injury................................................................................................................................ 4
During use........................................................................................................................................ 5
Cleaning and care............................................................................................................................ 5
Operation.................................................................................................................................................6
Before first use................................................................................................................................. 6
Inserting and removing batteries ..................................................................................................... 6
Filling the water reservoir................................................................................................................. 6
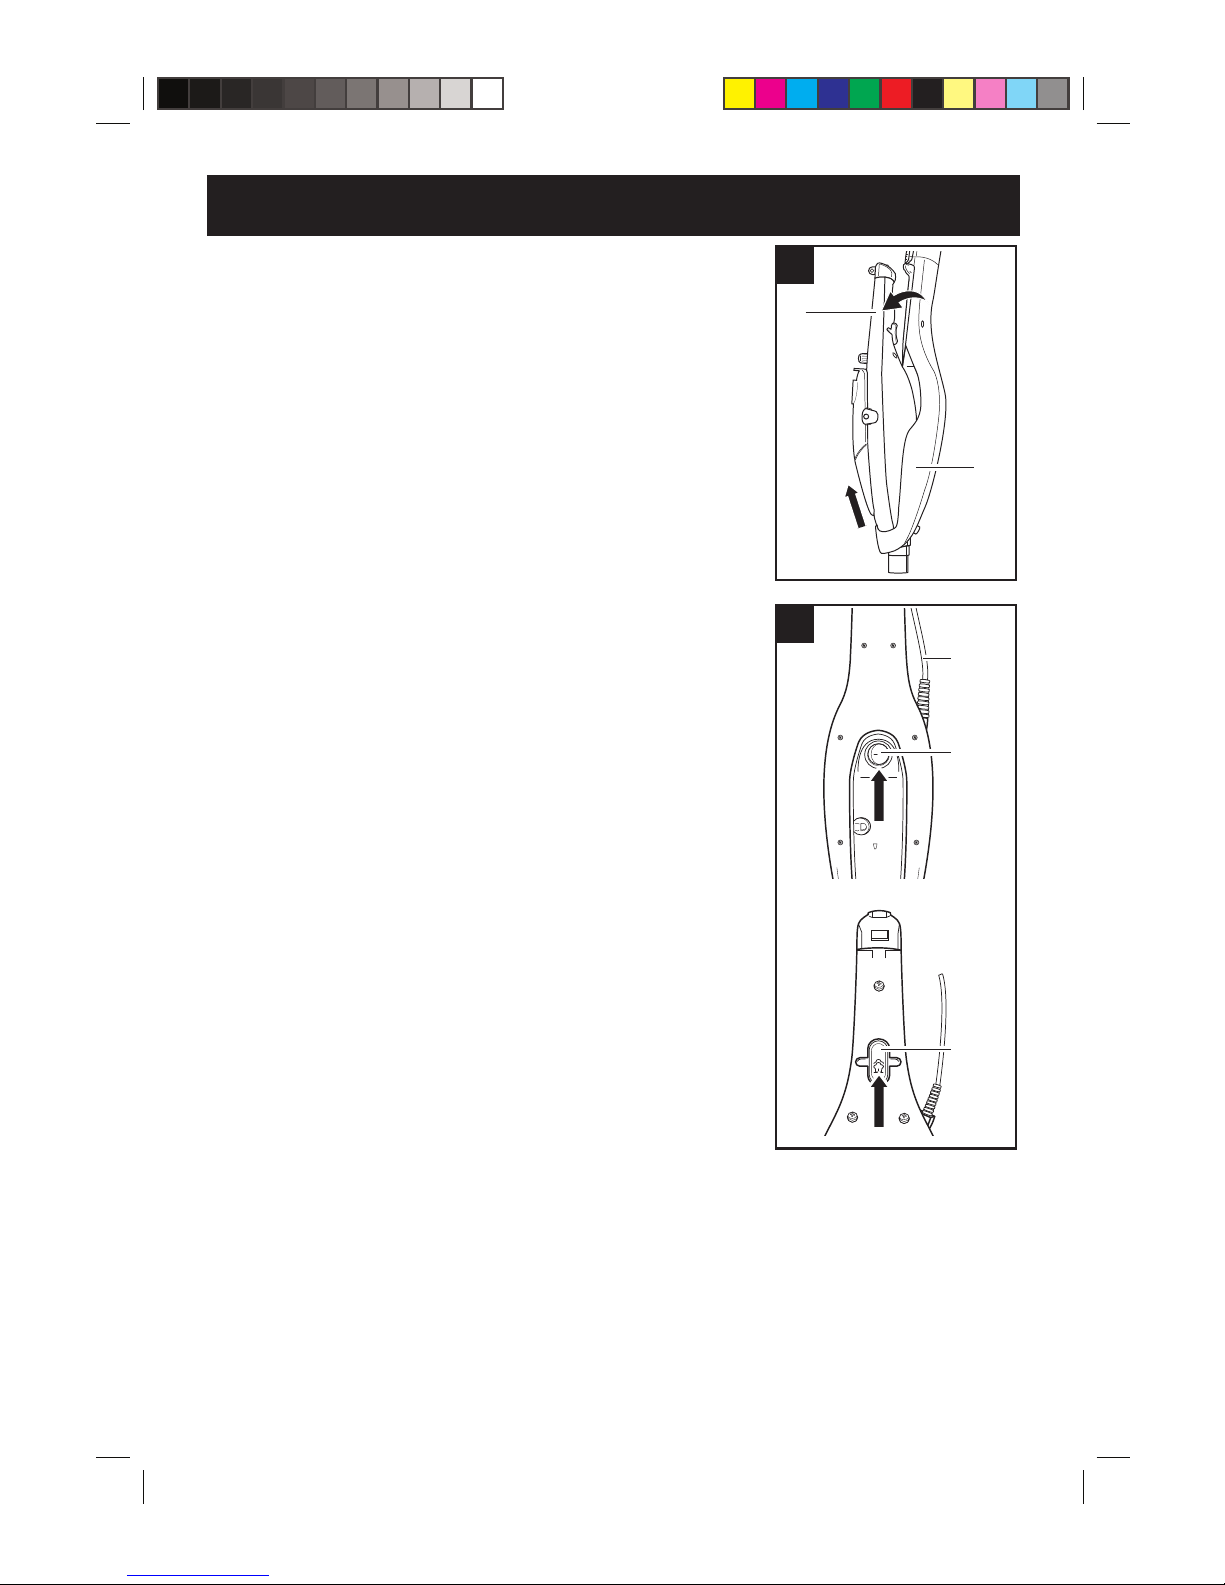
Hand held steam cleaner ................................................................................................................. 7
Floor steam cleaner ......................................................................................................................... 8
Cleaning ................................................................................................................................................10
Limescale filter ............................................................................................................................... 10
Storage........................................................................................................................................... 10
Disposal................................................................................................................................................. 11
Troubleshooting..................................................................................................................................... 11
Technical data........................................................................................................................................ 11
Steam Mop_56002(02608)_US+ES_IM_V1_130516.indb 1 5/16/13 5:12 PM

1 2
Dear Valued Customer,
Congratulations on the purchase of the Steam Mop with UV light. We understand that a
clean and organized home is important for a happy, healthy life for you, your family and
friends. At Fuller, we strive to help you achieve this goal.
IMPORTANT SAFEGUARDS
When using electrical equipment, basic precautions should always be followed, including
the following:
READ ALL INSTRUCTIONS BEFORE USING THIS APPLIANCE.
WARNING – To reduce the risk of re, electric shock, or injury:
• Do not leave the appliance when plugged in. Unplug from outlet when not in use and
before servicing.
• Do not allow the appliance to be used as a toy. Close attention is necessary when used
by or near children. Children must be supervised to ensure that they do not play with the
appliance.
• Use the appliance only as described in this manual. Use only manufacturer’s
recommended attachments and accessories.
• Do not use the appliance, if it appears damaged, has a damaged power cord or plug.
If the appliance is not working properly, has been dropped, damaged, left outdoors, or
dropped into water, return it to a service center immediately.
• Do not pull or carry the appliance by the power cord, use the power cord as a handle,
squash or bend the power cord, or pull the power cord around or over sharp edges or
corners. Do not run the appliance or other equipment over the power cord. Keep the
power cord, plug and the appliance away from heated surfaces and open ames.
• Do not unplug by pulling on power cord. To unplug, pull the plug, not the power cord.
• Do not handle plug, power cord or the appliance with wet hands.
• Turn the appliance off completely before unplugging.
• Keep this instruction manual for future reference. If the appliance is passed on to a third
part, please ensure this instruction manual is included.
• Never immerse the appliance, the power cord or plug in water or other liquids. Ensure
that the appliance, the power cord or plug do not fall into water, other liquids or become
wet. Danger of electric shock.
• Do not touch the appliance, power cord or plug with wet hands or standing an wet oor.
• No liquids must get into the appliance during cleaning; this can cause considerable
damage to the appliance.
• This appliance is not intended to be used as a room heating appliance. The appliance
can overheat and be damaged permanently. A overheating appliance may also lead to
res.
CAUTION: Hot surface, danger of burns/scalding! Avoid contact. During use,
only operate the appliance via its handles and buttons. Do not touch the cleaning
foot, oor cloth, accessories or any other parts that come into contact with steam
during use or immediately after use. Maintain a minimum distance of 12” (30 cm)
at all times. Wear shoes when cleaning oors.
SAVE THESE INSTRUCTIONS!
PARTS
22
23
24
18
19
20
21
25
26
27
28
1
2
3
4
5
6
7
8
9
10
11
12
13
15
14
16
17
1. Release button (articulated joint)
2. Release button (steam generator)
3. Steam generator
a. Steam outlet nozzle
4. Steam control knob
5. Water reservoir cap
6. Limescale lter (removable)
7. Control lamp
8. Viewing window (UV lamp)
9. Carpet attachment
10. Battery compartment with lid
11. On/off switch (UV lamp)
12. Water reservoir
13. Release button (water reservoir)
14. Floor cleaner housing
a. Steam nozzle receptacle
15. Power cord with plug
16. Cord guide
17. Floor cleaner housing handle
18. Steam release button
(oor cleaner housing)
19. Steam release button
(steam generator)
20. On/off switch 0/I (steam generator)
21. Release lever (foot attachment)
22. Floor cloth (x2)
23. Foot attachment
24. Brush attachment
25. Round brush attachment
26. Spatula attachment
27. Nozzle attachment
28. Adapter attachment
not shown: 3 x 1.5 V batteries, AA
Steam Mop_56002(02608)_US+ES_IM_V1_130516.indb 1 5/16/13 5:12 PM

3
IMPORTANT SAFEGUARDS
CAUTION: Shortly after use the used attachment may still be very hot. Therefore
wait for a few minutes until it has completely cooled down before detaching the
attachment. Always let the appliance cool down completely before adding or
removing water, cleaning or storage.
uv
CAUTION: UV Light – Do not look directly at this lamp
Do not attempt to replace the UV lamp yourself. It can only be changed by
qualied service personnel.
uv
WARNING:Do not remove the cover on the UV lamp, it is provided
with an interlock to reduce the risk of excessive ultraviolet radiation. Do not defeat
its purpose or attempt to service without removing cover completely.
• This appliance conforms to the applicable US Federal requirements, including the Code
of Federal Regulations, CFR Title 21, Part 1040, Chapter 1, Subchapter J, Radiological
Health.
SAVE THESE INSTRUCTIONS!
ADDITIONAL SAFEGUARDS
• For household use only!
Polarized plug
• This appliance has a polarized plug (one blade is wider than the other). To reduce the risk
of electric shock, this plug is intended to t into a polarized outlet only one way. If the plug
does not t fully into the outlet, reverse the plug. If it still does not t, contact a qualied
electrician. Do not attempt to modify the plug in any way.
Batteries
• Before inserting batteries check whether the contacts in the battery compartment and on
the batteries are otherwise clean them.
• Only use the type of batteries specied in the technical data.
• Always replace all the batteries at the same time. Do not use batteries of different types
or brands, or batteries with different capacities. When replacing batteries, pay special
attention to the correct polarity (+/-).
• Remove the batteries out of the appliance, if they are discharged or if the appliance is
not going to be used for an extended period of time. This will prevent damage that might
occur if a battery leaks.
• Remove exhausted batteries from the appliance promptly.
• Batteries must not be recharged or reactivated via other means, dismantled, exposed to
re, immersed in uids or short-circuited.
Steam Mop_56002(02608)_US+ES_IM_V1_130516.indb 3 5/16/13 5:12 PM

4
ADDITIONAL SAFEGUARDS
Intended use
• Only use this appliance in dry indoor rooms. Do not use outdoors.
• This appliance is for household use only and is not intended for commercial application.
Use this appliance only as described in these instructions. Any other use is deemed to
be improper.
• The appliance is suitable for cleaning heat-resistant surfaces. It can also be used for
cleaning laminated ooring, if the following instructions are followed:
- The laminate should be laid and have no gaps or cracks.
- Always test the appliance in an inconspicuous area and check for waves or penetration
of moisture.
- If the surface is unblemished, the appliance can be used to clean the entire laminated
area.
• The appliance is not suitable for unsealed wooden ooring, soft plastic, leather and
wooden furniture. Do not use on cold glass surfaces, hot steam could cause the glass
to shatter.
• Ask a specialist whether your ooring is suitable for cleaning with this appliance. Always
test the appliance in an inconspicuous spot rst.
• The UV lamp of the cleaning foot is designed for removing germs and bacteria.
• The appliance should always be used in closed rooms.
NOTE: When using on surfaces treated with wax, the heat and steam may remove it.
• This appliance must only be used for its intended use. No liability will be accepted for
damage resulting from improper use or non-compliance with these instructions.
• Do not leave the appliance unattended while connected to an outlet.
Danger of injury
CAUTION: Risk of suffocation! Packaging materials are not toys. Plastic bags, foils and
Styrofoam parts can suffocate children. Always keep all packaging materials away from
children and animals.
• This product is not intended for use by persons (including children) with reduced
physical, sensory or mental capabilities, or lack of experience and knowledge, unless
they have been given supervision or instruction concerning use of the product by a
person responsible for their safety. Children should be supervised to ensure that they do
not play with the product.
• CAUTION! Avoid exposing yourself to direct or heavily reected germicidal UV rays.
Germicidal UV rays are harmful to the eyes and skin!
• Lay the power cord in such a way that is does not pose a risk of tripping!
• Position the power cord in such way that it does not become squashed or bent and does
not come into contact with hot surfaces.
• Please take particular care when cleaning stairs.
• Only operate the appliance by its handle. Danger of burns.
• Do not use the appliance in rooms containing easily ignitable dust or poisonous and
explosive fumes.
Steam Mop_56002(02608)_US+ES_IM_V1_130516.indb 4 5/16/13 5:12 PM

5
ADDITIONAL SAFEGUARDS
• Disconnect the appliance from the wall outlet:
- before removing/changing attachments
- before relling/emptying the water reservoir
- before cleaning the appliance
- when the appliance is not in use.
• Always pull the plug and never the power cord.
• Never pull or carry the appliance by its power cord.
During use
CAUTION! Danger of burns! Improper use can lead to injuries, scalding and electric shock.
CAUTION: Hot steam, danger of burns/scalding! Never direct steam at persons,
pets or plants. This can cause severe scalding!
• Never direct steam at cables, appliances or electrical components, such as ovens,
fridges, switches and lights.
• Do not direct steam at one place for extended periods.
• Only use the appliance when it is completely assembled and operational. Do not use
when damaged. Check for damages before each use.
• Check the oor cloth for signs of wear before each use. Do not use it if it shows signs of
wear or if it is damaged. It could damage your ooring.
• Always disconnect the appliance from the wall outlet, before removing/attaching the oor
cloth or other attachments, relling/emptying the water reservoir, cleaning the appliance
or when the appliance is not in use.
• Never use the appliance without water. Always check if the lid of water reservoir is rmly
screwed in place and the water reservoir securely locked in place. Do not unscrew the lid
of the water reservoir during use.
• Only use tap or distilled water to ll the water reservoir. Do not use other liquids or
add other cleaning agents. This could damage the appliance and a safe operation is no
longer guaranteed.
• Do not cover the steam outlet. Do not place it on soft surface, thus covering it.
• Do not insert objects into the steam outlet.
• Do not drop the appliance. Ensure it cannot fall or be knocked over.
• Never use the cleaning foot without a oor cloth. Ensure the oor cloth is not damaged. If
damaged or signs of wear are visible, do not use it, it could damage your ooring.
• Do not use other accessories apart from the ones supplied with the appliance by the
manufacturer.
Cleaning and care
• Do not use corrosive or abrasive cleaning agents (e.g. vinegar) or cleaning pads to clean
the appliance.
• Once the appliance has cooled down completely and the water reservoir has been
emptied, place the appliance in its storage position.
• Before storing the appliance, wind the power cord around the provided hooks. Do not
wind it too tightly, as this could damage the power cord.
• Store the appliance in a dry, clean and cool place, preferable in its original packaging.
Ensure the appliance is stored out of reach from children or pets.
• Do not expose the appliance to extreme temperatures, strong temperature uctuations,
direct sunlight or moisture.
• For more details please see chapter “CLEANING”.
Steam Mop_56002(02608)_US+ES_IM_V1_130516.indb 5 5/16/13 5:12 PM

6
OPERATION
Before rst use
• Carefully remove the appliance and its accessories from
the packaging.
• Check package contents for completeness and damage.
Do not use the appliance if package content is incomplete
or appears damaged. Return it to the retailer immediately
(see chapter “PARTS”).
WARNING! To avoid danger of suffocation, keep the plastic
bag away from babies and children.
Do not use this bag in cribs, beds, carriages or play pens. This
bag is not a toy.
• Store the packaging material if you want to use it to pack,
ship or transport the product. Store it in such a way that it
cannot cause harm.
• Connect the oor cleaner housing (14) to the foot attachment
(23). Place the appliance on a stable surface.
• Lift the handle (17) into a vertical position. Ensure it locks
in place.
117
14
23
Inserting and removing batteries
1. To open the battery compartment (10), press both latches
on the battery compartment cover and take it off.
2. Insert 3 batteries of the type AA (1.5 V). Pay close attention
to the correct polarity (+/-), as indicated in the compartment,
when inserting the batteries.
3. Place the battery compartment cover back on top of the
battery compartment (10). Ensure it locks securely in place.
2
10
Filling the water reservoir
1. Press the two release buttons (13), located on the sides of the water reservoir (12), and
carefully pull the water reservoir (12) away from the steam generator (3).
2. Turn the water reservoir cap (5) anticlockwise, as indicated on the cap, and remove it from
the water reservoir (12).
3. Fill the water reservoir (12) with clean fresh tap water or distilled water only. Do not over
ll the water reservoir (12).
4. Replace the water reservoir cap (5) by placing it in its pervious place and turning it
clockwise. Ensure it is turned all the way.
5. Insert the water reservoir (12) back into the steam generator (3). The release buttons (13)
should lock in place, indicated by a “click”.
3
A B D EC
13 125 3
Steam Mop_56002(02608)_US+ES_IM_V1_130516.indb 6 5/16/13 5:12 PM

7
OPERATION
Using the appliance
This appliance can be used as a hand held steam cleaner or a oor steam cleaner.
CAUTION: Never direct steam at people, animals or plants. Danger of burns! Never direct
steam at cables, appliances or electrical components, such as ovens, fridges, switches and
lights.
CAUTION: Ensure the water reservoir (12) is lled with water. Do not operate the steam
generator (3) with an empty water reservoir (12). Check the water reservoir (12) regularly
during use.
NOTE: The amount of steam emitted can be adjusted via the steam control knob (4).
Hand held steam cleaner
When using the appliance as a hand held steam cleaner, it can be used in conjunction with
the following attachments.
Attachment Application
Foot attachment (23) Use this attachment to clean upholstery and mat tresses.
Brush attachment (24) Use this attachment to remove dirt and grime from
grooves and crevices.
Round brush attachment (25) Use this attachment to remove dirt and grime from areas
such as tiles, wheel rimes, mirrors and glass (non-cold).
Spatula attachment (26) Use this attachment to remove stubborn dirt and grime,
such as limescale and other deposits.
Nozzle attachment (27) Use this attachment to clean hard to reach places, such
as grooves and crevices.
Adapter attachment (28) Use this attachment in conjunction with the brush (24),
spatula (26), round brush (25) and nozzle attachment
(27). This attachment has a release lever.
4
28
24 27
23
2625
Steam Mop_56002(02608)_US+ES_IM_V1_130516.indb 7 5/16/13 5:12 PM

8
OPERATION
1. If necessary, remove the steam generator (3) from the oor
cleaner housing (14) by pushing the release button (2)
upwards and pulling the steam generator (3) forward and
up.
2. Select the required attachment. When using the brush (24),
spatula (26), round brush (25) and nozzle attachment (27),
please ensure the adapter attachment (28) is also being
used.
3. Plug the adapter attachment (28), if required, onto the
steam nozzle (3) of the steam generator (3). When placed
correctly, a “click” will be audible. To remove this attachment,
press the release lever located on the larger side of the
attachment. Press the lever and pull the attachment away
from the steam generator (3).
5
3
14
4. Place the selected attachment on the small nozzle of the
adapter attachment. (28), aligning the arrow found on the
selected attachment with the notch on the adapter attachment
(28). Once aligned, push the selected attachment onto the
adapter attachment (28) as far as possible, then rotate the
selected attachment 90° clockwise. Remove an attachment
by turning it 90° anticlockwise and lifting it of the adapter
attachment (28).
5. Connect the plug (15) with a suitable wall outlet.
6. To switch the appliance on, place the on/off switch (20) in
the position I. The appliance will now heat up.
7. Once the appliance has reached its operating temperature,
steam will be emitted from the appliance when pressing the
steam release button (19) on the steam generator handle.
8. Move the appliance over the surface to be cleaned. Move
it slowly and carefully. Press the steam release button (19)
as required.
9. Once the cleaning process has been completed, switch the
appliance off, by place the on/off switch (20) in the position
0, and disconnect if from the wall outlet. Once cooled down
remove the attachments, remove the water reservoir (12),
empty any remaining water and allow it to dry.
6
20
15
18
Floor steam cleaner
When using the appliance as a oor steam cleaner, it can only be used with the foot
attachment which has to be used with a oor cloth (22) in this set-up.
NOTE: Before the appliance can be used as a oor steam cleaner, it has to be assembled.
Please follow the steps below.
Steam Mop_56002(02608)_US+ES_IM_V1_130516.indb 8 5/16/13 5:12 PM

9
OPERATION
1. Place the steam generator (3) in the oor cleaner housing
(14). First insert the steam outlet nozzle (3a) into the
receptacle (14a). Once in place, push the top of the steam
generator (3) into the frame. A “click” indicates the steam
generator (3) is securely and correctly tted to the oor
cleaner housing (14).
2. Connect the foot attachment (23) to the nozzle at the bottom
of the oor cleaner housing (14). A “click” indicates that
the attachment is securely and correctly tted to the oor
cleaner housing (14).
3. Pull a oor cloth (22) over the foot attachment (23) and
secure it by pulling the elastic cord tight. To remove the oor
cloth (22), press the cap on the elastic cord. When using the
appliance to clean carpet, place the appliance in the carpet
attachment (9).
4. Connect the plug (15) with a suitable wall outlet.
7
3
3a
14a
23
22
9
5. To switch the appliance on, place the on/off switch (20) on the steam generator (3) in the
position I. The appliance will now heat up, which is indicated by the control lamp (7) on
the top of the foot attachment (23).
NOTE: To additionally remove germs and bacteria, use the UV lamp of the foot attachment
(23). To switch it on, press the on/off switch (11) on the foot attachment (23). To switch the
UV lamp off, press it again. The UV lamp is equipped with a safety switch, which ensures
the UV lamp is only switched on, when the foot attachment (23) is placed vertically on the
oor. Please note the UV lamp needs to heat up for about 3 minutes. To eliminate most
germs and bacteria, the area being treated requires an exposure to UV light for about 10
minutes. It is recommended to use the steam and UV function separately.
6. Once the appliance has reached its operating temperature,
steam will be emitted from the appliance when pressing the
steam release button (18) on the handle of the oor cleaner
housing (14).
7. Release the appliance from its standing position, by placing
one foot on the foot attachment (23) and pulling the handle
(17) backwards.
8. Move the appliance over the surface to be cleaned. Move
it slowly and carefully. Press the steam release button (18)
as required.
8
press once - on
press again - off
11
NOTE: If the oor cloth (22) or water reservoir (12) needs to be replaced/relled during use,
switch off the UV light, the steam generator and disconnect the plug from the wall outlet.
Allow the appliance to cool down. Once cooled down, replace the oor cloth (22) and/or
rell the water reservoir (12).
9. Once the cleaning process has been completed, switch the appliance off and disconnect
if from the wall outlet. Once cooled down, remove the attachments, remove the water
reservoir (12), empty any remaining water and allow it to dry.
Steam Mop_56002(02608)_US+ES_IM_V1_130516.indb 9 5/16/13 5:12 PM

10
CLEANING
Clean the product after every use to ensure a long appliance lifecycle.
CAUTION: Always remove the plug (15) from the wall outlet. Always allow the appliance to
cool down completely. Do not immerse any part of the appliance in water or other liquids. Do
not rinse any part of the appliance under running water. Do not use solvents or aggressive
cleaning agents.
1. Remove any attachments for the appliance.
2. If necessary, wipe the appliance with a slightly damp cloth and a small amount of mild
cleaning agent.
3. Empty the water reservoir and allow to dry.
4. The oor cloth can be washed in the washing machine, however, do not tumble dry!
Limescale lter
The appliance is equipped with a limescale lter, located
under the water reservoir on the steam generator. It should be
replaced when its color has changed completely blue. Please
follow below steps:
1. Press the two release buttons (13), located on the sides of
the water reservoir (12), and carefully pull the water reservoir
(12) away from the steam generator (3).
2. The limescale lter (6) can now be removed by pulling up on
the two small handles.
3. Replace the old limescale lter with a new one of the same
make and model. Please contact your retailer for details.
13
12
6
3
9
Storage
Always clean the appliance and ensure it is completely dry
before storing it.
1. Before storing the appliance, place the steam generator
(3) in the oor cleaner housing (14) and attach the foot
attachment (23).
2. Place the power cord (14) around the cord guides (16).
Ensure the cord guides (16) point way from each other.
3. To store the appliance, push the release button (1) and fold
the upper part of the oor cleaner housing (14) downwards.
4. The appliance can now be stored. It is recommended to
store the product in a dry place.
5. Store the product on a in a cupboard, preferably in its original
packaging. Ensure the product is stored out of reach from
children or pets.
10
1
Steam Mop_56002(02608)_US+ES_IM_V1_130516.indb 10 5/16/13 5:12 PM

11
DISPOSAL
The packaging material is recyclable. Please dispose of it in an environmentally friendly
manner.
TROUBLESHOOTING
If the appliance should stop working properly, rst check whether you are able to correct the
problem yourself. Otherwise, contact our customer service department. Do not try to repair
a faulty appliance yourself!
Problem Possible cause/solution
No steam is being
produced.
- Is the on/off switch (20) in position I?
- Is the plug connected to a suitable wall outlet?
- Is the wall outlet defective? Try another wall outlet.
- Check the fuse of your wall outlet.
The control lamp
does not light up.
- Has the appliance reached its operating temperature? The
appliance needs to heat up for around 30 seconds before steam
can be produced.
- Is the water reservoir empty? Rell the water reservoir (see the
chapter “OPERATION”, section “Filling the water reservoir”).
TECHNICAL DATA
Model: 56002
Input steam mop: 120 V ~, 60 Hz, 12 A
Input UV lamp: 4.5 V (3 x 1.5 V, batteries AA type)
Power: approx. 1500 W
Steam temperature: approx. 212 °F (100 °C)
Capacity water reservoir: approx. 13.52 oz (400 ml)
Steam Mop_56002(02608)_US+ES_IM_V1_130516.indb 11 5/16/13 5:12 PM

12
Estimado Cliente,
Enhorabuena por la adquisición de la Mopa a Vapor con Luz UV. Comprendemos que
un hogar limpio y organizado es importante para una vida feliz, saludable para usted, su
familia y amigos. En Fuller nos esforzamos por ayudarle a lograr este objetivo.
MEDIDAS DE SEGURIDAD
IMPORTANTES
Cuando se utilizan aparatos eléctricos, se deben seguir las precauciones básicas de
seguridad, incluyendo las siguientes:
LEA TODAS LAS INSTRUCCIONES ANTES DE USAR ESTE APARATO.
ADVERTENCIA – Para reducir el riesgo de incendio, descarga
eléctrica o lesiones:
• No deje el aparato sin supervisión si está enchufado. Desenchufe del tomacorriente
cuando no esté en uso y antes de darle servicio.
• No permita que el aparato sea utilizado como juguete.Preste especial atención cuando
sea utilizado por o cerca de niños. Los niños deben ser supervisados para asegurar que
no jueguen con el producto.
• Utilice sólo como se describe en este manual. Utilice únicamente accesorios
recomendados por el fabricante.
• No utilice el aparato si parece dañado, si tiene un cable de alimentación o enchufe
dañado. Si el aparato no funciona correctamente, se ha caído, dañado, dejado a la
intemperie o se ha caído al agua, devuélvalo inmediatamente a un centro de servicio.
• No jale ni transporte el aparato por el cable de alimentación, ni utilice el cable de
alimentación como mango, no aplaste ni doble el cable de alimentación, ni pase el cable
de alimentación alrededor o sobre bordes o esquinas alados. No haga funcionar el
electrodoméstico u otro equipo sobre el cable de alimentación. Mantenga el cable de
alimentación, el enchufe y el aparato lejos de supercies calientes y llamas abiertas.
• No desconecte el aparato tirando del cable de alimentación. Para desenchufar, tire del
enchufe, no del cable de alimentación.
• No manipule el enchufe, el cable de alimentación o el aparato con las manos mojadas.
• Apague el aparato por completo antes de desenchufarlo.
• Guarde este manual de instrucciones para referencia futura. Si el aparato se entrega a
terceros, por favor asegúrese de incluir este manual de instrucciones.
• Nunca sumerja el aparato, el cable o el enchufe en agua u otro liquido. Asegúrese de
que el aparato, el cable o el enchufe, no caigan al agua, a otros líquidos o se mojen.
Peligro de descarga eléctrica.
• No toque el aparato, el cable eléctrico o el enchufe con las manos mojadas o parado
sobre piso mojado.
• Ningún líquido debe penetrar en el aparato durante la limpieza; esto puede causar
considerables daños en el aparato.
• Este aparato no está destinado a ser utilizado como dispositivo de calentamiento de
habitación. El dispositivo puede sobrecalentarse y dañarse de forma permanente. Un
aparato sobrecalentado también puede dar lugar a incendios.
Steam Mop_56002(02608)_US+ES_IM_V1_130516.indb 12 5/16/13 5:12 PM

13
MEDIDAS DE SEGURIDAD
IMPORTANTES
ATENCIÓN: ¡Supercie caliente, peligro de quemaduras/escaldaduras! Evite
el contacto. Durante su uso, sólo opere el aparato a través de sus controles y
botones. No toque el pie de limpieza, el paño de limpieza, los accesorios u otras
partes que entran en contacto con el vapor durante el uso o inmediatamente
después de su uso. Mantenga una distancia mínima de 12” (30 cm) en todo
momento. Use zapatos para limpiar pisos.
ATENCIÓN: Poco después de usar el accesorio utilizado puede estar todavía
muy caliente. Por ello espere unos minutos hasta que se haya enfriado
completamente antes de desconectar los accesorios. Deje siempre que el aparato
se enfríe completamente antes de introducir o extraer agua, antes de la limpieza
y almacenamiento.
uv
ATENCIÓN: Luz UV - No mire directamente a la lámpara
No intente cambiar la lámpara UV usted mismo. Sólo puede ser cambiado por un
técnico cualicado.
uv
ADVERTENCIA:No saque la cubierta de la lámpara UV, está
provista de un sistema de bloqueo para reducir el riesgo de radiación ultravioleta
excesiva. No anule el propósito ni intente hacer el servicio sin quitar la tapa
completamente.
• Este aparato cumple las disposiciones Federales de EE.UU. aplicables, incluyendo el
Código Federal de Regulaciones, Título 21 CFR, Parte 1040, Capítulo 1, Subcapítulo J,
Salud Radiológica.
¡GUARDE ESTAS INSTRUCCIONES!
Steam Mop_56002(02608)_US+ES_IM_V1_130516.indb 13 5/16/13 5:12 PM

14
MEDIDAS ADICIONALES
• Sólo para uso doméstico!
Enchufe polarizado
• Este aparato tiene un enchufe polarizado (una pata es más ancha que la otra). Para
reducir el riesgo de choque eléctrico, se ha previsto que este enchufe quepa en un
enchufe hembra en una sola posición. Si el conector no cabe completamente en el
enchufe hembra, gire el conector. Si aún así no encaja, comuníquese con un electricista
cualicado. No intente modicar el enchufe de ninguna manera.
Baterías
• Antes de colocar las pilas comprobar si los contactos del compartimento de las pilas y
las baterías están limpios de lo contrario límpielos.
• Sólo use las baterías mencionadas en la información técnica.
• Cambie siempre todas las pilas al mismo tiempo. No utilice pilas de distintos tipos o
marcas, o baterías de diferentes capacidades. Al cambiar las pilas, preste especial
atención a la polaridad correcta (+/-).
• Retire las pilas del aparato si están descargados o si el aparato no va a ser utilizado
durante un largo periodo de tiempo. Esto evitará daños que podrían ocurrir si la batería
tiene fugas.
• Retire las baterías gastadas del producto rápidamente.
• Las pilas no deben recargarse ni reactivarse mediante otros medios, ni desmantelarse,
ni exponerse a fuego, sumergirse en líquidos o cortocircuitarse.
Uso previsto
• Sólo utilice este aparato en ambientes interiores secos. No usar en exteriores.
• Este aparato es sólo para uso doméstico y no está diseñado para uso comercial. Use
este aparato sólo como se indica en estas instrucciones. Cualquier otro uso se considera
inadecuado.
• El aparato es adecuado para la limpieza de supercies resistentes al calor. También
se puede utilizar para la limpieza de pisos laminados, si se siguen las siguientes
instrucciones:
- El laminado debe estar colocado y no debe tener huecos o grietas.
- Siempre pruebe el aparato en un lugar poco visible y compruebe si hay ondas o
penetración de humedad.
- Si la supercie está impecable, el aparato puede ser utilizado para limpiar toda la
supercie laminada.
• El aparato no es adecuado para suelos de madera sin sellar, plástico blando, cuero y
muebles de madera. No utilizar sobre supercies de vidrio frías, el vapor caliente podría
quebrar el vidrio.
• Consulte a un especialista si su piso es apto para la limpieza con este artefacto. Siempre
pruebe el artefacto en un lugar poco visible.
• La lámpara UV del pie de limpieza está diseñada para la eliminación de gérmenes y
bacterias.
• El aparato se debe utilizar siempre en espacios cerrados.
OBSERVACIÓN: Cuando se utilice en supercies tratadas con cera, el calor y el vapor
pueden eliminarla.
Steam Mop_56002(02608)_US+ES_IM_V1_130516.indb 14 5/16/13 5:12 PM

15
MEDIDAS ADICIONALES
• Este aparato sólo debe ser utilizado para el uso previsto. No se aceptará responsabilidad
alguna por los daños resultantes del uso indebido o incumplimiento de estas instrucciones.
• No deje el artefacto sin supervisión si está conectado a un enchufe.
Peligro de lesión
ADVERTENCIA: ¡Riesgo de asxia! Los materiales de embalaje no son juguetes. Bolsas
de plástico, láminas y piezas de espuma de poliestireno pueden asxiar a los niños.
Mantenga siempre todos los materiales de embalaje alejados de niños y animales.
• Este producto no ha sido concebido para personas (incluyendo niños) con capacidades
físicas, sensoriales o mentales reducidas, o sin experiencia y conocimiento a menos
que estén supervisados o hayan recibido instrucción sobre el uso del producto por una
persona responsable de su seguridad. Los niños deben ser supervisados para asegurar
que no jueguen con el producto.
• CUIDADO! Evite exponerse a rayos UV germicidas directos o fuertemente reejados.
¡Los rayos UV germicidas son perjudiciales para los ojos y la piel!
• ¡Coloque el cable de alimentación de tal manera que se no suponga un riesgo de
tropiezo!
• Asegúrese de que el cable de alimentación no sea doblado o aplastado y que no entre
en contacto con supercies calientes.
• Por favor, tenga especial cuidado al limpiar escaleras.
• Sólo operar el aparato por el mango. Peligro de quemaduras.
• No utilice el aparato en ambientes con presencia de polvo fácilmente inamable o gases
tóxicos y explosivos.
• Desconecte el aparato de la toma de corriente:
- antes de quitar/cambiar los accesorios
- antes de llenar/vaciar el depósito de agua
- antes de limpiar el aparato
- cuando el artefacto no esté en uso.
• Siempre tire del enchufe y nunca del cable de alimentación.
• Nunca cargue o tire el aparato por el cable de alimentación.
Durante el uso
¡CUIDADO! ¡Peligro de quemadura! El uso inadecuado puede causar lesiones,
quemaduras y choque eléctrico.
ADVERTENCIA: ¡Vapor caliente, peligro de quemaduras/escaldaduras! Nunca
dirija el vapor a personas, animales o plantas. ¡Esto puede causar quemaduras
severas!
• Nunca dirija el vapor a cables, aparatos y componentes eléctricos, tales como hornos,
frigorícos, interruptores y luces.
• No dirigir vapor a un mismo lugar durante períodos prolongados.
• Utilice el aparato sólo cuando esté completamente montado y en funcionamiento. No
utilice si está dañado. Compruebe si hay daños antes de cada uso.
• Revise la bayeta en busca de signos de desgaste antes de cada uso. No la utilice si
muestra signos de desgaste o si está dañada. Podría dañar el suelo.
• Siempre desconecte el aparato de la toma de corriente, antes de retirar/colocar el paño
de limpieza u otros accesorios, rellenar/vaciar el depósito de agua, limpiar el aparato o
cuando el aparato no esté en uso.
Steam Mop_56002(02608)_US+ES_IM_V1_130516.indb 15 5/16/13 5:12 PM

16
MEDIDAS ADICIONALES
• No use nunca el aparato sin agua. Asegúrese siempre de que la tapa del depósito de
agua esté rmemente atornillada en su lugar y que el depósito de agua esté bloqueado
en su lugar. No desenrosque la tapa del depósito de agua durante el uso.
• Utilice agua del grifo o agua destilada para llenar el depósito de agua. No utilice otros
líquidos ni añada otros agentes de limpieza. Esto podría dañar el aparato y la operación
segura ya no está garantizada.
• No cubra la salida de vapor. No la coloque sobre una supercie blanda, cubriéndola.
• No introduzca objetos en la salida de vapor.
• No deje caer el aparato. Asegúrese de que no se puede caer o ser derribado.
• No utilice nunca el pie de limpieza sin una bayeta. Verique que la bayeta no esté
dañada. Si hay daños o signos de desgaste visibles, no lo use, podría dañar el piso.
• No utilice otros accesorios aparte de los suministrados con el aparato por el fabricante.
Limpieza y cuidado
• No utilice productos de limpieza corrosivos o abrasivos (p.ej. vinagre) o almohadillas de
limpieza para limpiar el aparato.
• Una vez que el aparato se haya enfriado por completo y el depósito de agua esté vacío,
colocar el aparato en su posición de almacenamiento.
• Antes de guardar el aparato, enrolle el cable de alimentación alrededor de los ganchos
previstos. No enrolle con demasiada fuerza, ya que esto podría dañar el cable de
alimentación.
• Guarde el aparato en un lugar seco, limpio y fresco, preferiblemente en su empaque
original. Asegúrese de que el aparato se almacene fuera del alcance de niños o mascotas.
• No exponga el aparato a temperaturas extremas, fuertes variaciones de temperatura,
luz solar directa o humedad.
• Para más detalles, véase el capítulo “LIMPIEZA”.
Steam Mop_56002(02608)_US+ES_IM_V1_130516.indb 16 5/16/13 5:12 PM

17
PARTES
22
23
24
18
19
20
21
25
26
27
28
1
2
3
4
5
6
7
8
9
10
11
12
13
15
14
16
17
1. Botón de liberación (articulación)
2. Botón de liberación (generador de vapor)
3. Generador de vapor de una boquilla de
salida de vapor
4. Perilla de control de vapor
5. Tapa del depósito de agua
6. Filtro antical (extraíble)
7. Lámpara de control
8. Ventanilla (lámpara UV)
9. Fijación de alfombras
10. Compartimiento de batería con cubierta
11. Interruptor on/off (lámpara UV)
12. Depósito de agua
13. Botón de liberación (depósito de agua)
14. Caja del limpiador de piso. Receptáculo
de la boquilla de vapor
15. Cable eléctrico con enchufe
16. Guía de cable
17. Mango de carcasa de limpiador de piso
18. Botón de liberación de vapor (caja del
limpiador de piso)
19. Botón de liberación de vapor
(generador de vapor)
20. Interruptor on/off 0/I (generador de
vapor)
21. Palanca del disparador
(Accesorio de pie)
22. Paño de piso (x2)
23. Accesorio de pie
24. Cepillo
25. Cepillo redondo
26. Espátula
27. Boquilla
28. Accesorio adaptador
no se muestra: 3 baterías de 1,5 V, AA
Steam Mop_56002(02608)_US+ES_IM_V1_130516.indb 17 5/16/13 5:12 PM

18
FUNCIONAMIENTO
Antes del primer uso
• Retire con cuidado el aparato y sus accesorios del
embalaje.
• Revise si el contenido del paquete está completo y no tiene
daños.No utilice el aparato si el contenido del paquete está
incompleto o parece estar dañado.Lleve a la tienda de
inmediato (véase el capítulo “PARTES”).
ADVERTENCIA! Para evitar el peligro de asxia, mantenga la
bolsa de plástico lejos de bebés y niños.
No utilice esta bolsa en cunas, camas, coches o corralitos.
Esta bolsa no es un juguete.
• Guarde el material de embalaje si desea utilizarlo para
empacar, enviar o transportar el producto.Guarde de tal
manera que no pueda causar daño.
• Conecte la carcasa del limpiador de piso (14) a la jación del
pie (23). Coloque el aparato sobre una supercie estable.
• Levante la palanca (17) a una posición vertical. Asegúrese
de que encaje en su lugar.
117
14
23
Inserción y extracción de las baterías
1. Para abrir el compartimento de las pilas (10), presione
los pestillos en la tapa del compartimiento de la batería y
retírela.
2. Inserte 3 pilas de tipo AA (1,5 V). Preste mucha atención
a la polaridad correcta (+/-), tal como se indica en el
compartimiento, al insertar las pilas.
3. Coloque la tapa del compartimento de la batería de
nuevo en la parte superior del compartimento de la
batería (10). Asegúrese de que encaje en su lugar.
2
10
Llenar el depósito de agua
1. Pulse los dos botones de liberación (13), situados en los laterales del depósito de
agua (12) y tire con cuidado el depósito de agua (12) del generador de vapor (3).
2. Gire la tapa de depósito de agua (5) en sentido antihorario, como se indica en la tapa y
retírela del depósito de agua (12).
3. Llene el depósito de agua (12) con agua corriente fresca y limpia o agua destilada. No
llene en exceso el depósito de agua (12).
4. Vuelva a colocar la tapa del depósito de agua (5), colocándola en su lugar previo y gírela
en sentido horario. Asegúrese de girar hasta el nal.
5. Inserte el depósito de agua (12) de nuevo en el generador de vapor (3). Los botones de
liberación (13) deben bloquearse en su lugar, indicado con un “clic”.
Steam Mop_56002(02608)_US+ES_IM_V1_130516.indb 18 5/16/13 5:12 PM

19
FUNCIONAMIENTO
3
A B D EC
13 125 3
Uso del artefacto
Este aparato se puede utilizar como limpiador de vapor manual o como limpiador de vapor
de piso.
ADVERTENCIA: Nunca dirija el vapor a la gente, animales o plantas. ¡Peligro de
quemaduras! Nunca dirija el vapor a cables, aparatos y componentes eléctricos, tales como
hornos, frigorícos, interruptores y luces.
ADVERTENCIA: Asegúrese de que el depósito de agua (12) esté lleno de agua. No haga
funcionar el generador de vapor (3) con un depósito de agua vacío (12). Revise el depósito
de agua (12) de forma regular durante el uso.
OBSERVACIÓN: La cantidad de vapor emitida puede ajustarse a través del regulador de
vapor (4).
Limpiador a vapor manual
Al utilizar el aparato como un limpiador a vapor manual, puede ser utilizado con los
siguientes accesorios.
Accesorio Solicitud
Accesorio de pie (23) Utilice este accesorio para limpiar la tapicería y mechones
alfombra.
Accesorio de cepillo (24) Utilice este accesorio para eliminar la suciedad y el hollín
de las ranuras y grietas.
Accesorio de cepillo redondo
(25)
Utilice este accesorio para eliminar la suciedad y el hollín
de áreas tales como azulejos, aros de ruedas, espejos y
vidrio (no frío).
Accesorio de espátula (26) Utilice este accesorio para eliminar suciedad rebelde,
como los de cal y otros depósitos.
Accesorio boquilla (27) Utilice este accesorio para limpiar lugares de difícil
acceso, como las ranuras y grietas.
Accesorio adaptador (28) Utilice este accesorio con el cepillo (24), la espátula (26),
cepillo redondo (25) y la boquilla redonda (27). Este
accesorio tiene una palanca de liberación.
Steam Mop_56002(02608)_US+ES_IM_V1_130516.indb 19 5/16/13 5:12 PM

20
FUNCIONAMIENTO
4
28
24 27
23
2625
1. Si es necesario, retire el generador de vapor (3) de la
caja del limpiador de piso (14) presionando el botón de
liberación (2) hacia arriba y tirando del generador de
vapor (3) hacia adelante y hacia arriba.
2. Seleccione el accesorio deseado. Cuando use el
cepillo (24), la espátula (26), el cepillo redondo (25) y el
accesorio de boquilla (27), asegúrese también de que esté
utilizando el accesorio adaptador (28).
3. Conecte el accesorio del adaptador (28), si es necesario, a la
boquilla de vapor (3) del generador de vapor (3). Cuando se
coloca correctamente, un “clic” será audible. Para eliminar
este accesorio, pulse la palanca de liberación situada en la
lado más grande del conector. Presione la palanca y tire el
accesorio fuera del generador de vapor (3).
5
3
14
Steam Mop_56002(02608)_US+ES_IM_V1_130516.indb 20 5/16/13 5:12 PM
Table of contents
Languages:
Other Fuller Brush Steam Cleaner manuals
Popular Steam Cleaner manuals by other brands

Dirt Devil
Dirt Devil AQUAclean 3 in 1 instruction manual

Silvercrest
Silvercrest SDM 1500 D2 operating instructions

Dirt Devil
Dirt Devil M325 instruction manual

Thermo-Star
Thermo-Star Avantgarde Operating and maintenance manual

EUROPRO
EUROPRO Shark EP85SS Use & care instructions

Silvercrest
Silvercrest SDRB 1000 B1 operating instructions

Silvercrest
Silvercrest 340803 1907 operating instructions

Silvercrest
Silvercrest 353449 2007 Operating instructions and safety instructions

HomeTek
HomeTek Light n Easy HT851 instruction manual

EUROPRO
EUROPRO V1707H owner's manual

Dirt Devil
Dirt Devil aqua clean DD301 operating manual

EUROPRO
EUROPRO Ultra Steam Shark EP903 owner's manual