Original Saw Company 3531-01 Manual

11
This manual is provided for your convenience in the use
and care of your saw. These instructions include opera-
tion, precautions, preventative maintenance and other
pertinent data to assist you in assuring long life and de-
pendable service from your saw.
WARNING: FOR YOUR SAFETY READ AND
UNDERSTAND THIS MANUAL PRIOR TO
USING THE SAW. REVIEW ALL SAFETY
RULES AND OPERATING INSTRUCTIONS
FREQUENTLY.
RADIAL ARM SAW
TYPE 5 - cross cut only
14” models 3531-01, 3536-01, 3531-03, 3536-03
16” models 3541, 3546
For Serial number 20190603790 forward
(July 2019)
Operations & Maintenance Manual
Original Saw Company
465 Third Ave SE
Britt, IA 50423 USA
PH 641-843-3868
800-733-4063
custom[email protected]
www.originalsaw.com
Getting Started
Unpacking, general machine precautions, wiring,
installation, preventative maintenance.

22
TABLE OF CONTENTS
SECTION PAGE
Warranty Information …...……………………………………………………………….. 2
Service Record ……..…………………………………………………………………….... 3
Power Tool Safety ……………………………………………………………….………… 4
Use / ANSI Conformity …………………………………………………………………….. 5
Use / Preventative Maintenance …………………………………………………………. 6
Symbols / Decals ………………………………………………………………………….. 7
Decal Locations ……………………………………………………………………………. 8
Saw Components and Controls ……………………………………………………..…… 9
Product Specifications …………………………………………………………………..... 10
Saw Assembly and Installation …………………………………………………....……..12-15
Electrical Connections ……………………………………………………………....…… 11-13
Arbor Rotation ……………………………………………………………....……….…… 13
Changing Motor Voltage …………………………………………………….…………… 13
Blade Mounting ……………………………………………………………………………… 15
Operating Instructions ………………………………………………………………...…. 16-17
Alignment and Adjustments ………………………………………………………..…… 18-21
Troubleshooting …………………………………………………………………….… 24-26
Industrial Use Warranty Information
Your new Original Radial Arm Saw is precision manufactured under strict quality standards. In the
unlikely event there is trouble with your machine, the Original Saw Company warrants the machine
for the period of one year from the date of purchase. The warranty covers defects in materials and
workmanship. We will cover the cost of the defective part and ground shipping. If a replacement
part is sent under warranty the defective part must be returned to Original Saw Company or you will
be charged for the replacement. The part must also be accompanied by a return goods authorization
number. This number can be obtained by calling customer service at 1-800-733-4063. When the
part is returned it may be repaired or replaced at our discretion. The part must be shipped prepaid
to: The Original Saw Company, Attn. Warranty Replacement Counter, 465 Third Avenue SE, Britt,
Iowa 50423.

33
Service Record
Serial Number_____________________ Date Purchased ______________
Date Service Performed By

44
GENERAL RULES FOR SAFE OPERATION OF POWER TOOLS
1. KNOW YOUR POWER TOOL. Read the owner’s manual carefully. Learn the applications and
limitations as well as the specific potential hazards of the tool.
2. GROUND ALL TOOLS.
3. KEEP GUARDS IN PLACE. Keep guards in working order.
4. KEEP WORK AREA CLEAN. Cluttered areas and benches invite accidents.
5. AVOID DANGEROUS ENVIRONMENTS. Don’t use power tools in damp or wet locations. Keep
work area well lit.
6. KEEP CHILDREN AWAY. All visitors should keep a safe distance from the work area.
7. DON’T FORCE TOOL. The tool will do a better job if used at a normal cutting rate do not force.
8. WEAR PROPER APPAREL. Loose clothing, gloves or jewelry may get caught in moving parts.
Rubber footwear is recommended when working outdoors.
9. USE PROTECTIVE GLASSES. If operation is dusty also wear a dust mask.
10. DON’T OVER REACH. Keep proper balance and footing at all times.
11. MAINTAIN TOOLS WITH CARE. Tools kept sharp and clean provide the best and safest
performance. Follow instructions for lubricating and changing accessories.
12. DISCONNECT TOOLS FROM POWER SOURCE. When not in use, before servicing, when changing
accessories, blades, or cutters, the tool should be disconnected and locked out.
13. REMOVE ADJUSTING KEYS AND WRENCHES. Make it a habit to ensure keys and adjusting
wrenches are removed prior to starting tool.
14. USE RECOMMENDED ACCESSORIES. Consult your distributor or Original Saw Company for
recommended accessories. Using improper accessories may cause hazards.
15. SECURE YOUR WORK. Use clamps or a vise to hold work when practical.
16. NEVER LEAVE TOOL RUNNING WHILE UNATTENDED.
POWER TOOL SAFETY

55
ANSI-Declaration of conformity
3531-01-230, 3536-01-230, 3531-03-208/230, 3536-03-
208/230, 3531-03-460, 3536-03-460, 3531-03-575/600,
3536-03-575/600
Original Saw declares that these power pools have been
designed in compliance with ANSI Machine
Standards 01.1-2013. For more informaon, please con-
tact Original Saw at the address below or refer to the address
on back of the manual.
Noise Exposure
It is the responsibility of the installer and
end user to ensure The Noise Exposure
requirements of 29 CFR 1910.95 are
satisfied.
3531-01-230, 3536-01-230, 3531-03-208/230, 3531-03
-460, 3531-03-575/600, 3536-03-208/230, 3536-03-
460, 3536-03-575/600
LpA (sound pressure) dB(A)* 85.5 85.5
LWA (acoustic power) dB(A) 93.5 93.5
* at the operator’s ear
Take appropriate measures for the protection of hearing
if the sound pressure of 85 dB(A) is exceeded. Note:
sound levels will very depending on material being cut
and what blade is installed on the machine.
Original Saw Company
465 Third Ave SE
Britt, IA 50423
PH 641-843-3868 FX 641-843-3869
Intended Use of Machine
− Machines for Wood and plastic cutting only
− Maximum size of material
− 3531-01 3531-03 width 16” / 400 mm
thickness 4 1/8 ” /100 mm
− 3536-01, 3536-03 width 24” / 600 mm
Thickness 4 15/16” / 125 mm
Residual Risks
The following risks are inherent to the use of
radial arm saws:
In spite of the application of the relevant
safety regulations and the implementation of
safety devices, certain residual risks cannot
be avoided.
These are:
- Impairment of hearing.
- Risk of accidents caused by contact with the uncovered
parts of the rotating saw blade.
- Risk of injury when changing the blade.
- Risk of pinch hazard between bevel stop and carriage of
machine.
• Health hazards caused by breathing dust developed
when sawing wood, especially oak, beech, MDF.
Dust / Chip Collection
End user must ensure that the machine is
installed in a well ventilated area with chip
and dust extraction system fitted to the
extraction points
− The machine is set for indoor use only and must be
connected to a dust/chip collection system.
− The dust collection system must be switched on be-
fore cutting operations can begin.
− The hoses on the dust collection must be grounded.
− There are dust collection shrouds available as acces-
sories please call customer service at 641-843-3868
or email customerservice@originalsaw.com with any
questions
Eye Protection
− Eye protection must be worn at all times during use.
Trip / Slip Hazard
− Make sure power cable is routed in a manner to en-
sure there is no trip / fall or a slip hazard
− Keep work area around saw clean and free of
hazards.
Blades
− Use only correctly designed and or
sharpened saw blades manufactured in ac-
cordance with all applicable regulations..
− Use only blades that are rated at the
specified 3600 RPM when machine is operate at
60Hz or 2825 when machine is operated on 50 Hz the
RPM on the machine. No blade shall be used that is
not rated for the rpm of the machine.
Lighting requirements
− The area around the machine must be well lit.
Use and ANSI Declaration

66
Modifications:
− Any modifications to the machine including incorpora-
tion into an assembly, addition of integrated feeds or
other changes are the responsibility of the end user
and the end user must ensure ongoing compliance.
Additional Safety Actions to be Take by End
User
− Lock out Tag out procedures to be adopted during all
maintenance.
− Lock out Tag out procedures to be observed when
changing blade
Functional Testing
− Braking time test—tested monthly
(20 second brake run down )
− Upper Guard locking—tested monthly, prove there is
an inability to open upper guard without tools.
− Test lower guards for hang ups make sure upper plas-
tic section drop down to cover blade
− Test lower ring guard (inner) test to make sure it moves
freely, it is not bent, and does not hang up– must drop
freely to lower portion of blade
General instrucons for Safe Use:
− • Always observe the safety instrucons and applicable
− regulaons.
− • Ensure the material to be sawn is rmly secured in place.
− • Apply only a gentle pressure to the tool and do not exert
side
− pressure on the saw blade.
− • Avoid overloading.
− • Install the appropriate saw blade. Do not use excessively
worn blades. The maximum rotaon speed of the tool must
not exceed that of the saw blade.
− • Do not aempt to cut excessively small pieces.
− • Allow the blade to cut freely. Do not force.
− • Allow the motor to reach full speed before cung.
− • Make sure all locking knobs and clamp handles are ght.
− • Never run the machine without the guards in place.
− • Never li the machine by the table top.
Preventave Maintenance — Connued
− Weekly
− Perform daily PM tasks and then also:
− Make sure spring return pulls carriage back behind the
fence from any posion in the arm.
− Look at saw blade, make sure it is free of cracks and is
sharp,
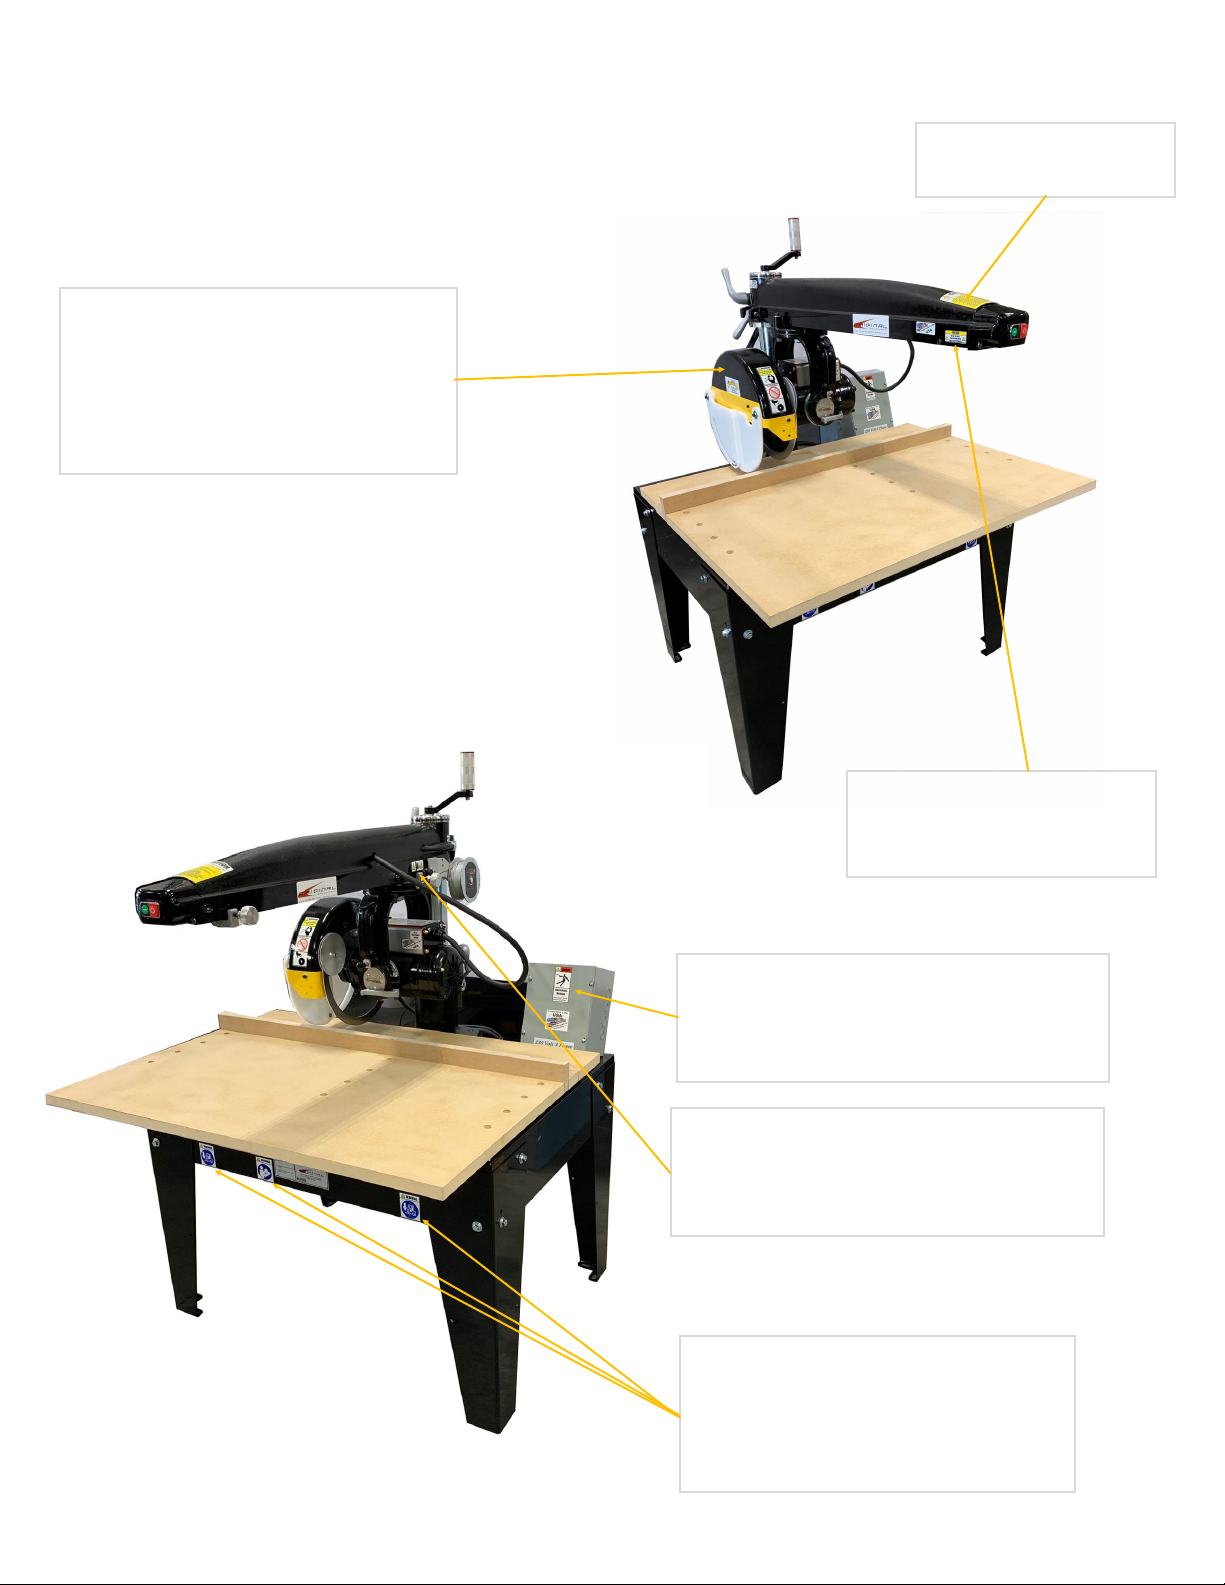
− Review all safety labeling and make sure they are intact
and legible, if they are damaged order replacements
from Original Saw Company.
−
− Monthly / Bi-Monthly—Every 160 hours of use:
− Disconnect power from machine
− Remove saw blade, end cap, and stop bolt pull out car-
riage and gently rest the carriage assembly on the table
top.
− Wipe down the machined tracks with denatured alcohol
or paint thinner to remove any residual wood pitch
buildup. Note do not lubricate the tracks.
− Wipe down the bearings with denatured alcohol or paint
thinner to remove any residual wood pitch buildup.
Check for free movement if there are any bad bearings
have them replaced– they will cause wear and damage.
− Review all cords for cracks replace if damaged.
− Reassemble the carriage in the arm, reinstall stop bolt,
end cap. Check for looseness in the carriage or le to
right movement specically near the fence area.
− The column should be wiped down with a clean dry rag,
if there are any wood pitch please use denatured alcohol
or pain thinner to remove then keep column dry.
− Vacuum the table and inside the frame to make sure
sawdust is not building up in those areas.
− Annually / Bi-Annually
− Adjustment and alignment of saw is necessary only when
cung results in unacceptable accuracy but yearly take a
square and double check alignment as shown starng on
page 18.
− Aer many years of use your saw may need replace-
ment parts. If any of the following wears out all others
listed should be checked also.
− Arm Tracks: If the saw is used primarily for short cut-
os, the tracks may wear making it dicult to adjust the
roller head bearing for full length arm travel. Arms can
generally be re-machined—contact Original Saw for pric-
ing and shipping instrucons.
− Motor bearings: Check for free, smooth rotaon. Do not
aempt to lubricate. Replace every 5 years with factory
original bearings. Or if unit is used more than 6-8 hours
per day replace every 2 years.
− Elevang mechanism: Remove, clean and lubricate with
type EP grease. Check for wear between nut and jack
screw. Replace assembly if loose.
Preventave Maintenance
Original Radial Arm Saws are designed to provide you with
precision cung with a minimal amount of maintenance.
The frequency of the maintenance depends on the amount of
use and the desired cung quality.
Always disconnect and lockout power supply before per-
forming maintenance.
− Daily:
− Wipe down the machined tracks in the arm with a dry
clean cloth. Removing this dust will keep it from building
up on the tracks.
− Glance at the guards and make sure the upper guard is
in good shape free from damage and the lower movea-
ble porons have free movement and are not binding.
Use and Preventative Maintenance

77
SYMBOLS / DECALS
The following symbols are used throughout this manual:
Denotes risk of personal injury, loss of life or damage to the
tool in case of non-observance of the instructions in this
manual.
Always replace damaged, missing, or illegible decals.
Contact Original Saw at 641.843.3868 for replacement
parts.
6
.Denotes hearing and eye
protection required.
7
.Denotes guards required to be
in place.
8
.
Denotes general safety hazard.
See operators manual for more
information pertaining to these
areas.
9
.Denotes lift point.
Denotes risk of injury, loss of life,
or
damage to the tool in case of not
observing the instructions in this
manual.
1
.
Denotes risk of electrical shock.
2
.
Denotes risk of pinching hazard.
3
.
Denotes hazard of rotating
blade.
4
.
Denotes hazard of entangle-
ment.
5
.

88
Symbols / Decals
Guard:
# 4 Hazard Rotating blade
# 6 Hearing and eye protection
# 7 Guards required to be in place
- rotation direction
- use blades rated at 3450 rpm
Arm:
General Caution
Frame:
# 4 Denotes lift point
Note there are 2 on front of frame
and 2 on the rear of the frame
#1 Denotes read manual before
using
Arm: left side
# 3 Denotes a pinch point on front
of bevel stop and roller head yoke
#5 Denotes hazard of entanglement
Arm: right side
Do not operate with
safety stop removed
Magnetic Starter:
Risk of electrical shock

99
E
A
B
CD
K
O
P
EF
G
H
LM
C
N
Q
R
S
K
I
J
Components and Controls
!!! CAUTION !!!
BOTH UPPER AND LOWER GUARDS MUST REMAIN IN PLACE FOR SAFE CUTTING OPERATION.
Control Locations
A. Miter Latch Handle
B. Arm Clamp Handle
C. Elevating Control Handle
D. Miter Scale
E. On/Off Switch
F. Adjustable Arm Stop
G. Operating Handle
H. Bevel Index Pin
I. Bevel Scale
J. Bevel Clamp Handle
K. Serial Number Plate
L. Carriage lock clamp
M. Carriage return spring
N. Magnetic starter assembly
(Usually mounted on wall)
O. Blade guard (upper)
P. Blade guard (lower) 2 pcs
Q. Front table
R. Fence board
S. Spacer boards
T. Elevating Base/Clamp Handle
*Medium arm models only
T

1010
3531-01 3536-01 3531-03 3536-03 3541 3546
Motor Power (input) W
Motor Power (output) W2250 2250 3800 3800 3800 3800
Voltage V208/230 208/230 208/230/460/ 575
208/230/460/
575 208/230/460/ 575 208/230/460/ 575
Blade Diameter max Inches/mm 14/350 14/350 14/350 14/350 16/400 16/400
Blade Bore Inches/mm 1/25.4 1/25.4 1/25.4 1/25.4 1/25.4 1/25.4
Spindle Diameter mm 25.4 25.4 25.4 25.4 25.4 25.4
No load speed 50Hz rpm 2825 2825 2825 2825 2825 2825
No load speed 60Hz rpm 3450 3450 3450 3450 3450 3450
Brake time
Depth of cut at 90o
seconds
Inches/mm
20
4.125”/ 100
20
4.125”/ 100
20
4.125” / 100
20
4.125” /100
20
4.94” / 125
20
4.94” /125
Depth of cut at 45oInches/mm 1.75” / 44 1.75” / 44 1.75” / 44 1.75” / 44 2” / 50 2” / 50
Max crosscut capacity
at 0o in 25mm stock Inches/mm 16” / 400 24” / 600 16” / 400 24” / 600 16” / 400 24” / 600
Max Miter cut capacity
at 45o in 25mm stock Inches/mm 10.875” / 276 15.5” / 393 10.875” / 276 15.5” / 393 10.875” / 276 15.5” / 393
Max crosscut width Inches/mm 16” / 400 24” / 600 16” / 400 24” / 600 16” / 400 24” / 600
Max rip cut width Inches/mm n/a n/a n/a n/a n/a n/a
overall dimensions
(with legs) Inches/mm 59” x 44” x 43”
1520x1120x1117
59” x 44” x 43”
1520x1190x1117
59” x 44” x 43”
1520x1120x1117
59” x 44” x 43”
1520x1190x1117
59” x 44” x 43”
1520x1120x1117
59” x 44” x 43”
1520x1190x1117
Dust extraction adapter
( Optional ) Inches/mm 4” / 100 4” / 100 4” / 100 4” / 100 4” / 100 4” / 100
Weight Lbs/kg 491lbs/223kg 520lbs/235kg 491lbs/223kg 520lbs/235kg 491lbs/223kg 520lbs/235kg
Standard equipment:
Machine, Complete upper and lower blade guard, carriage return at-
tachment wrench kit, magnetic starter with overload/ low voltage pro-
tection, low voltage start/stop station, oversized MDF table top, heavy
gage steel frame and leg stand.
14” / 350mm 3531-01, 3536-01, 3531-03, 3536-03
16” / 400mm 3541, 3546

1111

1212
SAW ASSEMBLY AND INSTALLATION
UNPACKING YOUR HEAVY DUTY SERIES SAW
Your Heavy Duty series saw system has been completely assembled, tested, and then partially
disassembled. The shipment of your saw contains the following items:
• The Heavy Duty Series Saw, (4) frame legs, arbor wrenches, allen hex wrench kit, hardware to
attach legs.
Your machine will be banded down to a shipping skid with the legs removed and packaged under
the table top. To uncrate simply remove the corners and the framing from the skid and cut the
bands that hold the saw to the skid. The unit can them be picked up with a forklift under the steel
frame and then the legs can be installed using the 3/8 bolts, lock washers, and heavy hex nuts.
Make sure to use the leg with the warning stickers on the left front. Install bolts finger tight and
place machine where it is to be set up then tighten legs this will allow machine to level itself
to the floor. Note: if you are mounting our roller tables to the machine leave legs loose so
assist in aligning the brackets properly then when all extension tables are installed tighten all
bolts down.
IMPORTANT
All cable lengths have been adjusted during manufacture to allow for proper movement of the arm and
rollerhead. However, you should check the cables to ensure full range of movement. If adjustment is
necessary, loosen the cable clamp (at right rear of arm) and adjust the cables so rollerhead is free to
travel the total length of the arm. Check to ensure there is enough slack in the cables between the rear
FLOOR MOUNTING DIMENSIONS
Your saw may be mounted to the floor using 1/2”
diameter hardware appropriate for the floor surface
and located according to the diagram below. All
dimensions are center-to-center.
Your saw may be mounted to the floor. Use
the diagram at below to assist you in
placing the saw and fastening it to the floor.

1313
SAW ASSEMBLY AND INSTALLATION … continued
Check Arbor Rotation (3 Phase Only)
Check arbor rotation with arbor nut and arbor collars removed. Open line disconnect to the saw to remove arbor nut and col-
lars, close the line disconnect and start saw. The rotation of the arbor must be clockwise as indicated on the arrow on the
nameplate. If the rotation is counterclockwise, the incoming wires are not properly connected to the switch box. To change the
direction reverse any two of the wires leading to the switch box from the power supply.
Changing Voltage on dual voltage motors and Resetting Thermal Protection
Dual voltage motors can be operated on either of the two voltages indicated on the motor
nameplate. The voltage setting from the factory can be found on the tag attached to the
guard stud. To change the voltage:
1. Change the motor lead connections as shown on the diagram on the inside cover of
the motor conduit box. This is also found on page 23-24 in this manual. Disconnect
and lockout the power supply before attempting voltage change.
2. Reconnect the transformer in the magnetic starter as shown in the diagram on the
inside of the starter box cover. This is also found on pages 23-24 of this manual.
3. Replace or adjust the thermal overload protectors (D) using dial (A), see below right)
with those rated at the desired amperage range. If the overloads trip you will need
to press reset button (C) to resume operation.
4. Contact your dealer or customer service via phone at 800-733-4063 or email at
customerservice@originalsaw.com for correct information on thermal overload
protectors.
Overload Protection
Your saw is equipped with automatic reset thermal overload protection. To restart after thermals
have tripped, wait until the motor cools, then press the saw start button. If overloads continue to
trip, the machine is being overloaded. Do not continue to operate under these conditions. This could
indicate an electrical problem take the time to find the trouble and correct it—see the electrical trou-
ble shooting section of this manual. The power supply branch circuit should be fused as follows us-
ing time delay fuses:
T1, T2, T3
Power out
to Motor
Overload
Block (D)
Thermal
setting
Dial (A)
Reset button
(C )
L1, L2, L3
Power In
from supply
Control Panel layout and components
Ground
Lug
1 Phase 3 Phase 3 Phase 3 Phase
Motor Horsepower 200-240 V 200-240 V 440-480 V 550-600 V
550 30 15 —
5—40 15 15

1414
General Safety Precautions
1. Be sure the blade rotates clockwise when facing the saw from the left side. Blade must rotate to the front of the saw.
2. Be sure all clamp handles are tight before turning on motor.
3. Keep the blade sharp and properly set.
4. Hold or clamp the material firmly against the guide strip when cutting.
5. Be sure the blade and arbor collars are clean and the recessed side of the collars are against blade.
6. Never oil or grease arm tracks or motor.
7. Do not start machine without proper tool guard.
8. Do not remove the anti-kickback device from the blade guard. Adjust it to just clear the work.
9. Keep motor air slots clean.
10. Return roller head to full rear after each operation.
General Cautions When Using the Lower Blade Guard:
1. Used properly the lower blade guard is designed to provide protection from contact with the side of the blade. It is not
designed to prevent contact with the front or rear of the blade. When the lower guard contacts the fence or material
being cut it will rise up and expose the blade. Be careful to keep your hands out of the line of the cut.
2. Lower blade guards may become caught in prior kerfs in the fence or table. Alleviate this by replacing the guide fence
frequently. Always stop the saw before attempting to remove a guard that is stuck in a kerf.
3. Short cut-off pieces of wood may become caught between the lower guard and the blade. If this happens shut off the
saw and wait until blade stops to remove the piece.
4. The lower blade guard’s effectiveness is limited in bevel operations. It may have to be raised out of the way when set-
ting the bevel angle. Be sure the power is off/locked out and blade is completely stopped before making any
adjustment.
5. Catching the lower guard in saw kerfs when changing the saw setup can be avoided by elevating the saw until the bot-
tom of the guard clears the fence.
6. Do not use the lower guard with any accessory other than the correct size blade.
Using the Adjustable Arm Stop
The arm stop should be used whenever roller head travel needs to be limited, such as when repetitive cross cuts are being
made. Use of the arm stop will also prevent the blade from throwing small cut off pieces on the return stroke. Do not ad-
just the arm stop unless the power is off and locked out and the blade stopped. The arm stop must be used on
the right side of the arm. Proper adjustment of the arm stop is completed as follows:
1. Pull the roller head forward far enough for the blade to sever the material and travel 1/4” past the material.
2. Lock the roller head to the arm with the riplock and place the arm stop so it is touching the roller head.
3. Loosen the riplock and return the roller head behind the fence.
Alternate Fence Board Positions
Your saw was assembled with the fence board in the
most frequently used position on the work table (see
figure 3). The fence board may be moved to alternate
positions to accommodate varying uses. Moving the
fence board behind the spacer board will allow for
maximum cross cutting capabilities. Moving the fence
board back to the rear board will provide for maxi-
mum ripping capability.
Figure 3
SAW ASSEMBLY AND INSTALLATION … continued

1515
Mounting the Blade (Caution! Disconnect power source before mounting blade)
1. Place the hex box wrench over the arbor nut and place the long allen wrench in the arbor shaft end hole. Place a wood
striking block under the allen wrench to avoid marring the tabletop. Push down on the hex wrench to loosen nut (left hand
threaded). (See figure 2)
2. Remove the nut and first arbor collar. Wipe the arbor collar faces and mounting area on the blade. Slide the blade on the
shaft with the directional arrow away from the motor and pointing clockwise.
3. Place the arbor collar, recessed sides against the blade, arbor nut and tighten securely. ( See figure 1)
Guard Mounting (note guard is installed when machine is shipped)
(Caution! Disconnect/lockout power source before mounting guard)
1. Remove the 1/4”x 20 Hex nut or wing nut from the right front lower guard mounting stud and remove the retainer washer.
2. Remove the right lower guard by sliding it backward and down.
3. Place the guard over the blade, tilting the guard to the right so the HDPE lower guard sections clears the end of the arbor.
4. Seat the die cast guard mount bracket in the groove on the front of the motor arbor end bell with the guard stud through the
hole in the guard. Secure with wing nut.
5. Reconnect the lower right guard and replace the parts removed.
6. Move the carriage forward across the fence to verify proper operation then pull to the limit of its travel.
Caution: Your saw is now ready to use. Before using it, study the control loca-
tions (found on page 9), cautions and operating instructions contained in the
following pages.
FIGURE 1 FIGURE 2
Adjusting the Saw Guard
The guard can be pivoted about the motor by loosening the wing nuts that connect the cast guard to the die cast guard mount
bracket. CAUTION—DO NOT ADJUST THE GUARD WHILE BLADE IS MOVING. KEEP ALL ADJUSTING MECHANISMS
TIGHT.
SAW ASSEMBLY AND INSTALLATION … continued
Electrical Precautions
1. Be sure machine is properly grounded.
2. Do not attempt to operate saw on any voltage other than the one designated.
3. Use correct size time delay fuses to protect incoming current.
4. If it takes more than 3 seconds to reach maximum speed with a standard blade, turn the saw off. ( See trouble shooting on
page 26 of this manual).
5. Do not cause the motor to repeatedly approach a stall.
6. Do not attempt to start the saw for at least 15 minutes after thermal overload has tripped.
7. Disconnect and lockout the saw from the power source before opening a starter box, conduit box or whenever removing
a guard.

1616
Operating Instructions
Moving the Arm Horizontally and Vertically
The elevating crank is used to raise or lower the arm to accommodate cutting operations (see below left). Do not adjust the
height of the saw with the base / clamp handle tight (see page 9 for location) or while the motor is running. Change the posi-
tion of the arm for miter cutting is done by pulling the arm clamp handle (A) forward and lifting the miter latch handle (B).
Observing the miter scale, swing the arm either right or left to the desired angle. The arm can quickly be located at the 0o and
45o marks by using the indexing slots machined into the column ring. When you have located the saw at the required position
engage both the miter latch and the arm clamp.
!!! CAUTION !!!
BOTH UPPER AND LOWER GUARDS MUST REMAIN IN PLACE FOR SAFE CUTTING OPERATION.
Rotating the Motor to Bevel Cutting
Position
Raise the arm to allow the saw blade sufficient clear-
ance above the table top. Release the bevel clamp
handle (A) and pull the bevel index pin. (B) The motor
can now be moved to a bevel position as indicated on
the bevel scale. Un-Lock the motor by releasing the
bevel index pin (possible only at 0o, 45o and 90o) and by
locking the bevel clamp handle.
Cross Cutting
Lock the arm in the 0o position. Place the material
securely against the guide strip– keep hands well away
from the blade. Draw the saw blade across the materi-
al. After the cut has been completed return the blade
behind the guide strip. Observe this order of operation
for all cross cuts. Never push the saw blade into the
material. Pull the blade slowly and firmly across the
material from the rear of the arm using the operating
handle. The saw blade should cut into the table about
1/16” when cutting through the material. Raise the
anti-kickback to just clear the material being cut.
Adjust for varying wood thickness or warped material.
A
B
A
B

1717
In Rip—Out Rip
When ripping the arm should be locked in a cross cut
position. Pull the motor to the end of the arm. Release
the yoke clamp handle by pulling forward and lift the rip
index pin. Revolve motor 90o right or left for out-rip or
in-rip position. Engage rip index pin and lock yoke
clamp handle. Locate saw for desired width of rip and
lock saw carriage by tightening riplock against side of
arm. Rotate guard so the in-feed side almost touches
the material. Lower anti-kickback assembly so the
fingers are approximately 1/8” lower than the material.
Place material against the guide strip and feed evenly
into the saw blade. Use push board on narrow work.
Never place hands between blade and guide fence. Do
not force material and DO NOT feed from the kickback
side of the guard. Serious injury could result. Note
Red arrows indicate direction of material
movement. Continued on next page.
!!! DANGER !!!
NEVER FEED MATERIAL FROM THE KICKBACK (Front) SIDE OF THE GUARD. SERIOUS INJURY COULD RESULT.
Operating Instructions
Rip Cutting - (rip kit required and is Optional )

1818
In Rip—Out Rip
To set up guard for ripping start by swiveling the carriage into the
in rip or out rip position. Then using a wrench loosed the studs
that run through the inner guard ring retainers on both the front
and back retainers as in figure #1 and Figure #2. The rotate the
guard back or to the rear to bring the rear bottom edge of the
guard closer to the material being cut Figure 3. Using the thumb
screw adjust down the material hold down roller to contact the
surface of the material being ripped (Red arrows in Figure 4).
Then adjust down the kickback attachment on the front of the
guard so the steel fingers contacts the materiel slightly (red arrow
in Figure 3). This will keep the material from kicking back out of
the machine.
Figure 1
Figure 3
Figure 2
Operating Instructions
Rip Cutting - (rip kit required and is Optional )
Figure 2
Figure 1
Figure 3 Figure 4

1919
Bevel Cutting
Lock the arm in the cross cutting position.
Raise the motor by rotating the elevation
crank. Release the bevel clamp and the
bevel index pin and tilt the motor in the
yoke. The bevel angle is shown on the bevel
scale. Release the bevel index pin and lock
the bevel clamp. Lower the arm into cutting
position. Adjust the arm stop to assure
clearance between blade and base. Pull the
saw through as you would for cross cutting.
Compound Miter Cutting
The compound miter is merely a combination
of the bevel cut and the miter cut. Set up the
machine for bevel cutting. Release the arm
clamp handle and the miter latch handle.
Move the arm into the required position and
lock the miter latch and arm clamp. Adjust
arm stop to assure clearance between blade
and base. Pull the blade through as you
would for cross cutting.
Adjusting the tension on the auto carriage return spring
Upon original setup of your Original saw you may want to adjust the tension on the auto carriage return spring for personal preference. To tighten or add tension
to the carriage, carefully turn the return spring counter clockwise or to the left until you have enough slack in the cable to add a winding. To loosen, carefully turn
the return spring counter clockwise or to the left until you have enough slack in the cable to remove a winding.
WARNING: IF YOU UNIT HAS BEEN WORKING CORRECTLY AND IS IN NEED OF TIGHTENING BECAUSE THE CARRAIGE IS NOT RETURNING TO
THE HOME POSITION BEHIND THE FENCE BY ITSLEF THE ARM TRACKS AND THE BEARINGS MAY NEED TO BE CLEANED.
WARNING!! DO NOT OVERTIGHTEN THIS WILL RESULT IN DAMAGE TO THE SPRING AND THE CABLE ASSEMBY
Return Spring
cable
Mounting bracket

2020
Maintenance Adjustments and Alignments
Caution! Disconnect and lockout power supply before making any adjustments or alignments.
Your saw has been completely assembled, aligned and tested at the factory...then partially disassembled for shipment. Han-
dling during shipment may cause some misalignment and the following information will enable you to correct any cutting
inaccuracy you discover. These adjustments may also be necessary after a period of use. (See preventive maintenance on
page 7 of this manual.)
Important ...Since one adjustment may affect another it is important to run through the adjustments in the sequence as
follows.
Adjustment of Base to Column Fit
If excessive side motion exists at the end of the arm
while the arm clamp is engaged, adjustment to the base
or bronze gib (C) is generally necessary. To adjust:
1. Loosen all pinch bolts (A) and set screws (B). Pull
the arm clamp handle forward.
2. With the motor and yoke in the rearmost position
the elevation effort should be easy. Tighten the
bottom pinch bolt until there is an increase in the
elevation effort. Once elevation becomes snug back
off the bolt 1/4-1/2 turn. Repeat this for all the
pinch bolts.
3. Tighten the gib set screws (B) hard, then back them
off. Run them back up against the gib lightly, then
snug up the locknut.
4. If the saw is equipped with a column clamp handle
the adjustment should be made so that the clamp
firmly secures the post when pushed back and re-
leased when the handle is pulled forward.
Adjustment of the Arm Clamp
The arm clamp holds the arm tightly on the column
in the desired position for cutting. The arm clamp
handle should be upright when tightened. If it goes
beyond center adjust as follows:
1. Place motor carriage in the rearmost position.
2. Loosen the arm clamp set screw (A).
3. Move arm clamp handle to upright position and
tighten the arm clamp handle bolt (B). Note
this is a left hand threaded bolt.
4. Tighten the screw.
Adjustment of the Roller head to Arm
Accurate work cannot be done if the roller bearings in the motor carriage are not in proper adjustment. When play develops
between the roller head and the arm the following adjustment is required:
1. Bring the roller head to the front of the arm and lock in place using the adjustable stop. Move saw to in-rip position.
2. Loosen the sockethead screws holding the arm end cap and rotate the end cap upward to expose bearings.
3. Clean the tracks thoroughly. Wipe them clean with a solvent, do not use kerosene. Use extreme caution as most sol-
vents are toxic and/or flammable. Do not grease or oil the tracks.
4. Loosen the locking set screws (A) two full turns to release the eccentric shafts. (Both are located on the right hand
side.)
Continued on the next page
C
B
A
Other manuals for 3531-01
1
This manual suits for next models
5
Table of contents
Other Original Saw Company Saw manuals

Original Saw Company
Original Saw Company OS 040032-06-24-00 User manual

Original Saw Company
Original Saw Company 3531-01 Manual

Original Saw Company
Original Saw Company 3579-16L Manual

Original Saw Company
Original Saw Company 3553 Manual

Original Saw Company
Original Saw Company 3579-16M User manual

Original Saw Company
Original Saw Company 3691-01-03 User manual

Original Saw Company
Original Saw Company 3551 Manual

Original Saw Company
Original Saw Company 3512-01 Manual