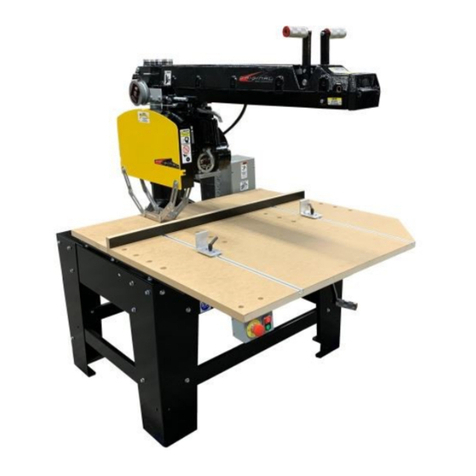
Original Saw Company 3579-16M User manual

22” Metal Cutting Radial Arm Saw
22” Metal Cutting Radial Arm Saw 22” Metal Cutting Radial Arm Saw
22” Metal Cutting Radial Arm Saw
TYPE 9
TYPE 9TYPE 9
TYPE 9
MODELS 3579
MODELS 3579MODELS 3579
MODELS 3579
22M, 3579
22M, 357922M, 3579
22M, 3579
22L
22L22L
22L
With VFD Technology
With VFD TechnologyWith VFD Technology
With VFD Technology
Operations & Maintenance Manual
Parts Bulletin
WARNING:
WARNING: WARNING:
WARNING: FOR YOUR SAFETY READ AND UNDERSTAND THIS MANUAL PRIOR
TO USING THE SAW. REVIEW ALL SAFETY RULES AND OPERATING
INSTRUCTIONS FREQUENTLY.
This manual is provided for your convenience
in the use and care of your saw. These
instructions include operation, precautions,
preventative maintenance and other pertinent
data to assist you in assuring long life and
dependable service from your saw.
Note—power carriage feed shown is available at additional cost

Service Record
Serial Number_____________________ Date Purchased ______________
Date Service Performed By

INDEX
General Rules for Safe Operation of Power Tools
1. KNOW YOUR POWER TOOL— Read the owner’s manual carefull . Learn the applica-
tions and limitations as well as the specific potential hazards of the tool.
2. GROUND ALL TOOLS.
3. KEEP GUARDS IN PLACE. Keep guards in working order.
4. KEEP WORK AREA CLEAN. Cluttered areas and benches invite accidents.
5. AVOID DANGEROUS ENVIRONMENTS. Don’t use power tools in damp or wet loca-
tions. Keep work area well lit.
6. KEEP CHILDREN AWAY. All visitors should keep a safe distance from the work area.
7. DON’T FORCE TOOL. The tool will do a better job if used at its designed rate.
8. WEAR PROPER APPAREL. Loose clothing, gloves or jewelr ma get caught in mov-
ing parts. Rubber footwear is recommended when working outdoors.
9. USE PROTECTIVE GLASSES. If operation is dust also where a face or dust mask.
10. DON’T OVERREACH. Keep proper balance and footing at all times.
11. MAINTAIN TOOLS WITH CARE. Tools kept sharp and clean provide the best and saf-
est performance. Follow instructions for lubricating and changing accessories.
12. DISCONNECT TOOLS FROM POWER SOURCE. When not in use, before servicing,
when changing accessories, such as blades or cutters, the tool should be discon-
nected and locked out.
13. REMOVE ADJUSTING KEYS AND WRENCHES. Make it a habit to ensure ke s and ad-
justing wrenches are removed prior to starting tool.
14. USE RECOMMENDED ACCESSORIES. Consult our distributor or the Original Saw
Compan for recommended accessories. Using improper accessories ma cause
hazards.
15. SECURE YOUR WORK. Use clamps or vise to hold work when practical.
16. NEVER LEAVE TOOL RUNNING WHILE UNATTENDED.
17. ONE OPERATOR ONLY. The person who pulls the saw should position the work.
18. DO NOT REMOVE SMALL SCRAPS FROM THE TABLE WITH YOUR FINGERS.
This manual is not totally comprehensive. It does not and cannot cover every
possible safety and operational factor which may arise during the life of the
machine.
General Safet Precautions/Specifications . . 3-4 Parts Diagram and Listings . . . . . . . . . . . . . . . . . 17-25
Unpacking and Assembl . . . . . . . . . . . . . . 5-6 Setting Thermal Overload Rela /Changing Voltage 26-27
Operating Cautions/Alternative Setup . . . . . 7 Troubleshooting. . . . . . . . . . . . . . . . . . . . . . . . . 28–30
Operating Instructions. . . . . . . . . . . . . . . . 8-11 Accessories/Preventive Maintenance. . . . . . . . . . . 31
Adjustments and alignments. . . . . . . . . . . . 12-16 Warrant Information/Factor Service . . . . . . . . . 32
!!! CAUTION !!!
OR ILLUSTRATION PURPOSES ONLY , THE LOWER GUARD HAS BEEN REMOVED
OR THE PHOTOS USED IN THIS MANUAL. IN ACTUAL USE BOTH UPPER AND
LOWER GUARDS MUST REMAIN IN PLACE OR SA E CUTTING OPERATION.

16” & 20” RADIAL ARM SAWS
MODEL MOTOR SIZE VOLTAGE GUARD SIZE ARM LENGTH
3551 T pe 7 5 hp 1 phase 208/230 V 60 Hz 16” 44”
3556 T pe 7 5 hp 1 phase 208/230 V 60 Hz 16” 52”
3571 T pe 7 7.5 hp 3 phase 208/230/460 V 50/60 Hz 16” 44”
3576 T pe 7 7.5 hp 3 phase 208/230/460 V 50/60 Hz 16” 52”
3553 T pe 7 7.5 hp 3 phase 208/230/460 V 50/60 Hz 20” 44”
3558 T pe 7 7.5 hp 3 phase 208/230/460 V 50/60 Hz 20” 52”
Machines wired for 380 and 575 volt operation also available
Model numbers and serial numbers are found on a tag located on the front of the frame.
SPECI ICATIONS
FLOOR OUNTING DI ENSIONS
Your saw ma be mounted to the floor.
Use the diagram at right to assist ou in
placing the saw and fastening it to the
floor.
MODEL: 3579-16M 3579-16L 3579-20M 3579-20L 3579-22M 3579-22L
Arm Medium Long Medium Long Medium Long
Blade Size 16" / 400mm 16" / 400mm 20" / 500mm 20" / 500mm 22" / 550mm 22" / 550mm
MOTOR: ALL MOTORS TOTALLY ENCLOSED FAN COOLED
HP 7.5* 7.5* 7.5* 7.5* 7.5* 7.5*
Phase 3 3 3 3 3 3
Hertz 50/60 50/60 50/60 50/60 50/60 50/60
Volts * 230/460 ** 230/460 ** 230/460 ** 230/460 ** 230/460 ** 230/460 **
Brake automatic automatic automatic automatic automatic automatic
Arbor 1" dia x 1 3/8" 1" dia x 1 3/8" 1" dia x 1 3/8" 1" dia x 1 3/8" 1" dia x 1 3/8" 1" dia x 1 3/8"
CAPACITIES: inches/ metric
Max Cross Cut 1" Stock 24" / 609mm 32" / 812 mm 23" / 584 mm 31 "/ 787 mm 16"/400 mm*** 24" / 600mm***
Max Miter 45
o
1" Stock 16" / 406 mm 21 5/8" / 549 mm 16" / 406 mm 21 5/8" / 549 mm 11" / 270mm 16" / 406mm
Max Depth of Cut 5" / 127 mm 5" / 127 mm 7" / 175 mm 7" / 175 mm 8 / 200 mm 8 / 200 mm
Max Depth of Cut 45
o
Bevel 2" / 50mm 2" / 50 mm 3 3/8" / 85 mm 3 3/8" / 85 mm 4" / 101 mm 4" / 101 mm

Unpacking
The box included in our shipment contains the legs, hardware and wrenches. Please use the following procedure to remove
the box: Remove the elevating handle from the hardware bag fastened to the carton top. Install handle on shaft located at
the lower right side of saw frame. Release the column clamp, elevate the arm and remove carton.
Attaching the Table Legs
The machine can be lifted with a fork lift under the steel saw frame. A sling or chain hoist ma be used under the arm ONLY if
placed at the rear of the arm near the column with the arm clamp handle and the base clamp handle tightened down.
Attach the legs using the 3/8” hex head cap screws, lock washers and nuts provided in the hardware bag.
Tighten cap screws securel after the machine has been lowered onto its legs. When the saw has been placed in its perma-
nent location shim the legs where necessar to provide a solid foundation. This is important to maintaining an accurate cut.
In order to prevent the forward movement of the carriage when the operator releases his grip, it is recommended the front
legs be shimmed.
Important
Loosen the 2 cable clamps (1 inside of arm, 1 at right rear of arm) and adjust the cables so rollerhead is free to travel the
total length of the arm with the motor pivoted in the roller head so the blade is on the right hand side. Also, check to ensure
there is enough slack in the cables between the rear of the arm and the starter enclosure so the arm can be swung to the
right a full 900 while the arm is elevated to its highest position.
Electrical Hookup
Recommended Copper Wire Sizes (A.W.G.)
To obtain maximum efficienc from our saw motor, the feeder wire from the power source to the machine should compl
with the table below.
1 Phase 3 Phase
Motor Horsepower 200-240 V 200-240 V 440-480 V 550-600 V
5 6 6 — —
7.5 — 4 6 8
NOTE: This table is based on 60-100’ distances from power suppl . Less than 60’ ma use one even size smaller (high num-
ber = smaller size); 100-160’ use one even size larger, over 160’ use two even sizes larger.
Connecting Electrical Current See pg 30 for full description
The motor is properl connected to the variable frequenc drive at the factor for operation on the electrical voltage specified
on the tag attached to the electrical enclosure. Make sure incoming voltage from our power suppl conforms to the voltage
specified on the tag.
Loosen the 2 screws that tighten the door on the drive enclosure, swing open the door. Insert power suppl cable through the
dust proof fitting and connect wires to R/L1, R/L2 and R/L3, and ground to the ground screw. Wiring must conform to the
National Electrical Code and an applicable local codes.
Check Arbor Rotation (3 Phase Only)
Check arbor rotation with arbor nut and arbor collars removed. Open line disconnect to the saw to remove arbor nut and
collars, close the line disconnect and start saw. The rotation of the arbor must be clockwise as indicated on the arrow on the
nameplate. If the rotation is counterclockwise, the outgoing power wires to the motor much be switched around, to do so
simpl interchange an 2 of the outgoing power wires, V/T1, V/T2, V/T3 and this will reverse rotation.
Changing Voltage
(Dual Voltage otors Only)
1. The motors on the Original Super Dut Series are dual voltage but the are powered using a Variable Frequenc Drive
that is voltage sensitive and cannot be field changes, please contact technical support for information 800/733-4063.

Overload Protection
Your saw is equipped with automatic reset thermal overload protection. To restart after thermals have tripped, wait until the
motor cools, then press the saw start button. If overloads continue to trip the machine is being overloaded. Do not continue
to operate under these conditions. Find the trouble and correct it—see the electrical trouble shooting section of this manual.
The power suppl branch circuit should be fused as follows using Time Dela fuses:
1 Phase 3 Phase
Motor Horsepower 200-240 V 200-240 V 440-480 V 550-600 V
5 60 30 — —
7.5 — 50 25 20
Electrical Precautions
1. Be sure machine is properl grounded.
2. Do not attempt to operate saw on an voltage other than the one designated.
3. Use correct size time dela fuses to protect incoming current.
4. If the drive takes more than 20 seconds for the machine to ramp up or to reach maximum speed with a standard blade,
turn the saw off. ( See trouble shooting on page 27 of this manual).
5. Do not cause the motor to repeatedl approach a stall.
6. Do not attempt to start the saw for at least 15 minutes after thermal overload has tripped.
7. Disconnect and lockout the saw from the power source before opening a starter box, conduit box or whenever removing
a guard.
ounting the Blade (
Caution! Disconnect power source before mounting blade)
1. Place the hex box wrench over the arbor nut and place the long allen wrench in the arbor shaft end hole. Place a wood
striking block under the allen wrench to avoid marring the tabletop. Push down on the hex wrench to loosen nut (left
hand threaded). (See figure 2)
2. Remove the nut and first arbor collar. Wipe the arbor collar faces and mounting area on the blade. Slide the blade on
the shaft with the directional arrow awa from the motor and pointing clockwise.
3. Place the arbor collar, recessed sides against the blade, arbor nut and tighten securel . ( See figure 1)
IGURE 1 IGURE 2

General Safety Precautions
1. Be sure the blade rotates clockwise when facing the saw from the left side. Blade must rotate to the front of the saw.
2. Be sure all clamp handles are tight before turning motor on.
3. Keep the blade sharp and properl set.
4. Hold material firml against the guide strip when cutting.
5. Be sure the blade and arbor collars are clean and the recessed side of the collars are against blade.
6. Never oil or grease arm trackwa s or motor.
7. Do not start machine without proper tool guard.
8. Do not remove the anti-kickback device from the blade guard. Adjust it to just clear the work.
9. Keep motor air slots clean.
10. Return roller head to full rear after each operation.
General Cautions When Using the Lower Blade Guard:
1. The lower blade guard will provide protection from contact with the side of the blade. It is not designed to prevent con-
tact with the front or rear of the blade. When the lower guard contacts the fence or material being cut it will rise up
exposing the blade. Be careful to keep our hands out of the line of the cut.
2. Lower blade guards ma become caught in prior kerfs in the fence or table. Replace guide fence frequentl . If guard
becomes caught stop saw before attempting to remove.
3. Short cut-off pieces of wood ma become caught between the lower guard and the blade. If this happens shut off the
saw and wait until blade stops to remove the piece.
4. The lower blade guard’s effectiveness is limited in bevel operations. It ma have to be raised out of the wa when set-
ting the bevel angle. Be sure the power is off/locked out and blade is completely stopped before making any
adjustment.
5. Catching the lower guard in saw kerfs when changing the saw setup can be avoided b elevating the saw until the bot-
tom of the guard clears the fence.
6. When ripping narrow strips the lower guard ma have to be raised to rest on top of the guide fence. Be sure to use a
pusher stick to feed the work.
7. Do not use the lower guard with an accessor other than the correct size blade.
Using the Adjustable Rollerhead Stop
The rollerhead stop should be used whenever rollerhead travel needs to be limited for example when repetitive cross cuts are
being made. Use of the rollerhead stop will also prevent the blade from throwing small cut off pieces on the return stroke.
Do not adjust the rollerhead stop unless the power is off and locked out and the blade stopped. The rollerhead
stop must be used on the right side of the arm. Proper adjustment of the rollerhead stop is completed as follows:
1. Pull the rollerhead forward far enough for the blade to sever the material and travel 1/4” past the material.
2. Lock the rollerhead to the arm with the riplock and place the rollerhead stop so it is touching the rollerhead and tighten
the knob.
3. Loosen the riplock and return the rollerhead behind the fence.

Operating Instructions
!!! CAUTION !!!
FOR ILLUSTRATION PURPOSES ONLY ,THE LOWER GUARD HAS BEEN RE OVED FOR
THE PHOTOS USED IN THIS ANUAL. IN ACTUAL USE BOTH UPPER AND LOWER
GUARDS UST RE AIN IN PLACE FOR SAFE CUTTING OPERATION.
Control Locations
A. On / Off Switch
B. Miter Controls
C. Miter Scale
D. Bevel Controls
E. Bevel Scale
F. Column Clamp Handle
G. Elevation Control
H. Rip Controls
I. Operating Handle
J. Anti-kickback assembl
Raising and Lowering the Arm
When the column clamp handle is pulled forward,
the elevating crank can be used to raise or lower
the arm. Using the elevating scale and the indica-
tor on the elevating crank, the desired depth of cut
can be adjusted. Each calibration (1/8 turn) on the
elevating scale raises or lowers the arm 1/64”,
therefore, one full turn of the elevating crank
moves the arm exactl 1/8”, one half turn exactl
1/16”. The elevating crank can be removed to
avoid an interference during the operation of the
saw. Engage column clamp after elevating the
desired amount.
To Revolve the Arm Horizontally
To change the position of the arm, pull both the
miter latch handle and the arm clamp handle for-
ward. Observing the miter scale, swing the arm
either right or left to the desired angle. The arm
can quickl be located at the 0 and 45 degree
marks b using the locator slots machined into the
column ring. When ou have located the saw at
the required position engage both the miter latch
and the arm clamp b pushing the handles back.

!!! CAUTION !!!
FOR ILLUSTRATION PURPOSES ONLY ,THE LOWER
GUARD HAS BEEN RE OVED FOR THE PHOTOS USED IN
THIS ANUAL. IN ACTUAL USE BOTH UPPER AND LOWER
GUARDS UST RE AIN IN PLACE FOR SAFE CUTTING
OPERATION.
Revolving the otor Vertically in the
Yoke
Raise the arm to allow the saw blade sufficient clearance above
the table top. Release the bevel clamp handle , grasp the saw
guard with the left hand and lift the bevel latch handle. The
motor can now be swung to a bevel position as indicated on the
bevel scale. Lock the motor b engaging the bevel latch han-
dle (possible onl at 0o, 45o and 90o) and b locking the bevel
clamp handle.
Adjusting the Saw Guard
The 16” guard can be pivoted about the motor b loosening the guard mounting wing nut.
The 20” guard can be pivoted about the guard bracket b loosening the two wing nuts on the motor side of the guard.
CAUTION—DO NOT ADJUST THE GUARD, OR ANTI-KICKBACK WHILE BLADE IS MOVING. KEEP ALL ADJUSTING
MECHANISMS TIGHT.
Cross Cutting
Lock the arm in the 0o position. Place the material
securel against the guide strip– keep hands well awa
from the blade. Draw the saw blade across the mate-
rial. After the cut has been completed return the blade
behind the guide strip. Observe this order of operation
for all cross cuts. Never push the saw blade into the
material. Pull the blade slowl and firml across the
material from the rear of the arm using the operating
handle. The saw blade should cut into the table about
1/ 16” when cutting through the material. Raise the
anti-kickback to just clear the material being cut.
Adjust for var ing wood thickness or warped material.

Bevel Cutting
Lock the arm in the cross cutting position.
Raise the motor b rotating the elevation
crank. Release the bevel clamp and the
bevel latch and tilt the motor in the oke.
The bevel angle is shown on the bevel scale.
Lock the bevel latch and clamp. Lower the
arm into cutting position. Adjust the bevel
stop to assure clearance between blade and
base. Pull the saw through as ou would for
cross cutting.
Compound iter Cutting
The compound miter is merel a combination of
the bevel cut and the miter cut. Set up the ma-
chine for bevel cutting. Release the arm clamp
handle and the miter latch handle. Swing the
arm into the required position and lock the miter
latch and arm clamp. Adjust bevel stop to as-
sure clearance between blade and base. Pull the
blade through as ou would for cross cutting.
!!! CAUTION !!!
FOR ILLUSTRATION PURPOSES ONLY ,THE LOWER GUARD HAS BEEN RE OVED FOR THE PHOTOS USED IN
THIS ANUAL. IN ACTUAL USE BOTH UPPER AND LOWER GUARDS UST RE AIN IN PLACE FOR SAFE CUT-
TING OPERATION.

aintenance Adjustments and Alignments
Caution! Disconnect and lockout power supply before making any adjustments or alignments.
Your saw has been completel assembled, aligned and tested at the factor ...then partiall disassembled for shipment. Han-
dling during shipment ma cause some misalignment and the following information will enable ou to correct an cutting
inaccurac ou discover. These adjustments ma also be necessar after a period of use. (See preventive maintenance)
Important ...
Since one adjustment ma affect another it is important to run through the adjustments in the sequence as
follows.
Adjustment of Base to Column Fit
If excessive side motion exists at the end of the arm when the
arm clamp is engaged and the column clamp is released,
adjustment to the base or bronze gib is generall necessar .
To adjust:
1. Loosen all locknuts, setscrews and bolts and pull column
clamp handle forward.
2. With the motor and oke in the rearmost position the
elevation effort should be eas .
3. Tighten the bottom pinch bolt (A) until there is an in-
crease in the elevation effort. Bottom the jack screw (B)
against the opposite side of the slot; this will lock the
pinch bolt.
4. Tighten the gib screw (C) hard, then back it off. Run it
back up against the gib lightl , then snug up the locknut
(D).
5. With the column clamp handle in the forward position
insert a 1/4” allen wrench into column clamp bolt (E) and
turn it clockwise until all pla is removed from the col-
umn clamp handle. Lock the handle adjustment b
tightening the bolt (F) on the opposite side of the base.
Adjustment of the Arm Clamp
If the arm will not clamp tight on the column:
1. Place motor carriage in the rearmost position.
2. Pull the miter handles (A) forward.
3. Tighten upper arm pinch bolt (B) until slight resistance
to arm swing is felt.
4. Swing the arm to the left 10o until the two locking set
screws (C) are aligned with an oblong hole in the bottom
of the column collar (D).
5. Loosen the two set screws.
6. Use a 1/4” allen wrench to tighten the arm clamp screw
(E) b rotating clockwise.
7. Retighten the two locking set screws securel to a re-
quired torque of 200-225 inch/ lbs. The must be tight to
prevent clamp screw slippage.
Adjustment of the Rollerhead to Arm
Accurate work cannot be done if the roller bearings of the motor carriage are not in proper adjustment. When pla develops
between the rollerhead and the arm the following adjustment is required:
1. Remove the arm end cap b taking out the two socket head cap screws in the front of the end cap.
2. Clean the tracks thoroughl . Wipe them clean with a solvent, do not use kerosene. Use extreme caution as most sol-
vents are toxic and/or flammable. Do not grease or oil the tracks.
3. Loosen the locking set screws (A) on the two left hand 45o bearings (C) just enough to loosen them (1/6 of a turn or
less).
4. Using a 1/4” allen wrench and a light behind the rollerhead, adjust the eccentric studs (B) on the left-hand side bearings
until all 8 bearings contact the track. Attempt to equalize the load on the front and rear bearings b putting the same
load on the front and rear eccentrics.

Adjustment of the Rollerhead to Arm (cont’d)
5. Retighten the locking set screw securel to a required
torque of 90-100 inch/lbs., after adjusting each eccen-
tric.
6. Replace the end cap
7. If an of the top rollers do not revolve when in contact
with the top track it will be necessar to remove the
entire carriage to closel check each roller bearing. If
bearings do not revolve, and thorough cleaning doesn’t
make them all free to revolve, the defective ones
should be replaced.
Note-Too much pressure on the roller bearings will
cause excessive and unnecessary wear in the parts
and make the carriage work harder. Seven to ten
pounds average pull on the carriage is a desirable
preload.
Adjustment of the Yoke Clamp Handle
If the oke clamp handle (A) becomes too loose the follow-
ing steps will correct this condition:
1. Pull oke clamp handle forward.
2. Remove socket head cap screw (B) on the underside
of the oke.
3. Using the same allen wrench rotate the kingbolt (C)
counterclockwise to tighten.
4. Replace the cap screw.
Adjustment of Table Top Parallel to Arm
The arm tracks must be parallel to the tabletop at all
points. This assures uniform depth of cut, especiall
when dado cutting. Remove the blade and insert an
arbor wrench or allen wrench between the saw arbor
collars. Lower the wrench until it touches the tabletop.
If the top is not level:
1. Locate the highest point b swinging the arm from
side to side and moving the carriage back and forth
on the arm.
2. Loosen the lock nuts beneath the table frame.
3. Raise the jack screws so as to bring the low parts of
the tabletop level with the high spots.
4. Tighten the lock nuts beneath the table frame.
How to check the Guide Strip For Accuracy
For accurate work the guide strip must be straight. If the machine has been exposed to the weather or used for a period of
time the wood parts ma become warped or worn so that the guide strip is no longer straight. It should be made straight b
planing and sanding. Check it with a straight edge or square before proceeding and make an adjustments necessar .
Caution! Disconnect and lockout power supply before making any adjustments or alignments.

To Square Saw Blade with the Table Top
Make sure the tabletop is level and place a steel square
against the side of the blade; the square should be
against the gullets and not the teeth of the blade. If
the blade is not square to the tabletop:
1. Release the bevel clamp handle (A) and bevel
latch (B).
2. Loosen the two set screws (C) in the front of the
oke locking the bronze bevel latch adjustment
screws. (D).
3. Adjust the bevel latch adjustment screws b back-
ing off one and tightening the other to move the
blade flush to the square. Tighten the two locking
set screws to a required torque of 90-100 inch/lbs.
4. After adjustment, the bevel latch should move
freel but with no side pla .
5. Engage the bevel latch and bevel clamp and re-
check for square.
6. Adjust the bevel pointer washer (E) to line up with
zero on the bevel scale.
Adjustment of Rear Trunion and Bevel Clamp Handle
If the rear motor trunion is loose in the oke, or if bevel clamp will not hold:
1. Loosen locking set screws (A in Figures 5 and 6) and bevel clamp (B in figure 5).
2. Tighten rear trunion pinch bolt (B, figure 6) until bevel movement becomes slightl difficult. Reset its locking set screw
to a torque of 90—100 inch/lbs.
3. Tighten the bevel clamp stud (C in figure 5).
4. Tighten its locking set screw to 90-100 inch/lbs.
To Adjust for “Heel” (Saw Blade Not Parallel to Arm)
When the saw blade is not parallel to the arm the result will be what is called “heel” - the back of the blade will not follow in
the kerf of the front of the blade. Signs of a blade heeling are indicated when the rear teeth of the blade mark the material
with an offset in the cut. This condition can be noticed with b e e or with a straight edge. To correct this situation:
A. irst- -Adjust at the 90o Bevel Position
1. Put the motor into 90o bevel position. Engage both bevel latch and bevel clamp.
2. Place a block about 5” high on the tabletop, ahead of and right of the arbor.
3. Elevate and move the carriage until a saw tooth forward and to the right of the arbor just touches the block.
4. Pull the carriage forward and turn the blade until the same tooth is over the same spot on the block. The tooth
should just touch the block at each position. If it does not:
a. Release the bevel clamp (C in figure 6). Loosen the 4 cap screws (D in figure 6) holding the rear trunion
(E, figure 6) to the motor. Move the rear trunion b means of the two set screws (F in figure 6) so the
saw tooth just strikes the block in the 2 positions with the bevel clamp engaged. Retighten the cap screws
to a required torque of 200—225 inch/lbs.
Steps 1—4 normally need be done only when rear trunion has been removed from motor.
igure 5
igure 6

To Adjust for “Heel”
(Saw Blade Not Parallel to Arm) (cont’d)
B. Second - Adjust at the 0o Bevel Position
1. Put the motor into 0o bevel position. Engage
bevel latch (A, Fig. 7) and bevel clamp (B).
2. Cross cut a piece of material and determine
the side of the cut on which the teeth are
heeling. Make a note which side of the cut
material has heeling marks.
3. Pull the oke clamp handle (C, Fig. 7) for-
ward.
4. Release the rip swivel latch (D, Fig. 7.
5. Loosen the two set screws (E, Fig. 7) locking
the bronze rip swivel latch adjusting screws
(F, Fig. 7).
6. If the heel marks were on the right side of
the material loosen the adjusting screw on
our left and tighten the one on the right. If
the marks were on the right of the material
tighten the adjusting screw on our left and
loosen the one on our right.
7. Tighten the two locking set screws to a re-
quired torque of 90—100 inch/lbs.
8. The rip swivel latch must move freel without
side pla .
9. Engage rip swivel latch and lock the oke
clamp, recheck the crosscut and make addi-
tional adjustment if necessar .
If after making these adjustments the blade continues to heel, particularl if the blade heels on both sides of the material, the
blade ma require tensioning. If the blade must be re-tensioned contact our local distributor.
Square the Saw Travel with the Guide Strip
Engage the miter latch, miter clamp and column clamp. Place
a steel square against the guide strip, flat on the tabletop. If
the blade does not move parallel to the square as the carriage
is moved forward the following adjustments are in order:
1. Pull miter handles (A) forward.
2. Loosen the two set screws (B) on the bottom of the rear
of the arm that lock the bronze miter latch adjusting
screws (C).
3. If the blade moved toward the square when pulled,
loosen the adjusting screw on the right and tighten the
one on the left (as viewed from the front). If the blade
movement was away from the square then tighten the
adjusting screw on the right and loosen the left.
4. Tighten the two locking set screws to a required torque
of 200– 225 inch/lbs.
5. The miter latch must have no side pla after adjusting.
6. Make a final check of square with the column clamp,
miter latch and miter clamp engaged.
Adjustment of iter, Bevel and Swivel Latches
If a loose condition ever develops between the miter, bevel or swivel latches and their respective adjusting screws, refer back
to the following sections for adjustment. Miter Latch above, Bevel Latch page 14 and Rip Swivel Latch above. Be sure to
check alignment after adjusting latches.
Caution! Disconnect and lockout power supply before making any adjustments or alignments.
igure 7

Bevel Stop Rod
The bevel stop rod (A) is a device mounted on the roller-
head to prevent the blade from contacting the base when
the bevel cuts are being made; particularl with 20” blades.
A socket head cap screw (B) locks the rod into position.
BEFORE MAKING BEVEL CUTS ALWAYS BE CERTAIN THE
BEVEL STOP ROD IS POSITIONED SO THE BLADE CLEARS
THE BASE WITH THE MOTOR IN ITS REAR POSITION.
Adjustment of iter Scale
The miter scale is located at the rear of the arm.
When the arm is positioned for straight cross
cutting, the pointer should be a 0o on the scale.
To adjust, loosen the screw holding the pointer
and adjust to 0o. Retighten the screw.
Adjustment of Bevel Scale
The bevel scale is located at the front of the
oke. When the motor is positioned for straight
cross cutting the pointer should be at 0o on the
scale. To adjust, loosen screw and move pointer
to 0o and tighten.

Parts List and Ordering Instructions
Order only genuine replacement parts from your Original Saw Company Dealer.
When ordering parts be sure to include:
• Name of manufacturer—Original Saw Compan
• Complete machine identification data found on name plate on front of frame
• Complete motor identification from motor name plate
• Quantit , part number and description of parts required
• Complete shipping and billing instructions
Because of the importance of tightening critical bolts and set screws to an established torque, each of the fol-
lowing parts lists pages contains torque tightening requirements for certain fasteners. These fasteners have
their part numbers highlighted and torque requirements specified.
Information is supplied on these parts lists showing where lubrication is desired. Such areas are marked and
a general purpose grease should be used.
22” Removable Door Style (090535-03)
Index Part Description Qty
No. No.
1 090535-03 22” Door St le Guard 1
Includes itmes #1- #6
2 082401 5/16-18 x 1 soc set scr 1
3 082007 5/16 wing nut 1
4 082166 5/16 socket hd cap screw 2
5 099361-16 5/16 flat washer 2
6 99364-04 5/16 hex jam nut 1
7 096678 22” lower guard kit 1
Includes hardware
1 2
3
4
5
6
7

Index Part Description Qty Index Part Description Qty
No. No. No. No.
1 068545-01 Arm (52”) 1 24 099264-06 1/4-20 x 3/8 Panhd Screw (52”) 5
1A 068545-00 Arm (44”) 1 1/4-20 X 3/8 Panhd Screw (44”) 4
2 068190-04 End Cap 1 25 068490 Rip Scale (16” Long 52”) 1
3 084319 5/16 Lockwasher 2 25A 068395 Rip Scale (16” Med. 44) 1
4 082179 5/16-18 x 2 Sckthd Cap Screw 2 25B 068490-01 Rip Scale (20” Long 52”) 1
5 070871 End Cap Bumper 1 25C 068395-01 Rip Scale (20” Med 44”) 1
6 103117 Arm Caution Plate 1 26 068188-02 Miter Latch Rod (52”) 1
7 003041 #2 3/16 Drive Screw 1 26A 068188-01 Miter Latch Rod (44”) 1
8 068634 Concentric Shaft 2 27 070258 Flanged Bushing 2
9 058529 Retaining Ring 4 28 068955 Sleeve Bushing 2
10 068589 Miter Handle 2 29 900101-02 Switch Kit –Square Button 1
11 068189-01 Miter Clamp Rod (44”) 1 30 071684 Clamp Nut 1
11A 068189-02 Miter Clamp Rod (52”) 1 31 081778 Cable Clamp 1
12 066210 not used on 22” series 1 32 082354 1/4-20 x 2 Roundhead Screw 1
12A 084963 not used on 22” series 1 33 080634 1/4-20 x 1/2 Roundhead Screw 1
13 068967 3/8-16 x 1/2 Set Screw 4 34 084173 1/4 Lockwasher 1
14 068077 Set Screw Slug 4 35 099264-06 1/4-20 x 3/8 Panhead Screw 1
15 068424 Arm Clamp Stud 1 36 203597-09 Miter Pointer 1
16 068591 Miter Clamp 1 37 122458-01 Miter Cap 1
17 122051 Flat Washer 1 38 068567 Miter Scale 1
18 082115 5/8-11 x 3/4 Hexhd Cap Screw 1 39 099249-06 10-24 x 5/16 Panhead Screw 2
19 068262 Adjustment Screw 2 40 082190 1/4-20 x 1 Sockethead Cap Screw 3
20 068590 Miter Latch 1 41 081777 Cable Clamp ( not shown) 1
21 083412 Set Screw Slug 1 42 000415 3/8 Lockwasher 2
22 068703 5/16-18 x 1/2 Set Screw 3 43 082098 3/8-16 x 3/4 Hexhead Bolt 2
23 082488 Flat Washer 2
Arm Assembly
52”- 800420-02 44”- 800410
NOTE: When replacing arm clamp
stud (#15, the distance from the
outer face of washer (#17) to the
end of the stud should be 11/16” to
3/4”.

anual Chain Feed Assembly
52”- 040022 44”-040021

Rollerhead Assembly
800500-02
Index Part Description Qty Index Part Description Qty
No. No. No. No.
1 068632 Rollerhead 1 11 070270 Stop Plate 1
2 068636 Rip Lock 1 12 058529 Retaining Ring 1
3 068654 Locking Knob 1 13 068263 Bevel Stop Rod 1
4 068634 Concentric Shaft 6 14 068653 Bumper 1
5 081476-01 Ball Bearing 8 15 099264-06 1/4-20 x 3/8 Panhd Screw 2
6 068703 5/16-18 x 1/2 Set Screw 8 16 068635 Shoe 1
7 068633 Eccentric Shaft 2 17 067927 King Bolt 1
8 099358-08 Flat Washer 1 18 068527 In Rip Pointer 1
9 070269 Bevel Stop Lock 1 19 068348 Out Rip Pointer 1
10 080590 5/16-18 x 1 3/4 Sochd Cap Screw 1 20 103422 Bearing Shaft Washer 8
Item #2 and #3 are not used in 3579 Metal Cutter or 40005 Power Crossfeed

Yoke and Trunion Assembly
800300
Index Part Description Qty Index Part Description Qty
No. No. No. No.
1 068622 Yoke 1 12 203085 special washer 4
2 068626 Adjusting Screw 4 13 068624 Rear Trunion 1
3 083412 Set Screw Slug 6 14 068623 Front Trunion 1
4 068703 5/16-18 x 1/2 Set Screw 6 15 068631 Dowel Screw 1
5 068627-01 Swivel Latch Handle 1 16 073872 Bevel Scale 2
6 068628-01 Bevel Latch Handle 1 17 099264-06 1/4-20 x 3/8 Panhd Screw 4
7 068625 Stud 1 18 203588-01 Bevel Pointer 1
8 114720 1/2 Flat Washer 1 19 082200 5/16-18 x 3/8 Sochd Cap Scrw 1
9 068629-01 Bevel Clamp Hdle some units build w/o 1 20 068655 Adjuster Washer 1
10 082172 5/16-18 x 1 1/4 Sochd Cap Screw 1 21 090539 Yoke Clamp Nut 1
11 082168 5/16-18 x 1 Sochd Cap Screw 8 22 084173 1/4 Lockwasher 1
Important:
1. Bevel clamp #7 should be adjusted flush to 1/8” inside bottom of Bevel Clamp Handle #9
2. Turn front trunion #14 counterclockwise as far as it will go before tightening screws #11.
3. Some units built without index #9 bevel clamp handle, because of material clearance issues.
21
This manual suits for next models
5
Table of contents
Other Original Saw Company Saw manuals

Original Saw Company
Original Saw Company 3691-01-03 User manual

Original Saw Company
Original Saw Company 3531-01 Manual

Original Saw Company
Original Saw Company 3531-01 Manual

Original Saw Company
Original Saw Company 3551 Manual

Original Saw Company
Original Saw Company 3512-01 Manual

Original Saw Company
Original Saw Company OS 040032-06-24-00 User manual

Original Saw Company
Original Saw Company 3553 Manual

Original Saw Company
Original Saw Company 3579-16L Manual