Orno OR-ZS-851 User manual

1
OR-ZS-851
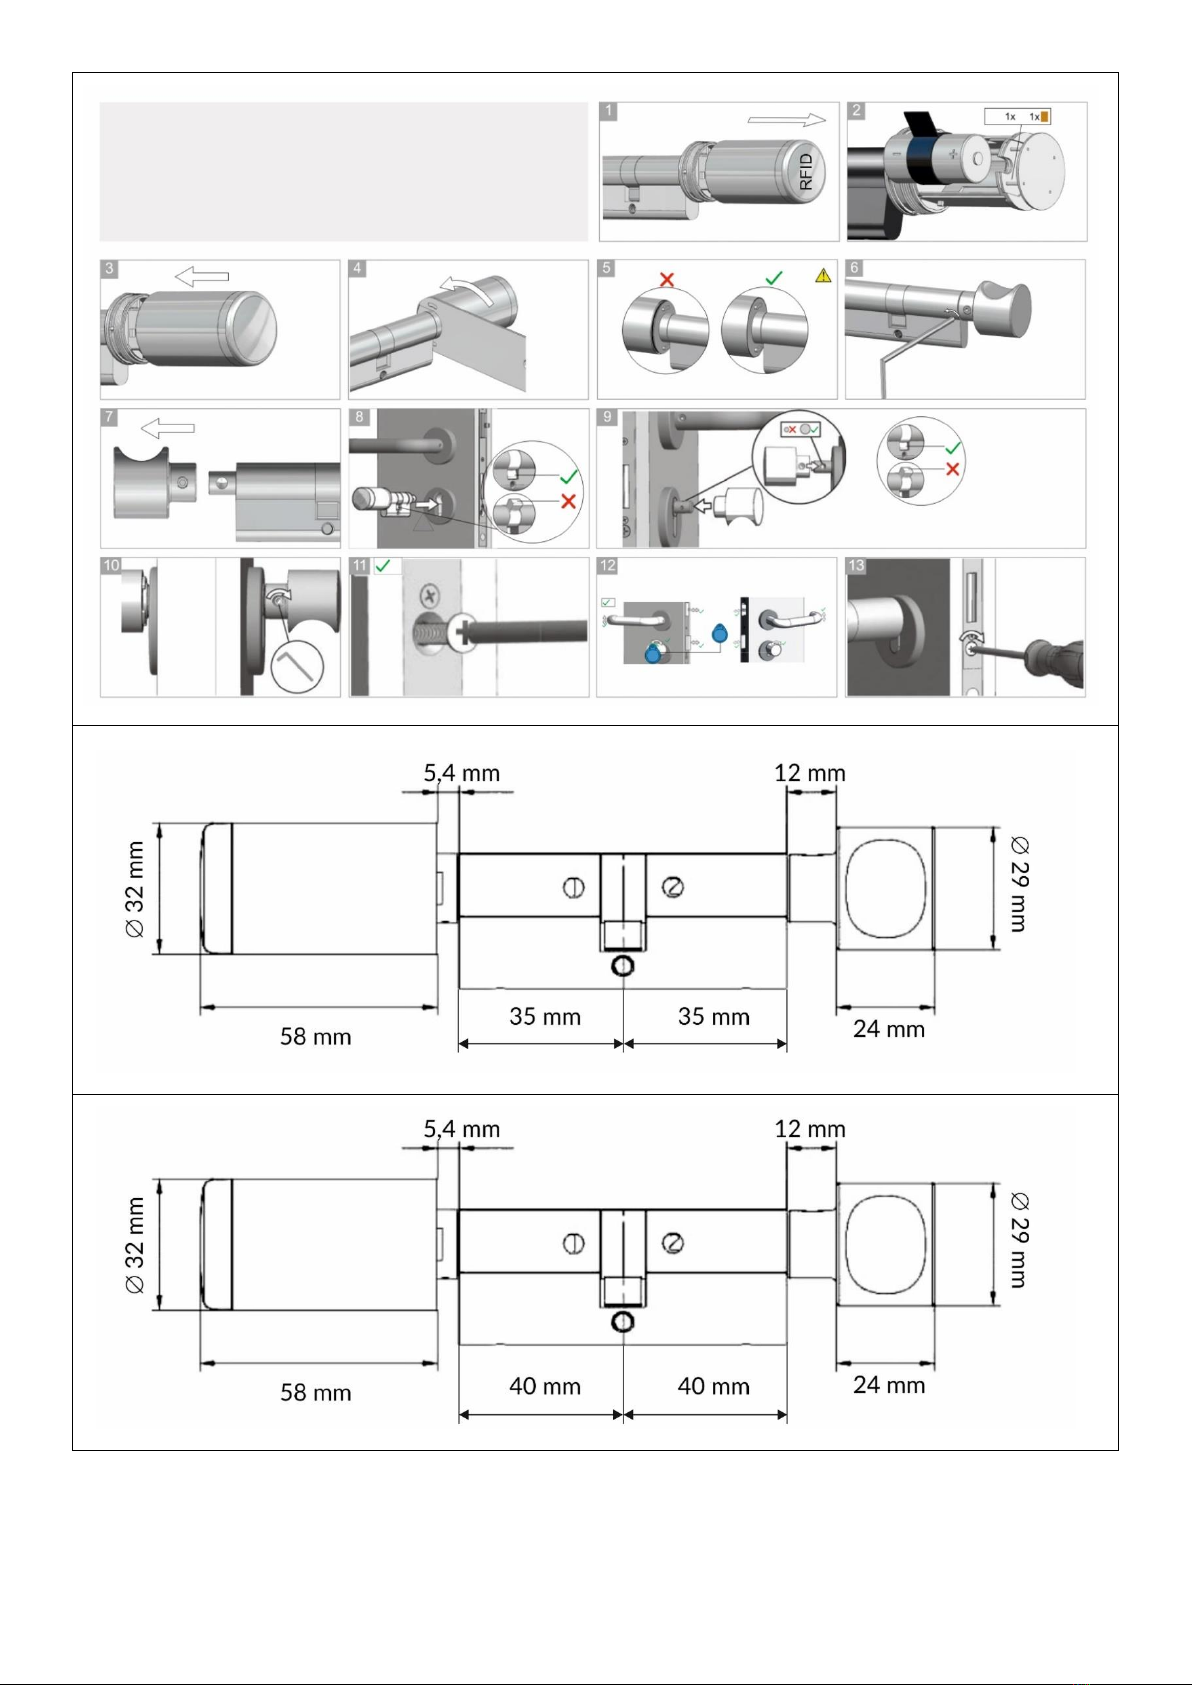
DOUBLE KNOB CYLINDER IP65 (35+35)
(PL) Wkładka elektroniczna sterowana za pomocą smartfona,
z czytnikiem RFID
(DE) Tür-Schließzylinder, mit einem RFID-Leser, IP65
OR-ZS-852
DOUBLE KNOB CYLINDER IP65 (40 + 40)
(PL) Wkładka elektroniczna sterowana za pomocą smartfona,
z czytnikiem RFID
(DE) Tür-Schließzylinder, mit einem RFID-Leser, IP65
ORNO-LOGISTIC Sp. z o.o.
ul. Rolników 437
44-141 Gliwice
tel. (+48) 32 43 43 110
(PL) WAŻNE!
Przed rozpoczęciem korzystania z urządzenia, należy zapoznać się z niniejszą instrukcją obsługi oraz zachować ją na przyszłość. Dokonanie samodzielnych napraw
i modyfikacji skutkuje utratą gwarancji. Producent nie odpowiada za uszkodzenia mogące wyniknąć z nieprawidłowego montażu czy eksploatacji urządzenia.
Z uwagi na fakt, że dane techniczne podlegają ciągłym modyfikacjom, Producent zastrzega sobie prawo do dokonywania zmian dotyczących charakterystyki wyrobu oraz
wprowadzania innych rozwiązań konstrukcyjnych niepogarszających parametrów i walorów użytkowych produktu. Dodatkowe informacje na temat produktów marki ORNO
dostępne są na: www.orno.pl. Orno-Logistic Sp. z o.o. nie ponosi odpowiedzialności za skutki wynikające z nieprzestrzegania zaleceń niniejszej instrukcji. Firma Orno-Logistic
Sp. z o.o. zastrzega sobie prawo do wprowadzania zmian w instrukcji - aktualna wersja do pobrania ze strony www.orno.pl.
Wszelkie prawa do tłumaczenia/interpretowania oraz prawa autorskie niniejszej instrukcji są zastrzeżone.
1. Nie zanurzaj urządzenia w wodzie i innych płynach.
2. Produkt przeznaczony do użytku wewnętrznego i zewnętrznego.
3. Nie obsługuj urządzenia, gdy uszkodzona jest obudowa.
4. Nie dokonuj samodzielnych napraw.
5. Nie używaj urządzenia niezgodnie z jego przeznaczeniem.
(EN) IMPORTANT!
Before using the device, read this Service Manual and keep it for future use. Any repair or modification carried out by yourselves results in loss of guarantee. The manufacturer
is not responsible for any damage that can result from improper device installation or operation.
In view of the fact that the technical data are subject to continuous modifications, the manufacturer reserves a right to make changes to the product characteristics and to
introduce different constructional solutions without deterioration of the product parameters or functional quality.
Additional information about ORNO products are available at www.orno.pl. Orno-Logistic Sp. z o.o. holds no responsibility for the results of non-compliance with the
provisions of the present Manual. Orno Logistic Sp. z o.o. reserves the right to make changes to the Manual - the latest version of the Manual can be downloaded from
www.orno.pl.
Any translation/interpretation rights and copyright in relation to this Manual are reserved.
1. Do not immerse the device in water or other fluids.
2. The product is designed for internal and for outdoor installation
3. Do not operate the device when its housing is damaged.
4. Do not open the device and do not repair it by yourselves.
5. Do not use the device contrary to its dedication.
(DE) WICHTIG!
Vor der Inbetriebnahme des Geräts die Bedienungsanleitung sorgfältig lesen und für die zukünftige Inanspruchnahme bewahren. Selbständige Reparaturen und
Modifikationen führen zum Verlust der Garantie. Der Hersteller haftet nicht für die Schäden, die aus falscher Montage oder falschem Gebrauch des Geräts folgen können.
In Anbetracht der Tatsache, dass die technischen Daten ständig geändert werden, behält sich der Hersteller das Recht auf Änderungen in Bezug auf Charakteristik des
Produktes und Einführung anderer Konstruktionslösungen, die die Parameter und Gebrauchsfunktionen nicht beeinträchtigen, vor.
Zusätzliche Informationen zum Thema der Produkte der Marke ORNO finden Sie auf der Internetseite: www.orno.pl. Orno-Logistic Sp. z o.o. haftet nicht für die Folgen der
Nichteinhaltung der Empfehlungen, die in dieser Bedienungsanleitung zu finden sind. Die Firma Orno-Logistic Sp. z o.o. behält sich das Recht auf Änderungen in der
Bedienungsanleitung vor –die aktuelle Version kann man auf der Internetseite www.orno.pl herunterladen.
Alle Rechte auf Übersetzung/Interpretation sowie Urheberrechte an dieser Bedienungsanleitung sind vorbehalten.
1. Tauchen Sie das Gerät nicht ins Wasser oder in andere Flüssigkeiten.
2. Produkt zum Innenbereich und für die Außenmontage geeignet.
3. Nutzen Sie das Gerät nicht, wenn sein Gehäuse beschädigt ist.
4. Nehmen Sie keine selbständigen Reparaturen vor.
5. Verwenden Sie die Einrichtung nur ordnungsgemäß.
Każde gospodarstwo jest użytkownikiem sprzętu elektrycznego i elektronicznego, a co za tym idzie potencjalnym wytwórcą niebezpiecznego dla ludzi
i środowiska odpadu, z tytułu obecności w sprzęcie niebezpiecznych substancji, mieszanin oraz części składowych. Z drugiej strony zużyty sprzęt to cenny materiał, z
którego możemy odzyskać surowce takie jak miedź, cyna, szkło, żalazo i inne. Symbol przekreślonego kosza na śmieci umieszczany na sprzęcie, opakowaniu lub
dokumentach do niego dołączonych wskazuje na konieczność selektywnego zbierania zużytego sprzętu elektrycznego i elektronicznego. Wyrobów tak oznaczonych,
pod karą grzywny, nie można wyrzucać do zwykłych śmieci razem z innymi odpadami. Oznakowanie oznacza jednocześnie, że sprzęt został wprowadzony do obrotu
po dniu 13 sierpnia 2005r. Obowiązkiem użytkownika jest przekazanie zużytego sprzętu do wyznaczonego punktu zbiórki w celu właściwego jego przetworzenia.
Zużyty sprzęt może zostać również oddany do sprzedawcy, w przypadku zakupu nowego wyrobu w ilości nie większej niż nowy kupowany sprzęt tego samego rodzaju.
Informacje o dostępnym systemie zbierania zużytego sprzętu elektrycznego można znaleźć w punkcie informacyjnym sklepu oraz w urzędzie miasta/gminy.
Odpowiednie postępowanie ze zużytym sprzętem zapobiega negatywnym konsekwencjom dla środowiska naturalnego i ludzkiego zdrowia!
Each household is a user of electrical and electronic equipment, and hence a potential producer of hazardous waste for humans and the environment, due to the
presence of hazardous substances, mixtures and components in the equipment. On the other hand, used equipment is valuable material from which we can recover
raw materials such as copper, tin, glass, iron and others. The weee sign placed on the equipment, packaging or documents attached to it indicates the need for selective
collection of waste electrical and electronic equipment. Products so marked, under penalty of fine, cannot be thrown into ordinary garbage along with other waste.
The marking means at the same time that the equipment was placed on the market after August 13, 2005. It is the responsibility of the user to hand the used
equipment to a designated collection point for proper processing. Used equipment can also be handed over to the seller, if one buys a new product in an amount not
greater than the new purchased equipment of the same type. Information on the available collection system of waste electrical equipment can be found in the
information desk of the store and in the municipal office or district office. Proper handling of used equipment prevents negative consequences for the environment
and human health!
Jeder Haushalt ist ein Nutzer von elektrischen und elektronischen Geräten und dadurch auch ein potenzieller Produzent von für Menschen und Umwelt gefährlichen
Abfällen aufgrund der sich drin befindenden gefährlichen Stoffe, Mischungen und Bestandteile. Andererseits sind die gebrauchten Geräte auch ein wertvoller Stoff,
aus denen wir Rohstoffe wie: Kupfer, Zinn, Glas, Eisen und andere wieder verwerten können. Das Zeichen einer durchgestrichenen Mülltonne auf dem Gerät, der
Verpackung oder in den Dokumenten, die dem Gerät beigelegt sind, weist darauf hin, dass die elektronischen und elektrischen Altgeräte getrennt gesammelt werden
müssen. Die so gekennzeichneten Produkte dürfen nicht im normalen Hausmüll mitsamt anderen Abfällen entsorgt werden, unter Androhung einer Geldbuße. Das
Zeichen bedeutet auch, dass das Gerät nach dem 13. August 2005 in den Verkehr gebracht wurde. Der Nutzer ist verpflichtet, das Altgerät an die angewiesene
Rücknahmestelle zu übermitteln, damit es richtig wieder verwertet wird. Beim Kauf von neuen Geräten kann man die Altgeräte in gleicher Menge und Art beim
Verkäufer zurückgeben. Die Informationen über das System der Sammlung der elektrischen Altgeräte kann man sich bei einem Auskunftspunkt des Ladens sowie bei
der Stadt-/Gemeindeverwaltung einholen. Der richtige Umgang mit den Altgeräten verhindert negative Konsequenzen für die Umwelt und die Gesundheit!

2
rys.1/fig.1/Add.1 Montaż/Instalation/Montage
rys.2a Wymiary OR-ZS-851/fig.2a Dimension OR-ZS-851/Add.2a Größe OR-ZS-851
rys.2b Wymiary OR-ZS-852/fig.2b Dimension OR-ZS-852/Add.2b Größe OR-ZS-852

3
PL
Instrukcja obsługi
OPIS
Elektroniczna wkładka do montażu w standardowych drzwiach, zastępuje zwykłą wkładkę otwieraną na klucz. Doskonała ochrona przed
niepożądanym wejściem lub próbą otwarcia. Urządzenie sterowane jest za pomocą dedykowanych breloków lub typowych kart zbliżeniowych,
a dzięki aplikacji na telefon administrator sam decyduje kto może otwierać drzwi. Jednemu identyfikatorowi użytkownika można nadać uprawnienia
do wielu wkładek, a gdy zajdzie taka potrzeba, możesz wylogować użytkownika i odebrać mu możliwość otwierania drzwi. Montaż nie wymaga
żadnego okablowania. Urządzenie wykonane zostało ze stali nierdzewnej. Dzięki wysokiemu stopniowi szczelności IP65, wkładka jest odporna na
kurz i działanie silnych strumieni wody, a zatem z powodzeniem można ją montować w drzwiach zewnętrznych. Jest też i zabezpieczona przed
nieuprawnionym otwarciem zgodnie z normą EN 15684:2012. Dodatkowo wkładka może być obsługiwana za pomocą transponderów Mifare 13,56
MHz, czyli można także uruchamiać ją za pomocą karty kredytowej do płatności zbliżeniowych.
DANE TECHNICZNE
Napięcie zasilania:
CR123 (bateria w zestawie)
Typ kart (breloków):
13.56 MHz standardu ISO/IEC 14443A i Mifare
Tryb pracy:
Brelok / karta zbliżeniowa lub Bluetooth
System operacyjny:
iOS 7.0/ Android 4.3
Materiał:
stal nierdzewna
Stopień ochrony:
IP65
Rozmiar wkładki:
35/35 mm (dot. OR-ZS-851), 40/40 mm (dot. OR-ZS-852)
Waga netto:
Zgodność z normą:
EN 15684:2012 Okucia budowlane. Wkładki mechatroniczne do zamków
Ocena:
1
6
0
4
A
B
0
0
EN
User manual
DESCRIPTION
Double knob cylinder suitable for installation in standard doors, it replaces a standard door cylinder opened with a key. It helps to ensure protection
against undesired access or opening attempts. The device is operated with the use of dedicated proximity tags and standard access cards and
thanks to a smartphone app, the administrator decides who can open the door. One user ID code can be assigned to a number of door cylinders,
and it can be deleted and logged off the system, whenever a need occurs. No cables are required for installation. This door cylinder is made of
stainless steel. High protection level (IP65) guarantees that our cylinder resists dust and strong water splashes, thus can be successfully used in
doors located outdoors. It is also secured against unauthorized opening attempts, as per the EN 15684 Directive. Additionally, the device can be
operated with Mifare 13.56MHz transponders, i.e. it can be activated with a credit card.
TECHNICAL SPECIFICATION
Power source:
CR123 (included)
Type of card (proximity tags):
13.56 MHz, operational standards: ISO/IEC 14443A and Mifare
Work modes:
Tag / proximity card or Bluetooth
Operational system:
iOS 7.0/ Android 4.3
Material:
stainless steel
Ingress protection:
IP65
Cylinder length:
35 x 35 mm (re. OR-ZS-851), 40 x 40 mm (re. OR-ZS-852)
Net weight:
Legal compliance:
EN 15684:2012 Building hardware. Mechatronic cylinders.
Ratings:
1
6
0
4
A
B
0
0
DE
Bedienungsanleitung
BESCHREIBUNG
Das Zahlentürschloss für den Einbau in Standardtüren ersetzt einen gewöhnlichen Profilzylinder, der mit einem Schlüssel geöffnet wird.
Ausgezeichneter Schutz gegen unerwünschtes Eindringen oder Öffnungsversuch. Dank der mobilen App entscheidet der Verwalter selbst, wer die
Tür öffnen darf. Eine einzige Benutzer-ID kann mehreren Schlössern zugewiesen werden, und bei Bedarf können Sie einen Benutzer vom Konto
abmelden und ihm die Möglichkeit nehmen, die Tür zu öffnen. Für die Montage ist keine Verkabelung erforderlich. Das Schloss ist aus rostfreiem
Stahl hergestellt. Dank der hohen Schutzart IP65 ist der Einsatz staub- und strahlwasserresistent, so dass er erfolgreich in Außentüren eingebaut
werden kann. Sie ist gegen unbefugtes Öffnen gemäß EN 15684 geschützt. Zusätzlich kann das Zahlentürschloss mit 13,56 MHz Mifare-
Transpondern betrieben werden, d.h. er kann auch mit einer Kreditkarte für kontaktlose Zahlungen aktiviert werden.

4
TECHNISCHE DATEN
Stromversorgung:
CR123 (enthalten)
Kommunikation:
13.56 MHz standardu ISO/IEC 14443A i Mifare
Betriebsart:
Schlüsselanhänger / Proximity-Karte oder Bluetooth
Operational system:
iOS 7.0/ Android 4.3
Material:
Edelstahl
Schutzart:
IP65
Länge das Zahlentürschloss:
35 x 35 mm (bezieht sich auf OR-ZS-851), 40 x 40 mm (bezieht sich auf OR-ZS-852)
Nettogewicht:
Einhaltung des Standards:
EN 15684:2012 Gebäudeausstattung. Mechatronische Einsätze für Schlösser
Auswertung:
1
6
0
4
A
B
0
0
1. Instalacja / Installation / Installation
(PL) W przypadku systemów operacyjnych IOS wyszukaj „zealingsmart”
w sklepie App store. Dla systemów Android, pobierz aplikację korzystając
z kodu QR lub poniższego linku:
http://zealing.kingforcechina.com/apk/Zealing.apk
Po zainstalowaniu aplikacji otwórz ją i przejdź do strony startowej.
(EN) IOS - search “zealingsmart” from the App store. Android – use the
QR-code or link: http://zealing.kingforcechina.com/apk/Zealing.apk
After installing the App, open the application and enter the App
homepage.
(DE) Für IOS suchen Sie im App-Store nach "zealingsmart". Für Android
laden Sie die Anwendung mit aus dem QR-Code oder dem Link unten:
http://zealing.kingforcechina.com/apk/Zealing.apk
Nachdem Sie die Anwendung installiert haben, öffnen Sie sie und gehen
Sie auf die Startseite.
2. Tworzenie konta / Create account / Konto-Erstellung
(PL) Po zakończeniu instalacji, każdy nowy użytkownik musi założyć konto.
Naciśnij Create Account na stronie startowej, aby przejść na stronę
tworzenia konta. Wprowadź aktualny numer telefonu komórkowego bez
prefiksa krajowego (phone number or email). W polu z globusem wybierz nr
kierunkowy kraju (nie dotyczy adresu e-mail). Następnie naciśnij Get code
(prześlij kod), aby otrzymać kod weryfikacyjny. Po otrzymaniu kodu
weryfikacyjnego na wskazany wcześniej numer telefonu lub adres email,
wpisz go w polu verification code (kod weryfikacyjny). Następnie wprowadź
swoje hasło w polu your password i powtórz je w polu confirm. Aby
zakończyć tworzenie konta kliknij Create Account. Jeśli wprowadzone
informacje zawierają błędy, w aplikacji pojawi się okienko z informacją
o błędzie. Jeśli rejestracja jest poprawna, w aplikacji pojawi się
potwierdzenie w postaci komunikatu i system wróci do strony logowania.
(EN) After the installation is completed, users need to create account if
they use the App for the first time. Click the Create Account on the
homepage to enter the Create Account page. Enter a valid mobile phone
number (without country prefix) or your email address. In the globe field,
select the country code (not including e-mail). Then click Get code. After
receiving the verification code on your mobile or mailbox, type the
received code, enter your password and click Create Account. If the
registration fails, the App will pop up an error message. If the registration
is successful, the App will inform you about successful registration and
switch to the login interface.
(DE) Nachdem die Installation abgeschlossen ist, muss jeder neue Benutzer
ein Konto erstellen. Drücken Sie auf der Startseite auf Konto erstellen, um
zur Seite der Kontoerstellung zu gelangen. Eingabe der aktuellen
Mobiltelefonnummer ohne Landesvorwahl (Telefonnummer oder E-Mail).
Wählen Sie im Feld Globus den Ländercode aus (gilt nicht für die E-Mail-
Adresse). Drücken Sie dann auf Get code, um den Verifizierungscode zu
erhalten. Nach Erhalt des Verifizierungscodes an der zuvor angegebenen
Telefonnummer oder E-Mail-Adresse geben Sie diesen in das Feld für den
Verifizierungscode ein. Geben Sie dann Ihr Passwort in das Feld Ihr
Passwort ein und wiederholen Sie es im Bestätigungsfeld. Um die
Kontoerstellung abzuschließen, klicken Sie auf Konto erstellen. Wenn die
eingegebenen Informationen Fehler enthalten, wird in der Anwendung
eine Fehlermeldung angezeigt. Wenn die Registrierung korrekt ist,
erscheint eine Bestätigungsmeldung in der Anwendung und das System
kehrt zur Anmeldeseite zurück.

5
3. Logowanie / Login / Login
(PL) Na stronie startowej wprowadź nazwę użytkownika i hasło. Następnie
kliknij (login), aby przejść na stronę użytkownika.
Po pierwszej instalacji i logowaniu, aplikacja poprosi użytkownika
o otwarcie odpowiednich pozwoleń. Użytkownik wyraża zgodę postępując
zgodnie z wyświetlanymi informacjami.
Jeśli użytkownik nie pamięta swojego hasła, można je zresetować poprzez
kliknięcie (forget password) na stronie startowej. Podczas resetu hasła,
wprowadź kod weryfikacyjny, nowe hasło i powtórz nowe hasło jeszcze
raz. Kliknij na pole modify password.
(EN) On the front page, enter the username and password and click the
login to open the user page. After the first installation and login, the App
will prompt the user to open the corresponding permission and the user
shall allow it according to the prompt. If the user forgets the password, it
can be reset by clicking forget password on the home page. When resetting
the password, enter the verification code, new password, then confirm the
password, and click the modify password button.
(DE) Geben Sie auf der Startseite Ihren Benutzernamen und Ihr Passwort
ein. Klicken Sie dann auf (Login), um zur Benutzerseite zu gelangen.
Nach der ersten Installation und dem Login fragt die Anwendung den
Benutzer um die entsprechenden Genehmigungen zu öffnen. Der
Benutzer erklärt sich damit einverstanden, den angezeigten Informationen
zu folgen.
Wenn Sie sich nicht mehr an Ihr Passwort erinnern, können Sie es
zurücksetzen, indem Sie auf der Startseite auf (Passwort vergessen)
klicken. Wenn Sie das Passwort zurücksetzen, geben Sie den
Verifizierungscode und das neue Passwort ein und wiederholen Sie das
neue Passwort noch einmal. Klicken Sie auf das Feld Passwort ändern.
4. Menu główne / Main interface / Hauptmenü
(PL) Główne menu składa się z pięciu zakładek – Home (strona startowa),
Record (nagrywanie), Add lub Bind (dodawanie), Message (wiadomości), Me
(moje konto). Wystarczy kliknąć na którąś z nich, aby zmienić stronę.
W menu głównym kliknij na ikonę w górnym lewym rogu, aby otworzyć
bieżącą listę zamków, która na tym etapie jest jeszcze pusta. Kliknij na
ikonę Settings (ustawienia) w prawym górnym rogu, aby przełączyć na
ekran ustawień.
(EN) The main interface consists of the five tabs –Home, Record, Add or
Bind, Message, Me. The user can click the icon below to easily switch them.
Clicking the top left button on the main interface opens the current lock
list, which is now empty. Click the settings button in the upper right corner
to open the system settings screen.
(DE) Das Hauptmenü besteht aus fünf Registerkarten - Home (Startseite),
Record (Aufnahme), Add oder Bind (Hinzufügen), Message (Nachrichten), Me
(Mein Konto). Klicken Sie einfach auf eine von ihnen, um die Seite zu
ändern. Klicken Sie im Hauptmenü auf das Symbol in der linken oberen
Ecke, um die aktuelle Liste der Schlösser zu öffnen, die zu diesem
Zeitpunkt noch leer ist. Klicken Sie auf das Symbol "Settings" in der oberen
rechten Ecke, um zum Bildschirm Einstellungen zu wechseln.
5. Lista zamków / Lock list / Liste von Schlössern
(PL) W przypadku nowych użytkowników lista zamków jest pusta, bo
żaden nie został jeszcze dodany.
Jeśli dla użytkownika został wprowadzony już jakiś zamek, wyświetli się
lista dostępnych zamków, w tym również zamki administratorów
i tymczasowe zamki przypisane przez innych użytkowników.
(EN) The lock list is empty for a new user because no locks have been
added yet. If a lock has been added for the user, the lock list displays all
the locks, including administrators’ locks and temporary key chains
assigned by other users.
(DE) Bei neuen Benutzern ist die Liste der Schlösser leer, da noch keine
hinzugefügt wurden.
Wenn für einen Benutzer bereits eine Schlösser eingegeben wurde, wird
eine Liste der verfügbaren Schlösser angezeigt, einschließlich der
Administratorschlösser und der von anderen Benutzern zugewiesenen
temporären Schlösser.

6
6. Ustawienia systemowe / System setting / System-Einstellungen
(PL) W menu ustawień systemowych możesz sprawdzić informacje
o konkretnym zamku, jego nazwę i przypisane do niego ustawienia.
(EN) In the system setting interface, you can view the lock information, its
name and setup.
(DE) Im Menü der Systemeinstellungen können Sie die Informationen
überprüfen über ein bestimmtes Schloss, seinen Namen und die ihm
zugewiesenen Schauplätze.
7. Parowanie administratora / Bind administrator / Kopplung des Administrators
(PL) Kliknij na ikonę Add lub Bind (dodaj) u dołu menu głównego i pojawi
się menu parowanie administratora (Bind Administrator). Wprowadź adres
MAC, np. DB:16:12:11:01:23 lub zeskanuj kod QR (naklejka z kodem
znajduje się na opakowaniu/w instrukcji) i kliknij w zakładkę Bind
Administrator (parowanie administratora).
Jeśli parowanie nie powiodło się, pojawi się raport o błędach. Jeśli
parowanie zakończy się powodzeniem, system również o tym poinformuje.
W głównym menu aplikacji pojawi się oznaczenie nowego zamka.
Podczas parowania zamka upewnij się, że zamek znajduje się w zasięgu
Bluetooth i wprowadź właściwy adres MAC. Bateria musi być sprawna,
w przeciwnym razie parowanie nie powiedzie się.
(EN) Click the Add or Bind icon at the bottom of the main interface and the
App will enter the Bind Administrator interface. Enter the lock Mac address,
such as DB:16:12:11:01:23 or scan QR code (sticker with the code is on
the package/instruction) and click Bind Administrator. If the binding fails,
an error report will pop up. If the binding succeeds, the App will prompt
about successful operation. The App will display the newly added lock in
the main interface. When binding a lock, make sure the lock is within
Bluetooth range and enter the correct MAC address. The battery must be
working, otherwise the binding will fail.
(DE) Klicken Sie auf das Symbol "Add”oder „Bind“ (Hinzufügen) unten im
Hauptmenü, und das Menü "Bind administrator" (Kopplung des
Administrators)wird angezeigt. Geben Sie die MAC-Adresse, z.B.
DB:16:12:11:01:23 oder scannen Sie den QR-Code (ein Aufkleber mit dem
Code befindet sich auf dem Paket/der Anleitung) und klicken Sie auf die
Registerkarte "Bind Administrator".
Wenn die Kopplung fehlgeschlagen ist, erscheint ein Fehlerbericht. Wenn
die Kopplung erfolgreich ist, informiert Sie das System auch darüber. Die
neue Schlösser werden im Hauptmenü der Anwendung angezeigt.
Stellen Sie beim Koppeln des Schlosses sicher, dass sich das Schloss
innerhalb der Bluetooth-Reichweite befindet, und geben Sie die korrekte
MAC-Adresse ein. Die Batterie muss funktionsfähig sein, sonst wird die
Kopplung fehlschlagen.

7
8. Otwieranie zamka / Unlocking / Schloss öffnen
(PL) Po skutecznym sparowaniu wkładki, użytkownik może kliknąć na
ikonę kłódki w menu głównym, aby go otworzyć. Upewnij się, że zamek
jest w zasięgu Bluetooth. Podczas otwierania zamka, w aplikacji wyświetli
się jego aktualny status (otwarty).
(EN) After successful pairing of the cylinder, the user can click on the
padlock icon of the main interface to unlock (please make sure the lock is
within the range of Bluetooth connection). When opening a lock, the App
will display the current unlocked state.
(DE) Nach erfolgreicher Kopplung des Schlosseinführung kann der
Benutzer auf das Vorhängeschloss-Symbol im Hauptmenü klicken, um es
zu öffnen. Stellen Sie sicher, dass sich das Schloss in Bluetooth-Reichweite
befindet. Wenn Sie das Schloss öffnen, zeigt die Anwendung ihren
aktuellen Status (offen) an.
9. Przydzielanie kluczy / Auth key / Tastenbelegung
(PL) Administrator może przydzielić E-klucze innym użytkownikom, w tym
klucze stałe i tymczasowe. Klucze można przydzielać tylko
zarejestrowanym użytkownikom.
(EN) The administrator can authorize E-keys to other users, including
permanent keys and temporary keys. Keys can only be authorized to
registered accounts.
(DE) Der Administrator kann anderen Benutzern E-Schlüssel zuweisen,
einschließlich fester und temporärer Schlüssel. Schlüssel können nur
registrierten Benutzern zugewiesen werden.
10. Klucz stały / Permanent key / Fester Schlüssel
(PL) W menu przydzielania kluczy Auth Key, w polu Key Type (rodzaj klucza)
wybierz Permanent (stały).
Wprowadź konto zarejestrowanego użytkownika lub zeskanuj kod QR
umieszczony w aplikacji, z prawej strony konta (Me -> QR code). Dotknij
kodu aby powiększyć, wybierz czy zezwolić na otwarcie zamka poza siecią
(offline) i kliknij send (wyślij). Jeśli autoryzacja nie powiedzie się, aplikacja
potwierdzi to komunikatem. Jeśli autoryzacja zakończy się powodzeniem,
system również wyświetli stosowną informację. Podczas przesyłania
danych stałego klucza, upewnij się, że wkładka znajduje się w zasięgu
połączenia Bluetooth, w przeciwnym razie przesyłanie danych klucza nie
powiedzie się.
W przypadku zgody na otwieranie zamka poza siecią, użytkownik
docelowy może zalogować się do aplikacji również w trybie offline (aby
zalogować się po raz pierwszy, użytkownik musi połączyć się do sieci i nie
wychodzić z trybu logowania). Następnie otwórz zamek.
(EN) In the Auth key interface, select permanent key as the key type. Enter
the registered user account or scan QR code on the right side of the
account (Me →QR code) in the App. Touch the code to enlarge, select
whether to allow offline unlock and click send. If the authorization
succeeds, the App will pop up a successful prompt.
When sending a permanent key data, make sure the cylinder is within the
Bluetooth connection, otherwise sending will fail. If you want to allow
offline unlock, the target user can log in the App when offline (the target
user needs to log in under network conditions for the first login, and do
not click exit login), and unlock the lock.
(DE) Wählen Sie im Menü Automatische Schlüsselzuweisung im Feld Key
Type die Option Permanent.
Geben Sie das Konto des registrierten Benutzers ein oder scannen Sie den
QR-Code auf der rechten Seite des Kontos (Me -> QR-Code) in der
Anwendung. Berühren Sie den Code zum Vergrößern, wählen Sie aus, ob
das Schloss offline geöffnet werden darf, und klicken Sie auf Senden
“send”. Wenn die Autorisierung nicht erfolgreich ist, bestätigt die
Anwendung sie mit einer Meldung. Wenn die Autorisierung erfolgreich ist,
zeigt das System auch die relevanten Informationen an. Achten Sie bei der
Übertragung fester Schlüsseldaten darauf, dass sich der Schlüssel in
Reichweite der Bluetooth-Verbindung befindet, da sonst die Übertragung
der Schlüsseldaten fehlschlägt.
Wenn Sie zustimmen, die Schlösser außerhalb des Netzwerks zu öffnen,
kann sich der Zielbenutzer auch im Offline-Modus bei der Anwendung
anmelden (um sich zum ersten Mal anzumelden, muss der Benutzer eine
Verbindung zum Netzwerk herstellen und darf den Anmeldemodus nicht
verlassen). Dann öffnen Sie das Schlösschen.

8
11. Klucz tymczasowy / Temporary key / Temporärer Schlüssel
(PL) Do wyboru są trzy rodzaje kluczy tymczasowych: Interval, Alarm,
Count.
W menu przydzielania kluczy Auth Key, wybierz temporary key. Wprowadź
numer konta zarejestrowanego użytkownika lub zeskanuj kod QR
umieszczony w aplikacji, z prawej strony konta (Me -> QR code). Dotknij
kodu aby powiększyć, wprowadź dane w pole Notes, wybierz czy zezwolić
na otwieranie zamka poza siecią. Wprowadź odpowiednie ustawienia w
zależności od swoich potrzeb.
Interval (przedział czasu): określ datę rozpoczęcia i zakończenia –min. 1
dzień
Alarm mode (cykliczny przedział czasu): wybierz konkretny dzień lub dni
tygodnia –min. 1 minuta
Count (odliczanie): określ ilość wejść
Po wprowadzeniu powyższych danych, kliknij send (wyślij).
(EN) There are three types of temporary keys: Interval, Alarm, Count. In the
Auth key interface, select the temporary key, enter the registered user
account or scan the QR code on the right side of the account (Me →QR
code) in the App. Touch the code to enlarge, enter the required data in the
Notes field, select whether to allow offline unlock. Then set corresponding
settings according to different modes.
Interval mode: selects start time and end time –min. 1 day
Alarm mode: select day in a week –min. 1 minute
Count mode: specify the number of entrances
After completing the above information, click send. If the authorization
fails, the App will pop up an error message. If authorization succeeds, the
App will prompt about successful operation.
(DE) Es gibt drei Arten von temporären Schlüsseln: Interval, Alarm, Count
(Zählung). Wählen Sie im Menü Auth Key assignment (Automatische
Tastenzuweisung) die Option temporary key. Geben Sie die Kontonummer
des registrierten Benutzers ein oder scannen Sie den QR-Code auf der
rechten Seite des Kontos (Me -> QR-Code) in der Anwendung. Berühren Sie
den Code zum Vergrößern, geben Sie die Daten in das Feld Notes ein,
wählen Sie, ob das Schloss außerhalb des Netzwerks geöffnet werden soll.
Nehmen Sie die entsprechenden Einstellungen nach Ihren Bedürfnissen
vor.
Interval (Intervall): Start- und Enddatum angeben - min. 1 Tag
Alarm mode (Alarmmodus): Wählen Sie einen bestimmten Tag oder
bestimmte Wochentage aus - min. 1 Minute
Count (Zählung): die Anzahl der Eingänge angeben
Nachdem Sie die oben genannten Daten eingegeben haben, klicken Sie auf
Senden “send”.
12. Zarządzanie kluczami Key Adm / Key Admin / Key Adm-Schlüsselverwaltung
(PL) Po wejściu w menu zarządzania kluczami, administrator może
zobaczyć listę wszystkich kluczy, które zostały zatwierdzone i skasować
wybrane z nich. Chcąc skasować klucz należy wybrać właściwą nazwę
klucza, a następnie przesunąć pole w lewo i kliknij OK w okienku, które
pojawi się na ekranie.
(EN) The administrator can enter the Key Adm interface to view the list of
keys that have been authorized and delete the keys that have been added.
When deleting the key, select the key to be deleted, move the field to the
left and click ok in the confirmation dialog box that pops up.
(DE) Nach dem Eintritt in das Menü für die Schlüsselverwaltung kann der
Administrator eine Liste aller genehmigten Schlüssel sehen und die
ausgewählten Schlüssel löschen. Um einen Schlüssel zu löschen, wählen
Sie den richtigen Schlüsselnamen aus, verschieben Sie dann das Feld nach
links und klicken Sie in dem auf dem Bildschirm erscheinenden Fenster auf
OK.

9
13. Dodawanie użytkowników / Add user / Benutzer hinzufügen
(PL) Kliknij na Add User (dodawanie użytkownika), aby wejść w menu
dodawania użytkownika. Można wybrać spośród czterech sposobów
identyfikacji: Fingerprint (odcisk palca), Password (hasło), IC Card (karta lub
brelok zbliżeniowy) oraz Remote Control (pilot). Różne rodzaje zamków
obsługują różne sposoby identyfikacji i tę część można konfigurować w tle,
w zależności od modelu zamka. Model OR-ZS-851 oraz OR-ZS-852
obsługuje tylko karty/breloki zbliżeniowe.
(EN) Click add user and the add user interface will be opened. There are
four access modes: Fingerprint, Password, IC card and Remote Control.
Different types of locks support different access modes and this part can
be configurated in the background, according to this lock model. The OR-
ZS-851 and OR-ZS-852 support only proximity cards/blocks.
(DE) Klicken Sie auf Add User (Benutzer hinzufügen), um das Menü
Benutzer hinzufügen aufzurufen. Sie können zwischen vier Arten der
Identifizierung wählen: Fingerprint (Fingerabdruck), Password (Passwort), IC
Card (Proximity-Karte oder Schlüsselring) und Remote Control
(Fernbedienung). Verschiedene Arten von Schlössern unterstützen
unterschiedliche Arten der Identifizierung, und dieser Teil kann je nach
Schlossmodell im Hintergrund konfiguriert werden. Die OR-ZS-851 und
OR-ZS-852 unterstützen nur Proximity-Karten/Blöcke.
14. Zarządzanie użytkownikami (User Manage) / User Management / Benutzerverwaltung
(PL) W menu zarządzania użytkownikami, administrator może zobaczyć
listę wszystkich dodanych użytkowników oraz kasować użytkowników
z listy.
(EN) In the user management interface, the administrator can view the list
of added users and delete the added users.
(DE) Im Menü der Benutzerverwaltung kann der Administrator eine Liste
aller hinzugefügten Benutzer sehen und Benutzer aus der Liste löschen.
15. Ustawienia zamka / Setting the lock / Einstellen des Schlosses
(PL) Kliknij Settings (ustawienia), aby wejść w menu Settings. W tym menu,
użytkownik może zobaczyć adres MAC przypisanej wkładki, ilość
przypisanych użytkowników, nazwę i inne informacje.
W tym samym czasie użytkownik może kliknąć pole Delete u dołu ekranu,
aby skasować (wylogować) daną wkładkę.
(EN) Click Settings to enter the lock setting interface. In this interface, the
user can view the Mac address of the cylinder, the quantity of the lock, the
name and other information. At the same time, the user can click the delete
button at the bottom of the interface to delete the cylinder (unbind).
(DE) Klicken Sie auf Settings, um das Menü Settings zu öffnen. In diesem
Menü kann der Benutzer die MAC-Adresse des zugewiesenen
Schlosseinführung, die Anzahl der zugewiesenen Benutzer, den Namen
und andere Informationen sehen.
Gleichzeitig kann der Benutzer auf das Feld Delete am unteren
Bildschirmrand klicken, um einen bestimmten Schlosseinführung zu
löschen (abzumelden).

10
16. Nagrywanie / Record / Aufnahme
(PL) Kliknij na pole Record, aby przejść do menu nagrywania.
W celu odtworzenia zdarzeń przesuń puste pole w dół, aby załadować
nagrania historii otwierania drzwi.
Jeśli użytkownik jest administratorem, wyświetlą się wszystkie zapisy
otwierania danej wkładki (w tym również otwarcia przez użytkowników
tymczasowych).
Jeśli użytkownik obsługuje klucz tymczasowy, wyświetli się zapis
otwierania zamka przez tego użytkownika.
Kliknij na prawy górny róg, aby skasować nagrania, które są aktualnie
wyświetlone.
(EN) Click the Record tab and the App will enter the record interface.
Clicking “click on me to get the record” or pulling down the blank area will
load the unlock record of the cylinder. If it is an administrator user, all the
cylinder records (including the records of the assigned temporary user)
corresponding to the lock are displayed.
If it is a temporary key user, the unlock record of the temporary user is
displayed.
Click the top right corner to clear the record, and the corresponding unlock
record will be deleted.
(DE) Klicken Sie auf Record-Feld, um zum Aufnahme-Menü zu gelangen.
Um Ereignisse wiederzugeben, bewegen Sie das leere Feld nach unten, um
Aufzeichnungen des Türöffnungsverlaufs zu laden.
Wenn der Benutzer der Administrator ist, werden alle Aufzeichnungen
über das Öffnen eines bestimmten Schlosseinführung (einschließlich der
Aufzeichnungen von temporären Benutzern) angezeigt.
Wenn ein Benutzer einen temporären Schlüssel unterstützt, wird eine
Aufzeichnung über das von diesem Benutzer geöffnete Schloss angezeigt.
Klicken Sie auf die obere rechte Ecke, um die aktuell angezeigten
Aufnahmen zu löschen.
17. Me - moje konto / Me / Me - mein Konto
(PL) Kliknij Me w menu użytkownika.
Na tym ekranie użytkownik może sprawdzić swoje informacje o koncie,
zmieniać swoje nazwy użytkownika (nickname), zmieniać hasła, wyświetlać
listy zamków, wylogować użytkowników i wychodzić się z systemu.
(EN) Click Me to enter the user interface. In this interface users can view
their account information, modify nicknames, change password, view lock
lists, log out users and log out.
(DE) Klicken Sie im Benutzermenü auf Me.
Auf diesem Bildschirm können Sie Ihre Kontoinformationen überprüfen,
Ihre Benutzernamen (Nicknames) ändern, Passwörter ändern, Sperrlisten
anzeigen, Benutzer abmelden und das System verlassen.
18. Zmiana hasła / Change password / Passwort-Änderung
(PL) Kliknij na Password (hasło), aby wejść w te funkcję i zmienić hasło
w menu. Funkcja zmiany hasła jest podobna do funkcji odzyskiwania hasła
w przypadku, gdy go zapomnisz.
(EN) Click the password and enter to change password interface, which is
similar to the function of the forgot the password.
(DE) Klicken Sie auf Password (Passwort), um diese Funktion aufzurufen
und das Passwort im Menü zu ändern. Die Funktion der Passwortänderung
ist ähnlich der Funktion der Passwortwiederherstellung, falls Sie das
Passwort vergessen haben.

11
19. Lista zamków / Lock list / Liste der Schlösser
(PL) Klikając na listę zamków wyświetli się lista wszystkich informacji
o zamkach przypisanych do danego użytkownika, w tym zamki główne i te
przypisane przez innych administratorów.
(EN) Click on the lock list to view a complete list of locks assigned to a user,
including locks with administration rights and locks assigned to them by
other administrators.
(DE) Wenn Sie auf die Liste der Schlösser klicken, wird eine Liste aller
Informationen angezeigt über vom Benutzer zugewiesene Schlösser,
einschließlich der Hauptsperren und der von anderen Administratoren
zugewiesenen Schlösser.
This manual suits for next models
1
Table of contents
Other Orno Door Lock manuals