ORTAL Lyric User manual

Lyric Remote Control Operation Manual: November 2019
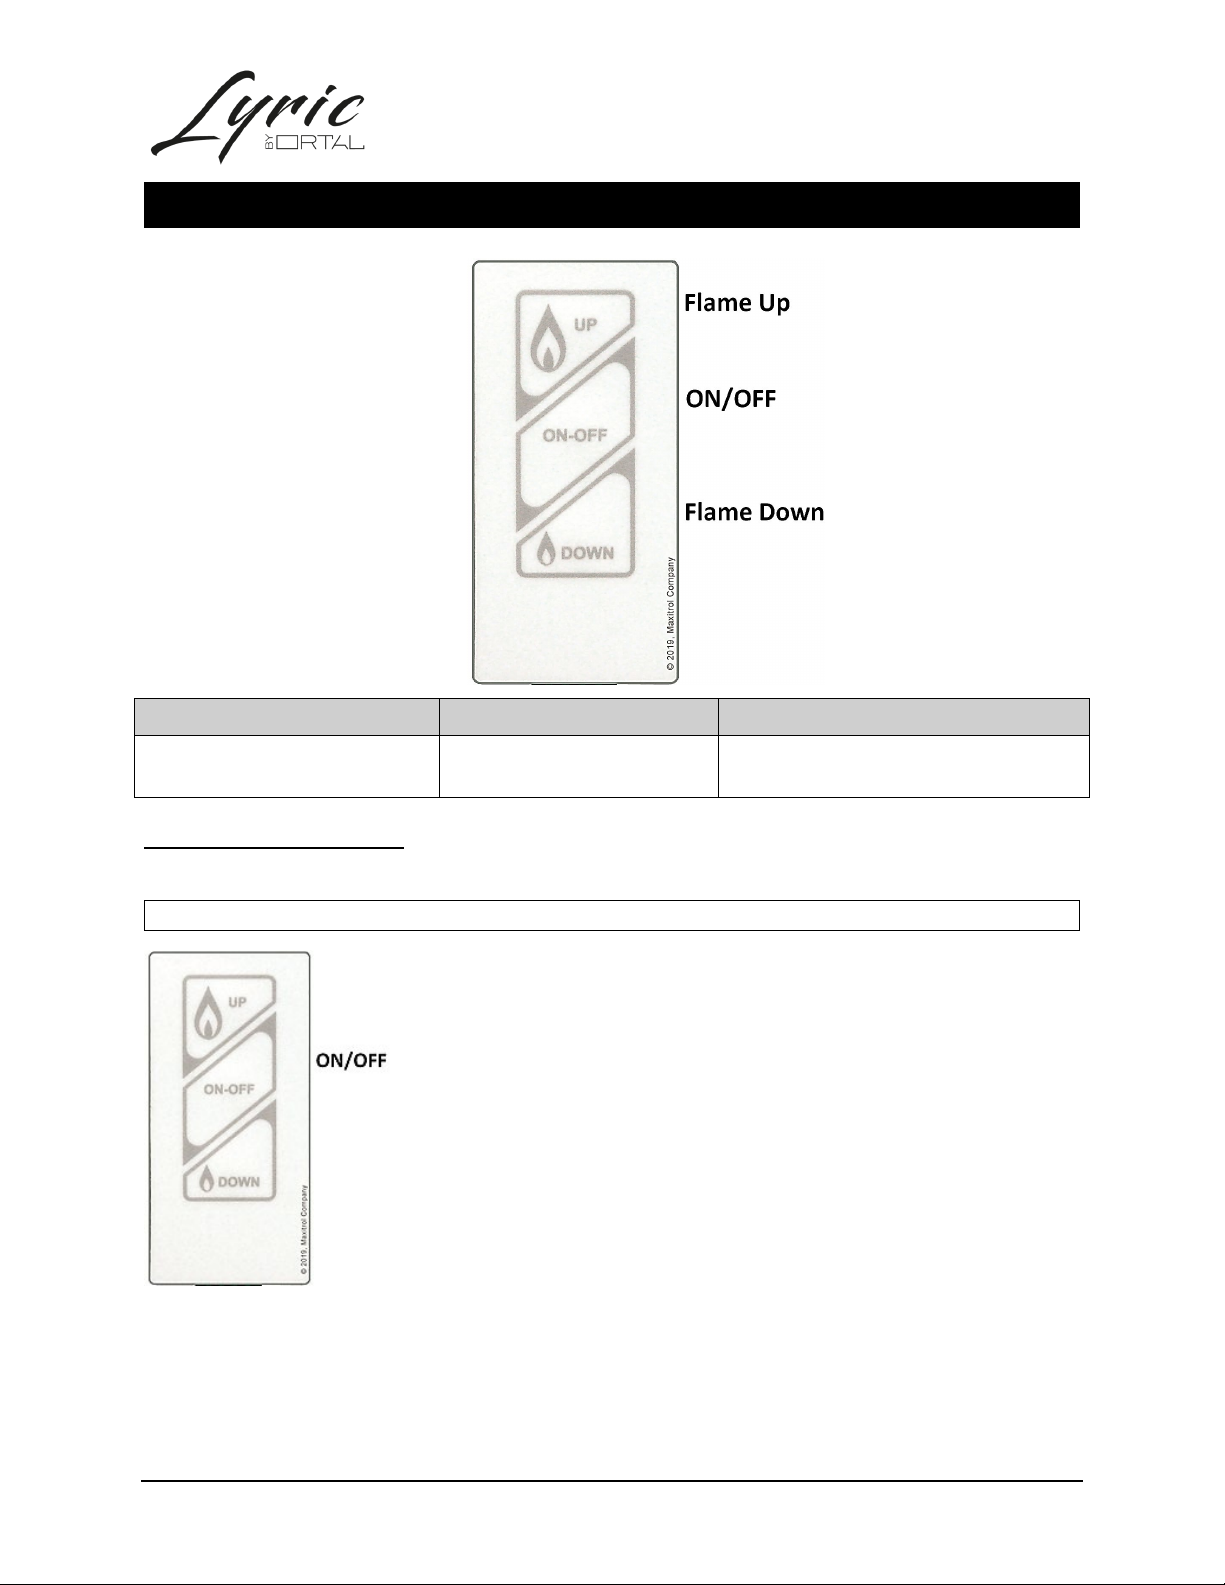
Remote Control Operation Manual
Remote Control Options:
10-Button Handset
Puck Handset
Wall Switch
myfire App

1
Fireplace Safety Information and Warnings
It is important to SAVE THESE INSTRUCTIONS and to read the following instructions carefully. Failure to follow
them could result in a fire or explosion causing property damage, personal injury or loss of life.
WARNING –FIRE OR EXPLOSION HAZARD
The product must be installed and operated according to
all codes and local regulations.
Installation and service must be performed by a qualified
installer, service agency or the gas supplier. Installation
shall conform with local codes or in the absence of local
codes, in accordance with the National Fuel Gas Code ANSI
Z223.1/NFPA 54 or the IFGC or CSA B149.1. All piping and
tubing must comply with local codes and ordinances.
Do NOT store or use gasoline or other flammable vapors
and liquids in the vicinity of this control or other
appliances.
WARNING –IF YOU SMELL GAS
If you smell gas, take the following action immediately:
Do not operate any appliance.
Do not touch any electrical switch.
Do not use any phone in your building.
Immediately evacuate the area and contact the gas
supplier. Follow the gas supplier’s instructions.
If you cannot reach the gas supplier, call the fire
department.
WARNING –ELECTRIC SHOCK HAZARD
This control must be electrically wired and operated in
accordance with all codes and local regulations. Service
and installation must be performed by a trained,
experienced service technician.
Do NOT use the control if you suspect it may be damaged.
Do NOT use this control or any gas appliance if any part
has been under water or in contact with water.
Immediately call a qualified service technician to replace
the control system and any gas control that has been
under water or in contact with water.
WARNING –FIREPLACE TEMPERATURE
Due to high temperatures, the appliance should be located
out of traffic and away from furniture and draperies.
Children and adults should be alerted to the hazards of
high surface temperature and should stay away to avoid
burns or clothing ignition.
Young children should be carefully supervised when they
are in the same room as the appliance. Toddlers, young
children and others may be susceptible to accidental
contact burns. A physical barrier is recommended if there
are at-risk individuals in the house. To restrict access to a
fireplace or stove, install an adjustable safety gate to keep
toddlers, young children and other at-risk individuals out
of the room and away from hot surfaces.
WARNING –FLAMMABLE OBJECTS
Do not place flammable objects or materials with 3 feet of
the appliance. Pay special attention to furnishings and
ornaments around the fireplace.
WARNING –FIREPLACE BARRIER
A barrier designed to reduce the risk of burns from hot
viewing glass is provided with this appliance.
Never use the fireplace with the glass or safety barrier
removed.
If the barrier becomes damaged, the barrier shall be
replaced with the manufacturer’s barrier for this
appliance. Any safety screen, guard, or barrier removed
for servicing the appliance must be replaced prior to
operating.
WARNING –GLASS HANDLING
Do NOT open the glass. The glass must be removed ONLY
by an authorized and/or qualified installer.
If removing the glass becomes necessary, please contact
your Lyric dealer.
WARNING –PILOT FLAME
If the pilot flame goes out for any reason, wait for 5
minutes before attempting to relight it.
WARNING –IF YOU SMELL GAS
If you smell gas, take the following action immediately:
Do not try to light any appliance.
Do not touch any electrical switch.
Do not use any phone in your building.
Call your gas supplier from a neighbor’s phone and follow
the gas supplier’s instructions.
If you cannot reach your gas supplier, call the fire
department.
WARNING –ANNUAL MAINTENANCE
It is essential that the fireplace, vent and complete venting
are cleaned and inspected annually by a Lyric dealer.

2
Table of Contents
Fireplace Safety Information and Warnings ....................................................................................................1
10-Button Handset ..........................................................................................................................................3
Operating Instructions ...............................................................................................................................3
Turning the Fireplace On......................................................................................................................3
Turning the Fireplace Off......................................................................................................................4
Flame Height Adjustment.....................................................................................................................4
Designated Low Flame Setting .............................................................................................................4
Designated High Flame Setting ............................................................................................................5
Countdown Timer.................................................................................................................................5
Setting the Time ...................................................................................................................................5
Setting Fahrenheit or Celsius................................................................................................................6
Setting Child Proof Function.................................................................................................................6
Thermostatic Mode ..............................................................................................................................6
Program Mode .....................................................................................................................................7
Program Mode: Turn On and Off .........................................................................................................8
Eco Mode............................................................................................................................................10
Light/Dimmer Operation ....................................................................................................................10
myfire App ..........................................................................................................................................11
Puck Handset .................................................................................................................................................11
Operating Instructions .............................................................................................................................12
Wall Switch ....................................................................................................................................................13
Operating Instructions .............................................................................................................................13
Turning the Fireplace On/Off .............................................................................................................13
Flame Height Adjustment...................................................................................................................14
myfire App .....................................................................................................................................................14
App Setup.................................................................................................................................................14
Kwik Connect......................................................................................................................................15
Standard Setup...................................................................................................................................15

3
10-Button Handset
NOTE: Any device that functions using the same radio frequency as the handset will be affected when handset
is in use.
Operating Instructions
Instructions for operating the 10-Button Handset are shown below.
NOTE: Some options on the remote may not be available for all fireplaces.
Turning the Fireplace On
1. Press button and button simultaneously until you hear continuous beeping
and a blinking series of lines confirms the start sequence has begun; release buttons.
2. Main gas flows once pilot ignition is confirmed.
3. The Symax system automatically goes into Manual Mode after main burner ignition.
NOTE: When pilot ignition is confirmed, motor turns automatically to maximum flame
height.
NOTE: If the Timer function has been set and the fireplace is manually turned on, the
Timer function will need to be reset.
Control Option Radio Frequency Power Supply
10-Button Handset 918.0 MHz
(U.S. & Canada)
2 x 1.5V AAA batteries
(quality alkaline recommended)
Replace batteries after 2 years
or when low battery indicator
appears on handset display

4
Turning the Fireplace Off
1. Press button to turn the fireplace off.
NOTE: The fireplace may be turned on again after the OFF icon stops flashing.
Flame Height Adjustment
1. To increase flame height, press and hold button to desired flame height.
2. To decrease flame height, or to set appliance to pilot flame only, press and hold
button.
Designated Low Flame Setting
1. To go to designated low flame setting, double-click button.
2. LO is displayed.
NOTE: Flame goes to high flame before going to low flame.

5
Designated High Flame Setting
1. To go to designated high flame setting, double-click button.
2. HI is displayed.
Countdown Timer
ON/SETTING:
1. Press and hold button until is displayed and hour flashes.
2. To select hour, press or button.
3. To confirm press button. Minutes will flash.
4. To select minutes, press or button.
5. To confirm press button or wait.
OFF:
1. Press button. and Countdown Time will disappear.
NOTE: At the end of Countdown Time period, the fireplace shits off. The Countdown Timer only works in
Manual, Thermostatic, and Eco Modes. Maximum Countdown Time is 9 hours and 50 minutes.
Setting the Time
1. Press and buttons simultaneously. Day will flash on the display.
2. Press or button to select a number to correspond with the day of the week.
(1=Monday, 2=Tuesday, 3=Wednesday, 4=Thursday, 5=Friday, 6=Saturday, 7=Sunday)
3. Press and buttons simultaneously. Hour will flash on the display.
4. To select hour, press or button.
5. Press and buttons simultaneously. Minutes will flash on the display.
6. To select minutes, press or button.
7. To confirm press and buttons simultaneously or wait.

6
Setting Fahrenheit or Celsius
1. To change between °C and °F, press and buttons simultaneously.
NOTE: Choosing °F will switch to a 12-hour clock. Choosing °C will switch to a 24-
hour clock.
Setting Child Proof Function
ON:
1. To activate, press and buttons simultaneously.
2. will appear on the display and every function other than the OFF function
renders inoperable.
OFF:
3. To deactivate, press and buttons simultaneously.
4. disappears.
Thermostatic Mode
•The room temperature is measured and compared to the set temperature. The
flame height is then automatically adjusted to achieve the set temperature.

7
Thermostatic Mode: Turn On and Off
ON:
1. Press button.
2. will appear in the display. Preset temperature will appear briefly, and then room
temperature will appear.
OFF:
3. Press button.
4. Press or button to enter Manual Mode.
5. Press button to enter Program Mode.
6. Press button to enter Eco Mode.
Thermostatic Mode: Setting
Press button and hold until appears on the display. The temperature will flash on
the display.
1. To adjust set temperature, press or button.
2. To confirm, press button or wait.
Program Mode
•PROGRAM 1 and 2, each can be programmed to go ON and OFF at specific times at a
set temperature.

8
Program Mode: Turn On and Off
ON:
1. Press button.
2. , 1 or 2, ON or OFF will appear on the display.
OFF:
1. Press button.
2. Press or button to enter Manual Mode.
3. Press button to enter Thermostatic Mode.
4. Press button to enter Eco Mode.
NOTE: The set temperature for Thermostatic Mode is the temperature for the ON time in Program Mode.
Changing the Thermostatic Mode set temperature also changes the ON time temperature in Program Mode.
Program Mode: Default Settings
ON TIME (Thermostatic) TEMPERATURE: 70°F.
OFF TIME TEMPERATURE: (pilot flame only)
Program Mode: Temperature Setting
1. Press button and hold until flashes. ON and set temperature (setting in
Thermostatic Mode) will appear on the display.
2. To continue, press button or wait. , OFF will appear on the display, and
temperature will flash.
3. Select OFF temperature by pressing the or button.
4. To confirm, press button.
NOTE: The ON (Thermostatic) and OFF set temperatures are the same for each day.

9
Program Mode: Day Setting
(steps continued from TEMPERATURE SETTING section above)
5. ALL will appear on the display. Press or button to choose between ALL,
SA:SU, 1, 2, 3, 4, 5, 6, 7.
6. To confirm, press button.
ON TIME SETTING (PROGRAM 1):
7. , 1, ON is displayed, ALL is displayed shortly, and hour flashes.
8. To select hour, press or button.
9. To confirm, press button. , 1, ON is displayed, ALL displayed shortly, and minutes
flash.
10. To select minutes, press or button.
11. To confirm, press button.
OFF TIME SETTING (PROGRAM 1):
12. , 1, OFF is displayed, ALL displayed shortly, and hour flashes.
13. To select hour, press or button.
14. To confirm, press button. , 1, OFF is displayed, ALL displayed shortly, and
minutes flash.
15. To select minutes, press or button.
16. To confirm, press button.
NOTE: Either continue to PROGRAM 2 and set on and off times or stop programming at this point and PROGRAM 2
remains deactivated.
NOTE: PROGRAM 1 and 2 use the same on (Thermostatic) and off temperatures for ALL, SA:SU, and Daily
Timer (1, 2, 3, 4, 5, 6, 7). Once a new ON (Thermostatic) and/or OFF temperature has been set, that temperature
becomes the new default setting.
NOTE: If ALL, SA:SU, and Daily Timer are programmed for PROGRAM 1 and PROGRAM 2 ON and OFF times,
these become the new default times. The batteries must be removed to clear the PROGRAM 1 and PROGRAM 2
ON and OFF times and temperatures.

10
Program Mode: SA:SU or Daily Timer (1, 2, 3, 4, 5, 6, 7) selected
•Set ON time and OFF time using the same procedure as “ALL selected” (above).
•SA:SU: Set ON time and OFF time for both Saturday and Sunday.
•Daily Timer: Unique ON and OFF times may be set for a single say of the week, for multiple days of the
week, or for every day of the week.
•Wait to finish setting.
Eco Mode
•Flame height modulates between high and low.
•If the room temperature is lower than the set temperature, the flame height stays
on high for a longer period of time.
•If the room temperature is higher than the set temperature, the flame height stays
on low for a longer period of time.
•One cycle last approximately 20 min.
Eco Mode: Turn On and Off
ON:
1. Press button to enter Eco Mode.
2. will apear on the display.
OFF:
1. Press button.
2. Press or button to enter Manual Mode.
3. Press button to enter Thermostatic Mode.
4. Press button to enter Program Mode.
Light/Dimmer Operation
ON:
1. Press button. will appear on the display.
2. Light is ON at preset level.
OFF:
1. Press button. will disappear.
SETTING:
1. Press button and hold until flashes on the display.
2. To adjust light between 20 – 100%, press or button.

11
3. To confirm setting, either press button or wait. will appear.
NOTE: If you want the light but no flame, press button.
myfire App
•If Thermostatic, Program or Eco Mode is activated in the myfire App, the
corresponding icon and “APP” is displayed on the handset.
•The modes can be operated according to the descriptions on the previous page.
NOTE: In Manual Mode, “APP” is not displayed on the handset.
NOTE: Before the app can be used, the myfire Wi-Fi box must be wired and
plugged into the AC adapter according to the myfire App setup diagram, and the app
setup must be completed.
NOTE: If you have any questions or concerns about the operation of your fireplace, please contact
an authorized Lyric dealer for assistance.
Puck Handset
NOTE: Any device that functions using the same radio frequency as the handset will be affected when handset
is in use.
Control Option
Radio Frequency
Power Supply
Puck Handset 918.0 MHz
(U.S. & Canada)
2 x 1.5V AAA batteries
(quality alkaline recommended)
Replace batteries after 2 years or
when low battery indicator
appears on handset display

12
Operating Instructions
Instructions for operating the Puck Handset are shown below.
Turning the Fireplace On/Off
ON:
•Press and hold the button until two short beeps confirms the start
sequence has begun; release button.
OFF:
•Press and hold the button.
Flame Height Adjustment
INCREASE:
•To increase flame height, press and hold +button.
DECREASE:
•To decrease flame height, press and hold –button.
•Holding the –button long enough sets the fireplace to pilot flame (Standby
Mode).
Designated Flame Settings
Designated Low Flame Setting
•To go to designated low flame setting, double-click –button.
NOTE: Flame goes to High Flame before going to Low Flame.
Designated High Flame Setting
•To go to designated high flame setting, double-click +button.
NOTE: If you have any questions or concerns about the operation of your
fireplace, please contact an authorized Lyric dealer for assistance.
13
Wall Switch
Operating Instructions
Instructions for operating the Wall Switch are shown below.
Turning the Fireplace On/Off
ON:
•Press and hold the ON-OFF button until two short beeps confirms the start
sequence has begun; release button.
OFF:
•Press the ON-OFF button.
Control Option Radio Frequency Power Supply
Wall Switch 918.0 MHz
(U.S. & Canada) N/A

14
Flame Height Adjustment
INCREASE:
•To increase flame height, press and hold (up flame) button.
DECREASE:
•To decrease flame height, press and hold (down flame) button.
•Holding the (down flame) button long enough sets the fireplace to pilot
flame (Standby Mode).
myfire App
App Setup
NOTES:
•For detailed App setup and operating instructions, refer to www.myfireapp.com.
•App only functions when connected to the same Wi-Fi as the fireplace.
Initial Setup
INITIAL SETUP
1. Download myfire App from the Apple App Store or Google Play Store.
2. Touch screen to start App setup.
3. Choose language, temperature (°C or °F) and time format (12 or 24 hour).
REGISTRATION
NOTE: You must register before logging in. Registration is one time only.
1. Fill in data and accept the “Privacy Policy”.
2. Touch “OK” in pop-up notice.
3. Touch link to confirm email verification.
4. You will be shown a message saying you have successfully registered the myfire App.

15
5. Return to App.
LOGIN
1. Fill in your registration password.
2. Accept “Terms and Conditions”.
3. Touch the “Login” button.
Kwik Connect
If KWIK Connect is not available, skip to “Standard Setup” instructions below.
CONNECT SMART DEVIDE TO MYFIRE WI-FI BOX
1. Touch the icon.
2. The Home Wi-Fi Network your smart device is connected to will be displayed.
3. Type in the Wi-Fi Network password.
4. Touch “Connect”. The myfire App will begin connecting the myfire Wi-Fi box to the Wi-Fi Network.
COMPLETE MYFIRE APP SETUP
1. Type in a name for your fireplace or select an icon.
2. Activate Light feature if installed in your fireplace.
3. Touch “Finish” to complete the setup.
The home screen is displayed and the myfire App is ready to go.
Standard Setup
1. Type in the password of the displayed Home Wi-Fi Network.
2. Follow the instructions on the screen and touch the “Standard Setup” button to proceed.
3. Go to your smart device Wi-Fi settings and select the myfire Wi-Fi Box network (myfire_WiFi-
Box_<number>) you want to connect.
4. Go back to the myfire App setup and follow the instructions on the screen. Your selected Wi-Fi Box network
name from the smart device Wi-Fi settings is shown.
NOTE: To connect myfire Wi-Fi Box to Wi-Fi Router (home network), make sure:
•Home network is available.
•Home network name and password are correct.
•SSID of the Wi-Fi Router is not hidden.
•Home network signal is in range.
•Wi-Fi Router supports User Datagram Protocol (UDP).
NOTES:
•After setting up the myfire Wi-Fi Box and myfire App, the time has to be synchronized in the settings of the
myfire App.
•The active device (The Puck, Symax, or smart device) is the one last used. An exception is if the non-active
device is used to change Light. The non-active device will make the changes, but the active device remains
so if it is in the Thermostatic, Program, or Eco Mode. If a Profile includes a Thermostatic, Program, or Eco
setting it will also cause the active device to remain active.
•If Thermostatic, Program, or Eco Mode is activated using the App, the corresponding icon and “APP” is
displayed on the Symax.
•During motor movement no information between the Receiver and transmitter is exchanged. The
synchronization follows after motor has stopped.
•The room temperature data is transferred by the Symax during synchronization.

Other manuals for Lyric
2
Table of contents
Other ORTAL Remote Control manuals

Popular Remote Control manuals by other brands


SmartDrive Systems
SmartDrive Systems KeyFob user manual

aci
aci 2002 Operation manual

Universal Remote Control
Universal Remote Control PHAZR-5 UR5U-9020L operating instructions

Aeon Labs
Aeon Labs AEOTEC WallMote Quad user manual

Matsui
Matsui 25M3 Quick setup guide

Kenwood
Kenwood KCA-RC700A instruction manual


