BITTE DIE VORLIEGENDE ANLEITUNG SORGFÄLTIG LESEN UND AUFBEWAHREN
Fußorthese zur Mobilisierung
KONFORMITÄTSERKLÄRUNG
Die ORTHOSERVICE AG erklärt, in seiner Funktion als Hersteller, in alleiniger Verantwortung, dass dieses vorliegende
Medizinprodukt der Klasse I angehört und gemäß den Anforderungen der EU-Verordnung 2017/745 (MDR) hergestellt
wurde. Die vorliegende Anleitung wurde unter Anwendung der vorgenannten Verordnung erstellt. Sie dient dazu, den
ordnungsgemäßen und sicheren Gebrauch des Medizinprodukts zu gewährleisten.
WARENMARKEN DER MATERIALIEN
Velcro®ist eine eingetragene Warenmarke von Velcro Industries B.V.
VORSICHTSMASSNAHMEN
Es wird empfohlen, dass der vom Produkt ausgeübte Druck nicht auf die Teile des Körpers einwirkt, die Verletzungen,
Schwellungen oder Tumeszenzen aufweisen. Es ist ratsam, das Produkt nicht zu fest anzuziehen, um keine übermäßigen,
lokalen Druckstellen zu erzeugen und keine Kompression der darunterliegenden Nerven und/oder Blutgefäße auszulösen.
Es ist ratsam, ein Kleidungsstück zu tragen, das den direkten Kontakt mit der Haut vermeidet. Bei Bedenken zur Anwendung
des Produkts bitte an einen Arzt, Physiotherapeuten oder Orthopädietechniker wenden. Bitte sorgfältig das Innenetikett
mit der Material-Zusammensetzung des Produkts lesen. Es ist ratsam, das Produkt nicht in der Nähe von offenen Flammen
oder starken elektromagnetischen Feldern verwendet werden. Nicht bei direktem Kontakt mit offenen Wunden auftragen
HINWEISE
Es ist ratsam, dass das Produkt, das für die unten aufgeführten spezischen Indikationen bestimmt ist, von einem Arzt
oder Physiotherapeuten verschrieben und von einem Orthopädietechniker entsprechend den individuellen Bedürfnissen
angepasst wird. Um die Wirksamkeit, Verträglichkeit und korrekte Funktionalität zu gewährleisten, muss die Applikation
mit größter Sorgfalt durchgeführt werden. Keinesfalls darf die vom Arzt/Physiotherapeuten/Orthopädietechniker
vorgenommene Einstellung verändert werden. Bei nicht bestimmungsgemäßer Anwendung oder Einstellung erlischt die
Haftung des Herstellers. Die Orthese ist nur für den Gebrauch durch einen einzigen Patienten bestimmt, andernfalls
übernimmt der Hersteller keine Haftung gemäß der Verordnung für Medizinprodukte. Bei überempndlichen Personen
kann es bei direktem Hautkontakt zu Rötungen oder Reizungen kommen. Bei Auftreten von Schmerzen, Schwellungen,
Tumeszenzen oder anderen anormalen Reaktionen bitte sofort an den eigenen Arzt wenden und, in besonders
schwerwiegenden Fällen, die Tatsache dem Hersteller und der zuständige Behörde in eigenen Land melden. Die
orthopädische Wirksamkeit des Produktes ist nur dann gewährleistet, wenn alle seine Komponenten verwendet werden.
AUSWAHL/GRÖSSEN
MATERIALIEN
Grundkörper: Polyamid; Innenpolster: Polyurethan mit beidseitigem Velour-Bezug; Sohlenpolsterung: Evazote® Ethylen-
Copolymer-Schaumstoff; Klettverschluss: Polyamid.
ZWECKBESTIMMUNG
Die R.O.M. Walker Unterschenkel-Fußorthese ist auschließlich für die orthetische Versorgung des Sprunggelenkes, der
Unterschenkels und der Fußes einzusetzen. Einsatzbereich ist das Sprunggelenk, der Unterschenkel und der Fuß. Das
Gelenk ist individuell einzustellen
PFLEGE
Nicht bleichen Keine chemische Reinigung
Nicht bügeln Nicht im Trockner trocknen
Waschanweisung: Polster: Von Hand in handwarmem Wasser (max. 30°C) mit neutraler
- Seife waschen, gründlich ausspülen. Nicht in der Nähe von Wärmequellen trocknen lassen
- Feste Teile: Mit einem Schwamm mit handwarmem Wasser (max. 30°C) und neutraler Seife abreiben.
Mit einem Lappen trocknen.
Das Produkt und seine Bestandteile nach dem Gebrauch sachgerecht entsorgen.
INDIKATIONEN
• Konservative Behandlung von Knöchelfrakturen
• Distorsionstraumata des Sprunggelenks III. Grades
• Postoperative Rehabilitation von Knöchelfrakturen, Stabilisierung von Bänderverletzungen des Sprunggelenks,
der Achillessehne
• Mobilisierung bei verzögerter Konsolidierung von Tibiafrakturen
• Charcot-Fuß
KONTRAINDIKATIONEN
Die Anwendung dieser Orthese wird nur empfohlen, wenn dokumentiert ist, dass die Fraktur stabil ist und akzeptable
Grenzen in Bezug auf Achs- und Drehfehlstellung nicht überschritten werden.
EIGENSCHAFTEN
• Grundkörper aus widerstandsfähigem, leichtem Kunststoff
• Rutschfeste Gummisohle
• Innenpolster der Sohle aus ungiftigem Evazote®
• Senkrechte Gelenkschienen mit Klettverschluss zur Befestigung am Polster
• Fußüberzug aus weichem, doppelt gefüttertem Schaumstoff mit Nylongaze-Beschichtung für den Klettverschluss
• Klettverschlussbänder
• Der gepolsterte Fußüberzug ist waschbar
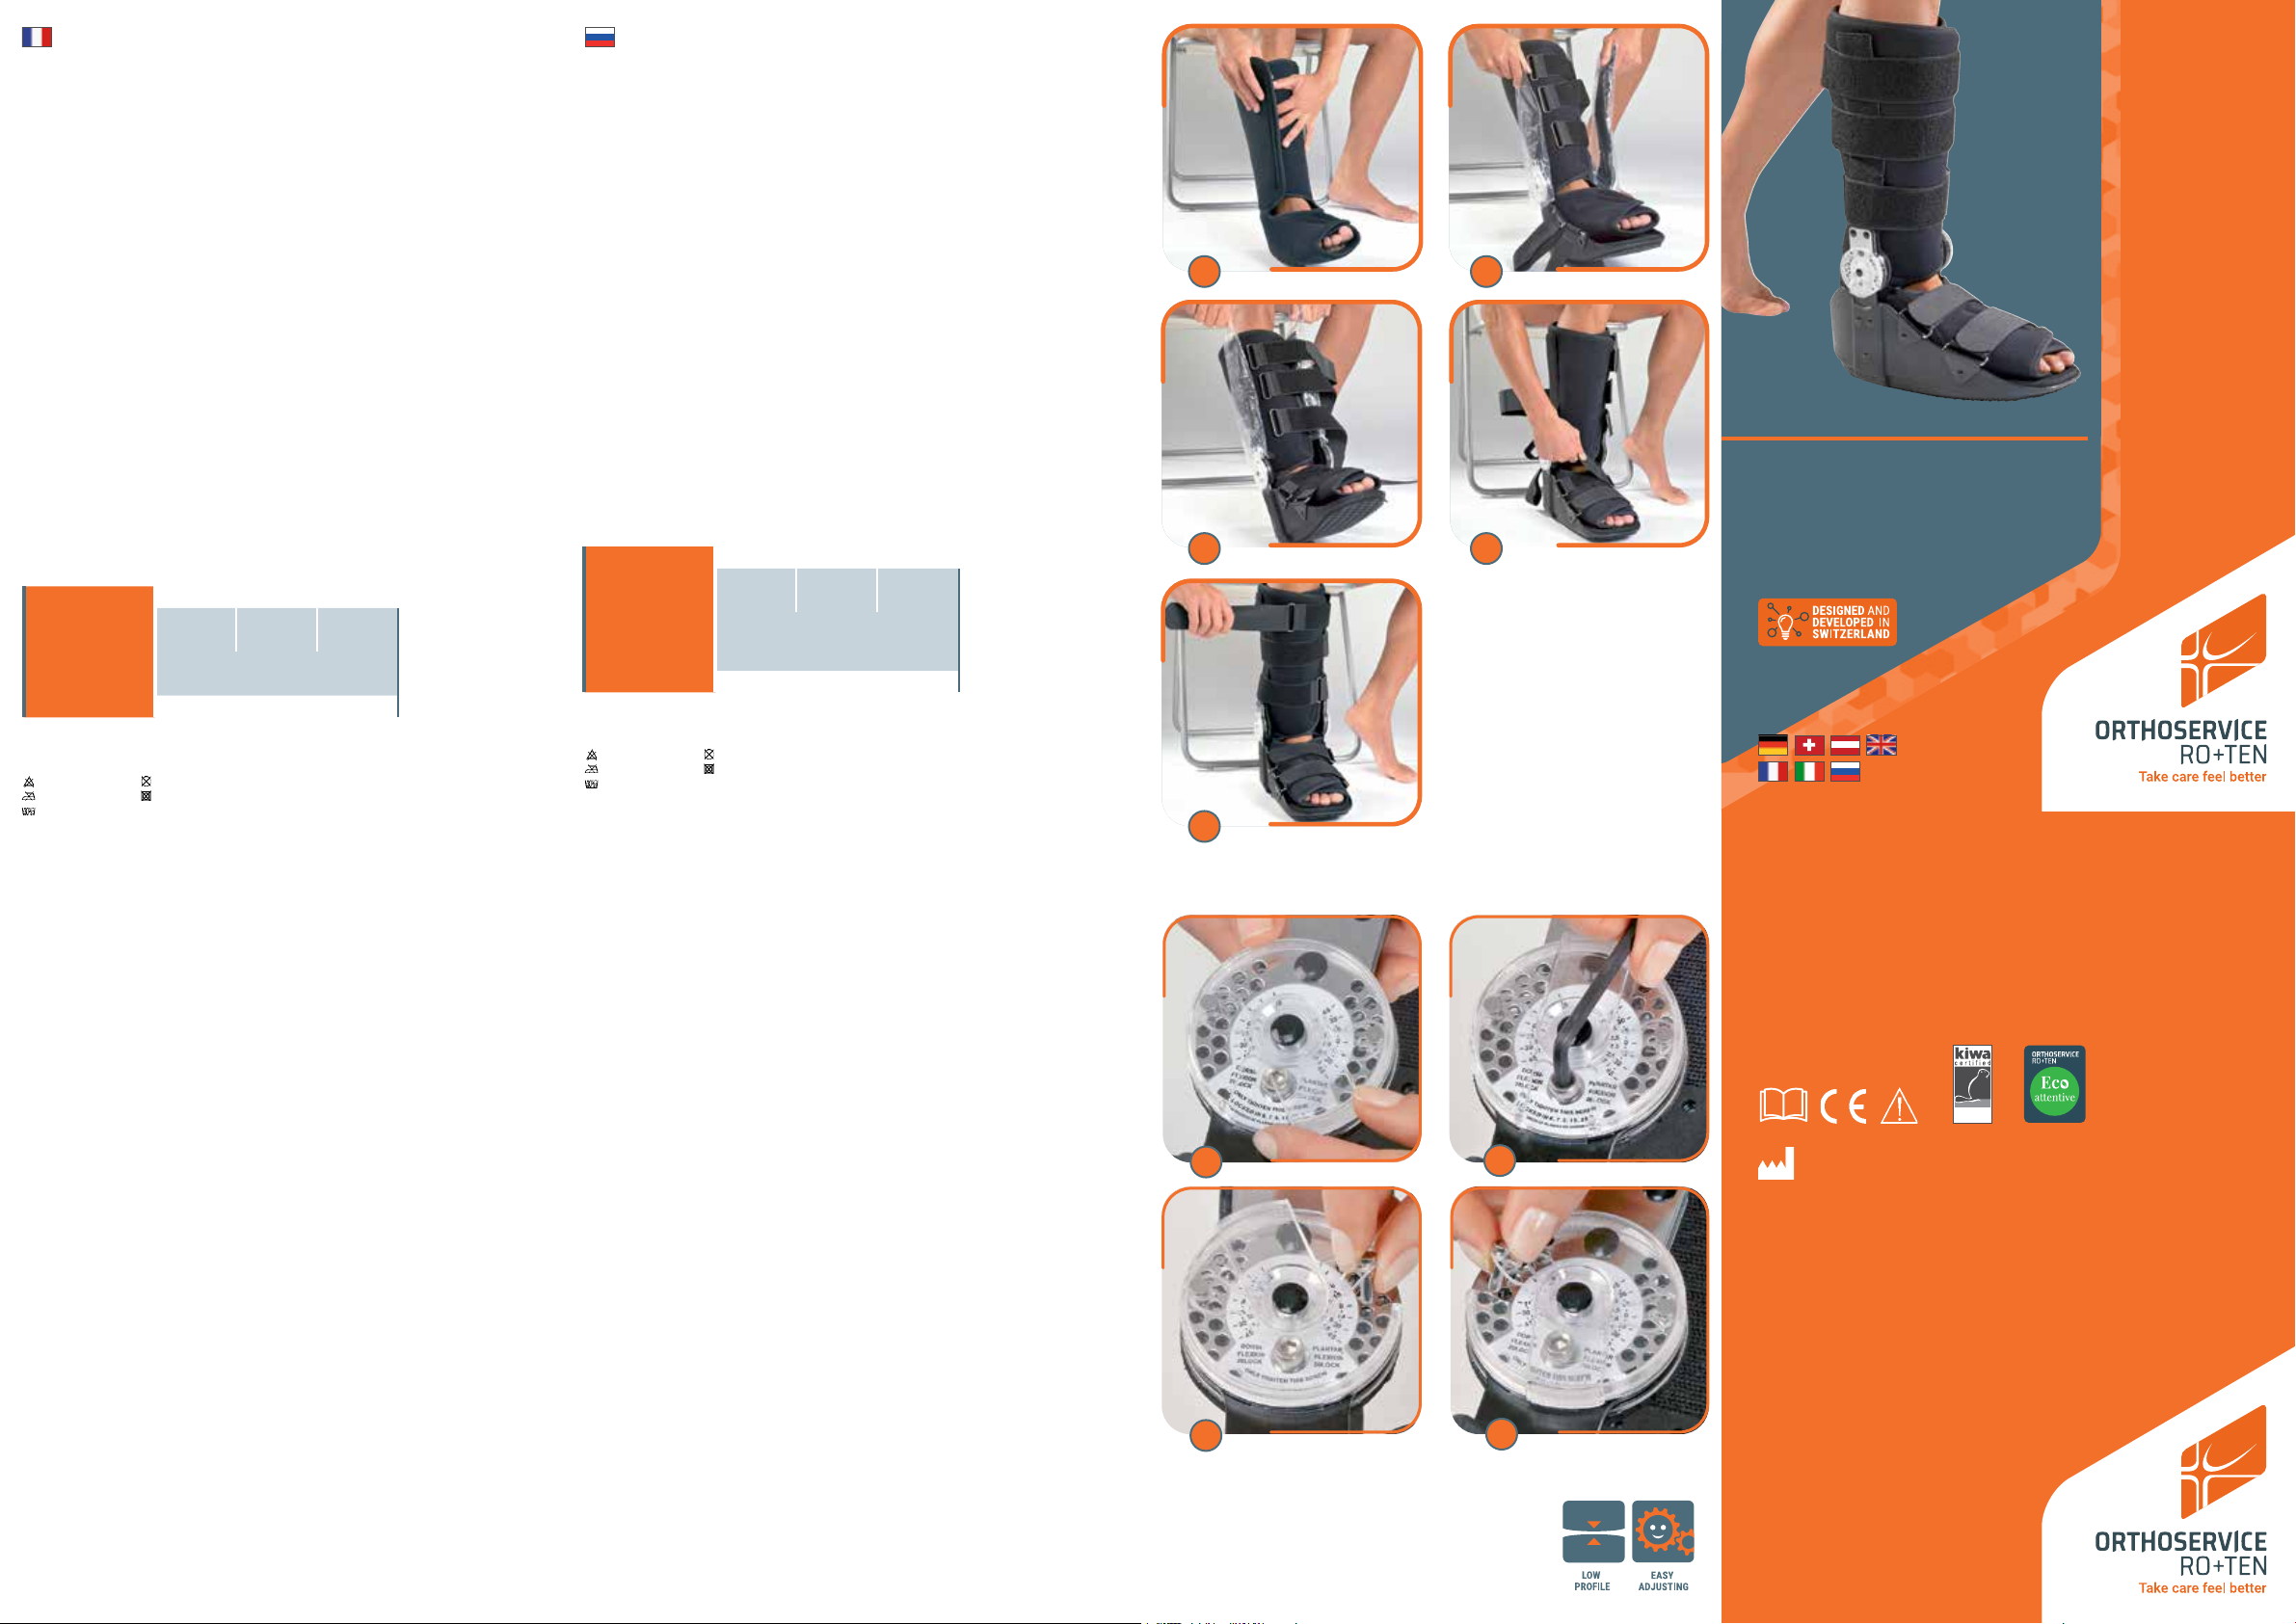
ANPASSEN FÜR DEN ARZT / TECHNIKER
1 Die Klettbänder lockern und das Innenpolster des Stiefels herausnehmen. Den Fuß in das Polster einführen; darauf
achten, dass das Polster hinten an der Ferse anliegt.
2 Zuerst das Fußteil schließen und anschließend das Unterschenkelteil des Polsters mit dem Klettverschluss (Abb. A). Das
Polster muss über die ganze Länge gut anliegen, die Blutzirkulation darf jedoch nicht behindert sein.
3 Das Gelenk wie auf den nächsten Seiten beschrieben einstellen.
4 Die Schalen mit beiden Händen öffnen und den Stiefel über das Polster ziehen; die Schalen an der Mittelachse des
Unterschenkels ausrichten (Abb. B). Bei Bedarf können die Zusatzpolster eingesetzt werden, um einen besseren Halt
und einen optimalen Tragekomfort zu erzielen.
5 Das Polster am Klettverschluss der Schalen befestigen; dazu die Kunststoff-Trennstreifen durch Ziehen nach oben
entfernen (Abb. C).
6 Die Klettbänder des Gehstiefels befestigen; zuerst die Bänder an der Fußspitze schließen und nacheinander die übrigen,
von unten nach oben (Abb. D-E).
ANLEGEN FÜR DEN PATIENTEN
1 Die Kunststoffabdeckung zum Öffnen drehen (Abb. 1).
2 Den Deckel bis zur Inbusschraube drehen und die Schraube mit dem dazugehörigen Schlüssel lockern (Abb. 2).
3 Einstellung der Dorsalexion (Abb. 3): Den Deckel drehen, bis die Öffnung über der Flexionssperre liegt, und den Stift
herausziehen; Deckel und Stift bis zur Öffnung mit dem gewünschten Flexionsgrad (dieser ist auf dem Mechanismus
angegeben) drehen und in dieser Position den Stift einstecken.
4 Einstellung der Plantarexion (Abb. 4): Den Deckel drehen, bis die Öffnung über der Extensionssperre liegt, und den Stift
herausziehen; Deckel und Stift bis zur Öffnung mit dem gewünschten Extensionsgrad (dieser ist auf dem Mechanismus
angegeben) drehen und in dieser Position den Stift einstecken.
5 Die Kunststoffabdeckung wieder schließen.
6 Soll das Gelenk vollständig gesperrt werden, die Stifte für die Dorsal- und Plantarexion auf die gleiche Gradzahl
einstellen und anschließend die Inbusschraube festziehen.
LEGGERE ACCURATAMENTE LE PRESENTI ISTRUZIONI E CONSERVARLE
Tutore a stivaletto articolato
DICHIARAZIONE DI CONFORMITÀ
Quale fabbricante, la ORTHOSERVICE AG dichiara, sotto la propria unica responsabilità, che il presente dispositivo medico
è di classe I ed è stato fabbricato secondo i requisiti richiesti dal Regolamento UE 2017/745 (MDR). Le presenti istruzioni
sono state redatte in applicazione del Regolamento sopra menzionato. Esse hanno lo scopo di garantire un utilizzo
adeguato e sicuro del dispositivo medico.
MARCHI COMMERCIALI DEI MATERIALI
Velcro®è un marchio di fabbrica registrato di Velcro Industries B.V.
PRECAUZIONI D’USO
Si raccomanda che le pressioni esercitate dal dispositivo non agiscano su parti del corpo che presentano ferite, gonori o
tumefazioni. È consigliabile non stringere eccessivamente il prodotto per non generare zone di pressione locale eccessiva o la
compressione di nervi e/o vasi sanguigni sottostanti. È consigliabile indossare un indumento, evitando il contatto diretto con
la pelle. In caso di dubbio sulle modalità di applicazione, rivolgersi ad un medico, un sioterapista o un tecnico ortopedico.
Leggere attentamente la composizione del prodotto sull’etichetta interna.
È consigliabile non indossare il dispositivo in vicinanza di amme libere o forti campi elettromagnetici. Non applicare a
contatto diretto con ferite aperte.
AVVERTENZE
E’ consigliabile che il prodotto, studiato per le speciche indicazioni sotto riportate, venga prescritto da un medico o da
un sioterapista e applicato da un tecnico ortopedico, in conformità alle esigenze individuali. Per garantirne l’ecacia,
la tollerabilità e il corretto funzionamento è necessario che l’applicazione venga effettuata con la massima cura. Non
alterare assolutamente la regolazione effettuata dal medico/sioterapista/tecnico ortopedico. La responsabilità del
fabbricante decade in caso di utilizzo o adattamento inappropriato.
L’ortesi è fatta per l’utilizzo da parte di un solo paziente; in caso contrario il fabbricante declina ogni responsabilità, in
base a quanto previsto dal regolamento per i dispositivi medici. In soggetti ipersensibili il contatto diretto con la pelle
potrebbe causare rossori o irritazioni. In caso di comparsa di dolori, gonori, tumefazioni o qualsiasi altra reazione
anomala, rivolgersi immediatamente al proprio medico e, in caso di particolare gravità, segnalare il fatto al fabbricante
e all’autorità competente del proprio Stato. L’ecacia ortopedica del prodotto è garantita solo con l’utilizzo di tutte le
sue componenti.
SCELTA/DIMENSIONI
MANUTENZIONE
Non candeggiare Pulizia chimica non consentita
Non stirare Non asciugare in asciugatrice
Istruzioni per il lavaggio:
- Imbottiture: lavare a mano in acqua tiepida (max. 30°C) con sapone neutro; risciacquare accuratamente. Lasciare
asciugare lontano da fonti di calore.
- Parti rigide: stronare con una spugna imbevuta in acqua tiepida(max. 30°C) e sapone neutro. Asciugare con un
panno.
Non disperdere nell’ambiente il dispositivo né alcuna sua componente.
INDICAZIONI
• Trattamento conservativo fratture malleolari
• Traumi distorsivi di caviglia di III grado
• Recupero post chirurgico fratture malleolari, ricostruzioni legamentose della caviglia, tendine di Achille
• Recupero deambulazione in ritardi di consolidazione delle frature tibia
• Piede di Charcot
CONTROINDICAZIONI
L’applicazione di questo tutore è consigliata unicamente nel caso in cui sia documentato che la frattura è stabile e
sussistano limiti accettabili di deformità angolare e rotatoria.
CARATTERISTICHE E MATERIALI
• Struttura in materiale plastico resistente e leggero
• Suola in gomma antiscivolo
• Imbottitura interna della suola in Evazote® atossico
• Aste montanti con Velcro® per la presa all’imbottitura
• Rivestimento dello stivaletto in soce gommaschiuma bifoderata con nylon garzato per la presa a Velcro®
• Cinturini per la chiusura a Velcro®
• Rivestimento imbottito lavabile
PRIMA APPLICAZIONE PER IL MEDICO / TECNICO
1 Allentare gli strap ed estrarre l’imbottitura interna allo stivale. Inlare il piede nell’imbottitura, in modo che la parte
posteriore di quest’ultima risulti aderente al tallone.
2 Chiudere a Velcro® la parte del piede, quindi la parte dell’imbottitura relativa alla gamba (g. A). L’imbottitura deve
essere aderente per tutta la sua lunghezza, ma non deve impedire la circolazione.
3 Regolare lo snodo articolato come descritto nelle pagine seguenti.
4 Aprire i montanti con entrambe le mani e calzare lo stivale sopra all’imbottitura, allineando i montanti con l’asse centrale
della gamba (g. B). Se necessario è possibile aggiungere le imbottiture supplementari per ottenere maggiore aderenza
e comfort.
5 Rimuovere i separatori in plastica tirandoli verso l’alto, in modo che l’imbottitura possa ssarsi a Velcro® ai montanti
rigidi. (g. C).
6 Fissare gli strap dello stivale, partendo dalla punta del piede e risalendo lungo la gamba (g. D-E).
REGOLAZIONE DEGLI SNODI
1 Far scorrere la protezione in plastica per aprirla (g. 1).
2 Ruotare il coperchio no alla vite a brugola e con l’apposita chiave allentare la vite stessa (g. 2).
3 Regolare la essione dorsale (g. 3): portare l’apertura del coperchio in coincidenza del fermo della essione ed estrarre
il perno; far ruotare il coperchio e il perno no al foro con i gradi di essione (indicati sul meccanismo) desiderati ed
inserirvi il perno.
4 Regolare la essione plantare (g. 4): portare l’apertura del coperchio in coincidenza del fermo della estensione ed
estrarre il perno; far ruotare il coperchio e il perno no al foro con i gradi di estensione (indicati sul meccanismo)
desiderati ed inserirvi il perno.
5 Richiudere la protezione in plastica.
6 Nel caso si volesse bloccare completamente l’articolazione regolare i perni di essione dorsale e plantare allo stesso
grado e poi serrare la vite a brugola.
PLEASE READ THESE INSTRUCTIONS CAREFULLY AND KEEP THEM
Walker with range of motion
DECLARATION OF CONFORMITY
As the manufacturer, ORTHOSERVICE AG declares, under its sole responsibility, that this is a class I medical device that
has been manufactured and assessed, according to the EU Regulation 2017/745 (MDR). These instructions have been
drawn up in application of the aforementioned Regulation. They are intended to ensure an adequate and safe use of the
medcal device.
TRADEMARKS OF MATERIALS
Velcro®is a registered trademark of Velcro Industries B.V.
SAFETY PRECAUTIONS
We recommend that the pressure exerted by the device does not act on parts of the body with wounds, swelling, or
welts. It is advisable to not over tighten the device so as to avoid generating areas of excessive local pressure or
the compression of underlying nerves and/or blood vessels. Furthermore, we recommend wearing a garment to avoid
direct contact with the skin. If in doubt on how to apply the device, contact a doctor, physiotherapist, or an orthopedic
technician. Read the product composition on the internal label carefully or strong electromagnetic elds.
We recommend to not wear the device in the proximity of free ames or strong electromagnetic elds. Do not apply in
direct contact with open wounds.
WARNINGS
It is advisable that the device, designed for the specic indications as set out below, be prescribed by a doctor or a
physiotherapist and applied by an orthopedic technician, according to the specic needs of the patient.
To ensure effectiveness, tolerability, and proper functioning, the application must be carried out with the utmost care.
Never alter the adjustment made by the doctor/physiotherapist/ or orthopedic technician. The responsibilities of the
manufacturer shall lapse in case of inappropriate use or adaptation.
The orthosis is made and to be used by only one patient. Should the orthosis be inappropriately used, the manufacturer
declines all responsibility, as provided by the regulation for medical devices.In hypersensitive individuals, direct
contact with the skin may cause redness and irritation.
In case of pain, swelling, welts, or any other adverse reaction, contact your doctor immediately, and in case of a
particularly severe adverse event, report the incident to the manufacturer and the competent authority of your country.
The effectiveness of the orthopedic product is only guaranteed when all the components are properly in use.
SELECTION/SIZE
MAINTENANCE
Do not bleach No chemical cleaning
Do not iron Do not tumble-dry
Washing instructions:
- Padding: Wash by hand in lukewarm water (max. 30°C) with neutral soap; rinse thoroughly. Dry away from heat
sources
- Rigid parts: Clean with a sponge soaked in lukewarm water (max. 30°C) and neutral soap. Dry with a cloth.
Do not dispose of the product or any of its components into the environment..
INDICATIONS
• Malleolar fractures conservative treatment
• Grade 3 ankle sprains
• Post-surgical care for osteosynthesis of malleolar fractures, ankle ligament recontruction and Achilles tendon
tenorraphy
• Walking recovery in consolidation delay of tibial fractures
• Charcot foot
CONTRAINDICATIONS
The application of this protector is advised only when it is documented that the fracture is stable and there are
acceptable limits of angular and rotational misalignments.
CHARACTERISTICS AND MATERIALS
• Structure made of durable, light plastic
• Non-slip rubber sole
• Inner padding of the sole made of non-toxic Evazote®
• Struts with Velcro for padding grip
• Soft foam pad with double lining in brushed nylon for Velcro® grip
• Velcro® fastening tapes
• Washable padding
ADAPTING FOR THE DOCTOR / TECHNICIAN
1 Undo the Velcro® straps and remove the inner padding from the boot. Insert the foot into the padding. Pay attention
to ensure that the padding is positioned at the rear of the heel.
2 First close the foot section and then close the calf section of the padding using the Velcro® fastener (g. A). The
pad must be snug the full length but the blood circulation may not be hampered.
3 Set the joint as described on the next pages.
4 Open the shells with both hands and pull the boot over the padding. Align the shells with the centre axis of the calf
(g. B). If need be, additional pads may be used to ensure better hold and optimum comfort for the wearer.
5 Secure the pad using the Velcro® faster of the shells. To do this, remove the separating plastic strip by pulling
upwards (g. C).
6 Secure the Velcro® straps of the boot. First close the straps at the toe, and then the others one after another,
working from bottom to top (g. D-E).
SETTING THE JOINTS
1 Rotate the plastic cover to open (g. 1).
2 Rotate the cover to the Allen head screw and loosen the screw with the appropriate key (g. 2).
3 Setting the dorsal exion (g. 3): Rotate the cover until the opening is positioned over the exion lock and pull out
the pin. Rotate the cover and the pin to the opening with the desired degree of exion (shown on the mechanism)
and insert the pin at this position.
4 Setting the plantar exion (g. 4): Rotate the cover until the opening is positioned over the extension lock and
pull out the pin. Rotate the cover and the pin to the opening with the desired degree of extension (shown on the
mechanism) and insert the pin at this position.
5 Close the plastic cover again.
6 If the brace is to be locked fully, set the pins for dorsal and plantar exion to the same degree and tighten the Allen
head screw.
Codice REF. 600
Taglia S M L
Misura scarpa 36/39
39/44 44/47
Flessione plantare 0° - 7,5° - 15° - 22,5° - 30° - 37.5° - 45°
Flessione dorsale 0° - 7,5° - 15° - 22,5° - 30° - 37.5° - 45°
Colore nero
ambidestro
Art.-Nummer REF. 600
Größen S M L
Schuhgröße 36/39
39/44 44/47
Plantarexion 0° - 7,5° - 15° - 22,5° - 30° - 37.5° - 45°
Dorsalexion 0° - 7,5° - 15° - 22,5° - 30° - 37.5° - 45°
Farbe schwarz
beidseitig anwendbar
Code REF. 600
Size S M L
Shoe size 36/39
39/44 44/47
Plantar exion 0° - 7,5° - 15° - 22,5° - 30° - 37.5° - 45°
Dorsal exion 0° - 7,5° - 15° - 22,5° - 30° - 37.5° - 45°
Colour black
ts right and left
A B
4
1
3
2
C
E
D