Ortur 4 V2 User manual

Dongguan Ortur Intelligent Technologies Co., Ltd.
www.ortur3d.com www.ortur3dprinter.com
No.27, Second Industrial Park, Heshi Road, Qiaotou Town, Dongguan 523527, Guandong Province, China
Ortur4 V2: Bed Leveling Manual
※Manually level the bed prior to setting up auto-leveling!
Step 1. Using both hands, turn the Z-axis couplers at the same time to raise the X-axis. Place the two
included wooden horizontal blocks, one on each side,under the X-axis and lower the X-axis (turn the
Z-axis couplers the other direction) until it rests on both blocks. This ensures that your X-axis gantry is
properly squared with the frame.
Step 2. Power on the printer and using the control knob navigate to “Motion→Move axis→Move
Z→Move 1mm” and turn the knob clockwise. Remove the two wooden horizontal blocks and navigate to
“Motion→Auto Home” (the print head will return to the home position at X:-11, Y:-9, Z:0).
Dongguan Ortur Intelligent Technologies Co., Ltd.
www.ortur3d.com www.ortur3dprinter.com
No.27, Second Industrial Park, Heshi Road, Qiaotou Town, Dongguan 523527, Guandong Province, China
Step 3. Press the reset button (located under the control knob) to disable the X and Y motors. Manually
move the print head by hand to each of the four corners of the hotbed, then adjust the leveling knob to set
the distance between the nozzle and hotbed to be approximately 0.1mm. Note that turning the leveling knob
clockwise with raise the bed (decrease the distance between the nozzle and hotbed), while turning
counter-clockwise will lower the bed (increase the distance between the nozzle and the hotbed).
A standard piece of A4 printer paper is 0.1mm thick. Slide a piece of A4 paper between the nozzle and the
hotbed until you feel slight resistance but are still able to slide the paper without it folding. Each adjustment
can potentially impact the other corners, so we recommend doing this twice.
Step 4. Place a roll of filament on the spool holder, cut the filament at a 45° angle, pass it through the
filament sensor and extruder, and continue until it reaches the print head (ensure the filament tube is flush
with the bottom of the hotend assembly to avoid filament leaks or clogs).
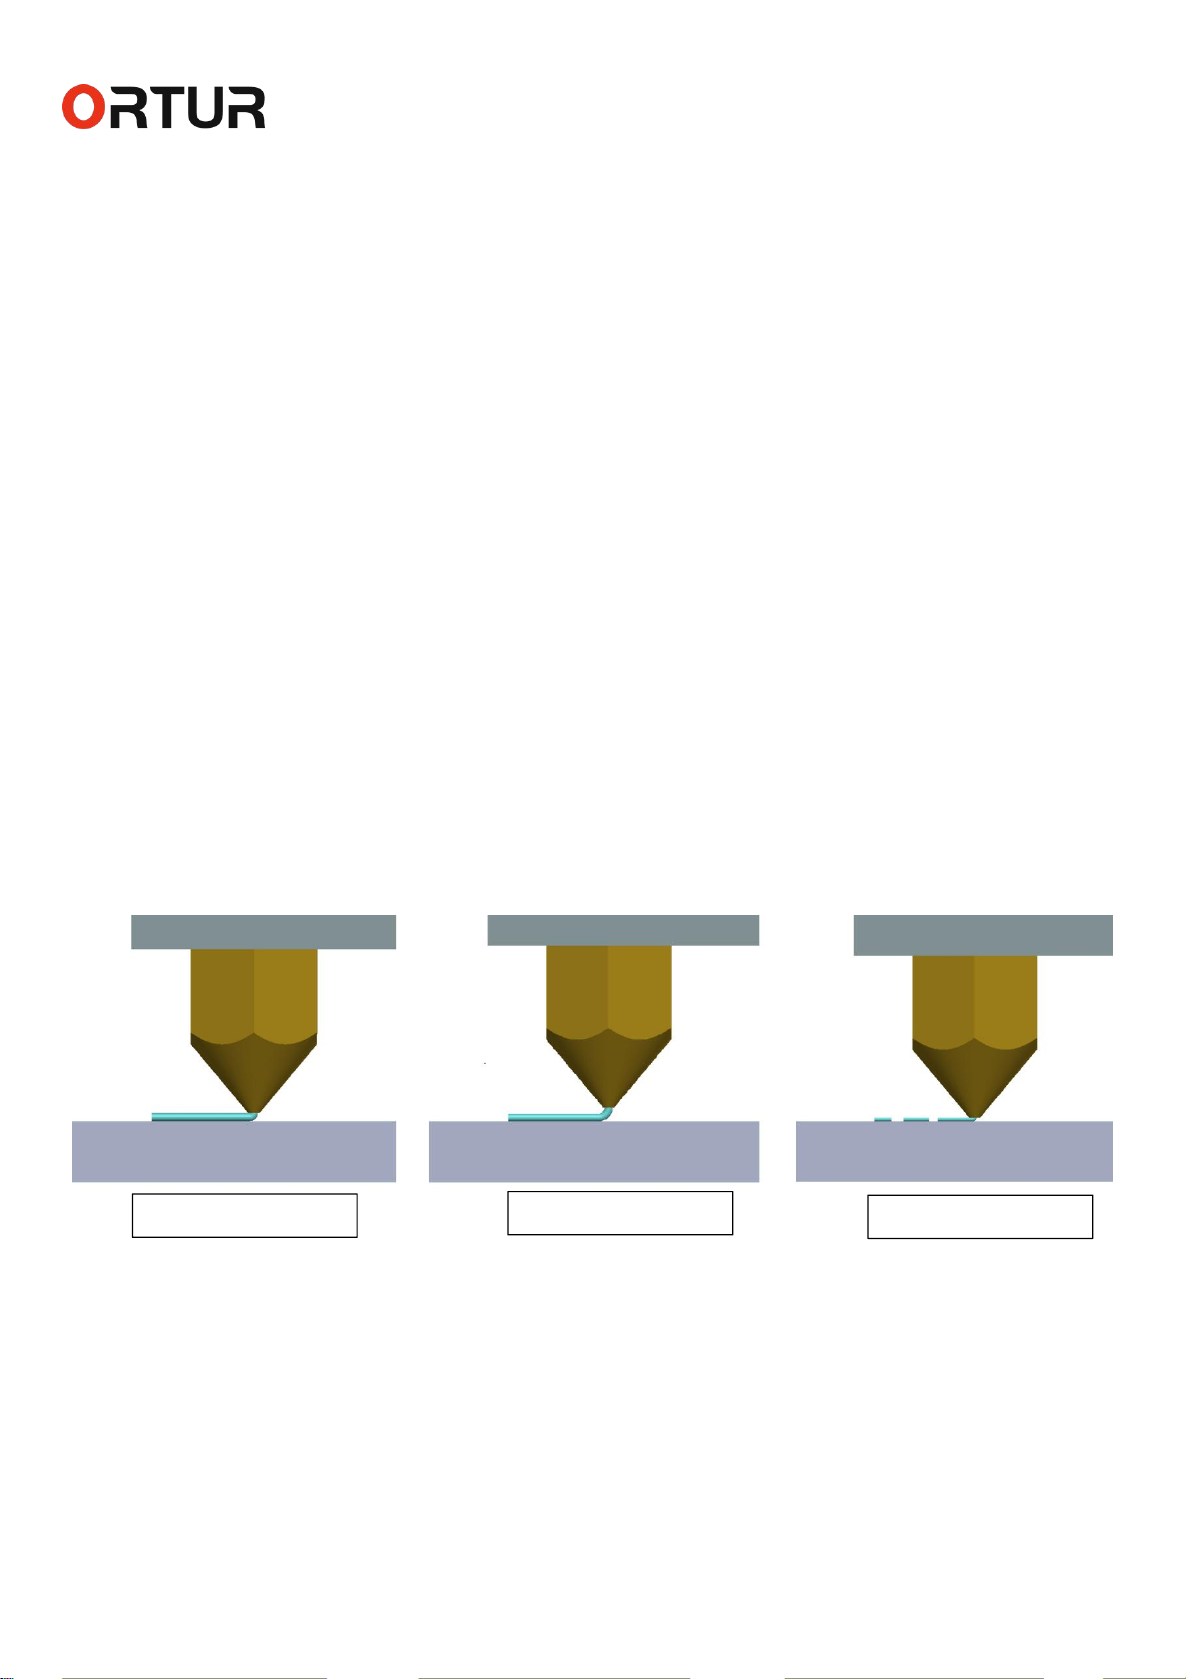
Step 5. Please insert the supplied MicroSD card into the slot, then using the control knob, navigate to “Print
with SD”. Select the Testing Gcode File to ensure the printer operates properly. The images below can be
used as a reference to determine if you have appropriately set the nozzle height and achieved the correct
amount of “squish” with your filament.
Perfect Distance
Nozzle is too high
Nozzle is too close

Dongguan Ortur Intelligent Technologies Co., Ltd.
www.ortur3d.com www.ortur3dprinter.com
No.27, Second Industrial Park, Heshi Road, Qiaotou Town, Dongguan 523527, Guandong Province, China
※Auto bed leveling can compensate for minor heated bed inconsistencies.
Step 1. Power on the printer and depress the control knob to access the main menu. Navigate to
“Configuration→Advanced Settings→Initialize EEPROM→Initialize EEPROM” to ensure the
EEPROM is initialized.
Step 2. Press the reset button to return to the main menu. Navigate to “Auto Home”, and then disable the
stepper motors by selecting “Disable Steppers”. Navigate to “Move Axis→ Soft Endstops” and turn soft
endstops off (change from On to Off). Turn the knob to select “Move Z→ Move 0.1mm” and raise the print
head 3-5MM about the hotbed. Using your hands, gently move the extruder head to the center of the bed.

Dongguan Ortur Intelligent Technologies Co., Ltd.
www.ortur3d.com www.ortur3dprinter.com
No.27, Second Industrial Park, Heshi Road, Qiaotou Town, Dongguan 523527, Guandong Province, China
Step 3. Turn the control knob to move the Z-axis in 0.1mm increments to move down the extruder head
towards the hotbed until the Auto-Leveling sensor illuminates and take note of the Z coordinate value. For
example, in the screenshot below, this Z coordinate value is +2.6mm (note that this may vary from your
printer).
Step 4. Continue to turn the control knob to move the Z-axis in 0.1mm increments until the nozzle touches
the hotbed and take note of this Z coordinate value. For example, in the screenshot below, this Z coordinate
value is at 2.1mm (again, this example might vary from your printer).
Step 5. To calculate the Z-Offset value, the Formula is:
Z-Offset value = Z coordinate value of nozzle - Z coordinate value of Auto-leveling sensor + 0.1mm
(adding back 0.1mm helps to replicate the piece of paper normally used to level the bed)
In this example, it would be 2.1mm - 2.6mm + 0.1mm = -0.4mm. Note that this value is negative; this is
because the nozzle is closer to the bed than the sensor. Remember that “-0.4mm” is just an example and
your individual results may vary.
Step 6. Return to the previous menu and click the “Soft Endstops” option to turn soft endstops back on.

Dongguan Ortur Intelligent Technologies Co., Ltd.
www.ortur3d.com www.ortur3dprinter.com
No.27, Second Industrial Park, Heshi Road, Qiaotou Town, Dongguan 523527, Guandong Province, China
Step 7. Go back and select “Bed Leveling → Auto Home” to home all axes. Scroll down and select the
“Probe Z Offset” option, and turn the knob to adjust the Z-Offset Value to be the value we calculated above,
for example, it’s -0.4mm for this printer.
Step 7. When the correct Z-Offset value is set, please go back and select the “Store Settings” option to store
the value. Press the Reset Button to reset the printer!
(if you are not receiving good adhesion or proper filament “squish”, you can return to this menu to fine tune
the Z-Offset value until you are satisfied with the results)
Step 8. Return to the main menu and navigate to “Motion→Bed Leveling→Level Bed”. The hotend
assembly will now move and map 25 different locations on the hotbed to determine the precise difference in
height between the sensor and the hotbed. This “map” will allow the printer to compensate for differences
in leveling or imperfections in the flatness of the bed. After the Auto-leveling sensor has completed probing,
click the “Store Settings” option to save the values.
Congratulations! You have successfully setup auto leveling and are ready to print. Please go to the main
menu and click the “Print from SD” menu to choose a Gcode file and start your 3d print.
Other manuals for 4 V2
1
Table of contents
Other Ortur 3D Printer manuals


