Ortur Ortur-4 User manual

Dongguan Ortur Intelligent Technologies Co., Ltd.
www.ortur3d.com www.ortur3dprinter.com
No.27, Second Industrial Park, Heshi Road, Qiaotou Town, Dongguan 523527, Guandong Province, China
1
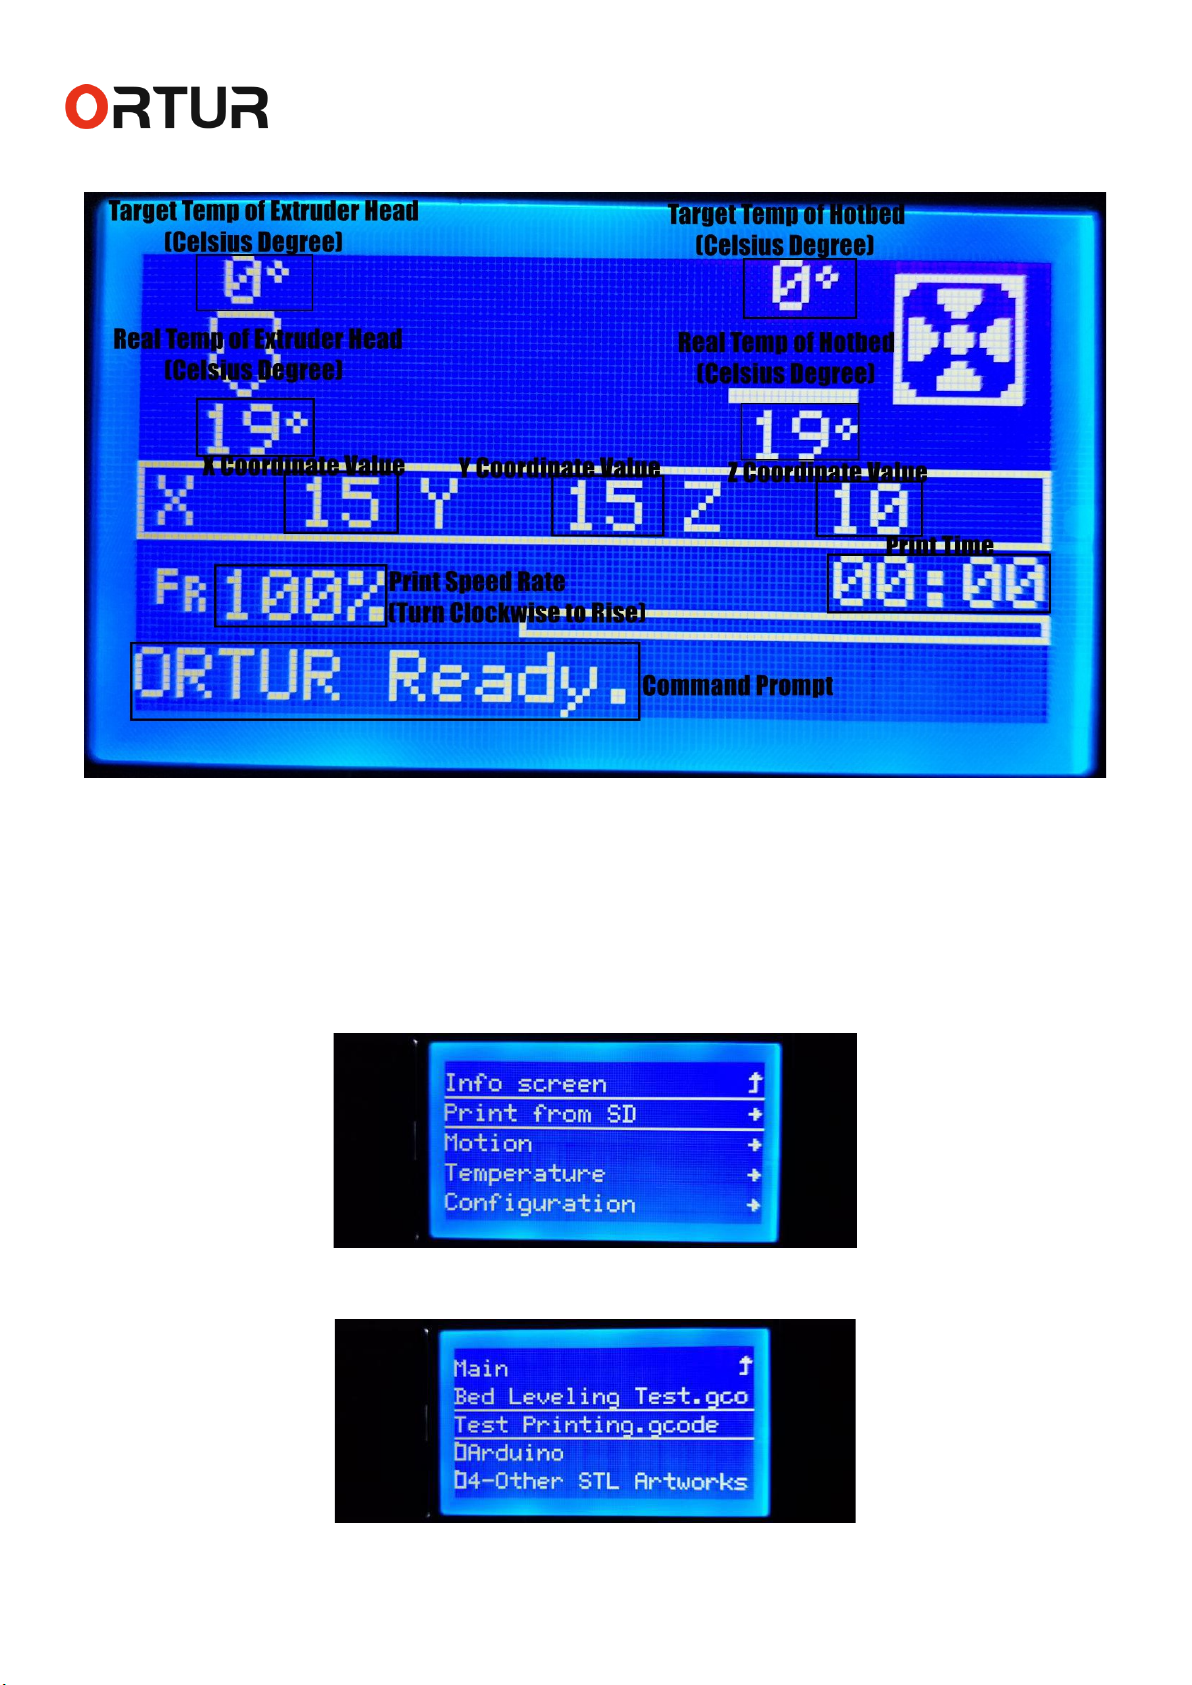
Operation Manual of Ortur-4
Phase 1: The Operation Menu Before Printing:
1. “Print from SD” Menu:-----------------------------------------------------------------------------------------------------------------3
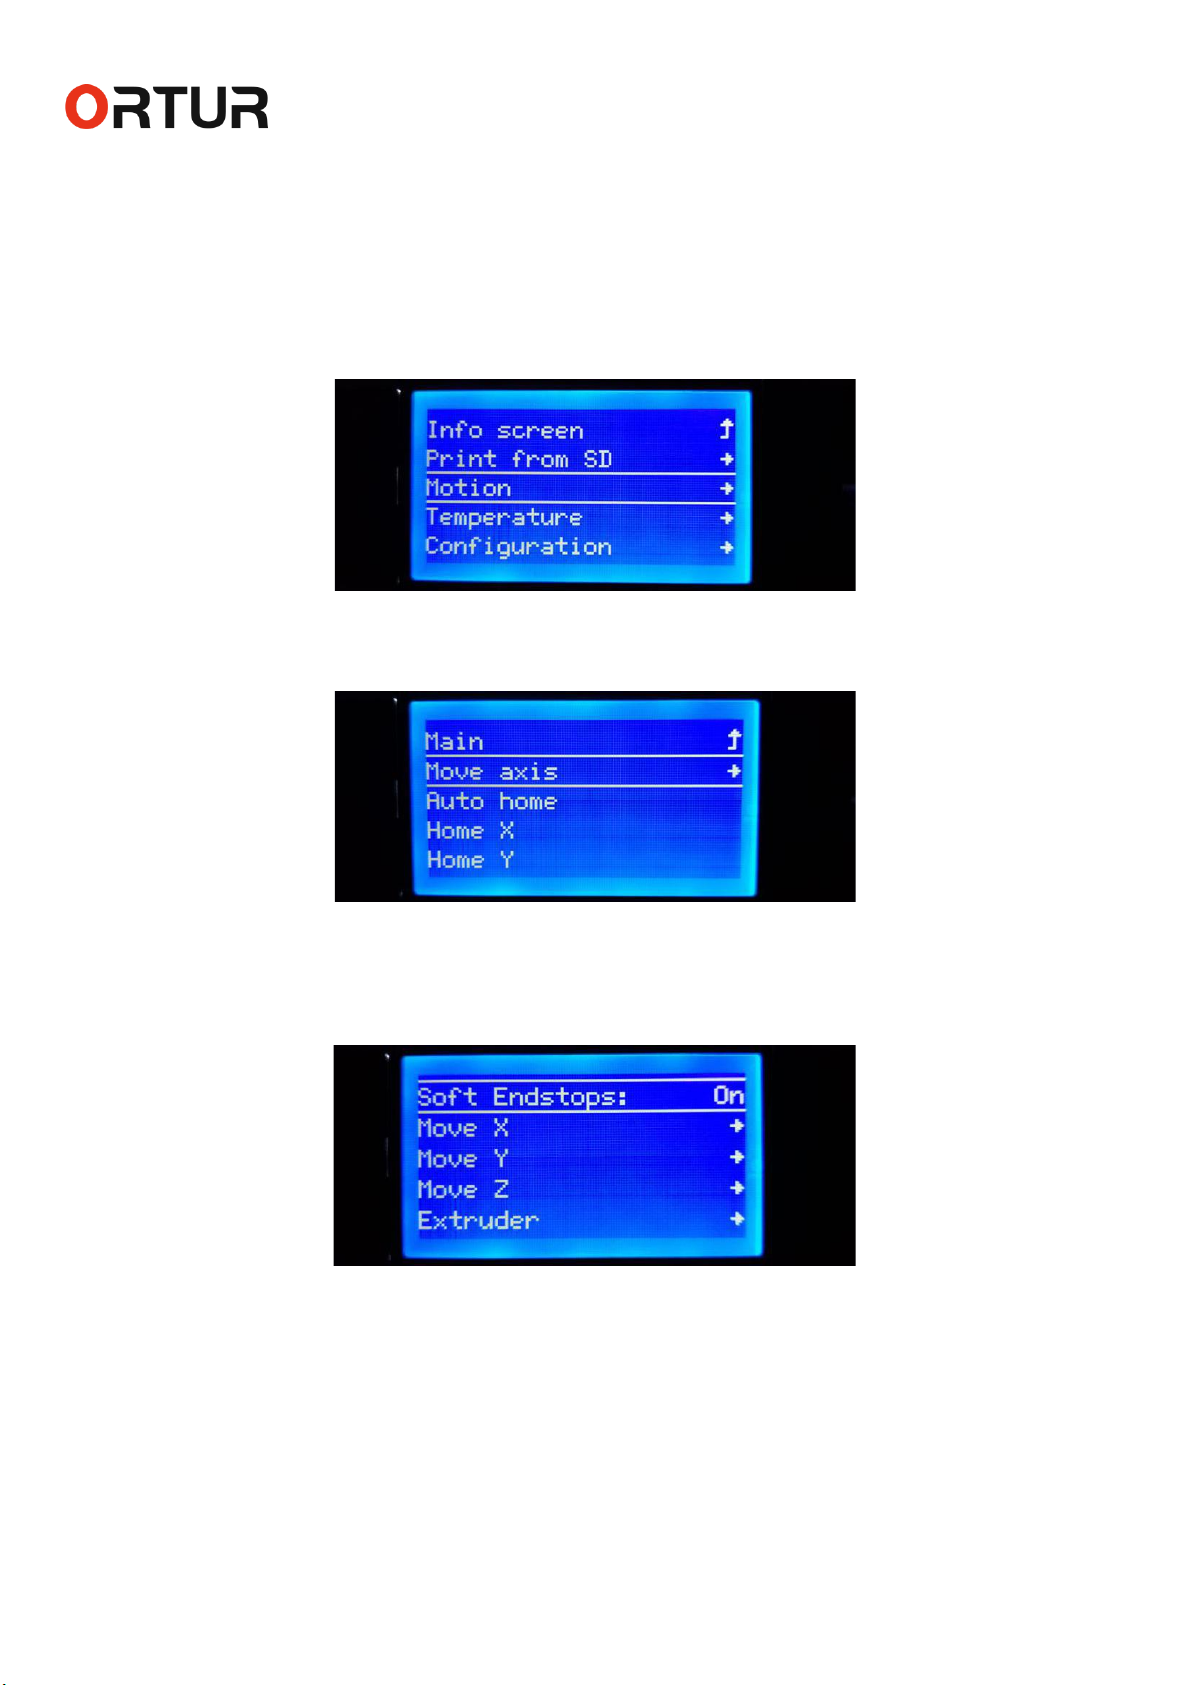
2. “Motion” Menu:-------------------------------------------------------------------------------------------------------------------------4
2.1 “Move axis” Menu: -------------------------------------------------------------------------------------------------------------------4
2.1.1 “Soft Endstops” Option:-----------------------------------------------------------------------------------------------------------4
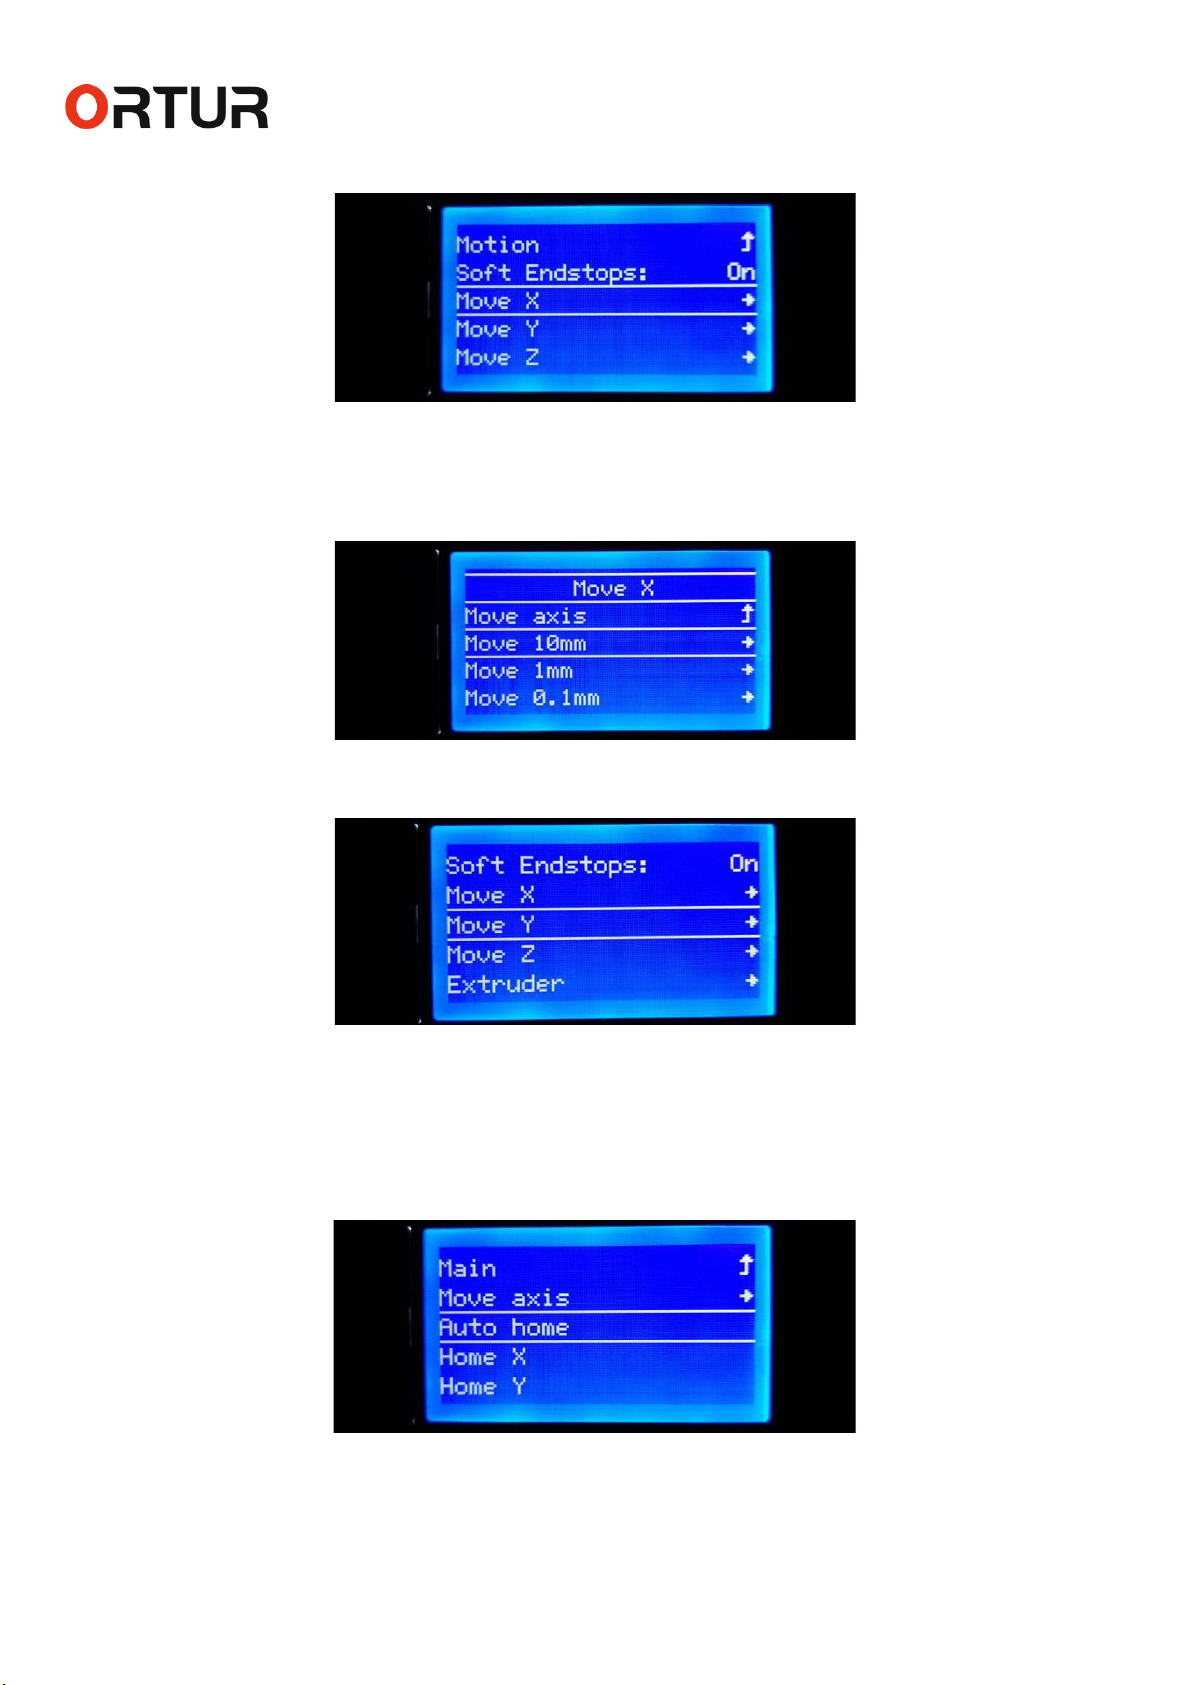
2.1.2 “Move X” Menu:---------------------------------------------------------------------------------------------------------------------5
2.1.3 “Move Y” Menu + 2.1.4 “Move Z” Menu+ 2.1.5 “Extruder” Menu:--------------------------------------------------------5
2.2 “Auto home” Command:-----------------------------------------------------------------------------------------------------------5
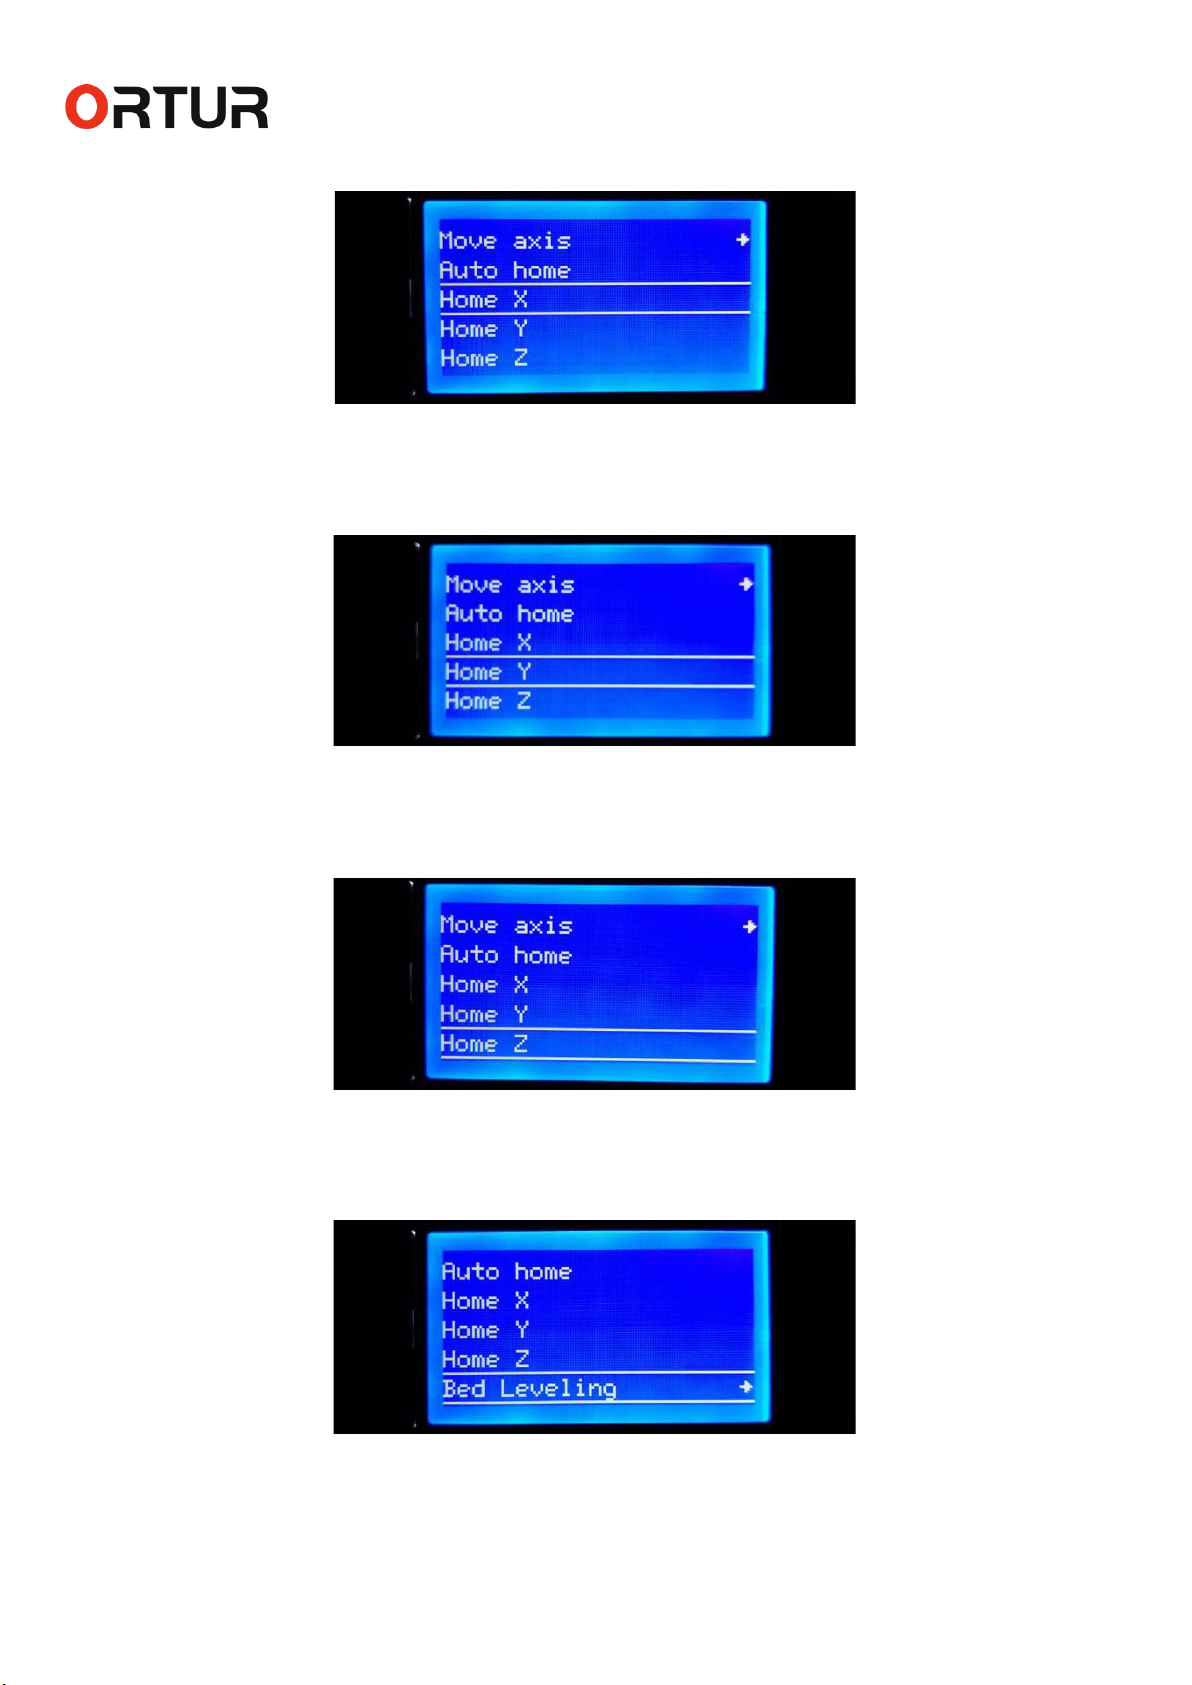
2.3 “Home X” Command:----------------------------------------------------------------------------------------------------------------6
2.4 “Home Y” Command:----------------------------------------------------------------------------------------------------------------6
2.5 “Home Z” Command:----------------------------------------------------------------------------------------------------------------6
2.6 “Bed Leveling” Menu:---------------------------------------------------------------------------------------------------------------6
2.6.1 “Auto Home” Command:----------------------------------------------------------------------------------------------------------7
2.6.2 “Level bed” Command:-----------------------------------------------------------------------------------------------------------7
2.6.3 “Edit Mesh” Menu:-----------------------------------------------------------------------------------------------------------------7
2.6.4 “Bed Leveling” Option:-----------------------------------------------------------------------------------------------------------8
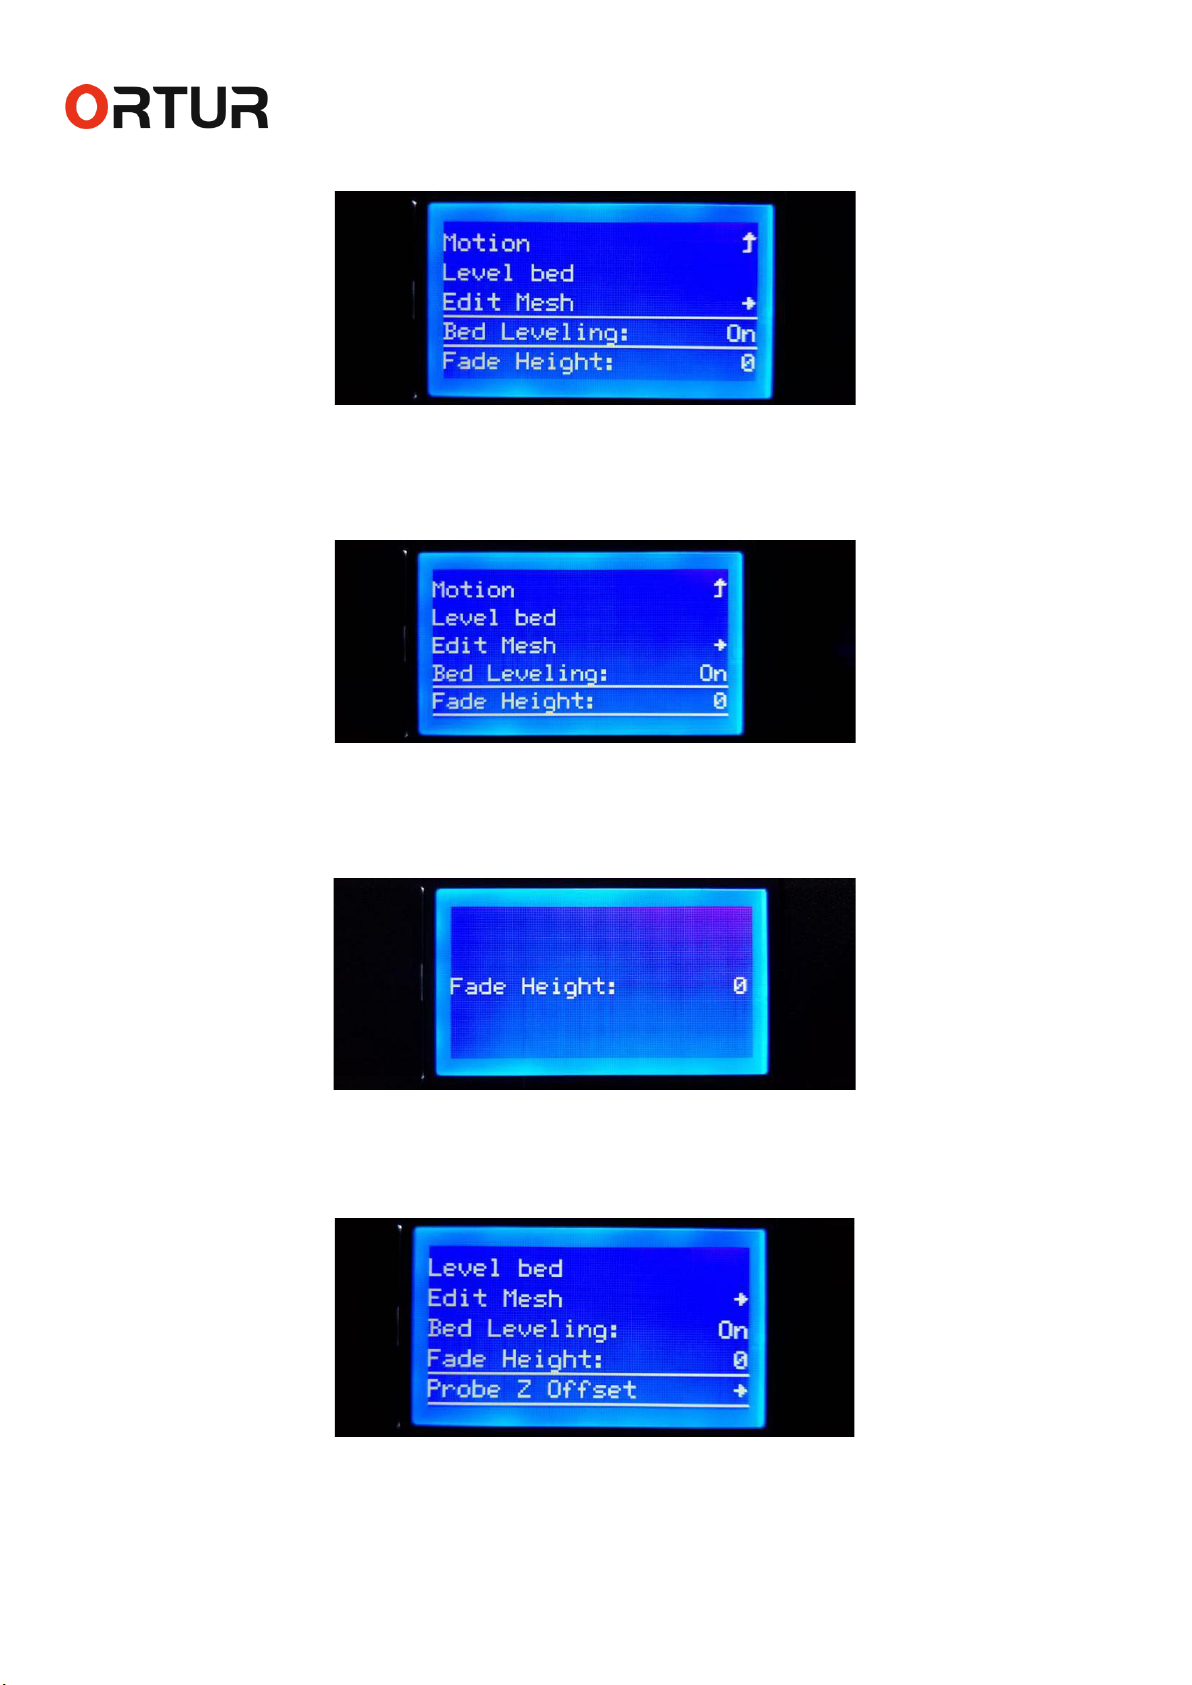
2.6.5 “Fade Height” Menu:--------------------------------------------------------------------------------------------------------------8
2.6.6 “Probe Z Offset” Menu:-----------------------------------------------------------------------------------------------------------8
2.6.7 “Load setting” Command:-------------------------------------------------------------------------------------------------------9
2.6.8 “Store setting” Command:------------------------------------------------------------------------------------------------------9
2.7 “Disable Steppers” Command:---------------------------------------------------------------------------------------------------9
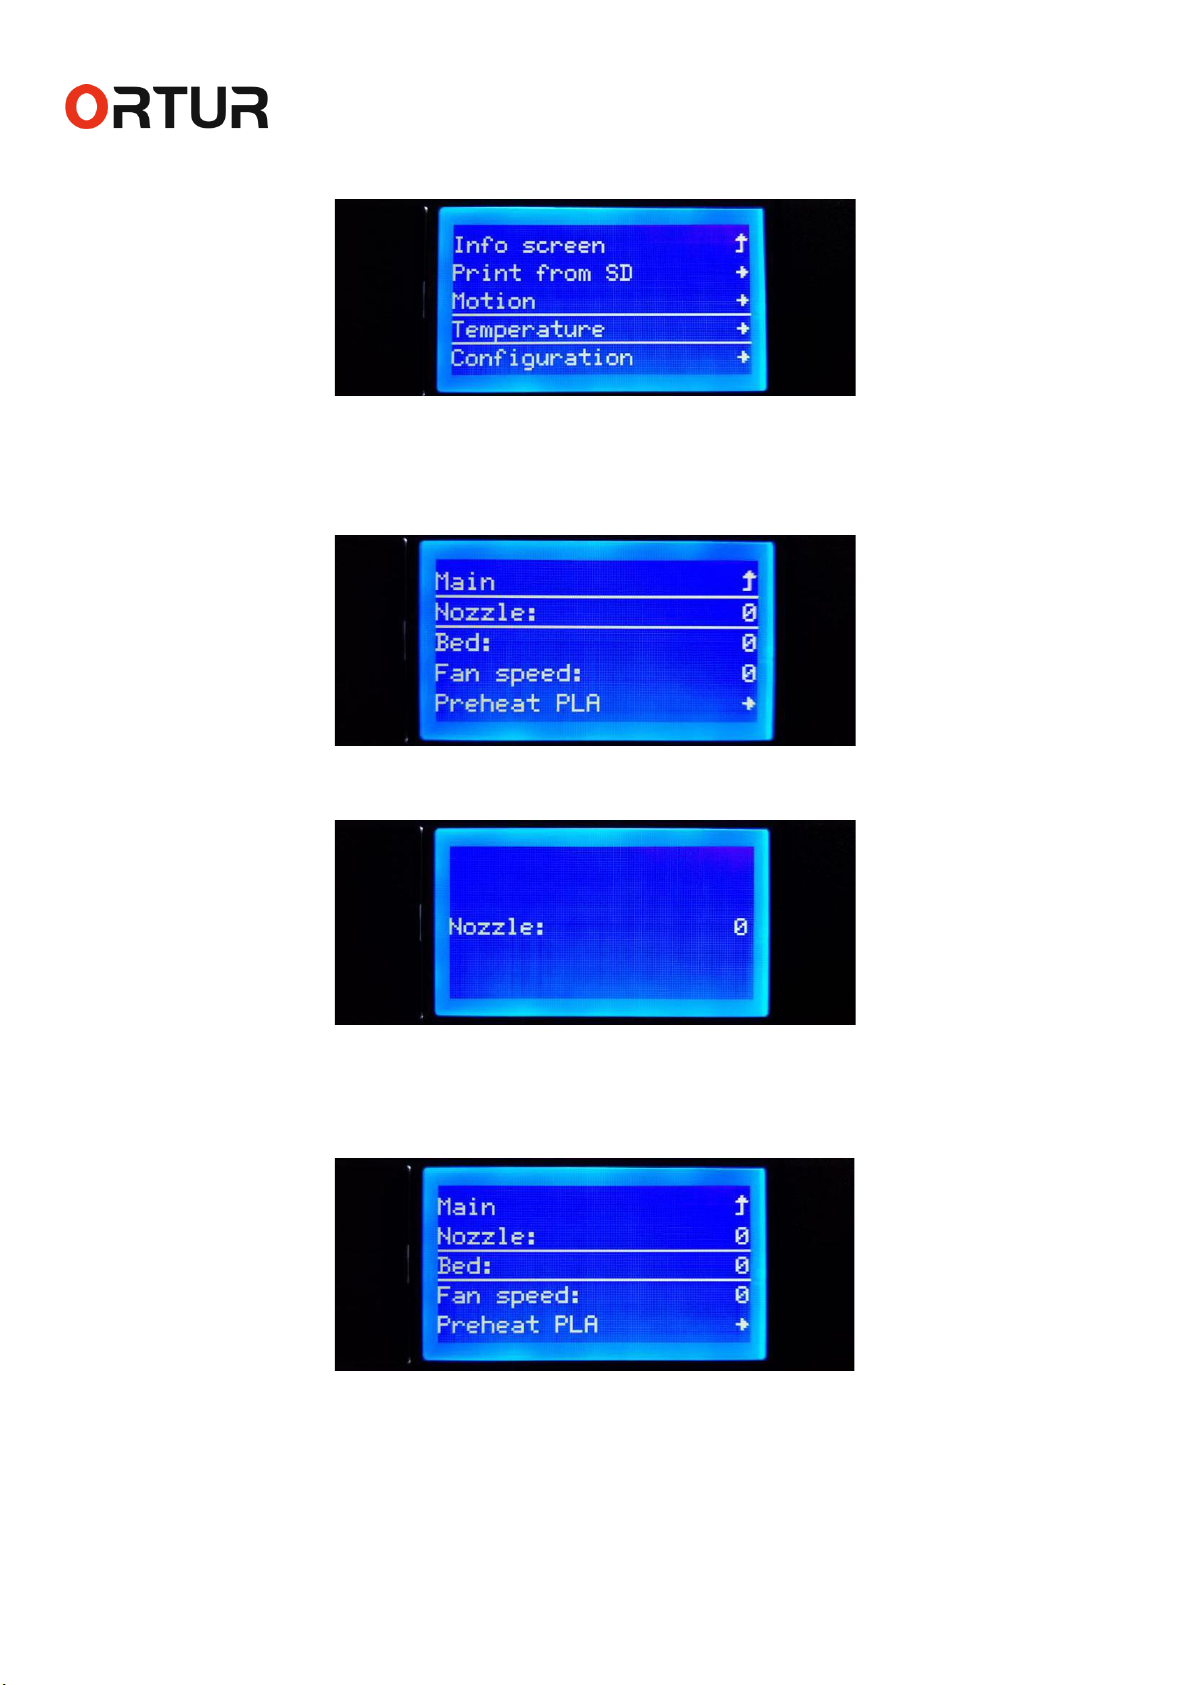
3. “Temperature” Menu:---------------------------------------------------------------------------------------------------------------10
3.1 “Nozzle” Menu:-----------------------------------------------------------------------------------------------------------------------10
3.2 “Bed” Menu:--------------------------------------------------------------------------------------------------------------------------10
3.3 “Fan speed” Menu:------------------------------------------------------------------------------------------------------------------11
3.4 “Preheat PLA” Menu:---------------------------------------------------------------------------------------------------------------11
3.4.1 “Preheat PLA” Command:-------------------------------------------------------------------------------------------------------12
3.4.2 “Preheat PLA End” Command:-------------------------------------------------------------------------------------------------12
3.4.3 “Preheat PLA Bed” Command:------------------------------------------------------------------------------------------------12
3.5 “Preheat ABS” Menu:--------------------------------------------------------------------------------------------------------------13
3.5.1 “Preheat ABS” Command + 3.5.2 “Preheat ABS End” Command + 3.5.3 “Preheat ABS Bed” Command:---13
4. “Configuration” Menu:--------------------------------------------------------------------------------------------------------------13
4.1 “Advanced Settings” Menu:------------------------------------------------------------------------------------------------------13
4.1.1 “Probe Z Offset” Menu:-----------------------------------------------------------------------------------------------------------14
4.1.2 “Set home offsets” Command:------------------------------------------------------------------------------------------------14

Dongguan Ortur Intelligent Technologies Co., Ltd.
www.ortur3d.com www.ortur3dprinter.com
No.27, Second Industrial Park, Heshi Road, Qiaotou Town, Dongguan 523527, Guandong Province, China
2
4.1.3 “Velocity” Menu:------------------------------------------------------------------------------------------------------------------14
4.1.4 “Acceleration” Menu:------------------------------------------------------------------------------------------------------------14
4.1.5 “Jerk” Menu:------------------------------------------------------------------------------------------------------------------------15
4.1.6 “Steps/mm” Menu:---------------------------------------------------------------------------------------------------------------15
4.1.7 “Temperature” Menu:------------------------------------------------------------------------------------------------------------15
4.1.8 “Filament” Menu:-----------------------------------------------------------------------------------------------------------------15
4.1.9 “Initialize EEPROM” Menu:------------------------------------------------------------------------------------------------------16
4.2 “Runout Sensor” Option:----------------------------------------------------------------------------------------------------------16
4.3 “Outage Recovery” Option:------------------------------------------------------------------------------------------------------16
4.4 “Preheat PLA configuration” Menu:--------------------------------------------------------------------------------------------17
4.5 “Preheat ABS Configuration” Menu:-------------------------------------------------------------------------------------------17
4.6 “Store setting” Command:-------------------------------------------------------------------------------------------------------18
4.7 “Load setting” Command:--------------------------------------------------------------------------------------------------------18
4.8 “Restore failsafe” Command:---------------------------------------------------------------------------------------------------18
5. “Change filament” Menu:----------------------------------------------------------------------------------------------------------18
5.1 “Preheat PLA” Command:---------------------------------------------------------------------------------------------------------19
5.2 “Preheat ABS” Command:--------------------------------------------------------------------------------------------------------21
5.3 “Preheat Custom” Command:---------------------------------------------------------------------------------------------------21
Phase 2: The Operation Menu During Printing:
6. “Pause print” Command:----------------------------------------------------------------------------------------------------------22
7. “Stop print” Menu:-------------------------------------------------------------------------------------------------------------------22
8. “Tune” Menu:--------------------------------------------------------------------------------------------------------------------------23
8.1 “Speed” Menu:----------------------------------------------------------------------------------------------------------------------23
8.2 “Nozzle” Menu:----------------------------------------------------------------------------------------------------------------------23
8.3 “Bed” Menu:-------------------------------------------------------------------------------------------------------------------------24
8.4 “Fan speed” Menu:-----------------------------------------------------------------------------------------------------------------24
8.5 “Flow” Menu:------------------------------------------------------------------------------------------------------------------------25
8.6 “Babystep X” Menu:---------------------------------------------------------------------------------------------------------------25
8.7 “Babystep Y” Menu:----------------------------------------------------------------------------------------------------------------26
8.8 “Probe Z Offset” Menu:------------------------------------------------------------------------------------------------------------26
9. “Configuration” Menu:--------------------------------------------------------------------------------------------------------------27
10. “Change filament” Command:---------------------------------------------------------------------------------------------------27

Dongguan Ortur Intelligent Technologies Co., Ltd.
www.ortur3d.com www.ortur3dprinter.com
No.27, Second Industrial Park, Heshi Road, Qiaotou Town, Dongguan 523527, Guandong Province, China
3
Info Screen:
When Ortur-4 3D Printer is working, You would see this Info Screen.
And when you press the Control Button, you could go to the Main Menu to operate this printer.
Phase 1: The Operation Menu Before Printing:
1. “Print from SD” Menu:
In the Main Menu, the First Submenu is “Print from SD”, You could press the Control Button to go to this
menu.

Dongguan Ortur Intelligent Technologies Co., Ltd.
www.ortur3d.com www.ortur3dprinter.com
No.27, Second Industrial Park, Heshi Road, Qiaotou Town, Dongguan 523527, Guandong Province, China
4
In the “Print from SD” Menu, you would find the Gcode files, you had saved in the SD card. Please turn
clockwise or anticlockwise the Control Button to choose the Gcode file, you’d like to print. And then, press
the Control Button to start the print.
PS, Before the printing, please make sure you have leveled the X Axis and Hotbed. Otherwise, the printer
may be damaged !
2. “Motion” Menu:
In the Main Menu, the Second Submenu is “Motion”, You could press the Control Button to go to this menu.
2.1 “Move axis” Menu:
In the “Motion” Menu, the First Option is the “Move axis” Menu, You could press the Control Button to go to
this menu.
2.1.1 “Soft Endstops” Option:
In the “Move axis” Menu, the First Option is “Soft Endstops” Option, You could press the Control Button to
turn on tor turn off the “Soft Endstops” Function.
PS. When “Soft Endstops” turn on, the motors wouldn’t move the axes to the negative coordinate value.
So, if XYZ End stops are bad, this Command would protect the printer, wouldn’t let the XYZ motors keep
driving the XYZ axes and damaging the printer.

Dongguan Ortur Intelligent Technologies Co., Ltd.
www.ortur3d.com www.ortur3dprinter.com
No.27, Second Industrial Park, Heshi Road, Qiaotou Town, Dongguan 523527, Guandong Province, China
5
2.1.2 “Move X” Menu:
In the “Move axis” Menu, the Second option is “Move X” Menu, You could press the Control Button to go to
this menu.
And then, you could choose the “Move 10mm”, “Move 1mm” and “Move 0.1mm” Commands.
It sands for different displacement distances, would let the X motor move 10mm, 1mm and o.1mm.
2.1.3 “Move Y” Menu + 2.1.4 “Move Z” Menu+ 2.1.5 “Extruder” Menu:
It’s same operation as the “Move X” Menu.
PS. If you want to move the Extruder Motor, you need to preheat the Hotend first, so that the filament could
be removed from extruder head.
2.2 “Auto home” Command:
In the “Motion” Menu, the Second Option is the “Auto home” Command, You could press the Control Button
to let the XYZ Axes go back Home (X:0, Y:0, Z:0) automatically.

Dongguan Ortur Intelligent Technologies Co., Ltd.
www.ortur3d.com www.ortur3dprinter.com
No.27, Second Industrial Park, Heshi Road, Qiaotou Town, Dongguan 523527, Guandong Province, China
6
2.3 “Home X” Command:
In the “Motion” Menu, the Third Option is the “Home X” Command, You could press the Control Button to only
let the X Axis go back Home (X:0).
2.4 “Home Y” Command:
In the “Motion” Menu, the Fourth option is the “Home Y” command, Press the control button to only let the Y
axis go back Home (Y:0).
2.5 “Home Z” Command:
In the “Motion” Menu, the Fifth Option is the “Home Z” Command, You could press the Control Button to only
let the Z Axis go back Home (Z:0).
2.6 “Bed Leveling” Menu:
In the “Motion” Menu, the Sixth Option is the “Bed Leveling” Menu, You could press the Control Button to go
to this menu.

Dongguan Ortur Intelligent Technologies Co., Ltd.
www.ortur3d.com www.ortur3dprinter.com
No.27, Second Industrial Park, Heshi Road, Qiaotou Town, Dongguan 523527, Guandong Province, China
7
2.6.1 “Auto Home” Command:
Before you activate the Auto Bed Leveling Function, You need to press the Control Button to do the “Auto
home” firstly.
2.6.2 “Level bed” Command:
In the “Bed Leveling” Menu, the Second Option is “Level Bed” Command. You could press the Control Button
to let the sensor probe the Levelness of the Hotbed.
If the hotbed is moved, you should let the Sensor to probe the Hotbed again, After 25 points probed, Please
remember to press the “Store Setting” again.
2.6.3 “Edit Mesh” Menu:
In the “Bed Leveling” Menu, the Third Option is “Edit Mesh” Menu, You could press the Control Button to go
to “Edit Mesh” Menu. Then, you could adjust the Z value of any point by hand.
PS. Usually, it would be too complex and useless for the normal users, so, you could just do the Second
option “Level Bed” Command, and ignore this menu.

Dongguan Ortur Intelligent Technologies Co., Ltd.
www.ortur3d.com www.ortur3dprinter.com
No.27, Second Industrial Park, Heshi Road, Qiaotou Town, Dongguan 523527, Guandong Province, China
8
2.6.4 “Bed Leveling” Option:
In the “Bed Leveling” Menu, the Fourth Option is “Bed Leveling” Option, You could press the Control Button
to turn on or turn off the “Bed Leveling” Function .
2.6.5 “Fade Height” Menu:
In the “Bed Leveling” Menu, the Fifth Option is “Fade Height” Menu, You could press the Control Button to go
to this menu.
And then, you could turn clockwise or anticlockwise to adjust the Height, that the “Bed Leveling” Function
would be available during this Height.
PS. If let the Fade Height to be “0”, the “Bed Leveling” would be available during the whole printing. And it
recommend to let the height to be “0” .
2.6.6 “Probe Z Offset” Menu:
In the “Bed Leveling” Menu, the Sixth Option is “Probe Z Offset” Menu, You could press the Control Button to
go to “Probe Z Offset” Menu. And then, you could turn clockwise or anticlockwise to adjust the Z Offset
Value.

Dongguan Ortur Intelligent Technologies Co., Ltd.
www.ortur3d.com www.ortur3dprinter.com
No.27, Second Industrial Park, Heshi Road, Qiaotou Town, Dongguan 523527, Guandong Province, China
9
PS. Please MUST take a look at the Manual of “How to set up the Auto-Leveling & Probe Z Offset Function”, So
that you could get know how to set up this Z Offset Value, it’s very important, otherwise, you may damage
the printer by wrong operation!
2.6.7 “Load setting” Command:
In the “Bed Leveling” Menu, the Seventh Option is “Load setting” Command. If you don’t want to activate
what you have just set up, please press “Load setting” to load the Setting, that you had stored at last time.
2.6.8 “Store setting” Command:
In the “Bed Leveling” Menu, the Seventh Option is “Store setting” Command. If you’re satisfied with the New
Setting, please press the Control Button to store setting.
2.7 “Disable Steppers” Command:
In the “Motion” Menu, the Seventh Option is the “Disable Steppers” Command, You could press the control
button to disable the steppers.
Then, the motors would stop working, and you could move the XZY axes by hand.

Dongguan Ortur Intelligent Technologies Co., Ltd.
www.ortur3d.com www.ortur3dprinter.com
No.27, Second Industrial Park, Heshi Road, Qiaotou Town, Dongguan 523527, Guandong Province, China
10
3. “Temperature” Menu:
In the Main Menu, the Third Submenu is “Temperature” Menu. You could press the Control Button to go to
this menu.
3.1 “Nozzle” Menu:
In the “Temperature” Menu, the First Option is “Nozzle” Menu. You could press the Control Button to go to
“Nozzle” Menu.
And then, you could turn clockwise or anticlockwise to adjust the Target Temperature of Nozzle. And press
the Control Button to preheat the Nozzle to this Temperature.
3.2 “Bed” Menu:
In the “Temperature” Menu, the Second Option is “Bed” Menu. You could press the Control Button to go to
this menu.

Dongguan Ortur Intelligent Technologies Co., Ltd.
www.ortur3d.com www.ortur3dprinter.com
No.27, Second Industrial Park, Heshi Road, Qiaotou Town, Dongguan 523527, Guandong Province, China
11
And then, you could turn clockwise or anticlockwise to adjust the Target Temperature of Hotbed. And press
the Control Button to preheat the Hotbed to this Temperature.
3.3 “Fan speed” Menu:
In the “Temperature” Menu, the Third Option is “Fan speed” Menu. You could press the Control Button to go
to this menu.
And then, you could turn clockwise or anticlockwise to adjust the Target Fan Speed of the Blower. And
press the Control Button to let the Blower Fan start working.
3.4 “Preheat PLA” Menu:
In the “Temperature” Menu, the Fourth Option is “Preheat PLA” Menu.
If the filament is PLA, you could go to this Menu to use these commands to preheat the PLA filament
directly.

Dongguan Ortur Intelligent Technologies Co., Ltd.
www.ortur3d.com www.ortur3dprinter.com
No.27, Second Industrial Park, Heshi Road, Qiaotou Town, Dongguan 523527, Guandong Province, China
12
3.4.1 “Preheat PLA” Command:
In the “Preheat PLA” Menu, the First Option is “Preheat PLA” Command. You could press this command, and
it would preheat both of Nozzle and Hotbed to the target temp for PLA filament.
PS. You could set up the Target Temperatures & Fan Speed in advance at {Configuration => Preheat PLA
Configuration}.
3.4.2 “Preheat PLA End” Command:
In the “Preheat PLA” Menu, the First Option is “Preheat PLA End” Command. Press this command, it would
only preheat the Nozzle to the target temp for PLA filament.
3.4.3 “Preheat PLA Bed” Command:
In the “Preheat PLA” Menu, the First Option is “Preheat PLA Bed” Command. Press this command, it would
only preheat the Hotbed to the target temp for PLA filament.

Dongguan Ortur Intelligent Technologies Co., Ltd.
www.ortur3d.com www.ortur3dprinter.com
No.27, Second Industrial Park, Heshi Road, Qiaotou Town, Dongguan 523527, Guandong Province, China
13
3.5 “Preheat ABS” Menu:
In the “Temperature” Menu, the Fifth Option is “Preheat ABS” Menu.
If the filament is ABS, you could go to this Menu to use these commands to preheat the ABS filament
directly.
3.5.1 “Preheat ABS” Command + 3.5.2 “Preheat ABS End” Command + 3.5.3 “Preheat ABS Bed” Command:
It’s same Operation as {“Preheat PLA” Command}.
4. “Configuration” Menu:
In the Main Menu, the Fourth Submenu is “Configuration” Menu. Press the Control Button to go to this
submenu.
4.1 “Advanced Settings” Menu:
In the “Configuration” Menu, the First Option is “Advanced Setting” Menu. Press the Control Button to go to
this menu.

Dongguan Ortur Intelligent Technologies Co., Ltd.
www.ortur3d.com www.ortur3dprinter.com
No.27, Second Industrial Park, Heshi Road, Qiaotou Town, Dongguan 523527, Guandong Province, China
14
4.1.1 “Probe Z Offset” Menu:
It’s same one as 2.6.6 “Probe Z Offset” Menu.
PS. Please MUST take a look at the manual of “How to set up the Auto-Leveling & Probe Z Offset Function”, So
that you could get know how to set up this Z Offset Value, it’s very important!
4.1.2 “Set home offsets” Command:
In the “Advanced Settings” Menu, the Second Option is “Set home offsets” Command. If you press the
Control Button, it would let the printer set home offsets.
4.1.3 “Velocity” Menu:
PS. For the normal users, please don’t change any configuration in this menu.
4.1.4 “Acceleration” Menu:
PS. For the normal users, please don’t change any configuration in this menu.

Dongguan Ortur Intelligent Technologies Co., Ltd.
www.ortur3d.com www.ortur3dprinter.com
No.27, Second Industrial Park, Heshi Road, Qiaotou Town, Dongguan 523527, Guandong Province, China
15
4.1.5 “Jerk” Menu:
PS. For the normal users, please don’t change any configuration in this menu.
4.1.6 “Steps/mm” Menu:
PS. For the normal users, please don’t change any configuration in this menu.
4.1.7 “Temperature” Menu:
PS. For the normal users, please don’t change any configuration in this menu.
4.1.8 “Filament” Menu:
PS. For the normal users, please don’t change any configuration in this menu.

Dongguan Ortur Intelligent Technologies Co., Ltd.
www.ortur3d.com www.ortur3dprinter.com
No.27, Second Industrial Park, Heshi Road, Qiaotou Town, Dongguan 523527, Guandong Province, China
16
4.1.9 “Initialize EEPROM” Menu:
In the “Advanced Settings” Menu, the Ninth Option is “Initialize EEPROM” Menu.
You could press the Control Button to go to “Initialize EEPROM” Menu. And there is a “Initialize EEPROM”
Command. This command would let the printer clean your own setting and get back to the default factory
settings.
When the “Initialize EEPROM” Command executed, all the manual setting would be cleaned, and you need
to press the “Reset” Button, and redo the manual setting (For example, the Bed Leveling again.
4.2 “Runout Sensor” Option:
In the “Configuration” Menu, the Second Option is “Runout Sensor” Option. You could press the Control
Button to turn on or turn off the Filament Run-out Detection Function.
4.3 “Outage Recovery” Option:

Dongguan Ortur Intelligent Technologies Co., Ltd.
www.ortur3d.com www.ortur3dprinter.com
No.27, Second Industrial Park, Heshi Road, Qiaotou Town, Dongguan 523527, Guandong Province, China
17
In the “Configuration” Menu, the Third Option is “Outage Recovery” Option. You could press the Control
Button to turn on or turn off the Power Outage Recovery&Resume Print Function.
4.4 “Preheat PLA configuration” Menu:
In the “Configuration” Menu, the Fourth Option is “Preheat PLA configuration” Menu. You could press the
Control Button to go to “this Menu.
And then, you could adjust the Configuration of Fan speed, Nozzle Temperature and Hotbed Temperature,
and store the new setting.
4.5 “Preheat ABS Configuration” Menu:
In the “Configuration” Menu, the Fifth Option is “Preheat ABS configuration” Menu. You could press the
Control Button to go to this Menu.
And then, you could adjust the Configuration of Fan speed, Nozzle Temperature and Hotbed Temperature,
and store the new setting.

Dongguan Ortur Intelligent Technologies Co., Ltd.
www.ortur3d.com www.ortur3dprinter.com
No.27, Second Industrial Park, Heshi Road, Qiaotou Town, Dongguan 523527, Guandong Province, China
18
4.6 “Store setting” Command:
In the “Configuration” Menu, the Sixth Option is “Store setting” Command. You could press the Control
Button to store your manual setting.
4.7 “Load setting” Command:
In the “Configuration” Menu, the Seventh Option is “Load setting” Command. You could press the Control
Button to load the the setting, that you had stored at last time.
4.8 “Restore failsafe” Command:
In the “Configuration” Menu, the Eighth Option is “Restore failsafe” Command. You could press the Control
Button to load the the default setting, that had been stored at factory.
5. “Change filament” Menu:
In the Main Menu, the Fifth Submenu is “Change filament” Menu. You could press the Control Button to go to
this submenu.

Dongguan Ortur Intelligent Technologies Co., Ltd.
www.ortur3d.com www.ortur3dprinter.com
No.27, Second Industrial Park, Heshi Road, Qiaotou Town, Dongguan 523527, Guandong Province, China
19
5.1 “Preheat PLA” Command:
In the “Change filament” Menu, the First Option is “Preheat PLA” Command. Press the Control Button to
change a roll of new PLA Filament step by step:
5.1.1 First Step: The Extruder Head would Home All.
5.1.2 Second Step: The Nozzle would heat up to the Target Temperature of PLA.
5.1.3 Third Step: The Filament would be unloaded from the Extruder Head automatically. And then, you
need to pull out the old PLA Filament from the Extruder by hand.

Dongguan Ortur Intelligent Technologies Co., Ltd.
www.ortur3d.com www.ortur3dprinter.com
No.27, Second Industrial Park, Heshi Road, Qiaotou Town, Dongguan 523527, Guandong Province, China
20
5.1.4 Fourth Step: You need insert the new PLA Filament from the Filament Detection Sensor, through the
Exturder and Filament Tube, till the Extruder Head.
5.1.5 Fifth Step: Waiting for the Nozzle heating up to the Target Temperature of PLA.
5.1.6 Sixth Step: Waiting for the New PLA Filament loaded into the Nozzle.
5.1.7 Seventh Step: Waiting for the Old Fused PLA Filament purged from the Nozzle.
5.1.8 Eighth Step: Choose the “Purge more” Command Or “Continue” Command:
Other manuals for Ortur-4
1
Table of contents
Other Ortur 3D Printer manuals
Popular 3D Printer manuals by other brands

Felix Storch
Felix Storch Tec 4.0 to Tec 4.1 Upgrade Kit Upgrade manual

Full Spectrum Laser
Full Spectrum Laser Muse Operation manual

FLASHFORGE 3D PRINTER
FLASHFORGE 3D PRINTER Creator Startup guide

Elegoo
Elegoo NEPTUNE 3 user manual

Blocks
Blocks Pro S30 user guide

Tractus3D
Tractus3D LARGE VOLUME Series Installation and user manual