Oryx SCA Waterjet User manual


This page intentionally left blank.

Table of Contents
Introduction...............................................................................................................................................4
How to Use This Guide...........................................................................................................................4
Safety Precautions .................................................................................................................................4
Waste disposal.......................................................................................................................................5
Overview....................................................................................................................................................6
Description.............................................................................................................................................6
Key Features ..........................................................................................................................................6
How It Works .........................................................................................................................................6
SCA Waterjet System Contents..............................................................................................................7
Machine Operation Features.................................................................................................................8
Setup........................................................................................................................................................11
Locating the SCA Waterjet...................................................................................................................11
Mobile Setup........................................................................................................................................11
Stationary Setup ..................................................................................................................................14
Operation.................................................................................................................................................14
System Priming ....................................................................................................................................14
Operator Position ................................................................................................................................15
Model Cleaning....................................................................................................................................16
Daily Maintenance and Inspection ......................................................................................................17
Long Term Maintenance and Inspection.............................................................................................18
Glove Replacement Procedure............................................................................................................19
Troubleshooting.......................................................................................................................................21
Specifications...........................................................................................................................................23
Customer Support....................................................................................................................................24
Contact ORYX Support.........................................................................................................................24
Replacement and accessory parts .......................................................................................................24
Supplemental Information.......................................................................................................................25
SCA Waterjet Cleaning System Limited Warranty...............................................................................25
Declaration of Conformity ...................................................................................................................26

4
Introduction
How to Use This Guide
This User Guide is laid out in easy to follow sections that cover Setup, Operation, Maintenance, and
Troubleshooting. Read each section carefully so you will get the best performance from your
cleaning system.
Safety Precautions
For your own protection and to ensure proper operation of the SCA Waterjet please follow
these safety precautions. Failure to use the SCA Waterjet for the intended function may result
in personal injury and will void the warranty.
•Do not operate the SCA Waterjet until you have read and understood this usermanual.
•Only properly trained personnel should operate the SCA Waterjet.
•Do not operate the SCA Waterjet if the cabinet side access door into the work interior is not
closing or a hose or wand appears to be damaged.
•Inspect gloves before each use. If either of the gloves appear to be damaged or worn, replace
before operating the SCA Waterjet.
•Never operate the SCA Waterjet with the cabinet side access door open.
•Use the power supply voltage as noted in the Specifications section of this manual. Avoid
overloading the electrical outlet with multiple devices.
•Use only the power cord supplied by the manufacturer. Replace a damaged power cord
with one approved by the manufacturer.
•Ensure the system is well-grounded. Plugging the SCA Waterjet into a Ground Fault
Interrupt (GFI) or similar protected outlet is recommended.
•Always power off and unplug the SCA Waterjet from the power outlet when it is
being cleaned, moved or serviced.
•Do not use the SCA Waterjet for any purpose other than cleaning and removing support
material from 3D printed models produced using the Material Jetting (MJ) process with
UV Cured Resins.
•Wear Safety Glasses when working near or operating theSCA Waterjet.
•The SCA Waterjet operates at 85-88db noise level –Ear Plugs are REQUIRED.
•Do not use any liquid other than cool clean waterin the SCA Waterjet.
•Before disassembling or attempting repairs on the system, contactTechnical
Support as directed in the Customer Support section of thismanual.
Following classifications used throughout this guide and/or marked on the SCA Waterjet:
Caution Electrical Danger

5
Précautions de sécurité
Pour votre propre protection et pour assurer le bon fonctionnement du SCA Waterjet, veuillez
suivre ces précautions de sécurité. Le fait de ne pas utiliser le SCA Waterjet pour la fonction prévue
peut entraîner des blessures et annulera la garantie.
•N'utilisez pas le SCA Waterjet avant d'avoir lu et compris ce manuel d'utilisation.
•Seul un personnel correctement formé doit utiliser le SCA Waterjet.
•N'utilisez pas le SCA Waterjet si la porte d'accès du côté de l'armoire à l'intérieur du poste de
travail ne se ferme pas ou si un tuyau ou une lance semble être endommagé.
•Inspectez les gants avant chaque utilisation. Si l'un des gants semble être endommagé ou usé,
remplacez-le avant d'utiliser le SCA Waterjet.
•Ne jamais faire fonctionner le SCA Waterjet avec la porte d'accès côté armoire ouverte.
•Utilisez la tension d'alimentation comme indiqué dans la section Spécifications de ce
manuel. Évitez de surcharger la prise électrique avec plusieurs appareils.
•Utilisez uniquement le cordon d'alimentation fourni par le fabricant. Remplacez un cordon
d'alimentation endommagé par un autre approuvé par le fabricant.
•Assurez-vous que le système est correctement mis à la terre. Il est recommandé de
brancher le SCA Waterjet sur un interrupteur de fuite à la terre (GFI) ou une prise
protégée similaire.
•Éteignez et débranchez toujours le SCA Waterjet de la prise de courant lorsqu'il est
nettoyé, déplacé ou réparé.
•N'utilisez pas le SCA Waterjet à d'autres fins que le nettoyage et le retrait du matériau de
support des modèles imprimés en 3D produits à l'aide du processus de projection de matériau
(MJ) avec des résines durcies aux UV.
•Portez des lunettes de sécurité lorsque vous travaillez à proximité ou utilisez le SCA Waterjet.
•Le SCA Waterjet fonctionne à un niveau de bruit de 85 à 88 dB - Des bouchons d'oreille
sont REQUIS.
•N'utilisez pas d'autre liquide que de l'eau fraîche et propre dans le SCA Waterjet.
•Avant de démonter ou de tenter de réparer le système, contactez l'assistance
technique comme indiqué dans la section Assistance clientèle de ce manuel.
Classifications suivantes utilisées tout au long de ce guide et / ou marquées sur le SCA Waterjet:
Attention Danger électrique
Waste disposal
Consult material suppliers and your local regulations regarding handling and disposal of cured,
partially cured and dissolved resins.

6
Overview
Description
The SCA Waterjet is a cool water, power cleaning system capable of removing support material
from Material Jetting (MJ) 3D printed models with rapid bulk and fine detail jetting options.
It is configurable for stationary direct facility hookup or as a self-contained mobile unit, for difficult
to plumb situations. Its ergonomically considered design and functionality provide comfort and
enhanced productivity for operators.
Key Features
•Mobile or Stationary Options:
▪Mobile –Onboard 5-gallon water holding tank for recirculation.
▪Stationary - Connect directly to facility water supply and drain; this requires
optional installation components and instructions available from Oryx.
•3-Stage Filter System for mobile recirculation option and 2-Stage Waste Filter System for
stationary option.
•Integrated frame with locking front casters for mobility.
•Ergonomically designed gloved access to facilitate operator model handling and cleaning, and
operation of internal control for jet wand selection.
•Two independent jet wand spray nozzles with easily accessed selector valve: Coarse for rapid
bulk removal and Fine for fine detail and delicate support removal.
•High and low cleaning power settings.
•High visibility work area environment through viewing window with efficient LED lighting and
internal-mount wiper blade assembly (automatic operation).
•Large processing environment to accommodate model sizes up to 19.5” x 15.5” x 9”.
•The SCA Waterjet can be operated while standing or seated.
How It Works
The interior work area of the SCA Waterjet is accessed via two gloved ports on machine front,
allowing operators full control of models inside the work area. The integral Pump mounted on
the mobile support frame delivers selectable high and low cleaning power with two handheld
jet wands (Coarse and Fine), each with a defined degree of spray directivity: 15° Coarse for
rapid bulk and 0° Fine spray for detail removal. The sliding access door located on the right side
of the machine allows entry into the interior work area for insertion of models. Machine ON-Off
and integral Pump of the SCA Waterjet are operated using the control interface located above
the window. An automatic inlet supply shut-off valve isolates the Waterjet from the water
supply when the pump is not operating (important for units connected to facility water supply).
The foot pedal switch allows full control with hands-free operation with both hands inside the
work area.

7
SCA Waterjet System Contents
NOTE: The SCA Waterjet cleaning system as shipped is for Mobile setup only –please call Oryx for
additional system components for the Stationary direct mode hook-up.
The items shown in the figure below are shipped standard with the SCA Waterjet.
Figure 1 SCA Waterjet System Contents
1SCA Waterjet
2Cabinet Door and mounting hardware
3Holding Tank
4Foot Switch
5Coarse Screen
6Fine Screen
7User Manual
8Spare Gloves (Not Shown)
8
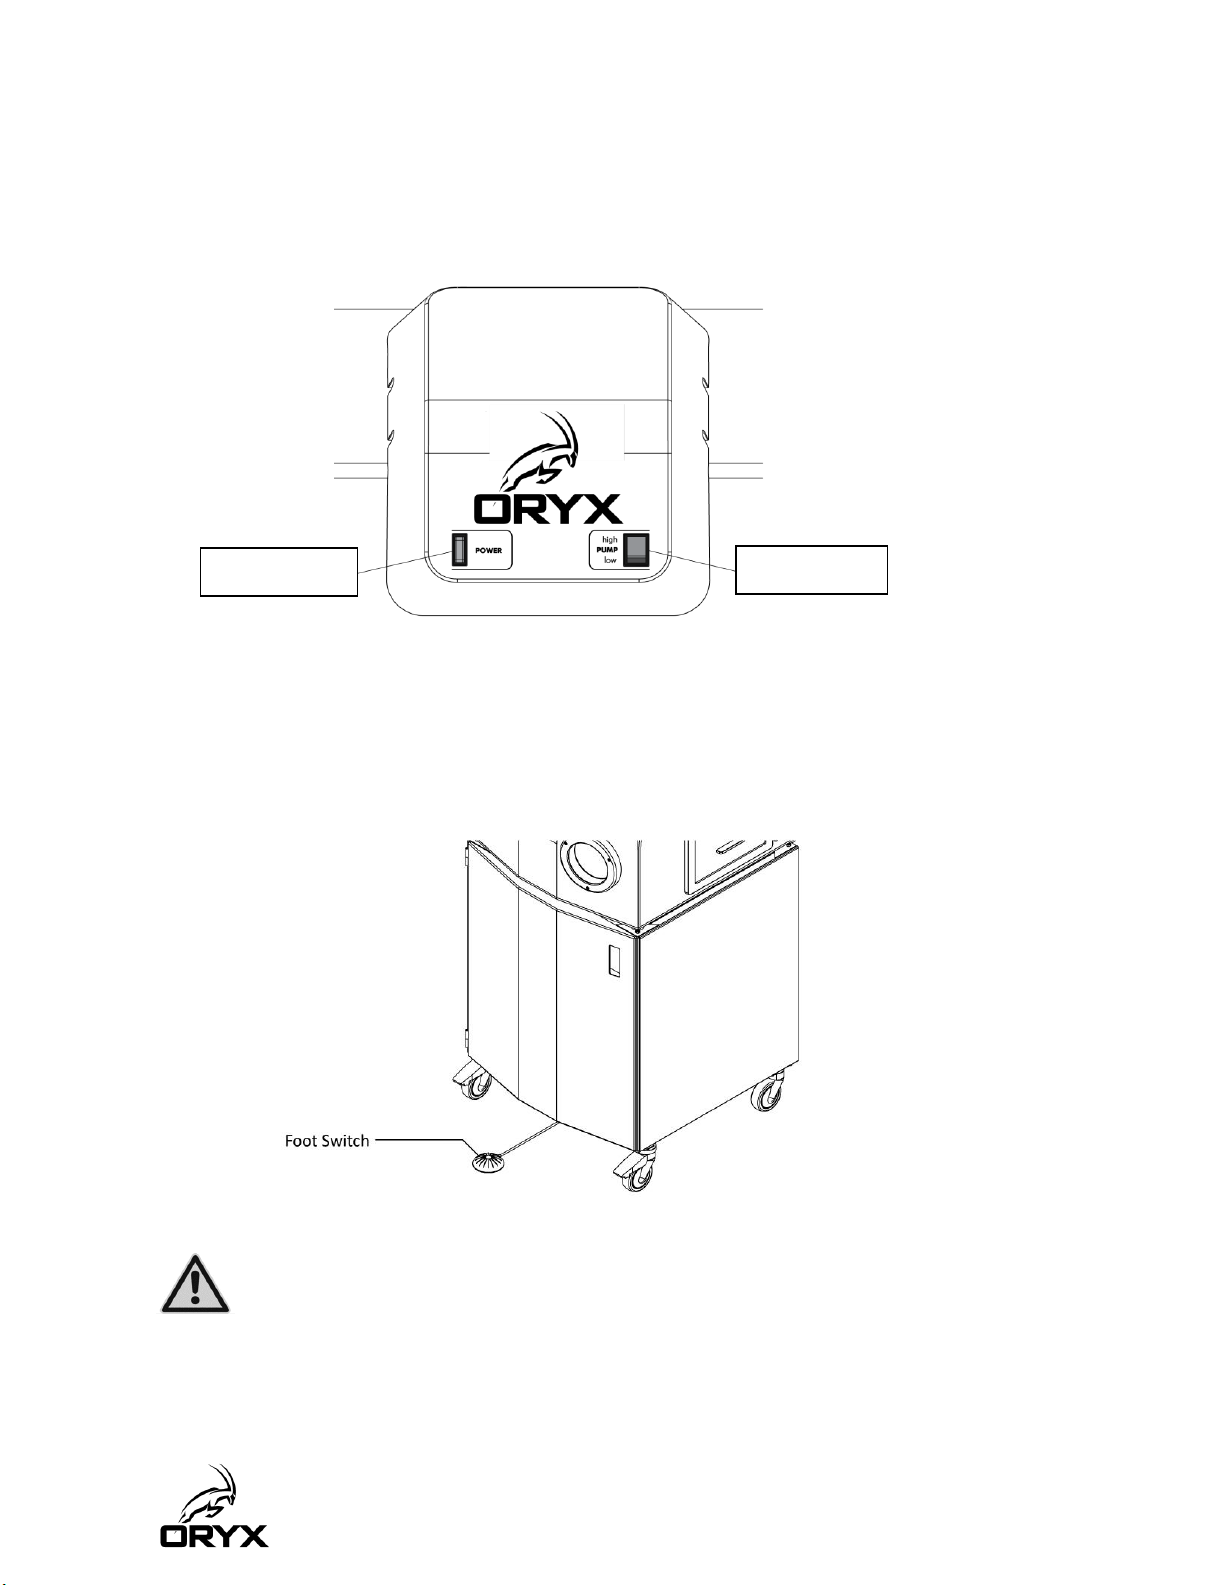
Machine Operation Features
Figure 2 Control Panel at machine top
Power Switch illuminates when power is ON, turns on work area lighting and places Pump
and cleaning functions in Standby Mode.
Pump Switch is used for High and Low cleaning power selections.
Figure 3 Foot Switch
Foot Switch opens the inlet shut-off valve and activates the pump and wiper.
Never engage the Foot Switch without being properly positioned to operate the SCA Waterjet and
having a firm grasp FIRST of the selected jet wand.
Ne jamais engager la pédale de commande sans être correctement positionné pour faire
fonctionner le SCA Waterjet et avoir une prise ferme PREMIER de la baguette à jet sélectionnée.
Pump Switch
Power Switch

9
Figure 4 Wand Selector Valve & Jet Wands
Wand Selector Valve
Right –Coarse jet wand is activated.
Center OFF Position –Neither jet wand is activated, valve is closed, and Pump will not run.
Left –Fine jet wand is activated.
Figure 5 Coarse Jet Wand Hose Hanger
Hose Hanger keeps Hose clear of Side Access Door opening when loading and unloading models
into and from the work interior.

10
Figure 6 Side Access Door
Side Access Door allows entry into the interior work area to load and unload models, and to
remove drain filters for cleaning.
Side Access Door operation
Open –Grasp door handle with left hand and retract lower latch plunger with
Slide the door up until door upper latch plunger locks into place.
Close –Grasp door handle with left hand and retract upper latch plunger with right hand.
NOTE: Lower door until the door reaches the lower latch plunger. Maintain grasp on door handle
and retract the lower latch plunger. Lower door to fully closed position and release lower latch
plunger.
Failure to grasp door handle and lower door by hand could result in operator injury
or damage to door. Also: Only release the plunger after door has been lowered approximately
one inch. Friction from plunger will prevent door from slamming shut if accidently released.
Le fait de ne pas saisir la poignée de porte et d'abaisser la porte à la main peut entraîner des blessures
pour l'opérateur. ou endommagement de la porte. Aussi: ne relâchez le piston qu'une fois la porte
abaissée approximativement un pouce. Le frottement du piston empêchera la porte de se fermer si elle
est relâchée accidentellement.

11
Setup
Locating the SCA Waterjet
To maximize ease of use and operational safety, make sure the following preparations of the
physical site are met:
•Shipping carton + pallet dimensions: 33.9”W x 31.5”D x 76.6”H.
•Shipping weight (gross): 229.3 lbs.
•The SCA Waterjet must be located on a level floor able to support 450 lbs., the system weight
with the 5-gallon holding tank filled with water and operator.
•SCA Waterjet dimensions: 30.0 W x 29.5 D x 71.5 H in.
•The SCA Waterjet has integral casters on the frame for easy relocation to the installation site.
The two front casters swivel and lock.
•The operating environmental temperature must be between 41⁰F – 104⁰F; and operating
environmental humidity between 0% - 80% RH.
•Power Requirements: North America –120VAC, 60Hz, 15A. Europe –230VAC, 50Hz, 8A
•The electrical outlet must be located within 6 ft (2 m) of the SCA Waterjet. Do not use an
extension cord or power strip with the system.
Mobile Setup
•Uncrate and remove all packing material.
•Install Door, See Figure 7.
•Install Fine Filter Screen and Coarse Filter Screen, See Figure 8.
•Position Waterjet at final installation location and lock front Casters, See Figure 9.
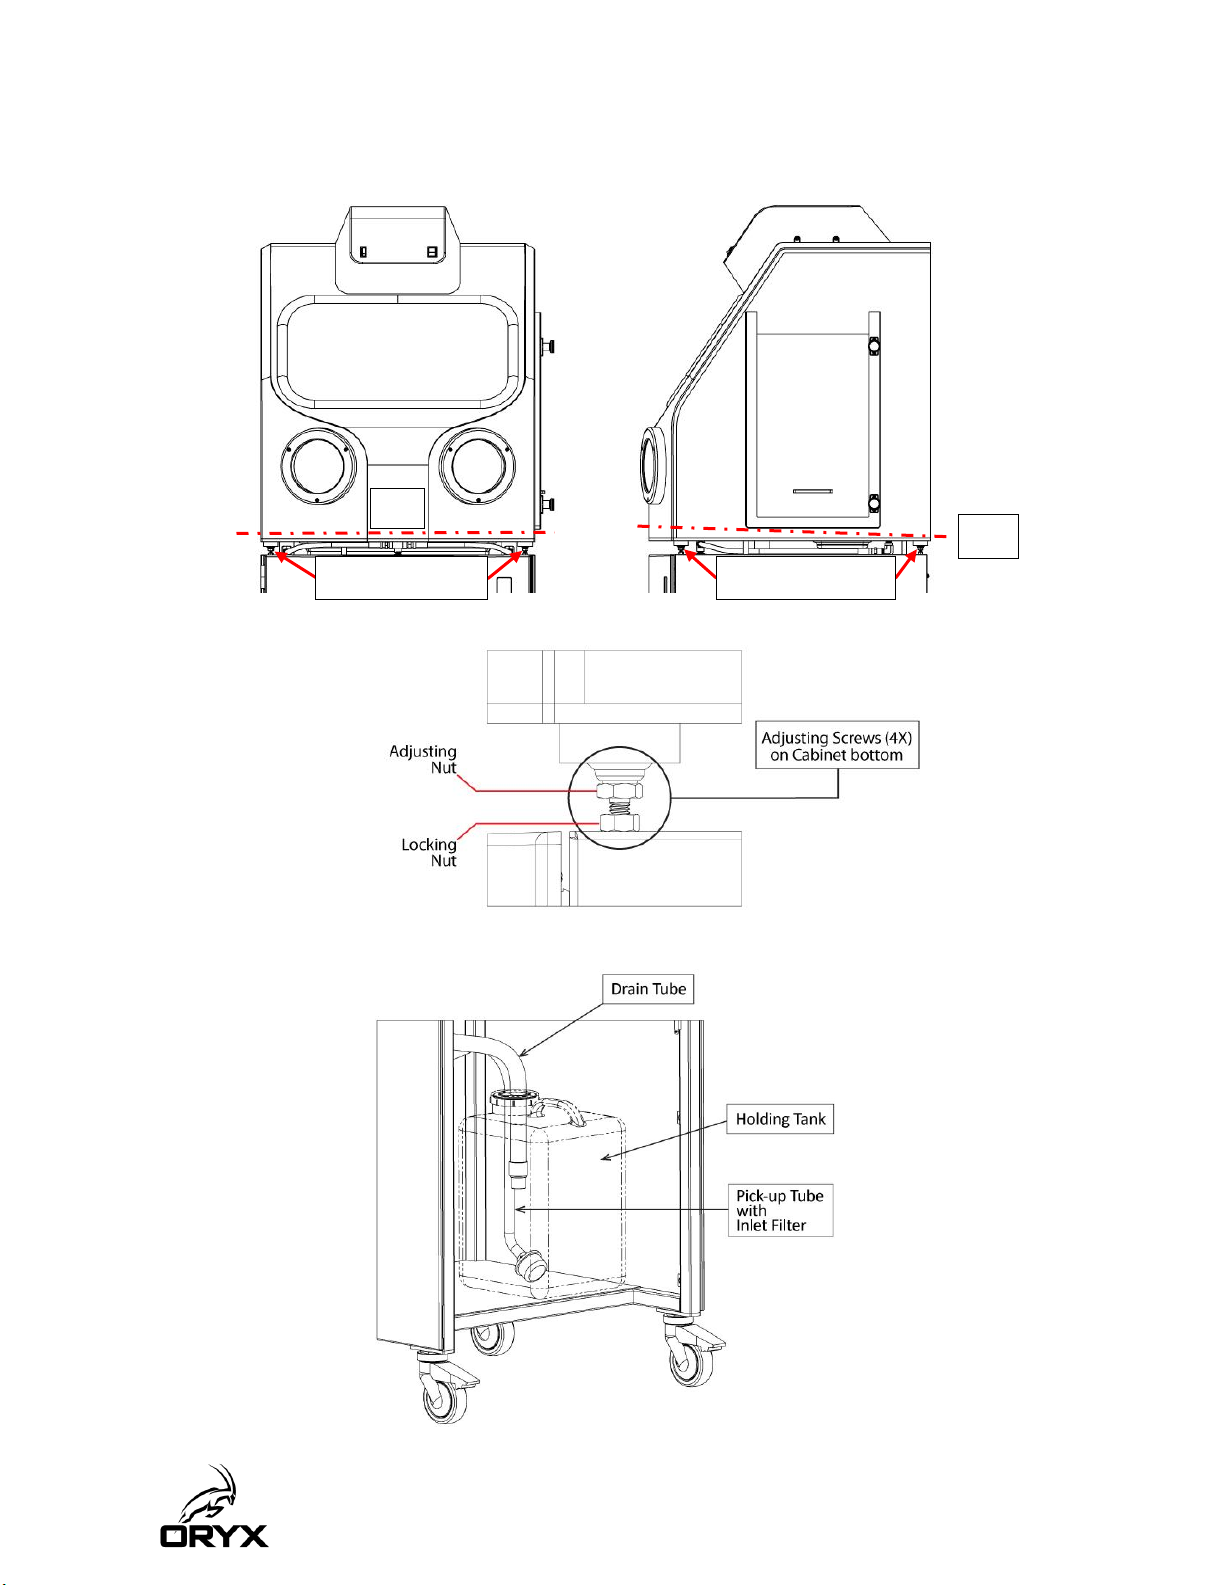
•Position the foot switch in the front of the Waterjet.
•Using Adjusting Screws between cabinet and frame, level cabinet from side to side and
angle front to back approximately .5 to 1 degree up from level, See Figure 10.
•Fill the Holding Tank with fresh cool clean water, approximately 5 gallons. Insert drain
tube and pick-up tube with inlet filter into the holding tank and fasten cap down tight.
Be sure pick-up tube filter is resting on bottom of tank, See Figure 11.
•Plug power cord into the appropriate power receptacle.

12
Figure 7 Install the Cabinet Door (hardware included).
Figure 8 Install the Fine and Coarse Filter Screens (interior work area).
Figure 9 Lock Front Casters after locating the SCA Watejet.
13
Figure 10 Level Cabinet side to side and angle front to back with Adjusting Screws (2).
Figure 11 Holding Tank, Drain Tube and Pick-up Tube with Inlet Filter
0˚
.5˚
Adjusting Screws
Adjusting Screws

14
Stationary Setup
To connect the Waterjet directly to facility water supply and drain, additional components
and instructions are required: contact Oryx Support.
Pour connecter le Waterjet directement à l'alimentation en eau et au drain de l'installation, des
composants supplémentaires et des instructions sont nécessaires: contactez le support Oryx.
Operation
For your Vision and Hearing Protection, Safety Glasses and Ear Protection are REQUIRED.
Pour votre protection visuelle et auditive, des lunettes de sécurité et une protection auditive
sont NÉCESSAIRES.
System Priming
The system needs to be primed on initial startup and when the holding tank water is changed
out.
Le système doit être amorcé lors du démarrage initial et lorsque l'eau du réservoir de stockage
est remplacée.
1. Verify holding tank is FULL (mobile) or facility inlet supply is ON (stationary).
2. Power on the unit, Position the wand selector valve to the right (Coarse Wand) and set the
pump switch to High.
3. Be sure filter screens are in place and the cabinet access door is fully closed and then place
hands in gloves and position them inside the cabinet.
4. Firmly grasp the Coarse Wand and point it toward lower left rear corner of the interior work
area.
5. Depress the foot switch and let the pump run until a full stream is achieved at the wand.
6. Once the pump is primed the Waterjet is ready for use.
TIP: On initial startup, after the system is primed, run the pump using the coarse and fine
detail wand for 2 to 3 minutes each and then change out the water in the holding tank.
This will ensure that the system is properly flushed and ready for use.

15
DO NOT use hot water. The SCA Waterjet is designed for cool (room temperature)
water supply. Hot water may damage the pump.
Never change the pump cleaning power when the pump is running
Never switch between wands when the pump is running
For delicate models switch the pump to “Low” for low power cleaning and use caution
not to damage the model
N'utilisez PAS d'eau chaude. Le SCA Waterjet est conçu pour une alimentation en eau
froide (température ambiante). L'eau chaude peut endommager la pompe.
Ne modifiez jamais la puissance de nettoyage de la pompe lorsque la pompe est en
marche
Ne jamais basculer entre les baguettes lorsque la pompe est en marche
Pour les modèles délicats, mettez la pompe sur «Faible» pour un nettoyage à faible
puissance et faites attention de ne pas endommager le modèle
Operator Position
The SCA Waterjet cleaning system can be operated from the standing position with the front door
closed or from a sitting position with the front door open –See Figure 12 (2) Illustrations.
Figure 12 STANDING and SITTING POSITIONS for the SCA Waterjet Operator.
Open Cabinet
Door for Proper
Sitting Position
SITTING POSITION
STANDING POSITION

16
Model Cleaning
Wearing protective gloves, remove excess support material by hand –break away excess support
material from the outside of the 3D printed model.
Wand Overview, See Figure 13
Coarse Jet Wand with 15° Spray
Use for rapid bulk removal of support material.
Fine Detail Removal Wand with 0° Spray
Use for close detail support removal from blind holes, slots, delicate and hard to reach
features.
Figure 13 COARSE and FINE Spray Jet Wands ‒Direct at model 6 to 8 inches away from it.
Cleaning Power Overview:
High
Use the High-Power setting for rigid and thick-walled models.
Low
Use the Low Power setting for delicate and thin-walled models.
Cleaning process
•Power on the SCA Waterjet and switch pump to appropriate cleaning power.
•Select the appropriate wand for the application.

17
•Place model in the SCA waterjet interior work area and close cabinet side access door.
•Place arms in protective gloves.
•Hold model in left hand and firmly grasp selected wand in right hand, See Figure 13 above.
•Point wand at the model, positioned 6 to 8 inches away from the part.
•Activate the pump with the foot switch.
•Manipulate the model and wand to remove support material.
•When the support material is satisfactorily removed from the model, place the coarse jet
wand hose on the hanger, open the cabinet access door and lock it open with the latch
plunger, then remove the model.
•Remove and empty the coarse and fine filter screens. Rinse and clean both screens and
reinstall.
TIP: When not in use, leave the cabinet door open to allow the cabinet to dry out. This will
help reduce or eliminate mildew and/or mold forming inside the work area.
5Maintenance
Even though SCA Waterjet cleaning system is designed for low maintenance, daily and long-term
inspections and maintenance are required.
Daily Maintenance and Inspection
1. CAUTION: Inspect Gloves for wear or damage. Replace if there is any sign of wear or
damage, as unprotected hands can be injured by contact with high water pressure.
ATTENTION: Inspectez les gants pour détecter toute trace d'usure ou de dommage.
Remplacez-le s'il y a des signes d'usure ou de dommages, car les mains non protégées
peuvent être blessées par contact avec une pression d'eau élevée.
2. Empty, rinse and refill holding tank.
3. Clean pick-up tube inlet filter.
4. Clean cabinet interior.
5. Clean fine filter screen and coarse filter screen.

18
Long Term Maintenance and Inspection –See Figure 14 (3) Illustrations
1. Wiper Blade –Check for wear or damage every 6 months. Best to replace blade
every 6 months if machine is used daily, replacement part #100413
2. High Pressure Hoses –Check for damage, wear or cracking every 6 months, see
figure.
a. 100288, HP Outlet Hose 1
b. 100172, HP Outlet Hose 2
c. 100378, 15 Degree nozzle HP Hose Assy
d. 100358, Fine Detail Wand Assy
3. Low Pressure Hoses –Check for damage, wear or cracking every 6 months.
a. 100247, Pump Inlet Hose 1
b. 100289, Pump Inlet Hose 2
c. 100285, Drain Hose Assy.
4. Gloves –Replace gloves every 6 months, replacement part #100407.
5. Pick-up Tube and Inlet Filter –Inspect every 6 months and replace if damaged,
replacement part #100414.
6. Wands –Inspect every 6 months, or if Wands leak or Spray Patterns change.
a. 100358, FINE Jet Wand and Hose Feed
b. 100378, COARSE Jet Wand and Hose Feed

19
Figure 14 Maintenance and Inspection Illustrations:
Glove Replacement Procedure - See Figure 15 (2) Illustrations
1. Remove left and right Glove Outer Collar.
2. Remove old Gloves from Glove Inner Collar.
3. Position new Gloves with thumbs up, insert through arm holes (a) and fold edge of
arm sleeve over and around Inner Glove Collar (b).
4. Reinstall Glove Outer Collar over fitted Glove.
CAUTION: Tighten screws by hand to avoid overtightening them.
ATTENTION: Serrez les vis à la main pour éviter de trop les serrer.
100288
100172
100172
100247
100289
100285
100378
100358

20
Figure 15 Glove Removal and Replacement Procedure.
Table of contents
Other Oryx Ultrasonic Jewelry Cleaner manuals


