OSKA 3 Auto Series User manual

Version 3: 17.11.2022
User Guide
Series3 Auto

Series3 Auto User Guide 03
Please read the following instructions carefully and observe the
warning instructions before using the system.
Contents
03 Know your symbols
04 Important safeguards
04 Statements
05 Introduction
05 Package contents
06 Product function
08 System installation
09 Operation
10 General
11 CPR function
11 Pressure set up
11 Low pressure warning
12 Cleaning
13 Environment requirements
13 Handling and storage
13 Maintenance
15/16 Troubleshooting
17 Specications
Know your symbols
Manufacturer Do not iron
Foot end Tumble dry
CE marked Do not dry clean
REF Catalogue number Resistant to ignition
REPEC Authorized EC
Representative Wipe down
Machine wash at 95 Recycling
Drip dry UKCA marked
<1%
CL <1% Chlorine Medical Device
Airo(Xiaxen)MedicalCo.,Ltd.
1F,3F,4F,No.6,EastHaijingRoad,Haicang,Xiamen,Fujian,China
Emergo Europe B.V.
Prinsessegracht202514AP,TheHague,TheNetherlands
REPEC

Series3 Auto User Guide 05
Pump Unit
Mattress
Manual
Always read this manual before using this product.
Important safeguards
Whenusingelectricalproducts,especiallywhen
childrenarepresent,basicsafetypresent,basic
safetyprecautionsshouldalwaysbefollowed,
including the following:
Danger
To reduce the risk of electrocution:
• Always unplug this product immediately after
use.
• Do not use while bathing.
• Do not place or store product where it can fall
or be pulled into a tub or sink.
• Do not place in or drop into water or other
liquids.
• Do not reach for a product that has fallen into
water. Unplug immediately.
Warning
Toreducetheriskofelectrocutionorinjuryto
persons:
• A product should never be left unattended
when plugged in.
• Close supervision is necessary when this
productisusedby,on,ornearchildrenor
invalids.
• Use this product only for its intended use as
described in this manual.
• Do not use attachments not recommended by
the manufacturer.
• Neveroperatethisproductifithasadamaged
cordorplug,ifitisnotworkingproperly,ifit
hasbeendroppedordamaged,ordropped
into water. Return the product to a service
centreforexaminationandrepair.
• Keep the cord away from heated surfaces.
• Neverblocktheairopeningsoftheproduct
orplaceitonasoftsurface,suchasabedor
couch,wheretheairopeningsmaybeblocked.
Keeptheairopeningsfreeoflint,hair,andthe
like.
• Neverdroporinsertanyobjectintoany
opening or hose.
• Do not use outdoors or operate where
aerosol(spray)productsarebeingused.
• Connect this product to a properly grounded
outlet only.
• Donotdisassemble,repairorrebuildthe
productwithoutpermission,otherwisemayhas
riskofreanddangerinlife.
Grounding
Beforeanyconnectionismade,makecertainthat
this product shall be connected to a protective
earth conductor via the three-wire power cord;
the three-blade plug shall be inserted only into
a socket outlet that provides a protective earth
contact.
Statements
Note
Indicates some tips or some information users
should be aware of.
Caution
Indicate correct operating or maintenance
procedure in order to prevent damage to or
destruction of the equipment or other property.
Introduction
This manual should be used for the initial set up of
the system and for reference purposes.
General
TheSeries3Autoisahighqualityandaffordable
air mattress system support suitable for medium
and high-risk pressure ulcer treatment. It has been
specicallydesignedforpreventionofbedsores
andoffersanaffordablesolutionto24-hour
pressure area care.
TheSeries3Autohasbeentestedandcertiedfor
the following standards:
• CE
• UL
Intended Use
TheSeries3Autoisintendedtoreducethe
incidence of pressure ulcers while optimizing
patient comfort. It also provides the following:
• Individual customized setting capability.
• Pain management as prescribed by a physician.
Contraindication
Patient conditions for which the application of
pressure relieving therapy on an alternation system
is contraindicated are as follows:
• Cervical or skeletal traction.
• Unstablespinalcordinjuries.
Package contents
Check inside the package. If any of the following
itemsshouldbemissingordamaged,please
contact your local dealer or service centre for
replacement immediately.
Version 1: 2.9.2021
User Guide
Series3 Auto

Series3 Auto User Guide 07
Product function
Pump Unit
ThefunctionsofthepumpforSeries3Autoare
as follows:
Alternate mode(5)
• Press to set the air mattress
in alternate therapy mode.
Static mode(6)
• Press to set the air mattress
in static therapy mode.
Max Firm(7)
• Press to set the air mattress
inquickinationmode,
which facilitates nursing and
caring.
Seat Inate(8)
• Press to set the air mattress
inseatinate+alternateor
seatinate+staticmode,
pressure value will increase
by5mmHg,whichfacilitates
seating.
• Undermaxrmmode,keep
maxpressureof55mmHg,
no more 5mmHg increased.
Lock button(9)
• Auto: it will automatically
lock in 5 minutes without
operation.
• Manual: press lock button for
3secondstolockthepanel,
pressagainfor3secondsto
unlock the panel.
Power Switch(1)
• The switch is at the right side
of the pump.
• TurnON/OFFthepower
and press Power button
onthepanel,thepump
willstart/stopoperation.
Press Cycle Time(2)
• The cycle time can be
selected from the panel.
• The cycle time value options
are:10,15,20,or25minutes.
Auto weight(3)
• Auto:Pressthebutton,the
pumpwillautomaticallyadjust
mattress air pressure to
match patient’s weight.
• Manual: Press the button
for 2 seconds to select the
pressure value manually.
20mmHg~55mmHg is
corresponding to eight LED
indicators.
Alarm Mute(4)
• Theaudible/visiblealarmturns
onwhenlowpressure,power
failure or alternate failure.
• Tomutetheaudiblealarm,
press the Alarm Mute button.
The visible alarm indicator will
ashtillproblemsolved.
• Re-press the Alarm Mute
button to reactivate the alarm.
42 1
65 7 8
9
3
Series3 Auto User Guide 09
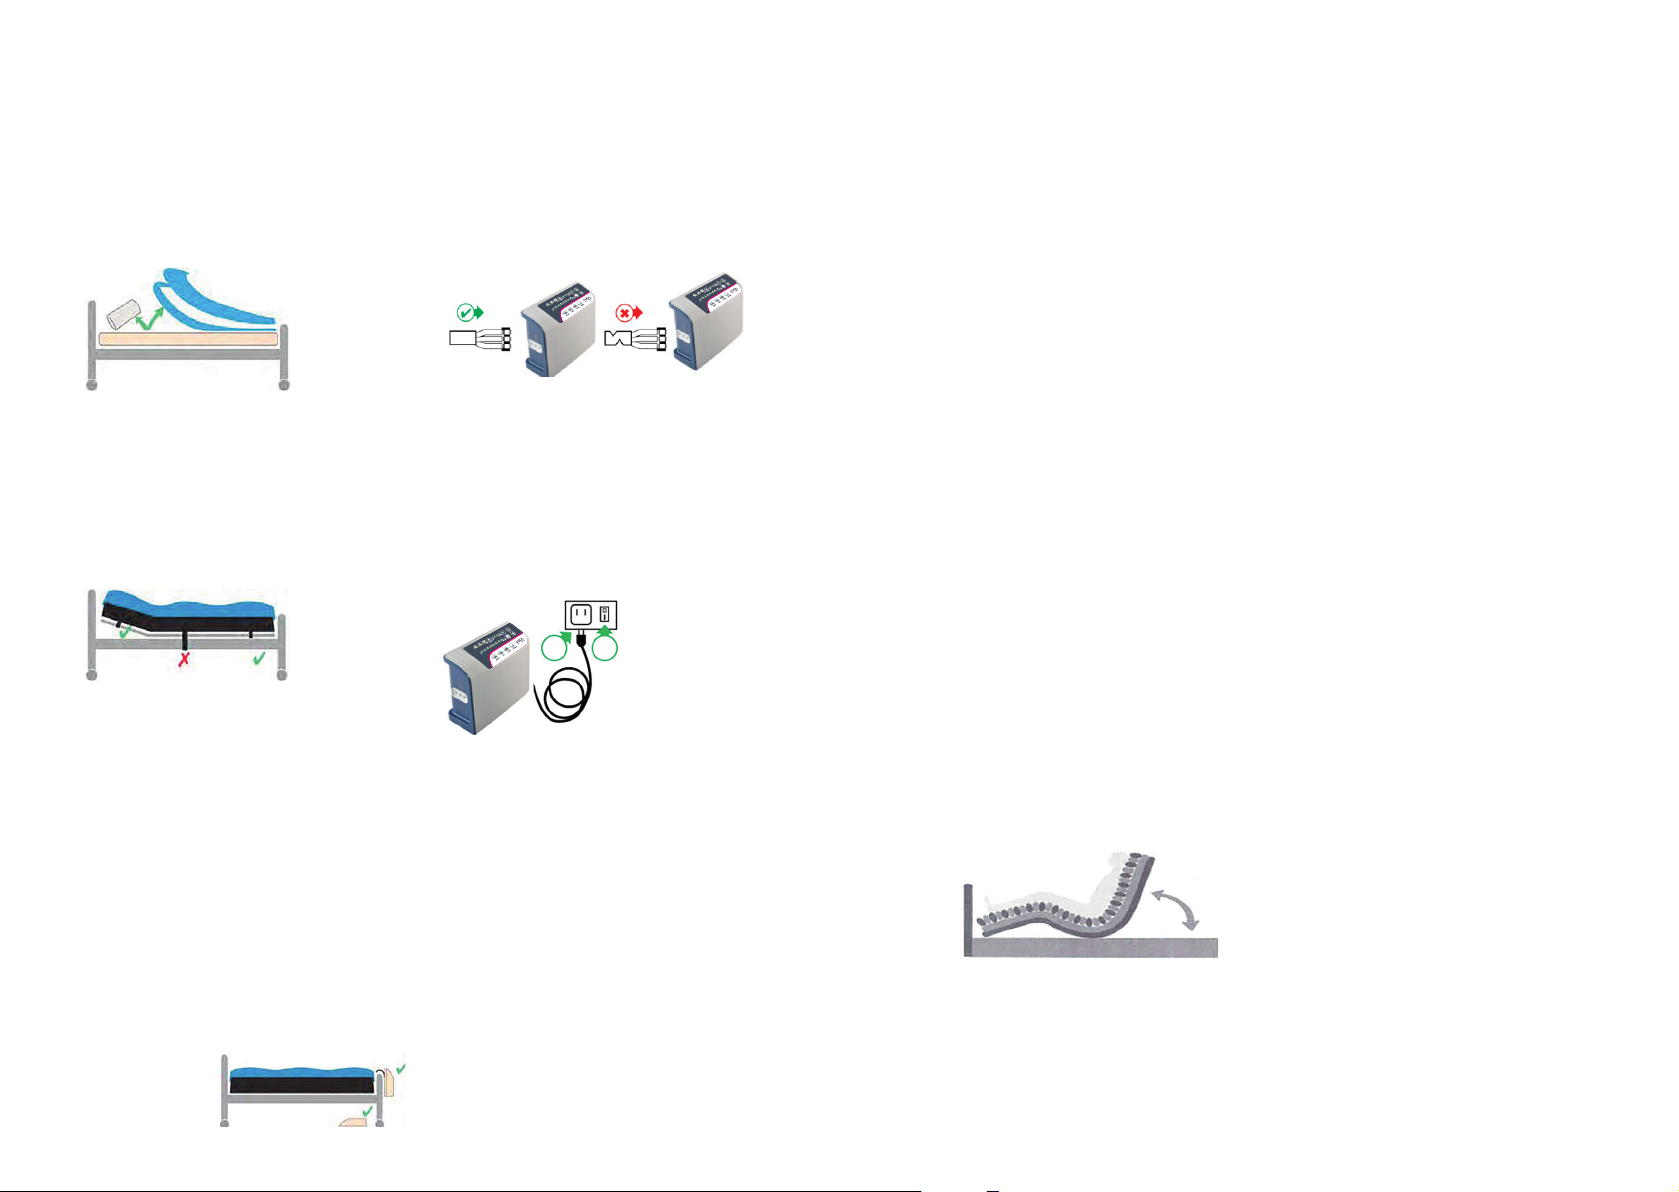
System Installation
b)Attachtheairhosesthroughtheuseofthe
quick connector to the Control Unit. Ensure air
hosesdonotkinkbetweenmattress,bedframe
and Pump Unit.
c)Plugthepowercordintoanelectricaloutlet
with grounded AC power.
NOTE:Beforeinsertingtheplugintotheoutlet,
make sure the voltage is compatible. Also make
sure this product is well grounded.
d)Switchthepowerbuttonon.Allowupto40
minutesforfullination.
e)The8pressureindicatelightswillashuntil
themattressisinatedandreadyforpatient
use.Onceready,theweightsettingwillshow
aconstantlightatthe40kgweightsetting.
Perform a “bottom out” test to ensure that
patient is properly suspended. Slide your hand
underthetopcoveralongadeatedcellin
thesacral(bottom)area.Securesheetsloosely
enough to ensure they do not interfere with cell
alternation.
Perform a “bottom out” test to ensure that patient
is properly suspended. Slide your hand under
thetopcoveralongadeatedcellinthesacral
(bottom)area.Securesheetslooselyenoughto
ensure they do not interfere with cell alternation.
The following describes the procedures for setting
upthesystemforthersttime.
a)Removeallcovers,sheetsandmattressfrom
the bed.
b)Onastandardbed,positionMattress
Replacementontopofbed,printedtopcover
facing upwards and air hoses towards the base
of the bed. Attach to the bed by securing the
adjustablestrapsundereachendofyourbed.
Ensure buckles are securely fastened and straps
are pulled tight.
c)IMPORTANT:Onaprolingbed,securethe
side straps around the moveable sections of the
bedbase.DONOTsecuretothesiderailsor
main bed frame – irreparable damage could be
caused to the bed and mattress
d)Conrmtherearenosharpobjectsinthe
immediate area which may risk damage to the
Mattress Replacement.
Pump Unit Activation
a)PositionControlUnitbyhanginghooksover
footboardofthebedorplaceunitontheoor
under the bed.
Operation
NOTE:Always read the operating instructions
before use.
General
Thisproductisdesignedtoprovidemaximum
comfort to patients. Make sure that you operate
this product in a proper way optimizing its value.
Here we provide some general information that
you should be aware of.
For products:
• DONOTuseanotherpumpwithdifferent
specicationsunlessinstructedtodosoby
OSKA Care
• DONOTchangeanycomponentbyyourself.
Ifthereisneedforreplacementorrepair,
always contact OSKA Care
For patients:
Whenthepressurehasbeenadjustedtoadesired
levelofrmness,thepatientcanthenlieonthe
mattress.
Armsurfacewillmakeiteasierforthepatientto
transfer or reposition. Make use of the static mode
functionforthisfeature.Tositapatientupinbed,
press the Seat Button to increase the pressure to
have better support on sacrum area.
Hand check:
Checkifthepressureisproperlyadjustedby
sliding one hand between the air mattress and bed
frame to feel the patient’s buttock.
Usersshouldbeabletofeelthespaceinbetween,
andtheacceptablerangeisapproximately25to
40mm(1”to1-1/2”).

Series3 Auto User Guide 11
NOTE: Please follow instructions below for
detailed operating procedure of each type.
Step 1 Turn on the power. A beep sound will
begin the operation.
Step 2 The pump will enter into static mode
when the power is initially turned on.
Firstitwillinatethemattressto
25mmHg and then start weight
calculation automatically. During
calculation,the8LEDindicatorswill
ashuntilthecalculationisnished,then
mattress will enter alternate mode.
Step3 Thealternatingcycletimeissetat10min.
Selectfromthetouchpaneltoadjustthe
cycle time.
NOTE:Pressthestaticmodebuttonfrom
thetouchpaneltoprovidearmsurface
that makes it easier for the patient to
transfer or reposition.The static mode
can support the patient by keeping the
mattress from bottoming out when the
patient is in a sitting position.
Step4 Duringnormaloperation,theunitwill
monitor pressure. If the mattress pressure
islowerthanthesetpressure,thepump
willautomaticallyinatethemattressto
the set level and then stop.The alarm will
beep and its LED will come on to alert a
low pressure condition.
Press the Alarm Mute button to mute
the alarm.The alarm LED will continue
ashing.
Press the Alarm Mute button again to
re-enable the audible alarm.
Step5 PresstheMaxFirmbuttonto
automaticallyinatethemattresstothe
maximumlevel(55mmHg)forabout20
minutes.The pressure will return to a
previously set level after 20 minutes.
In case there is a bad connection of
tubing or any air leakage from the
mattress,thiswillresultinalowpressure
condition,anditwillactivatethealarm
within 15 mins.
NOTE:Forsuitablepressure,pleaserefer
topage8forthehandcheckprocedure.
CPR function
When there is an emergency requirement to
performCPRonthepatient,presstheCPRbutton
at the head section of the mattress and disconnect
the air hose from the pump to release the air
quickly from the mattress.
Pressure set up
The pump unit can automatically set the pressure
according to patient’s weight. Other functions will
notworkduringweightcalculation,exceptthe
MaxFirm.Userscanalsoadjustthepressurelevel
oftheairmattresstoadesiredrmnessmanually
(pressthebuttonfor2seconds).
NOTE:ItisrecommendedtopressMaxFirmon
thepanelwhenthemattressisrstinated.The
autoweightcalculationwillstartafterMaxFirmis
nished.
Low pressure warning
Whenabnormalpressureoccurs,theLow
Pressure indicator will come on. For some types
ofpumps,thealarmwillbeactivatedtoalertofa
low pressure condition. Check if the connections
are secure and correctly installed according to the
relevant instructions.
NOTE:Ifthepressureisconsistentlylow,open
thezipperandconrmthatallofthehosesare
properly connected.Then check for any noticeable
leakageinanyofthetubes.Ifnecessary,contact
your local dealer to replace any damaged tubes
or hoses.
Power failure
Ifthepoweriscut,onlythepowerfailurealarm
works.The low pressure alarm can only work
under power connected.The power failure alarm
could last for 2 hours.
Ifthepumpremainsconnected,theairwillleak
graduallyandafter4hours,theupperairchamber
(dynamic)willbetotallydeated.
If the pump is disconnected and the transport cap
isinplacetheairleaksgraduallyandafter8hours,
theupperairchamber(dynamic)willbetotally
deated.
Thelowerairchamber(static)couldlastforat
least24hoursunderCPRvalvebeingwellinstalled
(notbeunplugged).

Series3 Auto User Guide 13
Cleaning
Inthissection,wedescribetheprocedurestoclean
and decontaminate the pump. It is important to
follow these procedures before using the system
again.
The cleaning task is required at least once a week
to maintain personal hygiene.
Pump Unit
• DONOTimmerseorsoakthepumpinany
wateroruids.
• Checkforexternaldamageandmovethe
pump to the cleaning area.
• Place the pump on a work surface and
spray or wipe the outside of the case with
quaternary ammonium solution.
• DONOTsprayanycleaningsolutiondirectly
on the surface of the pump.
• DONOTuseaHypocarbonateorPhenolic
based cleaning solution as this may cause
damage to the case. Allow the solution to
incubate for 10 minutes or accordingly as
stated by the cleaning product instructions.
• Wipe case with a clean cloth. Make sure all
areasareclean(topandbottom,bothsides).
• Spray cloth with cleaning solution and clean
faceplate.DONOTallowexcesscleaning
solutiononfaceplateorcontrolpanel.(If
solutiongetsinside,damagewilloccur.)Allow
surface to thoroughly dry after cleaning.
• After the pump is thoroughly cleaned and
dried,proceedtopluginthepumpandtestto
see if it runs normally.
• Unplug the pump and store with proper
identicationtag.
• Avoidlongexposuretosunlight.
Mattress
• Brush off or wipe down all surfaces of the
cover sheet with soap and water before
wetting with any liquid disinfectant.
• Any obvious blood spots should be wet
thoroughlywith1:9Hypochioritesolution(1
partbleachto9partswater)andallowdrying
foratleast10minutes.Thenblotwithaclean,
damp cloth.
• Unzip the top cover from the mattress.
• Brush or wipe down all surfaces with soap and
water before applying any liquid.
• Covers are immersed and soaked in
disinfectant for the required incubation time.
• Afterpre-soaking,thecoverisrinsedthrough
a regular cycle in a washer with no soap
thenlaunderedwithmilddetergent(wash
temperature93°F/34°C,rinsetemperature
78°F/26°Coronthecoldestsetting).
• Covers are aerated until they are fully dry.
(Dryingtemperaturerange90-120°F/32-49°C
oronthecoldestsetting.)
• The air cells are unsnapped from one side and
are sprayed on all sides with a disinfectant.
Let it sit for the required incubation time and
wipedownwithacleancloth.(Makesureto
disconnectalltheaircells,onebyone,and
spraythedisinfectantonallsides,includingall
the connecting tubes and hoses. Let it sit for
least10minutes.)
• If there is a base after you remove all the air
cells,thebasehastobesprayeddownwith
thedisinfectant,insideandoutside.Letitsitfor
the required incubation time and wipe down
with a cloth.
• Repeattheprocesswiththetubingset:spray,
incubate,andthenwipeclean.
• The carrying bag should be turned inside
out and completely wiped down using the
disinfectant solution.Allow it to thoroughly air
dry.Oncetheinsideisdry,turnitback:wipe
down the outside of the bag with disinfectant.
• Drythemattressonaatsurfaceareaafter
cleaning,awayfromexposuretothesun.
• Avoidlongexposuretosunlight.
Environment requirements
Operating Conditions
• AmbientTemperature:5°C~40°C
• RelativeHumidity:15%~90%,non-condensing
• Atmosphericpressure:700hPato1060hPa
Storage and shipping conditions
• Ambienttemperature:-25°C~70°C
• RelativeHumidity:10%~90%,non-condensing
• Atmosphericpressure:700hPato1060hPa
Handling and storage
• Laythemattressoutatandupsidedown.
• Roll from the head end towards the foot end;
the foot-end strap can then be stretched
around the rolled mattress to prevent unrolling.
• Donotfold,creaseorstackthemattress.
Maintenance
General
• Check the power cord and plug to see if there
areabrasionsorexcessivewear.
• Check the mattress cover for signs of wear or
damage. Ensure the mattress cover and tubes
are connected together correctly.
• Pluginthepumpunitandchecktheairow
fromthehoseconnectionport.Theairow
should alternate between ports every half-
cycle time.
• Check the air hoses to see if there are any
kinksorbreaks.Forreplacement,please
contact your local agent or dealer.
• Make sure the mattress tube is well connected.
• Check the pump unit and make sure both
power indicators are off when the switch is
turned off.
Low pressure
Examineifthereisanyairleakagebetweenthe
pump and the mattress connections or from the
air mattress tubes:
• Check connectors between the air mattress
andpump.Ifthereisanydisconnection,please
reconnect it.
• Check the CPR Valves. Ensure their outlets are
sealed.
• Check the air-connecting tubes. Ensure each
single cell is not broken.
• SetthepressureatMaxrm.Keepthetubes
fullyinatedandinspectforairleakage.
• Check if there is any air leakage from cells.
Ensurenoleakageoccurs.Ifanyleakageoccurs,
please contact your local agent or dealer.

Series3 Auto User Guide 15
Problems Reasons Maintenance
Mattress fail
toinateor
donotinate
completely.
Pump
issue
1. Pump does not work. 1. Afterpoweredon,checkifvisibleLED
lightturnson.Ifnot,pleasecheckthe
below issues:
1.1 Check if power cord is plugged into
appropriate voltage AC outlet.
1.2 Checkiffuseislooseorburnedout,
make sure it’s connected well or
replace with new one.
1.3 Openthepumpandseeifwiresinside
areconnectedwell,makesuretheyare
not loose.
1.4 ChangelowerPCB.
2. Air pressure from
pump is too low.
1. Checkifairpressureandairow
(100mmHg,8.0L)arehighenough
fromthecompressor,ifnotthen
replace with new compressor.
2. Check if there is air leakage from the
exchanger,ifyesthenreplacewithnew
exchanger.
3. Checkifsiliconetubeinsidethepump
is connected well.
Mattress
issue
1. Quick connector on
mattress does not
connect well with
pump.
2. Air tube connected
toT/Lconnector
andairvalveisloose,
CPR connector is not
capped.
3. Onewayvalveis
broken.
4.Aircellisleaking.
1. Make sure quick connector on
mattress is connected well with pump.
2. MakesureT/Lconnectorandairvalve
isconnectedwell,CPRconnectoris
capped well.
3. Changeonewayvalve.
4. Changeaircell.
Troubleshooting guide
Problems Reasons Maintenance
Mattress has pillow
function,butaircellfailto
inate.
1. One way valve is assembled
reversely.
1. Assemble the one way valve
in correct direction.
Pump is working but
synchronous motor does
not work; thus mattress
doesnotalternate,and
alternate failure alarm is
activated.
1. Synchronous motor is out of
order.
2. Wires inside synchronous motor
not connect well.
3. LowerPCBisoutoforder.
1. Change synchronous motor
2. Make sure wires are
connected well.
3. ChangethelowerPCB.
Pump and motor keep
working,butcycletimeis
incorrect.The alternate
failure alarm is activated.
1. Microswitchontheexchanger
is out of order.
2. Lower PCB is out of order.
1. Change the micro switch.
2. Change the lower PCB.
Whenpoweredon,
compressor stop after
working some time; but
theexchangerkeeprotary.
1. Pressure detector is out of
order.
1. Change the lower PCB.
Mattress pressure is low
but alarm is not activated.
1. Pressure detector is out of
order.
1. Change the lower PCB.
Push button on panel is
notoperatedwell,and
LED indicator does not
light up.
1. Push button is not operated
well.
2. LED is out of order.
1. Change the upper PCB.
Mattress pressure is too
high or too low.
1. Pressure sensor is out of order. 1. Change the lower PCB.
Power failure alarm can’t
be activated after power
failure.
1. Battery is out of order. 1. Change the lower PCB.
Troubleshooting guide continued
03 Know your symbols
04 Important safeguards
04 Statements
05 Introduction
05 Package contents
06 Product function
08 System installation
09 Operation
11 Cpr function
11 Pressure set up
11 Low pressure warning
12 Cleaning
13 Environment requirements
13 Handling and storage
13 Maintenance
14 Troubleshooting
16 Specications

Series3 Auto User Guide 17
Specifications
Pump Mattress
Item:Series3AutoPump Item:Series3AutoMattress
Powersupply:220V/50Hz,1A Size:203cm(L)x90cm(W)x20cm(H)
Airoutput:8litre/min. Topcover:Nylon/PUwithzipper
Pressure range: 20 mmHg – 55 mmHg Aircells:NylonPVC/NylonTPU/TPU
Cycletime:10/15/20/25min. Base:DurableNylon/PVC840D
Case Material: Flame Retardant ABS 20x8’’Cell-on-Cellaircells
Maxrmmode CPR valve for emergency procedures
Alarm:Lowpressure/Powerfailure/Alternate
failure
Pillow function
Alternate/Static/Seatinate/Autoweightmode Quick connectors
Size:31cm(L)x12.5cm(W)x21cm(H) MaximumWeightCapacity:200kg
Weight: 2.5 kg
Note:
Theabovespecicationsarealsoapplicabletothoseareasoperatingwiththesamepowersupplyrange.
Warranty: 2 years for pump and mattress
Technical Specications
Notes

Series3 Auto User Guide 19
Notes Notes

Series3 Auto User Guide
EdwardHouse,5PennerRoad,Havant,PO91QZ
02394318318|[email protected]
oska.uk.com
Pressure Care Experts
Table of contents
Other OSKA Indoor Furnishing manuals


Popular Indoor Furnishing manuals by other brands

Balzar Beskow
Balzar Beskow B-110 Assembly instructions

fantastic furniture
fantastic furniture TORONTO King Bed manual

Songmics
Songmics RDT15 quick start guide

Connection
Connection Tier Assembly instructions

Cooper Lighting
Cooper Lighting METALUX 15/ASY Specification sheet

Alvin
Alvin CH202 Assembly instructions


Ercol
Ercol CHESHAM HIGHBOARD Assembly instructions

Birlea
Birlea AZTEC Assembly instructions

Wyndham Collection
Wyndham Collection WC-1414-48 Installation instructions manual

Kvik
Kvik MH539-060 Assembly instructions

Serene
Serene 4FT6 EVELYN DOUBLE BED Assembly instructions

SMITH SYSTEM
SMITH SYSTEM 11160 Assembly instructions