Ossila UV Ozone Cleaner User manual
USERMANUAL
Manual Version: 2.0.E
Product Code: L2002A2
Product Version: 2.0
Software Version: 2.0
UV OZONE CLEANER

Contents
1. Overview............................................................................................................................................4
1.1 Applications ..................................................................................................................................................4
1.2 Contaminants..............................................................................................................................................4
2. EU Declaration of Conformity (DoC)..........................................................................................5
3. Safety..................................................................................................................................................8
3.1 Warning..........................................................................................................................................................8
3.2 Use of Equipment.......................................................................................................................................8
3.3 Hazard Icons.................................................................................................................................................8
3.4 General Hazards.........................................................................................................................................9
3.5 Power Cord Safety...................................................................................................................................10
3.6 Servicing......................................................................................................................................................10
3.7 Health and Safety – Installation...........................................................................................................10
3.8 Health and Safety – Operation............................................................................................................10
3.9 Health and Safety – Servicing ..............................................................................................................11
4. Unpacking...................................................................................................................................... 11
4.1 Packing List ................................................................................................................................................11
4.2 Damage Inspection.................................................................................................................................11
5. Specications................................................................................................................................ 12
6. System Components................................................................................................................... 12
7. Installation..................................................................................................................................... 13
8. Operation....................................................................................................................................... 14
8.1 Overview.....................................................................................................................................................14
8.2 User Interface............................................................................................................................................15
8.3 Practical Operation..................................................................................................................................15
8.4 Program Operation ................................................................................................................................16
8.5 Operational Safety...................................................................................................................................19
9. Maintenance................................................................................................................................. 20
9.1 Cleaning ......................................................................................................................................................20
9.2 Repair and Service...................................................................................................................................21
9.3 Storage Conditions..................................................................................................................................21
10. Troubleshooting......................................................................................................................... 21
11. Related products........................................................................................................................ 22
11.1 Compatible Substrates........................................................................................................................22
11.2 Related Equipment...............................................................................................................................22

4
1. Overview
The UV Ozone Cleaner is part of of the Institute of Physics award-winning Solar Cell Prototyping Platform*.
It provides a simple, inexpensive, and ecient method of obtaining ultra-clean surfaces free of organic
contaminants. The UV Ozone Cleaner can clean a wide range of substrates, such as quartz, silicon, gold,
nickel, aluminium, gallium arsenide, alumina, and glass slides.
The UV ozone cleaning process can produce an atomically-clean surface in only a few minutes. However, the
substrate surface must be nominally clean beforehand. The cleaning rate of UV ozone using atmospheric
oxygen at ambient conditions depends on the nature of the contaminant molecules, but is typically of the
order of 0.1 - 1.0 Å/s. The exact exposure times and methods required to remove various contaminants will
vary and should be determined empirically.
The Ossila Solar Cell Prototyping Platform is a complementary collection of substrates, materials, and
equipment as part of a high-performance standard photovoltaic reference architecture. This platform
enables researchers to produce high-quality, fully-functional solar cells which can be used as a reliable
baseline.
For more information: ossila.com/pages/solar-cell-prototyping-platform
• Improving surface hydrophilicity
• Surface cleaning
• Preparation for thin-lm deposition and surface treatment
• Ultraviolet curing
• Surface sterilization
• Removal of surface monolayers
• Surface oxidation
• Photoresist
• Resins
• Human skin oils
• Cleaning solvent residues
• Plastic surface/silicon oil residues
• Solder ux
1.1 Applications
1.2 Contaminants
*

5
2. EU Declaration of Conformity (DoC)
We
Company Name: Ossila Limited
Postal Address: Solpro Business Park, Windsor Street.
Postcode: S4 7WB
City: Sheeld
Telephone number: +44 (0)114 2999 180
declare that the DoC is issued under our sole responsibility
and belongs to the following product:
Product: UV Ozone Cleaner (L2002A2)
Serial number: L2002A-2000-2000-2000- xxxx
Object of declaration:
UV Ozone Cleaner (L2002A2)
The object of declaration described above is in conformity
with the relevant Union harmonisation legislation:
Low Voltage Directive 2014/35/EU
EMC Directive 2014/30/EU
RoHS Directive 2011/65/EU
The following harmonised standards and technical specications
have been applied:
BS EN 61010-1:2010 Safety requirements for electrical equipment for
measurement, control, and laboratory use.
Signed:
Name: Dr James Kingsley
Place: Sheeld
Date: 01/02/2018

6
[Декларация] за съответствие на ЕС
Производител: Ossila Ltd., Solpro Business Park, Windsor Street, S4 7WD, Великобритания
Декларира с цялата си отговорност, че посоченото оборудване съответства на приложимото законодателство на ЕС за
хармонизиране, посочено на предходната(-ите) страница(-и) на настоящия документ.
[Čeština] Prohlášení o shodě EU
Výrobce: Ossila Ltd., Solpro Business Park, Windsor Street, S4 7WD, Spojené Království
Prohlašujeme na vlastní odpovědnost, že uvedené zařízeni je v souladu s příslušnými harmonizačními předpisy EU uvedenými na
předchozích stranách tohoto dokumentu.
[Dansk] EU-overensstemme lseserklærin g
Producent: Ossila Ltd., Solpro Business Park, Windsor Street, S4 7WD, UK
Erklærer herved, at vi alene er ansvarlige for, at det nævnte udstyr er i overensstemmelse med den relevante EU-
harmoniseringslovgivning, der er anført på den/de foregående side(r) i dette dokument.
[Deutsch] EU-Konformitätserklärung
Hersteller: Ossila Ltd., Solpro Business Park, Windsor Street, S4 7WD, Vereinigtes Königreich
Wir erklären in alleiniger Verantwortung, dass das aufgeführte Gerät konform mit der relevanten EU-Harmonisierungsgesetzgebung
auf den vorangegangenen Seiten dieses Dokuments ist.
[Eesti keel] ELi vastavusavaldus
Tootja: Ossila Ltd., Solpro Business Park, Windsor Street, S4 7WD, UK
Kinnitame oma ainuvastutusel, et loetletud seadmed on kooskõlas antud dokumendi eelmisel lehelküljel / eelmistel lehekülgedel ära
toodud asjaomaste ELi ühtlustamise õigusaktidega.
[Ελληνικά] Δήλωση πιστότητας ΕΕ
Κατασκευαστής: Ossila Ltd., Solpro Business Park, Windsor Street, S4 7WD, Ηνωμένο Βασίλειο
Δηλώνουμε υπεύθυνα όn ο αναφερόμενος εξοπλισμός συμμορφώνεται με τη σχεnκή νομοθεσία εναρμόνισης της ΕΕ που υπάρχει
σnς προηγούμενες σελίδες του παρόντος εγγράφου.
[Español] Declaración de conformidad UE
Fabricante: Ossila Ltd., Solpro Business Park, Windsor Street, S4 7WD, Reino Unido
Declaramos bajo nuestra única responsabilidad que el siguiente producto se ajusta a la pertinente legislación de armonización de la
UE enumerada en las páginas anteriores de este documento.
[Français] Déclaration de conformité UE
Fabricant: Ossila Ltd., Solpro Business Park, Windsor Street, S4 7WD, Royaume-Uni
Déclarons sous notre seule responsabilité que le matériel mentionné est conforme à la législation en vigueur de l’UE présentée sur la/
les page(s) précédente(s) de ce document.
[Hrvatski] E.U izjava o sukladnosti
Proizvođač: Ossila Ltd., Solpro Business Park, Windsor Street, S4 7WD, Velika Britanija
Izjavljujemo na vlastitu odgovornost da je navedena oprema sukladna s mjerodavnim zakonodavstvom EU-a o usklađivanju koje je
navedeno na prethodnoj(nim) stranici(ama) ovoga dokumenta.
[Italiano] Dichiarazione di conformità UE
Produttore: Ossila Ltd., Solpro Business Park, Windsor Street, S4 7WD, UK
Si dichiara sotto la propria personale responsabilità che l’apparecchiatura in elenco è conforme alla normativa di armonizzazione UE
rilevante indicata nelle pagine precedenti del presente documento.
[Latviešu] ES atbils tības deklarācija
Ražotājs: Ossila Ltd., Solpro Business Park, Windsor Street, S4 7WD, UK
Ar pilnu atbilclību paziņojam, ka uzskaitītais aprīkojums atbilst attiecīgajiem ES saskaņošanas tiesību aktiem, kas minēti iepriekšējās šī
dokumenta lapās.

7
[Lietuvių k.] ES atitikties deklaracija
Gamintojas: Ossila Ltd., Solpro Business Park, Windsor Street, S4 7WD, UK
atsakingai pareiškia, kad išvardinta įranga atitinka aktualius ES harmonizavimo teisės aktus, nurodytus ankstesniuose šio dokumento
[Magyar] EU-s megfelelőségi nyilatkozat
Gyártó: Ossila Ltd., Solpro Business Park, Windsor Street, S4 7WD, UK
Kizárólagos felelősségünk mellett kijelentjük, hogy a felsorolt eszköz megfelel az ezen dokumentum előző oldalán/oldalain található
EU-s összehangolt jogszabályokra vonatkozó rendelkezéseinek.
[Nederlands] EU-Conformiteitsverklaring
Fabrikant: Ossila Ltd., Solpro Business Park, Windsor Street, S4 7WD, UK
Verklaart onder onze uitsluitende verantwoordelijkheid dat de vermelde apparatuur in overeenstemming is met de relevante
harmonisatiewetgeving van de EU op de vorige pagina(‘s) van dit document.
[Norsk] EU-samsvarserklæ ring
Produsent: Ossila Ltd., Solpro Business Park, Windsor Street, S4 7WD, UK
Erklærer under vårt eneansvar at utstyret oppført er i overholdelse med relevant EU-harmoniseringslavverk som står på de(n) forrige
siden(e) i dette dokumentet.
[Polski] Deklaracja zgodności Unii Europejskiej
Producent: Ossila Ltd., Solpro Business Park, Windsor Street, S4 7WD, UK
Oświadczamy na własną odpowiedzialność, że podane urządzenie jest zgodne ze stosownymi przepisami harmonizacyjnymi Unii
Europejskiej, które przedstawiono na poprzednich stronach niniejszego dokumentu.
[Por tuguês] Declaração de Conformidade UE
Fabricante: Ossila Ltd., Solpro Business Park, Windsor Street, S4 7WD, Reino Unido
Declara sob sua exclusiva responsabilidade que o equipamento indicado está em conformidade com a legislação de harmonização
relevante da UE mencionada na(s) página(s) anterior(es) deste documento.
[Română] Declaraţie de conformitate UE
Producător: Ossila Ltd., Solpro Business Park, Windsor Street, S4 7WD, Regatul Unit
Declară pe proprie răspundere că echipamentul prezentat este în conformitate cu prevederile legislaţiei UE de armonizare aplicabile
prezentate la pagina/paginile anterioare a/ale acestui document.
[Slovensky] Vyhlásenie o zhode pre EÚ
Výrobca: Ossila Ltd., Solpro Business Park, Windsor Street, S4 7WD, Spojené kráľovstvo
Na vlastnú zodpovednosť prehlasuje, že uvedené zariadenie je v súlade s príslušnými právnymi predpismi EÚ o harmonizácii
uvedenými na predchádzajúcich stranách tohto dokumentu.
[Slovenščina] Izjava EU o skladnosti
Proizvajalec: Ossila Ltd., Solpro Business Park, Windsor Street, S4 7WD, UK
s polno odgovornostjo izjavlja, da je navedena oprema skladna z veljavno uskladitveno zakonodajo EU, navedeno na prejšnji strani/
prejšnjih straneh tega dokumenta.
[Suomi] EU-vaatimustenm ukaisuusvakuutus
Valmistaja: Ossila Ltd., Solpro Business Park, Windsor Street, S4 7WD, UK
Vakuutamme täten olevamme yksin vastuussa siitä, että tässä asiakirjassa luetellut laitteet ovat tämän asiakirjan sivuilla edellisillä
sivuilla kuvattujen olennaisten yhdenmukaistamista koskevien EU-säädösten vaatimusten mukaisia.
[Svenska] EU-försäkran om överensstämmelse
Tillverkare: Ossila Ltd., Solpro Business Park, Windsor Street, S4 7WD, Storbritannien
Vi intygar härmed att den utrustning som förtecknas överensstämmer med relevanta förordningar gällande EU-harmonisering som
fmns på föregående sidor i detta dokument.

8
3. Safety
3.1 Warning
• Operate within fume cupboard in a room with suitable air ventilation at all times
• Only use the power cord (and transformer) supplied with the unit
• Mains inlet rated for 230V ± 10%. For 110V mains supplies, use the transformer supplied
• Do not cover the ventilation slots
• If the lamp breaks, leave the room ventilating for at least 15 minutes & contact Ossila
• The unit must be connected to a grounded power outlet
3.2 Use of Equipment
The UV Ozone Cleaner is designed to be used as instructed. It is intended to be operated in a laboratory
environment under a fume cupboard/hood and is designed to be used in the following environmental
conditions:
• Indoors in a laboratory environment (pollution degree 2)
• Altitudes up to 2000 m
• Temperatures of 5°C to 40°C; maximum relative humidity of 80% up to 31°C.
The cleaner is supplied with a power cord (and if necessary an additional power transformer) for the country
of purchase, in accordance with European Commission regulations and British Standards. Use of any other
electrical power cables, adaptors, or transformers is not recommended.
3.3 Hazard Icons
The symbols shown in Table 3.1 can be found at points throughout the manual. Note each warning before
attempting any associated operations.
Table 3.1. Hazard warning labels used in this manual.
Symbol Associated Hazard
General warning or caution, which accompanying text will explain
Electrical shock
Severe injury or death by electrical shock
9
UV radiation
Ozone inhalation
Explosion
3.4 General Hazards
Before installing or operating the UV Ozone Cleaner, there are several health and safety precautions which
must be followed and executed to ensure safe installation and operation.
WARNING: Improper handling when operating or servicing this equipment can result in serious
injury. Read this manual before operating or servicing this equipment.
I. DANGER: DO NOT use the UV Ozone Cleaner in the presence of an explosive
atmosphere.
II. WARNING: To avoid electrical shock or injury, do not remove tray or try to access any
internal parts. Servicing should only be carried out by a trained professional. Before
servicing, disconnect the power cord and wait 10 minutes (high voltage may persist
in capacitors for some time after removal of power).
III. CAUTION: The UV Ozone Cleaner uses a ground-type power plug, which must be
connected to a grounded outlet to prevent electrical shock. The UV Ozone Cleaning
unit will be supplied with an earthed plug appropriate for the country of purchase.
IV. The UV lamp is a mercury vapour lamp. The user may be exposed to mercury if
the lamp glass breaks. If this happens, please abide by the following rules to
minimise exposure:
• Ensure the power is disconnected to avoid the risk of electrocution.
• Store the container and UV Ozone Cleaner in a fume hood and leave the room
under ventilation for at least 15 minutes.
• Using cut-resistant gloves, collect any stray pieces of glass in a sealed container.
Dispose of the glass at a suitable collection point.
V. The UV Ozone Cleaner has a high voltage source. Do not attempt to open the unit.
10
3.5 Power Cord Safety
3.7 Health and Safety – Installation
3.8 Health and Safety – Operation
3.6 Servicing
I. Emergency power disconnect options: Use the power cord as a disconnecting
method and remove it from the power source. To facilitate disconnect, make sure
the power outlet for this cord is readily accessible to the operator.
II. Only use the power cord (and transformer if using 110 V mains supply) supplied
with the UV Ozone Cleaner. Using an unearthed plug may result in serious injury or
death.
I. High-intensity, mercury vapour lamps can generate extreme heat and temperatures.
Furthermore, ozone is a powerful oxidising agent and can react explosively with
combustible materials. Keep ammable materials a minimum of three feet away
from operating equipment.
II. The UV Ozone Cleaner is intended for operation inside a fully-functioning fume hood
or fume cupboard only. There is no ozone ltration system incorporated into the UV
Ozone Cleaner.
I. UV radiation can cause severe burns to the eyes and skin. An integrated safety
interlock prevents the lamp from being powered on whilst the tray is open. As a
precaution, never look directly into the sample chamber when the UV ozone cleaner
unit is powered on.
II. Ozone is a highly reactive substance and can cause adverse health eects at the
sites of initial contact: The respiratory tract, lungs — and at higher concentrations,
the eyes. The principal health eects are caused by irritation or damage to the small
airways of the lungs, and symptoms include coughing and a feeling of tightness in
the chest. Uncontrolled exposure to high levels of ozone could lead to more severe
health eects.
If servicing is required, please return the unit to Ossila Ltd. Any other action will void the warranty.

11
3.9 Health and Safety – Servicing
4.1 Packing List
III. When operating the UV Ozone Cleaner, air ow in and around the unit must remain
unobstructed to prevent the unit from overheating. If the temperature inside the
sample chamber reaches above 65 °C, the unit will automatically switch o to
prevent overheating. Allow the system to cool down to room temperature before
resuming use.
IV. IMPORTANT NOTE: Excessive cooling will diminish the lamp’s operating voltage
and eectiveness, whereas Inadequate cooling may cause damage to system
components.
V. The UV Ozone Cleaner has a high voltage source. Do not attempt to open the unit.
I. Service or installation work that includes integrating electrical components should
only be performed by an Ossila engineer. Never alter the wiring of any purchased
equipment. If changes are made, such alterations may damage the equipment,
cause injury, or even death. At the very least, such alterations will void your warranty.
The standard items included with the UV Ozone Cleaner are:
• UV Ozone Cleaner unit
• Power cord set (specic for country of operation)
• User manual
4. Unpacking
4.2 Damage Inspection
Examine the components for evidence of shipping damage. If damage has occurred, please contact Ossila
directly for further action. The UV lamp is a mercury vapour lamp and the user may be exposed to mercury
only if the glass of the lamp is cracked or broken. If this happens, please contact Ossila after abiding by these
rules to minimise exposure:
1. Ensure the power is disconnected to avoid the risk of electrocution.
2. Store the container and UV Ozone Cleaner in a fume hood and leave the room under ventilation for at
least 15 minutes.
3. Using cut-resistant gloves, collect any stray pieces of glass in a sealed container. Dispose of the glass at a
suitable collection point.

12
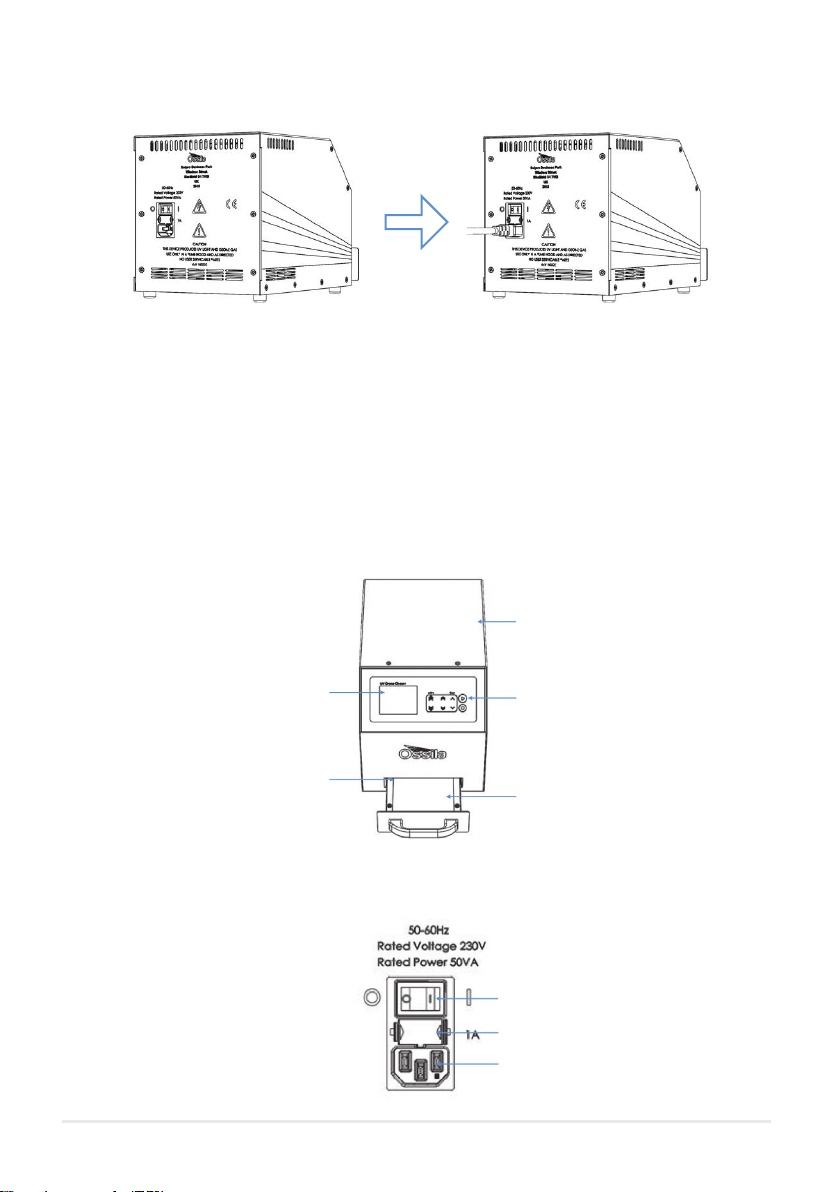
The UV Ozone Cleaner comprises two items:
• UV Ozone Cleaner unit (Figure 6.1).
• Power supply cord (Figure 6.2). The UV Ozone Cleaner unit is powered by 230V, 50/60Hz supply,
Countries with a 110V power supply are supplied with an additional power transformer.
The UV Ozone Cleaner specications are shown in Table 5.1
Table 5.1. UV Ozone Cleaner specications.
6. System Components
UV Ozone Cleaner Specications
UV Lamp Synthetic quartz 4 x 4 grid UV lamp
UV lamp key wavelengths 185 nm and 254 nm
Power supply 230V ± 10 %; 50/60Hz, 50 VA
Class of protection Class I
Degree of protection IP20
Maximum run time 59 minutes and 59 seconds
Safety features Interlock; thermal cut-out
Unit dimensions Width: 193 mm
Height: 230 mm
Depth: 300 mm
Tray dimensions 100 mm x 100 mm
Fuses 1 A slow blow
Weight 5 kg
5. Specications

13
Figure 6.1. UV Ozone Cleaner.
Figure 6.2. Main power cord adapter. The UV Ozone Cleaner ships with a suitable plug for the country of purchase.
7. Installation
1. Place the unit on a solid, level surface inside a fume cupboard.
i. Ensure the area is free from vibrations, temperature extremes and highly ammable or
explosive materials.
2. Before plugging in the UV Ozone Cleaner, ensure the power switch on the unit is switched to the ‘0’
position (o).
3. Connect the power cord to the UV Ozone Cleaner unit.
i. See Figure 7.1 to see how to connect the UV Ozone Cleaner to the power supply cable.
4. Switch the UV Ozone Cleaner power switch to the ‘I’ position to turn on.
14
Power switch
Fuse socket
Power socket
8. Operation
8.1 Overview
Figure 8.2 UV Ozone power switch, fuse socket, and power socket position on the back panel.
Figure 7.1. Plugging in the UV Ozone Cleaner power cord cable.
Figure 8.1. Components of the UV Ozone Cleaner
A top-down view of the UV Ozone Cleaner is shown in Figure 8.1, with all the relevant components
highlighted. Figure 8.2 shows the power cord socket, fuse socket, and the power switch.
Durable metal casing
Simple keypad for programming
Substrate tray
Clear LCD display
Internal safety interlock prevents the
lamp being on when tray is open

15
Figure 8.3 shows the front panel of the UV Ozone Cleaner. The function of each of the keypad buttons is
explained in Table 8.1.
Table 8.1. Operational buttons and their associated functions.
Figure 8.3. UV Ozone Cleaner LCD screen and keypad.
Button Function
START Starts operation for the Set Time programmed
STOP Terminates the running program and resets the Set Time to zero
MIN Increase the set time by 1 minute
Decrease the set time by 1 minute
SEC Increase the set time by 10 seconds
Decrease the set time by 10 seconds
Increase the set time by 1 second
Decrease the set time by 1 second
8.2 User Interface
8.3 Practical Operation
Operate within fume cupboard in a room with suitable air ventilation at all times.
1. Open the tray door.
2. Carefully load your sample to be cleaned onto the tray.
I. The tray surface may become slippery with use of the UV Ozone Cleaner; take
care to avoid your sample sliding o the surface.
16
8.4 Program Operation
II. WARNING: Should your sample fall inside of the UV Ozone Cleaner unit, do not
attempt to retrieve it. Doing so may result in damage to the unit or personal
injury. The UV Ozone Cleaner can operate safely should small objects fall into
the tray (providing the tray door can be fully closed).
3. Program the UV Ozone Cleaner with the desired Set Time and press the start
button (see section below).
4. Once the program has nished, open the tray door and remove your sample.
WARNING! High voltage
The internal UV lamp can operate at a maximum of 4000 V. Make sure the unit is
connected to a grounded power outlet. Ensure the area around the back of the unit
is kept clear. It is good practice to keep any cables around the unit in a tidy manner.
Avoid keeping any solvents around this piece of equipment.
WARNING! Ultraviolet light
The low-pressure mercury vapour grid lamp inside this equipment emits harmful UV
radiation. Avoid exposure at all times. Avoid keeping any solvents around this piece
of equipment.
WARNING! Inhalation hazard
Ozone is produced by this equipment during operation. Use only inside a fume
cupboard and in an area where appropriate ventilation is available.
1. Turn the UV Ozone Cleaner power switch on (position ‘I’); the bootup screen is shown Figure 8.4.
Figure 8.4. Bootup screen.
17
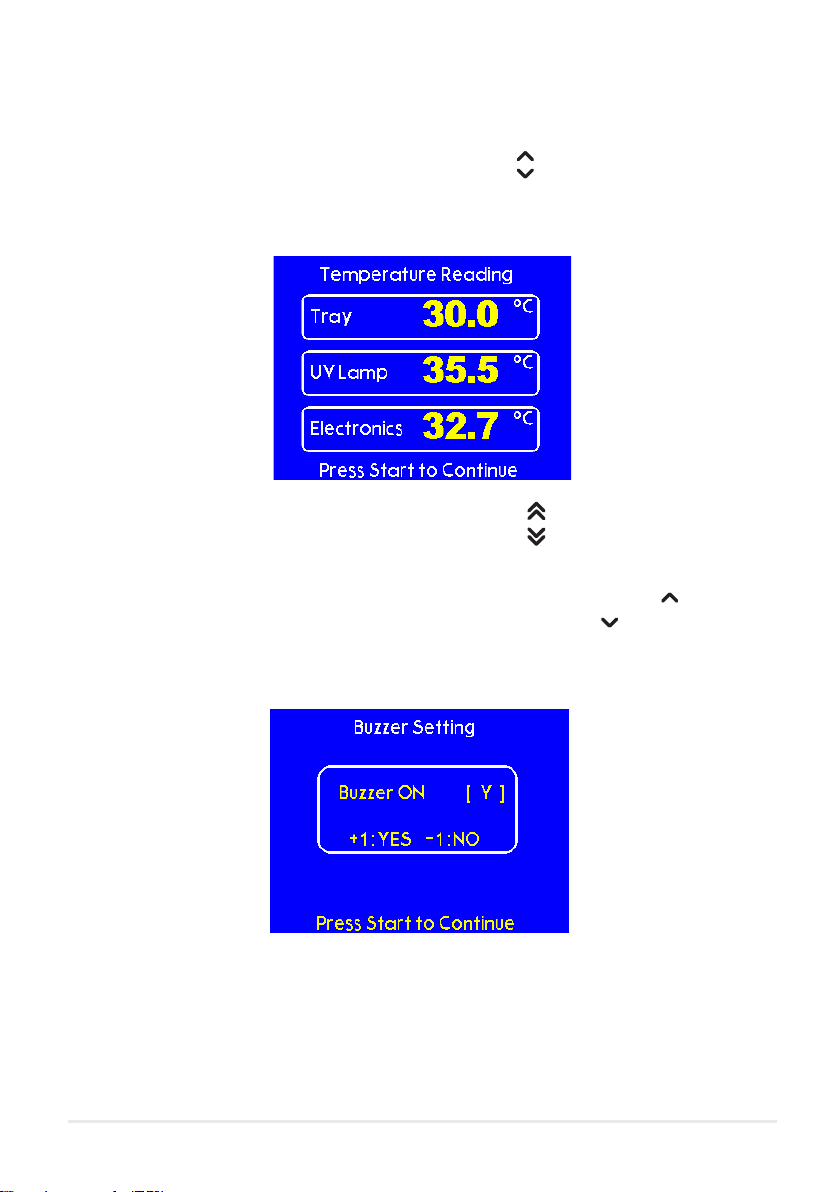
2. During the bootup time, the user can enter the buzzer setting and temperature reading menu screens
for the UV Ozone Cleaner.
I. Press and hold both single-increment second buttons at the same time to see
the temperature readings display as in Figure 8.5.
3. To exit the Settings page, press the START button to proceed to continue.
4. The user must read the caution message and press START to enter the main screen of the UV Ozone
Cleaner as shown in Figure 8.7.
II. Press and hold both double-increment second buttons at the same time to
enter the buzzer settings as in Figure 8.6.
III. To change the buzzer settings, press the single-increment up second button to turn
the buzzer sound on, or the single-increment down second button to turn the buzzer
sound o.
Figure 8.5. Temperature readings display.
Figure 8.6. Buzzer settings menu.

18
Figure 8.7. Caution screen
Figure 8.8 Set Time screen.
5. Modify the Set Time using the Minute (MIN) and Second (SEC) buttons on the keypad. The maximum
value of the timer is 59 min 59 secs (as shown in Figure 8.8).
6. Once the timer has been set, press the START button to run the program. The LCD will display the
following information (as shown in Figure 8.9).
I. The Elapsed timer will begin and the LED indicator light will switch on.
II. When the Elapsed time matches the Set Time, the one-note buzzer will sound — indicating the
program has nished.
III. While the program is running, the user can stop the program by pressing the STOP button. This
will also reset the Set Time to 00:00.

19
Figure 8.9. Run screen
Figure 8.10. ‘TRAY OPEN’ warning.
8.5 Operational Safety
(I) Safety Interlock
If the tray is opened while the system is running the program will automatically stop. Turn the lamp OFF and
reset the Set Time to 00:00. The display will indicate ‘TRAY OPEN’ (as shown in Figure 8.10).
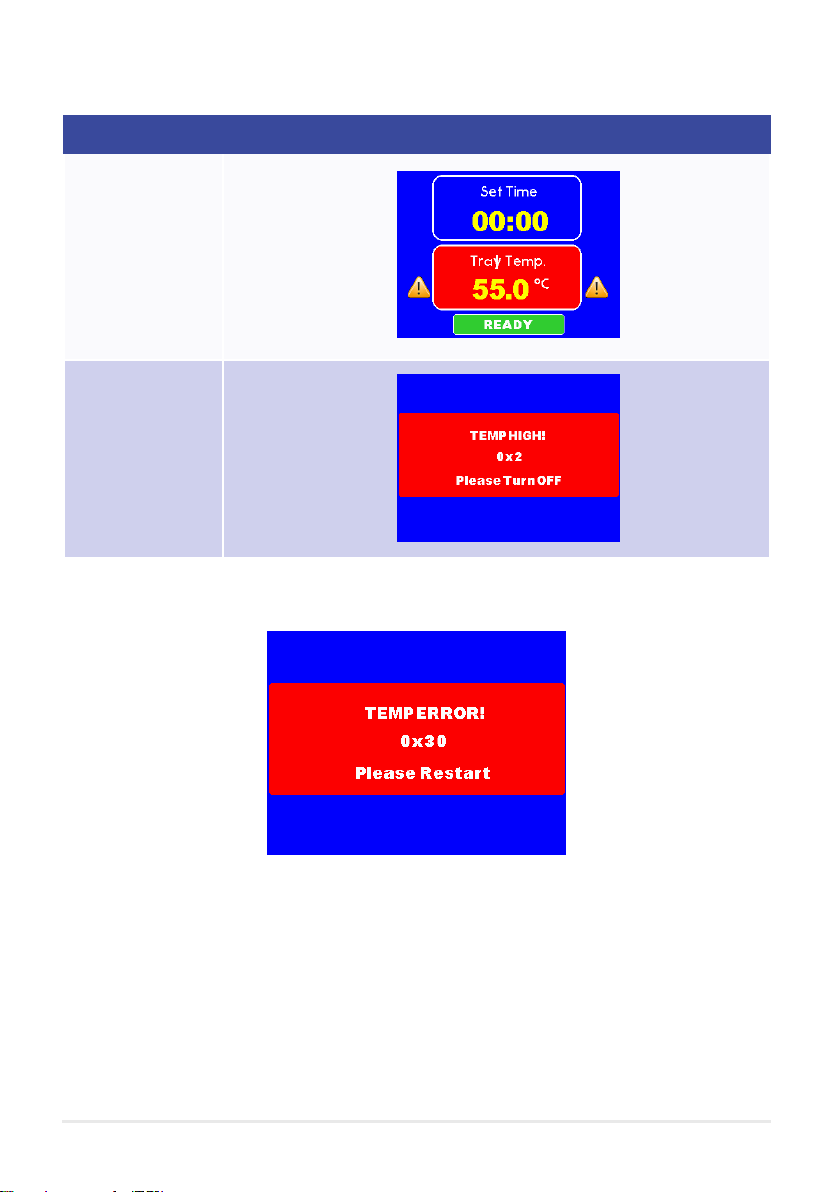
(II) High Temperature Safety Warning
If one or more of the internal temperature sensors reads above certain temperature value, a high
temperature warning will appear on the screen. Table 8.2 shows the dierent warnings for this unit for given
temperatures. The error code that is displayed when the tray or electronics sensor exceeds 65 °C indicates
which sensor is at a high temperature and is used for troubleshooting.
(III) Temperature Error
If one of the temperature sensors gives an error reading, a warning (as shown in Figure 8.11) will appear and
the user is required to restart the unit. The error code that is displayed indicates which sensor is in error and
is used for troubleshooting.
20
9. Maintenance
Maintenance consists of periodic cleaning. The exterior of the instrument can be cleaned with a clean, dry
cloth to remove any oil, grease, or grime. Never use liquid solvents or detergents. Repairs or servicing not
covered in this manual should only be performed by qualied personnel.
9.1 Cleaning
Figure 8.11. Temperature error warning.
Table 8.2. High temperature warning.
Warning Display
HIGH TEMP
(if tray or electronics is
> 50°C)
VERY HIGH TEMP
(if tray or electronics is
> 65°C)

21
10. Troubleshooting
There are no user-serviceable parts in this unit except for the fuse which is accessible externally. If the unit
is faulty, return it to Ossila Limited. Our service department will promptly quote to repair any faults that
occur outside the warranty period.
The UV Ozone Cleaner should be kept in dry conditions; away from direct sources of heat or sunlight, and
in such a manner as to preserve the working life of the instrument.
9.2 Repair and Service
9.3 Storage Conditions
Problem Possible cause Action
No power /
display
a. The power switch on the unit is in the
OFF position
b. The power supply may not be
connected properly
c. The fuse on the rear panel has blown
d. If the unit was supplied with a
transformer, it may be faulty
e. Fault on circuit board
a. Check the connection and ensure the power is
turned ON
b. Ensure the unit is rmly plugged in to the power
supply and the plug is rmly connected to both
the power inlet and the power socket
c. Ensure the unit is unplugged. Check the fuse
on the rear panel. If it has blown, replace with a
suitably rated 1A slow blow fuse
d. Contact Ossila for a replacement transformer
e. If all the above causes have been considered,
there may be a fault on the board. Please contact
Ossila for information
Power but timer
does not operate
The tray door has not been closed
properly
‘TRAY OPEN’ will display
Ensure the tray door is fully closed.
The drawer should hold rmly in position when
this is the case.
Continuous
buzzer
Error in temperature reading
UV Ozone Cleaner temperature is
extremely high
Check the temperature reading by entering the
settings mode (referred to Section 8.4)
If the temperature is extremely high, turn the unit
OFF and allow sucient time for it to cool down
Table 10.1. Troubleshooting guidelines for the Ossila UV Ozone Cleaner
Table of contents
Other Ossila Ultrasonic Jewelry Cleaner manuals


