Oster CKSTSTMM10 User manual

EGG COOKER/MINI FOOD STEAMER
MAQUINA PARA PREPARAR HUEVOS/MINI
VAPORERA PARA ALIMENTOS
User Guide/ Guía del Usuario:
CKSTSTMM10
www.oster.com
Safety
Seguridad
How to use
Cómo usar
Cleaning
Cuidado y Limpieza
Recipes
Recetas
Warranty
Garantía

www.oster.com
IMPORTANT SAFEGUARDS
When using electrical appliances, basic safety precautions should always be followed,
including the following:
Read all instructions before using.1.
Do not touch hot surfaces. Use potholders when removing cover or handling2.
hot containers to avoid steam burns.
To protect against electrical shock, do not immerse cord, plug or base unit in3.
water or other liquids.
Close supervision is necessary when any appliance is used by or near children.4.
Unplug from outlet when not in use. Unplug before putting on or taking off5.
parts, and allow to cool before cleaning.
Do not operate any appliance with a damaged cord or plug, or after the6.
appliance malfunctions or has been damaged in any manner.
Do not use outdoors. Do not let cord hang over edge of table or counter, or7.
touch hot surfaces.
Do not operate appliance while empty or without water in the reservoir.8.
Do not place on or near a hot gas or electric burner, or in a heated oven.9.
Extreme caution must be used when moving an appliance containing hot10.
food or water or other hot liquids.
Do not use appliance for other than intended use.11.
Lift and open cover carefully to avoid SCALDING and allow water to drip into12.
steamer.
The use of accessory attachments not recommended by this appliance13.
manufacturer may cause hazards.
2

www.oster.com
THIS UNIT IS INTENDED FOR
HOUSEHOLD USE ONLY.
This appliance has a polarized alternating current plug (one blade is wider than
the other). To reduce the risk of electric shock, as a safety feature, this plug will fit
in a polarized outlet only one way. If the plug does not insert fully in the outlet,
reverse the plug. If it still fails to fit, contact a qualified electrician.
DO NOT ATTEMPT TO DEFEAT THIS SAFETY FEATURE.
EXTENSION CORD USE
A short power-supply cord is provided to reduce the risk resulting from becoming
entangled in or tripping over a longer cord. An extension cord may be used if care
is exercised in its use. If an extension cord is used, the electrical rating of the cord
must be at least as great as the electrical rating of the appliance.The extension
cord should be arranged so that it will not drape over the countertop or tabletop
where it can be pulled on by children or tripped over unintentionally.
SAVE THESE INSTRUCTIONS
Thank you for purchasing the OSTER® Egg Cooker/
Mini Food Steamer. Before you use this product for the first
time, please take a few moments to read these instructions
and keep it for reference. Pay particular attention to the Safety
Instructions provided. Please review the product service and
warranty statements. To learn more about Oster® products,
please visit us at www.oster.com or call us at 1-800-334-0759.
3

a
b
h
e
c
f
g
d
i
www.oster.com
LEARNING ABOUT YOUR
EGG COOKER/MINI FOOD STEAMER
4
aLid
Food Basket
Drip Tray
External Water Fill
Removable Heating
Element Sleeve
Base
Water Reservoir
Power Indicator Light
Timer
Food Separator
b
c
d
e
f
g
h
i
j
Poaching Trays
Egg Cup
k
l
j
l
k
k

www.oster.com 5
BEFORE USING YOUR OSTER®
EGG COOKER/MINI FOOD STEAMER
1Remove all packaging materials before using
2Before using, wash lid, food basket, food separator, poaching
trays, drip tray, egg cup and removable heating element
sleeve in warm soapy water; rinse and dry thoroughly. Wipe
down water reservoir with a clean, damp cloth. Be sure to
read the CARE AND CLEANING Section of this manual to
learn the correct methods for taking the unit apart and
cleaning.

www.oster.com
6
HOW TO:
USING YOUR EGG COOKER/MINI FOOD STEAMER
General Steps:
NOTE: Make sure the unit is turned OFF and unplugged
before use.
Place unit on a flat, sturdy surface with adequate clearance
(i.e., do not place under wall cabinets). The steamer unit and
components are not for use in ovens (microwave, convection
or conventional) or on stovetop.
1AFill Water Reservoir with clean water
only, as illustrated in Figure 1A.
Do not put any other liquids or
add any salt, pepper, etc., in the
water reservoir. Make sure the
water does not exceed the MAX
fill level or go lower than the MIN
fill level as indicated inside the
water reservoir.
BPlace removable heating
element sleeve inside the base,
around heating element, as
illustrated in Figure 1B, then
place the drip tray on the base
as illustrated in Figure 1C.
Figure 1A
Figure 1B
Figure 1C

www.oster.com 7
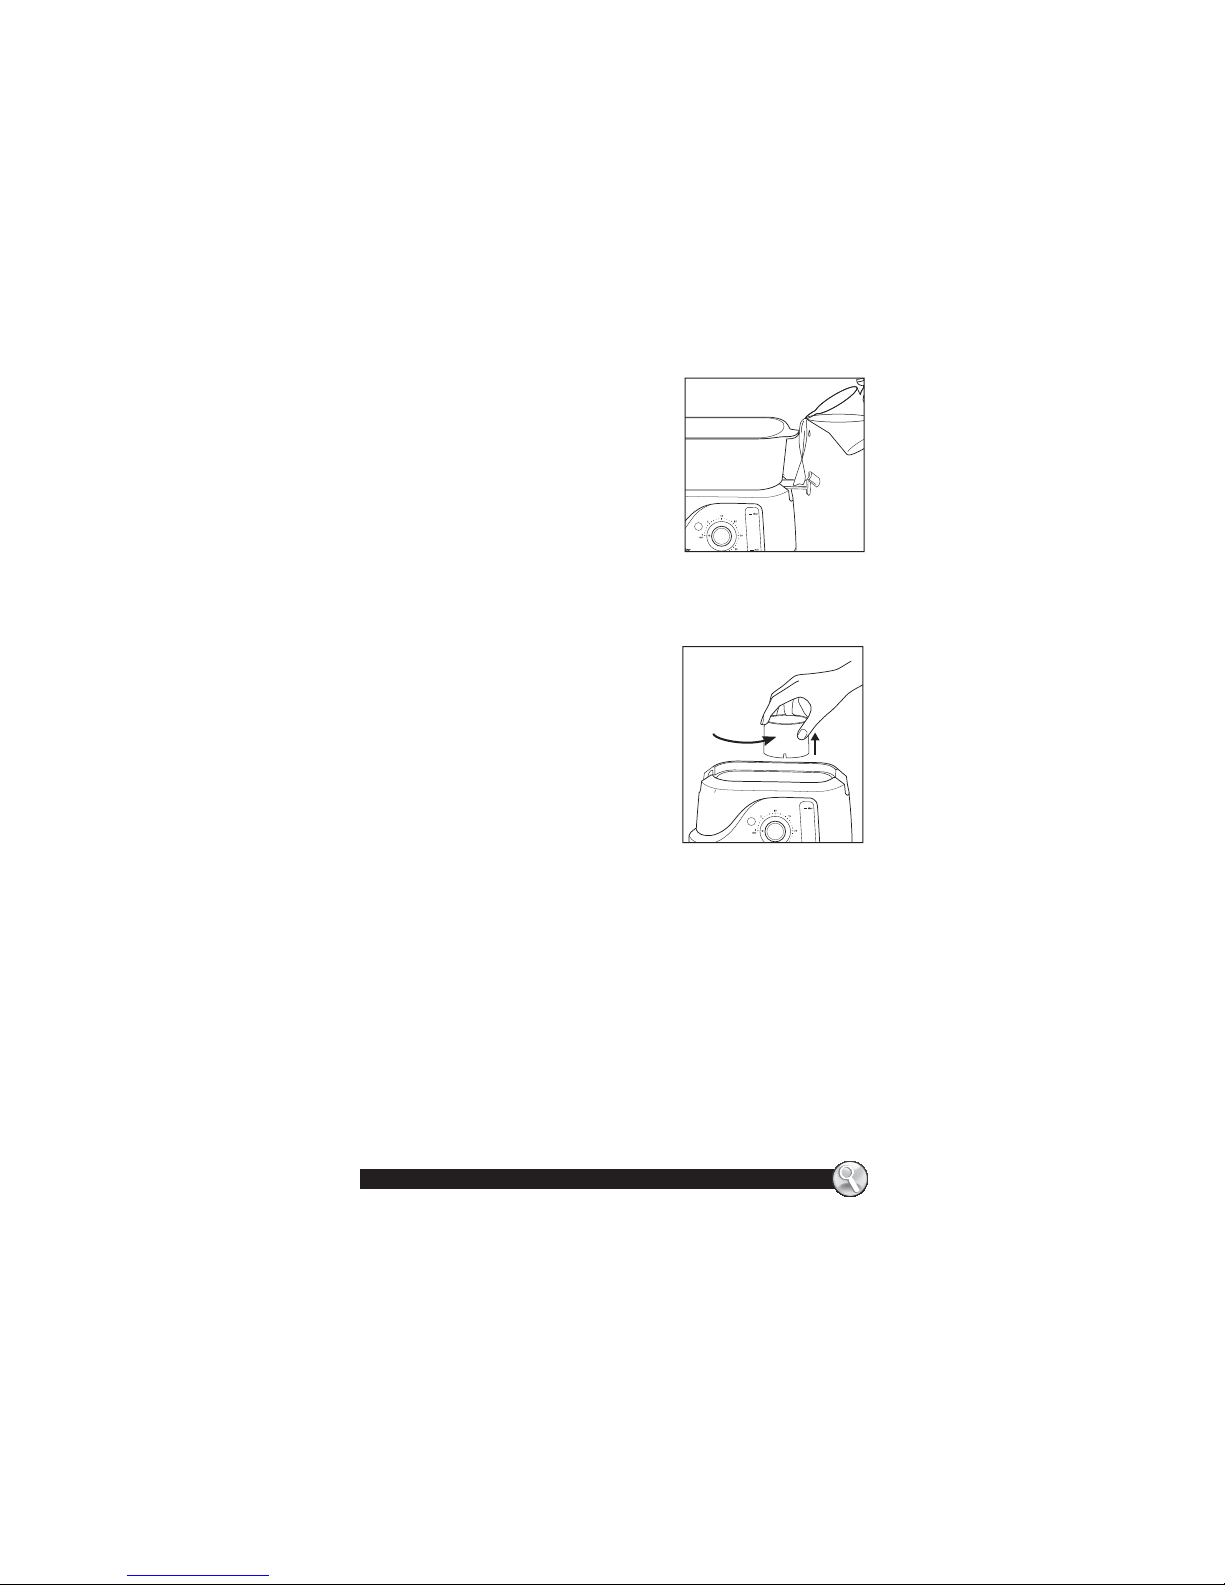
2You can also fill the water reservoir
through the External Water Fill as
illustrated in Figure 2. There are
MAX and MIN lines on the water
box to indicate the water level.
Even while food is still cooking,
if the water box shows that the
water level is low, you can add
water accordingly through the
External Water Fill without
moving the food basket.
NOTE: Water should never go below MIN line.
Instant Steam Function
Included is a removable heating
element sleeve. Before cooking,
when this sleeve is placed around the
heating element, the steam function
will automatically produce steam in 35
seconds. Do not operate the steamer
without the heating element sleeve.
PLEASE NOTE: The heating element
sleeve may be removed (as illustrated
in Figure 3). to allow cleaning of the
heating element. On the heating
element sleeve, there is a small indentation (cut) which should
face downward when replaced on the heating element.
For Soft, Medium, and Hard Boiled Eggs
You may soft, medium or hard boil up to eight eggs, or poach up
to four eggs in your Egg Cooker. Cooking times are estimates and
depend on the quantity, size, temperature of food, and desired
consistency. Consider all the cooking times given in the Egg
Cooking & Food Steaming Chart as suggestions.
1Rinse desired amount of eggs to cook—you may cook up
to eight eggs in egg cooker at a time. Place the eggs into
the food basket to fit into the indentations in the bottom
of the basket.
SLEEVE
Figure 2
Figure 3

www.oster.com
8
NOTE: This unit comes with an egg cup that includes an egg
pricker at the base of the cup. You can place an egg into the
egg cup to prick the large end of the egg. Pricking the large
end of the egg will help to prevent cracking while the eggs
are cooking.
2Place the food basket to rest on top
of the drip tray. Place lid on top of
the food basket and plug unit in, as
illustrated in Figure 4.
3 Refer to the Egg Cooking & Food
Steaming Chart to determine the
correct cook time. These times will
vary depending on the number of
eggs being cooked and the desired
consistency.
4Turn the control knob clockwise to
the time setting desired. The power
indicator light will automatically
come on.
5While the unit is operating, the red power indicator light will
be displayed indicating timer operation. After the unit has
cooked for the set amount of time, the red light will turn off,
and you will hear an audible alert.
6After cook time is complete, remove lid and cooked eggs
from food basket.
NOTE: Escaping Steam. Use caution when handling and
removing hot components. Remove eggs immediately to
prevent the eggs from overcooking.
HINT: Once eggs are done cooking, remove food basket from
base and place in a bowl of cold water to stop the cooking
process.
Figure 4

www.oster.com 9
For Poached Eggs
1 Rinse desired amount of eggs to poach—(unit can poach up
to 4 eggs in egg cooker at a time). Lightly butter or spray
vegetable oil on poaching trays.
2Crack one egg into each poaching section of the poaching
tray. Place poaching tray or trays inside the food basket by
grasping plastic handle in center of tray.
3Place the food basket to rest on top of the drip tray. Place
lid on top of the food basket and plug unit in.
4Refer to the Egg Cooking & Food Steaming Chart to
determine the correct cook time. These times will vary
depending on the number of eggs being poached.
5Turn the control knob clockwise to the time setting desired.
The power indicator light will automatically come on.
6While the unit is operating, the red power indicator light will
be displayed indicating timer operation. After the unit has
cooked for the set amount of time, the red light will turn off,
and you will hear an audible alert.
7After cook time is complete, remove lid and cooked eggs
from food basket. Loosen and remove eggs from tray using
a rubber spatula.
NOTE: Escaping Steam. Use caution when handling and
removing hot components. Remove eggs immediately to
prevent the eggs from overcooking.
FOR STEAMING
Steam cooking
Cooking food through steaming is a healthy and quick way to
cook a wide variety of foods. Whether in preparation for baby
food, for diet reasons or for pure flavor, steam cooking prepares
food at a very high heat and can overcook quickly.
You may steam up to 1.3 Qts. of food ( about 5 cups) at a time.
Steaming times are estimates and depend on the quantity, size
and temperature of food. Consider all the cook times given in
the Egg Cooking & Food Steaming Chart as suggestions.

www.oster.com
10
1Rinse vegetables, seafood, or other foods without sauce or
liquid (Can cook up to 1.3 quarts of food or about 5 cups of
food at a time). Place food in the food basket, arranging the
food in the center of the basket. Try not to block the steam
vents.
NOTE: Your mini steamer comes with a food separator. The food
separator allows you to steam two different types of food side
by side during the same steaming cycle. To use the food
separator, place between the vegetables, seafood, or other
foods that you would like to separate.
2Place the food basket to rest on top of the drip tray. Place lid
on top of the food basket and plug unit in.
3Refer to the Egg Cooking & Food Steaming Guide to
determine the correct cook time. These times will vary
depending on the quantity of food to steam.
4Turn the control knob clockwise to the time setting desired.
The power indicator light will automatically come on.
5While the unit is operating, the red power indicator light will
be displayed indicating timer operation. After the unit has
cooked for the set amount of time, the red light will turn off,
and you will hear an audible alert.
6 After cook time is complete, remove lid and food from food
basket.
NOTE: Escaping Steam. Use caution when handling and
removing hot components.
Boil-dry Feature
The egg cooker/mini food steamer has a self-protection feature
that will automatically cancel the cooking operation. This
indicates that the steamer is out of water, or too low on water to
complete the cooking cycle. Fill the reservoir with the proper
amount of water and reset the cook time.
NOTE: If you see the water level in the reservoir is close to the
indicated MIN line, re-fill with more water through the external
water fill.

www.oster.com
CARE & CLEANING
This appliance should be cleaned after every use.
NOTE: DO NOT IMMERSE BASE, PLUG OR CORD IN WATER OR
ANY OTHER LIQUIDS!
1Unplug cord from outlet. Before cleaning, allow steamer to
cool.
2Empty the drip tray and the water reservoir. If there is a small
amount of water remaining inside the water box, you can
just turn the unit upside down and water will come out from
the water inlet.
3Wash lid, food basket, drip tray, poaching trays, food separator
and removable heating element in hot, soapy water.
4Rinse and dry all parts, or wash on top rack of dishwasher.
5To clean water reservoir, wipe the inside with a clean, damp
cloth.
NOTE: Do not use abrasive cleaners
6In hard water areas, the scale may build up on the heating
element. If scale is allowed to accumulate, the steam could
turn off before the food is cooked. After 7–10 uses, pour
3 cups of clear vinegar into the water reservoir then fill with
water up to the MAX level. Do not place any other parts
in this procedure.
7Plug in and set timer to 20 minutes. When the timer rings,
unplug cord from outlet. Allow the unit to cool completely
before emptying the water reservoir. Use cold water to wipe
down the water reservoir several times.
11

www.oster.com
12
Egg Cooking and Food Steaming Guide
FOOD QUANTITY COOKTIME
VEGETABLES
Broccoli/Cauliflower 8 ounces 13-15 minutes
Green andWax Beans 8 ounces 10-12 minutes
Carrots, sliced in 1/2 inch pieces 6 large 12-14 minutes
Baby Carrots 8 ounces 12-14 minutes
Corn 2 large ears, halved 45-50 minutes*
Winter Squash, Acorn halved 22-24 minutes
Zucchini/Yellow Crookneck Squash, sliced in 1/2”rounds 2 large 19-20 minutes
Potatoes, medium red, cut into 1”pieces 2-4 potatoes 15-16 minutes
Sugar Snap Peas 8 ounces 12 1/2-13 minutes
Snow Pea Pods 8 ounces 12-13 minutes
MEATS
Breakfast Sausage, fully cooked, 3/4 inch thick 6 links 14-15 minutes
Sausage, fresh, 1 inch thick 6 links 18-20 minutes
Hamburger, 1/2 inch thick 1 patty 16-17 minutes
Chuck Steak, 3/4 inch thick 1/2 pound 16-20 minutes
Chicken, boneless tenders 6 16-18 minutes
Chicken, bone-in, halved breasts 2 large 45-48 minutes*
Hot Dogs 8 11-13 minutes
Meatballs frozen 12 ounces 13-14 minutes
Meatballs, 1”cooked, reheat 12 ounces 11-12 minutes
FISH
Large Shrimp 1 pound 11-12 minutes
Salmon 2 6-ounce fillets 12-13 minutes
FROZEN FOOD
Frozen corn kernels 1/2 bag 11-12 minutes
EGGS
Poached, large 2 10 minutes
Poached, large 4 14 minutes
Poached, extra-large 4 15 minutes
Soft Boiled 4 8 minutes
Soft Boiled 6 11 minutes
Soft Boiled 8 13 minutes
Hard Boiled 4 16 minutes
Hard Boiled 6 18 minutes
Hard Boiled 8 19 minutes
Eggs in a Cup 2 in 2 cups 12 minutes
*The Egg Cooker/Mini Food Steamer includes a 30 minute timer. The timer will need to be re-set for any cook times that exceed 30 minutes.

www.oster.com
HELPFUL HINTS & TIPS
FOR FOOD STEAMING:
Vegetables
1Clean the vegetables thoroughly. Cut off stems; trim, peel or
chop if necessary. Smaller pieces steam faster than larger ones.
2Quantity, quality, freshness, size/uniformity and temperature
of frozen food may affect steam timing. Adjust cooking time
as desired.
3Frozen vegetables should not be thawed before steaming.
4Frozen foods should be separated or stirred after 10-12
minutes. Use a long-handled fork or spoon to separate or stir
foods.
Fish and Seafood
1The steaming times listed in the chart are suggestions for
fresh, frozen or fully thawed seafood and fish. Before steaming,
clean and prepare fresh seafood and fish.
2Most fish and seafood cook very quickly. Steam in small
portions or in amounts as specified.
3When cooking shellfish, steam until shells open and discard
any shells that remain closed. When buying shellfish, be sure
to keep the bag open during transportation and storage to
ensure shellfish stay alive until cook time.
4Serve steamed seafood and fish plain or use seasoned butter
or margarine, lemon or favorite sauces.
5Adjust steaming times accordingly.
Frozen Food
When steaming frozen food, cook until food is thoroughly heated
and reaches temperatures above 175° F.
13

www.oster.com
14
Meat
Using an instant read thermometer to ensure foods such as
meat reach over 165° F will aid in knowing when meat is fully
cooked. Many instant read thermometers will fit through the
steam holes in the lid.
Cook times
Always err on the side of undercooking when trying to establish
exact cook times for specific foods. While times can be added
on, overcooking is permanent.
RECIPES
Hot Egg Salad
8 hard-cooked eggs, 1/2 teaspoon (2 ml) salt
coarsely chopped 1/4 teaspoon (1 ml) onion salt
2 cups (500 ml) diced celery dash of pepper
1 cup (250 ml) salad dressing 1–1/2 tablespoons (22 ml)
1 tablespoon (15 ml) butter, melted
chopped parsley 2 slices dry bread, crumbed
3/4 teaspoon (3 ml) dry mustard 1/3 cup (75 ml) chopped pecans
Preheat oven to 375° F (190° C). Combine eggs, celery, salad
dressing, parsley and seasonings; mix. Spoon into a buttered
shallow (1–1/2 liter) casserole. Combine butter, bread crumbs
and pecans. Sprinkle on casserole and bake 25–30 minutes.
Yield: 4-6 servings

www.oster.com
Sunday Brunch Treat
1 can ounces or 305 g) cream of
mushroom soup, undiluted
1 chicken bouillon cube
1 can (8 ounces or 227 g) mushrooms,
drained or 1/2 pound (227 g)
fresh mushrooms, sliced
3 poached eggs
3 English muffin halves, toasted
Combine cream of mushroom soup, bouillon cube and
mushrooms. Heat over med-lo heat. Fill “Water Reservoir”
of Egg Cooker with water. Season poaching dish and poach
3 eggs. Place poached eggs onto English muffin halves.
Spoon over sauce and garnish with parsley, if desired.
Yield: 3 servings
Eggs Florentine
1 cup (250 ml) medium white sauce 1 package (10 ounces or 280 g)
4 tablespoons (60 ml) grated frozen chopped spinach,
Parmesan cheese cooked and drained well
4 poached eggs
Prepare white sauce and add cheese. Mix well and set aside.
Spread spinach in a shallow buttered one-quart (1 liter) baking
dish and make four depressions in spinach. Place a poached
egg in each depression and pour sauce over eggs. Broil about 4”
(10 cm) from heat until bubbly and lightly browned.
Yield: 4 servings
Eggs Benedict
2 English muffins, split, toasted and buttered
4 slices cooked Canadian bacon
4 poached eggs
1 recipe Hollandaise or cheese sauce
Place a muffin half on each heated serving plate, top with
a slice of bacon and a poached egg. Spoon sauce over egg
and serve immediately.
Yield: 4 servings
15

www.oster.com
16
Egg-Tuna Sandwich
4 tablespoons (60 ml) salad dressing
1 slice medium onion
2 teaspoons (10 ml) lemon juice
1/2 teaspoon (2 ml) prepared mustard
1/2 teaspoon (2 ml) salt
1/4 teaspoon (1 ml) celery salt
1 can (7 ounces or 196 g) tuna fish, drained
4 hard-cooked eggs, quartered
Put all ingredients except eggs into Blender container, cover
and process at MIX (LO) until blended. Empty into a bowl.
Blender chop eggs two at a time and add to ingredients in bowl.
Toss lightly to mix.
Yield: 6 sandwiches
Eggs Divan Supreme
2 packages (10 ounces or 280 g) 1/2 teaspoon (2 ml) salt
frozen broccoli spears, thawed dash of white pepper
and well drained 1/2 cup (125 ml) Swiss cheese
1 medium onion, cut in eighths cubes
3 tablespoons (45 ml) butter 1/2 cup (125 ml) grated Parmesan
or margarine cheese
3 cups (750 ml) cooked ham pieces 3 tablespoons (45 ml)
(1/4”or 6cm thick) dry white wine
3/4 cup (200 ml) chicken broth 8 hard-cooked eggs, sliced
3/4 cup (200 ml) milk
3 tablespoons (45 ml) flour
Cook broccoli according to package directions. Blender chop
onion. Melt butter in medium saucepan and saute onion lightly.
Add ham pieces and stir until heated and lightly browned. Put
remaining ingredients except wine and eggs into Blender
container, cover and process at LIQUEFY (HI) until smooth. Pour
into saucepan and cook over medium heat, stirring constantly
until thickened. Add wine and mix well. Arrange broccoli spears
in a buttered casserole and arrange eggs on top. Pour sauce
over and sprinkle lightly with paprika. Broil 6” (15 cm) from heat
source until hot and bubbly and top is nicely browned.
Yield: 6 servings

www.oster.com
Devilish Egg Treat
4 tablespoons (60 ml) cold water 1/4 teaspoon (1 ml) hot pepper
1 envelope unflavored gelatin sauce
1/2 cup (125 ml) boiling water 1/4 green pepper, cut in pieces
1/2 cup (125 ml) mayonnaise 1 cup (250 ml) celery pieces
3/4 teaspoon (3 ml) salt 4 hard-cooked eggs, quartered
Put cold water and gelatin into Blender container. Cover and
process at STIR (LO) to soften. Remove feeder cap, add boiling
water and continue to process until gelatin is dissolved. If gelatin
granules cling to container, turn off motor, remove cover and
use rubber spatula to keep ingredients around processing
blades. Replace cover, process at LIQUEFY (HI) and add
mayonnaise, salt and hot pepper sauce through feeder cap
opening. Stop blender and add remaining ingredients. Cover
and process at GRIND (HI) 2 cycles. Pour into 3–CUP (750 ml)
mold or bowl. Chill until firm, about 3 hours.
Yield: 4-6 servings.
Low Cholesterol Egg Substitutes
Lightly coat the poaching dish with vegetable oil or a vegetable
spray. Divide 1 cup (250 ml) thawed Frozen Egg Substitute
among the 4 poaching cups, cover and turn the Timer to the
desired cook time. When light goes off, remove eggs from dish
immediately to prevent overcooking. Eggs may be served hot
or cooled and used in recipes calling for hard-cooked eggs.
17

www.oster.com
1 Year Limited Warranty
Sunbeam Products, Inc. doing business as Jarden Consumer Solutions or if
in Canada, Sunbeam Corporation (Canada) Limited doing business as Jarden
Consumer Solutions (collectively “JCS”) warrants that for a period of one year
from the date of purchase, this product will be free from defects in material
and workmanship. JCS, at its option, will repair or replace this product or
any component of the product found to be defective during the warranty
period. Replacement will be made with a new or remanufactured product or
component. If the product is no longer available, replacement may be made
with a similar product of equal or greater value.This is your exclusive warranty.
Do NOT attempt to repair or adjust any electrical or mechanical functions on
this product. Doing so will void this warranty.
This warranty is valid for the original retail purchaser from the date of initial
retail purchase and is not transferable. Keep the original sales receipt. Proof
of purchase is required to obtain warranty performance. JCS dealers, service
centers, or retail stores selling JCS products do not have the right to alter,
modify or any way change the terms and conditions of this warranty.
This warranty does not cover normal wear of parts or damage resulting from
any of the following: negligent use or misuse of the product, use on improper
voltage or current, use contrary to the operating instructions, disassembly,
repair or alteration by anyone other than JCS or an authorized JCS service
center. Further, the warranty does not cover: Acts of God, such as fire, flood,
hurricanes and tornadoes.
What are the limits on JCS’s Liability?
JCS shall not be liable for any incidental or consequential damages caused by
the breach of any express, implied or statutory warranty or condition.
Except to the extent prohibited by applicable law, any implied warranty or
condition of merchantability or fitness for a particular purpose is limited in
duration to the duration of the above warranty.
18

www.oster.com
JCS disclaims all other warranties, conditions or representations, express,
implied, statutory or otherwise.
JCS shall not be liable for any damages of any kind resulting from the purchase,
use or misuse of, or inability to use the product including incidental, special,
consequential or similar damages or loss of profits, or for any breach of contract,
fundamental or otherwise, or for any claim brought against purchaser by any
other party.
Some provinces, states or jurisdictions do not allow the exclusion or limitation
of incidental or consequential damages or limitations on how long an implied
warranty lasts, so the above limitations or exclusion may not apply to you.
This warranty gives you specific legal rights, and you may also have other
rights that vary from province to province, state to state or jurisdiction to
jurisdiction.
How to Obtain Warranty Service
In the U.S.A.
If you have any question regarding this warranty or would like to obtain
warranty service, please call 1-800-334-0759 and a convenient service center
address will be provided to you.
In Canada
If you have any question regarding this warranty or would like to obtain
warranty service, please call 1-800-667-8623 and a convenient service center
address will be provided to you.
In the U.S.A., this warranty is offered by Sunbeam Products, Inc. doing business
as Jarden Consumer Solutions located in Boca Raton, Florida 33431. In Canada,
thiswarrantyisofferedbySunbeamCorporation(Canada)Limiteddoingbusiness
as JardenConsumer Solutions,located at20 B HerefordStreet, Brampton,Ontario
L6Y 0M1. If you have any other problem or claim in connection with this product,
please write our Consumer Service Department.
PLEASE DO NOT RETURN THIS PRODUCT TO ANY OF
THESE ADDRESSES OR TO THE PLACE OF PURCHASE.
19

www.oster.com
20
NOTES/NOTAS
Table of contents
Languages:
Other Oster Egg Cooker manuals