oticon ConnectLine BS-F200 User manual

Instructions for use
TV Adapter 2.0

Introduction to this booklet
This booklet guides you on how to use and maintain your new TV Adapter. Please read
the booklet carefully including the Warning section. This will help you to achieve the full
benet of your new TV Adapter.
To support your eorts, we have put great care and attention into making sure that your
new TV adapter has the highest quality and is easy to use.
The complete system description is documented online at www.oticon.ca/connectline
Here you will also nd interactive presentations, “how to” videos and a support section
with frequently asked questions.
If you have additional questions about the use of your TV Adapter, please contact your
hearing care professional.
Intended use
TV Adapter 2.0 is intended to be used together with the Oticon Streamer
or Oticon Streamer Pro and Oticon wireless hearing instruments.
TV Adapter 2.0 enables the hearing instrument user to listen to
the TV, by wirelessly sending the TV sound from the TV adapter
through the Streamer directly to the hearing instruments.
191556CA-US / 2019.06.13 / Ver 1.0
191556CA-US / 2019.06.13 / Ver 1.0

TV adapter overview 8
Warnings 10
Installation 13
Placing the TV adapter 14
Connecting the TV adapter to a power outlet 16
Connecting the TV adapter to the TV 18
Connecting using TOSLINK 20
Connecting using RCA 22
Connecting using mini jack adapter 24
Connecting using SCART 26
Pairing the Streamer to the TV adapter 28
Volume control 32
Start TV listening 34
Turn on the TV sound 34
Turn o the TV sound 34
SelectMe, using more than one TV adapter 36
Technical information 38
IMPORTANT NOTICE
Please familiarize yourself with the entire content of this booklet before using
your TV adapter. It contains instructions and important information about the
use and handling of your TV adapter.
Contents
INSTALLATION GUIDEUSER GUIDE
Instructions for use
TV Adapter 2.0
7
INSTALLATION GUIDE
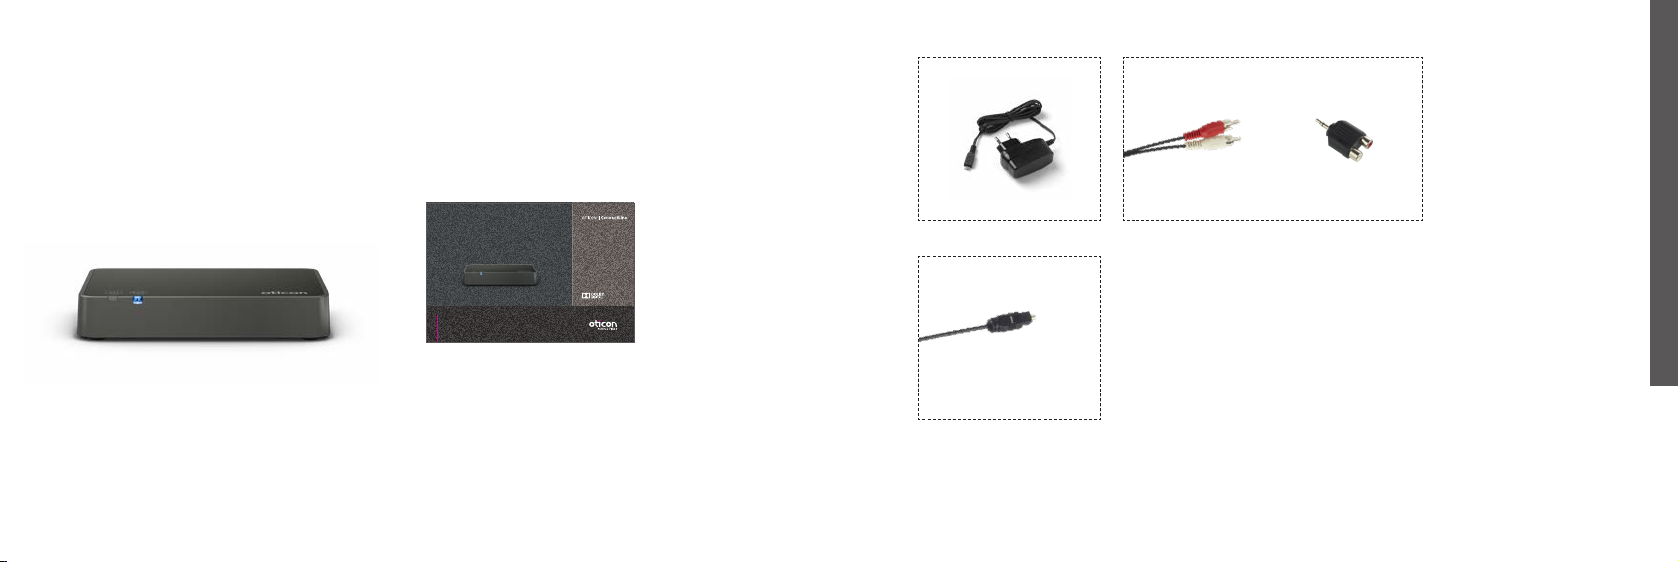
Package content
The TV adapter box consists of the following elements:
TV Adapter 2.0 This guide (Instructions for use)
Box 1
Box 3
Box 2
Power supply
TOSLINK
RCA cable Mini jack Adapter
OUT
IN
R
L
POWER
8 9
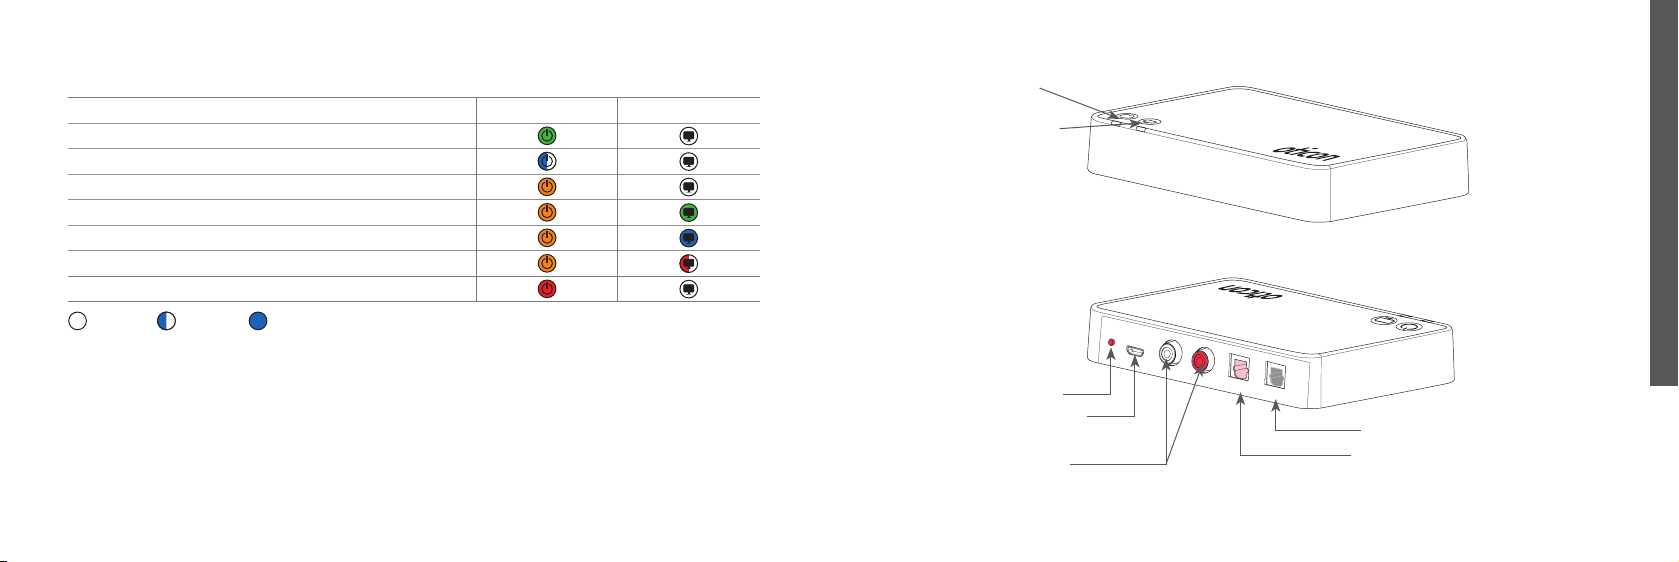
TV adapter overview
Back
Power supply
Front
TV indicator
Mode Power indicator TV indicator
Power on, no connection to the Streamer
In pairing mode
Streaming - no audio input detected
RCA inserted and streaming
TOSLINK inserted and streaming (digital)
TOSLINK inserted and streaming (invalid signal)*
Fault condition **
No light Blinking Steady
* Try other input connection
** Contact your hearing care professional
TOSLINK in
TOSLINK out
RCA left and right
Power indicator
For more information please refer to: www.oticon.ca/connectline
SelectMe
INSTALLATION GUIDE

10 11
You should familiarize yourself fully with the following general warnings and the
entire contents of this booklet before using your TV Adapter to ensure personal safety
and correct use. Consult your hearing care professional if you experience unexpected
operations or events with your TV Adapter.
Connection to external equipment
• The safety of the use of the TV Adapter with an auxiliary input cable is determined by
the external signal source. When the input cable is connected to equipment plugged
into a wall outlet, this equipment must comply with IEC-62368 (or IEC-60065,
IEC-60950 until June 20, 2019) or equivalent safety standards.
Interference
• Your TV adapter has been thoroughly tested for interference according to the most
stringent international standards. However, interference with your TV adapter and
other devices may occur, (e.g. some mobile telephones, citizens band devices and other
wireless devices). If this occurs, increase the distance between the TV adapter and the
interfering device.
Choking hazards and risk of swallowing small parts
• Your TV Adapter and its parts should be kept out of reach of children and anyone who
might swallow these items or otherwise cause injury to themselves.
If a part is swallowed, see a doctor immediately.
Warnings Warnings
INSTALLATION GUIDE
IMPORTANT NOTICE
Use a soft dry cloth to clean the TV adapter. It must never be washed or immersed in
water or other liquids.

13
Installation
Activating the TV adapter for the rst time
Before you can use the Streamer and your hearing aids with your TV, the TV adapter must
be connected to a power outlet, connected to the TV and paired with your Streamer.
This is a step-by-step guide on how to install the TV adapter.
All needed parts for the installation are included in the package.
INSTALLATION GUIDE

14 15
Placing the TV adapter
There are two options of placing the TV adapter:
1. Close to the TV — placed horizontally (A).
2. Behind or close to the TV hanging on the wall (vertically) (screws not included) (B).
A
B
INSTALLATION GUIDE

TUO
IN
POWER R
L
1 3
16 17
Connecting the TV adapter to a power outlet
Start by connecting the TV adapter to a power outlet.
Use the power supply from box 1
1. Plug the power cord into the “power” connector on the TV adapter (A).
2. Plug the power supply into the mains wall socket (B) and turn on the switch.
3. After a few seconds the power indicator will light up
green on the front of the TV adapter (C).
INSTALLATION GUIDE
Box 1
C
B
A
1 3
2
L
TUO
IN
R
1 2
TUO
IN
LR
1 2
TUO
IN
LR
L
R
Audio
Out
18 19
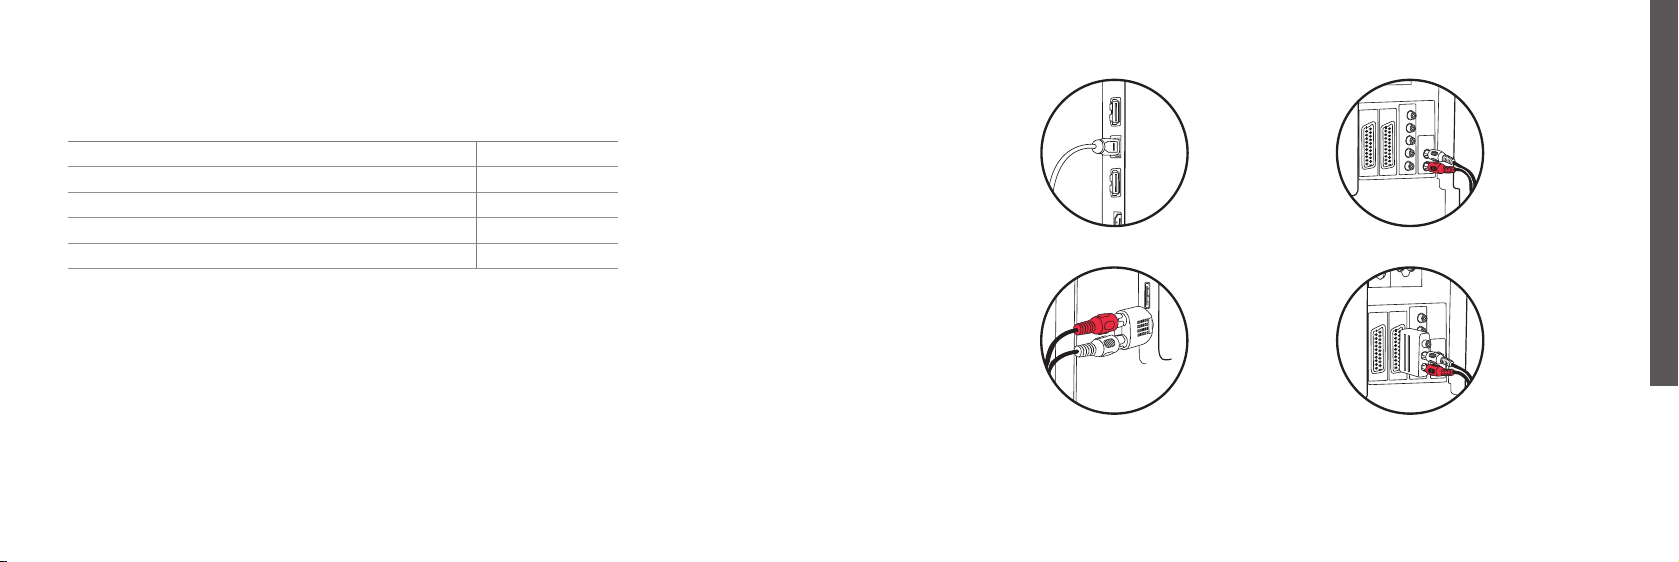
Connecting the TV adapter to the TV
You can connect the TV adapter to the TV in four dierent ways.
*Dolby and the double-D symbol are registered trademarks of Dolby Laboratories.
Please refer to the detailed specication of ConnectLine TV Adapter 2.0.
(www.oticon.ca/connectline) and your TV manual/specications to ensure compatibility.
Please see the following pages for a solution which ts your TV.
For more information please refer to: www.oticon.ca/connectline
RCA (p. 22)
SCART (p. 26)
TOSLINK (p. 20)
Connection Page
TOSLINK. Either digital stereo (PCM) or Dolby® Digital * 20
RCA audio output L+R 22
Mini jack audio output (typically headphone output) 24
SCART audio output (L+R) 26
1 2
TUO
IN
LR
Mini jack (p. 24)
INSTALLATION GUIDE

L
TUO
IN
R
1 2
3
1 3
2
L
TUO
IN
R
20 21
Connecting using TOSLINK
1. Use the TOSLINK cable from box 3 (A).
2. Remove the plastic cap from the TOSLINK cable. (B)
3. Connect the TOSLINK cable to the TOSLINK output on your TV/home theatre system (C).
4. Connect the TOSLINK cable to the pink TOSLINK input (D) on the TV adapter.
5. The TOSLINK output (E) may be used to connect other TOSLINK devices such as
external Dolby Decoders and surround sound systems etc.
6. Refer to page 28 for pairing of TV adapter with your Streamer.
Please note: It may be necessary to congure your TV, DVD player or home theatre system
so that the correct audio output is available on the TOSLINK output.
For more advanced or complex installations please refer to the support section on
www.oticon.ca/connectline
INSTALLATION GUIDE
Box 3
A
DE
C
C
B

TUO
IN
LR
L
R
Audio
Out
1 2
1 2
TUO
IN
LR
L
R
Audio
Out
22 23
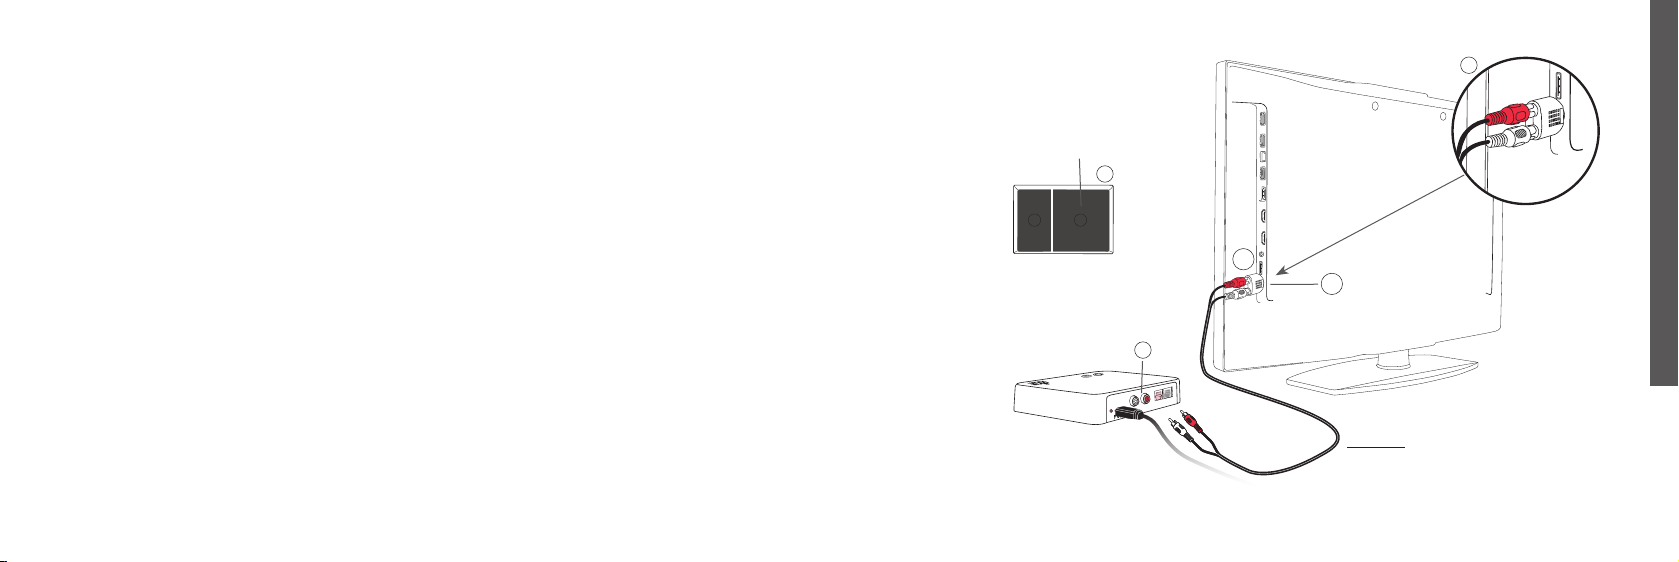
Connecting using RCA
1. Use the RCA cable from box 2 (A).
2. Connect the RCA cable to the RCA output on your TV (B) or home theatre system.
(Typically marked “L – R AUDIO OUT” and found on the TV back or bottom panel.)
3. Connect the RCA cable to the RCA connectors (C) on the back of the TV adapter.
4. Refer to page 28 for pairing of Streamer with the TV adapter.
Please note: It may be necessary to congure your TV so that the correct audio output is
available on the RCA output.
For more advanced or complex installations please refer to the support section on
www.oticon.ca/connectline
INSTALLATION GUIDE
Box 2
A
C
B
B
TUO
IN
LR
1 2
TV cord
1 2
TUO
IN
LR
24 25
Connecting using mini jack adapter
1. Use the mini jack adapter from box 2 (A).
2. Connect the RCA cable to the mini jack adapter (B1).
3. Connect the mini jack to the TV, this is typically the headphone output (B2).
4. Connect the RCA connectors to the TV adapter RCA input (C).
5. Refer to page 28 for pairing of the TV adapter with Streamer.
Please note: The TV speakers may be muted when connecting to the headphone output,
and sound only heard through the Streamer/TV adapter.
For more advanced or complex installations please refer to the support section on
www.oticon.ca/connectline
INSTALLATION GUIDE
Box 2
A
C
B1
B2
B

TUO
IN
LR
TUO
IN
LR
26 27
Connecting using SCART
1. Use a SCART Adapter*. (A)
2. Connect the RCA cable to the red and white terminals on the SCART adapter (B).
3. Connect the SCART adapter to the SCART output on your TV (C).
4. Connect the RCA connectors to the TV adapter RCA input (D).
5. Refer to page 28 for pairing of TV adapter with Streamer.
Please note: The audio output on the SCART connector can be dependent on the source
selected on the TV. For example some TV’s will only make TV sound available on the
SCART output (i.e. not e.g. sound from a connected DVD player).
For more advanced or complex installations please refer to the support section on
www.oticon.ca/connectline
INSTALLATION GUIDE
A
B
D
C
* The SCART Adapter is an accessory which is not included in the package content. If you need a SCART Adapter,
please contact your hearing care professional.
A
B
29
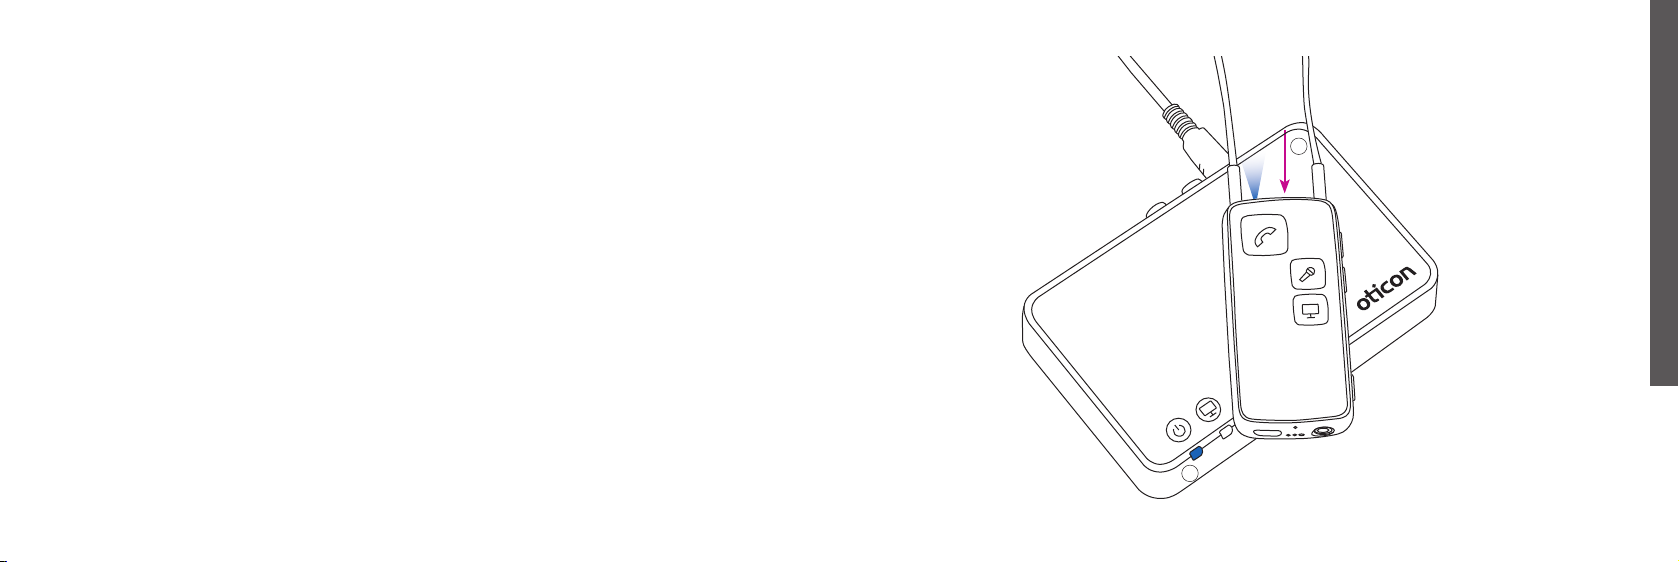
Pairing the Streamer to the TV adapter
Before using your Streamer for TV listening, it must be paired to the TV adapter.
For pairing:
1. Make sure the TV adapter is powered on, i.e. the power indicator is steady green.
2. Press and hold the on/o button on the Streamer Pro (B) for 5-6 seconds until the blue
light starts blinking (A).
3. Place the Streamer on top of, or close to, the TV adapter — the pairing takes around
20–60 seconds. The TV adapter will automatically begin pairing.
4. The pairing is completed when the power indicator on the TV adapter and the on/o
button on the Streamer briey turns steady blue, followed by orange status.
Pairing is done only once and will normally will not have to be repeated.
INSTALLATION GUIDE
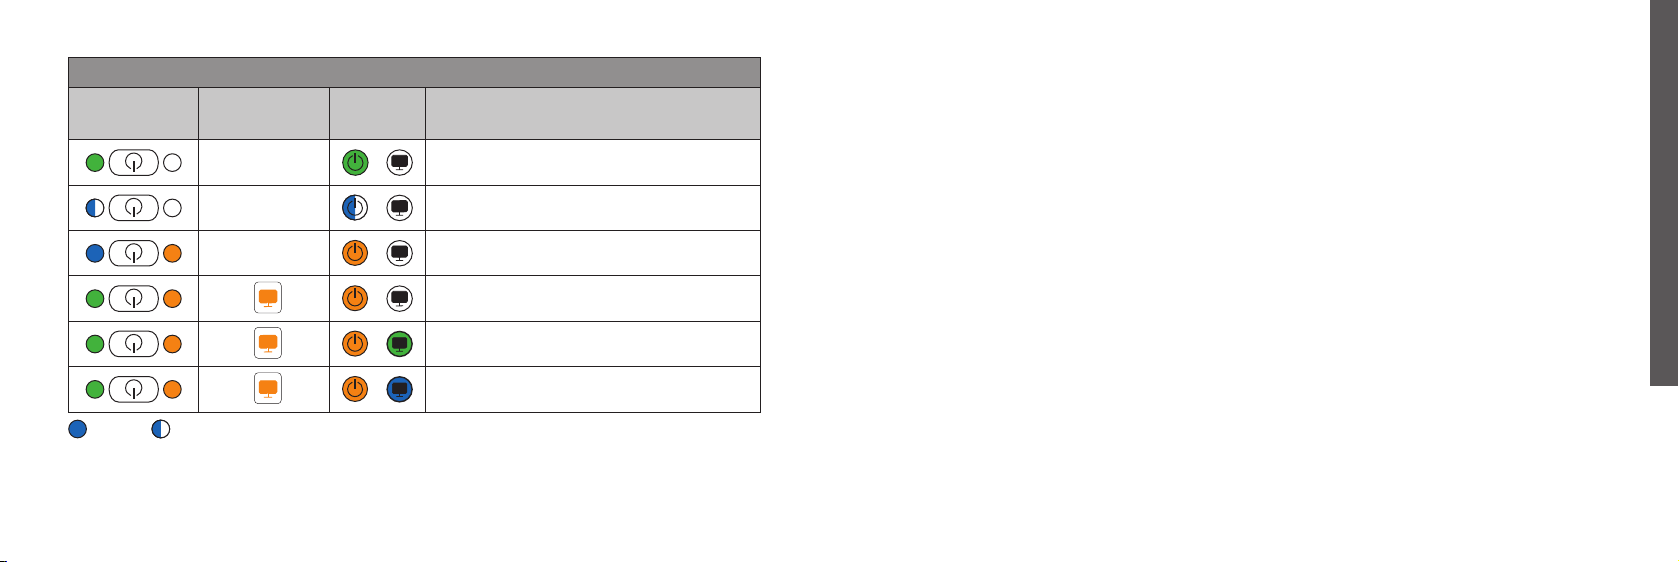
30
Pairing
Streamer Pro
top status
Streamer Pro
front
TV
adapter
Description
Streamer and TV adapter on
Streamer in pairing mode
Pairing complete
Streaming — no audio input detected
RCA inserted and streaming
TOSLINK inserted and streaming (digital)
Steady Blinking
INSTALLATION GUIDE

32 33
Mute
Volume up
Volume down
Streamer ProStreamer Pro
Volume control
Use the volume button on the Streamer to adjust the TV volume
level in the hearing instruments. Adjust the volume by pressing up or
down briey. Repeat the brief press for further adjustments.
Mute
While watching TV it is possible to switch o the microphones in your hearing
instruments, so that only the sound from the TV is heard.
Press both the up and down volume buttons until the surrounding
sound is muted. You will hear a conrmation beep indicating that the
microphones in the hearing instruments are now muted.
Please note: The TV volume in the hearing instruments is normally not
aected by the volume adjustments from the TV remote control.
USER GUIDE

34 35
Start TV listening
Make sure to wear the Streamer around your neck using the
neck loop, and make sure the Streamer is powered on.
Turn on the TV sound
Briey press the TV button on the front of the Streamer. The
Streamer connects to the TV adapter. After a few seconds
a steady orange light is shown on the Streamer and the TV
adapter. You will hear a conrmation beep in your hearing
instruments followed by the sound from the connected TV.
Turn o the TV sound
Briey press the TV button on the front of the Streamer. The
orange lights turn o on both the Streamer and the TV adapter.
You will hear a conrmation beep in your hearing instruments.
Pairing
Streamer Pro
top status
Streamer Pro
front
TV
adapter
Description
Streamer and TV adapter on
Streaming - no audio input detected
RCA inserted and streaming
TOSLINK inserted and streaming (digital)
USER GUIDE

OUT
IN
R
L
POWER
OUT
IN
R
L
POWER
36 37
SelectMe, using more than one TV adapter
With Streamer Pro 1.1 and later you can use multiple TV adapters.
E.g. one in the living room and one in the bedroom.
To switch between TV adapters:
1. Make sure you are not connected to any TV adapter i.e. the
Streamer should be turned on, but not active.
2. Briey press the SelectMe button on the TV adapter you wish to hear the sound from (A).
3. The TV adapter is automatically connected. You will hear a conrmation beep
in your hearing instruments followed by the sound from the connected TV. A
USER GUIDE

38 39
Technical information
Model name BS-F200
Operating conditions Temperature: +5°C to +40°C
Humidity: 15% to 93%, non-condensing
Atmospheric pressure: 700 hPa to 1060 hPa
Storage and transportation
conditions Temperature and humidity shall not exceed the below limits for
extended periods during transportation and storage:
Temperature: -25 °C to +70 °C
Humidity: 15% to 93%, non-condensing
The TV Adapter 2.0 contains a radio transceiver using Bluetooth at 2.4 GHz. The radio
transmitter is weak and always below 10mW equal to 10 dBm in total radiated power.
The TV Adapter complies with international standards concerning radio transmitters,
electromagnetic compatibility and human exposure.
Due to the limited space available on the TV Adapter relevant approval markings can be
found in this booklet.
USA and Canada
This device contains a radio module with the following certication ID numbers:
FCC ID: U28TVBOX03
IC: 1350B-TVBOX03
Notice: The device complies with Part 15 of the FCC Rules and with Industry Canada’s
licence-exempt RSSs standards. Operation is subject to the following two conditions:
(1) this device may not cause harmful interference, and (2) this device must accept any
interference received, including interference that may cause undesired operation.
Notice: Changes or modications not expressly approved by the party responsible for
compliance could void the user’s authority to operate the equipment.
This manual suits for next models
1
Table of contents
Other oticon Adapter manuals

oticon
oticon ConnectLine TV 2.0 User manual

oticon
oticon streamer User manual

oticon
oticon Phone 2.0 User manual

oticon
oticon ConnectLine User manual

oticon
oticon TVA3 User manual

oticon
oticon BS-H200 User manual

oticon
oticon TVA3 User manual

oticon
oticon FittingLINK 3.0 User manual

oticon
oticon ConnectLine User manual

oticon
oticon FittingLINK 3.0 User manual


