Outback S3 User manual

Outback S3™
Quick Reference Guide
Part Number: 875-0197-000 Rev B1
Starting the S3
Upon startup the S3 starts acquiring a DGPS signal (as
long as the antenna has a clear view of the sky)—this
may take several minutes, during which the vehicle can
be moving or you can perform certain functions.
Upon achieving a GPS signal, the satellite icon on the
GPS tab turns from red to orange. Upon acquiring a
DGPS signal, the satellite icon turns green and the GPS
tab displays “3D”. The S3 must have DGPS present to
begin a job and provide guidance.
1. Power up the S3. If you have any additional
components connected to the S3 power them on as
well. Upon powerup the S3 completes a self test, the
LED illuminates green, and a Warning appears.
2. Touch Accept at the warning. The Getting Started
window appears.
3. Touch any of the Job buttons to work with a job or
touch Cancel to close the Getting Started window
without selecting a Job option.
Working with Jobs
Loading a Job
1. On the Jobs screen touch the Jobs button.
2. In the Manage Jobs window, select the job you want
to load.
3. Touch the Load button. The selected job (and its data)
is loaded as the current job.
Beginning a New Job
• On the Jobs screen touch the New button. The
number in the Job Name field and on the bottom of
the Job tab change.
Continuing a Job
• On the Jobs screen touch the Continue button.
The most recently closed job (and all its data) is
activated.
Deleting a Job
1. On the Jobs screen touch the Jobs button.
2. In the Manage Jobs window, select the job you want
to delete.
3. Touch the Delete button. The selected job (and its
data) is deleted from the S3.
Deleting All Jobs
1. On the Jobs screen touch the Jobs button.
2. In the Manage Jobs window, touch the Delete All
button. A confirmation message appears.
3. Touch Ye s to continue. All jobs (and their data) are
deleted from the S3.
Exporting Data to the USB Drive
1. Insert the USB drive into the USB port on the side of
the S3.
2. On the S3 touch the Job tab.
3. Touch the Export button. The Export Data window
appears.
4. Select the job data (which includes associated
templates) to export and then touch the Export
button or touch the Export All button to export all
job data. A confirmation message appears.
5. Touch Ye s to continue. The data is exported.
Importing Job Data from the USB Drive
1. Insert the USB drive into the USB port on the side of
the S3.
2. On the S3 touch the Job tab.
3. Touch the Import button. The Import Data window
appears.
Note: Only job data contained in the S3jobs folder on
the USB drive will appear in the Import Data window.
4. Select the data files to import and then touch the
Import button or touch the Import All button to
import all data files. A confirmation message appears.
5. Touch Ye s to continue. The job is imported.
Closing a Job
1. On the Jobs screen touch the Close button. A
confirmation message appears.
2. Touch the OK button. The job closes.
Clearing Job Notes
You have the option of clearing the contents of all job
annotation fields (Farm ID, Field ID, Operator ID, Machine
ID, Crop, Operation, Temperature, Humidity, Wind
Speed, and Wind Direction).
• On the Jobs screen touch the Clear Notes button.
Job notes are cleared from the fields shown at
right.
Fore/Aft
Offset
Set the fore or aft offset of the antenna from
any implement; if the implement is in front
of the vehicle, enter the distance between
the implement and the antenna as a fore
offset; if the implement is behind the
vehicle, enter the distance as an aft offset.
Lightbar Reaction speed of the virtual lightbar
(manual guidance indicator sensitivity); set
to Low, Med (Medium) or High.
Headland
Alert
Notifies you with an audible beep when the
machine enters a previously worked area;
set to On or Off.
Lines Set the guidance lines (Off, AB, or Grid) that
display a regular pattern over an area by
which to guide; the distance between the
grid lines is based on the Grid Spacing field.
Grid
Spacing
Set the distance between the grid lines on
the Map screen.
Buttons Description
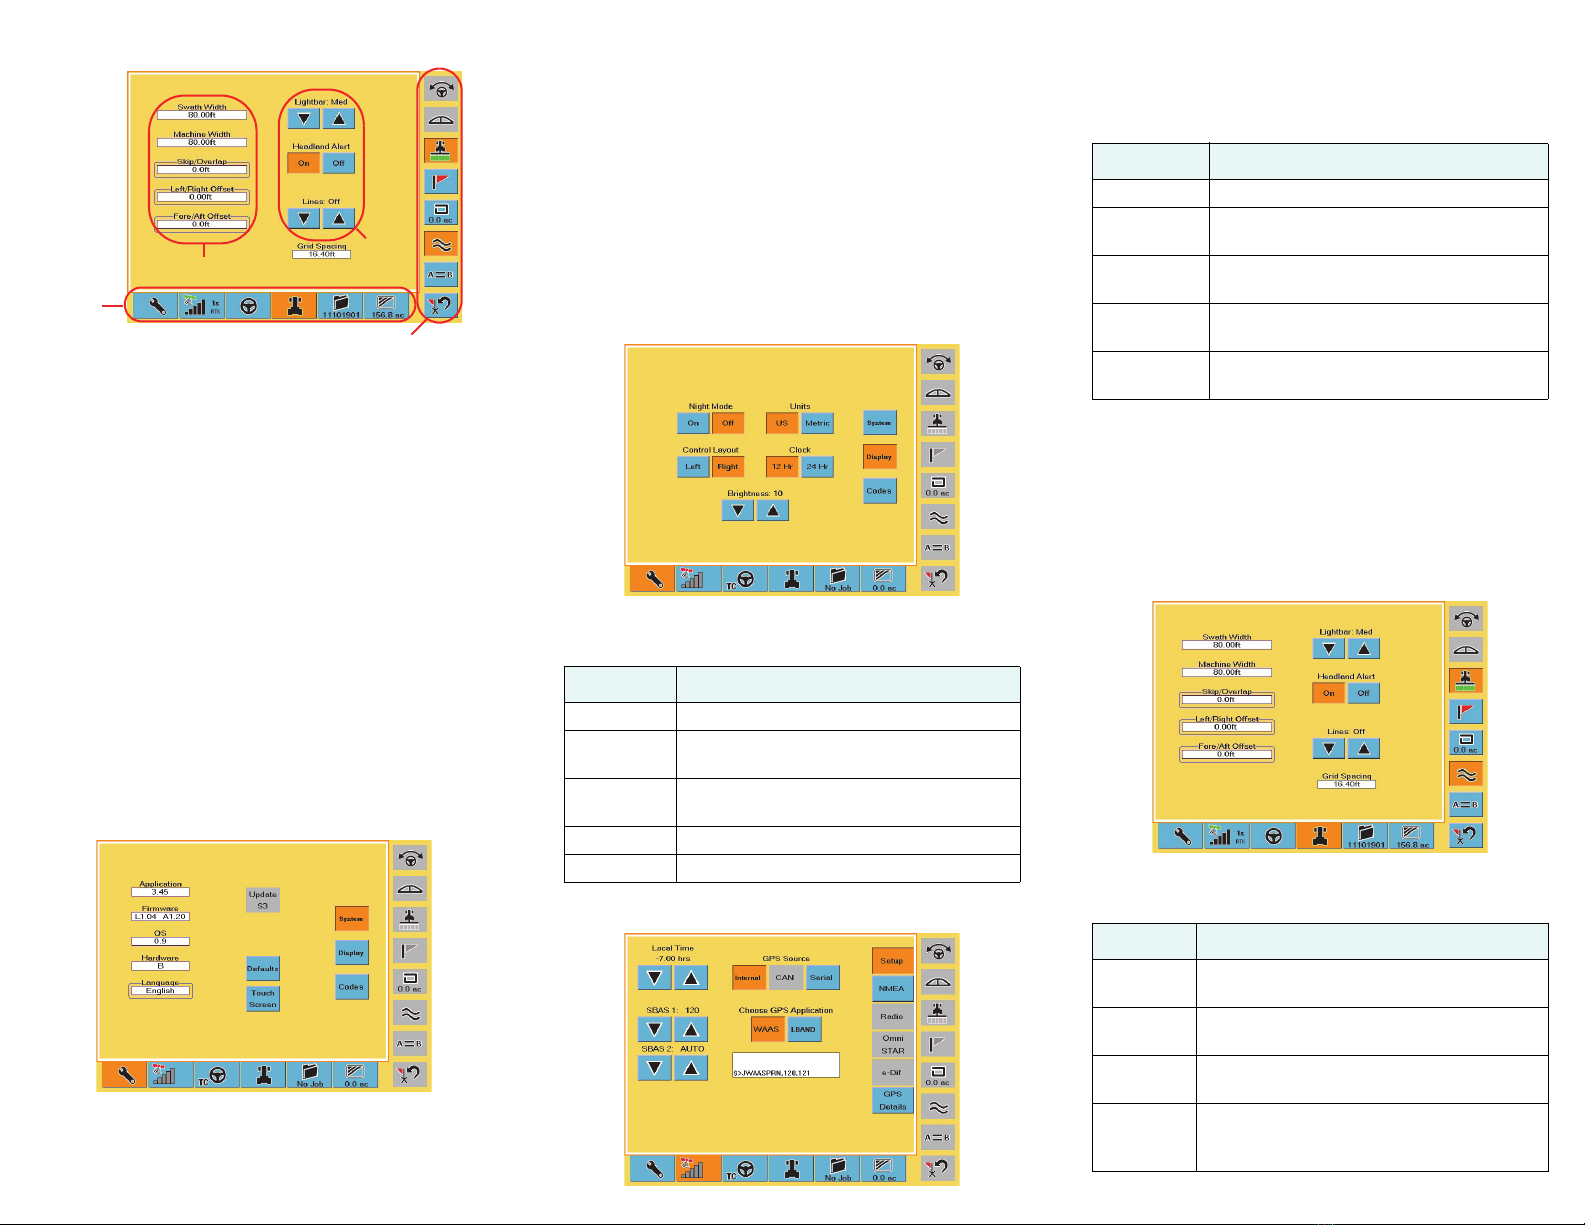
S3 Display
The S3 display consists of control buttons, screen tabs,
and screens (with fields and buttons).
•Control buttons allow you to perform such tasks
as engaging automated steering and displaying the
lightbar. Control buttons can be on the left or right
of the screen. An orange control button is active.
• You navigate the S3 using tabs (along the bottom
of the display) and screens. Touch a tab to display
the screen (or one of several screens) for that tab.
An orange tab is active (related screen displayed).
•Usefields to edit the specific settings and buttons
to adjust settings or activate functionality. If a field
has a line around you can edit its value. If a button
or field is gray, you cannot use/edit it.
Configuring the S3
The S3 has several screens in which you configure
important settings before beginning your initial pass.
Configuring System Settings
The System screen allows you to view hardware and
software information as well as change the system
language and calibrate the touch screen.
Your S3 is shipped factory-calibrated. However, you can
re-calibrate the touch screen if necessary.
1. On the System screen touch the Touch Screen
button. The calibration screen appears.
2. Each time a “Press” message appears press and hold
until “Release” appears until the following message
appears: Touch the screen to verify the target moves
to your finger.
3. Press and drag around the screen to verify the
onscreen image follows your finger.
4. Touch OK. You are returned to the System screen.
Configuring Display Settings
The Display screen has various settings that affect the
way the system displays and records information.
Configuring GPS Settings
The GPS Setup screen has various settings that relate to
the type of GPS differential correction the system uses.
Several of the fields on the GPS Setup screen provide
useful diagnostic information.
Configuring Steering Settings
S3 uses the settings on the Steering tab when you are
using an optional automated steering control unit, such
as Hemisphere GPS’ Outback eDriveTC/eDriveVSi or
eDriveX. Several of the fields on the Steering screen
provide useful diagnostic information.
Configuring Vehicle Settings
The Vehicle screen has various settings related to the
machinery and implements you use in the current job.
Control buttons
Tabs
Fields
Buttons
Buttons Description
Night Mode Set display for daytime/nighttime lighting.
Control
Layout
Place control buttons on left/right of
screen.
Units Set the measurement units (for display
and data recording) to US or Metric.
Clock Set the clock to 12-hour or 24-hour format.
Brightness Adjust display brightness.
Buttons Description
Local Time Set the system clock to the local time.
SBAS 1
SBAS 2
Change the SBAS satellites used in the
S3’s position calculation (default is Auto).
GPS Source Select the GPS source: Internal, CAN,
Serial, or Radio.
Choose GPS
Application
Set the type of differential correction S3
uses to calculate a position.
Message
window
Displays system generated messages
(useful when performing diagnostics).
Buttons Description
Swath
Width
S3-generated value (sum of Machine Width
and Skip/Overlap values).
Machine
Width
Width of the vehicle or implement for the
current job.
Skip/
Overlap
Set this value to drive a pattern where rows
intentionally skip or overlap.
Left/Right
Offset
Distance between the GPS antenna
centerline and the vehicle or implement
centerline. Set to right or left.
This manual suits for next models
1
Other Outback Automobile Accessories manuals


Popular Automobile Accessories manuals by other brands

Livoo
Livoo TEA228 user manual

Avitec
Avitec 110111 Instruction manual parts catalog

OMEX
OMEX Shift Light Sequential Installation and user instructions

AGRI-COVER
AGRI-COVER Lomax Stance installation instructions

Mitsubishi
Mitsubishi MP-G-BARRES instruction manual

Dometic
Dometic X-TEND A-ROOM Installation & operating instructions


