Outform iDISPLAY Thermometer User manual

User Manual
Adult Height Child Height Counter Height Wall Mount (Optional)

1
Table of Contents
Important Notices.............................................................................2
Copyright Information ..........................................................................2
Safety and Warning Information .........................................................3
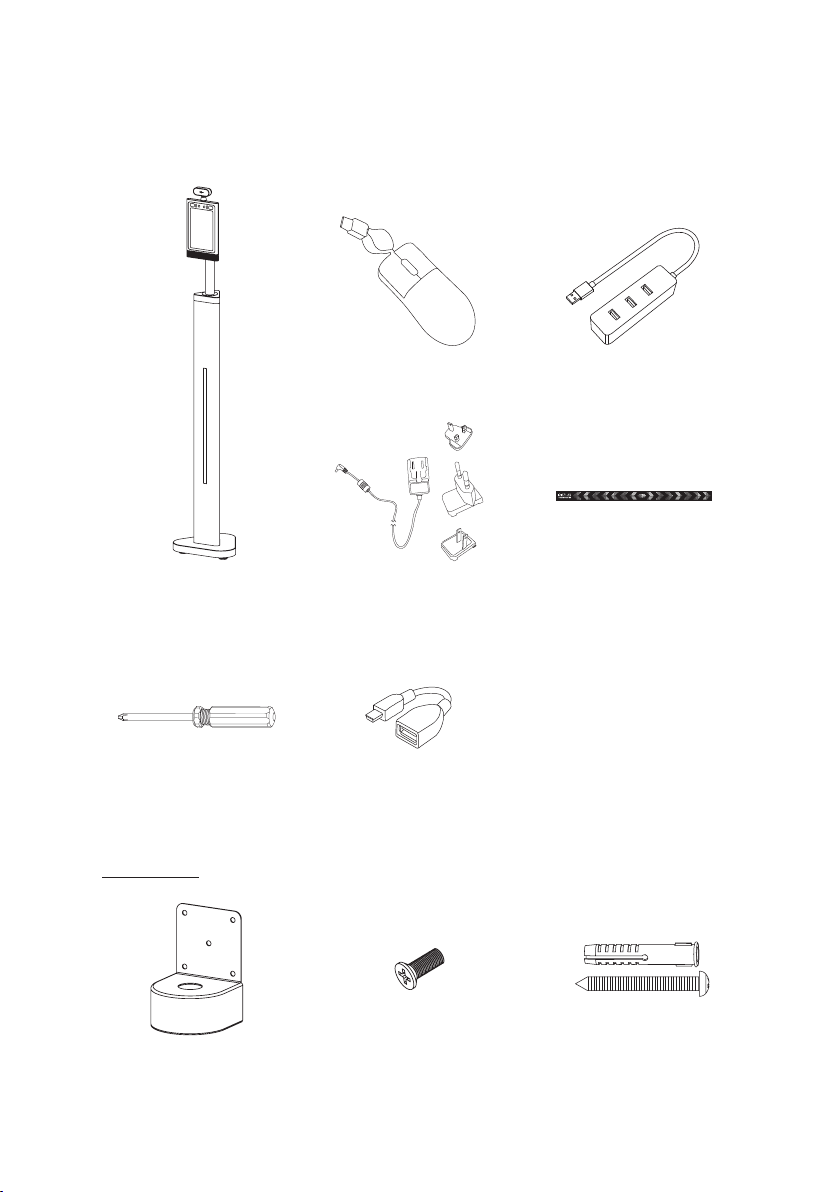
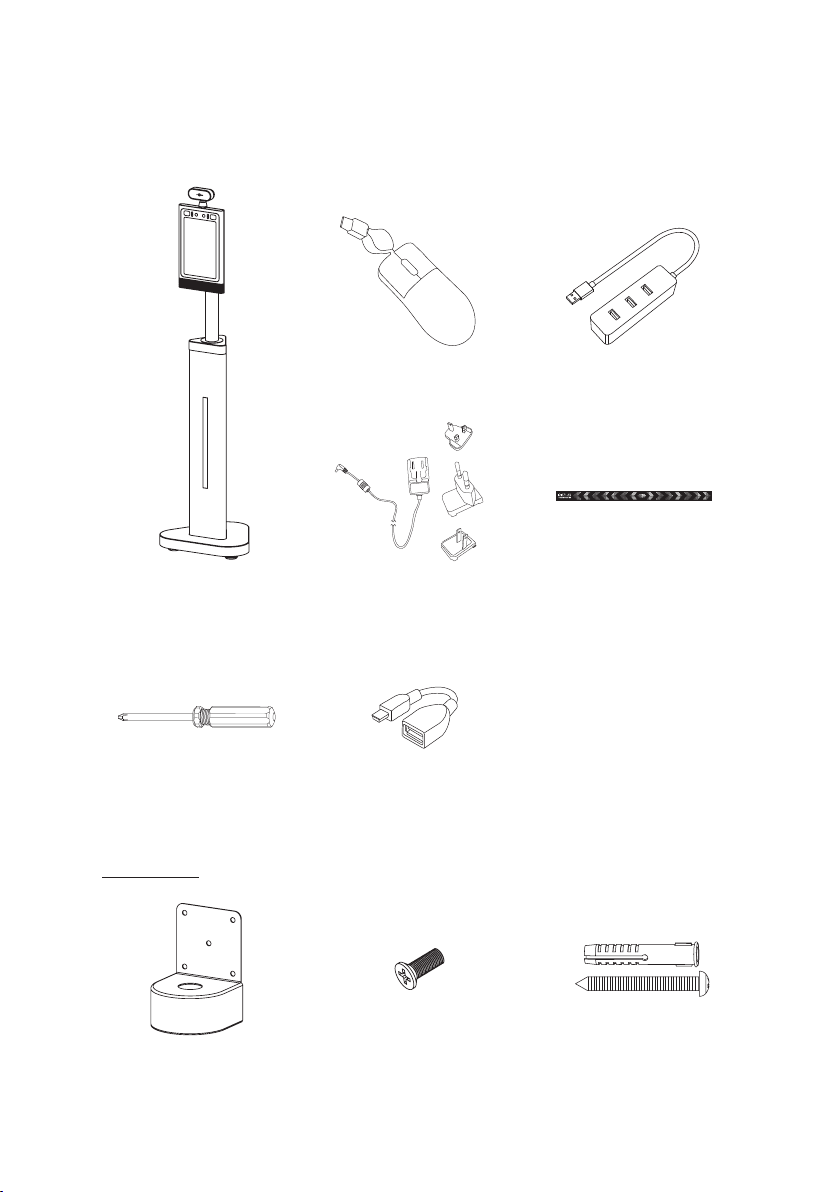
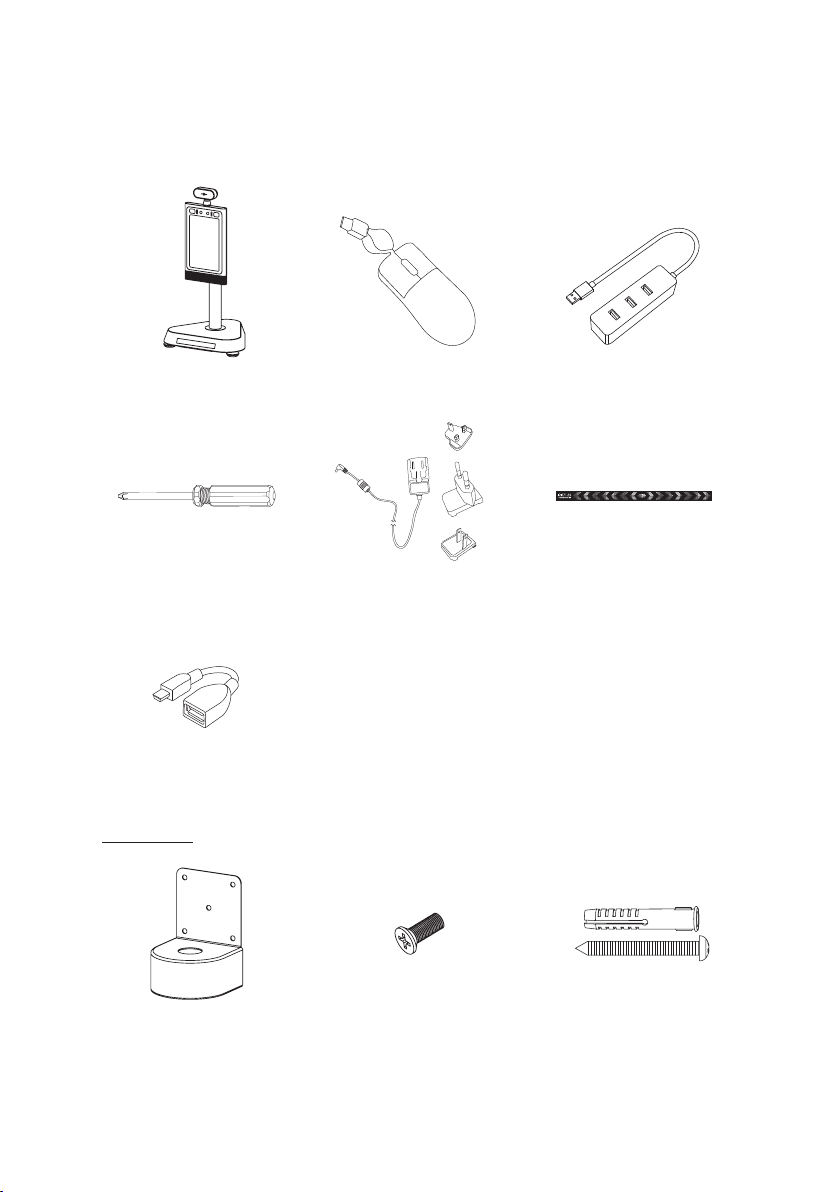
Package Contents ..............................................................................4
Adult Height........................................................................................... 4
Child Height ........................................................................................... 5
Counter Height ......................................................................................6
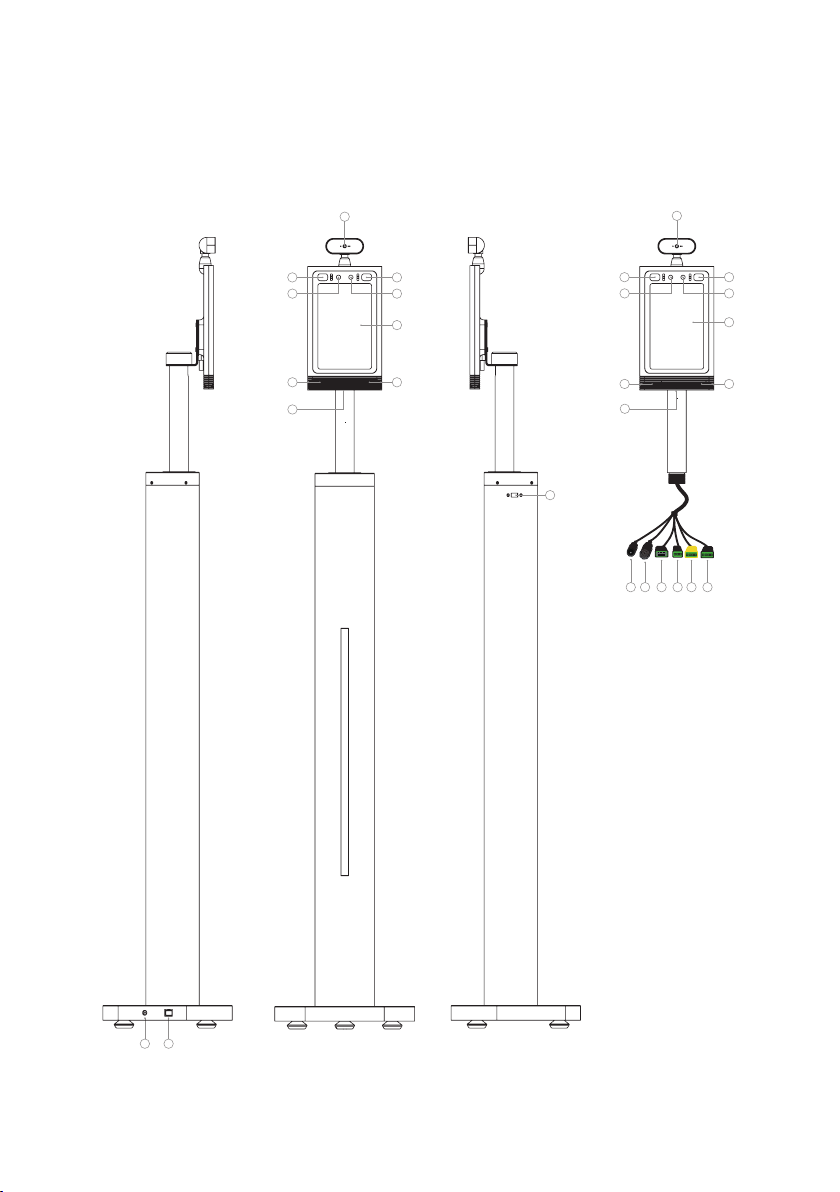
Product Diagram ...............................................................................7
Adult Height........................................................................................... 7
Child Height ........................................................................................... 9
Counter Height ......................................................................................10
Operational environment .................................................................11
Specifications For Temperature Measurements...............................12
Installation Instructions-Adult and Child Height ............................13
Operating Instruction .......................................................................16
How to change Unit of Temperature...................................................16
Custom Alarm Activation Temperature..............................................18
Face Registration - Single Registration................................................19
Face Registration_Batch Import........................................................... 22
Face Registration - Deleting Registrants.............................................25
Stranger Mode .......................................................................................26
Mask Mode.............................................................................................28
Add company name .............................................................................. 29
Set or change the password for the Settings section ........................30
Connecting Printer.................................................................................32
How to export the attendance record................................................. 34
How to connect to Access Control System ........................................35
Pedestal Adult and Child change to Wall mount.............................37
Installation Instructions - Counter...................................................41
Counter change to Wall mount ........................................................44
Installation Instructions - Wall mount.............................................47
How to upgrade the APK...................................................................50
Make sure the device connect to the internet ....................................50
Checking for updates ............................................................................53
Troubleshooting Guide......................................................................54

2
Important Notices
Copyright Information
Copyright © 2020 Outform. All rights reserved.
All intellectual property rights in this publication are owned by Outform and protected
by applicable copyright laws and international treaty provisions. Outform retains all
rights not expressly granted. No part of this publication may be reproduced in any form
whatsoever or used to make any derivative work without prior written approval by
Outform.
Outform reserves the right to revise this publication, and/or make improvements or
changes in the product(s) and/or the program(s) described in this documentation at
any time without prior notice. The information in this document is provided in good
faith, but without any representation or warranty whatsoever, whether it is accurate,
or complete or otherwise, and on express understanding that Outform shall have
no liability whatsoever to other parties in any way arising from or relating to the
information or its use.
All other trademarks are the property of their respective owners. Other company and
brand products and service names are trademarks or registered trademarks of their
respective holders.
This device complies with CE regulation.

3
Safety and Warning Information
NOTE
This mark is applied to indicate that the equipment conforms to European safety and
electro-magnetic compatibility standards.
WARNING!
Main Supply: This equipment is designed to operate from a 100-240 Volt, 50/60Hz AC
power supply. The use of other power sources may damage this equipment. Check that
the voltage marked on the rating plate located at the rear of the power adaptor states
100-240V. The manufacturer will NOT accept responsibility or damage or injury caused
by connecting to the wrong voltage.
WARNING!
Main Adaptor: The supplied power adaptor is compatible with a standard main socket.
If the power adaptor or lead gets damaged, it must be replaced by a qualified service
agent with an approved adaptor of the same type and rating.
WARNING!
Dangerous voltage constituting a risk of electric shock is present inside this equipment.
WARNINGS!
The main plug shall be the main disconnect device and shall remain operable at all
times.
Do not push objects into holes and ventilation slots.
Do not expose this product to moisture or place any objects filled with liquids on or
near the product.
Do not place a naked flame source, such as lighted candles, on or near this product.
Do not store or operate the device in environments where the temperature is above 50
degrees celsius or below -10 degrees celsius.
Do not intentionally hit the device or place heavy or sharp objects on the device.
Only use accessories specified by the manufacturer.
Keep the device away from benzene, diluents, and other chemicals.
Do not attempt to repair this product yourself. Always use a qualified service agent to
perform adjustments or repairs.

4
Package Contents
Adult Height
Adult Thermometer
Stand
3M long PSU with
dierent region plugs
Mini mouse
UK
EU
US
USB Hub
Reflective floor sticker x4pcs
Screwdriver Mini USB To USB Cable
Wall bracket M3 Screw x3pcs Self-tapping screw and
expansion screw x6pcs
Optional:

5
Package Contents
Child Thermometer
Stand
3M long PSU with
dierent region plugs
Mini mouse
UK
EU
US
USB Hub
Reflective floor sticker x4pcs
Mini USB To USB CableScrewdriver
Wall bracket M3 Screw x3pcs Self-tapping screw and
expansion screw x6pcs
Optional:
Child Height

6
Counter Height
Package Contents
Counter
Thermometer Stand
3M long PSU with
dierent region plugs
Mini mouse
UK
EU
US
USB Hub
Reflective floor sticker x4pcs
Screwdriver
Wall bracket M3 Screw x3pcs
Optional
Self-tapping screw and
expansion screw x6pcs
Mini USB To USB Cable

7
Product Diagram
2 2
4
55
66
33
78
1
2 2
4
55
33
7 98 10 11 12
9
1
Adult Height

8
No. Description
1 Infrared temperature measurement module
2 Indicator light with White/Green/Red three modes
3 Wide dynamic camera
4 8 inch IPS screen
5 Speaker
6 Hidden USB interface
7 DC 12V 2A
8 RJ45
9 USB 2.0
*10 Relay
*11 Wiegand OUT
*12 Wiegand IN
Product Diagram
Note: Items marked with * use cables for the Access Control System. Check details on
in the “How to connect to Access Control System” section on pages 35-36.

9
No. Description
1 Infrared temperature measurement module
2 Indicator light, has White/Green/Red three modes
3 Wide dynamic camera
4 8 inch IPS screen
5 Speaker
6 Hidden USB interface
7 DC 12V 2A
8 RJ45
9 USB 2.0
*10 Relay
*11 Wiegand OUT
*12 Wiegand IN
Product Diagram
Note: Items marked with * use cables for the Access Control System. Check details on
in the “How to connect to Access Control System” section on pages 35-36.
1
2 2
4
55
6
33
78
9
6
1
2 2
4
55
33
798 10 11 12
Child Height

10
Product Diagram
Note: Items marked with * use cables for the Access Control System. Check details on
in the “How to connect to Access Control System” section on pages 35-36.
79 8
1
2 2
4
55
6
33
6
1
2 2
4
55
33
7 98 10 11 12
Counter Height
No. Description
1 Infrared temperature measurement module
2 Indicator light, has White/Green/Red three modes
3 Wide dynamic camera
4 8 inch IPS screen
5 Speaker
6 Hidden USB interface
7 DC 12V 2A
8 RJ45
9 USB 2.0
*10 Relay
*11 Wiegand OUT
*12 Wiegand IN

11
Operational environment
Important Note: It is not advisable to have the iDISPLAY Thermometer in direct
sunlight as this could adversely aect the accuracy of the temperature readings. It is
also not advisable to put the iDISPLAY Thermometer outside, unless it is covered and
protected from sunlight.

12
Specifications For Temperature Measurements
Thermometric distance
The temperature measurement distance of infrared temperature sensor
to the target is: 40cm ~ 80cm.
Accuracy of temperature measurement
Temperature measurement accuracy of infrared temperature sensor to
temperature measurement target: ±0.2℃.
Operation Condition
Please avoid exposure to direct sunlight.
1.1m
43.3 in
1.6m
63.0 in
50cm
19.7 in

13
Step 1. Carefully open the package using
a box cutter. Take out the Thermometer
and all the accessories.
Step 2. Connect the power cable to the
thermometer and power socket.
Installation Instructions-Adult and Child Height

14
Step 3. Use the reflective sticker to
measure the correct standing distance
from the thermometer, as pictured below.
Use a pen to draw a straight line about 50
centimeters (1.97in) long.
Step 4. Using the line drawn in step 3 as
a guide, remove the protective film on the
backside of the reflective sticker, and place
the adhesive side on the floor.
Installation Instructions-Adult and Child Height

15
Step 5. The thermometer will be
running automatically. To have their
temperature read, a person will need to
stand 40-75cm (1.3.-2.5ft) away from
the screen. If the temperature reading is
normal, the thermometer will indicate
this with an alarm stating “Temperature
Normal” as well as a green color on the
screen with a green dot on the forehead.
Step 6. When the temperature exceeds
37.7C(99.86F), the thermometer will
indicate this with an alarm stating
“Temperature Error” as well as a red
color on the screen with a red dot on the
forehead.
Installation Instructions-Adult and Child Height

16
Step 3. Celsius and Fahrenheit are
available. Select the one that you want or
select both. For example select”Both”.
Step 4. Click “BACK” to check if the unit
of temperature has changed.
Step 1. Click the upper-left hand corner
to open the APK Settings section.
Step 2. Next to “Unit of Temperature”
select “CHANGE”.
Operating Instruction
How to change Unit of Temperature

17
Step 5. The unit of temperature is
changed to both.
Operating Instruction

18
Step 3. When the temperature
exceeds custom value, device will alarm
accordingly.
Step 1. Click the upper-left hand corner
to open the APK Settings section.
Step 2. Turn on “Custom Alarm
Activation Temperature“ option. A pop-up
will appear with the temperature input
box. Note: Please follow local regulations.
Operating Instruction
Custom Alarm Activation Temperature

19
Step 3. On the Connectivity screen, next
to “Face Manager” select “ADD/EDIT”.
Step 4. On the Face Manager screen,
select “FACE REGISTRATION”.
Step 1. Click the upper-left hand corner
to open the APK Settings section.
Step 2. Click “Connectivity“.
Operating Instruction
Face Registration - Single Registration
Table of contents
Other Outform Thermometer manuals