Ovation 1501 User manual

Ovation High Fidelity User Manual
Engineered for Art™
Model 1501 Stereo
Preamplifier

Model 1501 Stereo Preamplifier User Manual
w w w . o v a t i o n h i f i d e l i t y . c o m P a g e 3 | 20
Welcome to Ovation High Fidelity.
Thank you for purchasing this Ovation High Fidelity product. Every effort has
been taken during the design, engineering and manufacture of this product to
ensure the highest levels of craftsmanship and quality so that you will have many
years of trouble free operation and musical enjoyment.
Proof of Purchase
Should the item be returned under warranty, proof of purchase will be required.
Therefore, you must retain the original purchase invoice and receipt. We suggest
you staple this into the rear inside cover of this user manual and retain it in a safe
place after reading it
Product Usage Declaration
This product is designed for use in a domestic hi-fi system
Warranty: -
•This product is warranted free of manufacturing defects for a period of five
years from date of purchase.
•This warranty excludes cases where the product is abused, or used for
purposes other than which it was intended, or modified in anyway whatsoever
•The warranty is not transferable
•Remote controls are warranted for a period of one year from date of purchase.
The warranty does not cover damage due to battery leakage
•The costs of sending the product back to the company under warranty, and its
subsequent return, are for the account of the purchaser

Model 1501 Stereo Preamplifier User Manual
w w w . o v a t i o n h i f i d e l i t y . c o m P a g e 4 | 20
Returns Policy/30 Day Money Back Guarantee
Should you not be 100% satisfied with your product for any reason, you may
return it within 30 days from date of purchase for a full refund provided
•The product is returned packed in the original packaging
•The product is not damaged in anyway whatsoever either electrically or
cosmetically
•The company reserves the right to deduct from the refund any costs required
to make good any damage to products returned by customers.
•The costs of returning the product back to the company under the 30 day
money back guarantee are for the account of the purchaser.
The Ovation High Fidelity Company reserves the right to modify and/or make
technical and/or design changes to the design of its products without obligation to
prior purchasers

Model 1501 Stereo Preamplifier User Manual
w w w . o v a t i o n h i f i d e l i t y . c o m P a g e 5 | 20
Unpacking Your New Product
Do not damage the carton or the packaging.
Retain all packaging (outer box, internal polystyrene buffers,
polythene anti-scratch bags, documentation) in a safe, dry place
until after your 30 day Money Back Guarantee has expired.
Check that you have the following items in the shipping carton:-
•Model 1501 Preamplifier Unit
•Model 100 Remote control
•IEC mains lead with appropriate mains plug for your region*
•User manual (this document)
•Registration warranty card
Where to Locate Your New Model 1501 Preamplifier
Your model 1501 Preamplifier must be located in a well ventilated
area away from sources of heat, dust and humidity and direct
sunlight. You should position the product alongside your power
amplifier. We do not recommend that you stack high fidelity
components directly on top of one another as this could interfere
with ventilation.
You may not place any Ovation High Fidelity product on a carpet as
this will obstruct airflow and can lead to overheating.
Make sure that where the product is located, no liquids or any other
foreign objects can enter the unit through the ventilation holes.
Keep this equipment out of the reach of children.
*The IEC Mains cable is provided as a convenience so that you can get your
amplifier up and running immediately. Please see your dealer who can assist
you in selecting suitable high-quality cables for long term use in your system

Model 1501 Stereo Preamplifier User Manual
w w w . o v a t i o n h i f i d e l i t y . c o m P a g e 6 | 20
Warning!
Ovation High Fidelity products contain no user serviceable parts.
There are lethal mains voltages inside the unit.
DO NOT open the product under any circumstances - If faulty,
refer it back to Ovation High Fidelity if still within the warranty
period or to a qualified, authorized service engineer if not.
This product must be Earthed when in use. Use the supplied
mains cable to ensure this.
If you are not going to be using your equipment for any length of
time –e.g. going away on vacation - it is advisable to unplug it from
the mains.
Cleaning your Ovation High Fidelity Product
1. Unplug the unit from the mains supply
2. Use a soft, slightly damp cloth or chamois leather wipe to clean the
unit.
3. Use a soft, dry, lint free cloth to wipe the unit down after step 2 is
completed
4. Never use any abrasive agent to clean the unit –e.g. Cif, Vim, CLR
or Softscrub
5. Never use furniture polish or similar oil based agents to clean your
unit
6. Never use any solvent based cleaner like petroleum (i.e. gasoline),
turpentine, benzene, paraffin, methylated spirits or similar

Model 1501 Stereo Preamplifier User Manual
w w w . o v a t i o n h i f i d e l i t y . c o m P a g e 7 | 20
Front Panel Controls
Rear Panel
Input Select and
Power ON/OFF.
Depress and then
release to power up or
power down
Tape
Monitor/
Record Loop
Output Mute
IR Receiver
Headphone
Socket
Volume
Adjust
Fuse Draw –See
‘Replacing the
Fuse on Page 11
Power Switch and
IEC Plug
Receptacle
XLR Balanced
Output Sockets
Unbalanced RCA
Output Sockets
Line Inputs
Phono Inputs
Phono Ground
Bonding Screw
Rumble Filter
Select Switch

Model 1501 Stereo Preamplifier User Manual
w w w . o v a t i o n h i f i d e l i t y . c o m P a g e 8 | 20
Connecting Signal Sources to your Model 1501 Preamplifier
The figure above shows how to connect the model 1501 Preamplifier to source
equipment and your power amplifier
We recommend any of Ovation High Fidelity’s Power Amplifiers for
use with the Model 1501 –e.g. Model 1701 or 1721.
Switching ON and OFF
Firstly, make sure the MAINS POWER SWITCH on the rear panel
(see rear panel view above for location) is in the ON position. When
turning the mains power ON via the rear panel power switch, the
red MUTE LED on the front panel will illuminate for 3 seconds. You
must leave this switch in the ON position permanently.
Gently depress and then release the select dial on the left hand
side of the front panel. The red MUTE LED will illuminate along
with the green input selection LED made during the last power-up
cycle. The default input is CD which is selected when the unit is
powered up after the mains has first been applied. The MUTE LED
will extinguish a few seconds later, after which the output is active.
To turn your Model 1501 OFF, depress and then release the
SELECT dial again. The red MUTE LED will illuminate for a few
seconds and then extinguish along with the selected input LED,
after which the output is muted and the preamplifier in standby.
This switch must be
ON and the red pilot
light illuminated

Model 1501 Stereo Preamplifier User Manual
w w w . o v a t i o n h i f i d e l i t y . c o m P a g e 9 | 20
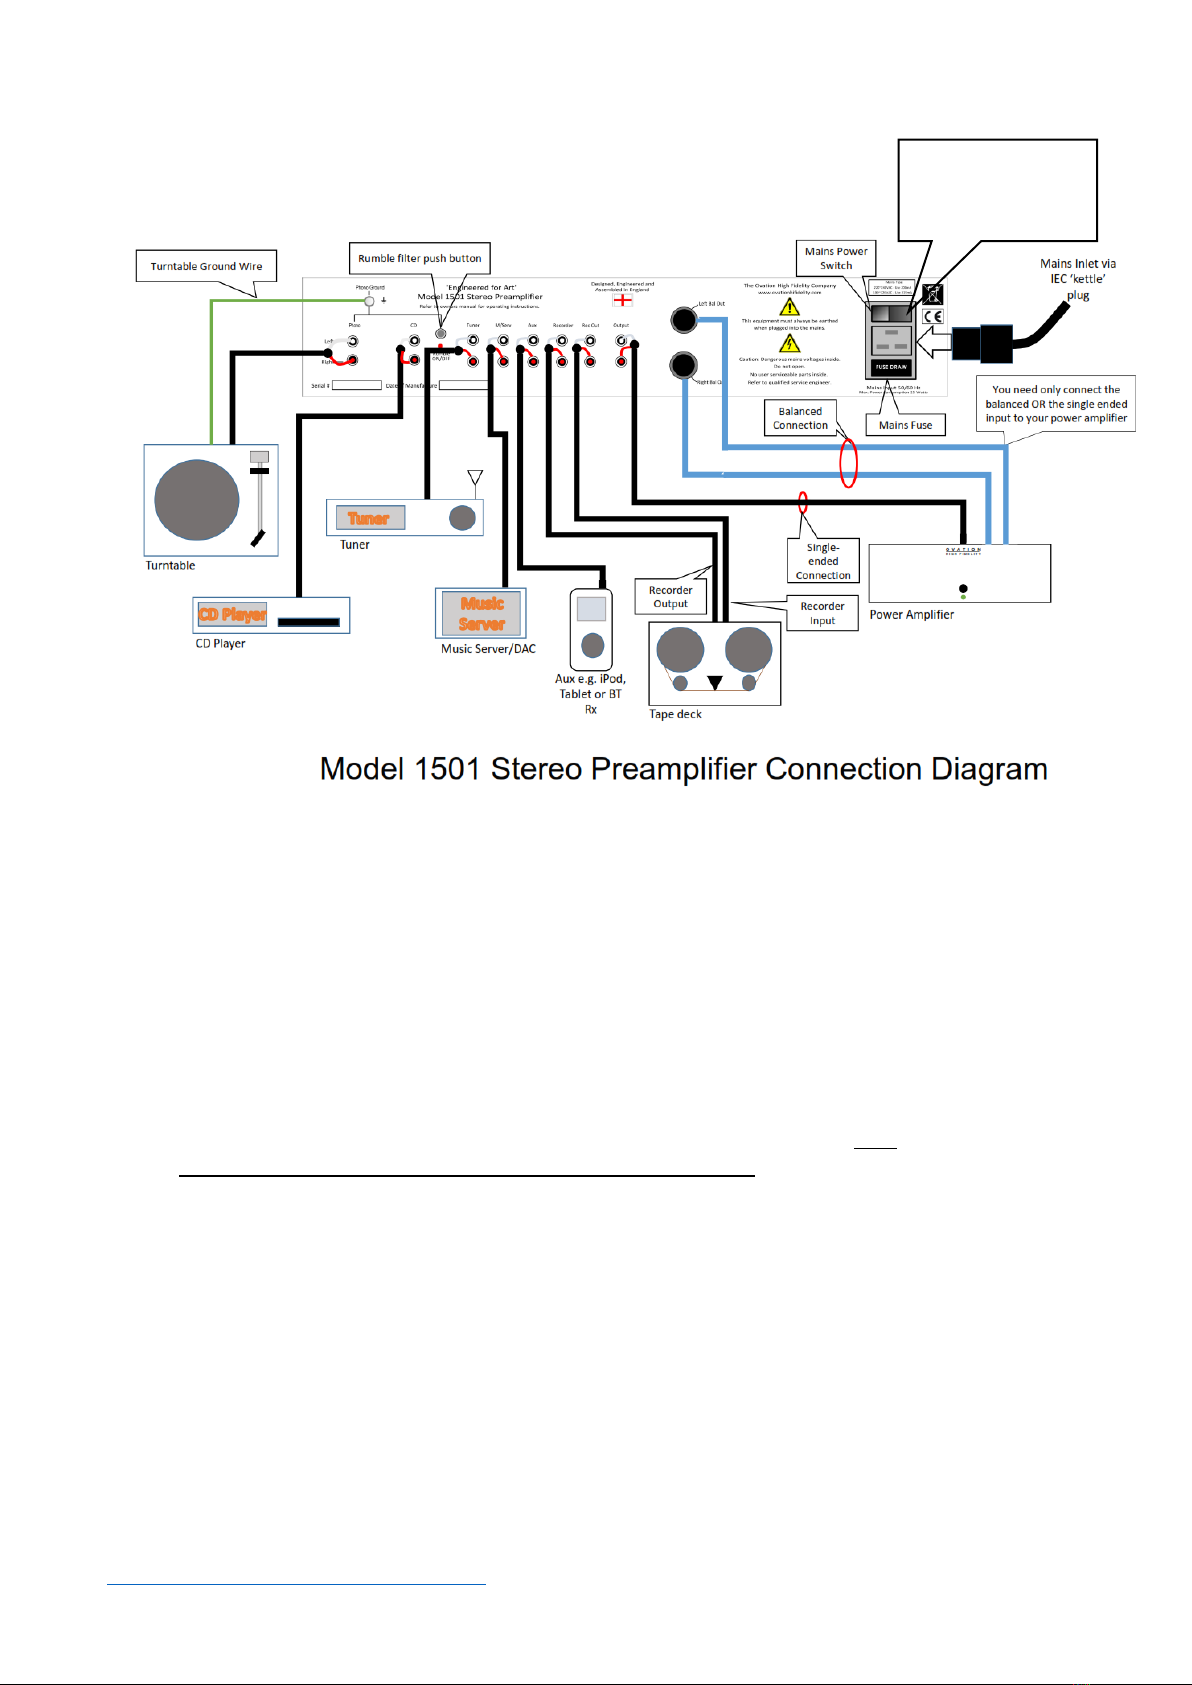
Selecting a Source
To select a source, simply rotate the SELECT dial either clockwise or anti-
clockwise. The green LED associated with the selected source will
illuminate.
Adjusting the Volume
The VOLUME control is located on the RHS of the front panel. Rotate it
clockwise to increase the volume and anti-clockwise to decrease the
volume. When you power up for the first time, set the volume to the 10
o’clock position so the volume is initially low.
Muting the output
To mute both pairs of outputs (balanced and unbalanced) and the
headphones, depress then release the mute pushbutton. Depress and
release the button again to restore signal to the outputs. When the
preamplifier is muted, the red MUTE LED on the front panel will illuminate.
Using the Record Loop (also known as the ‘Tape Monitor’) Function
Depress the REC LOOP button to activate the record loop function. This
works by sending a buffered version of the selected input signal out to your
recording device (e.g. a legacy tape deck or DAT recorder) before the
preamplifier volume control. After the signal has been recorded, a replica is
fed back to preamplifier via the ‘Record IN’ connectors on the rear panel
and through to the volume control so that you can confirm that the recording
is taking place and is distortion free.
Note carefully the following points with respect to REC LOOP operation: -
1. If you have selected the ‘Recorder’ input signal source, the ‘REC LOOP’
function is DISABLED by the preamplifier’s microprocessor and will not
engage
2. You can only select the REC LOOP function if either one of the Phono, CD,
Tuner, Music Server or Aux signal sources are selected
3. For the function to work correctly, you must connect both the REC OUT to
your recorder input and recorder output to the REC IN on the preamplifier so
that the audio signal loop is completed.

Model 1501 Stereo Preamplifier User Manual
w w w . o v a t i o n h i f i d e l i t y . c o m P a g e 10 | 20
Using the Phono Rumble Filter
When selected, the phono rumble filter sharply reduces the output below
20 Hz, thereby attenuating disc warp, turntable motor noise and other
extraneous low frequency sounds that are not part of the program
material. To engage the rumble filter, depress the white button on the
rear left hand side of the preamplifier (see Figure 1 above for exact
location). When the rumble filter is active, the red LED located below the
pushbutton switch will be illuminated. We recommend that if you need to
use it, you should leave it permanently ON –i.e. LED illuminated. The
rumble filter will also prevent large unwanted low frequency cone
excursions on your loudspeaker bass units that arise from record warp.
Note that the rumble filter only works on the phono input and no others.

Model 1501 Stereo Preamplifier User Manual
w w w . o v a t i o n h i f i d e l i t y . c o m P a g e 11 | 20
Using the Model 100 Remote Control
Follow the instructions on the graphic below
Depress and then
release this RED button
to alternately power-up
the preamplifier or place
it into standby mode
standby mode
The RED LED will
illuminate when
transmitting a command
Increase the volume
Decrease the volume
Depress and release this
button to cycle clockwise
through the input
sources. The
corresponding input
source indicator LED on
the preamplifier front
panel will illuminate
Switch the tone control
in and out with this
button. Applies only to
those products that have
this facility.
Depressing this button
will mute the preamplifier
including the headphone
output socket on the
front panel
Select soft roll-off filter
for 96kHz and higher
sampling rates or
standard sharp filter. For
44.1 and 48 kHz sample
rate recorded material,
this function is disabled.
This function is only
active on products fitted
with the digital input
facility. See the
respective product user
manual for further details
Select Bluetooth radio
reception. Only active
on Bluetooth equipped
products.
This button is reserved
for future use

Model 1501 Stereo Preamplifier User Manual
w w w . o v a t i o n h i f i d e l i t y . c o m P a g e 12 | 20
Changing the batteries on the Model 100 Remote Control
The batteries in the Model 100 Remote control will typically last
from between 6 and 12 months, depending upon usage. When your
preamplifier no longer responds to the remote control, or the
functions operate erratically, the batteries must be replaced.
1. Slide the battery compartment cover off on the underside of the
remote control
2. Remove the old batteries
3. Insert 2 off new AAA batteries, carefully noting the polarity
orientation
4. Replace the battery compartment cover after which the remote
should function correctly again.
Important Note: if you are not going to be using your system for
some weeks or months, we recommend you remove the batteries
from your remote to avoid battery leakage, which will damage the
internal connections and is not covered by the warranty. Store the
batteries in a dry, cool location. Further, we recommend that you
use good quality non-leak batteries like Duracell, Energizer or
Rayovac.
Important Notice:
Batteries contain harmful chemicals and can
damage the environment. Always dispose of
batteries safely and in compliance with your
local environmental regulations.

Model 1501 Stereo Preamplifier User Manual
w w w . o v a t i o n h i f i d e l i t y . c o m P a g e 13 | 20
Replacing the Fuses on your Model 1501 Preamplifier
In the unlikely event that the mains fuse on your unit should blow,
you should check the following carefully before replacing it:-
1. You are using the correct mains voltage. The mains voltage for
your product is set at the factory at the time of shipping and shown
on the rear panel bottom left hand side of the unit.
2. The power switch located on the rear panel just above the IEC plug
receptacle is turned ON. In the ON position, the rocker switch will
illuminate RED
3. The mains power plug at the wall socket is turned on
4. If your unit does still does not operate, you need to replace the fuse
as detailed below
Important! Always unplug the unit from the
mains before attempting to replace the fuse!
Use a flat bladed screw driver to lever open the fuse drawer
Replace the Model 1501 fuse with the ratings as indicated below
Mains Voltage
Fuse Rating
Fuse Type
110-130 VAC
315mA T
‘T’
220 –250 VAC
200mA T
‘T’
Firmly push the drawer closed, after which you can reconnect the
unit to the mains and then apply power.
Do not use fuses marked FF, F or M as these are fast/medium
acting and will likely blow when you power the preamplifier up. Only
use ‘T’ fuses.
If the fuse immediately blows again, refer your unit to a qualified
repair technician, or if still under warranty, contact the factory via
the ‘Contact’ page at www.ovationhifidelity.com
Never use fuses rated higher than shown in the table above on
your Model 1501. Equipment fuses are designed and rated to
prevent fire hazard and are a legal requirement in all countries.

Model 1501 Stereo Preamplifier User Manual
w w w . o v a t i o n h i f i d e l i t y . c o m P a g e 14 | 20
Trouble Shooting –Model 1501 Preamplifier
Problem
Likely Cause
Action
Unit will not power up when depressing
SELECT dial
Power switch on rear IEC mains
receptacle is not ON
See Page 8 –Is the RED pilot light ON?
Rear Power Switch is on, but unit
still does not power up
Make sure the wall socket mains switch is
ON
Rear Power Switch is on, but unit
still does not power up
If the wall socket is ON and power is
available and the rear power switch is on,
check the model 1501 mains fuse –see
Page 13
There is no sound coming from the system
The mute function has been
selected
Depress the MUTE pushbutton on the front
panel. The associated MUTE LED should
extinguish
Incorrect source is selected
Make sure the input SELECT dial is turned
to select the source you have plugged into
the rear panel of the unit
Tape Loop selected accidently
(red LED on front panel is
illuminated
Depress tape loop button to turn this
function OFF –the associated LED on the
front panel will extinguish
Interconnect cable between the
Model 1501 and the power
amplifier is not present
Connect an output cable to your amplifier.
Make sure if your amplifier takes RCA
cables or XLR cables, that you have
selected the correct input on your power
amplifier
Hum and a ‘shhhh’ sound comes out of the
speakers when Phono is selected
No source is connected to the
Phono input
Without a turntable connected to the
Phono input on the rear panel, you will get
hum and hiss from the loudspeakers when
you turn the volume up. Once you connect
a turntable, this noise will disappear
A turntable is connected, but there
is still hum coming from the
speakers
Make sure that the turntable earth bond
wire is firmly attached to the Phono Ground
Bonding Screw located in the top left hand
corner on the rear panel. See Page 8 for
details
The sound coming from the loudspeakers
unit and through the headphones has no
bass and is not a proper stereo sound
The input and/or output
interconnects on the unit’s rear
panel are not pushed completely
into their associated receptacles
Make sure all interconnect plugs are fully
seated into their respective sockets. This
problem could also arise if the ground
connection in the cable was broken when
using unbalanced interconnects, or if either
the HOT or COLD connection in the XLR
cable is faulty
The remote control is not working
The remote control batteries are
flat
Replace the remote control batteries –See
Page 12
The remote control range is low and/or
control of the Model 1501 using the Remote
is erratic
The remote control batteries are
flat
Replace the remote control batteries –See
Page 12
The remote control is not working despite
replacing the batteries
Hang-up of the microprocessor
controller within the Model 1501 -
highly unlikely but possible
Turn the power switch on the rear of the
unit OFF. Wait 20 seconds. Turn the
switch ON and then retry the remote
control
If your unit is still not working correctly, kindly contact your dealer or Ovation
High Fidelity via the ‘Contact’ page at www.ovationhifidelity.com

Model 1501 Stereo Preamplifier User Manual
w w w . o v a t i o n h i f i d e l i t y . c o m P a g e 15 | 20
Glossary –Some General Terms
AC
Alternating Current –the type of supply used in normal house wiring and to power consumer appliances like TV’s,
washing machines and high fidelity systems
A-D or A/D
Analog to Digital –an electronic technique whereby an analog signal is sampled at short, regular intervals and the
sampled value converted into a representative numeric value that is stored in computer memory, CD or some other
mass storage media
Analog Signal
A voltage or current signal that varies continuously with time. Examples are the pickup signal from a turntable, or the
output signal from a microphone. All natural world signals are analog.
Balanced Audio Signals
A method whereby audio is transferred between equipment using two connections without reference to ground, making
it highly immune to ground loop induced hum and extraneous noise pickup. Uses XLR connectors. See Unbalanced or
single-ended audio signals
Bipolar Transistor
A three-terminal semiconductor amplifying device
CMT
Current Mode Topology –a type of audio amplifier wherein the peak current into the main amplifier stage is determined
directly by the output voltage and the gain setting resistor. Also known as CFA (Current Feedback Amplifier)
D-A or D/A
Digital to Analog –the technique of converting digitally stored samples into a continuous analog signal
Damping factor
A measure of an amplifiers load impedance divided by its output impedance. The higher the figure the better. In a
modern amplifier, any figure above 50 should be considered adequate and above 100 excellent
DC
Direct Current. Examples would be the type of current supplied by a battery
Decibel or dB
A logarithmic measure of an analog signal with respect to a reference, or expressed as the difference between two
signals. 20 dB = 10x and 40 dB = 100x while 100 dB = 100 000x. By way of an example, if the S/N of a preamplifier is -
100 dBV, it means that the noise is 100 000 times lower than 1V –i.e. 10 millionths of a Volt. The ‘V’ in dBV refers to
the reference which is 1V and is an industry standard of measure
Digital Audio Signal
An audio analog signal is sampled at discrete time intervals and the resultant samples converted to a numerically
representative value. An example is a CD, where the original analog signal (e.g. the voice of a singer) is sampled 41000
times a second and each sample converted to a 16 bit digital representation using an A-D which is then written to the
CD
Digital signal
A binary coded numerical value represented by 0’s and 1’s where the ‘0’ value corresponds to 0V and the ‘1’
corresponds to 3.3V, 5V or some other non-zero voltage. Digital signals are either parallel or serial format. Examples
of digital signals would be the co-ax output from a CD drive (serial digital signal), or the data on an Ethernet cable used
in communications (also a serial digital signal)
Distortion and Noise
The presence in any electrical signal of unintended harmonics and/or noise. Reducing distortion and noise are key
goals in any equipment that reproduces audio signals
EMI or Electro-Magnetic
Interference
Noise and/or extraneous signal introduced into a system through magnetic or capacitive coupling mechanisms.
Filtering, bandwidth limiting and careful design and equipment layout can reduce the effects orders of magnitude below
human hearing threshold
EQ
Equalization
Frequency Response or Bandwidth
The extent of frequencies an amplifier can reproduce to within a specified range. Human hearing covers 20Hz to 20
kHz. Audio amplifiers should cover at least 2 Hz to 100 kHz (-3 dB) to ensure a flat response within the human hearing
range of 20 Hz to 20 kHz
Input Sensitivity
The level of input signal required to produce a given output from a preamplifier or a power amplifier.
IR Remote
Infra-red Remote control
JFET
Junction Field Effect Transistor –a three terminal semiconductor amplifying device that somewhat emulates vacuum
tube triodes in its performance characteristics.
Ohm
Unit of electrical resistance. Most loudspeakers are rated at 8 Ohms
Output Power
Measured in Watts, the amount of electrical power that can be delivered into a loudspeaker load by an amplifier. Always
quoted into a known resistive load –usually 4 or 8 Ohms
Phono socket
The small round sockets –usually grouped in Left (WHITE) and Right (RED) pairs on the rear side of audio equipment.
Also referred to as ‘RCA Phono’ sockets
RC5 IR
The protocol by which commands from the remote are encoded and transmitted via infra-red to the receiving equipment
which then executes them. Invented by Philips in the 1970’s and now one amongst 4 or 5 industry standards
RIAA
Recording Industry Association of America –The association that standardized the LP/vinyl playback equalization curve
in the early 1960’s that is still the standard for LP/vinyl today
Signal to noise ratio (SNR)
A measure of the amount of noise in a system against the nominal output signal of that system. In modern equipment,
any figure lower than -90 dBV should be considered very good, and lower than -100 dBV excellent
Slew Rate or S/R
The fastest rate of output voltage change that an amplifier can sustain. For consumer audio amplifiers, any figure
above 100 Volts per microsecond (100 V/us) should be considered excellent
Small signal rise time
A measure of the speed (i.e. rate of change) of an amplifier or preamplifier when dealing with low level signals in the 1-2
Volt range. Small signal rise time and slew rate (S/R) are not equivalent
Unbalanced or single-ended audio
signals
With this type of interconnection, the audio signal is transferred between equipment using a ground connection and a
signal connection. It is more common than balanced audio signals due to its lower implementation cost, but much more
susceptible to noise pick-up
VMT
Voltage Mode Topology –a type of amplifier wherein the peak current into the main gain stage is limited to that of the
input stage ‘Long Tail Pair’ (LTP) current source. Also known as VFA (Voltage Feedback Amplifier)
XLR
The standard interconnect format for balanced audio signals

Model 1501 Stereo Preamplifier User Manual
w w w . o v a t i o n h i f i d e l i t y . c o m P a g e 16 | 20
Specifications
Model 1501 Stereo Line Preamplifier
General Description
Microprocessor controlled ultra-low distortion, low noise, solid state stereo preamplifier featuring 6 selectable inputs, including an
RIAA phono stage and integrated headphone amplifier. Balanced and single ended outputs. Microprocessor controlled relays for
input selection, power up/down and mute control. Buffered record loop facility. All functions, except Record Loop (aka Tape Monitor)
are also available using the supplied Model 100 remote control. All signal switching accomplished using hermetically sealed precision
small signal relays.
Inputs 6 off for CD, Tuner, Music Server, Aux, Recorder, Phono; Phono equipped with switchable rumble filter
located on rear panel LHS.
Input sensitivity Phono: 5mV at 1kHz for 1 V output (measured at unbalanced output of preamplifier) or 2 V output
(measured at the balanced outputs of the preamplifier); Aux and Recorder Inputs 350 mV; CD, Tuner
and Music Server 2V
Input Impedance Phono Inputs 47k in parallel with 100pF; all other inputs 10k Ohms
Record Loop Selected via front panel push button. Buffered with Zout = 100 Ω (Ohms)
Frequency Response Line Level inputs: 20Hz to 20 kHz +0dB -0.1dB; 2Hz to 200 kHz +0dB -3dB
Phono: RIAA conformance 20 Hz to 20 kHz +-0.15dB typical
Phono Rumble Filter: -0.2dB at 20 Hz, -18 dB at 12 Hz, -36 dB at 6 Hz
Distortion Typically 0.0003% at 2 V out into 10 kΩ; line inputs at 10 V out into 10 k Ω: Better than 10ppm
(0.001%) Phono –better than 0.01%; typically, 0.005% at 5mV input
Signal to Noise Ratio Line: ≥110 dB ref 2V Output; ≥ 104 dB ref 1V output; ≥ 120 dB at 9 VRMS out
‘A Weighted’Phono: ~79 dB ref 5 mV input at 1 kHz
Output Drive 1k Ωor higher on single or balanced output; Output load capacitance in balanced mode should not
exceed 300 pF; Tape Loop output: 350mV 10 k Ωfor rated input sensitivities on all inputs.
Output Impedance 50 Ω Single ended; < 1 Ω in Balanced mode
Headphone Output 6 VRMS into 32 Ω; distortion < 0.002% 20Hz to 20kHz; peak output current ~350mA
Operating voltages 100-130 VAC or 200 to 260 VAC factory set at time of order
Power consumption 25 VA Max; ~5W in standby mode
Weight 10 Kgs
Operating Temperature -10 deg C to +45 deg C non-condensing
The Ovation High Fidelity Company Limited
Norfolk, England
www.ovationhifidelity.com
™

Model 1501 Stereo Preamplifier User Manual
w w w . o v a t i o n h i f i d e l i t y . c o m P a g e 18 | 20
Owners Information
Date of
Purchase
Date of
Warranty
Registration
Dealer
Serial
Number
We recommend you staple your purchase invoice to the
inside back page of this manual for safekeeping as proof
of purchase.
Table of contents
Other Ovation Amplifier manuals

Ovation
Ovation 1701 User manual

Ovation
Ovation Optima User manual

Ovation
Ovation I.C. 100 User manual

Ovation
Ovation 1721 User manual

Ovation
Ovation OP-24Plus User manual

Ovation
Ovation OP-24Plus User manual

Ovation
Ovation OP-PRO STUDIO User manual

Ovation
Ovation OP-24Plus User manual

Ovation
Ovation The Cat III User manual

Ovation
Ovation Engineered for Art 1707 User manual