HOMEOWNER’S GARAGE DOOR MANUAL
Models: 170 Series / 180 Series
Read this manual carefully and observe all
warnings when operating or maintaining your
garage door.
1-800-929-DOOR
www.OverheadDoor.com
Keep this manual for future reference.
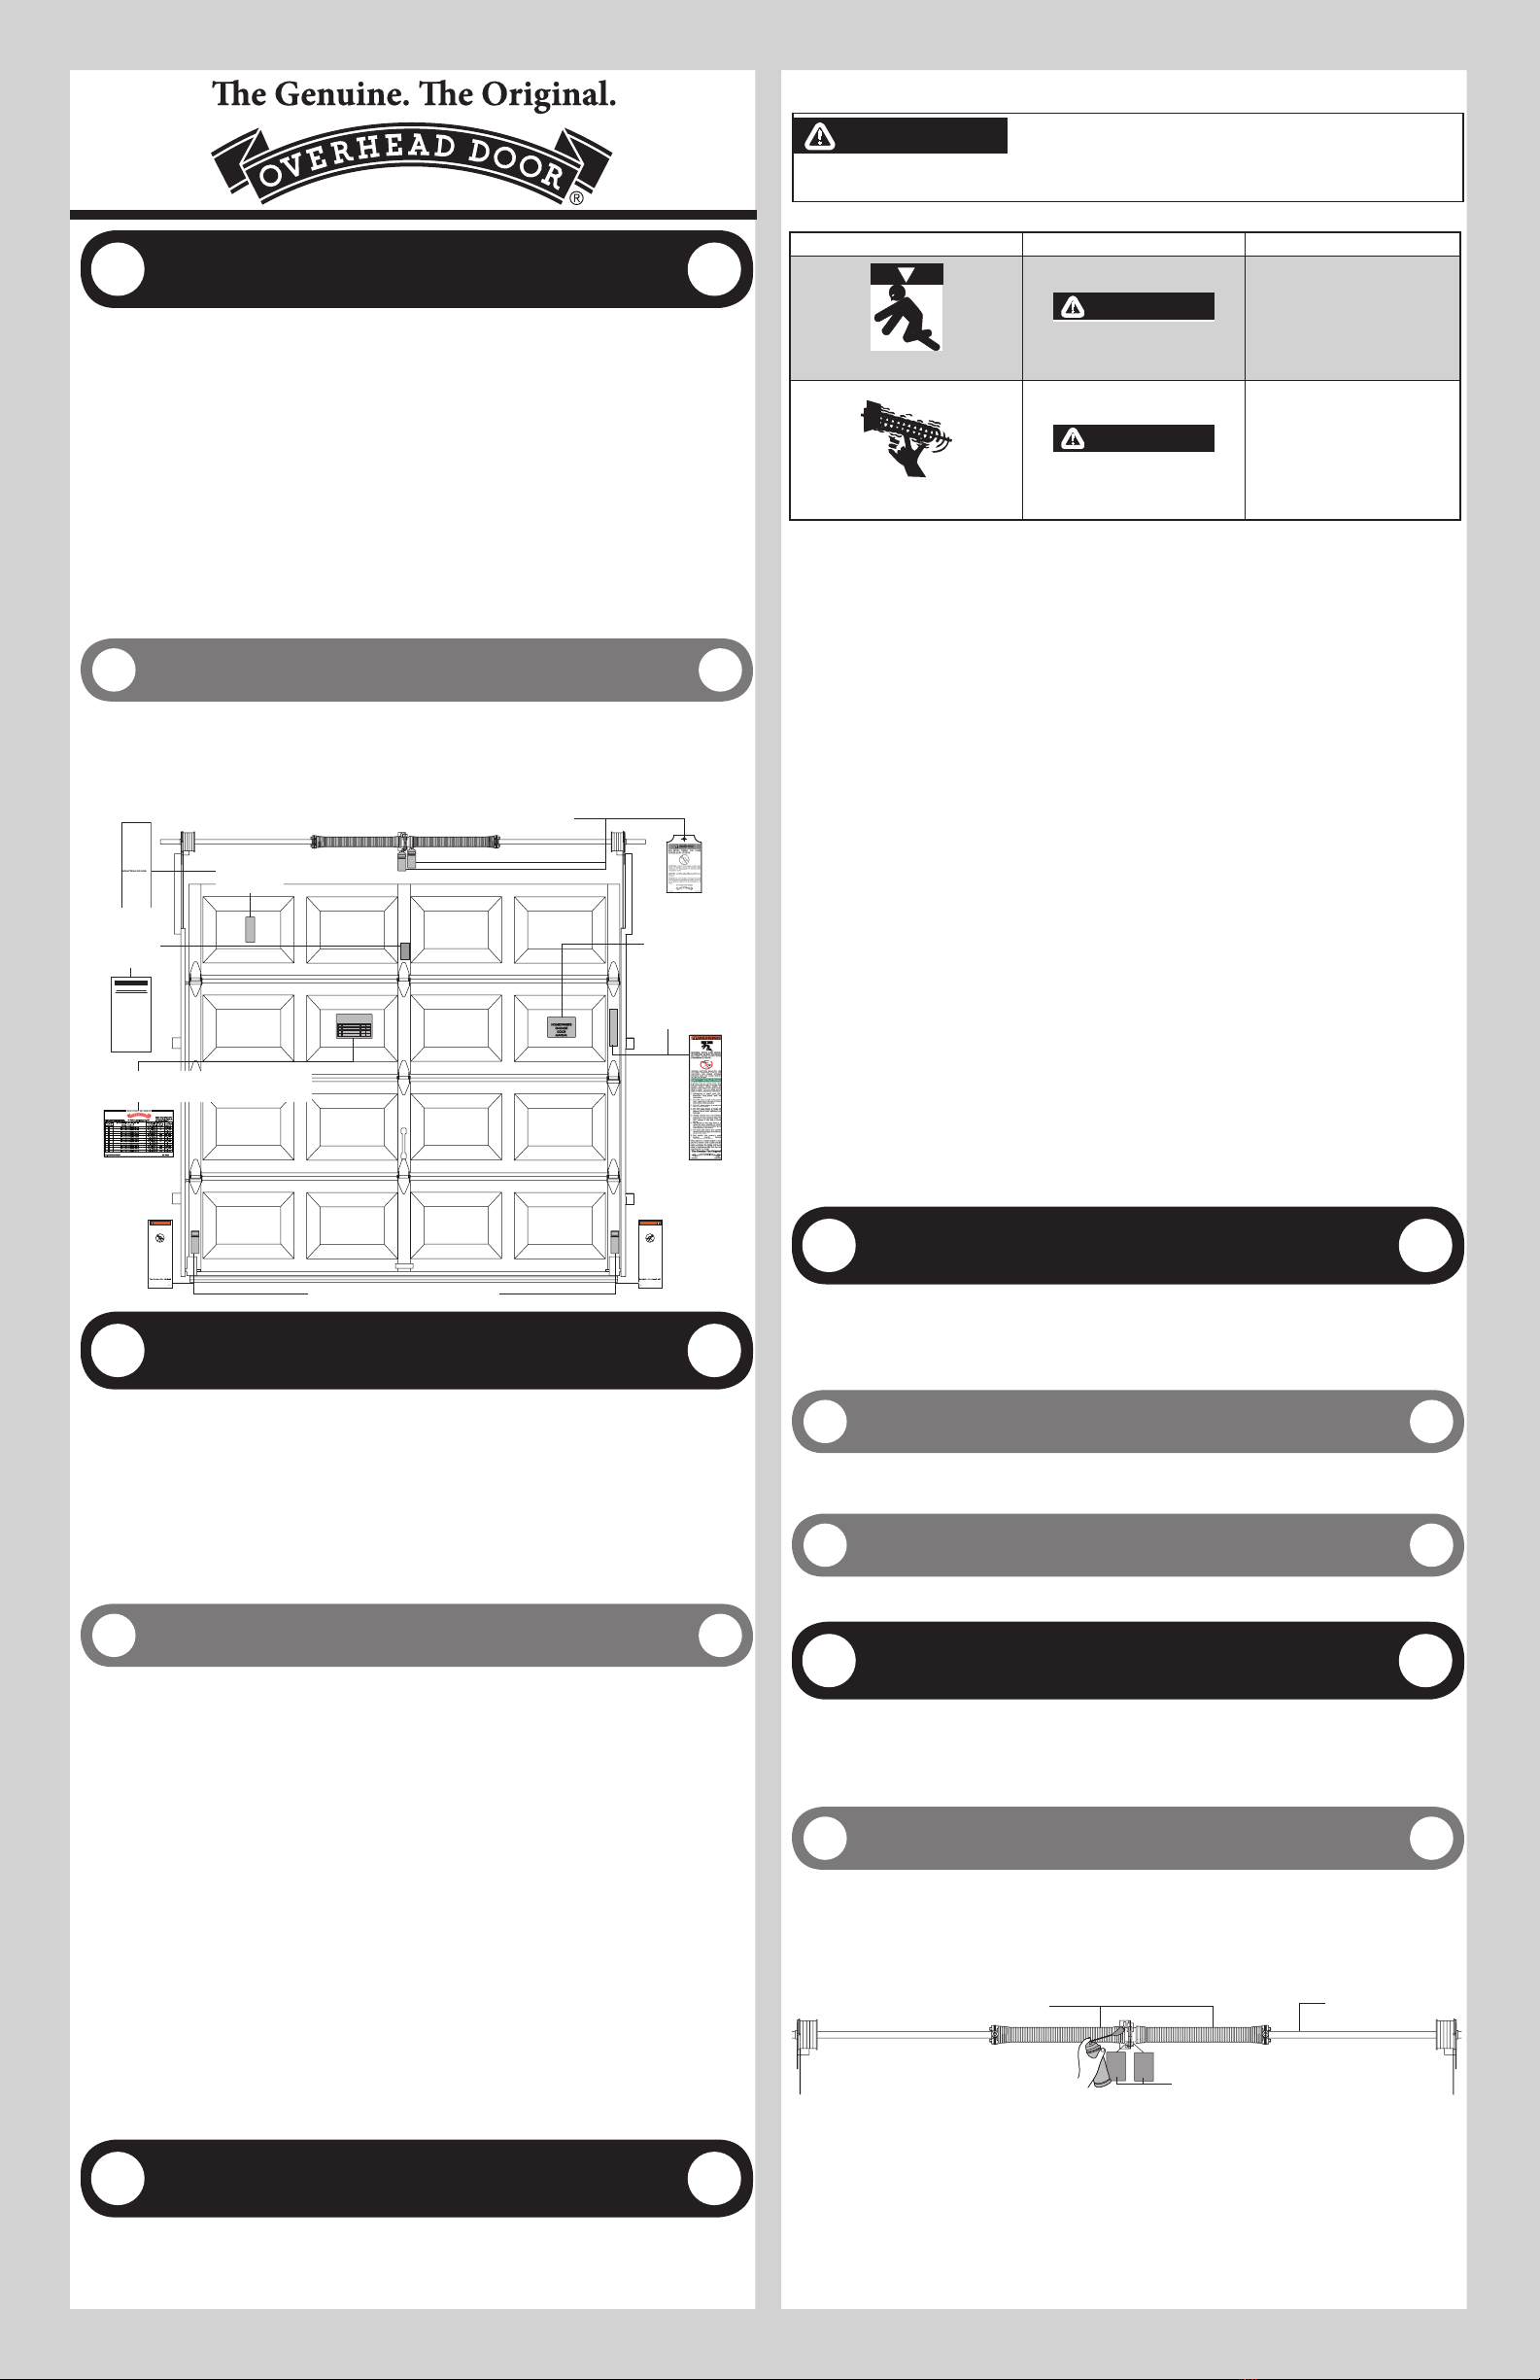
Label Placement
IMPORTANT: IF THE LABELS ARE NOT APPLIED AT THE FACTORY, THEN ENSURE YOU PLACE ALL LABELS IN POSITION,
AS SHOWN. IF ANY LABELS ARE MISSING, WORN OR DAMAGED, CALL YOUR OVERHEAD RIBBON DISTRIBUTOR FOR
REPLACEMENT.
NOTE: The Spring Warning tag(s) are factory attached (one per spring).
NOTE: Because of different configurations, some labels may require minor relocations.
PAINTING INSTRUCTIONS
WOOD DOORS
Do Not allow door to absorb moisture
before painting. Protection of the door is
your responsibility - Not the responsibility
of the supplier. Prior to, or immediately
after installation, this door should be
primed inside, outside, and on all edges.
If a latex primer is applied, a latex topcoat
should also be applied. If an oil based
primer is applied, an oil based topcoat
should also be applied. Read paint
manufacturer’s instructions.
NOTE: If door was supplied from factory
primed, a latex topcoat should be applied.
NOTE: Observe temperature limitations
for paint.
NOTE: Use of dark color paint on
STEEL DOORS
Clean surface with mild detergent
solution. Rinse with clear water and allow
to dry completely. Prepare surface with
a liquid sander/deglosser according to
manufacturers’ instructions. Finish with a
premium ACRYLIC LATEX paint. Read paint
manufacturers’ instructions.
NOTE: Oil based paints are not to be
used and void manufacturer’s warranty.
Observe temperature limitations for paint.
10/01/2008 409846-0003
IMPORTANT
MONTTIAON
TTOPOORTION
/28/02 020001
1
WARNING
THE ADJACENT BOTTOM DOOR
BRACKET IS UNDER EXTREME
TENSION AND CAN CAUSE
SERIOUS INJURY OR DEATH.
DO NOT adjust, repair or remove
bottom do or brackets or any parts
to which cables and/or springs are
connected. These parts are under
extreme tension and can cause
serious injury or death.
Adjustments or repairs must ON LY
be made by a trained door systems
technician using proper tools and
instructions.
DO NOT remove, cover or paint over
this label. Product user should inspect
this label periodically for legibility and
should order a replacement label from
the door manufacturer, as needed.
10/01/2008 080001
WARNING
THE ADJACENT BOTTOM DOOR
BRACKET IS UNDER EXTREME
TENSION AND CAN CAUSE
SERIOUS INJURY OR DEATH.
DO NOT adjust, repair or remove
bottom doo r brackets or any parts
to which cables and/or springs are
connected. These parts are under
extreme tension and can cause
serious injury or death.
Adjustments or repairs must ON LY
be made by a trained door systems
technician using proper tools and
instructions.
DO NOT re move, co ver or paint ov er
this label. Product user should inspect
this label periodically for legibility and
should order a replacement label from
the door manufacturer, as needed.
10/01/2008 080001
Residential
warning
label
Bottom section warning labels
Homeowner’s
Manual
Envelope
Torsion spring tag(s) (one per spring)
Windload label
(For Windload Applications Only)
Opener
bracket
label
Painting
instruction
label
CLEANING YOUR GARAGE DOOR
While factory-applied finishes for steel garage doors are so durable that they will last many years longer than ordinary
paints, it is desirable to clean them thoroughly on a routine basis. Apparent discoloration of the paint may occur when it
has been exposed in dirt laden atmospheres for long periods of time. Slight chalking may also cause some change in ap-
pearance in areas of strong sunlight. A good cleaning will generally restore the appearance of these coatings and render
repainting unnecessary. An occasional light cleaning will also help maintain an aesthetically pleasing appearance. To
maintain the original finish of the garage doors, the only regular maintenance necessary is that of annual washing. Mild
solutions of detergents or household ammonia will aid in the removal of most dirt, and the following are recommended
levels:
One cup of Tide™, or other common detergents, which contain less than 0.5% phosphate, dissolved into five gallons of
warm water.
NOTE: The use of detergents containing greater than 0.5% phosphate is not recommended for use in general cleaning of
garage doors.
Painting Your Garage Door
SURFACE PREPARATION FOR PAINTING:
Wax on the surface must be removed or paint peeling/flaking will result. To remove this wax, it will be necessary to lightly
scuff the surface with a gray (not green!) 3M Scotch Brite pad saturated with soapy water. A final wipe and rinse should
be done with clean water only, to remove any loose dust or soap film.
Surface scratches, which have not exposed the metal substrate, can be lightly buffed or sanded with 0000 steel wool
or No. 400 sand paper to create a smoother surface. Care must be taken to not expose the substrate under the paint
(see Note No. 2). Once this exposed condition exists, the likelihood for rusting is greatly increased. See the following
paragraph if the metal substrate is observed.
Exposed substrate must be treated to prevent rust from forming. Sand the exposed area lightly and paint with high quality
metal primer, especially formulated for galvanized surfaces, to protect against corrosion. Follow drying time on primer can
label before applying topcoat.
The surface to be recoated must not be too smooth or the repaint material will not adhere to it. It is advisable to test a
representative area to evaluate adhesion. If poor adhesion is observed, the surface must be abraded by sanding or buff-
ing using grades mentioned above. Care must be taken to not expose the substrate under the paint. (See Note No. 2)
After the surface has been properly prepared it must be allowed to dry thoroughly, then coated immediately with a
premium quality latex house paint. Follow the paint label directions explicitly. Do not use oil base paint, this will void the
warranty. Please note that if substrate is exposed, painting with latex paint may cause accelerated rusting of steel.
NOTES:
1. Re-painting of finish painted steel doors cannot be warranted as this condition is totally beyond door manufacturer’s
control.
2. If the steel door surface has a finish painted textured surface representing wood grain, stucco, etc., sanding should not
be attempted as danger of exposing substrate is greatly increased.
3. Consult a professional coatings contractor if in doubt about any of the above directions.
4. Follow directions explicitly on the paint and solvent container labels for proper applications of coatings and disposal of
containers. Pay particular attention to those directions involving acceptable conditions in which to paint.
SAFETY INFORMATION
OVERVIEW OF POTENTIAL HAZARDS READ THIS SAFETY INFORMATION CONVENTIONS USED IN THESE
INSTRUCTIONS:
Garage doors are large, heavy objects that move with the help of springs under high tension and electric motors. Since
moving objects, springs under tension, and electric motors can cause injuries, your safety and the safety of others
depend on you reading the information in this manual. If you have questions or do not understand the information
presented, call your nearest trained door system technician or visit our website.
WARNING WARNING
IN THE FOLLOWING TEXT, WARNING MEANS THAT SEVERE INJURY OR DEATH CAN RESULT
FROM FAILURE TO FOLLOW INSTRUCTIONS.
IMPORTANT SAFETY INSTRUCTIONS READ AND FOLLOW ALL INSTRUCTIONS SAVE THESE INSTRUCTIONS.
Potential Hazard Effect Prevention
Moving Door
Could result in Death or Serious Injury
Keep people clear of opening while Door
is moving.
Do NOT allow children to play with the Door
Opener.
Do NOT operate a Door that jams or one
that has a broken spring.
High Tension Spring(s)
Could result in Death or Serious Injury
Do NOT try to remove, install, repair or
adjust springs or anything to which door
spring parts are fastened, such as, wood
blocks, steel brackets, cables or other like
items.
Installations, repairs and adjustments must
be done by a trained door system techni-
cian using proper tools and instructions.
READ THIS SAFETY INFORMATION:
1. Do NOT permit children to play beneath or with any garage door or electric operating controls.
2. Keep hands and fingers clear of section joints, track, and other door parts when the door is opening and closing to
avoid injury. The lift handles are located for safe operation as well as easy use.
3. Bolts must be installed at the rear end of horizontal tracks. These act to stop the rollers and keep the door from rolling
off the back of the track.
4. Track installations must use sway braces on the rear track hangers to prevent sideways movement. If the tracks are
NOT firmly stabilized they might spread, allowing the door to fall and cause severe injury and damage.
5. Springs, Cables, and Bottom Corner Brackets are under strong spring tension. Do NOT attempt to remove, repair or
adjust any fasteners on these components or anything to which these parts are attached, such as wood blocks, steel
brackets, or other like items. You could suddenly release spring forces and risk severe injury.
6. If the garage door and/or any of the supporting tracks are damaged, operating the door could be hazardous. Take the
door out of service and call a trained door system technician to promptly service or repair the door.
7. Be sure that your garage complies with all applicable state and or local ventilation requirements before you enclose
any vehicles in the garage. Good ventilation avoids fire and health hazards caused by fumes accumulating within a well-
sealed garage.
8. Keep ice and snow from accumulating at the bottom of the door during winter weather conditions. Ice and/or frozen
snow may cause the door and bottom seal to stick to the floor. Operating a struck door may cause permanent damage to
the door system.
9. KEEP DOORS PROPERLY BALANCED. An improperly balanced door increases the risk of severe injury or death. Have a
trained door system technician make repairs to cables, spring assemblies and other hardware as necessary.
10. Doors equipped with an automatic door opener can cause serious injury or death if NOT properly adjusted and oper-
ated. To ensure safety of these doors:
a) Never let children operate or play with the door controls. Keep the remote control away from children,
b) Always keep the moving door in sight and people and objects away from the door until the door is completely closed.
NO ONE SHOULD CROSS THE PATH OF THE MOVING DOOR,
c) NEVER GO UNDER A STOPPED, PARTIALLY OPEN DOOR,
d) Test opener monthly. The door MUST reverse on contact with a 1-1/2” high object (or a 2” x 4” board laid flat) at the
center of the doorway on the floor. If the door does NOT reverse, re-test the door opener after adjusting either the force
or the limit of travel in accordance with the manufacturer’s instructions. Failure to adjust the opener properly may result
in severe injury or death,
e) When possible, use the emergency release only when the door is closed. Use caution when using this release with the
door open. Weak or broken springs are capable of increasing the rate and force of door closure and increasing the risk of
severe injury or death, and
f) If your door has a pull down rope or locking mechanism, you must remove the rope and either disable or remove any
door locks.
GENERAL INFORMATION
Operate the door only when it is properly adjusted and free of obstructions. If the door is hard to operate or does not
move, call a trained door system technician for repair.
If door is to be electrically operated, remove pull ropes and remove or disable the lock.
Repaint the door when paint is worn or damaged. Do not paint track, track rollers, graduated hinges, counterbalance lift
cables, springs, lock, or warning labels.
Recommendations
The manufacturer has designed and sized the components specifically for each type of door. The door will operate safely
and efficiently over an extended period of time if it is PROPERLY INSTALLED, OPERATED, and MAINTAINED. The
manufacturer recommends that the garage door be inspected and lubricated regularly as described in this manual.
Manual Operation
If provided, always use lift handles and step plates when operating the door manually. Do not place fingers or hands
between sections.
DOOR INSPECTION AND MAINTENANCE
GUIDELINES
All mechanical devices require periodic service and/or maintenance, and garage doors are no exception. The amount
and frequency of preventive maintenance required depends on the local environment conditions and the frequency of
door use. Preventive maintenance should be performed at least every six months, however more maintenance may be
required if conditions warrant. Maintenance includes lubrication of moving parts and inspection of certain components
for tightness. The following maintenance and inspection recommendations may be established until actual operating
conditions dictate otherwise.
Door Tracks
Keep tracks free of oil or grease so rollers move freely. Grease attracts dirt and dust which build up and keep door from
moving smoothly.
LIGHTLY OIL: Hinge Points, Steel Roller Stems and inner race assembly (Non-metal rollers do not require lubrication.),
Locking Device moving parts, Torsion Spring (Head plate bearing surfaces, torsion tube, and spring coil surfaces).
Lubrication reduces wear and friction. A 30w or other medium weight oil is satisfactory. Wipe off excess oil from door and
track surfaces.
Tosion tube
Spring coils surfaces
Torsion spring tag(s)
411075-0001 NEW 02/16/2011Part No.
©COPYRIGHT 2011 OVERHEAD DOOR CORPORATION


