Ovislink AirLive ePhone-1000 User manual

User’smanual
AirLive ePhone
–
1000
VOIP IP Phone

- 2 -
Safety Instructions
Safety Instructions Do not attempt to service the product yourself. Any
servicing of this product should be referred to qualified service personal.
To avoid electric shock, do not put your finger, pin, wire, or any other metal
objects into vents and gaps.
To avoid accidental fire or electric shock, do not twist power cord or place it
under heavy objects.
The product should be connected to a power supply of the type described in
the operating instructions or as marked on the product.
To avoid hazard to children, dispose of the product’s plastic packaging
carefully.
Please read all the instructions before using this product.

- 3 -
Safety Notices
These are the safety considerations for using the AirLive ePhone-1000. Read these notices before
installing or using the phone.
Warning This warning symbol means danger. You are in a situation that could cause bodily injury.
Before you work on any equipment, be aware of the hazards involved with electrical circuitry and
be familiar with standard practices for preventing accidents. To see translations of the warnings that
appear in this publication, refer to the Regulatory Compliance and Safety Information document
that accompanied this device.
Warning Read the installation instructions before you connect the system to its power source.
Warning Ultimate disposal of this product should be handled according to all national laws and
regulations.
Warning Do not work on the system or connect or disconnect cables during periods of lightning
activity.
Warning To avoid electric shock, do not connect safety extra low voltage (SELV) circuits to
telephone network voltage (TNV) circuits. LAN ports contain SELV circuits, and WAN ports
contain TNV circuits. Some LAN and WAN ports use RJ-45 connectors. Use caution when
connecting cables.
The next warning applies when you use an external power supply.

- 4 -
Warning This product relies on the building's installation for short-circuit (over current) protection.
Ensure that a fuse or circuit breaker no larger than 120 VAC, 15A U.S. (240 VAC, 10A
international) is used on the phase conductors (all current-carrying conductors).
Warning The device is designed to work with TN power systems.

- 5 -
Table of Contents
SAFETY NOTICES 3
TABLE OF CONTENTS 5
PRODUCT SPECIFICATIONS 7
PACKAGE CONTENTS 8
AIRLIVE EPHONE-1000 FUNCTIONS 9
Front Panel ................................................................................................................................................ 9
Rear and Back Panel .............................................................................................................................. 10
Function Keys ......................................................................................................................................... 11
HARDWARE INSTALLATION 12
CONFIGURING THE AIRLIVE EPHONE-1000 WITH THE KEYPAD 13
Configuring Network Settings............................................................................................................... 14
Configuring for DHCP..........................................................................................................................................14
Configuring for Static IP.......................................................................................................................................14
Configuring for PPPoE ........................................................................................................................................15
Protocol Settings .................................................................................................................................... 16
Audio Settings......................................................................................................................................... 18
Other Settings ......................................................................................................................................... 19
Speed Dial Settings ................................................................................................................................ 20
Revert Back to Factory Default............................................................................................................. 21
Storing Settings ...................................................................................................................................... 22

- 6 -
Editing Settings....................................................................................................................................... 23
Saving Settings....................................................................................................................................... 24
Exit Settings ............................................................................................................................................ 24
WEB CONFIGURATION 25
NETWORK PARAMETERS 27
PROTOCOL PARAMETERS 28
PHONE PARAMETERS 32
AUDIO PARAMETERS 35
OTHER PARAMETERS 36
SAVE/REBOOT PARAMETERS 37
Registration Message............................................................................................................................. 38
USING AIRLIVE EPHONE-1000 39
To make a phone call ............................................................................................................................. 39
Review call record .................................................................................................................................. 39
Speed Dial................................................................................................................................................ 39
Mute.......................................................................................................................................................... 40
Hold .......................................................................................................................................................... 40
APPENDIX 41
FREQUENTLY ASKED QUESTIONS 43

- 7 -
Product Specifications
Voice
Call Control Protocol SIP (RFC-3261) or H.323 V4
Voice Compression G.711A/µ -Law, G.723.1, G.729A/B/AB
Echo Cancellation G.165 16ms
Delay (Point to Point) < 100ms
Average Bandwidth Requirement 10-12k bit/s
Network Protocol RTP/RTCP, UDP/TCP
Support Silence Suppression
VAD, CNGAcoustic Echo CancellationJitter Buffering
DTMF tone detection
E.164 Dial plan
Network Interface
Interface 10 Base-T Ethernet
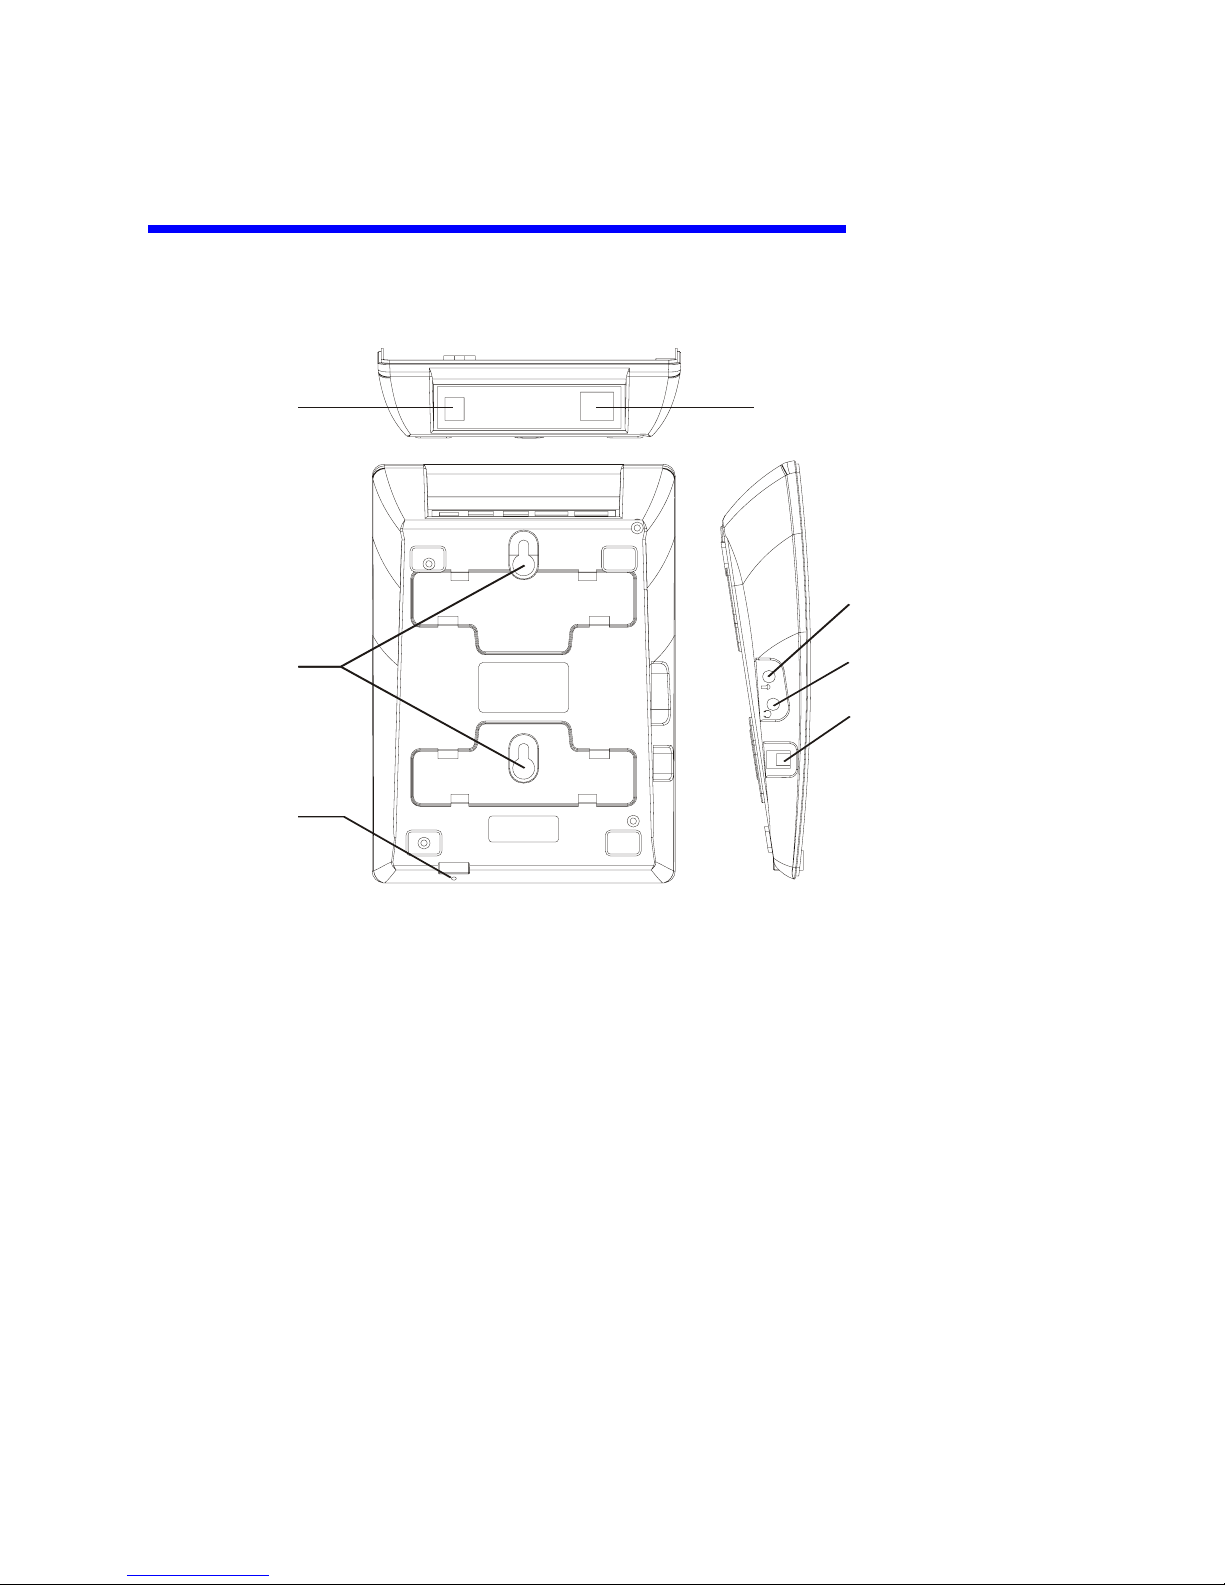
Connectors Type RJ-45 connector
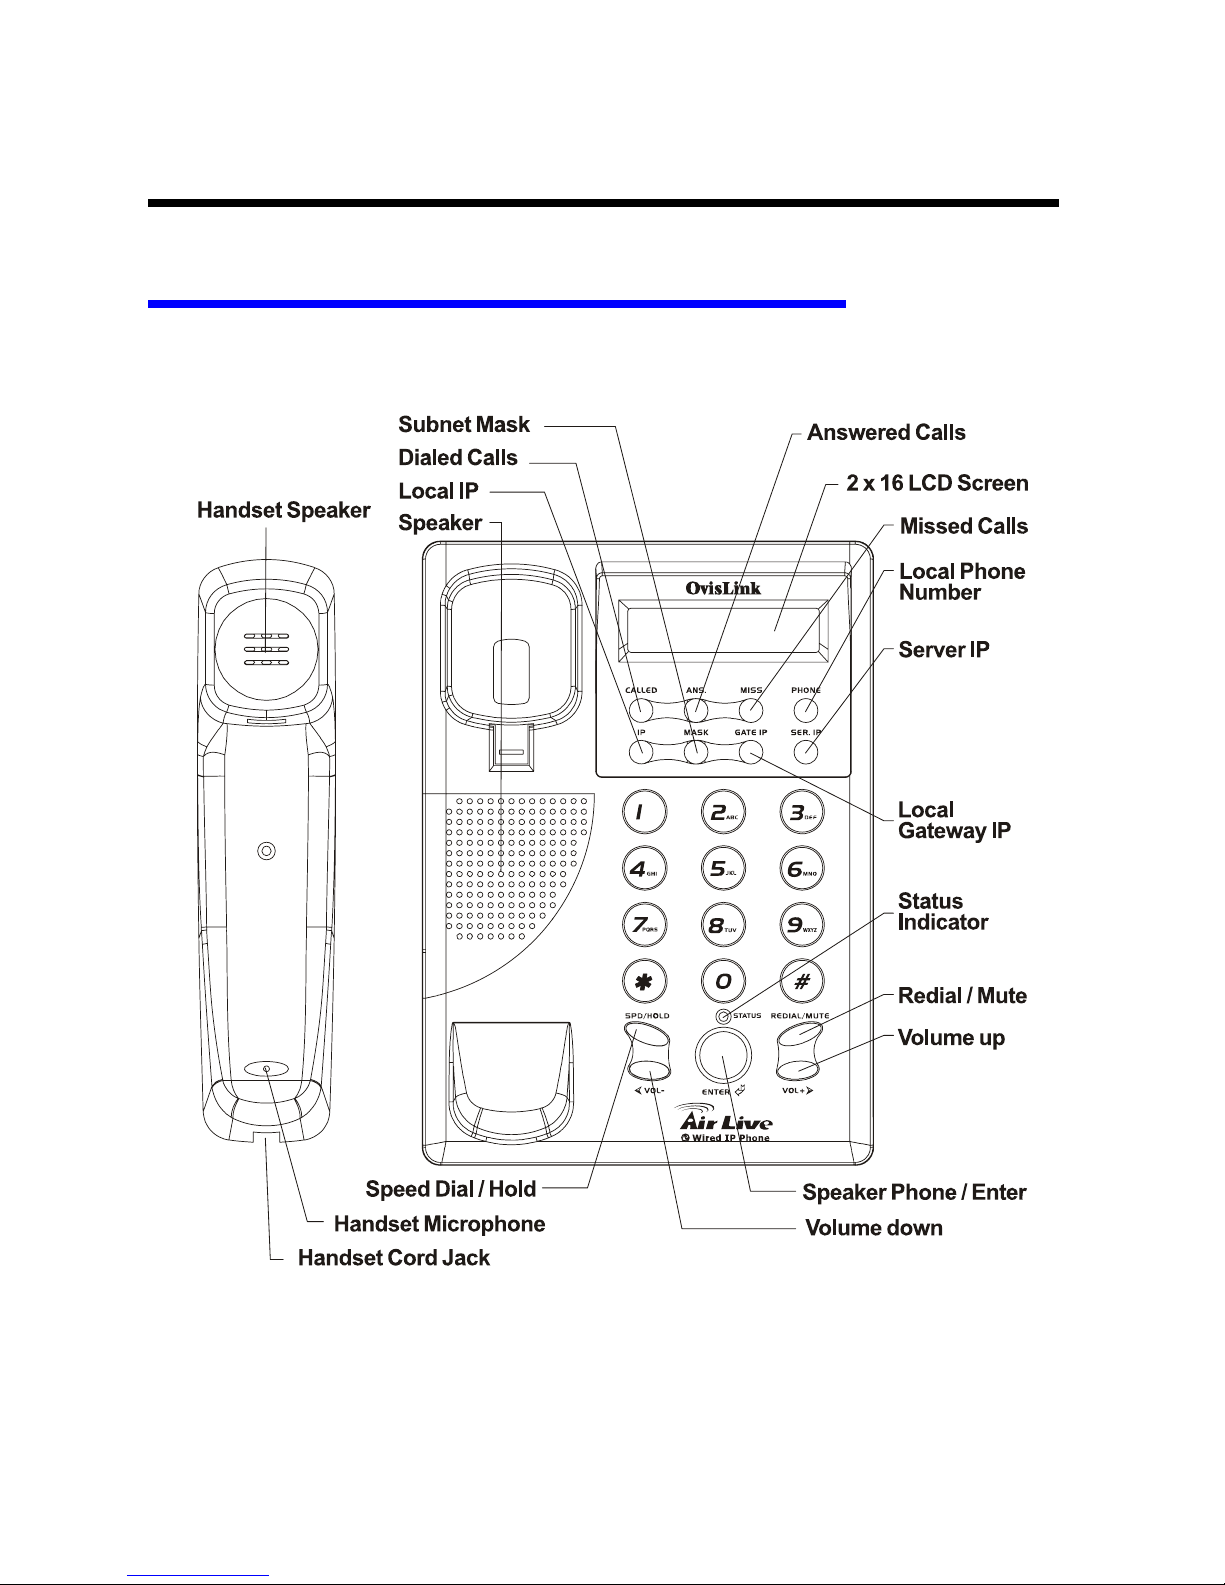
Configuration Tools Web BrowserPhone SettingLCD Monitor
IPAddress Support PPPoE, DHCP client/Static IP
Firmware Upgrade FTP/HTTP
Other Information
100 – 240VAC, 50 – 60Hz
Power 5VDC, 1A
Power Consumption 3W
Operating Temperature0 - 40(32° - 104°F)
Storage Temperature-30 - 65(-22° - 149°F)
Working Environment
Relative Humidity10 – 95% Non-Condensing
Certification CE, FCC
Headset Connection InterfaceFirmware Upgrade
NAT Pass-through (SIP with STUN)
Other Speaker phoneHoldMuteRedialSpeed Dial
Received CallsMissed CallsDialed CallsCall
StatusVolume AdjustmentVoice ResponseWeb
ConfigurationLED indicator, etc..

- 8 -
Package Contents
The AirLive ePhone-1000 Series VoIP phone package contains:
•One AirLive ePhone-1000 VoIP phone
•One power adaptor
•One RJ-45 Ethernet cable
•Quick Installation Guide
•Installation CD

- 9 -
AIRLIVE EPHONE-1000 Functions
Front Panel

- 10 -
Rear and Back Panel
Power Jack 10 Base T Ethernet RJ-45 Jack
Microphone Jack
Earphone Jack
Handset Cord Jack
Wall Mount
Microphone

- 11 -
Function Keys
Keys Function
These keys function with the handset hung
Called Press the Called key to display the IP address and phone number of the last call
placed.
Ans. Press the Ans. key to display the IP address and phone number of an incoming call.
Miss Press the Miss key to get local IP address of the phone to consult the missed call
number. In addition, dial # to dial this number.
Phone Press the Phone key to get the phone number of the phone. Press again will show
the data in the phone book.
IP With handset hung, press the IP key to get local IP address of the phone.
Mask With handset hung, press the Mask button to get the subnet mask of the AirLive
ePhone-1000.
GATE IP With handset hung, press the GATE IP button to get the gateway IP address in
LAN.
SER .IP With handset hung, press the SER. IP to get the service server IP address.
Hand Free Press this key to turn on the speaker phone.
These keys function at all times
SPD./HOLD Speed Dial; Hold
REDIAL/MUTE Redial; Mute
Vol - Decreases the volume of the handset or speaker; turns the recording back.
Vol + Increases the volume of the handset or speaker; turns the recording back.

- 12 -
Hardware Installation
Plug the power cord into the Power jack of the AirLive ePhone-1000 VoIP
Phone.
Plug the RJ-45 Ethernet cable into the Ethernet jack.
Plug the other end of other cable into the HUB, Router, ADSL Modem, or other
broadband device.
After installing the AirLive ePhone-1000, follow the configuration instructions
in the next chapters.

- 13 -
Configuring the AIRLIVE EPHONE-1000 with the Keypad
AirLive ePhone-1000 can be configured with its keypad or on a web page.
The table below illustrates Configuration Function keys:
Keys Function
SPD./HOLD Change Settings
REDIAL/MUTE Main Menu Options
Vol - Next Page
Vol + Previous Page
Enter Confirm Setting
The Main Menu of the Keypad LCD screen is shown below:

- 14 -
Configuring Network Settings
Network settings allow the AirLive ePhone-1000 to connect to a specific network
environment.
DHCP is the default setting for the AirLive ePhone-1000. This setting enables internet
connections with any DHCP environment.
If either PPPoE or Static IP are used, change the default network setting of AirLive
ePhone-1000 to one of these network environments.
Using the keypad you can select DHCP, Static IP or PPPoE for your network environment
Each of these three options is described below.
Configuring for DHCP
Connect the power adaptor of AirLive ePhone-1000 and connect the PPPoE network
to the RJ-45 port.
Press 1, 2, 3, 4, # (Hold the “#” key)
Enter a [Password]
Press 1, 2, 3, 4 and Enter ÆNetwork Settings appears.
Press Enter Æenter the [iptype]
Press SPD/Hold
When the Blinking Cursor appears press 1 and press Enter (1 sets the networking
settings to DHCP).
Configuring for Static IP
Connect the power adaptor to the AirLive ePhone-1000
Connect the PPPoE network to the RJ-45 port.
Press1, 2, 3, 4, # (Hold the “#” key) →enter a [Password]
Press 1, 2, 3, 4 and Enter→Network Settings appears.
Press Enter→[iptype] →
Press SPD/Hold→a Blinking Cursor appears

- 15 -
Press 0 and Enter (0 sets the networking settings to Static IP).
Press Enter again→enter the IP address [IP] →
Press SPD/Hold→a blinking cursor appears
Enter the IP address (XXX*XXX*XXX*XXX) and press Enter.
Press Enter again →the Subnet Mask parameter appears
Press SPD/Hold→when the blinking cursor appears→
Enter the Subnet Mask information (XXX*XXX*XXX*XXX) and then press Enter.
Press Enter again→the Router option appears
Press SPD/Hold→the blinking cursor appears,
Enter the Input Default Gateway Information (XXX*XXX*XXX*XXX) and the press
Enter.
Configuring for PPPoE
Connect the power adaptor to the AirLive ePhone-1000.
Connect the PPPoE network to the AirLive ePhone-1000 to its RJ-45 port.
Press1, 2, 3, 4, # (Hold the “#” key) enter a [Password]
Press 1, 2, 3, 4 and Enter→the Network Settings option appears.
Press Enter→enter the [iptype]
Press SPD/Hold→When the blinking cursor appears Press 1and then press Enter(1
sets the networking settings PPPoE).
Press Enter again→Enter the [pppid]
Press SPD/Hold→Enter the PPPoE Account Number and press Enter.
Press Enter→Enter the [pppin]
Press SPD/Hold
Enter the PPPoE password and press Enter→
Press Enter again to complete the configuration
Refer to the appendix when entering special Symbols such as @, A, a, B, b, C

- 16 -
Protocol Settings
To Access the Audio Settings Menu
Press 1,2,3,4,# ( Hold the “#” key)
Enter a [Password]
Press 1, 2, 3, 4 and press Enter→Network Settings appears
Press Vol.- (volume down button)→enter the [Protocol Setting].
To Configure Service Settings
Press Enter twice in the [protocol settings] prompt→the Service option appears.
¾Press SPD/Hold, “0” and Enter to disable service.
¾Press SPD/Hold, “1” and Enter to enable service.
To Configure the Proxy Server registrar location.
Press Enter multiple times in the [protocol settings] prompt
Enter the [service address]
Press SPD/Hold
Enter the IP address of the registrar proxy server (XXX*XXX*XXX*XXX) and press
Enter.
To Enable STUN for NAT pass-through when using SIP protocol:
At the [protocol settings] prompt of press Enter multiple times→the [nat traversal]
prompt appears.
Press SPD/Hold→press “4” to enable STUN and press Enter
Press Enter again→[nat addr] appears
Press SPD/Hold
Enter the IP address of the STUN server (XXX*XXX*XXX*XXX) and press Enter.
To Configure the AirLive ePhone-1000 Registration Type
At the [protocol settings] prompt, press Enter once
Press Vol. + (the volume up button) multiple times→[local type] appears

- 17 -
Press SPD/Hold
•Press “0” to input your telephone number for E.164 to register with the server
and press Enter.
•Press “1” and Enter. Continue with step 7 and 8.
To Configure the AirLive ePhone-1000 server account number
At the [protocol settings] prompt press enter multiple times→[account] appears
Press SPD/Hold→input server account number (XXX) and then press Enter
To Configure the AirLive ePhone-1000 server Account Password
At the [protocol settings] prompt press Enter multiple times→[pin] appears
Press SPD/Hold→Enter the Server Password and press Enter.
To Configure the AirLive ePhone-1000 Registration Port
At the [protocol settings] prompt press Enter multiple times→[register port] appears
Press SPD/Hold→Enter the required PORT number for registration (XXXX) and then
press Enter.

- 18 -
Audio Settings
To Access the Audio Settings Menu
Press 1, 2, 3, 4, # (Hold the “#” key) [Password]→Press 1 2 3 4 and
then press Enter→Network Settings
Press 1, 2, 3, 4, # (Hold the “#” key) →Press Vol.+ 3 times→[Audio
Settings] appears.
To Configure the AirLive ePhone-1000 voice compression Codec Type:
At the [audio settings] prompt press Enter once→[audio type] appears
→press SPD/Hold
•Press “0” and Enter to set the Codec to G.729
•Press “1” and Enter to set the Codec to G.7231
•Press “2” and Enter to set the Codec to G.711u
•Press “3” and Enter to set the Codec to G.711a1
•Press “4” and Enter to set to auto
Set the AirLive ePhone-1000 handset and speaker phone volumes
At the [audio settings] prompt press Enter 6 times→[handset in]
appears,
Press SPD/Hold→enter the volume level of the handset and the speaker
phone (the default setting is 7and 15 is the highest value) and press
Enter.

- 19 -
Other Settings
To Access the Other Settings Menu
Press 1, 2, 3, 4, # (Hold the “#” key) →[Password] appears
Press 1, 2, 3, 4 and press Enter→Network Settings appears →
Press 1, 2, 3, 4, # (Hold the “#” key) →Press Vol.- multiple times→[other
settings] appears
To Change the User Password
At the [other settings] prompt press Enter once→enter the [password]
Press SPD/Hold→enter a new password and press Enter.
To Change the Administrator Password
At the [other settings] prompt, press Enter twice→[super password]
appears
Press SPD/Hold
Enter the new password and press Enter.

- 20 -
Speed Dial Settings
To Access the Other Settings Menu
Press 1, 2, 3, 4, # (Hold the “#” key) →[Password] appears
Press 1, 2, 3, 4 and then press Enter→Network Settings appears
Press 1, 2, 3, 4, # (Hold the “#” key)
Press Vol.- multiple times
Enter the [speed dial setting].
To set a Speed Dial number
At the speed dial settings prompt press Enter once→[memory1]
appears
Press SPD/Hold to select the first speed dial number and press Enter
Press Enter again→[number1] appears
Press SPD/Hold
Enter the first set of telephone numbers and press Enter.
Repeat step 2 to store more numbers. The AirLive ePhone-1000 can store up
to 100 speed dial phone numbers.
Table of contents
Other Ovislink IP Phone manuals