ASSEMBLY INSTRUCTIONS
TO IMPROVE THE WEATHER RESISTANCE OF YOUR TENT, IT IS ADVISABLE
TO USE SEAM SEALER TO COAT ALL EXPOSED SEAMS. YOU SHOULD APPLY
ONLY TO THE INSIDE SEAMS OF THE TENT AND UNDERSIDE OF THE TENT FLY.
IF APPLIED TO THE OUTSIDE SEAMS, DISCOLORATION OF YOUR TENT MAY
OCCUR. SEAM SEALER IS AVAILABLE IN THE CAMPING SECTION OF ANY
LOCAL SPORTING GOODS STORE.
IMPORTANT: WE ADVISE YOU TO ASSEMBLE THE TENT ONCE BEFORE
GOING CAMPING TO BECOME FAMILIAR WITH THE ASSEMBLY OF THE TENT.
TO PROLONG THE LIFE OF THE TENT FLOOR, SELECT A LEVEL, CLEAN AREA
FOR THE CAMPSITE. TO PREVENT DAMAGE TO THE ZIPPER, UNZIP THE
DOORS TO ALLOW AIR TO ENTER THE TENT.
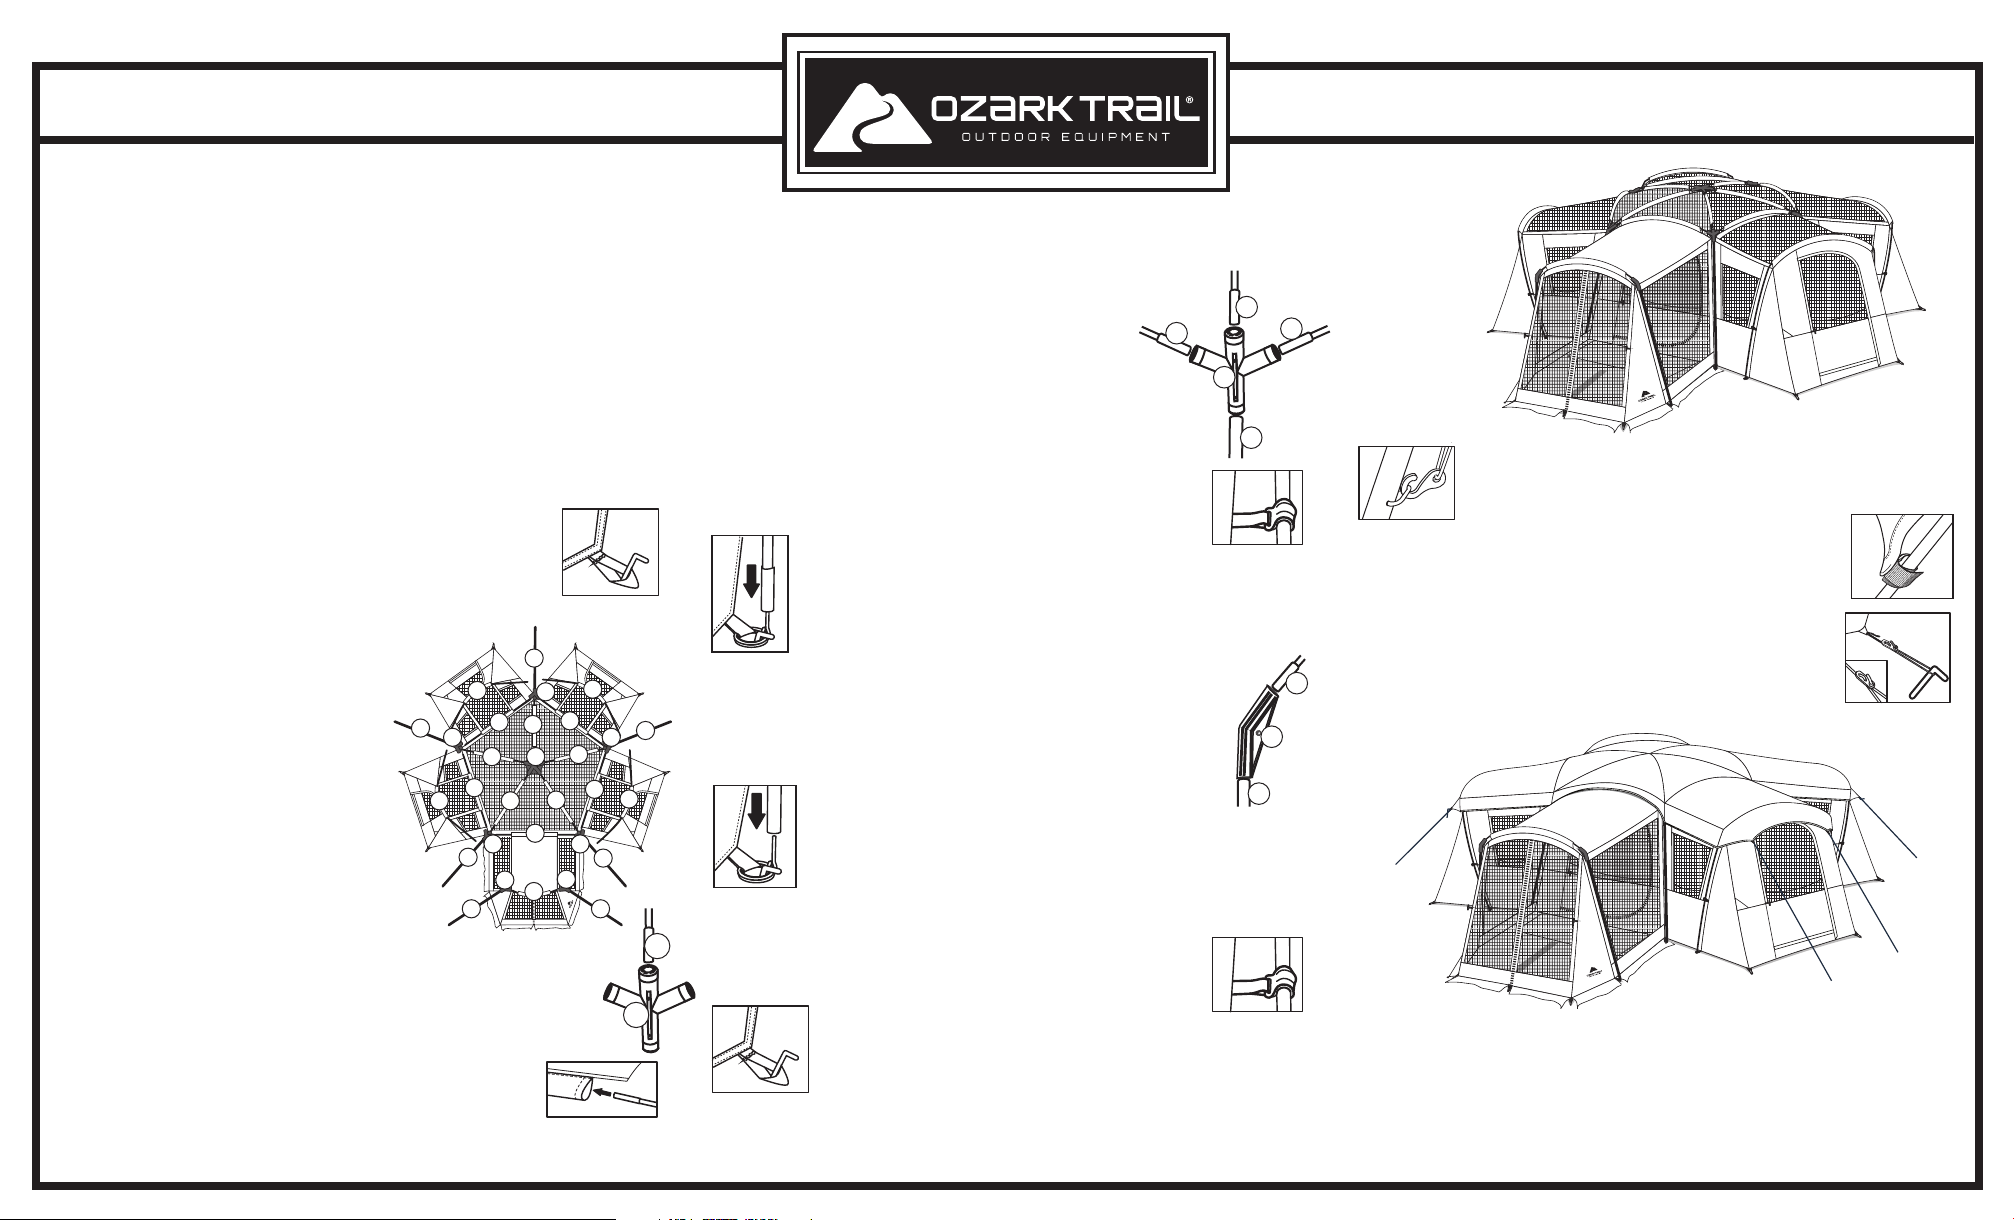
MODEL WDC2013 20 Person Tent with Screen Room
NOTE: PLEASE LOOK AT THE REPLACEMENT PARTS DIAGRAM TO SEE HOW
YOUR FRAME IS ASSEMBLED.
Assembled tent should
appear as shown.
STEP 1: Spread tent out flat, floor side down. Unzip the doors to allow air to enter
the tent during set up.
STEP 2: Stake the tent to the ground by inserting tent stakes through
the webbing stake loops and steel rings at the base of the tent. Hammer
the stakes into the ground at a 45° angle to the tent, making sure the
tent floor is pulled out even and tight. Stake down opposite corners
working around the tent pulling out the floor until it is tight.
STEP 3: Extend each of the 15 fiberglass poles
by pulling out each section and placing ends
into the connecting ferrules. The five matching
dark grey poles (A) are the main roof poles.
The five blue poles of the same length (B) are
the roofeave poles. The four longest light grey
poles (C) are for the side sleep rooms. The
single dark grey pole marked with white tape
is the Screen house roof pole.
STEP 4: While leaving the tent flat on the ground,
insert the five dark grey main roof poles (A) through
the grey sleeves on the roof at the center of the tent.
STEP 5: Insert the five main roof poles (A) into the 5-way
plastic center hub(G) located at the center of the tent.
STEP 6: Locate the five plastic eave joints (H) that are attached to the tent canopy.
Flex the fiberglass roof poles and insert the ends of the poles into the center opening
of the eave joints on the side with three openings. The fourth opening should face
down as pictured.
STEP 7: Insert the five blue roof eave poles (B) through the blue
sleeves on the eaves of tent.
STEP 8: Insert one end of the eave pole into eave joint. Gently flex and insert
the opposite end into the corresponding joint. Repeat for other four poles.
NOTE: Please be sure that the fiberglass pole ends are
completely inserted into
the hubs or the poles may be damaged during set-up or use.
STEP 9: Extend the seven steel poles. The 5 longer poles
with the D-rings at one end are the main upright poles (E).
The remaining two poles are the screen room upright poles (F).
STEP 10: Insert the end of one of the upright poles (E)
(D-ring near top) into the bottom opening of one of the
4-way eave hubs. Lift up on the pole and hub. While
raising the tent, place the bottom end of the steel pole
over the pin at the base of the tent. Repeat with the 4
remaining upright poles while working your way around the tent.
STEP 11: Clip the plastic hooks on the tent walls around the steel poles.
STEP 12: Slide one of the light grey side room poles (C) through the light grey
pole sleeve above one of the side room doors. With an adult on each end of
one of the pole, flex it into an arch and place the ends over the pins at base of
tent. Clip plastic hooks to frame. Repeat with the three other side room tent poles.
STEP 13: Insert the fiberglass screen room roof pole (D) through the grey
sleeve at the front of the screen room. Insert one end of the pole into one
of the corner joints. The smaller opening of the corner joint with “teeth” fits
the fiberglass pole ends. Gently flex the pole and insert the opposite end
into the corresponding joint.
STEP 14: Locate the two steel screen room upright poles (F). With an
adult on each side of the screen room, insert the ends of the upright
poles into the bottom opening of the plastic corner joints. Each adult
should lift up on the steel pole while raising the screen room. Place the
bottom end of the steel pole over the metal pins located on the rings at
the sides of the screen room.
STEP 15: Clip the plastic hooks on the tent walls around the steel poles.
STEP 16: Pull out and stake down the screen room by inserting stakes
through the loops at the front corners of the screen porch. Pull the porch
out even and tight. Make sure the screen room door zipper is closed.
Hammer the stakes into the ground at a 45° angle.
STEP 17:
Finish staking down the tent by inserting stakes through all the rings at
the base of the tent and all intermediate stake loops.
Tent should appear
as shown
STEP 18: Unfold fly and place over tent so the large grey triangle is aligned
with the grey roof of the screen room. Attach the fly to the tent by hooking the
S-hooks located at each of the fly corners to the “D” rings on the main upright
poles as well as the fabric loops on the side room pole sleeves.
STEP 19: Secure the fly to the tent by wrapping the Velcro fasteners on the fly around
the tent poles as well as securing the ties on the underside of the fly to the corner joints.
STEP 20: Guy ropes have been provided for the fly. Extend each of the
guy ropes which are attached to the fly edges. Make a loop at the opposite
end of the guy rope, by using slider as shown and place loop over a tent
stake. Adjust slider to make the guy rope tight and stake to the ground.
STEP 21: There is a mud mat attached to the front of the tent to help keep your tent floor clean.
NOTE: To take down tent, follow steps above in the reverse order. Be sure to leave
doors and windows unzipped. Make sure tent is clean and dry before storing. Place
stakes into stake bag and poles into pole bag, which are provided. The tent should be
folded into equal parts toward the center of the tent to distribute the bulk. Fold fly and
lay on top of tent. Start a small tight roll, the width of your carry bag, at the end opposite
the doors. Roll tent around the pole bag toward doors to allow air to escape. Once
rolled, tie a string around tent to hold in place. Place tent and stake bag into carry bag.
B
A
B
E
H
A
H
F
E
E
F F
II
D
E
E
E
C
CC
C
H
H
H H
H
B
B
B
BB
A
A
A
A
AG
D
I
F


