Ozito BSR-1000 User manual


Motor: 1000W
Input: 230-240V ~ 50Hz
No load speed: 120-360m/min
Belt Size: 75mm x 533mm (3” x 21”)
Weight (tool only): 3.6kg
Know your product :
SPECIFICATIONS - MODEL NO. BSR-1000
1
1. Rear soft grip handle
2. On/Off switch
3. Adjustable front handle
4. Variable speed dial
5. Lock on button
6. Belt tracking knob
7. Dust bag
8. Front roller
9. Belt tension release lever
10. Rear roller
11. Rear guide strip
14
11
5
7
23
6
8
9
10

2
TABLE OF CONTENTS
SPECIFICATIONS………………………………………….
TABLE OF CONTENTS……………………………………
INTRODUCTION…………………………………………..
ELECRICAL SAFETY……………………………………….
GENERAL POWER TOOL SAFETY WARNINGS………..
BELT SANDERS SAFETY WARNINGS…………………..
ASSEMBLY…………………………………………………..
OPERATION…………………………………………………
MAINTENANCE……………………………………………
CARBON BRUSHES………………………………..………
SPARE PARTS………………………………………………
DESCRIPTION OF SYMBOLS…………………………….
CONTENTS…………………………………………………
WARRANTY…………………………………………………
Page 1
Page 2
Page 3
Page 3
Page 4
Page 6
Page 7
Page 7
Page 11
Page 11
Page 12
Page 12
Page 13
Page 14

INTRODUCTION
3
Congratulations on purchasing an Ozito Belt Sander.
We aim to provide quality tools at an affordable price.
We hope you will enjoy using this tool for many years.
Your Belt Sander BSR-1000 has been designed for (what
is it designed for) and is intended for DIY use only.
Warning! When using mains-powered equipment, basic safety
precautions, including the following, should always be followed to reduce
risk of fire, electric shock, personal injury and material damage.
Read and understand the manual prior to operating this tool.
Save these instructions and other documents supplied with this tool for future reference.
The electric motor has been designed for 230V and 240V only. Always check that
the power supply corresponds to the voltage on the rating plate.
Note: The supply of 230V and 240V on Ozito tools are interchangeable for
Australia and New Zealand.
This tool is double insulated in accordance with AS/NZS 60745-1; therefore
no earth wire is required.
If the supply cord is damaged, it must be replaced by a qualified electrician or a
power tool repairer in order to avoid a hazard.
Note: Double insulation does not take the place of normal safety precautions when
operating this tool. The insulation system is for added protection against injury
resulting from a possible electrical insulation failure within the tool.
Using an Extension Lead
Always use an approved extension lead suitable for the power input of this tool.
Before use, inspect the extension lead for signs of damage, wear and ageing.
Replace the extension lead if damaged or defective.
When using an extension lead on a reel, always unwind the lead completely. Use of
an extension lead not suitable for the power input of the tool or which is damaged
or defective may result in a risk of fire and electric shock.
ELECTRICAL SAFETY
!
!
!
!

4
General Power Tool Safety Warnings - Personal Safety
Warning! Read all safety warnings and all instructions. Failure to follow the
warnings and instructions may result in electric shock, fire and/or serious injury.
Save all warnings and instructions for future reference.
The term "power tool" in all of the warnings refers to your mains-operated
(corded) power tool or battery-operated (cordless) power tool.
1) Work area safety
a) Keep work area clean and well lit. Cluttered or dark areas invite accidents.
b) Do not operate power tools in explosive atmospheres, such as in the
presence of flammable liquids, gases or dust. Power tools create sparks which
may ignite the dust or fumes.
c) Keep children and bystanders away while operating a power tool. Distractions
can cause you to lose control.
2) Electrical safety
a) Power tool plugs must match the outlet. Never modify the plug in any way.
Do not use any adapter plugs with earthed (grounded) power tools.
Unmodified plugs and matching outlets will reduce risk of electric shock.
b) Avoid body contact with earthed or grounded surfaces, such as pipes,
radiators, ranges and refrigerators. There is an increased risk of electric shock if
your body is earthed or grounded.
c) Do not expose power tools to rain or wet conditions. Water entering a power
tool will increase the risk of electric shock.
d) Do not abuse the cord. Never use the cord for carrying, pulling or unplugging
the power tool. Keep cord away from heat, oil, sharp edges or moving parts.
Damaged or entangled cords increase the risk of electric shock.
e) When operating a power tool outdoors, use an extension cord suitable for
outdoor use. Use of a cord suitable for outdoor use reduces the risk of electric shock.
f) If operating a power tool in a damp location is unavoidable, use a residual
current device (RCD) protected supply. Use of an RCD reduces the risk of
electric shock.
3) Personal safety
a) Stay alert, watch what you are doing and use common sense when operating
a power tool. Do not use a power tool while you are tired or under the
influence of drugs, alcohol or medication. A moment of inattention while
operating power tools may result in serious personal injury.
b) Use personal protective equipment. Always wear eye protection. Protective
equipment such as dust mask, non-skid safety shoes, hard hat, or hearing
protection used for appropriate conditions will reduce personal injuries.
c) Prevent unintentional starting. Ensure the switch is in the off-position before
connecting to power source and/or battery pack, picking up or carrying the
tool. Carrying power tools with your finger on the switch or energising power tools
that have the switch on invites accidents.
d) Remove any adjusting key or wrench before turning the power tool on. A
wrench or a key left attached to a rotating part of the power tool may result in
personal injury.
!
!
!
!

5
e) Do not overreach. Keep proper footing and balance at all times. This
enables better control of the power tool in unexpected situations.
f) Dress properly. Do not wear loose clothing or jewellery. Keep your hair,
clothing and gloves away from moving parts. Loose clothes, jewellery or
long hair can be caught in moving parts.
g) If devices are provided for the connection of dust extraction and collection
facilities, ensure these are connected and properly used. Use of these
devices can reduce dust-related hazards.
4) Power tool use and care
a) Do not force the power tool. Use the correct power tool for your application.
The correct power tool will do the job better and safer at the rate for which it
was designed.
b) Do not use the power tool if the switch does not turn it on and off. Any
power tool that cannot be controlled with the switch is dangerous and must
be repaired.
c) Disconnect the plug from the power source and/or the battery pack from
the power tool before making any adjustments, changing accessories, or
storing power tools. Such preventive safety measures reduce the risk of
starting the power tool accidentally.
d) Store idle power tools out of the reach of children and do not allow
persons unfamiliar with the power tool or these instructions to operate
the power tool. Power tools are dangerous in the hands of untrained users.
e) Maintain power tools. Check for misalignment or binding of moving parts,
breakage of parts and any other condition that may affect the power tools
operation. If damaged, have the power tool repaired before use. Many
accidents are caused by poorly maintained power tools.
f) Keep cutting tools sharp and clean. Properly maintained cutting tools with
sharp cutting edges are less likely to bind and are easier to control.
g) Use the power tool, accessories and tool bits etc. in accordance with these
instructions taking into account the working conditions and the work to be
performed. Use of the power tool for operations different from those intended
could result in a hazardous situation.
5) Service
a) Have your power tool serviced by a qualified repair person using only
identical replacement parts. This will ensure that the safety of the power tool
is maintained.
b) If the supply cord is damaged, it must be replaced by the manufacturer, its
service agent or similarly qualified persons in order to avoid a hazard.
General Power Tool Safety Warnings - Personal Safety
!
!

Belt Sander Safety Warnings
6
Hold power tool by insulated gripping surfaces, because the belt may contact its
own cord. Cutting a "live" wire may make exposed metal parts of the power tool
"live" and could give the operator an electric shock.
This appliance is not intended for use by persons (including children) with reduced
physical, sensory or mental capabilities, or lack of experience and knowledge, unless
they have been given supervision or instruction concerning use of the appliance by a
person responsible for their safety.
Recommendations for the use of a residual current device with a rated residual
current of 30mA or less.
It is recommended that the extension lead is a maximum of 25m in length. Do Not
use multiple extension leads.
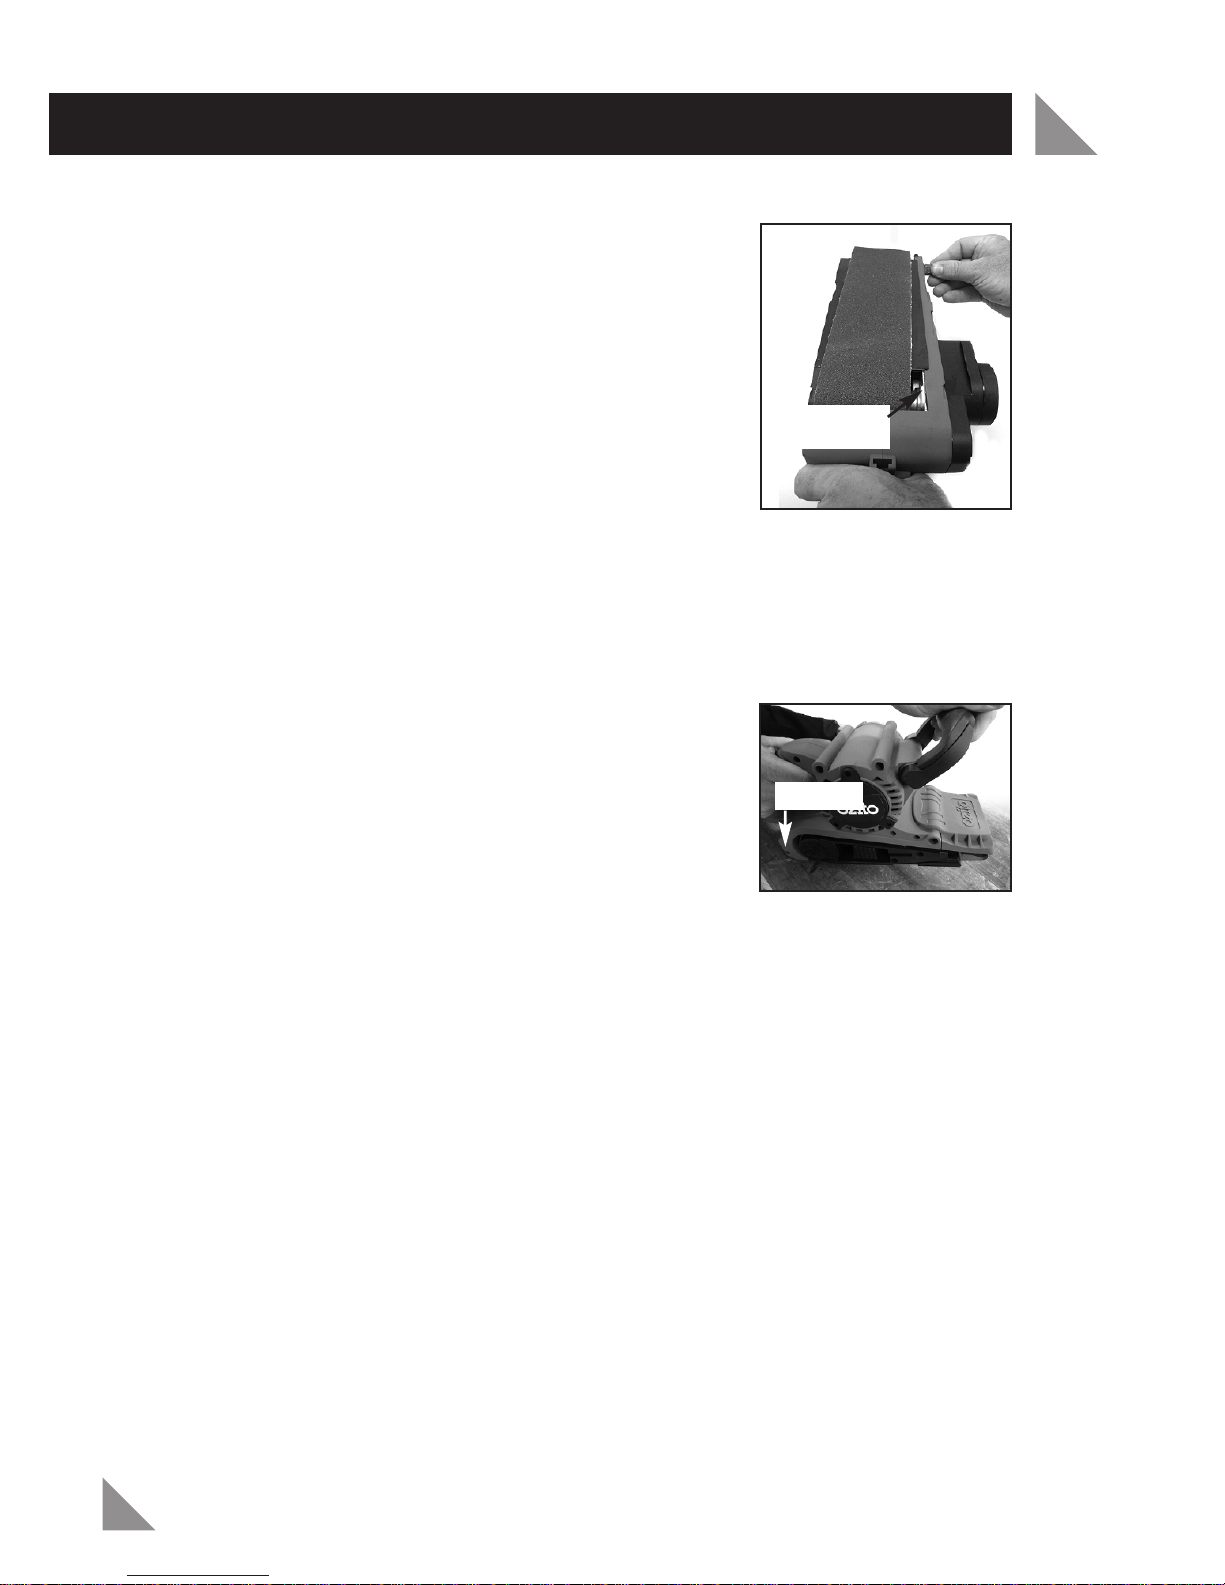
Unplug the sander before changing accessories. Accidental start-ups may occur if
the sander is plugged in while changing an accessory.
Disposing of dust. Be extremely careful of dust disposal, materials in fine particle form
may be explosive. Do not throw sanding dust on an open fire. Spontaneous
combustion, may in time, result from a mixture of oil or water with dust particles.
Always wear eye protection and a dust mask for dusty applications and when
sanding overhead. Sanding particles can be absorbed by your eyes and inhaled easily
and may cause health complications.
Use special precautions when sanding chemically pressure treated timber, paint
that may be lead based, or any other materials that may contain carcinogens. A
suitable breathing respirator and protective clothing must be worn by all persons
entering the work area. Work area should be sealed with plastic sheeting and persons
not protected should be kept out until work area is thoroughly cleaned.
Do not ‘wet sand’ with this sander.Liquids entering the motor housing are an
electrical shock hazard.
Keep fingers and clothing away from the belt. They could get cut or wedged
between the pulley, belt and motor housing.
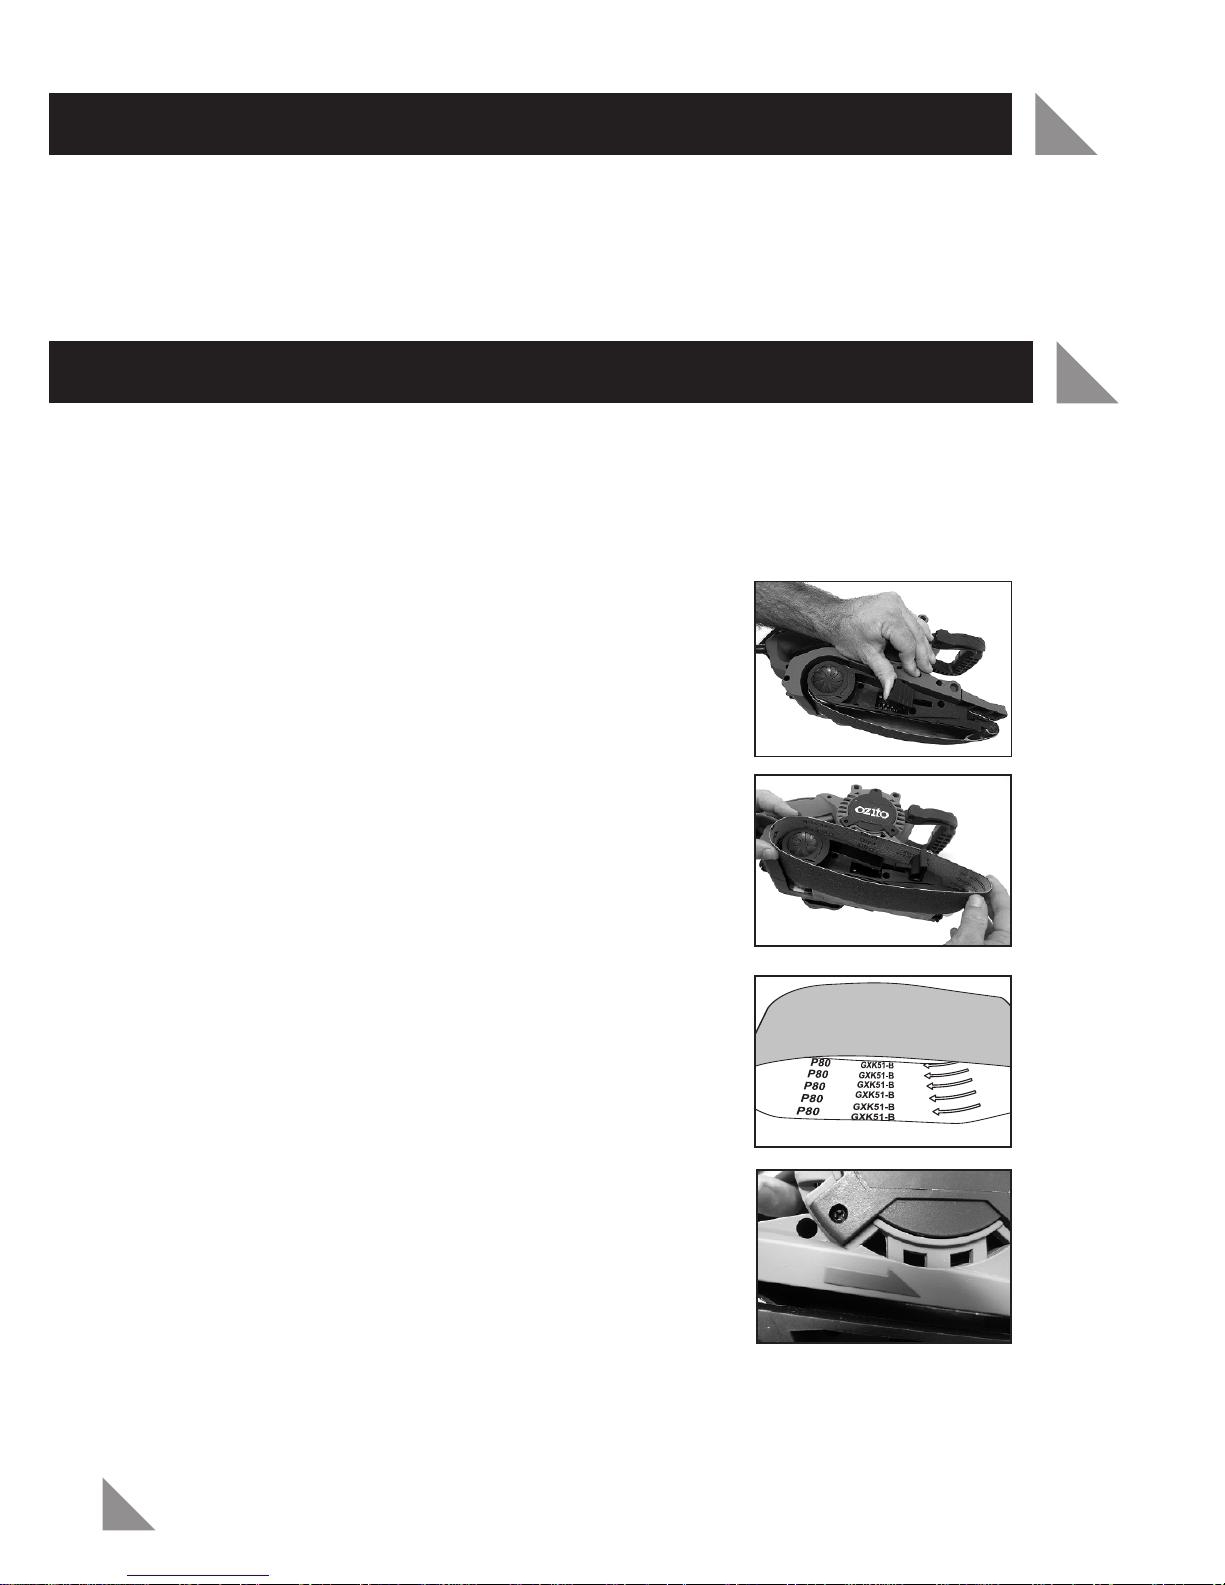
Properly adjust tracking of belt to avoid it overhanging the housing.
A running belt overhanging its housing can cause severe lacerations.
Keep the cord to the side away from pulleys. The cord can be dragged into the
belt housing and become entangled with the pulleys.
Warning! Some dust created by power sanding, sawing, grinding, drilling and other
construction activities contain chemicals known to cause cancer, birth defects or
other reproductive harm. Some examples of these chemicals are:
• Lead from lead-based paints
• Crystalline silica from bricks and cement and other masonry products
• Arsenic and chromium from chemically treated timber
Your risk from these exposures varies, depending on how often you do this type of
work. To reduce your exposure to these chemicals: work in a well ventilated area and
work with approved safety equipment, such as dust masks that are specially designed
to filter out microscopic particles.
!
!

7
OPERATION
Attaching the Dust Bag to The Belt Sander
Attach the dust bag (7) to the belt sander by sliding the plastic dust bag adaptor
over the dust ejection port on the left hand side of the belt sander beside the rear
soft grip handle (1).
BE SURE TO DISCONNECT THE BELT SANDER FROM THE POWER SUPPLY
BEFORE INSTALLING OR REMOVING THE SANDING BELTS.
Removing and Installing Sanding Belts
TO REMOVE BELT
1. Place the belt sander on it’s left hand side on a flat
surface. Pull out the belt tension release lever (9).
Push it towards the front of the sander until it locks
into place. The front roller retracts and locks into
place releasing the belt tension.
2. With the belt sander remaining on its left side
gently slide out the belt off the unit (Fig.2).
3. Use both hands easing both sides simultaneously.
TO INSTALL A BELT
1. When installing a belt to your belt sander ensure
you have the correct size sanding belts and grit for
your work piece. Belts also have markings on them
of arrows which are a direction markings to assist in
fitting the belt to your belt sander and a grit rating
that relates to how coarse the sanding belt is (Fig. 3).
While the belt sander is on it’s left side with the
belt tension release lever (9) locked, gently place
the belt over the front and rear rollers. The arrows
on the belt are to be aligned with the marking on
the belt sander (Fig. 4). This is very important as if
the belt is fitted in the incorrect direction the belt
will break. Please note that belts are not covered
under warranty.
2. Once the belt is in place, return the belt tension release lever (9) back to its
original position.
Fig.1
Fig. 2
Fig. 3
Fig. 4
ASSEMBLY

8
OPERATION (cont.)
TO ADJUST THE ADJUSTABLE FRONT HANDLE
To position the adjustable front handle (3) to your comfort zone. Simply pull the lever
towards yourself (Fig. 5) and adjust the front handle (3) to one of the 3 positions (Fig. 6).
Lock the adjustable front handle (3) into your desired position by returning the lever to
it's original position (Fig.7)
Variable Speed Dial
The variable speed dial (4) is located on the left side of the
tool above the rear soft grip handle (1).
1. Adjust the variable speed dial (4) to suit different
working materials.
2. Turn the variable speed dial (4) to a higher number for
Max or faster speed. Turn the variable speed dial (4) to a
lower number, for Min or a slower speed.
3. Determine the optimum speed by trialing on a scrap piece of timber.
NOTE: Using the correct speed for the job increases the life of the sanding belts.
On/Off Switch
To turn the tool on,squeeze the on/off switch (2).
To turn the tool off release the on/off switch (2).
Always squeeze and release the on/off switch (2) before
connecting it to a power supply,this will ensure the switch
lock on button (5) is not engaged.
Warning! Prior to connecting the tool to the power
supply, ensure the switch is not locked on.
Switch Lock On Button
The sander has been designed with a switch lock on button (5) for longer periods of
use. This button locks the switch in the on position to reduce user fatigue and allow
the user to focus on the task at hand.
To activate the switch lock on button (5), first squeeze the on/off switch (2) then
depress the switch lock on button (5) and release the switch. The switch will remain
locked on. To unlock the switch and turn off the sander, simply squeeze and release
the on/off switch (5).
Fig. 8
Fig. 5
Fig. 9
Fig. 6 Fig. 7

OPERATION (cont.)
9
Tracking Adjustment
Turn the sander upside down and hold it firmly with one
hand. Press the on/off switch (2) to start the power and
observe the tracking of the sanding belt. If the belt runs
outward, turn the belt tracking adjustment knob (6)
clockwise. If the belt runs inward turn the belt tracking knob
(6) counter clockwise (Fig.10).
Adjust the belt until the outer edge of the belt is even with
the outer edge of both front and rear rollers (Fig. 8,10).
Make sure the belt does not rub against the rear guide
strip (11). Once the belt stabilizes you can begin operation.
Always check your belt after it has been in use as it may
need readjusting.
Timber Sanding
Prior to running the sander ensure you have a firm grip on the rear handle and that
the sanding belt is not in contact with the workpiece.
Note: Never start the sander with the sanding belt in contact with the work piece.
To commence sanding gently place the rear heel of the
belt sander (See Fig. 11) on your workpiece. Ensure
that the sanding belt is not in contact with your
workpiece prior to starting the sander. Switch the
sander on and in a forward motion, begin the sanding
strokes as the machine is lowered onto the work surface
as this helps and prevents gouging. Keep the sander
moving so that your work will be smooth and even. The
Stroke is simply a back and forth movement with most of the sanding done on the
pull (back) movement. Don’t apply a lot of pressure on the unit allow the sander to
do the work.
Note: Apply firm even pressure when sanding excessive pressure can damage the
workpiece and sander. Excessive pressure can also cause the belt to "track off".
Take care to select the correct belt for the correct job. For initial smoothing of
rough timber, use course or very course grit and sand with the grain. On very
uneven surfaces or hardwood, sand across the grain. Be careful to avoid gouging.
Then switch to a medium grit belt and sand with the grain. This will provide a
relatively level and smooth finish. Insert a fine belt for final finishing. Always sand
with the grain to remove scratches left by coarser belts. Keep the sander moving in
long, light strokes during finishing operations. As a final touch, experienced
sanders will often insert a “used” fine belt to provide a smooth surface before
filling, sealing, brushing or spraying.
Note: It is best to try on a sample piece of timber prior to using on project/workpiece.
Fig. 11
Rear Heel
Fig. 10
Rear Guide
Strip (11)

10
OPERATION (cont.)
Sanding Coated Timber
Your belt sander will also help remove old paint, varnish or lacquer. However if the
coating consists of several layers, remove as much as possible with a paint remover.
This will assist in removing the paint faster and not clogging up your belts and belt
sander. Use a hand scraper to remove the residue left by the paint removing solvent
and allow the surface to dry completely before sanding.
Precautions to take when sanding paint
Sanding of lead based paint is NOT RECOMMENDED due to the dangers of lead
poisoning. In dusty areas a dust mask and eye protection should be worn.
Environmental Safety
• Paint should be removed in such a manner so as to minimize the amount of dust
generated.
• Areas where paint removal is occurring should be sealed with plastic sheeting.
• Sanding should be done in a manner to reduce traces of paint dust outside the
work area.
Cleaning and disposal
• All surfaces in the work area should be vacuumed and thoroughly cleaned daily for
the duration of the sanding project. Vacuum filter bags should be changed
frequently.
• Plastic drop sheets should be gathered up and disposed of along with any dust,
wood chips or other debris. They should be placed in sealed bags and disposed
of through regular garbage pick-up procedures.
• During clean up, children and pregnant women should be kept away from the
immediate work area.

MAINTENANCE
• Regularly empty the dust bag.
• Keep the ventilation slots of the belt sander clean at all times and prevent any
foreign matter from entering.
• If the housing of the belt sander requires cleaning, do not use solvents but a
moist soft cloth only. Never let any liquid get inside the tool. Never immerse
any part of the tool into a liquid.
• After each use blow air through the belt sander to ensure it is free from all
dust particles that may build up. Build up of dust particles may cause the tool
to overheat and fail.
• When the carbon brushes wear out, the tool will stop. The brushes should be
replaced prior to wearing out fully. Brushes will wear out after many uses but
before they do, take the tool to a power tool repairer for a quick and low
cost replacement.
Important:
If the motor on your belt sander operates but the belt does not rotate.
Do not return to the store. Check the drive belt has not been damaged - if it is
damaged or broken please replace.
• To remove and check the drive belt remove the two
screws from the belt cover (Fig. 12).
• If the belt is damaged or worn replace with a new
drive belt and fit onto the turning wheels. Replace
belt cover and screws and your Belt sander is ready
for operation (Fig. 13).
Carbon brushes
When the carbon brushes wear out, the tool will spark and/or
stop. Discontinue use as soon as this happens. They should
be replaced prior to recommencing use of the tool. Carbon
brushes are a wearing component of the tool therefore not
covered under warranty. Continuing to use the tool when
carbon brushes need to be replaced may cause permanent
damage to the tool. Carbon brushes will wear out after many
uses but when the carbon brushes need to be replaced, take
the tool to an electrician or a power tool repairer for a quick and low cost
replacement. Always replace both carbon brushes at the same time.
Note: Ozito Industries will not be responsible for any damage or injuries caused
by the repair of the saw by an unauthorised person or by mishandling of the saw.
11
Carbon brushes
screws Fig. 12
Fig. 13

12
DESCRIPTION OF SYMBOLS
VVolts Hz Hertz
~Alternating current WWatts
/min Revolutions or
reciprocation per minute
Double insulated Regulator compliance mark
n
o No load speed
Warning Read instruction manual
SPARE PARTS
Limited spare parts are available subject to availability. Please contact your local
Bunnings Special Orders Desk to order the required spare parts.
Most common spare parts listed below
Spare Part Part No.
Front Wheel Assembly SPBSR1000-13A
Brush Holder Cap (pair) SPBSR1000-07
Carbon Brushes (pair) SPBSR1000-08A
Drive Belt SPBSR1000-02
Dust Bag SPBSR1000-29
Belt Tension Assembly SPBSR850-72

AUSTRALIA (Head Office)
1-23 Letcon Drive, Bangholme Victoria, Australia, 3175
Telephone: 1800 069 486
Facsimile: +61 3 9238 5588
Website: www.ozito.com.au
Email: [email protected]
1 x Belt Sander BSR-1000
1 x Sanding Belt
1 x Dust Bag
1 x Instruction manual
Power tools that are no longer usable should not be
disposed of with household waste but in an environmentally
friendly way. Please recycle where facilities exist. Check with
your local council authority for recycling advice.
Recycling packaging reduces the need for landfill and raw
materials. Reuse of recycled material decreases pollution in the
environment. Please recycle packaging where facilities exist.
Check with your local council authority for recycling advice.
13
CONTENTS
CARING FOR THE ENVIRONMENT
OZITO INDUSTRIES PTY LTD

WARRANTY
-THIS WARRANTY FORM AND CONFIRMED BUNNINGS REGISTER RECEIPT SHOULD
BE RETAINED BY THE CUSTOMER AT ALL TIMES
The warranty is only made available by returning the product to your nearest
Bunnings Warehouse with a confirmed Bunnings register receipt.
PURCHASED FROM:________________________________________________
DATE PURCHASED: ________________________________________________
3 YEAR REPLACEMENT WARRANTY
Your Ozito tool is guaranteed for a period of 36 months from the original date of
purchase and is intended for DIY (Do it yourself) use only.
WARNING
The following actions will result in the warranty being void.
• Trade, professional, Industrial or high frequency use.
• If the tool has been operated on a supply voltage other than that specified on
the tool.
•If the tool shows signs of damage or defects caused by or resulting from abuse,
accidents or alterations.
• If the tool is disassembled or tampered with in any way.
Note: Warranty excludes consumable parts such as brushes, nylon line, sanding
pads, blades, sanding belts, drill bits, collets and accessories.
YOUR WARRANTY FORM SHOULD BE RETAINED
BY YOU AT ALL TIMES.
SHOULD YOU HAVE ANY QUESTIONS PRIOR TO
RETURNING YOUR PRODUCT FOR WARRANTY OR
REPAIR PLEASE TELEPHONE OUR CUSTOMER
SERVICE HELPLINE:
Australia 1800 069 486
New Zealand 0508 069 486
TO ENSURE A SPEEDY RESPONSE PLEASE HAVE THE MODEL NUMBER
AND DATE OF PURCHASE AVAILABLE. AN OZITO CUSTOMER SERVICE
REPRESENTATIVE WILL TAKE YOUR CALL AND ANSWER ANY QUESTIONS
YOU MAY HAVE RELATING TO THE WARRANTY POLICY OR PROCEDURE.
Table of contents
Other Ozito Sander manuals

Ozito
Ozito OZDS280WA User manual

Ozito
Ozito FSR-260 User manual

Ozito
Ozito bsr-800 User manual

Ozito
Ozito FSR-3000 User manual

Ozito
Ozito PDS-2000 User manual

Ozito
Ozito DETAIL SANDER User manual

Ozito
Ozito BGBS-240 User manual

Ozito
Ozito ROS-2000 User manual

Ozito
Ozito Power X Change PXTSS-018 User manual

Ozito
Ozito OZBP110WA User manual

Ozito
Ozito DSR-2500 User manual

Ozito
Ozito OZDS280WA User manual

Ozito
Ozito DSG-172K User manual

Ozito
Ozito PXBPS-254 User manual

Ozito
Ozito PXBSPS-180 User manual

Ozito
Ozito SPG-7000 User manual

Ozito
Ozito OZOS300WA User manual

Ozito
Ozito DSR-2000 User manual

Ozito
Ozito PXROS-125 User manual

Ozito
Ozito PXMSS-700 User manual