Pain Relief Essentials Rhythm Touch User manual

Page 3
Prepared for www.painreliefessentials.comTM – all rights reserved. 2017a
Low frequency acu-therapy massager and electrical muscle stimulator
Therapeutic Hand and Food Massage Charts ___________________________2
What is a Low-Frequency Massager? _____________________________________________ 4
A Note on Consistent Usage______________________________________________________ 5
Product Specification – Rhythm Touch Standard Unit_______________________________ 6
Set Up the Rhythm Touch For Use _________________________________________________ 6
Set Up Procedures____________________________________________________________________ 6
Assembly of Rhythm Touch_______________________________________________________ 7
Operation of Rhythm Touch ______________________________________________________ 8
Use of the Adhesive Gel Pads ________________________________________________________ 11
Basic Therapy Points _________________________________________________________________ 12
Acu-Roller Instructions__________________________________________________________ 13
Acu-Pen Instructions____________________________________________________________ 13
Acu-Flex Pad Instructions (formerly Acu_Mouse / Facial Pad) ____________________ 13
Acu-Feet Therapy Slipper Instructions____________________________________________ 14
Facial Muscle Workout__________________________________________________________ 16
Maintenance __________________________________________________________________ 17
Main Box____________________________________________________________________________ 17
Lead Wire___________________________________________________________________________ 17
Adhesive Gel Pad ___________________________________________________________________ 17
Acu-Roller, Acu-Slippers, Acu-pen ____________________________________________________ 17
Change the Battery _________________________________________________________________ 17
Troubleshooting ________________________________________________________________ 18
Safety Instructions ______________________________________________________________ 19
Contraindications ___________________________________________________________________ 19
Precaution __________________________________________________________________________ 19
Customer Service ______________________________________________________________ 20
Product Specifications _______________________________________________________________ 20
Warranty and Service________________________________________________________________ 20
Fibromyalgia___________________________________________________________________ 21
Chart of Reflex Points ___________________________________________________________ 22
Chart of Reflex Points and Chart of Symptoms_________________________________________ 22
Therapy Instruction Chart _____________________________________________23
Accessories for the Rhythm Touch_____________________________________24

Page 4
Prepared for www.painreliefessentials.comTM – all rights reserved. 2017a
What is a Low-Frequency Massager?
Rhythm Touch has been designed to stimulate and help massage, relax,
and strengthen muscles. The Rhythm Touch is a safe electronic muscle
stimulator meant for massaging, conditioning, relaxation, and tension
relief for use at home, in the office, while traveling, and for use in
exercise and therapy facilities. It will also help intensify your workout
and can help diminish stress by stimulating your endorphins.
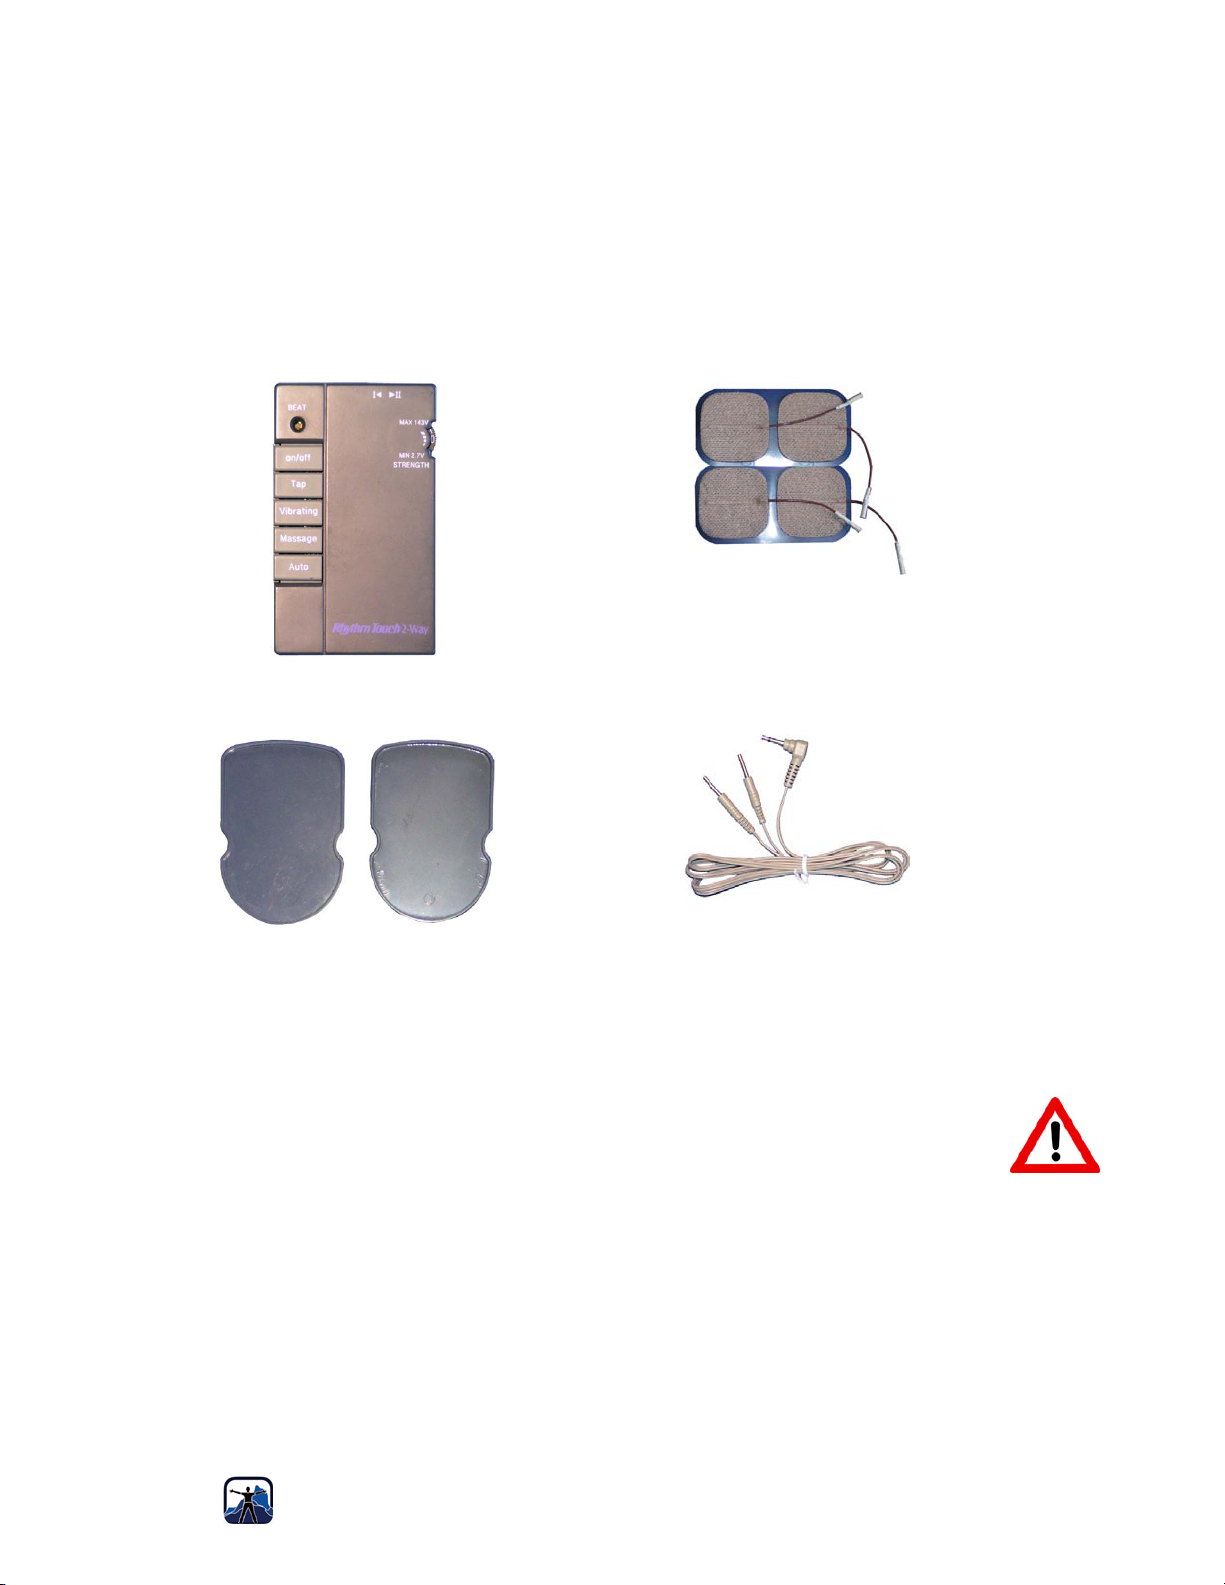
Rhythm Touch can be used with gel pads, a roller, a pressure point pen,
and a flexible rubber pad for a number of therapeutic methods.
Rhythm Touch uses specially modified electrical impulses to stimulate the skin’s acu-
therapy points. It provides you with the stimulation of acupuncture and an effect quite
similar to a massage. It can stimulate the whole body’s function and help improve blood
circulation. It is also recommended to help maintain muscle tone and decrease fatigue.
By stimulating your muscles with the Rhythm Touch, they naturally contract and release,
thus increasing blood circulation. Rhythm Touch is similar to a TENS unit
(Transcutaneous Electrical Nerve Stimulation) and offers similar benefits. It is safe,
portable, non-invasive, and drug-free.
It has also been found to help aid in muscle gratification, facial and body toning,
relieving tension, pressure point therapy, and stress relief.
We hope you will enjoy all of the benefits of using Rhythm Touch.
Please find further information for specific conditions and links to research information at
www.painreliefessentials.com.
If you have questions that aren’t answered in this guide, or have a success story to share,
please connect with us at info@painreliefessentials.com.
DISCLAIMER: This product and literature is not intended to diagnose, treat, cure or
prevent any disease.
The FDA mandates that manuals prominently display contraindication, warnings,
precautions and adverse reactions, including: no use for wearer of pacemaker; no use on
vital parts, such as carotid sinus nerves, across the chest, or across the brain; caution in
the use during pregnancy, menstruation, and other particular conditions that may be
affected by muscle contractions; potential adverse effects include skin irritations and
burns.

Page 5
Prepared for www.painreliefessentials.comTM – all rights reserved. 2017a
A Note on Consistent Usage
For the first few years we were involved with the Rhythm Touch a common question
from customers was “how do I use it for my condition?” Our response would be taken
from the instruction book that said where to place the pads and for how long. It turned
out that this wasn’t always the right answer… users were waiting for the effects of their
condition to show and then treating their symptoms. If they suffered with migraines they
would wait until the migraine showed up before using the unit.
After working with several thousand people a customer emailed us telling of the results
using the Rhythm Touch for her migraine headaches. She told us that instead of using it
during a migraine; she was using it every day on headache pressure points and had not
had her regular occurring headache in quite a while. She also reported sleeping much
better! After reading her letter we started working with people to encourage them to use
the Rhythm Touch on a regular basis: once a day at a minimum and for more serious
conditions, twice a day during the morning and evening.
The results have been incredible! Our customers report back that they sleep better and
their conditions seem to be improving. This was very exciting news to us so we decided
to research a little further. We approached several medical professionals about our
customer’s discoveries and they responded with an analogy about exercise; exercise once
month and you will see no gains, but exercise a little every day and see great
improvement over time. This method is very similar to how the Rhythm Touch works, it
exercises the muscles and we begin to see cumulative benefits.
We recommend using the Rhythm Touch 3-7 times a week. Many customers place their
Rhythm Touch next to their television remote control to remind them to use their unit
every day. If you work in an office, drive a truck or large machinery, or travel by air
you’ll find that the Rhythm Touch is easy to use because it is small, lightweight, portable,
and battery operated. For air travel it is especially nice to be get up from your small
seating area with no muscle cramps and to feel refreshed. One of our first customers
purchased his Rhythm Touch to use for Bells Palsy and immediately was an advocate of
using it for travel. He traveled from Anchorage Alaska to Australia and took his Rhythm
Touch to use on the 12 hour plane ride.
For those with serious conditions using the Rhythm Touch constantly is very important.
For some conditions that seem to get worse every day, customers have reported that with
consistent use they do not get worse and in a many cases they are reporting feeling much
better. Most will say they really notice when they do not use their unit for a period of
time so we really encourage you to consistently use your Rhythm Touch!
Best regards,
Your friends from Pain Relief Essentials

Page 6
Prepared for www.painreliefessentials.comTM – all rights reserved. 2017a
Product Description
The Rhythm Touch is a low-frequency electrical muscle stimulator and massager that
offers the highest quality and performance, is easy to use, has no side effects, offers a
fully automatic computerized control system.
Product Specification – Rhythm Touch Standard Unit
A: Massager Main Unit (1 pcs)
Figure 1 Rhythm Touch Q 2-Way Massager
B: Adhesive Gel Pads (4 pcs)
C: Protective Holder for Pads (2 ea.)
D: Lead Wire Cords (2 ea.)
E: Batteries: DC 1.5V x 2 (AAA size)
Set Up the Rhythm Touch For Use
Set Up Procedures
a. Take out the equipment from the case.
b. Start by setting the output level (Strength) on “0” or “off”.
c. Set the conversion switch to I or II, according to the number of leads used.
(Set to “I” mode for 1 lead with 2 pads, set to “II” mode for 2 leads with 4 pads)
d. Insert a lead wire cord into the correct plug socket of the massager.
e. Insert the opposite ends of the lead wire cord into each adhesive gel pad socket.
f. Take the adhesive gel pads off the protective holder.
g. Place the gel pads at desired areas of the body.
h. Turn “on” the unit by turning the Power-on/off level dial.
i. Select desired massage type key
j. Select desired strength level.
k. The Unit will shut off automatically after 15 minutes. Repeat if desired.

Page 7
Prepared for www.painreliefessentials.comTM – all rights reserved. 2017a
Assembly of Rhythm Touch
Power the unit by inserting 2 AAA batteries (included) in the battery compartment. This
is located at the back bottom of the Rhythm Touch. Connect the lead wire cords to gel
pads by inserting the thin metal end of the lead wire into the gel pad slots. Connect the
lead wire cords to the base unit by inserting the thick plug end of the lead wire into the
base unit sockets. Turn the device off before installing or changing batteries.
Please Note:
If the unit does not operate, consult the troubleshooting section of this instruction manual.
Always turn the unit off before replacing the batteries.
How to Use the Pads
The Rhythm Touch pads are designed to stimulate muscles of large body areas. Pads are
ideal for use on the shoulders, back, stomach, legs, arms and other areas of the body.
To use the pads connect the pads to the Rhythm Touch base unit, as described in the
Setup Procedures in this manual. Adjust the power level dial to the weakest setting (MIN
or "0"). This dial is located on the right-hand side of the base unit. Remove the vinyl
pad protectors, and stick the pads to the protective plastic holder during operation. Do
not stick the pads together or on paper. Before attaching pads, wipe off all sweat, oil and
dirt from the location on the body where they will be placed. Place the pads in the
desired location. Always attach two pads on the body, but do not overlap them. Turn the
strength dial to “0” before moving pads to another location. Turn the strength dial to “0”
before selecting different massage key.
Please refer to the Chart of Reflex Points and Safety Instructions information in this
manual.
Assembly Continued:
Turn the base unit on by pressing the on/off button, the top left front panel. The Rhythm
Touch will automatically shut off after 15 minutes. Adjust the strength level dial to the
strength you prefer, from weak to strong. Select the mode of operation you prefer.
Choices are located on the front panel and include:
1. Tap, 2. Vibrating, 3. Massage, 4. Auto Mode.
Turn the strength dial to “0” or “MIN” before moving pads to another location of the
body.
Please Note:
Do not put the pads in water.
Do not use the pads if they are wet.
The durability of the pads depends on how they are cared for and how often they are
used.

Page 8
Prepared for www.painreliefessentials.comTM – all rights reserved. 2017a
Operation of Rhythm Touch
Tap Key (Chopping massage) and Vibrating Key (Vibrating Massage)
•Tap and Vibrating are good for neck and shoulders, muscle cramps, deep knotted
areas, and to help increase your range of motion (rotator cuff).
•Tap mode is also ideal for relieving acute pain. It promotes the release of endorphins
which interact with the opiate receptors in the brain to reduce our perception of pain
and act similarly to drugs such as morphine and codeine. In contrast to the opiate
drugs, however, activation of the opiate receptors by the body's endorphins does not
lead to addiction or dependence. It's the body's natural pain reliever!
Massage Key (Kneading massage) This mode can be used on almost all areas of your
body.
•Lower back or sciatica - for sciatica treat both your lower back and your sciatica.
•Neck and shoulders - neck pain generally stems from your shoulders so we
recommend you treat both.
•Rotator cuff or frozen shoulders - place 4 pads surrounding the entire shoulder. Also
massage the shoulder and your neck.
•Knee (front or back) - use 4 pads on one knee at a time. It is best to massage both the
front and back of the knee.
•Hand or wrist - arthritis, tendonitis, carpal tunnel, or other injuries. Check the neck
area as well as sometimes hand and wrist pain begins from neck compression.
•Foot and ankle - Plantar fasciitis, heel spur, arch pain, gout, sprain, old injury,
circulation. Check the lower back
area as well as sometimes foot,
ankle, and knee pain starts from
lower back compression.
•Headaches and Migraines - Place
the pads around the neck and
shoulder. At first, operate the unit
on a gentle lower setting for 15
minutes only. Drink water. Rest and
see how you feel. Don't overdo it!.
A sudden rush or significantly large
amount of blood flow will
sometimes make you dizzy or
queasy.
Auto Mode Key (Various massage)
•Auto cycles through the other
modes and helps reduce muscle
memory.

Page 9
Prepared for www.painreliefessentials.comTM – all rights reserved. 2017a
1. On/Off
Beat light/
power indicator
light will light
up when power
is on.
2. Strength dial
Starting at the lowest
strength level slowly
increase the strength
to desired level by
turning the level dial.
Remember: Always
reset the strength to
lowest level before
selecting different
massage key, then Increase to desired
strength.
3. Tap (Chopping Massage) Key
When the Tap
mode is selected,
the light will flash
coinciding with
the sensation of
the pads creating
a chopping
massage
4. Vibrating (Vibrating Massage) Key
When the Vibrating
mode is selected, the
indicator light will
flash at a faster pace,
also coinciding with
the sensation of the
pads, and you will
feel an invigorating vibrating massage
5. Massage (Kneading Massage)
Key
When the
Massage mode
is selected, the
indicator light
will go on for
a few seconds
and then go
off, repeating the cycle. This mode
produces a strong finger pressure
effect and you will feel a strong
rubbing and pulling sensation similar
to kneading by the hand.
6. Auto Mode Key
When the Auto
mode is selected,
you will feel the
effects of Tap,
Vibration, and
Massage in
sequential order.
The cycle is repeated automatically.

Page 10
Prepared for www.painreliefessentials.comTM – all rights reserved. 2017a
7. Strength Dial Detail
When adjusting the
strength level dial to
“MAX” or "5" like
the figure, the output
value can be up to
the maximum
“5x26v”.
When adjusting the
Strength level dial to
“MIN”, it can go as low as “0x26v” or “0”.
oEach massage session stops
automatically after 15 minutes of
operation. Repeat if desired.
oEach mode can be detected by the
indicator light.
oConfirm the strength level
dial is set on “0” or “MIN” before
starting the massager. Always
increase the strength dial
gradually until it feels
comfortable.
8. Plug and Conversion Switch
oOutput mode select switch can be set
on either “I” or “II”.
oWhen using only one output (2 pads,
left socket), set the mode select switch
to “I”.
oWhen using two output (4 pads, both
sockets), set the mode select switch
to “II”.
<Output Plug I, II Socket >
9. Battery Housing
1.5 volt x 2
batteries
Size standard
“AAA”
When replacing
the battery, push
the cover
downward to
open and insert
battery as
indicated.
Verify that the battery polarity (+/-)
is properly aligned.
oNever use while doing strenuous
activity.
oKeep out of reach of children.
oTake out the batteries from the unit
when it’s not used for a long period of
time.
oDo not keep the unit near fire or flame.

Page 11
Prepared for www.painreliefessentials.comTM – all rights reserved. 2017a
Use of the Adhesive Gel Pads
•Always wash the area of your body where you intend to use the adhesive gel pads.
•Pull the pads off the vinyl cover by gripping the pads and not the wire.
•Place the pads on enclosed plastic pad holder, one on each side.
•When ready to use, place the pads securely on the skin.
•When not in use, store pads on protective pad holder, one on each side.
The pads purchased through Pain Relief Essentials are manufactured with stringent
controls and offer superior quality and better electrical dispersal compared to cheaper
pads. Replacement pads for any kind of electrical muscle stimulator will last for 1-2
months. The effectiveness of the unit diminishes when the pads start to wear. It is not the
adhesive part as much as the transfer of electricity through the pad. This is where the
quality of pad plays a large role. Pads with low quality gel will change the effectiveness
of the device very quickly, sometimes within the first couple of uses. We recommend
changing the good quality pads every 2 months, and changing lower quality pads every
10-20 days. Pads are moisture sensitive so for a longer effective life wipe them off after
every use with “wet ones”, a moist toilette available in individual packets or in containers
of up 100 toilettes. Pads are intended for single patient use.
Instructions for use:
1. Clean and dry application area. Apply electrodes to unbroken skin only.
2. Open and save pouch. Remove electrodes from package. Peel electrodes away
from release sheet by lifting the edge of the electrode, not by pulling the wires.
3. If electrode seems dry, add a few drops water to moisten gel and wait a few
minutes to allow water to re-hydrate the gel
4. Place electrodes on treatment area
5. Apply finger pressure to electrode edge and press entire electrode to assure
adequate contact with skin.
6. Wipe off electrode with a non-alcohol wipe- baby wipe or wet one.
Note:
The life of an electrode varies depending on skin condition and care, skin preparation,
type of stimulation, storage and climate. Your electrodes need to be replaced when
you notice any change in effectiveness of your unit or any change in the way the
stimulation feels. This happens as body oils and skin cells work their way into the gel.
Waiting too long to replace your electrodes will reduce the effectiveness of your unit.
Rhythm Touch pads should only be applied to normal, intact, clean skin. make
sure you drink lots of water when using Rhythm Touch for extended time periods.
Rhythm Touch replacement pads and cords may be ordered direct from Pain Relief
Essentials at www.painreliefessentials.com.

Page 12
Prepared for www.painreliefessentials.comTM – all rights reserved. 2017a
Basic Therapy Points
The Upper Body
•Attach one adhesive gel pad near (not directly over)
the third joint from the upside of the backbone.
•Attach the other adhesive gel pad to a desired
part of the body. (Arms, shoulders, etc.)
The Lower Back
•Attach one adhesive gel pad near (not directly
over) the third joint from the bottom on the
backbone.
•Attach the other adhesive gel pad to the
desired parts of the body. (upper thigh/ groin area)

Page 13
Prepared for www.painreliefessentials.comTM – all rights reserved. 2017a
Acu-Roller Instructions
Connect the Acu Roller by inserting the thick metal plug of
the lead wire cable into the top end of the unit (slot 1). Plug
1 lead wire (the thin metal plug) into the bottom of the
handle of the roller. Plug the other thin metal plug into one
of your gel pads. Apply the pad anywhere on your body.
Apply gel or lotion (we like Spectra®360 Electrode Gel or
Aloe Vera gel) to your skin where you wish to use the Acu Roller. Set Mode to 1.
Start off with the strength at 0 and increase to your comfort. Remember that both the
pad and roller need to be on your body to work.
Acu-Pen Instructions
Connect the Acu Pen by inserting the thick metal plug of
the lead wire cable into the top end of the unit (slot 1).
Apply gel or lotion (we like Spectra®360 Electrode Gel or
Aloe Vera gel) to your skin. Set Mode to 1. Switch the unit
on and press the metal top of the pen on the desired area and
choose motion key. Start at 0 strength and work your way
up until you feel sensation. You can only feel this on certain pressure points (neck,
fingers, ear…). Some will feel the effects more than others. (Note: plug in and place
a pad in a location near where you are going to use the pen to create a ground.)
Please see hand and foot charts on the inside front cover.
Acu-Flex Pad Instructions
(formerly Acu_Mouse / Facial Pad)
Connect the Acu Flex pad by inserting the thick metal plug
of the lead wire cable into the top end of the unit (slot 1).
Plug both lead wires (the thin metal plugs) into the 2 holes
located on the side of the Acu Flex pad. Apply lotion or gel
(we like Spectra®360 Electrode Gel or Aloe Vera gel) to
the application point on your skin and press the Acu Flex
pad against your skin and choose the motion key.

Page 14
Prepared for www.painreliefessentials.comTM – all rights reserved. 2017a
Acu-Feet Therapy Slipper Instructions
Acu-Feet Therapy Slippers make
the Rhythm Touch so much
easier and convenient to use on
your feet. Just drop a little water
based jell (we like Spectra®360
Electrode Gel or Aloe Vera gel)
on the five contact points inside
the slipper, slide your feet in and
adjust the straps for good
contact, connect the Rhythm
Touch to the lead wires that
come with the slippers, turn on
the Rhythm Touch, adjust
strength to comfortable level and
sit back and enjoy.
The bottoms of your feet are like
a fuse box. There are several pressure points on the bottom of our feet and these pressure
points are associated with other parts of out body. By stimulating the pressure points the
body part associated with the pressure point is also stimulated. The Acu-Feet Therapy
Slippers stimulate these pressure points and activate circulation.
If you have neuropathy you may not feel the stimulation right away, even at full strength.
Customers report either feeling the stimulation immediately to up to two weeks before
feeling the sensation with consistent use. Take it at your pace but use it at least once a
day for at least 15 minutes. Consistent use is the key; don’t expect to get the same results
sitting down for two hours once a week as you would if you used the slippers 15 minutes
every day.
1. The Acu-Feet Therapy Slippers are a non adhesive
version of the pads.
2. Use a gel or lotion on each of the 5 pressure point
knobs (Aloe Vera or Spectra®360 Electrode Gel).
3. Simply insert the thin metal prong into small holes
on the inner side top layer of the slipper where the arch of your foot will go.
4. This attachment should be held in place with straps over the feet.

Page 15
Prepared for www.painreliefessentials.comTM – all rights reserved. 2017a
Muscle Workout Instructions
1. Daily to twice weekly
2. Hamstring Back of Thighs
3. Inner Thighs
4. Outer Thighs
5. Buttocks
6. Calves
7. Front of Thighs
8. Abs
9. Breast Development
10.Pecs
11.Triceps (Back of Arms)
12.Biceps (Front of Arms)
13.Back Muscles
14.Obliques (Waist)
15.Forearm
Use 10-20 minutes in each location depending on results desired. Lower workout time if
muscle discomfort occurs.

Page 16
Prepared for www.painreliefessentials.comTM – all rights reserved. 2017a
Facial Muscle Workout
Instructions for Acu-Flex pad or Acu-Roller for facial workout
1. Place above eyebrows to lift eyelid and brow area
2. Place at the edge of the hairline to strengthen the forehead
3. Place on the outside of the optical bone above “crow’s feet” to smooth the area.
4. Place between ear and corner of the mouth on the soft part of the cheek to
strengthen facial muscles and tighten facial skin.
5. Below chin on the neck where right angle is formed, on the two parallel neck
muscles to tighten neck skin.
6. Below collarbone to tighten bust line.
Use massage mode on Rhythm Touch unit. Start very low setting and work upward if
desired five to ten minutes - 3-4 times per day.

Page 17
Prepared for www.painreliefessentials.comTM – all rights reserved. 2017a
Maintenance
Main Box
a. If dirty, remove the dirt off the surface gel pads with wet cotton and a mild
cleanser. Remove the pads from the unit before cleaning.
Never make the cotton so wet that the excess moisture flows into the
openings of the machine
b. Do not keep the unit in high or low temperatures or humid area when
storing the unit.
i. Temperature: below +10 degrees C & above +40 degrees C.
ii. Relative Humidity: below 30% and above 80%.
iii. Take out the batteries when not in use for long periods.
Lead Wire
Keep the wire loosely rolled when not in use. Folding may break wire.
Then remove the adhesive gel pads from the main unit and store separately.
Adhesive Gel Pad
a. when cleaning is necessary, use warm water, under 35 degrees C.
b. When cleaning the adhesive gel pads, remove the moisture completely by
shaking and air-drying.
c. Store pads on included plastic holders. Place one pad on each side.
d. Keep the gel pads stored only on the holder. Otherwise, the adhesive
strength will diminish faster.
e. The adhesive gel pads (electrodes) should be replaced with the same type
and model.
f. The related information on the adhesive gel pads (electrodes) is inserted
with the unit.
Acu-Roller, Acu-Slippers, Acu-pen
Clean the accessories by using anti-bacterial hand wipes or rinse under warm water. be
sure to wipe dry. For the Acu-Pen be sure to wipe or rinse the top inside of the pen to
avoid clogging.
Change the Battery
Remove the cover by slightly pushing on it and pulling it down and out. Put the batteries
in securely. They should be facing opposite direction. Replace the cover. Turn on the
on/off level dial and check if the LED lamp lights. If the lamp fails to light, check to see
if the batteries are securely inserted and polarity, (+) and (-), of the batteries are correct.
If the light is lit and goes out or the light is very dim, then the batteries may need to be
replaced.

Page 18
Prepared for www.painreliefessentials.comTM – all rights reserved. 2017a
Troubleshooting
Trouble
Check Points
Solution
It Doesn’t Operate
•Check if the battery
capacity is less than 2.2 V.
•Check if the polarity (+/-)
of the battery is accurate.
•Change the battery
•Re-insert the battery
Output Level Not
Detected
•Check if the lead wire is
disconnected.
•Check if the adhesive gel
pads are disconnected.
•Change the lead
wire
•Change the
adhesive gel pads
There is no change
in output •Raise the power/strength
level dial from weak to
strong.
•If it is functioning
normally now, then
it is OK.
Conversion switch
isn’t operating •Raise the power/strength
level dial from weak to
strong.
•If it is functioning
normally now, then
it is OK.
Power OFF during
operation •Check if the battery
capacity is insufficient.
•Put in new batteries
If your Rhythm Touch unit stops working even though the unit comes on, or if there
seems to be a 'contact' problem with the pads plugged in but the unit will not function:
Please try these things before anything else:
1. Wet your pads with a small amount of water...over time and use the pads will
completely stop the flow of electricity.
2. Change the batteries. We recommend purchasing batteries from a high volume store
like Wal-Mart. Older or expired batteries may only have enough juice to power the light
but nothing else.
3. Switch the cords around. Try different cords with different pads until all combinations
have been exhausted. The problem could be the lead wires or the pads. Also try the
different combinations of holes on top where the lead wires plug into the unit. The lead
wires are a very specific gauge (very small) there are times when the lead wires break
from folding or bending during storage.
4. There are springs holding the battery in. Pull them out a little (gently) with a pen knife
to make better contact with the battery. These springs will compress over time and will
not make good contact with the battery.

Page 19
Prepared for www.painreliefessentials.comTM – all rights reserved. 2017a
Safety Instructions
•Rhythm Touch pads should never be placed on or near the eyes, in the mouth, trans-
cerebrally (on both temples), on or near the heart or across the chest because the
introduction of an electrical current into the chest may cause rhythm disturbances to the
heart. On the front of the neck ( Due to the risk of acute hypotension through a vasovagal
reflex). Directly on the groin such as, ie: on the penis or testicles. On areas of numb
skin/decreased sensation. On areas of broken skin, or wounds. On or near the trigeminal
nerve if you have a history of herpes zoster induced trigeminal neuralgia (Post herpetic
neuralgia)
Contraindications
•The Rhythm Touch MUST NOT be used on patients or persons with cardiac pacemakers,
defibrillators, or other electronic implants.
•The Rhythm Touch should not be used during pregnancy, because it may induce
premature labor. (Do not use over the area of the uterus, as the effects of electrical
stimulation over the developing fetus are not known).
•DO NOT USE if you have epilepsy, cancerous lesions, abdominal or inguinal hernias,
critical ischemia of the lower limbs or blood flow deficiencies/venous thrombosis.
•The Rhythm Touch should not be applied over the carotid sinuses due to the risk of acute
hypotension through a vasovagal reflex.
•DO NOT USE post acute trauma or recent surgical procedures.
•The Rhythm Touch should not be placed over the anterior neck, because laryngospasm
due to laryngeal muscle contraction may occur.
•The Rhythm Touch should be used cautiously in patients with a spinal cord stimulator or
an intrathecal pump.
•Keep out of the reach of children.
Precaution
Before using the Rhythm Touch please consult your physician if you have any of the following
conditions:
•Malignant tumor, Heart/acute/infectious diseases, High fever, Abnormal blood pressure,
Skin sensory disorders or skin problems, Hernias - Abdominal or Lingual.
•If you suffer from a serious medical condition, consult your physician before using the
Rhythm Touch or any other electrical therapy device.
•Keep Rhythm Touch out of the reach of children.
•Pads should not come in contact with metal jewelry.
•For proper hygiene, the pads should not be shared between different users.
Always use the Rhythm Touch as instructed. never use the Rhythm Touch on muscles associated
with impaired joints or limbs, or undiagnosed muscles with acute pain. DO NOT USE while
sleeping, bathing, or driving. Using the Rhythm Touch for extended periods of time at too high a
strength can fatigue muscles, and may cause soreness. If you feel discomfort, such as nausea or
dizziness from using the Rhythm Touch, cease treatment immediately. The long term effects of
prolonged use of electrical stimulation are unknown.

Page 20
Prepared for www.painreliefessentials.comTM – all rights reserved. 2017a
Customer Service
Product Specifications
Product Name
Rhythm Touch
Voltage
DC 3V : battery AAA * 2 (1.5V)
Mode
Tap, Vibrating, Massage, Auto mode
Mode of Frequency (Hz)
1. Mode I: 2.9Hz, 2. Mode II: 10Hz,
3. Mode III: 50Hz, 4. Mode IV: 2.9-50Hz
Out Power Pulse
123-135v, 10ma
Type Class
BF Type
Size
15 x 60 x 100 m/m
Lead wire
L:1200 m/m // W:15 * 2mm // In :
2.4// Out:2.0
Assembly
User manual 1, main body 1, lead wire 2,
pads 4, Acu-pen 1 (power 1.5v2), Acu-
roller (power 1.5v2)
Acrylic holder
2
Electrodes
Product Model: Multi-Stick MG-1500, 4ea
manufactured in USA
Standards
EN 60601-1: 1990 & EN 60601-1-2:
1993 IEC 601-2-10 : 1999
Caution
Please read the user manual carefully
before use.
Warranty and Service
At Pain Relief Essentials we are dedicated to helping all Rhythm Touch customers with
service repair and supply needs.
If you purchased your Rhythm Touch through Pain Relief Essentials, and in case of
malfunction, service is guaranteed during the warranty period of five years from the date
of purchase. Please keep your receipt in a safe place.
If you purchased your Rhythm Touch from another source, please contact us to make
arrangements for low cost repair and/or replacement parts.
Replacement pads and cords may be ordered online from www.painreliefessentials.com
or by calling toll free 1-888-366-3257.
Table of contents
Popular Massager manuals by other brands

Binatone
Binatone FBM-317 instruction manual

HoMedics
HoMedics Seville SEV-1 Instruction manual and warranty information

truMedic
truMedic MC-3500 user manual

HoMedics
HoMedics SoleSalvation FM-1 Instruction manual and warranty information

Luraco
Luraco iRobotics 7 series manual

Therabody
Therabody RecoveryAir Prime user manual