Pakedge SW8-GBP User manual

pakedgedevice&software inc.
Pakedge SW8-GBP
Silent, 8 Port Gigabit AV Priority Switch with SFP
User Manual
Version 2.1

FCC Certifications
This equipment has been tested and found to comply with the limits for
a Class A digital device, pursuant to part 15 of the FCC Rules. These
limits are designed to provide reasonable protection against harmful
interference when the equipment is operated in a commercial
environment. This equipment generates, uses, and can radiate radio
frequency energy and, if not installed and used in accordance with the
instruction manual, may cause harmful interference to radio
communications.
Operation of this equipment in a residential area is likely to cause
harmful interference in which case the user will be required to correct the
interference at his or her own expense.
This device complies with Part 15 of the FCC Rules. Operation is subject
to the following two conditions: (1) this device may not cause harmful
interference, and (2) this device must accept any interference received;
including interference that may cause undesired operation.
CE Mark Warning
This equipment complies with the requirements relating to
electromagnetic compatibility, EN 55022 class A for ITE, the essential
protection requirement of Council Directive 89/336/EEC on the
approximation of the laws of the Member States relating to
electromagnetic compatibility.
The company has an on-going policy of upgrading its products and it may
be possible that information in this document is not up-to-date. Please
check with your local distributors for the latest information.
No part of this document can be copied or reproduced in
any form without written consent from the company.
Trademarks:
All trade names and trademarks are the properties of their respective
companies.
Copyright © 2009, All Rights Reserved.

Table of Contents
UNPACKING INFORMATION .............................. 1
INTRODUCTION ................................................ 1
GENERAL DESCRIPTION ..................................................................1
KEY FEATURES................................................................................1
FRONT PANEL..................................................................................2
REAR PANEL ...................................................................................3
NETWORK CONFIGURATION ............................. 4
NETWORK CONFIGURATION EXAMPLE.............. 5
EXAMPLE 1- SMALL SCALE NETWORK............................................5
EXAMPLE 2–LARGE SCALE NETWORK ..........................................6
EXAMPLE 3- INTERNET GATEWAY PRIORITY ...................................7
HARDWARE INSTALLATION .............................. 8
DESKTOP INSTALLATION .................................................................8
RACK-MOUNT INSTALLATION..........................................................8
INSTALLING NETWORK CABLES......................................................8
PRODUCT SPECIFICATIONS ............................ 10
TECHNICAL SUPPORT...................................... 11

1
Unpacking Information
Thank you for purchasing the Pakedge SW8-GBP, Silent 8-Port
Gigabit AV Priority Switch with SFP. Before you start, please verify
that your package contains the following items:
1. One Pakedge SW8-GBP 8-Port Gigabit AV Priority Switch with
SFP
2. One power cord (type - region specific)
3. Rack-mount brackets and screws (optional)
Introduction
General Description
The SW8-GBP is a simple-to-use, pre-configured, plug-and-play
switch designed to ensure a high Quality of Service, or QoS. High
bandwidth-demanding applications such as video and audio
streaming over IP LANs are given priority ‘by port’ within the
internal network, helping to achieve a smooth, uninterrupted,
jitter-free audio/video experience. Also, the SW8-GBP can give
priority to traffic going from the internal network out to the internet
cloud. It is designed to be used with other Pakedge plug-and-play
switches to create the most robust IP network for both computers
and audio/video devices. No configuration - just plug and play!
Key Features
z8 fixed 10/100/1000Mbps Gigabit Ethernet ports
zOne SFP port for optional fiber connection
zSupports “By Port” QoS for better communication
quality
zStore-and-forward forwarding scheme
zError packet filtering
zFCC Class A, CE, VCCI. Meets RoHS

2
Front Panel
The front panel consists of LED indicators.
LEDs for each port:
The switch provides one “1000M” LED and one “10/100M” LED for
each port.
1000M LED: Shows the current transmitting/receiving speed of
the port.
10/100M LED: Shows link status and the activities on the port.
LED Status Operation
1000M
Green The port is connected at 1000 Mbps.
Blinking Green A valid link is established, and there is data
transmitting/receiving.
Off No valid link on this port or the port is
connected at 10/100 Mbps.
10/100M
Steady Green A valid link is established and there is no data
transmitting/receiving.
Blinking Green A valid link is established and there is data
transmitting/receiving.
Off No valid link on this port or the port is
connected at 1000 Mbps.
Note:The mini GBIC slot shares the same LED indicator with port 8.
LED for the device:
The SW8-GBP’s power (PWR) LED reads as follows:
LED Status Operation
Power Steady Green The switch is powered on.
Off The switch is turned off.

3
Rear Panel
The rear panel of the switch is laid out as follows:
Port Operation
The auto-negotiation feature allows the ports to run at one of the
following operation modes:
Media Speed Duplex Mode
10/100/1000Mbps(copper) 10Mbps Full Duplex
Half Duplex
100Mbps Full Duplex
Half Duplex
1000Mbps Full Duplex
1000Mbps(Fiber)
(mini GBIC required) 1000Mbps Full Duplex
Port Priority
Port Color Port Priority
1 Gray High
2 Green High
3 Green High
4 Yellow Medium
5 Yellow Medium
6 Orange Normal
7 Orange Normal
8 Red Low
Note: For the last port, when both the fiber and
Cat5e interfaces are connected, the system uses the fiber cable and
disables the Cat5e port automatically.

4
Restore Default Button
You can use this button to reset the switch or restore factory default
settings. To reset the switch, press the button once. To restore
factory default settings, press and hold the button for three
seconds.
Power Plug
To be compatible with electric service standards around the world,
the switch is designed with a power supply in the range from 100 to
240VAC, 50/60Hz. Please make sure that your outlet standard is
within this range.
To power the switch, plug the female end of the power cord firmly
into the receptacle of the switch and the other end into a power
outlet. After the power cord is plugged in, the power LED should be
a solid green to indicate normal power status.
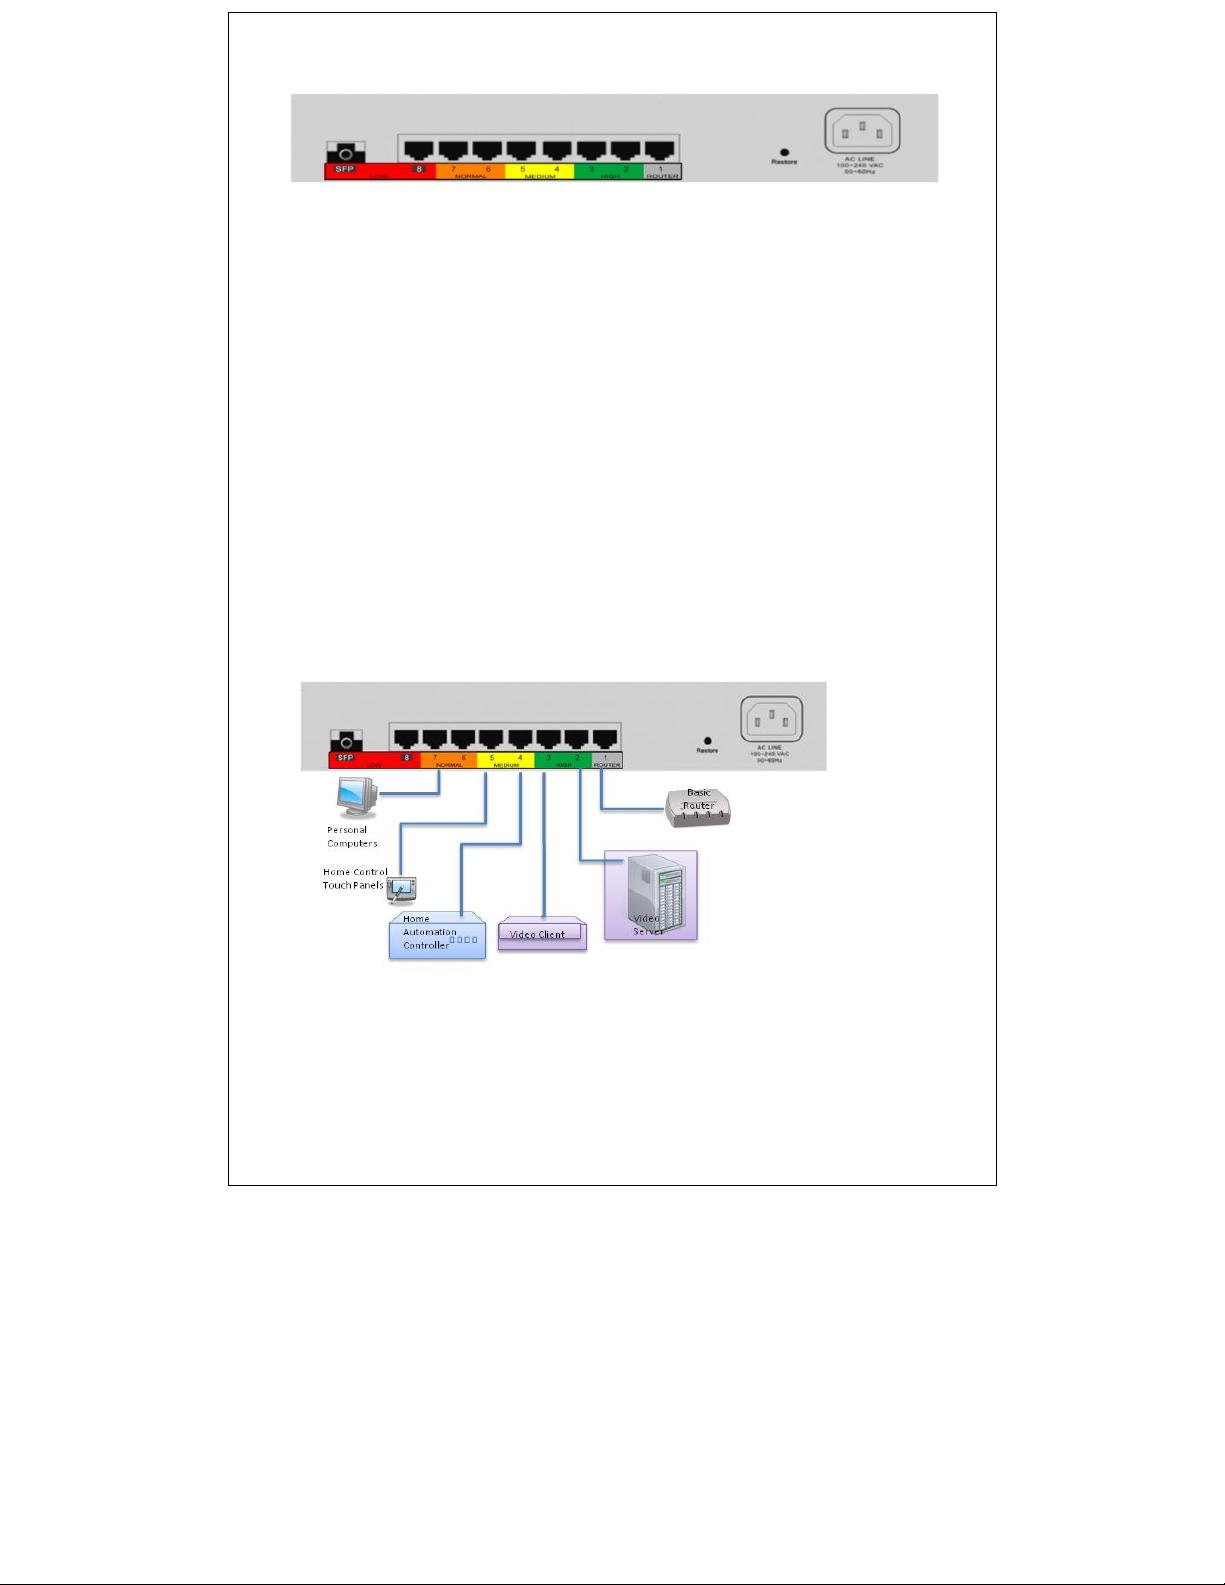
Network Configuration Overview
The Pakedge SW8-GBP is designed to be a plug-and-play device
that controls the Quality of Service (QoS) of the overall Local Area
Network (LAN). QoS enhances the communication quality by
giving different routing priority to specific packets based on the
type of information. For example, latency of video packets will
directly impact the user’s experience because the video stream will
freeze or pixilate. Therefore, any packet carrying a video stream
must have a higher priority than packets carrying computing
information.
The SW8-GBP provides port-based QoS by classifying the priority
of packets based on the port from which they originate. The
packets are transmitted and received according to their classified
priorities. This mechanism helps high bandwidth applications such
as VoIP and video streaming to get an unobstructed connection due
to their higher priority.
There are many ways the SW8-GBP can be installed in the overall
network. However, the SW8-GBP must be the central device
where all other network devices and switches terminate in order for
this priority scheme to be enforced. In other words, every other
device connects to the SW8-GBP because it controls the packet
priority of the internal network and also directs what goes out to
the internet cloud first.

5
The SW8-GBP ensures Quality of Service (QoS) by prioritizing
traffic ‘by port’.
•Devices connected to port 2 and 3 will have the highest
priority (Green color code);
•Devices connected to ports 4 and 5 will have medium
priority (Yellow color code);
•Devices connected to port 6 and 7 will have normal
priority (Orange color code);
•Device connected to port 8 will have the lowest priority
(Red color code).
•If additional ports/switches are needed, each switch will
be stacked/plug into the SW8-GBP so that the SW8-GBP
can control packet priority and nothing is by-passed.
Network Configuration Example
Example 1- Small Scale Network
The diagram above shows a simple network setup where IP-based
A/V devices and personal computers shared the same LAN. The
highest priority ports (Ports 1 and 2) should be given to audio and
video streaming devices. Home controls should have medium

6
priority because home control speed is critical but does not take
priority over audio and video streaming devices.
Finally, computers and laptops should have normal priority because
slight packet latency will not affect overall performance and user
experience. Note- Port 1 is reserved for connecting to the Router.
Example 2 – Large Scale Network
The layout for a large network is very similar to the small network
example above, however additional ports are required for the
additional client devices on the network. To accommodate all the
client devices, other Pakedge switches are added and stacked into
the SW8-GBP. In the example, note how similar devices that need
to communicate with priority are all plugged into the same Pakedge
switch and then stacked to the SW8-GBP.
For example, all AV streaming media server and
clients are plugged into a common Pakedge switch and then the
switch is stacked into the highest priority port on the SW8-GBP.
The overall network configuration is designed to keep similar traffic
with similar devices within a Pakedge switch. In addition, when
dissimilar devices need to communicate, such as a personal
computer with a media server, the priority of its interaction is
controlled by the SW8-GBP.

7
Also from the example, Port 8 is a dual connection port. Port 8 can
be used for another low-priority device using Cat5e or the fiber
capabilities can be used to bridge with another SW8-GBP.
Example 3- Internet Gateway Priority
The SW8-GBP only establishes priority for the internal network. In
other words, the SW8-GBP controls which internal devices have
priority when they communicate with each other and which internal
devices have priority when they go out to the internet cloud.
One point to note, once network requests go out to the internet
cloud, priority is no longer guaranteed. The SW8-GBP only
ensures priority for internal devices and which internal devices
have priority going out the internet gateway.
In the above example, VoIP is connected to the high priority port
because we want to ensure first priority going out to the internet.
The VoIP devices share high priority with A/V
streaming devices. Home controls and PC then take
up the Normal and Medium priority ports, respectively.

8
Hardware Installation
The Pakedge SW8-GBP can be installed on a flat surface, or
mounted in an audio/video rack.
Before installing the SW8-GBP, we recommend that:
1. The switch should be placed with a minimum of 25mm space
around the unit for proper ventilation.
2. The switch must be away from environments with excessive
moisture.
Desktop Installation
1. Install the switch on a level surface that can support the weight
of the device and the relevant components.
2. Plug the female end of the provided power cord into the switch
and plug the male end into a power outlet.
Rack-mount Installation
Rack-mounting is the best way for the Pakedge SW8-GBP to be
installed when combined with a series of networking devices.
Procedures to rack-mount the SW8-GBP:
1. Disconnect all cables and place the switch on a flat surface.
2. Fasten mounting brackets onto both sides of the unit. Tighten
with a screwdriver.
3. Insert the unit into the rack and secure with suitable screws.
4. Reconnect all cables.
Installing Network Cables
1. Crossover or straight-through cable: All ports on the switch
support Auto-MDI/MDI-X functionality. Both straight-through
or crossover cables can be used to connect the switch with PCs
and other devices such as switches, hubs, or routers.
2. Category 3, 4, 5, 5e, or 6 UTP/STP cable: To make a solid
connection and obtain optimal performance, an appropriate

9
cable that corresponds to different transmitting/receiving
speeds is required. To choose a suitable cable, please refer to
the following table.
Media Speed Wiring
10/100/1000Mbps
10Mbps Category 3, 4, 5 UTP/STP
100Mbps Category 5 UTP/STP
1000Mbps Category 5, 5e, 6 UTP/STP
1000Mbps Fiber
(Mini GBIC required)
1000Mbps The cable type differs dependin
g
on the type of mini-GBIC. Please
refer to the instructions that came
with your mini-GBIC.

10
Product Specifications
Standard
IEEE802.3 10BASE-T
IEEE802.3u 100BASE-TX
IEEE802.3x full-duplex operation and flow control
IEEE802.3ab/z 1000BASE-T
IEEE802.1p Priority Operation
Interface
8* 10/100/1000Mbps auto MDI/MDI-X RJ-45
switching ports
1* SFP( mini-GBIC) port
1 * Restore Default Button
Cable
Connections
RJ-45 (10BASE-T): Category 3,4,5 UTP/STP
RJ-45 (100BASE-TX): Category 5 UTP/STP
RJ-45 (1000BASE-T): Category 5,5e or enhanced
UTP/STP
Fiber: depends on Mini-GBIC types
Network Data
Rate
10/100/1000Mbps Auto-negotiation
Transmission
Mode
10/100Mbps Full-duplex, Half-duplex
1000Mbps Full-duplex
LED indications
System Power
Cat5e Port 1000M, 10/100M
Memory
8K MAC entries
180K Buffer Memory
9K Byte Jumbo Frame
Emission
FCC Class A, CE, VCCI, RoHS
Operating
Temperature
00~ 400C (320~ 1040F)
Operating
Humidity
10% - 90% (non-condensing)
Power Supply
Internal power supply
100-240V/ 50-60Hz universal input

11
Technical Support
Please visit our website for up-to-date support information:
Website: www.pakedge.com
Email:[email protected]
CONTACT INFORMATION:
Pakedge Device & Software Inc.
1011 Edwards Road
Burlingame, CA 94010
© Pakedge Device & Software Inc. 2009
All Rights Reserved

12
Notes:
Table of contents
Other Pakedge Switch manuals

Pakedge
Pakedge SX-24P16 User manual

Pakedge
Pakedge SE-18 User manual

Pakedge
Pakedge SK-24 User manual

Pakedge
Pakedge SE-8 User manual

Pakedge
Pakedge SW24-GBM User manual

Pakedge
Pakedge S3L-24P Manual

Pakedge
Pakedge S3 Series User manual

Pakedge
Pakedge MS Series User manual

Pakedge
Pakedge SX-8P User manual

Pakedge
Pakedge SX-24P User manual
Popular Switch manuals by other brands

Belkin
Belkin F1DN108C user manual

HP
HP S7500E Compliance and Safety Manual

TP-Link
TP-Link Jetstream Series quick start guide

motogadget
motogadget m-stop instruction manual

Mellanox Technologies
Mellanox Technologies SX1012 Quick installation guide

Endress+Hauser
Endress+Hauser Liquipoint T FTW32 operating instructions