paladin FFC LAF3554 User manual

Manual Number: MR95512
Models:
LAF3554, LAF3566 and LAF3576
with Serial Numbers greater than E042020
Release Date: August 1, 2005
800-747-2132 | www.paladinbrands.com FFC: 100 East Lee Road, Lee, IL 60530, United States of America
PATENTED
PREPARATOR
FFC SERIAL NUMBER:_________________
MACHINE SERIAL NUMBER:____________
®


1
TABLE OF CONTENTS
Introduction, General Information, Serial Number…………………………..……………….. 1
Owner and Operator Safety Information..............................…...................................……. 2-5
Definitions of Safety Terms and Symbols, Accident Prevention....……….………. 2
Safety Instructions..................…….....................................................................… 3-4
Safety Signs...............................……...…...............................…………………...... 5
Power Unit Specifications, Mounting………………………………..…………...……….……. 6
Hydraulic Connection………………………………………………………………….……….… 7
Setup ..........................................................……...................................…...................…… 8-9
Operation ......................…….............…………….....................................................……… 10-11
Maintenance ......................……............................................................…………….…....… 12
Service ..….........................................………...........…..............................................……… 13
Trouble Shooting................................……........................................................……....…… 14
Parts Illustrations & Parts Lists...............……........................................................………… 15-20
Specifications .................……...................................................……...........…………….….. 20
Warranty ...................................................…….........……............................…...........…..... i
INTRODUCTION
Congratulations on your purchase of a new FFC Attachments Preparator®. This product has been designed and built to
separate rocks and other debris from the soil while leveling and smoothing to prepare the soil for seeding or sod. You or
any other person who will be assembling, operating, maintaining, or working with this product are required to read and
completely understand the information and instructions contained in this manual. If anyone does not fully understand
every part of this manual, please obtain further assistance by contacting the dealer from which this product was
purchased or by contacting FFC Attachments at the telephone number or address listed on the cover of this manual.
Keep this manual available for reference whenever this product is being handled or used. Provide this manual to any new
owners and/or operators.
This manual covers model(s) LAF3554, LAF3566, andLAF3576. The difference between the models is the width of the
product, details of which are covered on the parts list and specifications page(s).
GENERAL INFORMATION
The purpose of this manual is to assist in assembling, mounting, operating, and maintaining your Preparator®. Read this
manual carefully to obtain valuable information and instructions that will help you achieve years of safe and dependable
service.
The illustrations and data used in this manual were current at the time of printing, but due to possible engineering and/or
production changes, this product may vary slightly in detail. FFC Attachments reserves the right to redesign and/or
change components as may be necessary without notification to anyone.
Throughout this manual, references may be made to:
Power Unit The engine-driven machine to which this product must be attached.
Right, Left, Front, Rear Directions that are determined in relation to the operator of the equipment when seated in
the normal operating position.
IMPORTANT Precautions that must be followed to prevent damage to the equipment.
NOTICE Precautions that must be followed to prevent substandard performance.
SERIAL NUMBER LOCATION
Always refer to the model and serial number when ordering parts or requesting information from your dealer. The serial
number plate for this product is located on the top left side of the bucket portion of your Preparator®.
Reference Information
Model Number Loader Make
Serial Number Loader Model
Date Purchased Loader Serial Number

2
DEFINITION OF SAFETY TERMS AND SYMBOLS
Throughout this manual, the terms DANGER, WARNING, and CAUTION are used to indicate the degree of hazard to
personnel if proper safety procedures are not followed. These words will be used in conjunction with the Safety Alert
Symbol: a dark triangle containing a white exclamation mark.
The Safety Alert Symbol means:
ATTENTION! BECOME ALERT! YOUR SAFETY IS INVOLVED!
DANGER Indicates an imminently hazardous situation which, if not avoided,
WILL result in death or serious injury.
WARNING Indicates a potentially hazardous situation which, if not avoided,
could result in death or serious injury.
CAUTION Indicates a potentially hazardous situation which, if not avoided,
may result in minor or moderate injury;
OR
may also be used to alert against unsafe practices that may result in personal injury.
ACCIDENTS CAN BE PREVENTED WITH
YOUR HELP !
No accident prevention program can be successful
without the wholehearted cooperation of the person who
is directly responsible for the operation of the equipment.
To read equipment accident reports from all over the
country is to be convinced that a large number of
accidents can be prevented only by operators who
consistently anticipate the results of their actions and
thus prevent accidents from ever occurring. No power-
driven equipment, whether it is on the highway, in a farm
field, or in an industrial plant, can be any safer than is
allowed by the person who is at the controls.
If accidents are to be prevented (and accidents can be
prevented), that prevention will come from equipment
operators who accept their complete responsibility.
The designer, the manufacturer, and the safety engineer
all help create a safe product, but the operator of that
product can wipe out their combined efforts with a single
careless act.
The best safety device is a careful operator. FFC
Attachments and your dealer ask that YOU be that
careful, responsible equipment operator.
YOU ARE THE KEY TO SAFETY BECAUSE:
YOU are responsible for the SAFE operation and
maintenance of YOUR Preparator®.
YOU are responsible to familiarize yourself, and anyone
else who will assemble, operate, maintain, or work
around this product, with the SAFETY information
contained in this manual.
YOU are responsible to read ALL information contained
in this manual to any operators or maintenance person-
nel who are not fully able to read the written English
language. Whether YOU read the manual as written or
translate it into another language, YOU must make cer-
tain that all operators and maintenance personnel have
a complete understanding of the full and exact contents
of this manual. Translations of this manual into other
languages are available by submitting a written request
to FFC Attachments.
YOU can reduce the risk of injury or death by following
all safety precautions and by using good safety
practices.

3
SAFETY INSTRUCTIONS
WORK SAFELY - A CAREFUL OPERATOR IS THE BEST INSURANCE AGAINST ACCIDENTS !!
SECTION 1
WARNING
Obey all the safety instructions listed in
this section and throughout this manual.
Failure to obey instructions in this
section could result in death or serious
injury.
BEFORE ATTEMPTING ANY TYPE OF ASSEMBLY,
OPERATION, MAINTENANCE, OR OTHER WORK ON
OR NEAR THIS PRODUCT:
•READ AND COMPLETELY UNDERSTAND THIS
MANUAL.
•READ AND COMPLETELY UNDERSTAND THE
MANUALS PROVIDED WITH YOUR POWER
UNIT, LOADER, and QUICK-ATTACH.
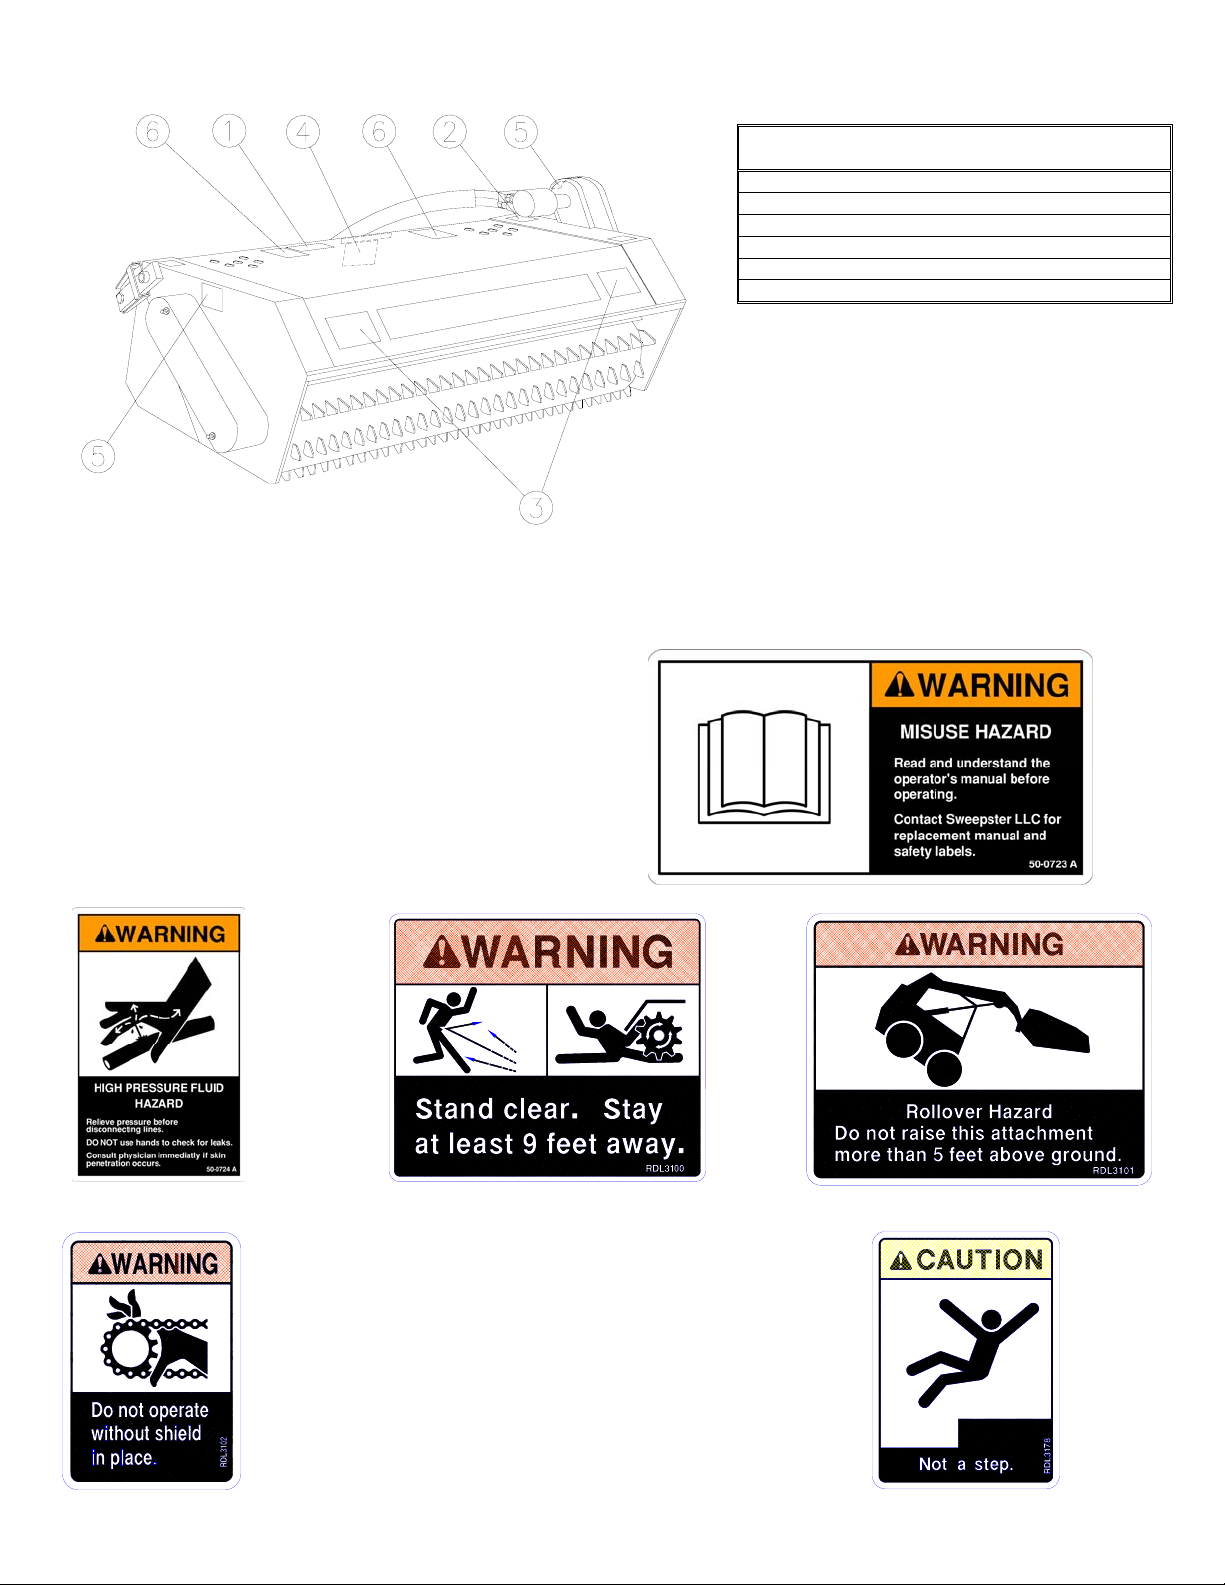
•Read and understand all safety signs on this product
and on your power unit, loader, and quick-attach.
•Know all your controls and know how to quickly stop
all power unit movement, the Preparator®
movement, and the engine in case of an emergency.
•Know and obey all applicable government rules,
O.S.H.A. regulations, local laws and other
professional guidelines for your operation.
•Make sure that anyone who will be assembling,
mounting, maintaining, repairing, removing, and/or
storing this product:
•has been instructed in the safe operation of this
product and of the power unit, loader, and quick-
attach to which this product is attached.
•is physically and mentally capable of the safe
operation of this type of equipment.
•is not under the influence of drugs or alcohol.
•is carefully supervised from a safe distance,
especially if such person is inexperienced.
•wears appropriate protective equipment (i.e.
hardhat, safety glasses, work gloves, protective
shoes, respirator, ear protection, etc.).
•does not wear loose fitting clothing, loose or
uncovered hair, or any accessories (jewelry,
necktie, scarf, wrist watch, etc.) that can catch in
moving parts.
•has annually reviewed all safety instructions.
•Know and follow good work practices when
assembling, mounting, maintaining, repairing,
removing, and storing this product:
•Work on a level surface in a well-lit area.
•Keep the area clean and dry.
•Use properly grounded electrical outlets & tools.
•Use the right tool for the job at hand.
•Make sure that your tools are in good condition
for performing the desired function.
•When using tools, wear the protective
equipment specified by the tool manufacturer.
(i.e. hardhat, safety glasses, work gloves,
protective shoes, etc.)
WHEN YOUR POWER UNIT IS USED DURING ANY
TYPE OF ASSEMBLY, OPERATION, MAINTENANCE,
OR OTHER WORK ON OR NEAR THIS PRODUCT:
•Before leaving the operator’s station or before
beginning any type of work on this product, lower
this product to the ground, apply your power unit’s
parking brake, stop the engine, remove the starter
key, wait for all moving parts to stop, and then
relieve all pressure in the hydraulic lines. Refer to
your power unit’s operator’s manual for instructions
on how to relieve hydraulic pressure in lines.
•Know your loader’s safe lifting and operating
capacity and the weight of this product. See the
specifications in this manual for the weight of this
product and refer to your power unit’s and your
loader’s operator’s manuals for safe operating limits.
Lift capacity may be reduced if using a quick-attach.
•Never allow anyone, except the operator, to be
around the power unit or this product when either is
in motion. Do not startup unless others are clear of
the work area.
•Do not allow riders on this product or the power unit.
•Do not stand or climb on this product when raised.
•Never lift the lowest portion of the attachment plate
higher than 5’-0” above the ground.
•Do not place any part of your body under any part of
this product unless this product is securely resting
on specified blocking or on the ground.
•Do not use blocking made of concrete blocks, logs,
buckets, barrels or any other material that could
suddenly collapse or shift positions. Do not use
wood or steel blocking that shows any signs of
material decay. Do not use blocking that is warped,
twisted, or tapered.
•Never operate controls from the ground. Operate
the controls only from the operator’s station.
•Never leave equipment unattended with the engine
running or with this product raised on the loader.
•Be aware of the added weight and width of this
product. Reduce travel speeds accordingly,
especially when traveling over rough ground.
•Keep this product close to the ground and under
control when transporting.

4
SAFETY INSTRUCTIONS
WORK SAFELY - A CAREFUL OPERATOR IS THE BEST INSURANCE AGAINST ACCIDENTS !!
SECTION 1 (CONTINUED)
WARNING
Obey all the safety instructions listed in
this section and throughout this manual.
Failure to obey instructions in this
section could result in death or serious
injury.
WHEN DEALING WITH HYDRAULICS DURING ANY
TYPE OF ASSEMBLY, OPERATION, MAINTENANCE,
OR OTHER WORK ON OR NEAR THIS PRODUCT:
•Hydraulic fluid under pressure can penetrate the
skin and cause serious injury or death. Hydraulic
leaks under pressure may not be visible!
•If any fluid penetrates the skin, GET IMMEDIATE
MEDICAL ATTENTION!!
•Wear safety glasses, protective clothing, and use a
sound piece of cardboard or wood when searching
for hydraulic leaks. DO NOT USE YOUR HANDS!
•Before connecting or disconnecting hydraulic hoses,
read your power unit’s operator’s manual for detailed
instructions on connecting and disconnecting
hydraulic attachments.
•Make certain that all parts meet the specifications for
this product when installing or replacing hydraulic
hoses or fittings.
•After connecting hydraulic lines:
•Slowly and carefully raise the loader and cycle
the rollback / dump cylinders to check hose
clearances and to check for any interference.
•Operate the hydraulics on this product to check
hose clearances and to check for any
interference.
•Make certain that the hoses cannot interfere
with or actuate the quick-attach mechanism.
•Make certain that hoses will not be pinched, or
get tangled, in any equipment.
•Do not lock the auxiliary hydraulics of your power
unit in the “ON” position.
•Refer to your power unit’s operator’s manual and
this manual for procedures and intervals, then
inspect and maintain the entire hydraulic system to
insure that the fluid remains clean, that all devices
function properly, and that there are no fluid leaks.
WHEN MOUNTING THIS PRODUCT TO YOUR
POWER UNIT:
•Refer to the operator’s manuals of your power unit,
your loader, and your quick-attach for special or
detailed mounting instructions.
•This product should fit onto the quick-attach or
loader arms of your power unit the same as the
original products that were designed by your loader /
quick-attach manufacturer.
•If this product does not fit properly, contact FFC
Attachments before operating.
•Never place your finger into the mounting plate or
loader holes. A slight movement of the power unit or
this product could cause serious injury.
BEFORE EACH USE, THOROUGHLY INSPECT THIS
PRODUCT AND:
•Make certain that all safety signs are in place and
legible. Refer to the safety sign page in this manual
for the placement of safety signs for this product.
•Replace all damaged or excessively worn parts and
hardware only with genuine FFC Attachments parts
or with properly rated fasteners, hydraulic hoses, or
fittings.
•Make certain that all locking pins, latches, and
connection devices are properly installed and
secured.
•Make certain that all protective guards, canopies,
doors, etc. are in place and secure.
WHEN OPERATING THIS PRODUCT IN
ACCORDANCE WITH DESIGN INTENTIONS:
•Keep everyone at least nine feet away from the unit
when operating.
WHEN ADJUSTING, SERVICING OR REPAIRING
THIS PRODUCT:
•Make no modifications to your Preparator®.
•When making repairs, use only genuine FFC
Attachments parts or, for fasteners, hydraulic hoses,
or hydraulic fittings, use only properly rated parts.
•Replacement parts, for parts with safety signs
attached, must also have safety signs attached.
SECTION 2
CAUTION
Obey all the safety instructions listed in
this section and throughout this manual.
Failure to obey instructions in this
section may result in personal injury.
•Do not use the top of this product as a step. Under
certain conditions, this area can be slippery.

5
SAFETY SIGN LOCATIONS
ITEM QTY
. PART# - DESCRIPTION
1 1 50-0723 – Read Manual
2 1 50-0724 – Hydraulics
3 2 RDL3100 – Stand Clear
4 1 RDL3101 –Rollover Hazard
5 2 RDL3102 – Shields
6 2 RDL3178 – No Step
INSTRUCTIONS
•Keep all safety signs clean and legible.
•Replace all missing, illegible, or damaged
safety signs.
•Replacement parts for parts with safety
signs attached must also have safety
signs attached.
•Safety signs are available, free of charge,
from your dealer or from FFC
Attachments.
PLACEMENT OR REPLACEMENT OF SAFETY SIGNS
1. Clean the area of application with non-flammable
solvent, and then wash the same area with soap and
water.
2. Allow the surface to fully dry.
3. Remove the backing from the safety sign, exposing
the adhesive surface.
4. Apply the safety sign to the position shown in the
diagram above and smooth out any bubbles.
ITEM 1
ITEM 2 ITEM 3 ITEM4
ITEM 5 ITEM6

6
POWER UNIT SPECIFICATIONS
IMPORTANT Exceeding any of the maximum recommended power unit specifications
CAN result in damage to this product and
WILL void all FFC Attachments warranties.
DESCRIPTION SPECIFICATIONS
Hydraulic Flow Output 25 gpm. Maximum
Hydraulic Pressure Output 2,500 psi. maximum (continuous)
3,500 psi. maximum (intermittent: no more than 6 seconds per minute)
Rear or Front Ballast As required to maintain full power unit stability. (Note the Shipping Weight
on Specifications page, then see the operators manual(s) for your power
unit, loader, and quick-attach for ballasting needs.)
PREPARATOR®MOUNTING
SAFETY FIRST!! READ AND UNDERSTAND THE SAFETY INSTRUCTIONS (pages
2-5 of this manual) BEFORE BEGINNING ANY PREPARATOR® MOUNTING
Loaders
1. Place this product on a firm, level surface that is large enough to safely accommodate this product, your power unit
and all workers involved in the mounting process.
2. Refer to the operator’s manual(s) for your power unit, loader, and quick-attach and follow the mounting instructions
contained therein.
3. Carefully raise the loader and cycle the tilt cylinders to check clearances and to verify that all mounting procedures
have been successfully completed.
4. IMPORTANT Lubricate all grease fittings before connecting this product to your power unit’s hydraulic
system. Refer to PREPARATOR®MAINTENANCE page and follow the instructions.
3 Point Hitch Category 1 or 2.
1. Place this product on a firm, level surface that is large enough to safely accommodate this product, your tractor, and
all workers involved in the mounting process. Making sure this product is in the operating position and level will
facilitate in selecting the proper mounting holes.
2. Read and understand the Operation and Maintenance manual for your tractor before installing this product.
3. Remove the top link on your tractors’ 3 point and drive the tractor backwards in to position to connect the lower links
to the attachment mounting ears. The ears have a combination category 1 & 2 hitch pin installed so you need to
make sure the outer pin matches your tractors’ category. Select a hole position on the mounting ears that aligns or is
a little above the lower link points with the tractor link arms fully lowered and connect the arms.
4. The upper link cylinder provided with this product requires a category #2, 1” diameter pin to attach to the tractors’
upper link point. If you have a category #1 tractor you will have to bush the pin up to category #2. It is important
that when you pin the rod end of the cylinder to the tractors’ upper link point there is between 4” and 5” of
exposed cylinder rod. If you have less the bucket will not roll back enough and if you have more the bucket will not
dump properly. Move the cylinder pin hole position on the mounting ears until you attain the recommended amount of
exposed cylinder rod.
5. IMPORTANT Lubricate all grease fittings before connecting this product to your power unit’s hydraulic
system. Refer to PREPARATOR®MAINTENANCE page and follow the instructions.

7
PREPARATOR®HYDRAULIC CONNECTION
SAFETY FIRST!! READ AND UNDERSTAND THE SAFETY INSTRUCTIONS (pages
2-5 of this manual) BEFORE BEGINNING ANY PREPARATOR® HYDRAULIC
CONNECTION
Loaders
1. Disconnect the hydraulic hose quick couplers from one another and attach the quick couplers to your power unit as
per the instructions in your power unit’s operator’s manual.
2. Carefully raise the loader and cycle the tilt cylinders to check hose clearances and to check for any interference.
3 Point Hitch Category 1 or 2.
1. This product requires two sets of auxiliary hydraulics. Purchase proper couplers and hoses for the upper link cylinder
locally and attach to the tractor per the instructions in your tractors’ operators manual.
2. Carefully raise the link arms and cycle the upper link cylinder to check hose clearances, interferences, and
acceptable range of motion to roll back and dump the bucket.
WARNING
Do not lock the auxiliary hydraulics of your power unit in the “ON” position.
Failure to obey this warning could result in death or serious injury.

8
PREPARATOR®SETUP
SAFETY FIRST!! READ AND UNDERSTAND THE SAFETY INSTRUCTIONS (pages
2-5 of this manual) BEFORE BEGINNING ANY PREPARATOR® SETUP
SKID SHOE ADJUSTMENT
Before adjusting the skid shoes, determine what the soil conditions are and what type of operation is to be performed.
Remember that each time the soil conditions or operation type changes, the skid shoes may need to be repositioned.
Soil Conditions
•HARD: This is highly compacted soil, usually inorganic (clay). Any soil that has been subject to vehicle
or construction traffic would also be considered this soil condition.
•MEDIUM: This is untilled soil that has not been subject to compaction devices or traffic.
•LOOSE: This soil that has received a rough tillage pass of some type, but is still lumpy and coarse.
•VERY LOOSE: This soil that has been tilled to a fine texture.
Operation Type
•ROCK COLLECTION: Collecting large rocks and debris that are resting on the soil surface.
•FOLIAGE REMOVAL: Uprooting and collecting foliage that is growing or has been growing on the soil
surface.
•SOIL TILLAGE: Tilling the soil to create a looser soil condition.
•ROUGHING: Scarifying, raking rocks, debris, & foliage, and filling depressions in tilled or untilled
soil.
•FLAT MODE ROUGHING: Roughing with the shroud parallel to the ground.
•ANGLED MODE
ROUGHING: Roughing with the shroud at an angle to the ground surface.
•FINISHING PASS: Collecting small rocks and debris that are in or on the soil surface.
Skid Shoe
Adjustment Slots
Rotor Tooth Depth
Below Skid Shoe
Operation on
Soil Condition
(Initial settings only. Workability, moisture,
experience, etc. affect settings.)
(-) 5/8” Finishing Pass on Very Loose soil.
Foliage Collection
1/4” Flat Mode Roughing on Medium or Loose soil.
Finishing Pass on Loose soil.
1-1/8” Rock Collection on Hard or Medium soil.
Soil Tillage on Medium soil.
Flat Mode Roughing on Hard soil.
Finishing Pass on Medium soil.
2” Foliage Uprooting on Hard or Medium soil.
Angled Mode Roughing on Hard, Medium, or Loose soil.
Soil Tillage on Hard soil.

9
PREPARATOR®SETUP (Continued)
SAFETY FIRST!! READ AND UNDERSTAND THE SAFETY INSTRUCTIONS (pages
2-5 of this manual) BEFORE BEGINNING ANY PREPARATOR® SETUP
Adjust the skid shoes as follows:
1. Park your power unit on a level surface with this product properly attached.
2. Place your power unit’s transmission in “Park” and engage the parking brake.
3. Lower this product onto preplaced blocking.
WARNING
Do not use blocking made of concrete blocks, logs, buckets, barrels or any other material that could
suddenly collapse or shift positions. Do not use wood or steel blocking that shows any signs of material
decay. Do not use blocking that is warped, twisted, or tapered. Failure to obey this warning could result in
death or serious injury.
4. Shut off your power unit’s engine, remove the starter key, wait for all moving parts to come to a stop, and relieve all
pressure in the hydraulic lines.
5. Loosen the two 1/2” hex nuts that secure the shoe.
6. Move the shoe to the proper slot for the appropriate soil conditions and for the operation being preformed. See the
chart above for recommended starting points for various soil and operating combinations.
NOTICE If, after conducting test passes, the operator determines that the best skid shoe setting for the
conditions being encountered is between two of those listed, then the rear of the skid shoe may
be set one slot above the front of the skid shoe.
7. Retighten the two 1/2” hex nuts to 84 ft. lbs. + or - 6.0 ft. lbs. of torque.
8. Repeat SKID SHOE ADJUSTMENT steps 5 through 7 for the other skid shoe.
TRACK SCRATCHER SPRING ADJUSTMENT
1. With this product positioned as directed by steps 1 through 4 for SKID SHOE ADJUSTMENT, loosen the two 3/8” hex
nuts that secure the track scratcher to the skid shoe.
2. Slide the track scratcher down until the tips of the lowest spring are 1/4” below the lowest surface of the skid shoe
when the skid shoe is at the selected operating angle.
IMPORTANT Operating this product with the spring tips extending more than ¼” into the soil
CAN result in damage to this product and
WILL void all FFC Attachments warranties.
3. Retighten the two 3/8” hex nuts to 34 ft. lbs. + or - 2.0 ft. lbs. of torque.
4. Loosen the single 3/8” hex nut that secures the front spring to the track scratcher.
5. Slide the spring outward until the outer tine of the spring is 1/2” beyond the outer edge of the skid shoe.
(Specific soil conditions may require an increase or a decrease in that distance.)
6. Retighten the 3/8” hex nut to 34 ft. lbs. + or - 2.0 ft. lbs. of torque.
7. Repeat TRACK SCRATCHER SPRING ADJUSTMENT steps 1 through 6 for the other track scratcher.

10
PREPARATOR®OPERATION
SAFETY FIRST!! READ AND UNDERSTAND THE SAFETY INSTRUCTIONS (pages
2-5 of this manual) BEFORE BEGINNING ANY PREPARATOR® OPERATION
WARNING
Failure to obey this warning could result in death or serious injury.
•Never lift the lowest portion of the attachment plate higher than 5’ above the ground.
•Do not lock the auxiliary hydraulics of your power unit in the “ON” position.
•Keep everyone at least nine feet away from this product when operating.
CAUTION
Failure to obey this warning MAY result in personal injury.
•Do not use the top of this product as a step. Under certain conditions, this area can be slippery.
IMPORTANT Operating this product continuously at hydraulic pressures greater than 2,500 psi
CAN result in damage to this product and
WILL void all FFC Attachments warranties.
NOTICE On certain power units equipped with counter weights, the use of the “float” position on
the loader arm lift control can affect overall performance.
The descriptions on the next page are for different operations that can be performed with this product. Please keep in
mind that:
•Before using this product, the application area must be free of all boulders larger than 20” in diameter, all logs and
branches, all wire, all lumber, and any other item that is too large for the bucket or could get wrapped around the
rotor.
•Other equipment must be used to obtain a reasonable starting grade. That means removing any large mounds of soil
and filling in any large or deep holes.
•Multiple passes requiring different skid shoe settings, different rotor speeds and rotation directions, and different
ground speeds and directions may be needed to achieve the desired results depending on what those results are and
what the initial conditions are.
•The wide variety of soil types, moisture conditions, compaction levels, foliage densities, and rock and debris
quantities that can be encountered mean that the operator may need to make adjustments from the descriptions on
the next page based upon the operator’s experience.
To operate this product:
1. Make sure that the skid shoes are in the correct position. (see PREPARATOR®SETUP for the recommended
settings.)
2. Make sure that the track scratchers are in the correct position. (see PREPARATOR®SETUP for the recommended
settings.)
3. Use the hydraulics on your power unit to properly position the rotor and bucket. (see the next page for the
recommended positions and the float/non-float loader arm settings.)
4. Activate the auxiliary hydraulics on your power unit to rotate the rotor in the correct direction. (see the next page for
the recommended direction.)
5. Increase your engine speed to the desired level and slowly move your power unit in the correct direction. (see the
next page for the recommended direction.)
6. Gradually increase the ground speed until the desired balance between operating results and efficiency is achieved.

11
PREPARATOR®OPERATION (Continued)
SAFETY FIRST!! READ AND UNDERSTAND THE SAFETY INSTRUCTIONS (pages
2-5 of this manual) BEFORE BEGINNING ANY PREPARATOR® OPERATION
ROCK COLLECTION (Fig. 1)
This operation is where surface rocks (5” to 20” dia.) are collected in the bucket.
•The teeth should move toward the bucket when contacting the soil.
•The power unit should move in a forward direction when mounting the attachment
in front of the power unit and backward for 3 point mountings.
•The larger the rocks, the slower the ground speed.
•The loader should be in the float position. (Dumping of the bucket is required.)
SOIL TILLAGE & FOLIAGE UPROOTING (Fig. 2)
This operation is for loosening undisturbed soil and uprooting foliage.
•The teeth should move away from the bucket when contacting the soil.
•The power unit should move in a reverse direction when mounting the attachment
in front of the power unit and forward for 3 point mountings.
•The loader should not float. (Dumping of the bucket is not required.)
FLAT MODE ROUGHING (Fig. 3) or ANGLED MODE ROUGHING (Fig. 4)
•These operations scarify, rake materials into piles or windrows and fill depressions.
•The teeth should move toward the bucket when contacting the soil.
•The power unit should move in a reverse direction when mounting the attachment
in front of the power unit and forward for 3 point mountings.
•The loader should not float. (Dumping of the bucket is not required.)
(If the bucket is closed at the end of a Flat Mode pass, then dumping is required.)
FOLIAGE COLLECTION (Fig. 5)
This operation is where foliage is uprooted and collected in the bucket.
•The teeth should move toward the bucket when contacting the soil.
•The power unit should move in a reverse direction when mounting the attachment
in front of the power unit and forward for 3 point mountings.
•The loader should be in the float position. (Dumping of the bucket is required.)
FINISHING PASS (Fig.5)
This operation is for the collection of rocks (less than 5” dia.) and debris in the soil.
•The teeth should move toward the bucket when contacting the soil.
•The power unit should move in a reverse direction when mounting the attachment
in front of the power unit and forward for 3 point mountings.
•The loader should be in the float position. (Dumping of the bucket is required.)
DUMPING OF THE BUCKET (Fig.6)
1. Shut off the auxiliary hydraulics.
2. Raise the unit about four feet above the ground.
3. Dump the bucket.
4. If some materials do not slide out, engage the auxiliary hydraulics so that the teeth
on the bottom of the rotor move away from the bucket.
ADDITIONAL OPERATING TIPS
•In certain conditions, if the rotor carries
rocks past the brush and drops them
back on the ground, reducing the rotor
speed will correct this situation.
•The bucket will hold more material if,
when the bucket starts to get full, the
bucket is rolled back to shift the material further back into the bucket.
Some unwanted soil can also be removed at this time if the roll-
back/dump cylinder(s) on the loader are used to “shake” the unit.

12
PREPARATOR®MAINTENANCE
SAFETY FIRST!! READ AND UNDERSTAND THE SAFETY INSTRUCTIONS (pages
2-5 of this manual) BEFORE BEGINNING ANY PREPARATOR® MAINTENANCE
BEFORE EACH USE
•Make sure that all nuts and bolts are in place and properly tightened.
•Make sure that all other fasteners are in place and are performing their specified function.
•Make sure that all hydraulic fittings are tightened and that there are no leaks in any fittings or hoses.
•Make sure that all safety signs are in place, are clean, and are legible.
(SEE THE SAFETY SIGN SECTION ON PAGE 5.)
•Replace any damaged parts and excessively worn parts.
AFTER EVERY 10 HOURS OF USE
•Grease 6 fittings: one on each of the two bearings at the ends of the drum shaft, one on each of the two bearings at
the ends of the brush shaft, and one on each of the two parallel link bars where the shroud pivots on the bucket.
•Make sure that the roller chains are tight as per the method described on page 13. This is necessary only after the
first 10 hours and should be done every 40 hours thereafter.
AFTER EVERY 40 HOURS OF USE
1. Remove the brush drive shield and the side and lower rotor drive shields.
2. Make sure that the four taper lock adapter assemblies are tight by turning the bearing locknut by hand.
•If a bearing locknut moves when turned by hand, then that taper lock adapter assembly must be retightened.
(SEE THE BEARING LOCK ADJUSTMENT INSTRUCTIONS BELOW.)
3. Make sure that the two roller chains are tight as per the method described on page 13.
4. Replace and properly secure all drive shields.
WARNING
Make certain that all protective guards, canopies, doors, etc. are in place and secure.
Failure to obey this warning could result in death or serious injury.

13
PREPARATOR®SERVICE
SAFETY FIRST!! READ AND UNDERSTAND THE SAFETY INSTRUCTIONS (pages
2-5 of this manual) BEFORE BEGINNING ANY PREPARATOR® SERVICE
BEARING LOCK ADJUSTMENT
If a taper lock adapter assembly is found to be in need of tightening after checking the bearing locknut by performing
steps 1 and 2 of the 40 hour maintenance schedule above, then the following action must be taken:
1. Bend the locking tang of each bearing lock washer out to free the bearing locknut.
2. Loosen the bearing locknut with the spanner wrench included with this product.
3. Retighten the bearing locknut until finger tight.
4. Use the spanner wrench to tighten the locknuts an additional 1-1/4 turns and, if necessary, continue tightening until
the first time when one tang of the bearing lock washer is aligned with a notch on the locknut.
5. Bend that tang of the bearing lock washer back into the notch on the locknut.
6. Replace and properly secure the appropriate drive shield(s).
CHAIN TENSION ADJUSTMENT
If the chain is found to be in need of tightening after checking the chain tension by performing steps 1 and 3 of the 40
hour maintenance schedule on the maintenance page, then the following action must be taken:
1. Shut off your power unit’s engine, remove the starter key, wait for all moving parts to come to a stop, and relieve all
pressure in the hydraulic lines.
2. Remove cover over rotor drive chain.
3. Check chain to see if adjustment is needed: Remove (1) link if possible (It may be necessary to add back in 1/2 link).
There should be at least 1/4” of movement in the chain. The height of the motor mount weldment may also be
adjusted to change chain tension.
4. Replace and properly secure the appropriate drive shield(s).
Brush Drive Side
1. Shut off your power unit’s engine, remove the starter key, wait for all moving parts to come to a stop, and relieve all
pressure in the hydraulic lines.
2. Remove cover over brush drive chain and completely remove the snap idler.
3. Check chain to see if adjustment is needed: Remove (1) link if possible (It may be necessary to add back in 1/2 link).
4. Adjust the brush leaving a 1/4” of movement in the chain and a maximum of 5/16” between the brush and the drum. If
the is more than 5/16” between the brush and the drum, then remove a 1/2 link from the chain. Be sure to adjust both
ends of the brush so it remains parallel to the drum.
5. Replace and properly secure the appropriate drive shield(s).

14
PREPARATOR®TROUBLE SHOOTING
SAFETY FIRST!! READ AND UNDERSTAND THE SAFETY INSTRUCTIONS (pages
2-5 of this manual) BEFORE BEGINNING ANY PREPARATOR® TROUBLE
SHOOTING
PROBLEM POSSIBLE CAUSE POSSIBLE REMEDY
Rotor does not turn. Rotor drive chain is loose. Adjust the chain tension.
Rotor drive chain is broken. Repair or replace the drive chain.
Rotor drive sprocket is off the shaft. Reinstall the drive sprocket.
Rotor idler sprocket is off the shaft. Reinstall the idler sprocket.
Rotor bearing is seized. Replace the bearing.
Obstruction (i.e. rock, etc.) is lodged against
the rotor. Remove the obstruction. Make sure that all
safety procedures are followed.
Low level of hydraulic fluid in the power unit. Add hydraulic fluid to the power unit.
Defective hydraulic valve on the power unit. Repair or replace the hydraulic valve on the
power unit.
Defective hydraulic pump on the power unit. Repair or replace the hydraulic pump on the
power unit.
Loss of power to rotor. Hydraulic fitting is leaking. Tighten or replace the hydraulic fitting.
Hydraulic motor seal is leaking. Replace the hydraulic motor seal.
Low level of hydraulic fluid in the power unit. Add hydraulic fluid to power unit.
Air in the power unit’s hydraulic system. Bleed the power unit’s hydraulic system.
Rotor turns erratically. Air in the power unit’s hydraulic system. Bleed the power unit’s hydraulic system.
Rotor drive chain is slipping on the sprocket. Adjust the chain tension.
Brush does not sweep
against the rotor. Brush drive chain is loose. Adjust the chain tension.
Brush drive chain is broken. Repair or replace the drive chain.
Sprocket square key is missing or broken. Replace the sprocket square key.
Skid shoes dig in or slide
with excessive resistance
on the ground.
Float circuit on the power unit is not
activated or is not properly operating. Activate or repair, as needed, the power
unit’s hydraulic controls.

15
PARTS ILLUSTRATION

16
PREPARATOR®PARTS LIST
LAF3554 LAF3566 LAF3576
ITEM QTY. 54” 66” 76” DESCRIPTION
1 1 LAF3590 LAF3501 LAF3502 Bucket
2 1 LAF3586 LAF3503 LAF3504 Shroud
3 1 LAF3591 LAF3505 LAF3506 Drum
4 1 LAF3507 Parallel Linkage Bar: Left
5 1 LAF3509 Rotor Drive Shaft (on left end of Drum)
6 1 LAF3510 Rotor Idler Shaft (on right end of Drum)
7 2 LAF3512 Taper Lock Adapter Assembly – Includes:
7A – Bearing Locknut: 1-3/4”
7B – Bearing Lock Washer: 1-3/4”
7C – Bearing Taper (male): 1-7/8” O.D.
8 2 LAF3513 Flange Mount Bearing: 1-3/4”/1-7/8” Taper Bore w/ Grease Zerk
9 1 LAF3514 Motor Shaft Spacer
10 1 LAF3516 Roller Chain: #80H x 59 Links
11 1 LAF3517 Connecting Link: #80H
12 1 LAF3518 Offset Connecting Link: #80H
13 1 LAF3530 Motor Mount
14 1 LAF3520 Roller Chain: #50H x 65 Links
15 1 LAF3521 Connecting Link: #50H
16 2 LAF3522 Offset Connecting Link: #50H
17 1 RHW1209 Grade 5 Hex Head Cap Screw: 3/8” x 1-1/2”
18 1 LAF3524 Rotor Drive Shield: Lower Cover
19 2 LAF3525 Brace Angle
20 1 LAF3526 Rotor Drive Shield: Lower Cover
21 1 LAF3532 Sprocket Bushing: 1-1/2” Quick Disconnect – Includes:
(1) Bushing: 1-1/2” I.D.
(3) Hex Head Cap Screws: ¼” x 1-3/8”
(3) Lock Washers: 1-4”
(1) Socket Set Screw: ¼” x 3/8”
22
2 LAF3533 Taper Lock Adapter Assembly – Includes:
22A – Bearing Locknut: 1-1/8”
22B – Bearing Lock Washer: 1-1/8”
22C – Bearing Taper (male): 1-1/4” O.D.
23 2 LAF3534 Flange Mount Bearing: 1-1/8”/1-1/4” Taper Bore w/ Grease Zerk
24 1 LAF3536 Sprocket: 17 Tooth #50 w/ 1” Bore and ¼” Key
25 1 LAF3537 Brush Drive Shield Gasket
26 1 LAF3540 Drive Sprocket Retainer: 13/32” I.D.
27 1 LAF3583 LAF3542 LAF3543 Brush: 13” Diameter
28 1 LAF3544 Sprocket: 26 Tooth #50 w/ 1-1/2” Bore and 3/8” Key
29 1 LAF3546 Sprocket: 12 Tooth #80 w/ 17 Tooth SAE Spline
31 1 LAF3549 Sprocket: 20 Tooth #80 w/ 17 Tooth SAE Spline
32 1 LAF3550 Brush Baffle Plate: Right
33 1 LAF3564 Brush Drive Shaft (on right end of Brush)
34 1 LAF3565 Brush Idler Shaft (on left end of Brush)
35 1 LAF3567 Sprocket Bushing: 1” Quick Disconnect – Includes:
(1) Bushing: 1” I.D.
(3) Hex Head Cap Screws: ¼” x 1-3/8”
(3) Lock Washers: ¼”
(1) Socket Set Screw: ¼” x 3/8”
37 1 RHW5970 Sprocket Spacer (use only as required to keep sprocket tight)
39 1 LAF3584 Brush Drive Shield
40 2 LAF3585 Rotor Mounting Plate
42 1 LAF3588 Brush Baffle Plate: Left
43 4 LAF3597 Skid Shoe Retainer
NOTE: All parts are the same as the LAF3576 except for those parts numbered under the other models.

17
PREPARATOR®PARTS LIST (Continued)
LAF3554 LAF3566 LAF3576
ITEM QTY. 54” 66” 76” DESCRIPTION
44 1 LAF4033 Hydraulic Hose Protector: 1-7/8” x 72”
45 2 LAF4278
Hydraulic Elbow: 90°, 10MB – 10MJ
46 2 LAF4321 Hydraulic Hose: ½” x 104”, 10MB – 10FJ
47 1 LAF4772 Hydraulic Motor
48 1 LAF9965 Drive Sprocket Retainer: 41/64” I.D.
49 1 LAF9982 Skid Shoe: Right
50 1 LAF9983 Skid Shoe: Left
51 1 LAF9990 Parallel Linkage Bar: Right
52 1 RHW1101 Grade 5 Hex Head Cap Screw: 5/16” x ½”
53 1 RHW1112 Grade 5 Hex Head Cap Screw: 5/16” x 2-1/2”
54 6 RHW1205 Grade 5 Hex Head Cap Screw: 3/8” x 1”
55 1 RHW1235 Grade 8 Hex Head Cap Screw: 3/8” x 1”
56 4 RHW1405 Grade 5 Hex Head Cap Screw: ½” x 1-1/2”
57 12 RHW1406 Grade 5 Hex Head Cap Screw: ½” x 1-3/4”
58 12 RHW1603 Grade 5 Hex Head Cap Screw: 5/8” x 1-3/4”
59 2 RHW1912 Grade 5 Hex Head Cap Screw: 1” x 4-1/2”
60 16 RHW2205 Grade 5 Carriage Bolt: 3/8” x 1”
61 4 RHW2406 Grade 5 Carriage Bolt: ½” x 1-3/4”
62 4 RHW4025 Grade 5 Flange Head Bolt: 3/8” x 1”
65 1 RHW6102 Grade 5 Lock Washer: 5/16”
66 22 RHW6202 Grade 5 Lock Washer: 3/8”
67 24 RHW6402 Grade 5 Lock Washer: ½”
68 12 RHW6602 Grade 5 Lock Washer: 5/8”
69 17 RHW7201 Grade 5 Hex Nut: 3/8”
70 4 RHW7401 Grade 5 Hex Nut: ½”
71 2 RHW7902 Grade 5 Locknut: 1”
73 2 RHW8061 Lynch Pin: 5/16” x 1-3/8” (useable)
74 1 RHW8071 Square Key: 3/8” x 3/8” x 1-1/2”
75 1 RHW8072 Square Key: ¼” x ¼” x 1-1/2”
76 6 RHW8090 Grease Zerk: ¼”, 28 tpi. Self-tapping
77 1 RHW8098 Grade 2 Fender Washer: 5/16” I.D. x 1-1/2” O.D. (0.08” thick)
78 1 RHW8113 Grade 5 Hex Head Cap Screw: 5/8” x 1-1/4”
81 8 RHW7403 Grade 5 Locknut: ½”
82 2 RHW8602 Machinery Bushing: 1-1/4” I.D. x 1-3/4” O.D. (1/16” thick)
83 1 RHW8613 Weld Plate f/ 7/8” O.D.
84 1 RHW8614 Cover Plate f/ 7/8” O.D.
85 2 RHW8616 Hose Cradle f/ 7/8” O.D. (2 hoses)
86 1 RHW8618 Hose Spring
87 2 RMR5002 Wiretie
88
89
1
1
Contact FFC to obtain the correct
couplers for your Power Unit Hydraulic Hose Quick Coupler:
Male Connection
Female Connection
NOTE: All parts are the same as the LAF3576 except for those parts numbered under the other models.

18
PREPARATOR®PARTS LIST (Continued)
LAF3554 LAF3566 LAF3576
ITEM QTY. 54” 66” 76” DESCRIPTION
3 Point Hitch Mountings
90 1 RHW8048 Clevis Pin: 1” x 6”
91 1 RHW8042 Lynch Pin: 3/16” x 1-9/16” (1-1/2” useable)
92 2 ILA1032 Bushing: 1-1/2” O.D. x 1-1/4” I.D.
93 1 LAF4515 Hydraulic Cylinder
94 2 RHW8401 Draw Pin Category 1 & 2
95 4 RHW2404 Grade 5 Carriage Bolt: ½” x 1-1/4”
96 4 RHW5492 Grade 8 Flat Washer: ½”, SAE (hardened)
NOTE: All parts are the same as the LAF3576 except for those parts numbered under the other models.
3 Point Hitch
Mounting Parts
This manual suits for next models
2
Table of contents
Other paladin Farm Equipment manuals