Palram Feria User manual

FeriaTM 3x4.2
Approx. Dim.
425L x 295W x 260-305Hcm / 167.3”L x 116.1”W x 102.4”-120”H
13mm
x2
0 1 2
CAULK /
SILICON
Wind Resistance
120km/hr
75ml/hr
Snow Load
30.7lbs/ft
150kg/m
EXTENDABLE
PRODUCT
EN 14963:2006
Year of ax: 16
Light Transmission
Clear - 65%
White Opal - 25%
82777_L_18.03
_MV_6.3

Extending the Patio Cover - 3 Meters Depth
3.05m/10’ 4.25m/14’ 5.46m/17’
6.1m/20’ 7.30m/24’ 8.5m/28’
9.15m/30’ 9.71m/32’ 10.35m/34’
Index
OPTIONAL! Use either all the supplied poles or store/dispose of the surplus pole/s.
Product Sizes 3.05m/10’ 4.25m/14’ 5.46m/17’ 6.1m/20’ 7.30m/24’ 8.5m/28’ 9.15m/30’ 9.71m/32’ 10.35m/34’
Supplied Poles 2 3 3 4 5 6 6 6 7
Surplus Poles - - - 1 1 1 2 1 2
4.25m/14’
3.05m/10’ 4.25m/14’
5.46m/17”
5.46m/17”
5.46m/17’ EZ Link
EZ Link
3.05m/10’
3.05m/10’
3.05m/10’
3.05m/10’
3.05m/10’
3.05m/10’
3.05m/10’
3.05m/10’
EZ Link
EZ Link
EZ Link
4.25m/14’
4.25m/14’
4.25m/14’
4.25m/14’
4.25m/14’
3.05m/10’ EZ Link
EZ Link
EZ Link
EZ Link

AFTER SALE SERVICE
palramapplications.com/after-sales-service
LOCATIONS
USA
England
France
Germany
International
customer.service@palram.com
customer.serviceUK @palram.com
customer.serviceFR@palram.com
customer.serviceDE @palram.com
customer.service@palram.com
www.palramapplications.com
877-627-8476
01302-380775
0169-791-094
0180-522-8778
+972 4-848-6816

0Concrete Foundation:
Use the screws and masonry anchors supplied with the patio
cover kit.
® Wood Foundation:
Use suitable fasteners for wood, screw them into the wood
for a minimum depth of6 cm (2.4 in.)
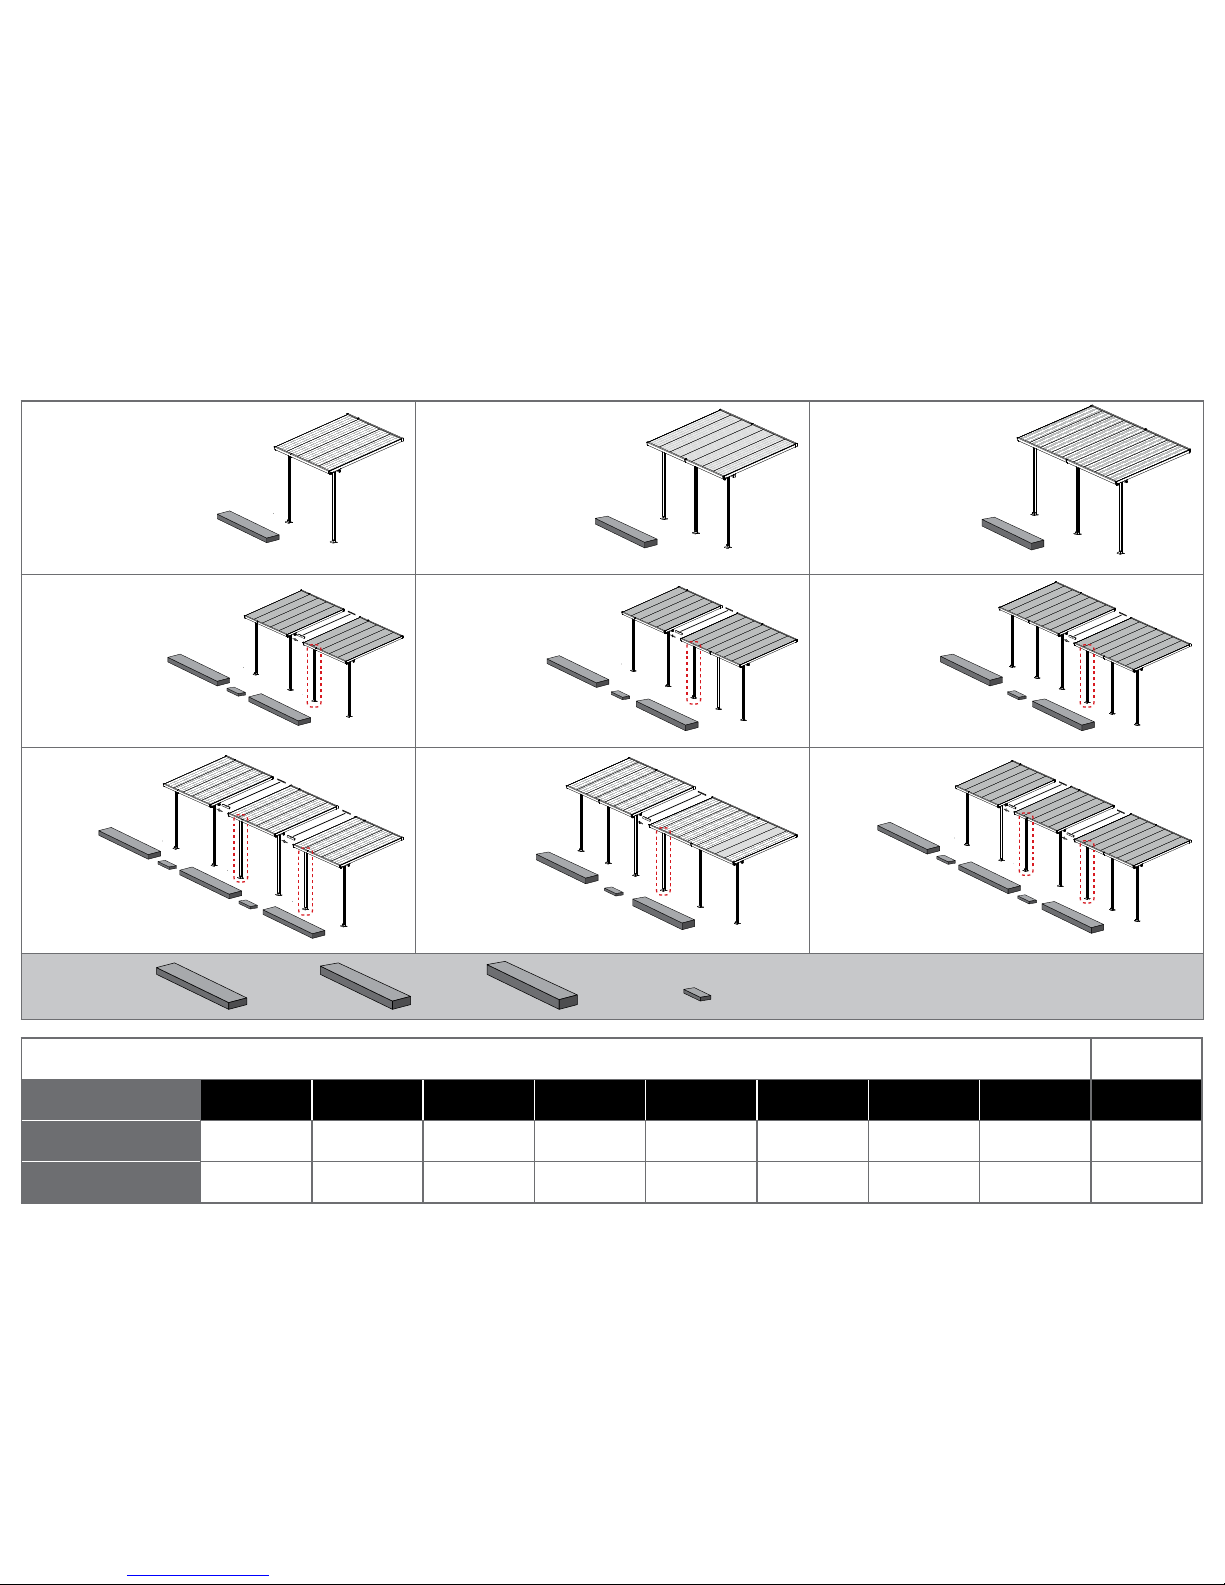
0Soil Foundation:
Dig holes sized 40/40/40 cm (15.8/15.8/15.8 in.) into the
ground, and fill with concrete, see relevant drawing.
*For frozen areas, please check the required depth needed
for these holes.
For any other type of hard surface / foundation:
Please consult with an expert regarding which fasteners are
suitable for your type offoundation.
Important! The poles position can be adjusted during the
installation.The poles' positioning is flexible, enabling you to
set their distance from the house and between the poles at
the front.
0Base de cemento: CB
utilice los tornillos y pernos de albanileria provistos con el
juego para el patio .
0Base de madera:
utilice tornillos para madera y ajustelos a una profundidad
minima de 6 cm (2,4 pulgadas)
0Base de tierra:
cave un hollo de 40/40/40 cm (15,8/15,8/15,8 pulgadas)
en la tierra y Ilenelo con cemento (ver imagen). * En areas
congeladas, controle la profundidad necesaria para los
orificios.
Para cualquier otro tipo de superficies/bases rfgidas:
consulte a un experto para conocer que sujetadoresson los
apropiados para su tipo de superficie
ilmportante! La posicion de las columnas puedeser
ajustada durante la instalacion. La posicion de las columnas
es flexible, por lo que podra elegir la distancia desde su casa
y entre las columnas del frente.
Foundation
0Betonfundament: CD
Verwenden Sie dazu die mitgelieferten Schrauben und
Maueranker
0Holzfundament:
Verwenden Sie geeignete Befestigungen fur Holz, schrauben
Sie diese mit einer Mindesttiefe von 6 cm in das Holz (2.4 in.)
0Bodenfundament:
Graben Sie ein Fundamentloch von 40/40/40 cm
(15,8/ 15,8 in) in den Boden und fullen Sie diese mit Beton,
siehe entsprechende Zeichnung:'
*Bitte berucksichtigen Sie bei gefrorenen Flachen die
notwendigeTiefe fur die Locher
Fur jede beliebige Oberflache/Fundament:
Bitte wenden Sie sich in Bezug auf die
Befestigungselemente, die fur lhre Fundamentart geeignet
sind, an einen Fachmann.
Wichtig! Die Position der Saulen kann wahrend des Einbaus
eingestellt werden. Die Positionierung der Saulen ist flexibel,
sodass Sie den Abstand zwischen dem Haus den Saulen auf
derVorderseite einstellen konnen.
0Fondazione in calcestruzzo:
Utilizzare viti e tasselli per la muratura forniti con il kit di
copertura del patio
0Fondazione in legno:
Utilizzare dispositivi di fissaggio adatti per il legno, avvitarli
nel legno per una profondita minima di 6 cm (2.4 in)
0Fondazione in terra:
Scavare buche dimensionate di 40/40/40 cm (15.8 / 15.8
/ 15.8. in) nel terreno, e riempire con calcestruzzo, vedi
disegno in questione. * Per aree ghiacciate, controllare la
profondita richiesta necessaria per questi fori.
Per qualsiasi altrotipo di superfici dure / fondazione:
Consultare un esperto in materia, the gli elementi di
fissaggio sono adatti per il tipo di fondazione
Importante! La posizione dei pali puo essere regolata
durante l'installazione. II posizionamento dei pali e flessibile,
vi permettera di impostare la loro distanza dalla casa e tra i
pali sulla parte anteriore
0Fondation en beton : CD
Utilisez les vis et les pattes de scellement fournies avec le kit
de couverture de patio.
0Fondation en bois :
Utilisez des fixations appropriees pour le bois. Fixez-les dans
le bois sur une profondeur minimale de 6 cm (2,4 po).
0Fondation au sol :
Creusez des trous de 40x40x40 cm (15,8x15,8x15,8 po)
dans le sol, puis remplissez-les de beton (voir le schema
correspondant).
*Pour les zones gelees, veuillez verifier la profondeur
necessaire requise pour ces trous
Pour tout autre type de surface dure / fondation :
Veuillez consulter un expert quant aux fixations compatibles
a votre type de fondation
Important! La position des poteaux peut etre ajustee au
moment de ('installation. Le positionnement des poteaux
est flexible, ce qui vous permet de les installer a distance de
votre maison ou entre les poteaux situes a ('entree.
0Betonovy zaklad:
PouZijte S'rouby a uchyty dodane v souprave s krytem
0Dreveny zaklad:
PouZijte vhodne upevnovaci prvky do dreva, naSroubujte je
do minimalni hloubky 6 cm (2,5 palce)
0Zaklad v zemi:
Do zerne vykopejte otvory o rozmere 40/40/40 cm
(15,8/15,8/15,8 palce) a vypInteje betonem, viz prisluSny
nákres.
*V pripade zamrzlych oblasti zkontrolujte hloubku techto
der.V pripade jakehokoli jineho typu tvrcleho povrchu/
zalcladu: Poradle se s odbornikem, ktere upevnovaci prvky
jsou pro vas" typ zakladu vhodne
()Weikel Pozici polO Ize nastavit behem instalace. Pozice
polO je flexibilni, umoZnuje yam nastavit vzdalenost od
domu a mezi poly v prednitasti.
co


Please read these instructions carefully before you start to
assemble this product.
Please carry out the steps in the order set out in these instructions.
Keep these instructions in a safe place for future reference.
P When encountering the information icon, please refer to the relevant
assembly step for additional comments and assistance.
:are and Safety Advice
Please follow the instructions as listed in this manual.
Having purchased a long patio cover, make sure you received all boxes according
to the additional page (Extending your patio cover) on the instruction manual.
As soon as you are ready to assemble your patio cover (you can start with this
box), sort the parts and check in accordance with the content list.
For safety purposes we strongly recommend the product to be assembled
by at least two people.
Some parts may have sharp edges. Please be careful when handling components.
Always wear gloves, eye protection, and long sleeves when assembling or
performing any maintenance on your product.
Do not attempt to assemble the product in windy or wet conditions.
Dispose of all plastic bags safely - keep them out of reach ofsmall children.
Keep children away from the assembly area.
Do not attempt to assemble the product if you are tired, have taken drugs,
medications or alcohol, or if you are prone to dizzy spells.
When using a stepladder or power tools, make sure you follow the
manufacturer's safety advice.
Do not climb or stand on the roof.
Heavy articles should not be leaned against the poles.
Do not hang or lay on the profiles.
Keep roofand gutter clear of snow, dirt & leaves.
Heavy snow load on roof can damage the product making it unsafe to stand
below or nearby.
This product was designed to be used mainly as a Patio cover.
Some versions ofthis product are painted.
If color was scratched during assembly it can be fixed.
Cleaning Instructions
When your product needs cleaning, use a mild detergent solution and rinse
with cold clean water.
Do not use acetone, abrasive cleaners, or others special detergents to clean
the panels.
Before Assembly
This product must be assembled on a solid base (such as concrete or asphalt) and
anchored to the ground.
Choose your site carefully before beginning assembly.
Sort the parts and check according to the contents parts list.
Site surface needs to be leveled (mainly below the poles).
Please consult your local authorities if any permits are required prior to constructing
the product.
Prior to enlarging the Patio Cover, several parts need to be dismantled, it is
recommended to keep them in a safe place for future use.
Note: Use only the parts registered in the content list, some parts may be surplus.
Tools & Equipment
T001 (Supplied)

Notes During Assembly
Use a soft platform belowthe parts to avoid scratches and damages.
Product dimensions can be adjusted to your specific needs:
1.The wall-mounting profile (top-back) can be adjusted from 260 to 305 cm (102.4"to 120") above ground.
The adjusting is done when measuring and drilling (Step 9).
Please note the installation recommendations' height suggested in Diagram A.
It is possible to fix the Patio Cover back wall height at the lowest point of 260 cm/102.4". This method is optional if the
assembly conditions and exterior walls do not allow to follow the suggested installation as appears in the manual.
Please note that the product appearance may slightly change as a result, however snow load weight does not change.
2. Poles distance from the wall can be adjusted from 226 to 286 cm (89"to 112.5") as suggested in Diagram B1.
Poles distance from the side edges can be adjusted from 0 to 54 cm (0" to 21.3") as suggested in Diagram B2.
The adjusting is done after assemblyand before anchoring (Step 27) by sliding poles and profile 7040 +7041 at the roof
profiles' channels.
3. Wall mounting and distance from the wall determine the roof angle and the total depth ofthe product (distance of
gutter from the wall). Higher wall mounting and shorter distance between wall and poles increasethe roof angle and
shorten the total depth as suggested in Diagram C.
II] Steps
Step 7: Please apply silicone sealants on both sides ofthe part combining 8119 in order to prevent water leakage.
Step 8: Apply silicone sealants on the inner part of 8116 & 8117 and connect to the profile.
Step 16: Please apply silicone sealants above beam 7288 + 7290, in order to prevent water from seeping in.
Step 18: Make sure that the angle between the back wall profile and the panel supporting profiles is 90 degrees.
Assembly of the panels should start from the middle of the patio cover to each side alternately.
Step 27: Please adjust the poles (inside out and sideways) by sliding them to their final position prior to anchoring.
Make sure that the poles distance from the Patio cover side edge does not exceed 54 cm/21.3".
*Please note: Anchoring this product to the ground is essential to its stability and rigidity. It is required to complete
this stage in order for your warranty to be valid. (Step 28)
*Tighten all screws when completing assembly.
Note:
The wall anchoring kit supplied with this product is suitable only for concrete walls.
Other wall types need an accordant wall fixation kit.
II
260-305cm
102.4"-120"
B1
226-286cm
89"- 112.5"
0-54cm
0'-21.3"
.
I
.
- 13° . + 17°
'.. ,..
+ -

Ir
ontents
Item Qty. Item
4043
8192
466
M6
M6
433
7121
M8
M8
4010
5000
5001
4000
(R rmumaa
Qty. tern
21(+1
36(+6
36(+6
7335
Qty. Item
1
Qty. Item Qty.
7295
729t
729-i
937

ontents
Item Qty. Item
7041
7040
1042
1043
1044
Qty.
7042
7043
3018

1
_ x6
x3
02»»»»»»»»»»»»»»»»k x6
x12
x6
x3

2
x12
.

3
x6 x12

4
x 1 x4
II,

5
0»»»»»»»»»»»»»»»»»»1 x6
x12
x6

6
xl
V'
xl

7
xl
L xi
.....
,- --,

8
,Wket(10 x8 x2 x1 x1

9
x1 x2
o 1

10
x2
03 :ITZ=1> x2 x1 0 x1

Other manuals for Feria
2
Table of contents
Other Palram Patio Furniture manuals

Palram
Palram CANOPIA EZ LINK KIT Administrator Guide

Palram
Palram Curtain Set User manual

Palram
Palram SideWall 3 User manual

Palram
Palram Olympia User manual

Palram
Palram CANOPIA STOCKHOLM Administrator Guide

Palram
Palram Canopia MILANO 10x10 Administrator Guide

Palram
Palram EZ Link Kit User manual

Palram
Palram Sierra 3x5.46 User manual

Palram
Palram EZ Link Feria User manual

Palram
Palram Palermo 3000 User manual