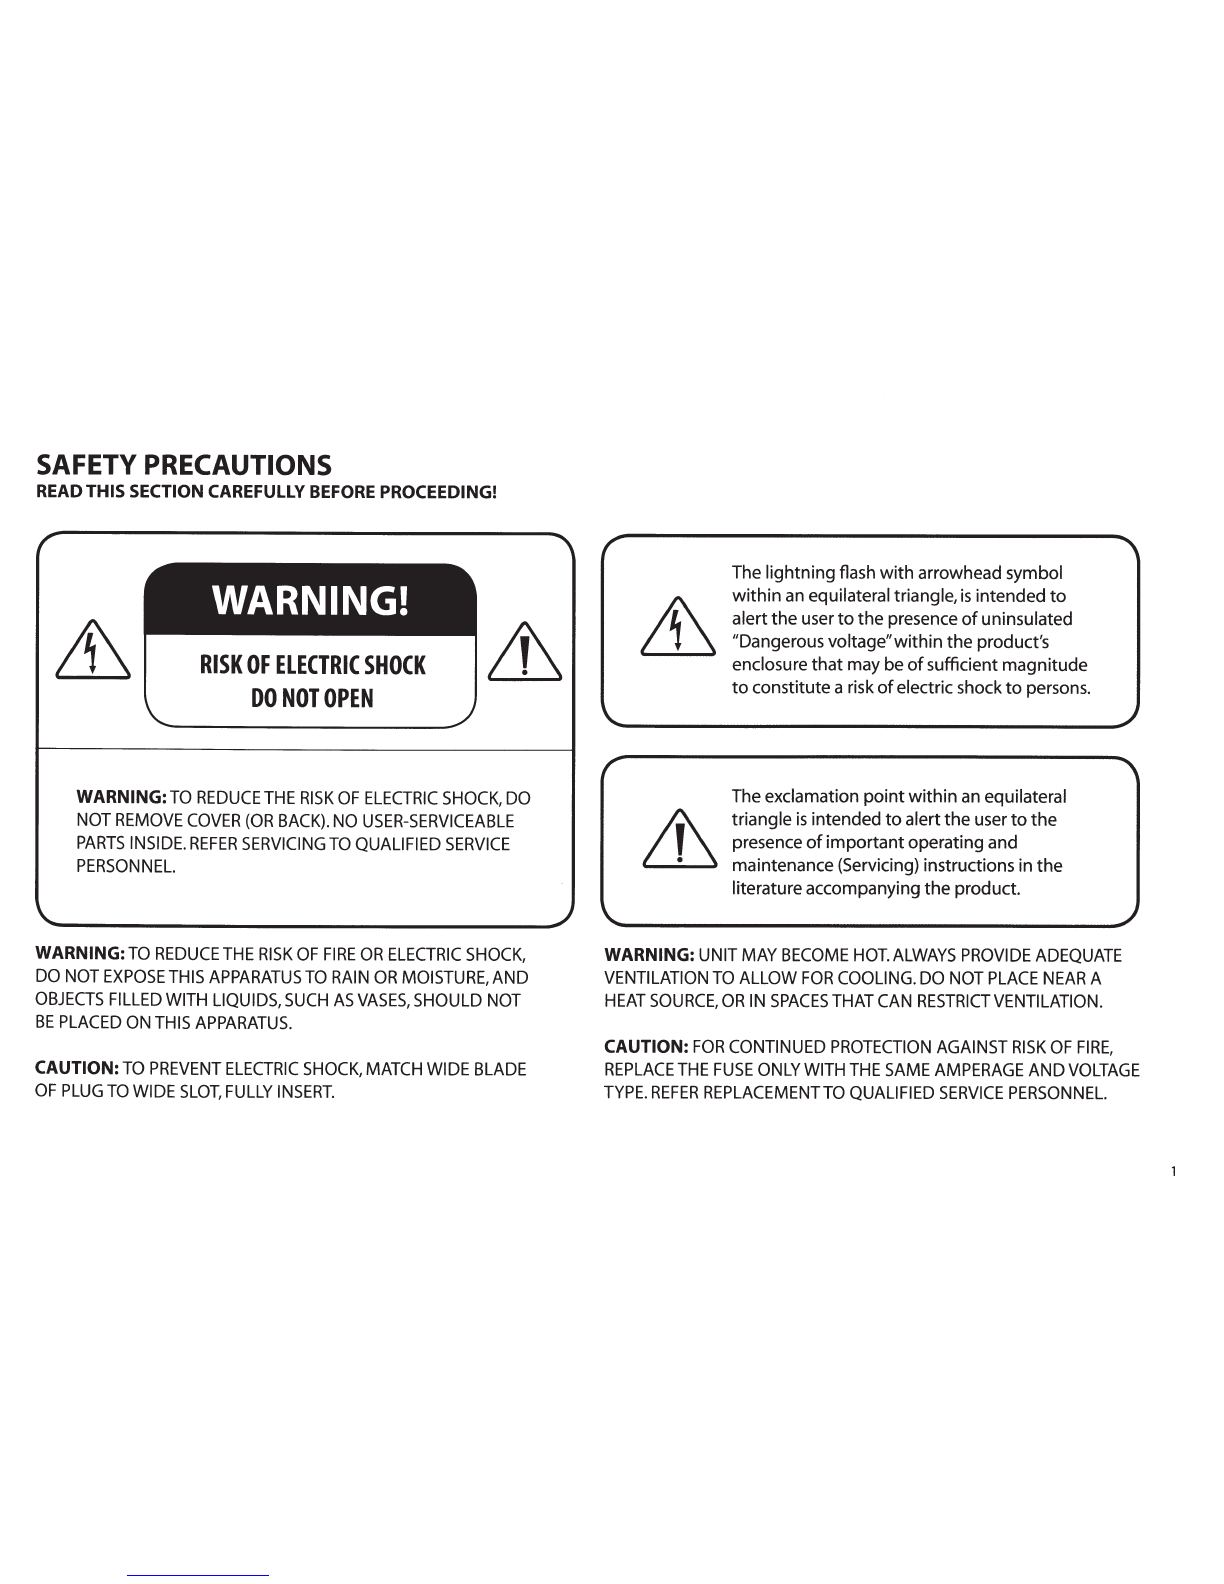
Paradigm Soundtrack User manual

The Official Sound
of
YOU™
System
Amplified Soundbar and Wireless Subwoofer
Set-Up Guide

What's in
the
box
...
soundbar
Remote
Your Soundtrack
System
is
capable
of
learning
codes
from
remote controls you are using
for
other
sources.
See
manual
for
details.
Feet
On
-wall brackets
(Adaptorfor
use
inhorizontal
position,wired connection onlyl
Subwoofer
feet
and screws
#2
Phillips (not supplied)

Paracligni
I
so
llt
dtrA~~
,
.
OPTIONAL
:
For
wall mounting instructions, refer to Owners Manual.
BEFORE
YOU
BEGIN,
READ
THE
SAFETY
PRECAUTIONS
AND IMPORTANT
SAFETY
INSTRUCTIONS
INCLUDED
IN
THE
OWNERS
MANUAL.
Setting upthe
sound
bar
Attach the Feet
Lay
your
sound
bar
face
down
on a soft
surface. Insertfeet
as
shown, pressfirmly
until you
hear
a 'click'.
Wireless pairing
Power
on,
sync
to subwoofer
Using
the
Remote
or
Onboard Interface.Tum Power
ON
and
repeatedly press InputSelector until you
hear
audio. Press
the
Wireless Sync
button
to
initiate connection
to
subwoofer.
Input
Selector
W
i
n
~
Jess
Sync
Connecting to
source
NOT
E:
Choose anal
og
OR
d1g1tal
connection
s
Wireless
status
indicator
The Wireless Status Indicator
on
the
sound
bar
should
blink
blue
for less
than
30
seconds
and
then
go
back
to
normal
operation.
*
If
the
soundbarWireless
St
at
us Indicator
alternates between red
an
d blue blinking,
pairing has failed
and
the process
mu
st
be
repeated.
Power connection
Connect
to
powersource.
Power connection
Connect
to
po
w
er
source.
Wireless
setting
Move switch
to
"wireless"
setting on subwoofer.
Wireless
Range
~50'~
orlSMeters
OPTIONAL
Attach feet to subwoofer
for horizontal positioning
Feet must
be
-
attached
for
heat
diSSipation
clearance
~
#2 Phillips
(notsupplied)
e
Adjust
subwoofer
loudness
Your subwoofer's
LEVEL
switch
is
set
to
12
o'clock
to
suitaverage preferences.
If
desired, adjust
up
or
down
to
match sound level ofyourspeakers.
LEVEL
BASS
MIN
MAX

SHIFTSERIESTm
CE
Paradigm, Soundtrack and associated proprietary and patented designs and technologies are registered trademarks
of
Paradigm
Electronics Inc.
Copyright©
Paradigm Electronics Inc. All rights reserved. All
other
trademarks are the property
of
their
respective owner(s). Paradigm Electronics reserves the right
to
change specifications
and/or
features
without
notice
as
design improvements are incorporated.
Paradigm Electronics Inc.
205 Annagem Blvd., Mississauga,
ON
Canada
LST
2V1
REV.
100912
OF
SONIC
EXCELLENCE
For
more
information
visit www.paradigm.com/shift
•••

The Official
Sound
of
YOU™
System
Amplified Soundbar and Wireless Subwoofer
Owners Manual

--
RECYCLING
AND
REUSE
GUIDELINES
FOR
EUROPE
In accordance
with
the European Union
WEEE
(Waste Electrical and Electronic Equipment) directive effective August
13,
2005, we
would
like
to
notifyyou
that
this product
may contain regulated materials which, upon disposal, according
to
the
WEEE
directive, require special
reuse
and recycling processing.
For
this reason Paradigm Electronics Inc.
(manufacturers
of
Paradigm speakers and Anthem Electronics)
has
arranged
with
our distributors
in
European Union member nations
to
collect and recycle this product at
no cost
to
you.
To
find your local
distributor
please contact the dealer from
whom
you purchased this product or
go
to
our website at www.paradigm.com/shift.
Please
note
that
the product only falls under the
WEEE
directive. When disposing
of
packing and other shipping material we encourage you
to
recycle
through
the normal channels.
This device contains
FCC
ID:
XCO-SUBWOOFER
and
FCC
ID:
XCO-SOUNDBAR.
This device complies
with
Part
15
of
the
FCC
Rules.
Operation
is
subject
to
the
following
two
conditions:
(1)
This device may
not
cause harmful interference, and
(2)
This device must accept any interference received, including information
that
may cause undesired operation. Changes or
modifications
not
expressly approved by
the
party
responsible for compliance could void
the
user's
authority
to
operate the
equipment.
WIRELESS
TRANSMITTER
COMPLIANCE
INFORMATION
The term"IC"before the radio certification number only signifies that Industry Canada technical specifications were met.
This
equipment complies
with
FCC
and
IC
radiation exposure limits
set forth for
an
uncontrolled environment.This
equipment
should
be
installed and operated
with
minimum
distance 20cm between the radiator and your body. This transmitter must
not
be co-located or operating in conjunction
with
any other antenna or transmitter.
To
reduce potential radio interference
to
other
users,
the antenna type and its gain should
be
so
chosen
that
the equivalent isotropically radiated power (e.i.r.p.)
is
not
more than
that
permitted for successful communication.
III
DOLBY
DIGITAL
Manufacturedunderlicense from DolbyLaboratories.
Dolby
and
the double-D symbolare registered trademarks
of
DolbyLaboratories.

TABLE
OF
CONTENTS
Safety Precautions . . . . . . . . . . . . . . . . . . . . . . . . . . . . . . . Wall
Mounting.
. . . . . . . . . . . . . . . . . . . . . . . . . . . . . . . . . 5
Important
Safety Instructions
........................
2 Control
......................................
6
Remote Control . . . . . . . . . . . . . . . . . . . . . . . . . . . . . . . 6
Serial
Number.
. . . . . . . . . . . . . . . . . . . . . . . . . . . . . . . . . 3 Onboard Interface
.............................
6
IR
Learning Codes . . . . . . . . . . . . . . . . . . . . . . . . . . . . . 7
About
Paradigm. . . . . . . . . . . . . . . . . . . . . . . . . . . . . . . . . 3 Connection . . . . . . . . . . . . . . . . . . . . . . . . . . . . . . . . . . . . . 7
About
Your Soundtrack System . . . . . . . . . . . . . . . . . . . . . . . 3 Setting
up
the
Soundbar
...........................
7
Break-In
......................................
4 Setting
up
the
Subwoofer
..........................
7
Cleaning
.....................................
4 Wireless Subwoofer
Operation.
. . . . . . . . . . . . . . . . . . . . . . . 8
Placement . . . . . . . . . . . . . . . . . . . . . . . . . . . . . . . . . . . . 4
Soundbar: On a credenza
or
shelf
....................
4 Wired Subwoofer Operation . . . . . . . . . . . . . . . . . . . . . . . . . 8
Soundbar: On a wall
............................
4
Subwoofer: Positioned Vertically
....................
4 Technical Specifications . . . . . . . . . . . . . . . . . . . . . . . . . . . . 9
Subwoofer: Positioned Horizontally. . . . . . . . . . . . . . . . . . . 4 Limited Warranty
................................
10

SAFETY
PRECAUTIONS
READ
THIS
SECTION
CAREFULLY
BEFORE
PROCEEDING!
WARNING!
RISK
OF
ELECTRIC
SHOCK
DO
NOT
OPEN
WARNING:
TO
REDUCE
THE
RISK
OF
ELECTRIC
SHOCK,
DO
NOT
REMOVE
COVER
(OR
BACK).
NO
USER-SERVICEABLE
PARTS
INSIDE.
REFER
SERVICING
TO
QUALIFIED
SERVICE
PERSONNEL.
WARNING:
TO
REDUCE
THE
RISK
OF
FIRE
OR
ELECTRIC
SHOCK,
DO
NOT
EXPOSE
THIS
APPARATUS
TO
RAIN
OR
MOISTURE,
AND
OBJECTS
FILLED
WITH
LIQUIDS,
SUCH
AS
VASES,
SHOULD
NOT
BE
PLACED
ON
THIS
APPARATUS.
CAUTION:
TO
PREVENT
ELECTRIC
SHOCK,
MATCH
WIDE
BLADE
OF
PLUG
TO
WIDE
SLOT,
FULLY
INSERT.
The lightning flash
with
arrowhead symbol
within
an
equilateral triangle,
is
intended
to
alertthe user
to
the presence
of
uninsulated
"Dangerous voltage"
within
the product's
enclosure
that
may be
of
sufficient magnitude
to
constitute a risk
of
electric shock
to
persons.
The exclamation
point
within
an
equilateral
triangle
is
intended
to
alert
the
user
to
the
presence
of
important
operating and
maintenance (Servicing) instructions in
the
literature accompanying
the
product.
WARNING:
UNIT
MAY
BECOME
HOT.
ALWAYS
PROVIDE
ADEQUATE
VENTILATION
TO
ALLOW
FOR
COOLING.
DO
NOT
PLACE
NEAR
A
HEAT
SOURCE,
OR
IN
SPACES
THAT
CAN
RESTRICT
VENTILATION.
CAUTION:
FOR
CONTINUED
PROTECTION
AGAINST
RISK
OF
FIRE,
REPLACE
THE
FUSE
ONLY
WITH
THE
SAME
AMPERAGE
AND
VOLTAGE
TYPE.
REFER
REPLACEMENT
TO
QUALIFIED
SERVICE
PERSONNEL.

IMPORTANT SAFETY INSTRUCTIONS
1.
Read
these instructions.
2.
Keep
these instructions.
3.
Heed
all
warnings.
4.
Follow
all
instructions.
5.
Do
not
use
this apparatus near water.
6.
Clean
onlywith dryacloth.
7.
Do
not block any ventilation openings.Install
in
accordance with the
manufacturer's instructions.
8.
Do
not install near any heat
sources
such
as
radiators, heat registers,
stoves,
or otherapparatus (including amplifiers) that produce heat.
9.
Do
notdefeat the safety purpose
of
the polarized or grounding type
plug.Apolarized plug
has
two
blades with one widerthan the other.
Agrounding type plug
has
two
blades
and
athird grounding prong.
The
wide blade orthe third prong
are
provided for your
safety.
Ifthe
provided plug does notfit into your outlet,consult
an
electrician for
replacement
of
the obsolete outlet.
10.
Protect the powercord from being walked on or pinched,particularly
at plugs,convenience receptacles and the point where they exitfrom
the apparatus.
11.
Only
use
attachments/accessories specified by the manufacturer.
12.
•
Use
only with the cart, stand,tripod,bracket,ortable
specified by the manufactureror sold with the
•
~
apparatus.
When
acart
is
used,
use caution when
moving the cart/apparatus combination,to avoid
injuryfrom tip-over.
13.
Unplug this apparatus during lightning storms orwhen unused for
long periods
of
time.
2
14.
Refer
all
servicing to qualified service personnel.Servicing
is
required
when the apparatus
has
been
damaged in any
way,
such
as
power-
supply cord or plug
is
damaged, liquid
has
been spilled or objects
have
fallen intothe apparatus,the apparatus
has
been exposed
to
rain
or
moisture,does notoperate normally,or
has
been dropped.
15.
Use
the mains plug
to
disconnectthe apparatus from the mains
or
''TO
COMPLETELY
DISCONNECT
THIS
APPARATUS
FROM
THE
AC
MAINS,
DISCONNECT
THE
POWER
SUPPLY
CORD
PLUG
FROM
THE
AC
RECEPTACLE.
16.
"WARNING-
TO
REDUCE
THE
RISK
OF
FIRE
OR
ELECTRIC-
SHOCK,
DO
NOT
EXPOSE
THIS
APPARATUS
TO
RAIN
OR
MOISTURE"
17.
"DO
NOT
EXPOSE
THIS
EQUIPMENT
TO
DRIPPING
OR
SPLASHING
AND
ENSURE
THAT
NO
OBJECTS
FILLED
WITH
LIQUIDS,
SUCH
AS
VASES,
ARE
PLACED
ON
THE
EQUIPMENT."
18.
"THE
MAINS
PLUG
OF
THE
POWER
SUPPLY
CORD
SHALL
REMAIN
READILY
OPERABLE."

SERIAL
NUMBER
The product's serial number
is
located on the rear panel
of
both
soundbar
and
subwoofer.ln
the
event
that
you
need
to
contact
Paradigm
about
your
system, please have
the
following
information
recorded:
Serial Number:
___________________
_
Retail OutletorWebsite
where Product
was
Purchased:
______________
_
Retail Outlet Phone Number:
----------------
Purchase Date:
___________________
_
ABOUT
PARADIGM
In
the
early 1980s Paradigm was
just
an idea in
the
minds
of
a couple
of
twenty
somethings
who
loved music. Unlike today,there was no 225,000
square-foot
factory,
no
36,000-cu.-ft.
on-site
anechoic
measurement
chamber,justadesire
to
make really good sounding speakers and
sell
them
at a
down
to
earth price.Today
our
speakers are sold on six continents.
We've been voted
#1
speaker brand 22 times* and fans scour the
web
to
buy used versions
of
ouroriginal speakers.That should tell you something
about
Paradigm quality.
In
our
SHIFT™
Series,
we've taken everything we've
learned
about
sound and
adapted
it
for
today's
more
casual
listening
formats. For more info visit
us:
www.paradigm.com.
*Rated
#1
Best Price/Value. InsideTrack Dealer Survey.
An
annual
independent
nationwide
survey
of
consumer electronics specialist retailers and custom installers.
ABOUTYOURSOUNDTRACKSYSTEM
Your
Soundtrack
System
is
a
high-performance
design
loaded
with
Paradigm
technology.
In
other
words, it's
got
loads
of
very
cool
stuff
you
won't
find
in
any
other
sound
bar
subwoofer
system. For
those
who
salivate over technical details, we've also
included
aTech Specs
section in
the
back
of
the
manual
to
give
you
the
skinny
on
why
your
Soundtrack system sounds
so
good!
The difference the Soundtrack system will make
to
yourtelevision, music
and movies can't be
put
into
words,
but
you'll hear
it
and you'll feel it.
It's an experience
that
takes you beyond a high performance system
to
a
place
where
you're absolutely lost in
the
experience. It's
the
Paradigm
Difference.
We
guarantee
you
won't
be
able
to
keep
that
difference
asecret and we hopeyou don't.Spread the word.
Talk
aboutyour Paradigm
system.
BRAG
about it.
Play
itand let others listen.
We're all differentand oursound should reflect that.Some
of
us
like music,
others love movies, others are
gaming
enthusiasts and others
enjoy
all
of
it.
No
matter
who
you are
or
where
you live,
what
you like or
what
you do,
we
wantto be The Official Sound
of
YOU™.
Read
this manual and follow
all
instructions.Ifyou still have questions visit
the Q&A page on ourwebsite at www.paradigm.com/shift.
3

BREAK-IN
Although
your
system
will
sound great
'out
of
the
carton'
it
will
sound
even
better
when
broken in. Allow
it
to
operate for several hours before
you listen critically.
CLEANING
Do
not
use
strong orabrasive cleaners on your Soundtrack System.Gently
wipethe cabinets
with
adamp soft cloth.
PLACEMENT
Soundbar: On a credenza
or
shelf
(Fig.
1)
The Soundtrack soundbar
must
sit on a flat surface directly
below
your
video display. Supplied stability feet must be attached.
See
the enclosed
Setup Guide for
how
to
attach
the
feet.
Soundbar: On a wall (Fig. 1
a)
For more
information
refer
to
the
'Wall
Mounting'
section.
4
Subwoofer
The Soundtrack subwoofer can be positioned horizontally
or
vertically.
Vertical:
Ifusing
the
subwoofer in
the
vertical position,
it
must sit in the
supplied cradle
(Fig.
2).
Horizontal:
Ifusing the subwoofer in the horizontal position,the supplied
feet
must
be attached
to
allow
for adequate heat dissipation (Fig.
2a).
Refer
to
the
Startup Guide for
how
to
attach feet.
Fig.2 Fig.2a

WALL MOUNTING
Paradigm does
not
supplyscrews and anchor bolts
to
mount
your
soundbar
to
a wall.
Although
we
do
provide
limited instructionsforwall mounting,you must
contact a Paradigm Dealer
for
more
information.
The
subwoofer
is
not
designed
to
bewall mounted.
The instructions
that
follow
assume
the
mounting
.
•••
•
Ji\
'·
...
..
surface
is
standard wood
studs.
Should
you
wish to
.~
mount
to
another
type
of
surface you
must
consult
a certified contractor.
What's Included
2 x Wall-Mounting Brackets
1 xWall-MountingTemplate
Recommended Tools (notincluded)
1 x Stud Finder
1 x Level
1 x Electric drill and appropriate drill bits
1 x Phillips Screwdriver
Recommended Hardware (notincluded)
4 x Screws
to
suit
mounting
surface and
weight
of
sound
bar.
4 xWall anchors
to
suit
mounting
surface and weight
of
sound
bar.
(NOTE:
Soundbar
weighs
7.35/bI 3.34
kg)
Mounting Steps
Step 1
Establish desired
mounting
location.
Step2
Lightlytape the supplied InstallationTemplate
to
the
wall in the correct
position,using a level for accuracy.Mark
the
locations
of
the
two
screws
on
the
wall.
(Fig.
3)
Fig.
3
•
•
Fig.
4
•
TEMPLATE
•
Step3
Using a stud finder, determine
if
there
is
a wall stud directly behind
the
chosen location.
(Fig.
4)
5

Step4
a)
If
a wall stud
is
found, drill a
pilot
hole
into
the
stud at each mark,
then
move
to
Step
5.
OR
b)
If
no
stud
is
found, install wall anchors at each
mark
following
the
instructions
for
the
type
of
wall
anchor
you are using.CAUTION:
We strongly recommend contacting a professional contractor
forthis type ofinstallation. Every effort
has
been made
to
provide
accurate
and
error-free
installation
instructions.
Paradigm
Electronics Inc. disclaims liabilityfor difficulties
that
may
arise
from
the
misinterpretation
of
information contained in these
instructions.
StepS
Using
the
screws, attach
the
first wall bracket
to
the
wall. DO NOT completely
tighten
screws
(Fig.
5).
Step6
Repeat all steps
for
the
second bracket.
Use
a level
to
make sure
the
brackets are
completely straight before tightening screws.
IMPORTANT: Attach audio cables
BEFORE
mounting soundbar
to
wall brackets. See Set-Up Guidefor how
to
attach cables.
I
I
Step7
Move soundbar into place directly over brackets and gently push it
to
the
wall making direct contact
with
brackets.
You
will hear a
CLICK
as
each
6
bracket makes contact
with
the
sound
bar.
DO NOT release soundbar
from yourgrasp until you hear those
two
clicks.
CONTROL
Remote Control
The supplied remote requires one lithium battery
(included).
The remote
turns the poweron and off,switches between inputs and controls volume.
Press to
select
Input
Press
..
,
to turn
system
on &off
Press and hold
for
decreased
volume
Onboard Interface
@ e
Press
to turn
Press
to
system select
on and
off
Input
Press to
silence the
system.
Press again
to
restore
sound
Press and
hold
for
increased
volume
@
Press
to synch
soundbar and
subwoofer
Battery Installation
Follow
the
diagram on
the
back
of
the
Remote
for correct insertion.
+to+
and
-to-.
IMPORTANT:
Ifyou lose
the
remote
contact
P~radigm
at
1-905-696-2868
to
purchase a
new
one.
Loss
of
remote
is
not
covered under
Paradigm warranty.
(-
+)
Press
and
Press
and
release to release to
decrease increase
volume volume

IR
Learning Codes
Your SoundtrackSystem
is
capable
of
learning certain codes from remote
controls you already own,such
as
the volume code from your
TV's
remote.
Each
code
must
be
programmed
in separately.
To
program,
follow
the
steps below.
Step 1
Press
and
hold
for
3 seconds
the
button
on
the
sound
bar's On
board
Interface for
the
desired function
to
be programmed
(eg.
volume,source,
mute,
on/off).
Step2
The Soundtrack's
LED
will start
to
flash indicating
that
the system
is
now
in
'IR
learning'mode.
Step3
Aim
the
source's remote control at the
front
of
the
soundbar and press
the
corresponding
function
button
on the source's remote.
Step4
Repeat
from
Step 1
to
program each additional
function.
NOTE:
To
learn a
MUTE
command from a remote control you already
own, press
the
Sync
button
on
top
of
the
soundbar for 3 seconds then
move
to
Step 2 above.
Your existing cable/satellite box remote control
or
TV
remote control
may use a code
that
the
Soundtrack System cannot learn.
In
these
instances you will have
to
use
the
remote control
that
came
with
your
system
or
use a universal
or
learning remote control.
CONNECTION
For
quick
setup
of
soundbar and subwoofer, refer
to
the
instructions
in
the
Set-Up Guide.
SETTING UP THE SOUNDBAR
See
Set-Up Guide.
SETTING UP THE SUBWOOFER
Paradigm
o
so\1\dtr.Ack
o
0 ;
SU81N
~
SHIFTSERIES
-
0
System
0
Wl~~~r
I
h
STATUSU
~e
MIN
MAX
,oc
•OOI?O'tf110.2-60'11 ·
!6Witll
l
f$MUI
-1Sw
-;
--
qyQ ,
o·
o
lltiSI.Ilw:tC~SWlliiP'Mli~Cit!l*t.a:"'..USI'lf'loRAIIC*IS!MIIUECIIUIHlHlU.liWINGt'WO
C~.II
I
IMISllf\IIQIIIIIAfM:IfCAIISt~W\I."""""""-NIDf2'1THISDI\IICllla.IST...a;u'l
MnlNTEI'If£11UIC!Fif
CFIYfD
llfCl
\IOIJoiC
INTUir£!1UI
CFT
HAIMAYCAUSEllfiD£SIIIFDOI"f11AliOM
t:~MGUOIIII'OOIHCATIOM!.NOIIl
i'II
I
SSI
'...,.,...O\'lDIYIHII'A~IYI'IISI"'f'ooSIIIIHJIIr:OMP\IANCI
GOU..DVOIOiltFIJSI-
II"SMJTll!lfllltliOUftiiAIII
..
f~
(Shown) Back
panel
of
Subwoofer.
See
pg. 8
for
description
of
numbered
functions.
7

0
0
Status
LED.
Indicates connection status between the subwoofer
and soundbar
(e.g.
Not
Paired, Searching for Connection,Paired).
For additional information refer
to
the
Set-Up Guide.
Line-Levellnput (for use in a wired subwoofer connection only)
Allows connection
from
the
wired Sub
Out
of
the
soundbar
or
Sub/
LFE
Out
of
an
external
AN
receiver, processor
or
othersuitable low-
level source. IMPORTANT: Do
not
connect acable
to
the
Line-Level
Input
if
you have already set-up a wireless subwooferconnection.
Pair.This feature initiates wireless pairing between the subwoofer
and
the
soundbar's transmitter inside
the
sound
bar.
Subwoofer Level. Balances
the
subwoofer's
output
level
to
that
of
the sound
bar.
See
Set-Up Guide for more information.
WIRELESS
OPERATION
Transmitter Range
In a typical listening room
the
built-in
wireless transmitter in
your
soundbar
has
a
maximum
range
of
50'(15m).Obstructions such
as
walls, large pieces
of
furniture, room dividers,etc., may reduce
that
range. Do
not
place
the
soundbar and subwooferfarther apart
than
the
recommended range.
The soundbar's wireless transmitterfeatures a
2.4
GHz
uncompressed
digital self-sensing design
that
will automaticallyadjustfor
the
best
wireless connection while
monitoring
the
integrity
of
the
data stream.
See Set-Up Guidefor synching instructions.
8
WIRED
OPERATION
Subwoofer
Back
Panel
Sound
bar
Back
Panel
Use
the
Line-LevellnputFrom
Sub/LFE
Out
on
sound
bar.
Using
an
RCA-to-RCA
interconnect
cable
connect
the
subwoofer
as
shown.

TECHNICAL SPECIFICATIONS
Soundbar
Design
Crossover
High-Frequency
Driver
(per channel)
Bass
I
Midrange
Driver (per channel)
Passive Radiator (per channel)
Low-Frequency Extension*
Frequency Response
On-Axis
30° Off-Axis
Total System Frequency Response
Sensitivity-
Room
I
Anechoic
Total Amplifier Power
Inputs
H
x
W
x
D (including feet)
Weight
(unpacked)
Finish
Accessories (included)
2 isolated, identical channels
for
Left and Right. Left Channel: 2-driver, 2-way plus
single passive radiator. Right Channel: 2-driver, 2-way plus single passive radiator.
Molded
ABS
enclosure
with
matte
finish.
3rd-order electro-acoustic at 2.4 kHz.
1x 25-mm
(1
in)
5-PAL™
satin-anodized pure-aluminum
dome
tweeter.
1x 1
02-mm (4") composite cone, 37-mm
(1-1
12")
voice coil.
1x 1
02-mm (4") composite.
90Hz
(DIN)
±2
dB
140Hz-20kHz
±2
dB
140Hz-20kHz
40Hz-20kHz
88dBI85dB
2 x 50 Watts
Optical digital;
RCA
to
RCA
5-5/16 in x 36-3/8 in x 2-15/16 in
I
13.5
em
x 92.3
em
x
7.3
em
7.35
lb
I 3.34
kg
Black
Stability feet and screws
9

TECHNICAL SPECIFICATIONS
(cont'd
.. .)
Subwoofer
Subwoofer Design
Amplifier Design: High-current, Discrete Output
Amplifier Features
Bass
Driver
Low-Frequency Extension*
Subwoofer Cut-Off Frequency
H
x
W
x
D
(cradle
adds
314
in
I
1.90
em
to
height)**
Weight (unpacked, standadds
0.70
lb
I .32kg)
Finish
Single driver, bass-reflex design,dual
low-turbulence
tuned
ports,
built-in
amplifier.
Molded
ABS
enclosure
with
matte
finish
Ultra-Ciass-0™ amplifier: 120 watts
RMS
Sustained
I
240 watts
Peak
Power
Auto-On
I
Standby, soft
clipping
21
0-mm
(8
in) reinforced polymer-composite cone,
38-mm
(1-1
12
in) voice-coil
33Hz
(DIN)
150Hz
fixed
14-3/16 in x 18-5116 in x 6-5116 in
I
36.0 em x 46.4 em x 16.0 em
11
.2
I
b
I
5.08 kg
Black
*DIN 45 500./ndicates
-3
dB
in a typicallistening room. **Feet
add
1in
I
2.5 em to
height
in
horizontal
position.
LIMITED
WARRANTY
Paradigm warrants this
product
against defects in materials and workmanship under normal
use
and operation for a period
of
one
(1)
year from
the
date
of
retail purchase
by
the original end-user purchaser.
For
warranty purposes you must retain your
sales
receipt and this Owners Manual for warranty
to
be
valid.
For
additional product support, call Paradigm at
905-696-2868
or email [email protected].
10

SHIFTSERIES
TM
CE
Paradigm, Soundtrack™ System and all associated
proprietary
and
patented
designs and technologies are
registered trademarks
of
Paradigm Electronics Inc.
Copyright©
Paradigm Electronics Inc. All rights reserved.
All
other
trademarks are
the
property
of
their
respective owner(s). Paradigm Electronics reserves
the
right
to
change specifications
and/or
features
without
notice
as
design
improvements
are incorporated.
Paradigm,Systeme SoundtrackMc
et
les conceptions
et
technologies connexes exclusives
et
brevetees sont
des marques de
commerce
deposees
de
Paradigm Electronics Inc. Oroits
d'auteur
©Paradigm
Electronics Inc.
To
us
droits reserves.Toutes
les
aut
res
marques
de
commerce sont
Ia
propriete
de
leurs proprietaires respectifs.
Paradigm Electronics
se
reserve le
droit
de
modifier
les specifications
ou
les caracteristiques sans preavis, au
fur
eta
mesure
que
des ameliorations
sont
incluses.
Paradigm, Sistema Soundtrack™ y
sus
diserios y tecnologfas propietarias y patentadas asociadas
son
marcas
registradas de Paradigm Electronics Inc.
Copyright©
Paradigm Electronics Inc.Todos los derechos reservados.
Todas
las
demas marcas comerciales son de propiedad de
sus
respectivos titulares. Paradigm Electronics
se
reserva
el
derecho de modificar
las
especificaciones y/o caracterfsticas
sin
aviso cuando
se
incorporan mejoras del diserio.
Paradigm Electronics Inc.
205
Annagem
Blvd., Mississauga, ON Canada
LST
2V1
REV.
101912
HD
HIGH-DEFINITION SOUND
Of
SONIC
lXCf:LUNCf
For
more
information
visit www.paradigm.com
I]
••
tl
Other manuals for Soundtrack
1
Table of contents
Other Paradigm Speakers System manuals

Paradigm
Paradigm SOUNDPLAY User manual

Paradigm
Paradigm Millenia One CT User manual

Paradigm
Paradigm Millenia Lp User manual

Paradigm
Paradigm DECOR 1S User manual

Paradigm
Paradigm Millenia One CT User manual

Paradigm
Paradigm MilleniaOne User manual

Paradigm
Paradigm OM-110 User manual

Paradigm
Paradigm Cinema User manual

Paradigm
Paradigm Cinema 100 CT User manual

Paradigm
Paradigm Active User manual