Parkmate MCPK-43BG User manual

MCPK-43BG User Manual
Universal Clip On 4.3” Rear View Mirror
Monitor & Camera Pack with Grid-lines

2
Thank you for purchasing Parkmate’s MCPK-43BG 4.3” Rear View Mirror Monitor & Camera
Pack with Grid-lines. This state of the art Parkmate product is packed with features including a
monitor embedded into the rear view mirror that automatically displays images from the rear-view
camera upon selecting reverse gear.
This product uses the most advanced technology and components to provide you with a long
service life and integrates perfectly with the factory look of your vehicle to add a high level of
safety and security to your driving experience.
Please note: Although this product will allow you to view driving blind spots, it does not remove
the responsibility of driving the vehicle from the driver. The legal responsibility and safe driving
practice remains with the driver at all times.
You have purchased this Parkmate product with the understanding that its use is as an aid only.
We highly recommend that you have this product professionally installed to ensure that it will
provide the functions it is set out to perform.
MCPK-43BG Component List
Warning:
• To prevent electrical shock, DO NOT OPEN MONITOR CASE.
• Avoid exposing monitor to water, rain, moisture etc.
• Do not disassemble the monitor or camera. This voids the warranty. Disassembling the camera
will compromise the waterproof seal.
• Do not remove the Directed warranty sticker as this voids warranty.
camera 3M tape
screws camera harness 6m video cablebumper adaptor
monitor harness
4.3” clip-on mirror monitor
hole saw

3
Parkmate’s MCPK-43BG is a reverse camera and mirror monitor system for small to medium
vehicles. The system utilises a clip on interior rear view mirror to display the camera view on an
embedded 4.3" LCD monitor when the vehicle shifts into reverse gear. The monitor allows the
driver to see blind spots behind the vehicle for increased convenience and safety. The camera
has an advanced lens sensor which is able to provide excellent images under dark and light
conditions. The camera has a 170° diagonal field of vision giving a superb viewing angle behind
the vehicle.
How to Operate your Mirror Monitor
1 Button V: V1/V2 Switch
2 Button : Adjustment -
3 Button M: Menu
4 Button : Adjustment +
5 Button : Power ON/OFF
How to Set your monitor:
When the mirror monitor is on, the on-screen menu commands may be selected by pressing the
MENU button. The menu displays on screen and allows you to adjust Brightness, Contrast, Colour,
Sharpness and Reset to Factory Settings:
Rear View Mirror Monitor Features & Benefits:
• Clip on mirror universally attaches to all pre existing rear view mirrors
• Easy DIY installation
• Rear camera image automatically displays when reverse gear is selected
• Integrated screen means no messy wires or devices on your dashboard or windscreen
• Selectable dual camera input - V1 / V2
IMPORTANT: The rear view Mirror/Monitor is not intended to be used for prolonged periods
of time. Therefore the monitor stays OFF until the reverse gear is engaged.
Camera Features & Benefits:
• Superb night vision
• 170° Diagonal field of vision
• Convert to bumper mount using the provided bumper adaptor
• Switchable to front view / mirror image by cutting the thin WHITE wire on the camera lead
• Grid-line removal by cutting the thin GREEN wire on the camera lead
1 2 3 4 5

4
Wiring Diagram:
Rear View Mirror Monitor Installation
Front view option: MCPK-43BG functions as a rear view camera standard
and also supports front view. For front view, cut the thin WHITE wire near the
camera lead. Power on and the image will be reversed.
Grid-line option: MCPK-43BG has parking grid-lines as a default. To remove
grid-lines, cut the thin GREEN wire near the camera lead. Power on and the
grid-lines will now be removed.
Clip over factory mirror
Pull down
1. Expand the mirror
monitor clamps and
place over existing
rear view mirror.
Adjust the mirror to
the best position.
2. Run the cable along
and behind the roof
lining where possible
and connect to
camera harness as
per wiring diagram.

5
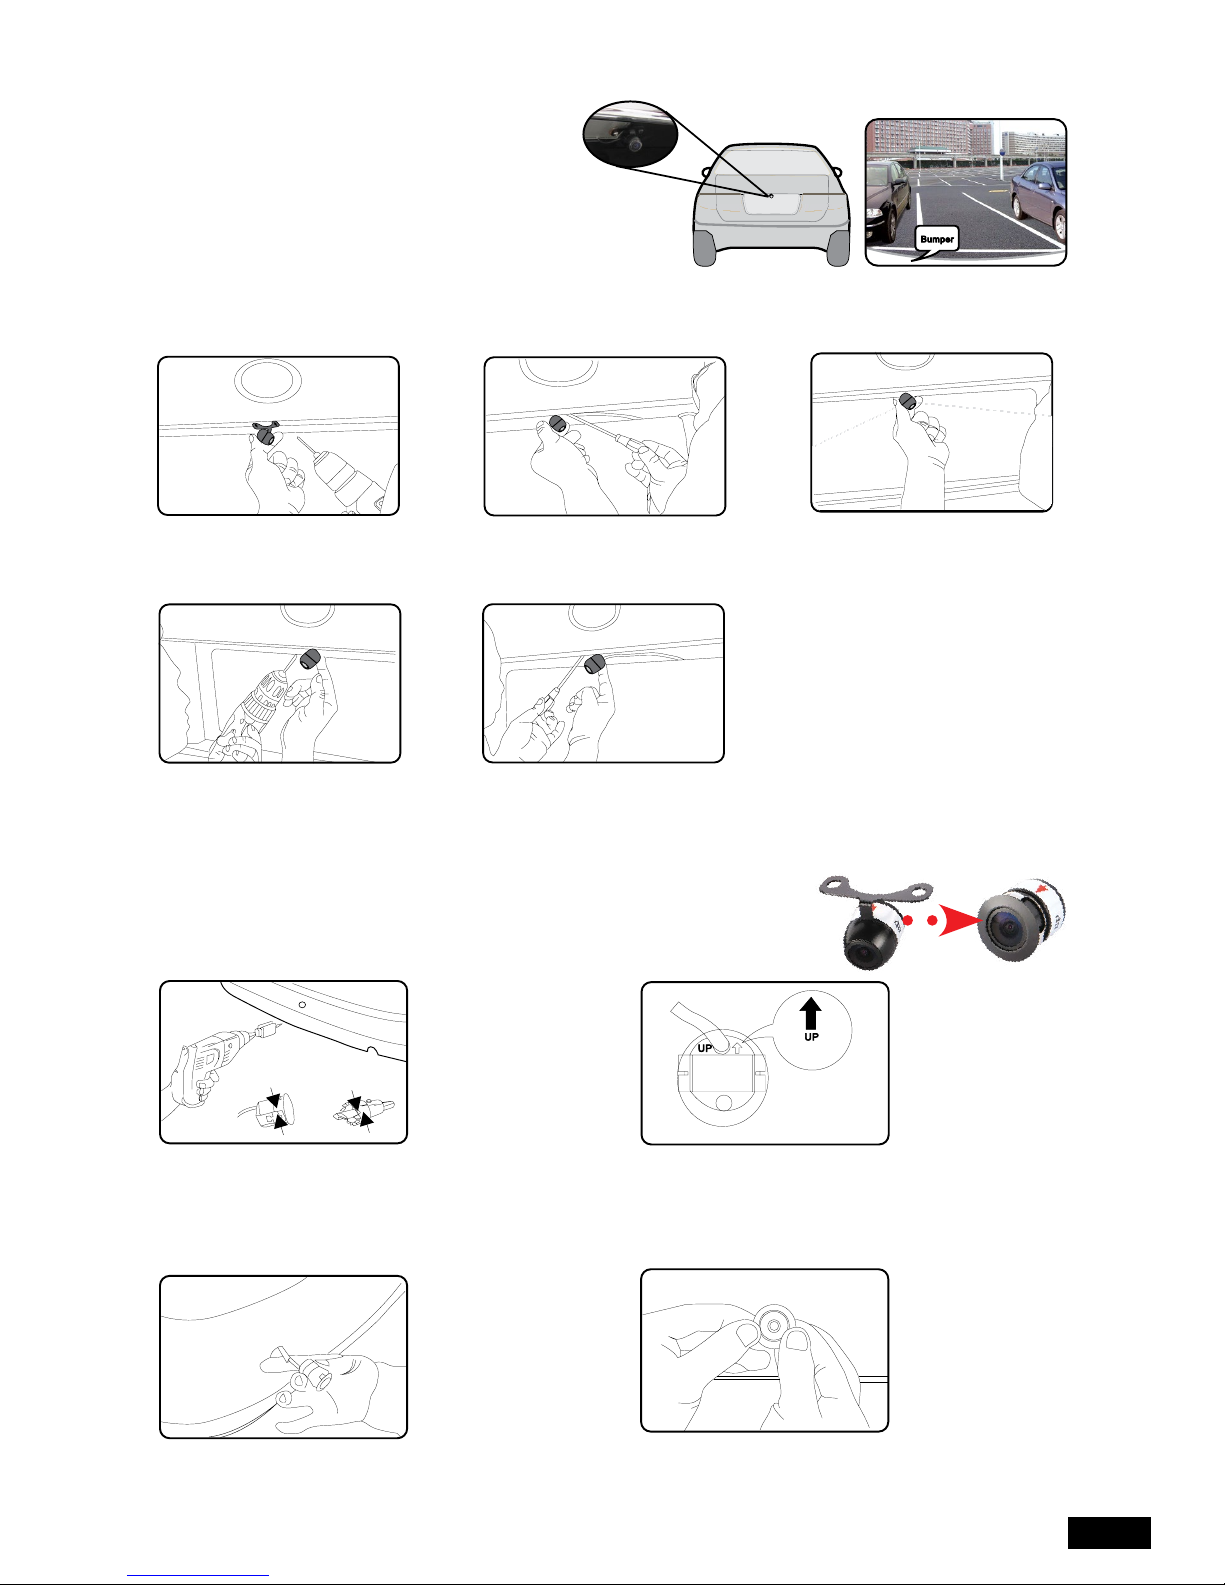
2. Attach tape to the bracket of
the camera, and drill a small
hole for the first screw.
3. Use a screw driver to fix the
first screw, but don’t tighten
it yet.
4. Insert camera wire through
newly drilled hole and mount
securely in place.
Suggested location
to mount camera
5. Mark the position suitable for
the second screw and drill a
small hole for it.
6. Fix the second screw and
tighten both screws.
Camera Installation - Butterfly
Mount
1. Select a flat and centred location near
the number plate lamp at the rear of the
vehicle to mount camera.
IMPORTANT: When selecting this location it is highly recommended that the image transmitted by
the camera show the rear bumper and area behind the vehicle.
Camera Installation - Flush Mount
1. Unscrew the upper part of the camera anticlockwise, detach the
upper part and bracket, and place the bumper adaptor instead.
2. On the bumper, mark the middle position
(both horizontally and vertically) where the
camera is going, and drill a hole with the
provided 16.5mm hole saw.
3. Ensure the "UP" arrow is positioned upwards.
As pictured.
4. Feed the camera lead through the
bumper hole before fixing the camera to
the bumper.
5. To ensure tight and flat mounting, put the
camera into the hole and using both thumbs,
press evenly.

6
Problem Solution
No power to monitor while reversing. Check power and reverse trigger connections.
"No Signal" appears while reversing. 1. Press AV1/AV2 button to change video inputs.
2. Check video input connections.
3. Check camera power connections.
Video image is not sharp. Check camera lens for debris.
Testing
How to test:
1. Apply the parking brakes (safety precaution).
2. Turn Ignition to Accessory Position. (DO NOT START ENGINE)
3. Shift into reverse gear.
4. Image should appear on the monitor.
Trouble Shooting:
Maintenance:
Always keep camera clear from dirt and mud. Clean camera with a soft moist cloth.

7
Product Specification(s):
Monitor Technical Specifications
Screen 4.3” TFT Colour LCD
Brightness 350cd/m2
Contrast Ratio 300:1
Resolution 480 x 272
Current Draw: Max 120mA
Video Format NTSC/PAL
Display Format 16:9
Nominal Voltage DC12V
Working Temp. -20°C to 70°C
Camera Technical Specifications
Signal System NTSC
Sync System Internal
Horizontal Resolution 550 TVL
Minimum illumination 0.2 Lux
Diagonal Angle 170°
Waterproof Grade IP67
Nominal Voltage DC12V
Working Temp. -20° to 65°
Mirror image switchable to flip view
Grid-line switching

www.directed.com.au
www.parkmate.com.au
© Parkmate 2014
Australian Residents - Warranty Terms & Conditions:
Our goods come with guarantees that cannot be excluded under the Australian Consumer Law.
You are entitled to a replacement or refund for a major failure and for compensation for any other
reasonably foreseeable loss or damage. You are also entitled to have the goods repaired or replaced
if the goods fail to be of acceptable quality and the failure does not amount to a major failure.
This warranty is provided in addition to your rights under the Australian Consumer Law.
Directed Electronics warrants that this product is free from defects in material and workmanship for
a period of 12 months from the date of purchase or for the period stated on the packaging. This
warranty is only valid where you have used the product in accordance with any recommendations or
instructions provided by Directed Electronics.
This warranty excludes defects resulting from alterations of the product, accident, misuse, abuse or
neglect.
In order to claim the warranty, you must return the product to the retailer from which it was purchased
or if that retailer is part of a National network, a store within that chain, along with satisfactory proof
of purchase. The retailer will then return the goods to Directed Electronics. Directed Electronics will
repair, replace or refurbish the product at its discretion. The retailer will contact you when the product
is ready for collection. All costs involved in claiming this warranty, including the cost of the retailer
sending the product to Directed Electronics, will be borne by you.
Directed Electronics Address: 44 Translink Drive, Keilor Park Victoria Australia 3042
Ph: +61 03 8331 4800
Email: [email protected]
To view the complete Parkmate range or for details on how to contact us, please visit our website at
www.parkmate.com.au
Table of contents
Other Parkmate Automobile Accessories manuals
Popular Automobile Accessories manuals by other brands

Thule
Thule 1599 instructions

Intermec
Intermec CV60 user manual

SpeedTech Lights
SpeedTech Lights K-FORCE 75 instruction manual

Kuda-Phonebase
Kuda-Phonebase 2670 Installation instruction

FALCON RIDGE
FALCON RIDGE AC-PRO-WD05 Instructions for Installation and Care

Diamondback
Diamondback 180 installation guide