PDi medTAB14 User manual

mymedTV.com
USER MANUAL
Document Number: PD196-413R2
Arm-Mounted, Healthcare-grade
Interactive LED HDTV with Android™ OS

MODEL:
medTAB19 /medTAB16 /medTAB14
Document Number:
PD196-413R2
User Manual
Page 2 of 16
PDi Communication Systems, Inc. ▪40 Greenwood Ln ▪ Springboro, Ohio 45066 USA ▪www.pdiarm.com and www.mymedTV.com ▪Phone 800.628.9870
Table of Contents
IMPORTANT SAFETY INSTRUCTIONS................................................................................................................................................................................................................................ 5
INSTALLING THE TELEVISION .............................................................................................................................................................................................................................................. 6
Installation Precautions....................................................................................................................................................................................................................................................... 6
Coax Cable Specifications.................................................................................................................................................................................................................................................... 6
Arm Mounting........................................................................................................................................................................................................................................................................... 6
INTRODUCTION............................................................................................................................................................................................................................................................................. 6
HOME SCREEN SETUP................................................................................................................................................................................................................................................................ 6
OTHER MENUS............................................................................................................................................................................................................................................................................... 7
ANDROID SETTINGS MENU ACCESS................................................................................................................................................................................................................................... 7
ANDROID SETTINGS ................................................................................................................................................................................................................................................................... 7
Android Device Settings....................................................................................................................................................................................................................................................... 8
Settings - Preferences............................................................................................................................................................................................................................................................ 9
TELEVISION SETTINGS.............................................................................................................................................................................................................................................................. 9
CHANNEL SETUP...................................................................................................................................................................................................................................................................10
Auto Program....................................................................................................................................................................................................................................................10
Customize Channel List................................................................................................................................................................................................................................10
Parental Controls............................................................................................................................................................................................................................................11
ADVANCED OPTIONS –PICTURE..................................................................................................................................................................................................................................12
Back Light...........................................................................................................................................................................................................................................................12
Picture Mode.....................................................................................................................................................................................................................................................12
Color Temperature.........................................................................................................................................................................................................................................12
Image Noise Reduction ................................................................................................................................................................................................................................12
Mpeg Noise Reduction..................................................................................................................................................................................................................................12
ADVANCED OPTIONS –SOUND......................................................................................................................................................................................................................................12
Internal Speaker..............................................................................................................................................................................................................................................12
Minimum Volume ...........................................................................................................................................................................................................................................12
Maximum Volume...........................................................................................................................................................................................................................................12
Power on Volume............................................................................................................................................................................................................................................12
Sound Mode.......................................................................................................................................................................................................................................................13
Equalizer .............................................................................................................................................................................................................................................................13
Balance.................................................................................................................................................................................................................................................................13
AVC, Surround, and SRS...............................................................................................................................................................................................................................13
ADVANCED OPTIONS –CHANNELS.............................................................................................................................................................................................................................13
Service Level .....................................................................................................................................................................................................................................................13
Configure Channels........................................................................................................................................................................................................................................13
Clear Service Level.........................................................................................................................................................................................................................................13
Copy Service Level..........................................................................................................................................................................................................................................13
Power on Channel...........................................................................................................................................................................................................................................13

MODEL:
medTAB19 /medTAB16 /medTAB14
Document Number:
PD196-413R2
User Manual
Page 3 of 16
PDi Communication Systems, Inc. ▪40 Greenwood Ln ▪ Springboro, Ohio 45066 USA ▪www.pdiarm.com and www.mymedTV.com ▪Phone 800.628.9870
Channel Lock.....................................................................................................................................................................................................................................................13
Channel Override/Auto Update...............................................................................................................................................................................................................13
Signal Information..........................................................................................................................................................................................................................................14
ADVANCED OPTIONS –LANGUAGE.............................................................................................................................................................................................................................14
ADVANCED OPTIONS –TIME..........................................................................................................................................................................................................................................14
Time Source.......................................................................................................................................................................................................................................................14
Date and Current Time.................................................................................................................................................................................................................................14
Off Time...............................................................................................................................................................................................................................................................14
Scheduled Time ...............................................................................................................................................................................................................................................14
Sleep Time..........................................................................................................................................................................................................................................................14
ADVANCE OPTIONS –FEATURES .................................................................................................................................................................................................................................14
Auto Power On/Lock.....................................................................................................................................................................................................................................15
Bed A/B/C/D.....................................................................................................................................................................................................................................................15
Closed Caption..................................................................................................................................................................................................................................................15
Channel to Other Sources............................................................................................................................................................................................................................15
Power On ARC MODE....................................................................................................................................................................................................................................15
ADVANCE OPTIONS –SYSTEM.......................................................................................................................................................................................................................................15
Diagnostics.........................................................................................................................................................................................................................................................15
Reset to Factory Defaults............................................................................................................................................................................................................................15
USB Cloning .......................................................................................................................................................................................................................................................15
Limited Warranty .......................................................................................................................................................................................................................................................................16

MODEL:
medTAB19 /medTAB16 /medTAB14
Document Number:
PD196-413R2
User Manual
Page 4 of 16
PDi Communication Systems, Inc. ▪40 Greenwood Ln ▪ Springboro, Ohio 45066 USA ▪www.pdiarm.com and www.mymedTV.com ▪Phone 800.628.9870
Overhead Falling Hazard
WARNING: To prevent injury, this apparatus must be
securely attached to the floor/wall in accordance with the
installation instructions.
TV can pose a striking hazard when mounted at an
elevated position. Use only PDi mounting brackets,
support arms, and appropriate hardware to assure TV
will not fall from the mounted position
Rain and Moisture
WARNING: To avoid the hazards of fire or electrical shock,
DO NOT expose this television to rain or moisture.
Oxygen Environment
WARNING: Do not use in any oxygen tent or oxygen
chamber. Such use may cause a fire hazard.
Note to Cable TV Installer
This reminder is provided to call the cable TV system installer’s
attention to Article 820-40 of the National Electrical Code. The code
provides guidelines for proper grounding and in particular specifies
that the
cable
ground
shall be
connected
to the
grounding
system of
the
building, as
close to the
point of
the cable entry as practical. Canadian installations shall be properly
grounded in accordance with the Canadian Electrical Code, Part 1.
FCC
This equipment has been tested and found to comply with the limits
for a Class A digital device, pursuant to part 15 of the FCC Rules. These
limits are designed to provide reasonable protection against harmful
interference when the equipment is operated in a commercial
environment. This equipment generates, uses, and can radiate radio
frequency energy and, if not installed and used in accordance with the
instruction manual, may cause harmful interference to radio
communications. Operation of this equipment in a residential area is
likely to cause harmful interference in which case the user will be
required to correct the interference at his own expense.
Maintenance and Servicing
The TV does not require periodic maintenance other than cleaning.
Never remove the back cover of the TV; this can expose you to high
voltage and other hazards. If the TV does not operate properly, unplug
it and call an authorized service center or PDi.
Cleaning and Disinfection
Clean the exterior of this television by removing dust with a lint-free
cloth. Spot test a new disinfectant by test cleaning a non-obvious small
spot on the TV’s back cabinet, keypad, and LCD panel. PDi recommends
using a premoistened disinfectant cloth, like PD600-001 Super Sani-
Cloth or similar, or spraying cleaner onto a dry cloth and then wiping
the unit. Specific recommendations can be found at www.pdiarm.com.
CAUTION: To avoid damage to the surface of the television, do not use
abrasive or chemical cleaning agents.
Product Modification
Do not attempt to modify this product in any way without written
authorization. Unauthorized modification could void the user’s
authority to operate this product.
Copyright, Trademarks
© 2020 PDi Communication Systems, Inc. All rights reserved. PDi®, medTV®
and medTAB®are registered trademarks of PDi Communication Systems,
Inc. Manufactured under license from Dolby Laboratories. Dolby, Dolby Audio,
and the double-D symbol are trademarks of Dolby Laboratories. The terms
HDMI, HDMI High-Definition Multimedia Interface, and the HDMI Logo are
trademarks or registered trademarks of HDMI Licensing Administrator, Inc.
Product logos, brands and other trademarks displayed within PDi’s products
are the property of their respective trademark holders, who are not affiliated
with, endorsing, or sponsoring PDi Communication Systems, Inc. or our
products.
Underwriters Laboratories
This model Hospital Grade LCD HDTV is a specialized TV and should be installed
to National Electrical Code specifications. This device is safety
tested and listed by the Underwriters Laboratories as a
product suitable for use in healthcare facilities in both the
United States and Canada.
Disclaimer
The author and publisher have used their best efforts in preparing this
manual. PDi Communication Systems, Inc. makes no representation or
warranties with respect to the accuracy or completeness of the contents of
this manual and specifically disclaims any implied warranties or
merchantability or fitness for any purpose and shall in no event be liable for
any loss of profit or any other damages. The information contained herein is
believed accurate, but is not warranted, and is subject to change
without notice or obligation.

MODEL:
medTAB19 /medTAB16 /medTAB14
Document Number:
PD196-413R2
User Manual
Page 5 of 16
PDi Communication Systems, Inc. ▪40 Greenwood Ln ▪ Springboro, Ohio 45066 USA ▪www.pdiarm.com and www.mymedTV.com ▪Phone 800.628.9870
IMPORTANT SAFETY INSTRUCTIONS
CAUTION: THIS INSTALLATION SHOULD BE MADE BY A
QUALIFIED SERVICE PERSON AND SHOULD CONFORM TO ALL
LOCAL CODES. READ AND FOLLOW THE SAFETY INSTRUCTIONS
BEFORE ATTEMPTING THIS INSTALLATION.
1. Read Instructions –All the safety and operating instructions
should be read before the product is operated.
2. Keep these Instructions –The safety and operating instructions
should be retained for future reference.
3. Heed all Warnings –All warnings on the product and in the
operating instructions should be adhered to.
4. Follow all Instructions –All warnings on the product and in the
operating instructions should be followed.
5. Water and Moisture –Do not expose this product to rain or
moisture. Do not use this product near water –for example, near
a bath tub, wash bowl, kitchen sink, or laundry tub; in a wet
basement; near a swimming pool; and the like.
6. Cleaning –Please see specific recommendations under “Cleaning
and Disinfection” on previous page.
7. Ventilation –Slots and openings in the cabinet are provided for
ventilation to ensure reliable operation of the product and to
protect it from overheating. These openings must not be blocked
or covered. The openings should never be blocked by placing the
product on a bed, sofa, rug, or other similar surface. This product
should not be placed in a built-in installation such as a bookcase
or rack unless proper ventilation is provided, or the
manufacturer’s instructions have been adhered to.
8. Heat –The product should be situated away from heat sources
such as radiators, heat registers, stoves, or other products
(including amplifiers) that produce heat.
9. Power-Cord Protection –Protect the power cord from being
walked on or pinched, particularly at plugs, convenience
receptacles, and the point where they exit from the product.
10. Attachments –Only use attachments/accessories specified by the
manufacturer.
11. Use only with cart, stand, tripod, bracket, or table
specified by the manufacturer, or sold with the
apparatus. When a cart is used, use caution when
moving the cart/apparatus combination to avoid
injury from tip-over.
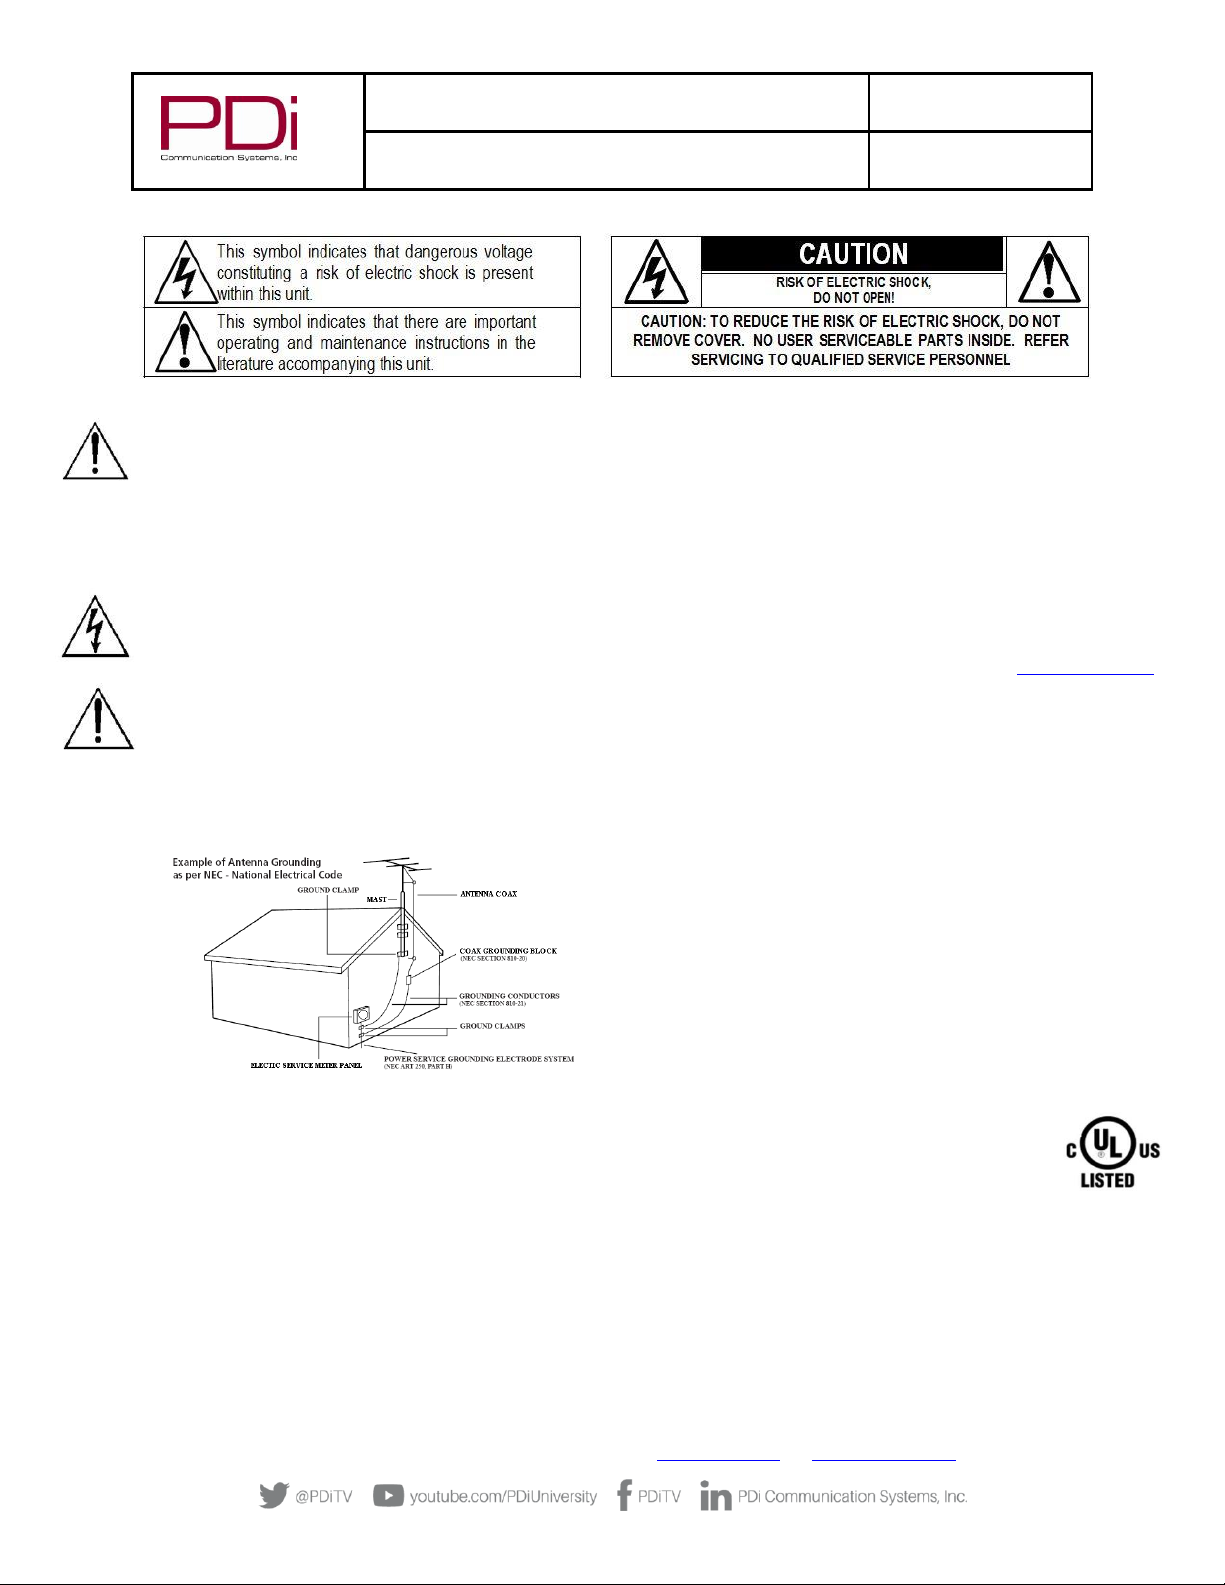
12. Lightning –For added protection for this product during a
lightning storm, or when it is left unattended and unused for long
periods of time, unplug it from the wall outlet and disconnect the
antenna or cable system. This will prevent damage to the product
due to lightning and power-line surges.
13. Servicing –Refer all servicing to qualified service personnel.
Servicing is required when the apparatus has been damaged in
any way, such as power cord or plug is damaged, liquid has been
spilled or objects have fallen into the apparatus, the apparatus
has been exposed to rain or moisture, does not operate normally,
or has been dropped.
14. Oxygen Environment –Do not use in an oxygen tent or oxygen
chamber. Such use may cause a fire hazard.
15. To prevent injury, this apparatus must be securely attached to the
wall in accordance with the installation instructions. TV’s can
pose a striking hazard when mounted at an elevated level.
16. Power Sources –This product should be operated only from the
type of power source indicated on the marking label. If you are
not sure of the type of power supply to your home, consult your
product dealer or local power company. For products intended to
operate from battery power, or other sources, refer to the
operating instructions.
CONSIGNES DE SÉCURITÉ IMPORTANTES
CETTE INSTALLATION DOIT ÊTRE EFFECTUÉE PAR UN
TECHNICIEN QUALIFIÉ ET DOIT ÊTRE CONFORME À TOUS LES
CODES LOCAUX. LIRE ET SUIVRE LES CONSIGNES DE SÉCURITÉ
AVANT DE PROCÉDER À L’INSTALLATION.
1. Lire ces instructions.
2. Conserver ces instructions.
3. Respecter tous les avertissements.
4. Suivre toutes les instructions.
5. Ne pas utiliser cet appareil près de l'eau - par exemple près
d'une baignoire, d'un lavabo, dans un sous-sol humide, ou près
d'une piscine ou similaire.
6. Veuillez voir les recommandations sous “Nettoyage et
Désinfection” à la Page précédente.
7. Ne pas obstruer les ouvertures de ventilation. Installer
conformément aux instructions du fabricant. Les ouvertures ne
doivent jamais être obstruées en plaçant le produit sur un lit, un
canapé, un tapis ou toute autre surface similaire.
8. NE PAS installer près de sources de chaleur telles que
radiateurs, registres de chaleur, poêles ou tout autre appareil (y
compris les amplificateurs) qui produit de la chaleur.
9. NE PAS neutraliser le dispositif de sécurité de la fiche polarisée
ou de terre. Ce produit est équipé d'une prise de terre à trois fils,
une fiche ayant une troisième broche (mise à la terre). Cette
fiche ne peut s'insérer que dans une prise de courant avec mise
à la terre. Il s'agit d'une caractéristique de sécurité. Si vous êtes
incapable d’insérer la fiche dans la prise, contacter votre
électricien pour remplacer votre prise obsolète.
10. Protéger le cordon d'alimentation pour qu’il ne soit pas piétiné
ni pincé, en particulier au niveau des fiches, des prises de
courant et au point de sortie de l’appareil.
11. Accessoires - Utiliser uniquement les attaches/accessoires
recommandés par le fabricant.
12. Utiliser uniquement avec un chariot, stand, trépied, support ou
table recommandé par le fabricant ou vendu avec l'appareil.
Lorsqu’un chariot est utilisé, faire attention lors du déplacement
de l'ensemble chariot/appareil afin d’éviter des blessures en cas
de basculement.
13. Débrancher cet appareil en cas d'orages ou lorsqu'il reste
inutilisé pendant de longues périodes.
14. Confier toute réparation à un personnel de service qualifié. Des
réparations sont nécessaires si l'appareil est endommagé d'une
façon quelconque, par exemple : cordon ou prise d'alimentation
endommagé, liquide renversé ou des objets sont tombés dans
l'appareil, l'appareil a été exposé à la pluie ou à l'humidité, ne
fonctionne pas normalement ou s'il est tombé.
15. Sources d'alimentation - Ce produit doit être utilisé uniquement
à partir du type de source d'alimentation indiqué sur l'étiquette.
Si vous n'êtes pas sûr sur le type d'alimentation de votre
domicile, consultez le détaillant de votre produit ou la
compagnie d'électricité locale. Pour les produits proposés de
fonctionner par piles, ou autres sources d’alimentation,
reportez-vous aux consignes d’utilisation.
16. Environnement d’oxygène - Ne pas utiliser sous une tente à
oxygène ou chambre à oxygène. Une telle utilisation peut causer
un risque d'incendie.

MODEL:
medTAB19 /medTAB16 /medTAB14
Document Number:
PD196-413R2
User Manual
Page 6 of 16
PDi Communication Systems, Inc. ▪40 Greenwood Ln ▪ Springboro, Ohio 45066 USA ▪www.pdiarm.com and www.mymedTV.com ▪Phone 800.628.9870
INSTALLING THE TELEVISION
Installation Precautions
For Power over Coax, use only a power source from PDi suitable for use in a healthcare facility. The single coaxial cable on top of
the TV is used to supply both low voltage AC or DC power (28VAC or 24VDC) and RF signal to the television, UNLESS the unit is
powered over ethernet.
Coax Cable Specifications
When using a central power supply, cable selection is crucial. Due to long coax cable runs encountered in hospital installations,
coax cable employing a solid copper center conductor and copper shield is required. Cable run lengths MUST NOT exceed 150 feet.
Required coaxial cable numbers include Alpha 9804C (non-plenum), Belden 9248 (non-Plenum), West Penn 806 (non-Plenum), or
West Penn 25806 (Plenum), which have been tested with coax-powered TVs.
Arm Mounting
This television is designed to attach to a PDi suspension arm.
Arm Recoil Hazard: The safety brake pin must remain in the SAFETY BRAKE PIN HOLE whenever the television is removed from
the arm or when the arm is removed from the wall bracket to prevent INJURY from the arm springing open. Note: Contact PDi for
additional information on arm compatibility and cable requirements.
INTRODUCTION
The medTAB® complete, personal patient television system delivers a touchscreen experience that patients understand and enjoy
as soon as they touch it. Built-in tv, games and relaxation apps, no internet required, no subscription fees, and no ADT integration
necessary. When ready to connect to the internet via WIFI or Ethernet, patients enjoy access to a web browser and URL links direct
to news, social or other online information. Contact PDi to create a customized user interface with custom applications, for example
patient education, movies, surveys or facility services apps.
HOME SCREEN SETUP
The first time you use the Android™ based medTAB®patient television, you will have the option to select the desired user interface
(UI). The choices include a 3-icon image with no internet connection or the 6-icon with Internet apps for a browser, news links and
social sites. A description of the HOME screen follows (Main Menu).
1. TV-Games-Relaxation apps are all active without internet connection.
2. Internet Browser –News –Social are browser links available on 6-icon UI once you connect to WIFI or Ethernet.
3. Clear Data –Patients can choose to clear cache memory on-demand using the Clear Data feature. Cache is automatically
erased when the device powers OFF or times out.
4. Blue Home Button –this is a floating button that when pressed, will return to this Home screen. Patients or users can
move it around on the Home screen. When touched outside of the Home screen, it will return to the Home screen.
5. Black Toolbar –This provides shortcuts for BACK –HOME –OPEN APPS. The BACK arrow is also used during setup.
6. medTAB Logo in top left corner is used to access system settings.
6
1
2
5
4
3

MODEL:
medTAB19 /medTAB16 /medTAB14
Document Number:
PD196-413R2
User Manual
Page 7 of 16
PDi Communication Systems, Inc. ▪40 Greenwood Ln ▪ Springboro, Ohio 45066 USA ▪www.pdiarm.com and www.mymedTV.com ▪Phone 800.628.9870
OTHER MENUS
ANDROID SETTINGS MENU ACCESS
Press and hold the “medTAB” logo on the top left of the
screen. The Unlock Settings Menu will appear. Enter the
default passcode “45066”, then press “OK”.
The person who will be responsible for managing the
network on the device and updating it should know the
passcode. This passcode cannot be changed.
ANDROID SETTINGS
The Settings screen is where you can adjust network, inputs, sleep settings, and factory reset. From the Main Menu, unlock Android
settings menu per above. Touch Back Arrow in bottom left of screen to exit out of the Settings screens. NOTE: TV Settings are not
found here. To make changes to the television, you must first open the green TV app found on the home screen, see TELEVISION
SETTINGS.

MODEL:
medTAB19 /medTAB16 /medTAB14
Document Number:
PD196-413R2
User Manual
Page 8 of 16
PDi Communication Systems, Inc. ▪40 Greenwood Ln ▪ Springboro, Ohio 45066 USA ▪www.pdiarm.com and www.mymedTV.com ▪Phone 800.628.9870
Android Device Settings
1. Settings –Network. Connect to the internet via
WIFI or Ethernet. Verify network settings here. To
search for WIFI networks, simply touch the word
Wi-Fi or slide the Wi-Fi toggle to the right/ON. If
the device finds a network previously used, it will
reconnect to it. Touch the network name to see
more details or enter WIFI password to connect to
the network. Connect to Ethernet or view IP
Settings.
2. Settings –Inputs. Identify your HDMI input
sources from a list of common names. You can also
enable/disable CEC controls (Consumer Electronic
Controls) such as allow the TV to control HDMI
devices, and power off/on controls with the TV.
3. Settings –Apps. Set App permissions, and review
system app settings.
4. Settings - Inactivity Timer. Choose when to put
device into Sleep mode: Never –2 min –5 min –10
min –20 min –30min –1hour. Default setting is 5
min.
5. Settings –Storage & reset. View shared storage
space or reset device to factory settings.

MODEL:
medTAB19 /medTAB16 /medTAB14
Document Number:
PD196-413R2
User Manual
Page 9 of 16
PDi Communication Systems, Inc. ▪40 Greenwood Ln ▪ Springboro, Ohio 45066 USA ▪www.pdiarm.com and www.mymedTV.com ▪Phone 800.628.9870
6. Settings –About. The About menu is where you
can find important information about the Android
system. It cannot be edited. Information shown
includes model number, serial number, build
version, kernel version, legal and more reference
data.
Settings - Preferences
1. Settings - Date & time. Use this menu to adjust
Date & Time. Use BACK arrow to return to Settings
menu.
2. Settings –Language. Default language is English
(US). If you choose an alternate language, it will
change the menu and the web browser language.
3. Settings –Keyboard. Device includes AOSP
keyboard.
4. Settings - Over the Air (OTA). OTA allows you to
update the Android build. Please contact PDi Pro
Services for help updating your device.
+1.800.628.9870.
TELEVISION SETTINGS
TV setup can be done using the touchscreen or a PDi programming remote. If you choose to use the PDi programming remote (Part
Number PD108-420), that must be ordered separately. Using the PD108-420 remote, use the LAST button in place of the BACK
function on the touchscreen. The following instructions assume you have correctly mounted the TV and connected a coax cable that
provides both power and RF signal.
Accessing TV Settings and Setup
To make changes to the television settings, you must first open the green TV app found on the Main Menu. From the onscreen user
interface, press Settings on the TV app user controls or press SETUP on the PD108-420 remote. The Settings menus are password
protected. Enter password “45066” then touch the blue checkmark on the touchscreen or press “OK” on remote.

MODEL:
medTAB19 /medTAB16 /medTAB14
Document Number:
PD196-413R2
User Manual
Page 10 of 16
PDi Communication Systems, Inc. ▪40 Greenwood Ln ▪ Springboro, Ohio 45066 USA ▪www.pdiarm.com and www.mymedTV.com ▪Phone 800.628.9870
CHANNEL SETUP
This TV offers three different programmable service levels: Free, Basic, and Premium. Only
one service level is usable at a time.
Auto Program
During Auto Program, the TV scans each available channel for activity. Channels that
display activity are memorized into the selected Service Level.
From the TV app:
1. Select Settings. Enter Password 45066
1. Select Channel Setup
2. Select Channel sources to open the Set up your sources menu
3. Select TV
4. Set the Service Level you are programming (Free, Basic, Premium).
5. Set the Antenna Type (Air or Cable) depending upon the healthcare facility’s signal style.
6. Select Auto Tuning to go to next step
7. Service Level and Antenna Type carry over from the prior menu. Confirm that these are correct.
8. Set the Search Type (ATV, DVT, ATV+DTV)
ATV = Analog Only: TV searches for analog channels only.
DTV =Digital Only: TV searches for digital channels only.
ATV+DTV = Analog and Digital: TV searches for both analog and digital channels.
Note: Any tuning mode that includes digital channels will require several minutes to complete the auto programming.
9. Press the Search button to start scanning. When auto programming is complete, press OK.
10. Touch BACK or press LAST on TV remote to exit settings.
Customize Channel List
From the TV app:
1. Select Settings. Enter Password 45066.
2. Select Channel Setup.
3. Select Customize channel list.
4. Scroll thru the channel list and uncheck any channels you want to exclude from the channel list.
5. Touch BACK or press LAST on TV remote to exit settings.

MODEL:
medTAB19 /medTAB16 /medTAB14
Document Number:
PD196-413R2
User Manual
Page 11 of 16
PDi Communication Systems, Inc. ▪40 Greenwood Ln ▪ Springboro, Ohio 45066 USA ▪www.pdiarm.com and www.mymedTV.com ▪Phone 800.628.9870
Parental Controls
Parental Controls allow you to block channels, TV shows, and movies. The default setting for parental controls is set to OFF. To
enable parental controls,
From the TV app:
1. Select Settings. Enter Password 45066
2. Select Channel Setup
3. Select Parental controls
4. To enable parental controls, create a pin.
5. Slide the toggle button to the right to turn parental controls on.
Channels blocked: Use this setting to block channels from the line up by selecting the
channels from the list.
Program restrictions: Use this setting to filter programs based on their rating as classified
by the rating systems explained below.
Rating Systems
1. There are four Rating Systems: Canada, Canada (French), United States, and United States (Film ratings) as shown below.
2. You can choose between High Restrictions (content suitable for children), Medium Restrictions (content suitable for older
children), Low restrictions (Content suitable for teens), Custom (Manual restrictions) or None.
Canada Ratings
E
Exempt
Exempt programming includes: news, sports, documentaries and other information
programming; talk shows, music videos
C
Young Children
Content not offensive to most viewers. Intended for younger children under age 8
years.
C8
Children 8 and over
Considered suitable for children over 8 years. It is suggested a parent/guardian co-
view programming.
G
General Audience
Considered suitable for all audiences and appropriate for entire family.
PG
Parental Guidance
Suggested Unsuitable for younger children, may contain: Suggestive Dialogue, Bad
Language, Sex, and Violence Scenes
14+
Parents Strongly Cautioned
Unsuitable for children under 14, may contain; Strong Dialogue, Bad Language, Sex,
and Violence Scenes.
18+
Mature Audience Only
Adults only, may contain: Strong Dialogue, Bad Language, Sex, and Violence Scenes
US Ratings
TV-Y
Young Children
Content designed to be appropriate for all children.
TV-Y7
Children 7 and over
Considered suitable for children age 7 and above.
TV-G
General Audience
Considered suitable for all audiences; most parents would find this suitable for all
ages.
TV-PG
Parental Guidance
Suggested Unsuitable for younger children. Many parents may want to watch
together with children.
TV-14
Parents Strongly Cautioned
Unsuitable for children under 14, may contain; Strong Dialogue, Bad Language, Sex,
and Violence Scenes.
TV-MA
Mature Audience Only
Adults only, may contain: Strong Dialogue, Bad Language, Sex, and Violence Scenes
US Film Ratings
G
General Audiences
Content not offensive to most viewers
PG
Parental Guidance Suggested
May contain some material parents might not like for their young children.
PG-13
Parents Strongly Cautioned
Program is inappropriate for preteens, with a greater degree of offensive
material suggested than a PG rated program
R
Restricted Viewing
Not for children under age 17. Contains some adult material, strong
elements of sex and/or violence.
NC-17
No Children under age 17
Not for children age 17 or younger, under any circumstances.
Strong sexual content or violence.
NR
No Rating
MPAA not rated.

MODEL:
medTAB19 /medTAB16 /medTAB14
Document Number:
PD196-413R2
User Manual
Page 12 of 16
PDi Communication Systems, Inc. ▪40 Greenwood Ln ▪ Springboro, Ohio 45066 USA ▪www.pdiarm.com and www.mymedTV.com ▪Phone 800.628.9870
ADVANCED OPTIONS –PICTURE
Use this menu to adjust Picture settings shown below. Touch BACK or press LAST on TV remote to exit settings.
From the TV app:
1. Select Settings. Enter Password 45066
2. Select Advanced Option
3. Select Picture
Back Light can be adjusted from 0 to 100. This setting applies to all TV and Android
screens.
Picture Mode includes 8 automated options to adjust the picture quality: Dynamic,
Standard, Soft, User, Game, Vivid, Natural, and Sports Picture Mode. The picture
settings can also be adjusted manually. Contrast, Brightness, Hue, Sharpness, and
Saturation have a range of 1-100.
Color Temperature can be set to Cold, Nature, Warm, or User defined. User defined
allows for manual adjustment of Red, Green, Blue along a scale of 0 to 2048 intensity.
Image Noise Reduction options include Off, Weak, Middle, Strong, and Auto. This
setting reduces noise from the image on the TV.
Mpeg Noise Reduction options include Off, Weak, Middle, and Strong. This setting
cleans up block noise around outlines and mosquito noise on the background.
ADVANCED OPTIONS –SOUND
From the Sound menu, you can customize the speaker settings. This allows you to set max volume levels, disable internal speakers,
etc. Touch BACK or press LAST on TV remote to exit settings.
From the TV app:
1. Select Settings. Enter Password 45066
2. Select Advanced Option
3. Select Sound
Internal Speaker
The TV’s internal speakers can be enabled or disabled by TV source/input requiring the
use of a headphone for private listening. This option is commonly used in dialysis clinics
and multiple occupancy rooms. Uncheck the boxes next to the sources/inputs for which
you want the internal speakers disabled. To ensure the speakers are always disabled,
uncheck all boxes.
Minimum Volume
Sets the minimum volume level the unit can reach. Setting this to any value other than 0
guarantees that some level of sound will always be heard when the TV is operating.
Touch the sliding scale to adjust volume from 0 to 100.
Maximum Volume
Sets the maximum volume level the TV can reach. Touch the sliding scale to adjust
volume from 0 to 100.
Power on Volume
Sets the initial volume for the TV upon powering on. Options include “Use last volume” or “Set volume” to manually set the power
on volume level. Once the TV is on, the volume can be set to any allowable level. NOTE: If Power on Volume is set to LAST, and
physical power is removed (ie. a power outage), the TV will power on with a volume of zero.

MODEL:
medTAB19 /medTAB16 /medTAB14
Document Number:
PD196-413R2
User Manual
Page 13 of 16
PDi Communication Systems, Inc. ▪40 Greenwood Ln ▪ Springboro, Ohio 45066 USA ▪www.pdiarm.com and www.mymedTV.com ▪Phone 800.628.9870
Sound Mode
Sound Mode can be set to Standard, Music, Movie, Sports, or User defined. User defined allows you to set the Low Pitch and High
Pitch from 0 to 100.
Equalizer
Sound adjustments can be made at 5 levels 120 Hz, 500 Hz, 1.5 KHz, 5 KHz, and 10 KHz from 0 to 100.
Balance
Adjust speaker volume left to right.
AVC, Surround, and SRS
Automatic Volume Control (AVC), Surround, and Sound Retrieval System (SRS) can be set to On/Off for these 3 settings.
ADVANCED OPTIONS –CHANNELS
The Channel menu allows the following controls:
From the TV app:
1. Select Settings. Enter Password 45066
2. Select Advanced Option
3. Select Channel
Service Level
Set the appropriate service level (Free, Basic, Premium)
Configure Channels
Auto Channel Alias
This setting automatically assigns a sequential channel number to the channels in the list.
Select the appropriate option: Fill Analog Gaps with Digital Channels, Renumber Only
Enabled Channels, Renumber All Channels, or Remove All Aliases.
Clear Service Level
This setting clears the channel map for the specified service level
Copy Service Level
This setting copies the channel map from one service level to another service level (ie Free copied to Basic)
Power on Channel
Power on Channel will display a certain channel each time the TV is turned on. This feature is useful for hospitals that have a
Welcome Channel and wish to have it displayed upon initial use of the TV. The patient can then tune to any other available channel.
To set the power on channel select the applicable service level, then scroll through the channel list and select the desired power on
channel
Channel Lock
Channel lock will fix the TV to a specific channel. To enable channel lock, tune the TV to the desired channel. Then go to the
Advance Option –Channel menu per the instructions above. Toggle the Channel Lock option to the right.
Channel Override/Auto Update
Override allows any channel to be entered using the TV remote’s number pad, even if the channel is not memorized in the current
Service Level. Toggle the switch to turn Channel Override On/Off.

MODEL:
medTAB19 /medTAB16 /medTAB14
Document Number:
PD196-413R2
User Manual
Page 14 of 16
PDi Communication Systems, Inc. ▪40 Greenwood Ln ▪ Springboro, Ohio 45066 USA ▪www.pdiarm.com and www.mymedTV.com ▪Phone 800.628.9870
Signal Information
You can display signal information on the current channel here. The information shown includes Antenna Type, Channel number,
and Signal Strength.
ADVANCED OPTIONS –LANGUAGE
This is where you can select the Primary Language and Secondary Language. Default is English.
From the TV app:
1. Select Settings. Enter Password 45066
2. Select Advanced Option
3. Select Language
ADVANCED OPTIONS –TIME
View clock settings, adjust on/off time settings, and sleep timers through this menu.
From the TV app:
1. Select Settings. Enter Password 45066
2. Select Advanced Option
3. Select Time
Time Source
You may choose to use network provided time or DTV time source.
Date and Current Time
Displays current date and Current Time settings. This can not be changed.
Off Time
Set the TV to turn OFF automatically at a specified time. Toggle the menu item to on and then set the Off time.
Scheduled Time
Set the TV to turn ON automatically at a specified time. Toggle the menu item to on and then set the On time.
Sleep Time
The Sleep Time function can be set to OFF, 10-20-30-40-50-60-90 min, or 2-3-4-5-6-7-8 hrs.
ADVANCE OPTIONS –FEATURES
From the TV app:
1. Select Settings. Enter Password 45066
2. Select Advanced Option
3. Select Features
Input Sources
The TV’s signal sources can be individually Enabled or Disabled. The available sources in
this menu correspond with the components you have connected to the TV’s connectors.
Change the source status to either Disabled or Enabled/APO (Auto Power Off) or
Enabled/No APO (No Auto Power Off).

MODEL:
medTAB19 /medTAB16 /medTAB14
Document Number:
PD196-413R2
User Manual
Page 15 of 16
PDi Communication Systems, Inc. ▪40 Greenwood Ln ▪ Springboro, Ohio 45066 USA ▪www.pdiarm.com and www.mymedTV.com ▪Phone 800.628.9870
NOTE: Please disable all TV sources that are not to be used. A TV that is switched to a non-connected source generates
nuisance hospital maintenance calls of TV Not Working, when in fact the TV does work, but has been set to an inactive
source.
Auto Power On/Lock
This toggle switch will allow the TV will turn on and stay on whenever electrical power is applied to the set. The feature is useful
for controlling the TV from a wall switch or preventing the TV from being turned off by the TV power button or the remote control.
Bed A/B/C/D
The TV can be controlled by a patient IR remote. The TV offers selectable codes Bed A, Bed B, Bed C, and Bed D for independent
control of a single television in a multi-television room. The patient remote can be toggled between Bed A, Bed B, Bed C, and Bed D
codes by using a paperclip to press the CODE button on the remote.
Closed Caption
Modify closed caption settings here. Use Power On CC Mode menu item to set CC to Off or Last
Channel to Other Sources
By enabling this setting, patient can access enabled sources by channeling up or down at the end or beginning of the channel map
Power On ARC MODE
Change from the default 16:9 to 16:9 Panorama, 14:9, 4:3, or Last
ADVANCE OPTIONS –SYSTEM
Find useful information about your device and manage cloning and firmware
From the TV app:
1. Select Settings. Enter Password 45066
2. Select Advanced Option
3. Select System
Diagnostics
This menu provides readouts of the TV’s internal operation. The Diagnostics items are read-
only and cannot be changed.
Field On Hours: Cumulative time TV is actually on.
Field Powered Hours: Cumulative time TV is powered.
Reset to Factory Defaults
Use this setting to restore the TV to factory defaults.
USB Cloning
Cloning allows you to quickly and easily copy settings and channels from one TV to other PDi TVs. Clone operation involves first
downloading setup information from a programmed host TV to a USB memory stick (thumb drive) and then uploading the setup
information to another TV. Cloning can also be used to re-program a programmed TV.
Save Settings to USB
1. In the TV app, select Advanced Option –System
2. Insert a USB thumb drive into the cloning port and open USB Cloning. The USB Cloning Menu will appear
3. Select Save Settings to USB.
4. If desired, rename the *.TDF file with the touchscreen keyboard.
5. Press Save.

MODEL:
medTAB19 /medTAB16 /medTAB14
Document Number:
PD196-413R2
User Manual
Page 16 of 16
PDi Communication Systems, Inc. ▪40 Greenwood Ln ▪ Springboro, Ohio 45066 USA ▪www.pdiarm.com and www.mymedTV.com ▪Phone 800.628.9870
Restore Settings from USB
1. In the TV app, select Advanced Option –System
2. Insert a USB thumb drive used above into the cloning port and open USB Cloning. The USB Cloning Menu will appear
3. Select Restore Setting to TV.
4. Press Save.
USB Firmware Update
The firmware is field upgradeable, but normally does not require this process and should be performed by the hospital technician.
A special data file is required from the PDi factory to complete this process. Firmware files are written to the root directory of a
blank USB Flash Drive, connected to the TV’s Cloning port and updated using the TV’s menus. Once complete, the TV settings must
be reprogrammed.
MTI/SmartPort Personality
You can toggle between MTI and SmartPort setting here . These settings support third-party systems. Please contact your vendor for
support
Security
You can manage the setup password here. You can Enable/Disable setup menu password protection or change the password here.
NOTE: The factory default password that is programmed into the TV is 45066.
Support Information
PDi Communication Systems, Inc.
Springboro, OH
www.pdiarm.com
800.628.9870
Limited Warranty
PDi Communication Systems Inc., (“PDi”) standard warranty information is found at pdiarm.com. For information regarding
authorized servicing and all other information pertaining to this warranty, please contact PDi COMMUNICATION SYSTEMS, INC. at
40 Greenwood Ln, Springboro, Ohio 45066 or phone 800-628-9870 and ask for the PDi ProServices team.
Other manuals for medTAB14
2
This manual suits for next models
2
Table of contents
Other PDi Medical Equipment manuals
Popular Medical Equipment manuals by other brands

Ultimate Healthcare
Ultimate Healthcare Heritage II Digital Quick reference guide

Siemens
Siemens MAMMOMAT Novation SP installation instructions

Smiths Medical
Smiths Medical CADD-Solis manual

Graham Field
Graham Field Hausted HORIZON Series operating manual

Johnson & Johnson
Johnson & Johnson Ethicon Endo-Surgery ULTRACISION HARMONIC... Service manual

Maquet
Maquet Datascope CS300 Service manual