This pump has been evaluated for use with
water only.
Risk of electric shock – this pump is supplied
with a grounding conductor and grounding-
type attachment plug. To reduce the risk of
electric shock, be certain that it is connected
only to a properly grounded, grounding-type
receptacle.
NOTICE: This pumps has been designed for working in presence
of water for cooling and lubrication. Working without water will
cause severe damage to the pump.
A qualied electrician must perform all the
wiring.
1. GENERAL INFORMATION
1.1. Read this Instruction Manual thoroughly prior to any work.
Work should be undertaken by qualified persons only.
1.2. Sump pumps are designed to operate intermittently and
usually seasonally. It is recommended that you test the pump
before your rainy season begins to insure that the pump
and switch are operating properly.
1.3. We suggest installing a high water alarm system and a
battery back-up pump system for finished basements or areas
where flooding will cause property damage. A back-up
generator is another option you can discuss with your pump
installer. Most power outages occur during rain storms, just
when you need your sump pump the most! Pump manufac-
turer’s warranties cover only the pump. Labor and incidental
damage such as flooding is not covered.
2. PRE-INSTALLATION CHECKS
2.1. Open all cartons and inspect for shipping damage. Report
any damage to your supplier immediately.
2.2. Verify that all equipment is the correct voltage. Warranty
does not cover damage caused by connecting pumps and
controls to incorrect voltage.
2.3. Is your basin sized correctly and the proper type for the
location?
Diameter - It must be wide enough to allow the pump and
switch to physically fit and provide room for the float switch to
operate freely. The vertical float switch models typically require
less diameter than the wide-angle float models. See “min. basin
diameter” in Chart 1.
Depth - It must be deeper than the minimum depth at
which the switch turns the pump On. As an example,
if the pump turns on at 7.50” you want to use a basin
deeper than 7.50”.
See “On level” in Chart 1.
Style - There are several sump basin styles
available. The location of the sump deter-
mines if you require a cover and what type
you require. It is important to keep debris from
entering the sump and clogging the pump.
An open sump in a trafc area such as a
basement is dangerous. If children or pets will
be playing in the area a bolt-on or child-proof
cover is recommended.
Do not use the power cord or discharge hose
to carry or handle the pump. Doing so may
cause severe damage to the power cord
connector, the power cord or discharge hose.
Use the carrying handle
supplied with the pump.
It is strongly recommended to use a “Ground
Fault Circuit Interrupt” GFCI device on
this pump. This GFCI (ground fault circuit
interrupter) should be listed by Underwriters
Laboratories (UL). This is required by many
local codes and enforcement agencies. It is
strongly recommended as it provides a safer
installation and will reduce possible injury
from electrical shock.
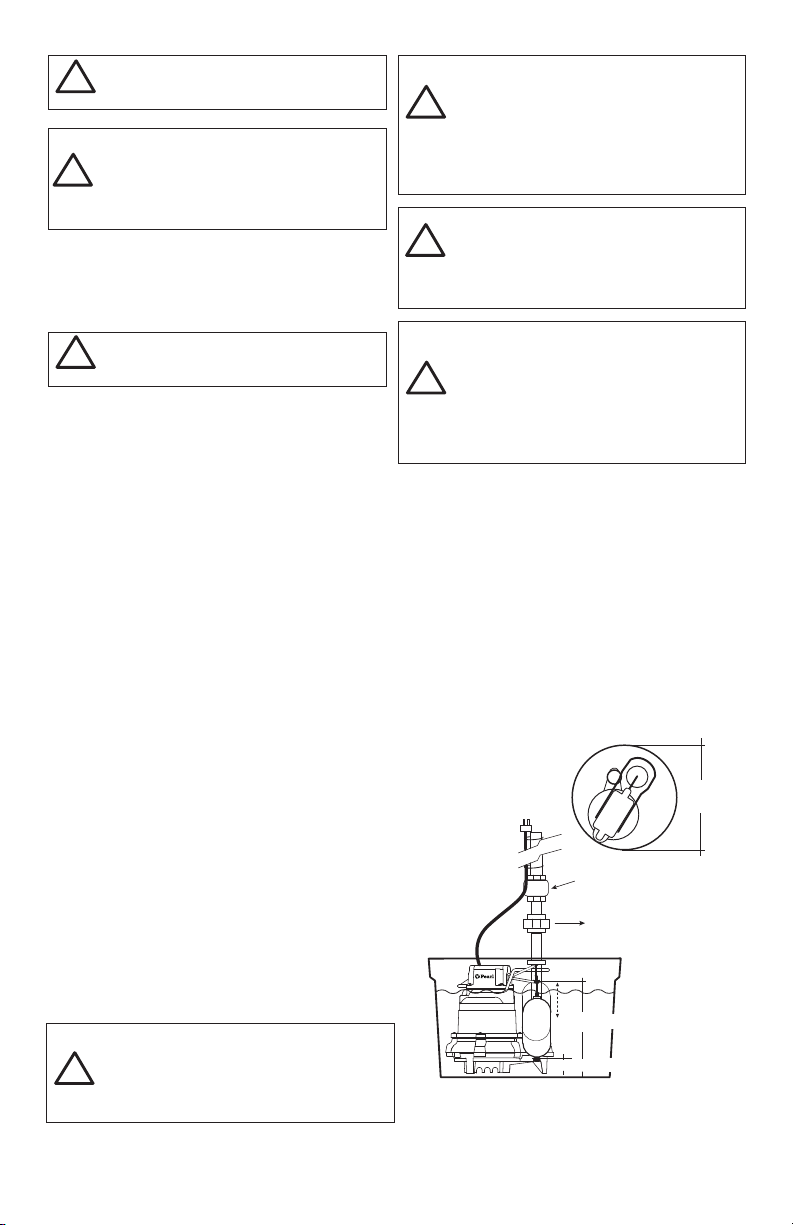
3. PIPING
3.1. The discharge pipe should be the same size as the pump
discharge (11/4”) to insure optimum performance. Using
undersized pipe will reduce the flow. Your pump supplier can
suggest the correct pipe for your installation.
3.2. Install a threaded pipe adapter, matched to the pipe type
you are using, into the threaded pump discharge. A union
installed just above the sump or basin cover will facilitate future
maintenance and replacement. See Chart 1 for discharge size.
3.3. Recommended to install a line check valve just above the
union to prevent backflow of water after each pump cycle.
CAUTION
!
CAUTION
!
CAUTION
!
CAUTION
!
WARNING
!
WARNING
!
WARNING
!
check valve
union
Chart 1
Min. OFF level 3 ½”
Min. ON level 7 ½”
Minimum basin
diameter 12”
4. INSTALLATION IN SUMP
4.1. The pump can be placed directly on the bottom of a poly or
fiberglass sump basin or a concrete sump bottom. The pump


