pela tools 77925 User manual

Elvinsch 12 V, 1588 kg
Electric winch 12 V, 1588 kg
Item No:
77925

Kontaktinformation
Verktygsboden Erlux AB
Källbäcksrydsgatan 1
SE-507 42 Borås
Telefon: 033-202650
Mejl: [email protected]
Miljöskydd/Skrotning
Återvinn oönskat material, släng
det inte bland hushållssoporna. Alla
maskiner, tillbehör och förpackning-
ar skall sorteras och lämnas till en
återvinningscentral och där kasseras
på ett miljövänligt sätt.
Specifikationer
Belastning ......................................................1588 kg
Motor .............................................0,8kw / 1,1hk 12V
Växellåda ...................................................... 128.2: 1
Kugghjul ................................... 3-stegs planetbroms
Broms..........................................................Mekanisk
Kabel ................................................. Φ5.4mm x15m
Rep ................................................... Φ6 .0mm x 15m
Trummans storlek........................... Φ 45mmx81mm
Vinschens mått ............ 354mm x 118mm x121mm
Vikt vinsch med kabel ...................................... 12 kg
Vikt vinsch med rep .......................................... 10 kg
Säkerhetsåtgärder
Varning! Följ säkerhetsåtgärderna för personlig
säkerhet och andras säkerhet. Felaktig användning
kan orsaka personskador och skador på
utrustningen. Läs följande noggrant innan du
använder din vinsch och förvara instruktionerna för
framtida referens.
Klä dig rätt
• Bär inte lösa kläder eller smycken. De kan
fastna i rörliga delar.
• Använd läderhandskar när du hanterar
vinschvajer. Hantera inte vajern med bara
händer då trasiga vajrar kan orsaka skador
• Halkfria skor rekommenderas.
• Använd hårnät om du har långt hår.
Håll ett säkert avstånd
• Se till att alla personer står med avstånd från
vinschvajern och last under vinschdrift, 1,5
gånger den rekommenderade vajerlängden. Om
en vajer dras loss eller bryts under belastning
kan den snurras tillbaka och orsaka allvarlig
personskada.
• Gå inte över vajern.
• Alla besökare och åskådare bör hållas borta
från arbetsområdet.
• Stå stabilt med god balans vid användning av
vinschen.
Missbruka inte elsladden
• Bär aldrig vinschen i elsladden eller dra i den
för att koppla bort den från eluttaget.
• Håll sladden borta från värme, olja och vassa
kanter.
Överansträng inte vinschen
• Om motorn blir obehagligt varm att röra vid,
stanna och låt den svalna i några minuter.
• Låt inte strömmen vara på till vinschen om
motorn stannar.
Undvik oavsiktlig start
• Vinschkopplingen bör kopplas ur när den inte
används och vara helt inkopplad när den
används.
Kontrollera skadade delar
• Innan du använder den bör du kontrollera din
vinsch noggrant. Varje del som är skadad bör
repareras eller bytas ut av en auktoriserad
reparatör.
Reparera din vinsch
• Vid reparation, använd endast identiska
reservdelar, annars kan det orsaka avsevärd
fara för användaren.
Rulla tillbaka vajern igen
• Läderhandskar måste bäras när du rullar
tillbaka vajern. För att rulla tillbaka korrekt är
det nödvändigt att hålla en liten belastning
på vajern. Håll vajern med ena handen och
fjärrkontrollen med den andra. Börja så långt
tillbaka som du kan och håll den i mitten. Håll
belastning på vajern och gå mot vinschen
under tiden som den rullar in.
• Låt inte vajern glida igenom handen och gå inte
för nära vinschen.
• Stäng av vinschen och upprepa proceduren tills
vajern endast har 1 m kvar som inte är inrullad.
• Koppla bort fjärrkontrollen och avsluta
upprullningen av vajern genom att vrida
trumman för hand med kopplingen
frånkopplad.
• På dolda vinschar, rulla in vajern med
strömmen på men håll undan händerna.
• Varning! Användning av något annat tillbehör
än de som rekommenderas i bruksanvisningen
kan utgöra en risk för personskada.
Varningar vid användning av vinschen

Läs följande noggrant innan du använder din vinsch
och förvara instruktionerna för framtida referens.
1. Ojämn upprullning av vajern, medan du drar en
last, är inte ett problem, såvida det inte nns
en vajerhög i ena änden av trumman. Om detta
händer, vänd vinschen för att avlasta
belastningen och ytta din förankringspunkt
längre till fordonets mitt. När jobbet är klart kan
du rulla av och rulla tillbaka för en snygg lagring
av vajern.
2. Förvara fjärrkontrollen i ditt fordon där den inte
skadas. Kontrollera den innan du ansluter den.
3. När du är redo att börja rulla upp, koppla in
fjärrkontrollen med kopplingen frånkopplad,
koppla inte i kopplingen när motorn går.
4. Anslut aldrig kroken tillbaka till vajern. Detta
orsakar vajerskador. Använd alltid en kedja
med lämplig styrka.
5. Observera din vinsch under vinschning, om
möjligt när du står på ett säkert avstånd.
Stoppa vinschprocessen varje meter för att
försäkra dig om att vajern rullas upp rätt. Att
fastna med vajern kan orsaka skador på din
vinsch.
6. Fäst inte dragkrokarna på
vinschmonteringsapparaten. De måste fästas
på fordonsramen.
7. Användningen av ett talja hjälper till vid
bärgningsoperationer genom att
tillhandahålla en fördubbling av
vinschkapaciteten och en halvering av
vinschhastigheten och medel för att
upprätthålla en korrekt upprullning av vajern.
Vid dubbelbelastning under stationär vinsch
ska vinschkroken fästas på fordonets chassi.
8. När du förlänger vinschvajern, se till att minst
fem lindningar vajer kvarstår på trumman hela
tiden. Underlåtenhet att göra detta kan leda till
att vajern skiljs från trumman under last. Det
kan leda till allvarlig personskada eller
materiella skador.
9. Alla vinschar är försedda med en röd
markering på vajern för att identiera att 5
vajerlindningar kvarstår på vinschtrumman
när detta märke visas på rullen. Inga försök till
bärgning bör utföras utöver denna märkning.
10. Eftersom den största dragkraften uppnås på
det innersta lagret av din vinsch, är det
önskvärt att dra ut så mycket vajer som du
kan för tunga drag (du måste lämna minst 5
lindningar på efter det röda märket på vajern).
Om detta inte är praktiskt, använd en talja och
arrangemang med dubbla vajrar.
11. Det rekommenderas att dra en kraftig lt eller
liknande föremål över den utökade vinschvajern
eftersom det dämpar en motreaktion om ett fel
skulle uppstå.
12. Snygg, tätt upprullning undviker trassel på
vajern, vilket orsakas när last appliceras och
vajern inte rullas in på rätt sätt. Om detta
händer, försök slå av och på vinschen. Försök
inte arbeta med en trasslad vajer under last.
13. Applicera block på hjulen när fordon är i en
lutning.
14. Batteri
• Se till att batteriet är i gott skick. Undvik kontakt
med batterisyra eller andra föroreningar.
• Använd alltid ögonskydd när du arbetar vid ett
batteri.
• Låt motorn gå när du använder vinschen för att
undvika att batteriet laddas ur.
15. Vinschvajer
• Se till att vajern är i gott skick och är ordentligt
ansluten.
• Använd inte vinschen om vajern är trasig.
• Flytta inte fordonet för att dra en last.
• Vajerns livslängd är direkt relaterad till den an-
vändning och vård den får. Efter sin första och
efterföljande användning måste en vajer lindas
på trumman under en belastning på minst 230
kg, eller de yttre varven dras in i de inre och
skadar vajern allvarligt under
vinschning. Den första användningen av
vinschen bör ske i en icke-bärgningssituation
så att du bekantar dig med vinschen. Rulla ut
vajern tills det röda vajermärket visas (cirka
fem lindningar på trumman) och rulla sedan
tillbaka vajern till trumman under en belastning
på minst 230 kg. Detta kommer att spänna den
något och sträcka det den nya vajern och skapa
ett tätt vajeromslag runt trumman. Om du inte
gör det kan det leda till vajerskador och
minskad livslängd på vajern.
• När vajern byts ut, se till att applicera laktat,
eller en liknande sammansättning, på vajers
klämtråd. Dra åt klämskruven ordentligt men
dra inte för hårt. Laktatet förhindrar att skruven
lossnar under svåra förhållanden. Laktat 7471
Primer och 222 gänglås rekommenderas.
16. Försök inte överskrida gränserna för dragning
med denna vinsch.
17. Kör INTE ditt fordon för att hjälpa vinschen på
något sätt. Fordonets rörelse i kombination
med vinschdrift kan överbelasta vajern, själva
vinschen eller orsaka skadliga
chockbelastningar.
18. Chockbelastning vid vinschning är farligt! En
chockbelastning uppstår när en ökad kraft
plötsligt appliceras på vajern. Ett fordon som
rullar tillbaka på en slak vajer kan orsaka en
skadlig chockbelastning.
19. Vinscharna som visas i denna manual är
enbart för fordon- och båtmonterade,
icke-industriell användning.
20. Använd inte vinschen för att lyfta, stödja eller
på annat sätt transportera människor.
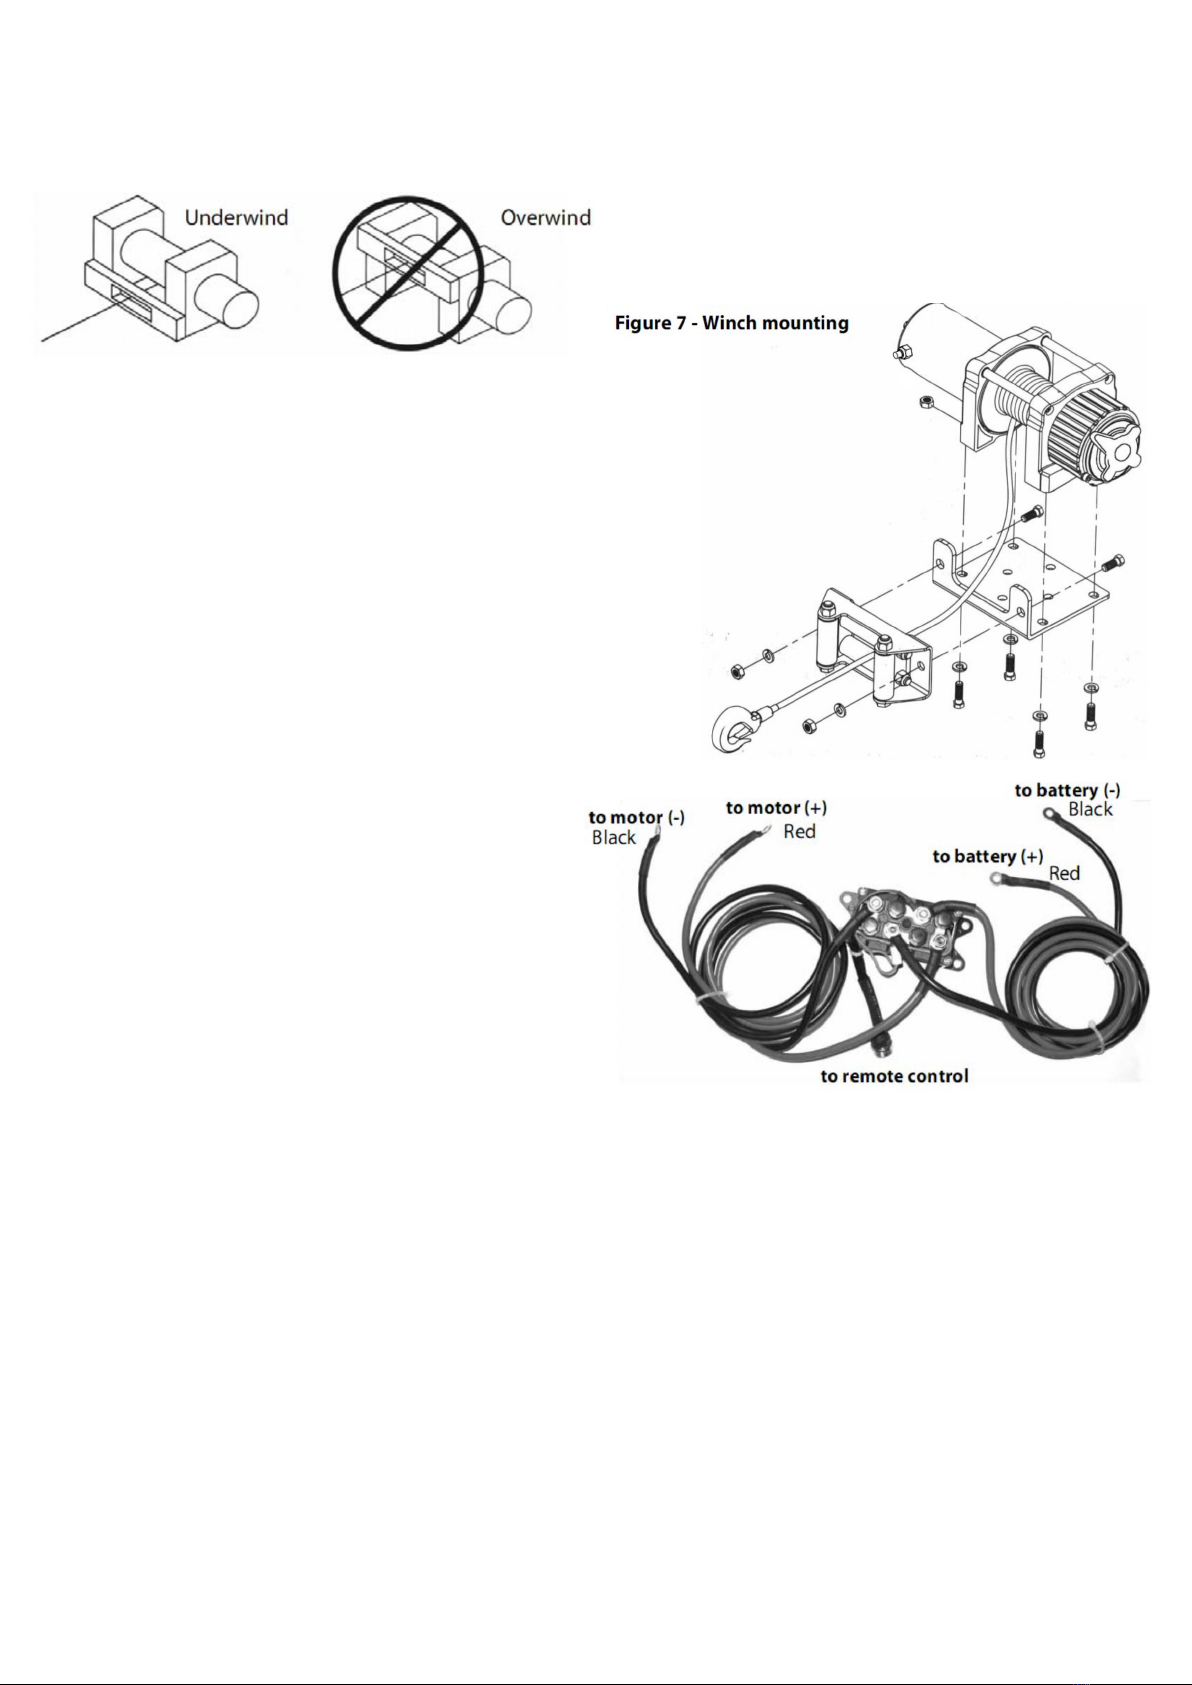
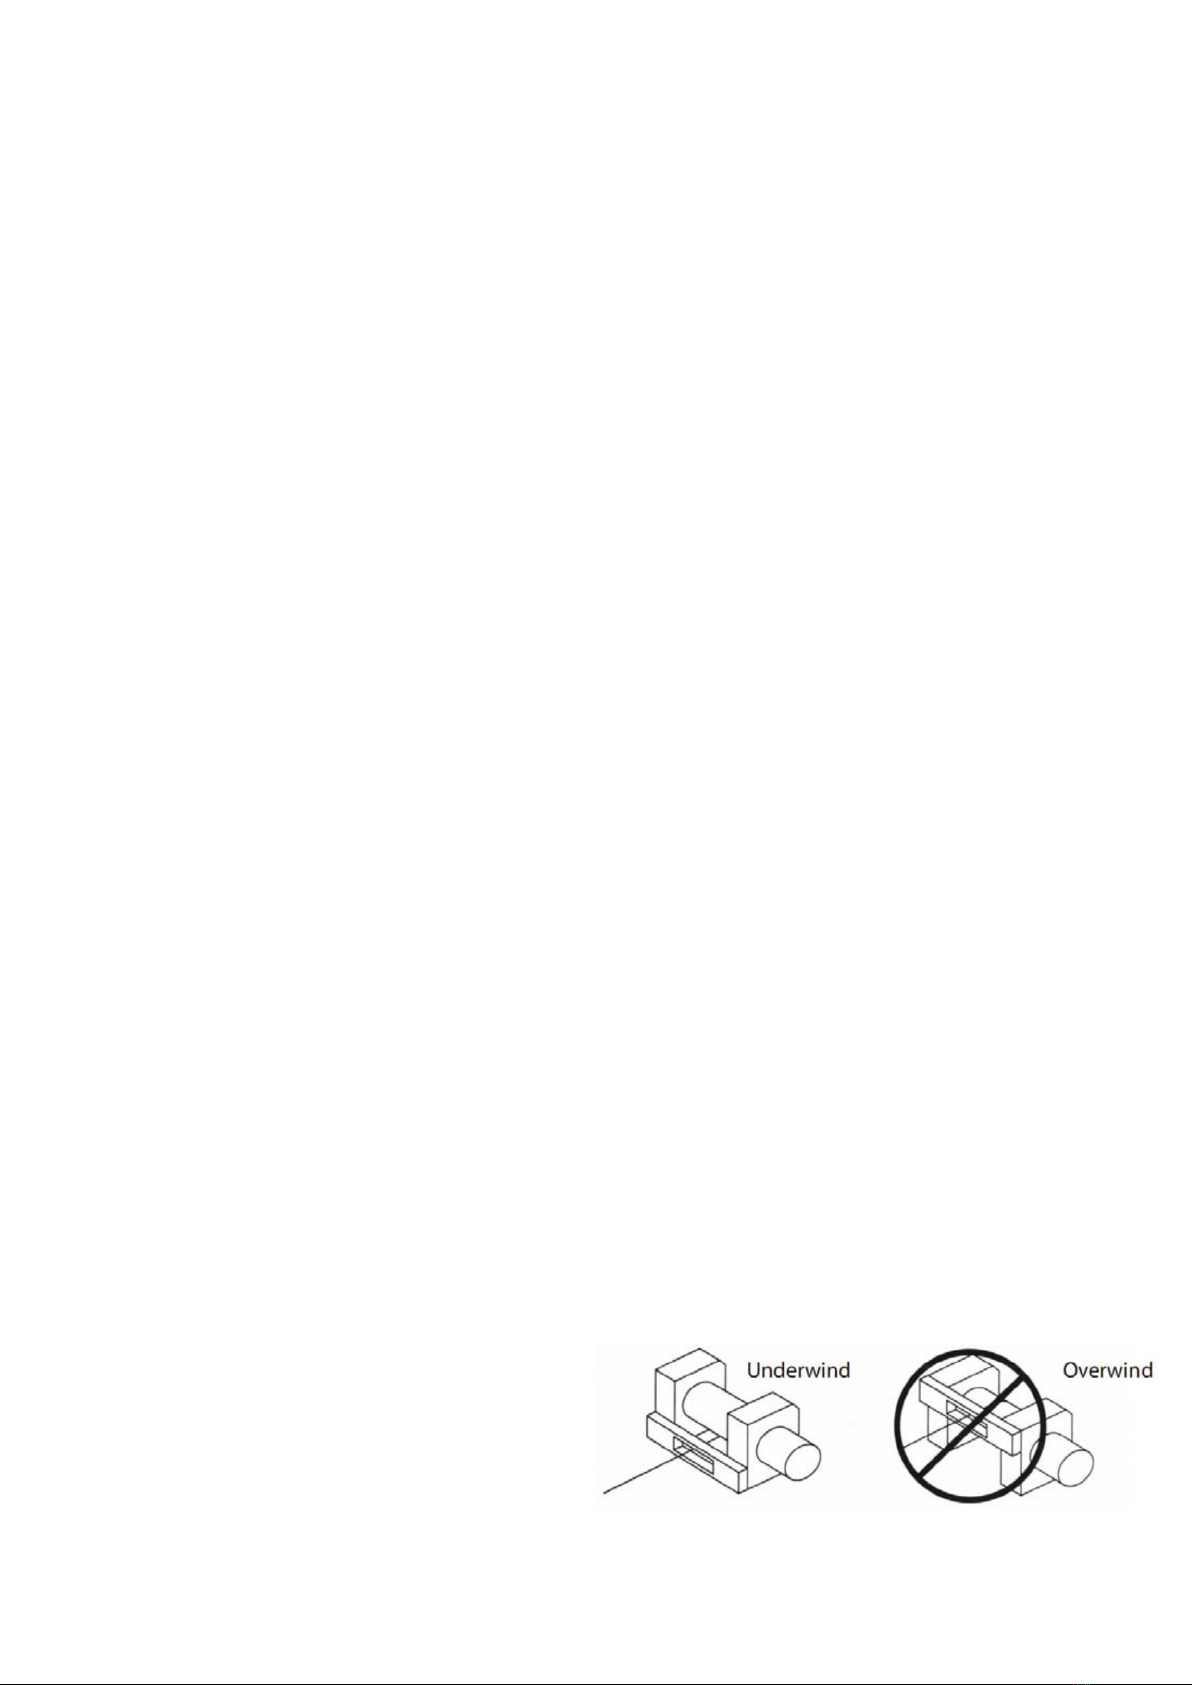
Montering av vinschen
Notera! Denna vinsch måste monteras med vajern i

riktning enligt bilden.
Innan vinsch installationen påbörjas, koppla bort
batteriet. Minsta elektriska krav: Var noga med
att välja lämpligt batteri eller strömförsörjning för
att hantera vinschen. Om vinschen belastas tungt
rekommenderas ett extrabatteri och en kraftig
generator.
Steg 1 Installera monteringssatsen på en säker
monteringsplats för vinschen så att motorn,
trumman och växellådan är rätt inriktade. Följ noga
instruktionerna som medföljer monteringssatsen.
Varning! Se till att stödet är tillräckligt starkt för att
stödja vinschens nominella kapacitet.
Notera! Om du inte har ett monteringssats måste
du borra hål i konstruktionsstödet. Se till att det
stödet är minst 5 mm tjockt.
Varning! Om olika längd av bultar, muttrar, brickor
och annat krävs vid installationen, se till att de
motsvarar en kvalitet som krävs.
Steg 2 Placera vinschen över hålen i
monteringssatsen.
Varning! När du placerar vinschen, se till att vajern
lindas i rätt riktning på trumman. Om vinschen inte
körs i rätt riktning kan vinschbromsen (om sådan
nns) fungera dåligt.
Steg 3 Fäst vinschen (gur 7) på
monteringssatsen eller konstruktionsstöd med
bultar, låsbrickor och fyrkantiga muttrar som
medföljer vinschen.
Steg 4 Fäst rullrörsledaren (gur 7) på
monteringsplattan med hjälp av två (2) M8x 20L
8,8 dragbultar.
Varning! Se till att både monteringsplattan och
vinschens delar har dragits åt ordentligt.
Varning! Ingen del av fordonet (ledningar,
hjälpbelysning, däck etc.) får hindra vinschen att
fungera. Se till att vinschens monteringsplats inte
minskar markfrigången avsevärt vid montering.
Montera magneten
1. Magneten kopplar bort vinschen från batteriet
när fordonet är avstängt.
2. Magnetventilen ska monteras nära batteriet
och platsen ska vara så ren och torr som
möjligt.
3. Obs: Magnetventilen ska inte monteras i så att
kontakterna riktas nedåt.
Växelinstallation
Tillämpningar: ATV-serien
Varning: När du ansluter kablar till motorn eller
magnetnslutningarna, håll den inre muttern med en
skiftnyckel medan du drar åt den yttre muttern med
en andra skiftnyckel.
Steg 1 Kontrollera att fordonets jordade och
positiva ledningar från batteriet är frånkopplade
innan du utför något elektriskt arbete.
Försök inte installera ledningar när batteriet är
anslutet. Bilbatterier innehåller brandfarliga och
explosiva gaser. Använd ögonskydd under
installationen och använd inga metallsmycken.
Luta dig inte över batteriet.

Figur 9 — Korrekt åtdragning
Steg 2 Obs! När kablarna dras bör lämpliga poler
placeras nära batteriet, omkopplarens monterings-
punkt och vinsch. Installationskraven varierar
beroende på fordon och vinsch. Se till att
ledningarna är tillräckligt långa för att nå batteriet,
byt monteringspunkt och vinsch.
Steg 3 Använd de medföljande klämmorna, fästet
och brytaren för att placera på en lämplig plats. Se
gur 10.
Ledningsinstallation
Steg 1 Dra de svarta ledningarna (1,32 m) från den
gula kontaktposten till motorns minuspol
Steg 2 Dra de röda ledningarna (1,32 m) från den
blå kontaktposten till motorns pluspol.
Steg 3 Dra de svarta ledningarna (1,85 m) från den
svarta kontaktposten till batteriets minuspol.
Steg 4 Dra de röda ledningarna (1,85 m) från den
röda kontaktposten till batteriets pluspol
Steg 5 Fäst de svarta ledningarna från
omkopplaren till de svarta ledningarna som är
anslutna till magneten.
Om din vinsch har en trådlös fjärrkontroll, fäst de
svarta ledningarna från mottagaren till de svarta
ledningarna till magnetplintarna . Den tunna svarta
ledningen från fjärrkontrollen ska anslutas till den
svarta kontaktposten (batteri “-”), annars skadas
fjärrkontrollen på grund av kortslutning.
Steg 6 Kontrollera att alla ledningar är fria från
vassa kanter. Säkra lösa ledningar med band eller
eltejp.
Varning! Innan du testar att vinschen fungerar som
den ska, var noga med att rulla ut cirka två meter
av vajern.
Testa vinschen
1. Dubbelkolla att alla kablar är korrekt
monterade.
2. Vrid till ON. Kontrollera vinschen för korrekt
drift.
Vajer
1. Vajerns livslängd är direkt relaterad till
underhållet den får. Kontrollera vajern före an-
vändning. Klämda, slitna eller knäckta
områden minskar belastningen kraftigt. Om
vajern är skadad byt ut den.
2. Förhindra att knutar bildas på vajern.
3. När det är nödvändigt att återkyla vajern utan
belastning efter användning, håll
fjärrkontrollen i ena handen och vajern i den
andra. Börja från så långt från fordonet som
fjärrkontrollen tillåter, aktivera strömbrytaren,
gå i era meter rep och släpp strömbrytaren.
Upprepa processen. Släpp alltid strömbrytaren
innan din hand kommer inom fyra meter från
ledaren (om sådan nns).
4. Se till att vajern fördelas jämnt och tätt på
trumman. En löst lindad trumma gör att vajern
kan arbeta sig ner i trumman och fastna.
5. Det rekommenderas inte att smörja vajern på
grund av att det ökar risken för smuts vilket
minskar vajerns livslängd.
a) Detta är början på en knut.
När detta uppstår bör vajern direkt
rätas ut.
(b) Vajern och öglan har dragits åt
till en knut. Vajern är nu permanent
skadad och ska inte användas.
(c)Resultatet av en knut gör att
vajern tappar formen och det minskar vajerets
lastkapacitet.
Byt ut vajern
1. Om vajern har blivit sliten eller börjar visa
tecken på att trådar går sönder måste den
bytas ut innan den används igen. För att göra
detta, ta bort den defekta vajern genom fri
spolning. Ta bort bulten på trumman och lossa
vajern.
2. Sätt i änden på det nya vajern och fäst bulten
ordentligt.
3. Koppla in kopplingen och spola den nya vajern
på trumman igen och håll spänningen på vajern
medan det rullar.
Varning! Byt endast vajern med samma som
rekommenderas av tillverkaren.
Användning av vinschen
Använd kraftiga läderhandskar när du hanterar

vajern. Använd alltid spaken när du hanterar
kroken (se gur 12.) Ha aldrig ngrarna på kroken,
det kan leda till personskada.
Fara! Rör aldrig vid vajern eller kroken när de är i
spänning eller under belastning. Även i viloläge kan
vinschen ha vajern i spänning. För aldrig ett vajer
under spänning mot trumman med händerna.
1. Vinschen ska ha minst fem lindningar av vajer
trumman. Med färre kan vajern dra sig loss från
trumman under belastning.
2. När du drar en last placerar du en lt, kappa
eller presenning över vajern nära krokänden (se
g 14). Detta kommer att bromsa en trasig
vajer och hjälpa till att förhindra allvarliga
skador.Öppna huven för att skydda vindrutan.
Underhåll
1. Kontrollera att monteringsbultar och
elektriska anslutningar är täta. Ta bort all smuts
eller korrosion och håll alltid vinschen ren.
2. Försök inte ta isär växellådan. Reparationer
bör utföras av tillverkaren eller en auktoriserad
reparatör.
3. Växellådan har smörjts med litiumfett med
hög temperatur och är förseglad från fabriken.
Ingen smörjning inuti krävs.
OBS! Säkerhetsinstruktionerna som beskrivs i den
här manualen täcker kanske inte alla möjliga
förhållanden och situationer som kan uppstå.
Användaren måste ha att sunt förnuft och
försiktighet vid användning av vinschen.
Problem Orsak Lösning
Motorn fungerar inte eller
fungerar bara i en riktning 1.Strömbrytaren fungerar inte
2.Trasiga ledningar eller dålig
anslutning
3.Skadad motor
1.Byt ut strömbrytaren
2.Kolla efter dåliga
anslutningar
3.Byt ut eller reparera
motorn
Motorn går extremt varm 1.Lång driftstid
2.Överbelastning
3.Skadad motor
1.Stäng av och låt svalna
2.Stäng av och låt svalna
3.Byt eller reparera motorn
Motorn går, men inte med
tillräcklig kraft. 1.Svagt batteri
2.Batteri för vinschtråd har an-
vänts för länge
3.Dålig batterianslutning
4.Dålig anslutning
5.Skadad motor
1.Ladda eller byt ut batteriet
och kontrollera
laddningssystemet
2.Byt batteri
3.Kontrollera batteripolerna
och rengör efter behov
4.Kontrollera och rengör
anslutningar
5.Byt ut eller reparera
motorn
Vinschen går bakåt 1.Kablarna är omvända
2.Batteriet är installerad
felaktigt
1.Kontrollera kablarna
2.Kontrollera
batterianslutningarna
Motorn går men trumman roterar
inte Kopplingen är inte inkopplad Anslut kopplingen
Motorn kör men stannar ibland Överbelastning Låt svalna
Felsöknig

Del Namn Antal
1 Sexkantsskruv 8 M5x20 8
2Fjäderbricka M5 4
3 Platt bricka 5 4
4Vred 1
5Tätning för vred 1
6 Växellådans ändlock 1
7Extern låsring 1
8 Skjut block 1
9Friktionspackning 1
10 Lokaliseringsplatta 1
11 Förseglare 2
12 Växellådshus 1
13 3: e planetväxelsats 1
14 Friktionsring 1
15 2: a planetväxelsats 1
16 Intern låsring 35 1
17 Extern låsring 7 2
18 Utgångsutrustning 1
19 Växellåda 1
20 1: a planetväxelsats 1
21 Fäste ring 1
22 Sexkantsmutter M6 2
Del Namn Antal
23 Växellådsfäste 1
24 Delad bricka 8 1
25 Kopplingsfjäder 1
26 Lagerbussning 2
27 Tätning 2
28 Trumma 1
29 Kopplingsaxel 1
30 Justeringsbrickan 1
31 Motor 1
32 Sexkantsskruv med M6X20 2
33 Fjäderbricka M6 2
34 Slipsstång 2
35 Syntetiskt rep 1
36 Rullljus 1
37 Magnetventiler 1
38 Handhållen kontroll 1
39 Röd batterikabel 1,85 m 1
40 Svart batterikabel 1.85m 1
41 Röd motorkabel 1,35m 1
42 Svart motorkabel 1,35m 1
43 Monteringsplatta 1
44 Krok 1
Ritning


Contact
PELA Tools
Solängsvägen 13
SE-513 70 Borås
Phone: 033-202650
E-mail: [email protected]
Environmental protection/
Scrapping
Recycle any unwanted material,
do not throw it in the household
rubbish. All machines, accessories
and packaging must be sorted and
left at a recycling center and disposed
of in an environmentally friendly manner.
Specifications
Working load..................................................1588 kg
Motor..............Permanent magnet,0.8kw/1.1hp 12V
Gear reduction ratio....................................... 128.2:1
Gear train....................................... 3-Stage Planetary
Brake.........................................................Mechanical
Cable(Diaxl)........................................ Φ5.4mm x15m
Rope................................................... Φ6.0mm x 15m
Drum size..........................................Φ 45mmx81mm
Overall dimensions....... 354mm x 118mm x121mm
Weight winch with cable....................................12 kg
Weight winch with rope......................................10 kg
Safety measures
Warning! Follow the safety precautions for
personal safety and the safety of others. Improper
use can cause personal injury and damage the
equipment. Read the following manual carefully
before attempting to use your winch and keep the
instructions for future reference.
Dress properly
• Do not wear loose clothing or jewelry. They can
get stuck in moving parts.
• Wear leather gloves when handling winch
cables. Do not handle the wire with bare hands
as broken wires can cause damage.
• Non-slip shoes are recommended.
• Use hair net if you have long hair.
Keep a safe distance
• Make sure that all people keep a safe
distance from the winch wire and load during
winch operation, 1.5 times the recommended
wire length. If a wire is pulled loose or broken
during the load, it can spin back and cause
serious personal injury.
• Do not walk cross/over the wire.
• All visitors should be kept away from the work
area.
• Stand rmly when using the winch
Do not misuse the power cord
• Never carry the winch in the power cord or pull
it to disconnect it from the electrical outlet.
• Keep cord away from heat, oil and sharp edges.
Do not force the winch
• If the engine gets uncomfortably hot to touch,
stop and let it cool for a few minutes.
• Do not leave the power on to the winch if the
engine stops.
Avoid accidental start
• The winch coupling should be disconnected
when not in use and fully engaged when it is
used.
Check damaged parts
• Controll damaged parts.
• Before using it, check your winch carefully. Any
damaged part should be repaired or replaced
by an authorized repairer.
Repair your winch
• When repairing, use only identical spare parts,
otherwise it can cause signicant danger to the
user.
Roll back the wire
• Leather gloves must be worn when rolling back
the wire. To roll back correctly, it is necessary
to keep a small load on the wire. Hold the wire
with one hand and the remote control with the
other. Start as far back as you can and hold it in
the middle. Hold the load on the wire and walk
towards the winch while it rolls in.
• Do not let the wire slide through your hand and
do not go too close to the winch.
• Switch off the winch and repeat the procedure
until the wire, except for 1 m, is rolled up.
• Disconnect the remote control and exit the
winding of the wire by turning the drum by hand
with the clutch disconnected.
• On hidden winches, roll in the wire with the
power on but keep your hands away.
• Warning! Use of any accessories other than
those recommended in the operating
instructions may pose a risk to personal injury.
Warnings when using the winch
Read the following carefully before using your
winch and keep the instructions for future
reference.
1. Uneven winding of the wire while pulling a load
is not a problem, unless there is a pile of wires

at one end of the drum. If this happens, turn the
winch over to unload the load and move your
anchor point further to the center of the vehicle.
When the job is done, you can roll off and roll
back for a nice storage of the wire.
2. Keep the remote control in your vehicle where it
will not be damaged. Check it before
connecting it.
3. When you are ready to start rolling up, engage
the remote control with the clutch disengaged,
do not engage the clutch when the engine is
running.
4. Never connect the hook back to the wire. This
causes wire damage. Always use a chain of sui-
table strength.
5. Observe your winch during winching, preferably
if possible at a safe distance. Stop the winch
process every meter to make sure the wire is
wound up correctly. Getting caught with the
wire can cause damage to your winch.
6. Do not attach the towbars winch mounting
devices. They must be attached to the vehicle
frame.
7. When extending the winch wire, make sure that
at least ve winding wires remain on the drum
at all times. Failure to do so may cause the wire
to separate from the drum under load. This
can lead to serious personal injury or property
damage.
8. All winches are tted with a red marking on the
wire to identify that 5 wire windings remain on
the winch drum when this mark appears on
the reel. No rescue attempts should be made
beyond this marking.
9. Since the greatest traction is achieved on the
innermost layer of your winch, it is desirable
to pull out as much wire as you can for heavy
traction (you must leave at least 5 windings
on after the red mark on the wire). If this is not
practical, use a hoist and arrangement with
double wires.
10. It is recommended to pull a heavy blanket or
similar object over the extended winch wire as
it dampens a backlash in the event of a
problem.
11. Nice, tight winding avoids tangles on the wire,
which is caused when loads are applied and the
wire is not rolled in correctly. Do not attempt to
work with a tangled wire under load.
12. Apply blocks to the wheels when the vehicle is
not standing on a at surface.
13. Battery
• Make sure the battery is in good condition.
Avoid contact with battery acid or other
contaminants. Always wear eye protection
when working around a battery.
• Let the engine run when using the winch to
avoid discharging the battery.
14. Winch wire
• Make sure that the wire is in good condition
and is properly connected.
• Do not use the winch if the wire is broken.
• Do not move the vehicle to pull a load.
• The service life of the cable is directly related to
the use and care it receives. After its rst and
subsequent use, a wire must be wound on the
drum under a load of at least 230 kg, or the
outer turns must be pulled into the inner ones
and seriously damage the wire during
winching. The rst use of the winch should be
in a non-salvage situation so that you become
familiar with the winch. Roll out the wire until
the red wire mark appears (approximately ve
turns on the drum) and then roll the wire back
to the drum under a load of at least 230 kg.
This will tighten it slightly and stretch the new
wire and create a tight wire wrap around the
drum. Failure to do so may result in wire
damage and reduced wire life.
15. When replacing the wire, be sure to apply
lactate, or a similar composition, to the wire
clamp wire. Tighten the clamping screw rmly
but do not tighten too hard. Lactate prevents
the screw from coming loose in dicult
conditions.
16. Do not try to exceed the limits of traction with
this winch.
17. DO NOT drive your vehicle to assist the winch in
any way. The movement of the vehicle in
combination with winch drive can overload the
wire, the winch itself or cause damage shock
loads.
18. To shock load the winch is dangerous! A shock
load occurs when an increased force is
suddenly applied to the wire. A vehicle rolling
back on a slack wire can cause a harmful
shock load.
19. The winches shown in this manual are for
vehicle and boat mounted, non-industrial
applications only.
20. Do not use the winch to lift, support or
transport people.
Mounting the winch
Note! This winch must be mounted with the wire
rope in a underwound direction.
Before starting the winch installation, disconnect
the vehicle ground and positive leads from the
battery.

Minimum electrical requirements: Be sure to select
the appropriate battery or power supply to handle
this winch. If the winch is in heavy use, an auxiliary
battery and a heavy-duty alternator are
recommended.
Step 1 Install mounting kit or prepare a at,
secure mounting location for winch to make sure
the motor, drum and gear box are aligned correctly.
Carefully follow the instructions included with the
mounting kit.
Warning! Be sure structural support is strong
enough to support rated capacity of the winch.
Note! If you do not have a mounting kit, you will
need to drill holes in the structural support. Be sure
that the structural support is at least 5 mm thick.
Warning! If different length bolts, nuts, washers
and other hardware are required for the installation,
always use hardware that equals or exceeds the
strength grade of the supplied hardware.
Step 2 Position the winch over the holes in the
mounting kit or structural support.
Warning! As you position the winch, make sure that
the wire rope winds in the proper rotation on the
drum. Failure to operate the winch in the proper
direction can cause the winch brake (if equipped)
to operate poorly.
Step 3 Secure winch (gure 7) to mounting kit or
structural support using bolts, lock washers and
square nuts supplied with the winch.
Step 4 Secure roller fairlead (gure 7) to mounting
plate or structure support using hardware
supplied or by using two (2) M8x 20L 8.8 Grade
Tensile steels bolts.
Warning! Be sure that both the mounting plate and
winch hardware have been properly tightened.
Caution! No part of the vehicle (skid plates, wiring,
auxiliary lights, tires, etc.) should impede the
operation of the winch. When mounting be sure
that the winch mounting location does not
signicantly reduce ground clearance.
Solenoid mounting
1. The solenoid disconnects the winch from
battery when the vehicle is turned off.
2. The solenoid should be mounted close to the
battery and in a location that is as clean and
dry as possible.
3. The solenoid should be mounted close to the
battery and in a location that is as clean and
dry as possible. Note: The solenoid should not
be mounted in an orientation in which that con-
tact posts are in a downward position.
4. Ensure the solenoid location selected provides
sucient clearance from all metal structures,
such as frame tubes.
Toggle switch installation
Applications: ATV Series
Caution: When attaching wires to the motor or
slenoid terminals, hold the inner nut with a wrench
while tightening the outer nut with a
second wrench. Do not allow terminals to rotate in
their housings. Rotation may cause internal wire
breakage or part misalignment (Figure 9).
Step 1 Check to ensure that the vehicle ground and
positive leads from the battery are
disconnected before performing any electrical
work.

Figure 9—Proper Terminal Tightening
Do not attempt to install wiring when the battery is
connected. Automotive batteries contain
falmmable and explosive gases. Wear eye
protection during installation and remove all me-
tal jewelry. Do not lean over battery while making
connections.
Step 2 Route the wiring harness, attaching the
harness to hard points on the vehicle with cable
ties. Note: When routing the wires, the
appropriate terminals should be located near the
battery, switch mounting point, and winch. Your
installation requirements will vary depending upon
your vehicle and winch. Make sure wires are long
enough to reach the battery, switch mounting point
and winch.
Warning! Ensure that wiring harness does not
interfere any hot or moving engine, suspension,
steering, braking or exhaust parts.
Step 3 Using the supplied clamps, bracket and
hardware mount toggle switch in a convenient
location. See Figure 10.
Wiring installation
Step 1 Route the black wires (1.32m) from the
yellow contact post to the motor negative terminal.
Step 2 Route the red wires (1.32m) from the blue
contact post to the motor positive terminal.
Step 3 Route the black wires (1.85m) from the
black contact post to the battery negative terminal.
Step 4 Route the red wires (1.85m) from the red
contact post to the battery positive terminal.
Step 5 Attach black leads from the toggle switch
to the black leads connected to the solenoid
terminals.
If your winch is with wireless remote, attach black
leads from the receiver to the black leads
connected to the solenoid terminals, and the thin
black wire from the remote needs to be connected
onto the black contact post (battery “-”), otherwise
the remote will be damaged due to short-circuit.
Step 6: Check that all wiring is clear of sharp ed-
ges and pinch points. Secure loose wiring with tie
wraps or electrical tape.
Warning! Before testing winch operation, be sure to
reel off approximately two feet of wire rope.
Test drive
1. Double check that all wiring is correct and that
there no exposed terminals that can short to
the vehicle frame.
2. Turn the ignition key to the ON position. Check
winch for proper operation.
Wire rope
1. The life of the wire rope is directly related to the
care it receives. The wire rope on a new winch,
and any replacement ropes, should be
respooled under a minimum of 45 kg load
before using the winch. Failure to do this will
result in wire rope damage. Inspect wire rope
before use. Mashed, pinched, frayed, or tangled
areas severely reduce the load-carrying
capacity. Replace damaged wire rope.
2. Prevent tangle before they occur.
3. When it is necessary to respool the wire rope
under no load after use, hold the remote switch
lead in one hand and the wire rope in the other.
Start from as far from the vehicle as the remote
switch will allow, activate the switch, walk in
several feet of rope and release switch. Repeat
the process. Always release the switch
before your hand comes within four feet from
the fairlead (if tted)
4. Be sure the wire rope is distributed evenly and
tightly on the drum. A loosely wound drum
allows the wire rope to work its way down into
the layers of wire rope on the drum and
become wedged.
5. It is not advisable to grease or oil the wire rope
due to dirt contamination that will reduce the
wire rope life.
a) This is the start of a tangle.

At this time, the wire rope should
be straightened.
(b) The wire rope was pulled and
the loop has
tightened to a tangle. The wire rope
is now permanently damaged and
should not be used.
(c) The result of tangeling is that each strand pulls
a different amount causing the strands under
greatest tension to break and reduce load
capacity of the wire rope.
Replace the wire rope
1. If the wire rope has become worn or is
beginning to show signs of strands breaking it
must be replaced before being used again. To
do this, remove the defective rope by free
spooling. Remove the bolt on the drum and
release the rope.
2. Insert the end of the new rope and secure bolt
tightly.
3. Engage the clutch and re-spool the new rope
on the drum keeping tension on the rope as it
spools. Ensure that the rope is respooling in the
under wind position.
Warning! Only replace the wire rope with the
identical replacement part recommended by the
manufacturer.
Preparing the winch
Wear heavy leather gloves when handling wire
rope, even with gloves on. When handling the hook,
always use handsaver (See Figure 12.) Never put
your ngers into the hook. Placing nger(s) in hook
could result in injury.
Danger! Never touch the wire rope or hook while
they are in tension or under load. Even at rest, the
winch may have the wire rope in tension. Never
guide a wire rope under tention onto the drum with
your hands (See Fig. 13).
1. Winch with at least ve wraps of wire rope
around the winch drum. With fewer wraps, the
wire rope could pull loose from the drum under
load.
2. When pulling a load, place a blanket, jacket
or tarpaulin over the wire rope near the hook
end(see Fig 14). This will slow the snap back of
a broken wire rope and help to prevent serious
injury. Raise hood to protect windshield.
Maintenance
1. Check the tightness of mounting bolts and
electrical connections regularly. Remove all dirt
or corrosion and always keep clean.
2. Do not attempt to disassemble the gear box.
Repairs should be done by the manufacturer or
an authorized center.
3. The gear box has been lubricated using a high
temperature lithium grease and is sealed at the
factory. No internal lubrication is required.
Note! The safety instructions and instructions
discussed in this manual may not cover all
possible conditions and situations that may occur.
It must be understood by the operator that
common sense and caution are factors that cannot
be built into this product, but must be applied by
the operator.

Problem Possible causes Solution
Motor will not operate or only
operates in one direction 1.Switch inoperative
2.Broken wires or bad
connection
3.Damaged motor
1.Replace switch
2.Check for poor
connections
3.Replace or repair motor
Motor runs extremely hot 1.Long period of opreration
2.Failed or removed overload
3.Damaged motor
1.Slow to cool
2.Place or repair overload
3.Place or repair motor
Motor runs, but with
insucient power or line
speed
1.Weak battery
2.Battery to winch wire too
long
3.Poor battery connection
4.Poor ground
5.Damaged motor
1.Recharge or replace
battery and check charging
system
2.Keep winch within
distance allowed by lead
wires
3.Check battery terminals
for corrosion and clean as
required
4.Check and clean
connections
5.place or repair motor
Winch runs backwards 1.Wires are reversed
2.Battery switch installed
incorrectly
1. Check wiring
2.Check battery
connections
Motor runs but drum does not
turn Clutch not engaged Clutch not engaged
Winch coasts Excessive load Reduce load or double line
Motor operations but stops Excessive load/overload Allow to cool
Trouble shooting

Part Part name QTY
1 Hex socket screw 8 M5x20 8
2Spring washer M5 4
3 Flat washer 5 4
4 Knob 1
5Knob seal 1
6End cap of gear box 1
housing 1
7External Circlip 1
8 Slide block 1
9Friction gasket 1
10 Locating plate 1
11 Sealer 2
12 Gear box housing 1
13 3rd planetary gear set 1
14 Friction ring 1
15 2nd planetary gear set 1
16 Internal Circlip 35 1
17 External Circlip 7 2
18 Output gear 1
19 Transmission shaft 1
20 1st planetary gear set 1
21 Bracket ring 1
22 Hex nut M6 2
Part Part name QTY
23 Gear box bracket 1
24 Split washer 8 1
25 Clutch spring 1
26 Bearing bush 2
27 Seal 2
28 Drum 1
29 Coupling shaft 1
30 Adjusting washer 1
31 Motor 1
32 Hex socket cap screw 2
M6X20
2
33 Spring washer M6 2
34 Tie bar 2
35 Wire rope or Snythetic rope 1
36 Roller fairlead 1
37 Solenoid 1
38 Handheld control 1
39 Red battery cable1.85m 1
40 Black battery cable1.85m 1
41 Red motor cable1.35m 1
42 Black motor cable 1.35m 1
43 Mounting plate 1
44 Hook 1
Diagram


Verktygsboden Erlux AB Källbäcksrydsgatan 1, SE-507 42 Borås
© Verktygsboden · Borås · Sweden · 0120504-03
Table of contents
Languages:
Other pela tools Winch manuals
Popular Winch manuals by other brands

Warn
Warn PN 61020 installation instructions

Mile Marker
Mile Marker HI9000 Installation & operator's manual

KStrong
KStrong AFA930301 User instruction manual

Monzana
Monzana DBSW001 quick start guide

SPEEDMASTER
SPEEDMASTER PCE553.1001 manual

Paccar Winch
Paccar Winch Braden BA2A Installation maintenance and service manual

Warn Industries
Warn Industries 15-A-59 Series manual

Stealth
Stealth 35STS12 owner's manual

MSA
MSA SURE STRONG SCE1074021050 Instruction for operation and maintenance

Tractel
Tractel tirak X 300 P Series Original assembly and operating instructions manual

Dover
Dover TWG TULSA WINCH 1200W Service manual

Andersen
Andersen WINCH 46 Mounting instruction