manuals.online logo
Brands
  1. Home
  2. •
  3. Brands
  4. •
  5. Perlick
  6. •
  7. Kitchen Appliance
  8. •
  9. Perlick RS-CDK User manual

Perlick RS-CDK User manual

FORM NO. Z2570
REV. A-09/18/2018
PERLICK RESIDENTIAL ICED COFFEE DISPENSING KIT
To prevent appliance or component damage and injury, read these
instrucons thoroughly prior to installaon and operaon.
RS-CDK
INSTALLATION
INSTRUCTIONS
PERLICK RESIDENTIAL RS-CDK INSTALLATION INSTRUCTIONS
2| perlick.com/residential
CONTENTS
3 Introducon
4 Installaon
PERLICK RESIDENTIAL RS-CDK INSTALLATION INSTRUCTIONS
perlick customer service (800)558-5592 | 3
INTRODUCTION
Model Number: _____________________________________
Serial Number: _____________________________________
Purchase Date: _____________________________________
Dealer Name/Address:
__________________________________________________
__________________________________________________
__________________________________________________
Phone Number: ____________________________________
C
US
IMPORTANT!
Read and understand all information in this manual before attempting the installation. All plumbing
and electrical work must be performed by a qualified technician and conform to all applicable state
and local codes.
CONGRATULATIONS
CongratulaonsonyourpurchaseofaPerlickhighquality
residenal Beer Dispenser. Perlick has proudly manufactured
beerdispensingsystemsforover50yearsforbars,restaurants,
stadiums,arenasandlargevenuesaroundtheworld.Thatsame
technologyisusedineachandeveryresidenalbeerdispenser
weproduce,assuringyou’llpourfresh,coldbeerasthebrewery
intendedittobeenjoyed.
All Perlick products are built with commercial grade stainless
steel,providingyouwiththebeautyanddurabilityforalifeme
ofuse.Thisinstallaonguidewillshowyouhowtoproperly
installthedispensingequipmentonyourPerlickBeerDispenser.
We dedicate considerable me to ensure that our products
providethehighestlevelofcustomersasfacon. If,however,
service isrequired,callPerlickat 800.558.5592. Foryour own
protecon,neverreturnmerchandiseforcreditwithoutour
approval.
WethankyouagainforselecngahighqualityPerlickBeer
Dispenser.Cheers!
IMPORTANT!
The installation of the actual beer dispens-
er cabinet should happen prior to installing
the dispensing equipment. Refer to the
Installation Manual that accompanied the
Beer Dispenser for step-by-step installation
of the cabinet.
Keep CO2 cylinder away from heat.
Rupture disc vents at 122°F maximum.
Allow only properly trained and
experienced personnel to handle high pressure gas.
Do not drop or throw regulator or
CO2 cylinder.
Do not apply oil to the regulator!
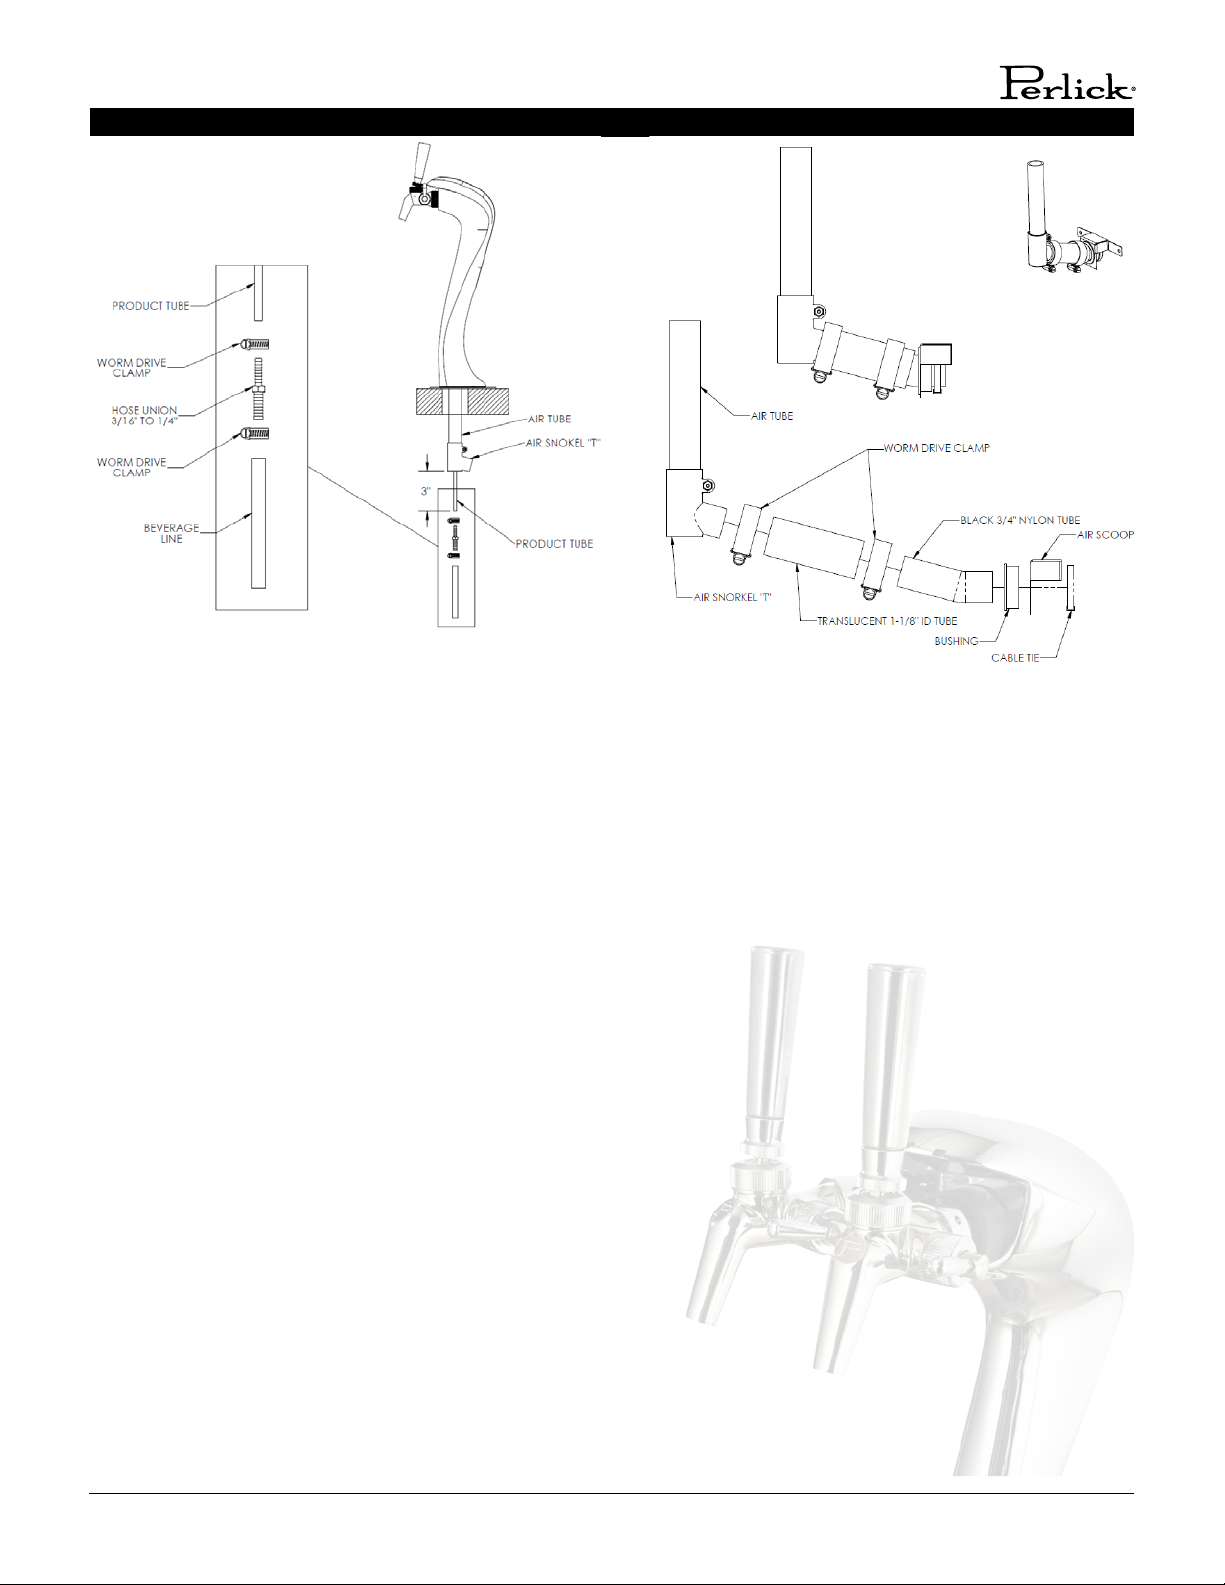
PLEASE NOTE
The following instructions are for both the
Draft Arm (standard tower) and the Adara
Signature Beer Tower. Some photos and
drawings may only show the Draft Arm, but
the instructions will also apply to the Adara
Signature Beer Tower unless noted.
DANGER
!
DANGER
!
WARNING
WARNING
PERLICK RESIDENTIAL RS-CDK INSTALLATION INSTRUCTIONS
4| perlick.com/residential
INSTALLATION
INSTALLATION OF DISPENSING EQUIPMENT
Openthetappingkitboxandbecomefamiliarwithitscompo-
nents.Theinstruconsonpages4through10willdemonstrate
howtoproperlyinstallthetappingequipmentonyourPerlick
BeerDispenser,withtheRS-CDKIcedCoeeDispensingKit.
Dispensing Head
Faucet Lead
Apply silicone to
bottom ange
Flange Sleeve
All hose connections
use worm-drive hose
clamps (view enlarged
to verify)
Quick Connect to
Nitrogen Regulator
Keg
Quick Connect to
Dispensing Head
Coee Connection
NOTE: Image does not accurately reect posions of the
dierent elements within the unit. Posions and hose lengths
shown are to clearly illustrate proper connecon methods only.
Nitrogen Tank
PERLICK RESIDENTIAL RS-CDK INSTALLATION INSTRUCTIONS
perlick customer service (800)558-5592 | 5
INSTALLATION
MOUNTING HOLE TEMPLATE FOR DRAFT ARMS
AND ADARA SIGNATURE TOWERS
NOTE: If installing accessory kit on exisng unit, skip to
page 6.
PERLICK RESIDENTIAL RS-CDK INSTALLATION INSTRUCTIONS
6| perlick.com/residential
INSTALLATION
INSTALLATION OF DISPENSING EQUIPMENT
Openthetappingkitboxandbecomefamiliarwithits
components.Ifthedispensingheadisgoingtobemountedon
acountertopdirectlyabovetherefrigeratedcabinet,havethe
countertoppre-drilledusingthesuppliedtemplateonpage12.
Makesurethattheaccessholeintherefrigeratedcabinetisin
linewiththecountertopholes.Removeanyobstruconsfrom
theaccessholeoftherefrigerator.
Followinstruconsonpages8through11toproperlyinstallthe
tappingequipmentonyourPerlickunit,orwatchourBeer
DispenserTappingInstallaonvideo.
NOTE: Wash tapping devices thoroughly. Flush beer
and faucet lines, as well as the tapping device (keg
coupler) with fresh water.
IF YOU ARE INSTALLING A DRAFT ARM - SKIP TO PAGE 8. THE FOLLOWING INSTRUCTIONS ARE
ADDITIONAL PREPARATION STEPS FOR THE ADARA DISPENSING HEAD ONLY
1. Marktheairtubeforcorrectlengthdependentuponyourinstallaonscenario.Ifinstallingdirectlyontopoftherefrigerated
cabinet,makeamark5inchesfromtheboomofthetower(Figure1).Ifinstallingdirectlyontopofacountertop,addthe
depthofthecountertoptotheoriginal5inchesandmarkatthatnewdimension(Figure2).
Figure 1. Figure 2.
PERLICK RESIDENTIAL RS-CDK INSTALLATION INSTRUCTIONS
perlick customer service (800)558-5592 | 7
INSTALLATION
2. Removeair“T”fromendofairtubebylooseningfastenerholdingthetwohalvestogether.Removetheairtubefromthe
towerbeingcarefulnottodamagetheproducttube.
3. Cutairtubeatmarkmadeinstep1.Re-installairtubeintotowerandre-install“T”ontheendoftheairtubeso“T”facesthe
rearofthetower.
4. Cutproducttube3inchesbelowthe“T”andinstallincludedbarbedunionintoproducttubeandclampusingwormdrive
clamp.
Figure 3. Figure 4.
PERLICK RESIDENTIAL RS-CDK INSTALLATION INSTRUCTIONS
8| perlick.com/residential
INSTALLATION
Locate the dispensing head , black beer line(s), and hose
clamp(s).Slideoneendofeachbeerlineontothestainless
steeltubeswhichprotrudeouttheboomofthedispensing
headandclampght.
Removetransittapewithaulityknifearoundtheholeinthe
topoftheunitfrombothinsideandoutsideofthecabinet.
Gentlypunchoutfoamw/screwdriverandremove.Insertthe
beerline(s)throughtheholeinthecountertop.Movehead
asideandbeadsiliconearoundperimeterofhole,andthen
posiontheheadbackinplace.Fastenusingthe4chrome
screws included with the dispensing head. Wipe o excess
siliconetocompletetheseal.
1.
2.
Usethe3/8”-thickfoampadincludedinthetappingkitand
rollintoacylinder.Frominsidethecabinet,insertthefoam
tubeupthroughtheholeinthecountertopunlitisrmly
againsttheinsulaoninthedispensinghead.Mark,thenput
awayanyexcessfoam.
NOTE: If using an Adara tower, foam needs to be installed so
that it is pressed up against the boom mounng ange of
the tower.
3.
PERLICK RESIDENTIAL RS-CDK INSTALLATION INSTRUCTIONS
perlick customer service (800)558-5592 | 9
INSTALLATION
Insert end of the snorkel up into the tower and screw air
scoopmounngbracketintovacatedholesabovethefan.
6.
InstalltheAirScoopKit.Startbyremovingtheuppersetof
screwslocatedabovethefanonthebackwallofthecabinet.
Assemblecomponentsfromthekitasfollows–Insertblack
snap bushing into air scoop mounng bracket, then insert
oneend oftheair snorkelthroughthesnapbushing.Azip
ecanbeinsertedbehindthemounngbrackettokeepthe
tubeinplace.
NOTE: For Adara Towers, the air snorkel consists of a 3 inch
piece of black tubing and a 3 inch piece of clear tubing that
slides over each other and then is clamped using included
worm drive clamp. The black tube is inserted per the above
instrucons and secured with the included zip e. The clear
tube is installed over the air “T” from the dispensing head and
secured with the included worm drive clamp. See Figure 4 on
page 5 for illustraon.
4.
5.
PERLICK RESIDENTIAL RS-CDK INSTALLATION INSTRUCTIONS
10 | perlick.com/residential
INSTALLATION
Slideoneendofrednitrogenhoseontothebarbngof
theregulatorandclamp.Slideotherendontoagrayquick
connect,clampandaachtocoeetankinlet.
7.
Slide black hose from dispensing head to quick connect,
clamp,andaachtocoeetankoutlet.
8.
Ontherightrearsidewallthereisadoublecolumnofscrews.
Removethelescrew.Locatethe safetychainanda#10x
1/2”sheetmetalscrewfromthepartsbag.Insertthescrew
throughtheclosed endlink ofthechainandghteninthe
vacantscrewhole.Thechaincannowbeusedtosecurethe
tankwith“S”hook,prevenngdamagetotheregulator.
9.
PERLICK RESIDENTIAL RS-CDK INSTALLATION INSTRUCTIONS
perlick customer service (800)558-5592 | 11
INSTALLATION
Locatethefaucetandinstallontothedispensingheadshanks.
Tightenwithsuppliedspannerwrench.Installblackhandle(s)
ontofaucet(s).
11.
Nitrogen tanks are shipped empty and must be lled prior
to use. Turn the adjusng knob on the regulator counter-
clockwise unl the secondary gauge (top) reads zero.
Make sure that the valve at the boom of the regulator
where the red hose is connected is in the o posion as
shown. Watching the secondary pressure gauge, turn the
regulator adjusng knob clockwise unl the pressure is at
15psig.Adjustmentscanlaterbemadebasedonowrates.
IMPORTANT:AllpressureadjustmentsMUSTbemadewhen
theshut-ovalveisintheOFFposion!
10.
PERLICK RESIDENTIAL RS-CDK INSTALLATION INSTRUCTIONS
12 | perlick.com/residential
INSTALLATION
CONNECTING THE REGULATOR TO THE NITROGEN CYLINDER
1. Removetheblueplugfromtheregulatorng,butdonot
removethecarbonicwasher.
2. Screwregulatorontogascylindervalve.Tightenwithwrench
unlvercallystraight.Besurethattheshut-ovalveonthe
regulatorisintheOFF(horizontal)posion.
3. Placescrewclamp overthe end of redlineand push onto
regulatortailpiece.Tightenclampwithascrewdriver.
4. Turnregulatoradjusngscrewcounterclockwiseunlitturns
freely.
5. Turnhandvalvecounter-clockwiseonthenitrogencylinder
tothefullyopenposion.
6. Turn regulator adjusng screw clockwise unl desired
pressureisreached(approximately12-15lbs.)Tightenstop
nutonadjusngscrew.
7. Openshut-outvalveonboomofregulator.
8. Dilute a small amount of liquid dishwashing soap and rub
the soapy mixture around connecons. If bubbles appear,
ghtenconnecon.
NITROGEN
NITROGEN
FORM NO. Z2570
REV. A-09/18/2018
8300 West Good Hope Road, Milwaukee, WI 53223, USA
perlick.com/residenal • (800) 558-5592
Perlick Residential is a division of Perlick Corporation
© 2018 Perlick Corporation

Other Perlick Kitchen Appliance manuals

Perlick Signature HP15R User manual

Perlick

Perlick Signature HP15R User manual

Perlick 4400QC Series User manual

Perlick

Perlick 4400QC Series User manual

Perlick HP15 User manual

Perlick

Perlick HP15 User manual

Perlick 63134-1 User manual

Perlick

Perlick 63134-1 User manual

Perlick HP24ZO-4 User manual

Perlick

Perlick HP24ZO-4 User manual

Perlick DP32B User manual

Perlick

Perlick DP32B User manual

Perlick Shallow Depth HH24WS-1X Owner's manual

Perlick

Perlick Shallow Depth HH24WS-1X Owner's manual

Perlick H Series User manual

Perlick

Perlick H Series User manual

Perlick HP15TS/TO User manual

Perlick

Perlick HP15TS/TO User manual

Perlick Signature Series HP15TS User manual

Perlick

Perlick Signature Series HP15TS User manual

Perlick HP24TS/TO User manual

Perlick

Perlick HP24TS/TO User manual

Perlick HC24BB User manual

Perlick

Perlick HC24BB User manual

Perlick HH Series Owner's manual

Perlick

Perlick HH Series Owner's manual

Popular Kitchen Appliance manuals by other brands

stelton Brus manual

stelton

stelton Brus manual

Trueshopping O-MINI-S-330 owner's manual

Trueshopping

Trueshopping O-MINI-S-330 owner's manual

elvita CWC3340X user manual

elvita

elvita CWC3340X user manual

Pkm WKS 44A instruction manual

Pkm

Pkm WKS 44A instruction manual

Aroma AEW-316 Instruction manual & authentic cooking guide

Aroma

Aroma AEW-316 Instruction manual & authentic cooking guide

Hamilton Beach 59780 instruction manual

Hamilton Beach

Hamilton Beach 59780 instruction manual

Berkel 919M Specifications

Berkel

Berkel 919M Specifications

Amitek SG350A Installation - use - maintenance

Amitek

Amitek SG350A Installation - use - maintenance

Russell Hobbs 28270-56 manual

Russell Hobbs

Russell Hobbs 28270-56 manual

Breville BMF600XL - REV D10 Instruction book

Breville

Breville BMF600XL - REV D10 Instruction book

Bialetti Moka timer Instructions for use

Bialetti

Bialetti Moka timer Instructions for use

Kenwood A995 manual

Kenwood

Kenwood A995 manual

Dash SMARTSTORE DSSP300 user manual

Dash

Dash SMARTSTORE DSSP300 user manual

W.Besteckhaus SCHAFER GOURMEMAXX user manuel

W.Besteckhaus SCHAFER

W.Besteckhaus SCHAFER GOURMEMAXX user manuel

U-Line UHBV515-IG01A User guide & service manual

U-Line

U-Line UHBV515-IG01A User guide & service manual

Sandra's Keukenmini's Egg Cooker instruction manual

Sandra's Keukenmini's

Sandra's Keukenmini's Egg Cooker instruction manual

Bella 14447 instruction manual

Bella

Bella 14447 instruction manual

Carat Pro-Mixer operating manual

Carat

Carat Pro-Mixer operating manual

manuals.online logo
manuals.online logoBrands
  • About & Mission
  • Contact us
  • Privacy Policy
  • Terms and Conditions

Copyright 2025 Manuals.Online. All Rights Reserved.