manuals.online logo
Brands
  1. Home
  2. •
  3. Brands
  4. •
  5. Pfister
  6. •
  7. Bathroom Fixture
  8. •
  9. Pfister Bedford 801-WS2-BD User manual

Pfister Bedford 801-WS2-BD User manual

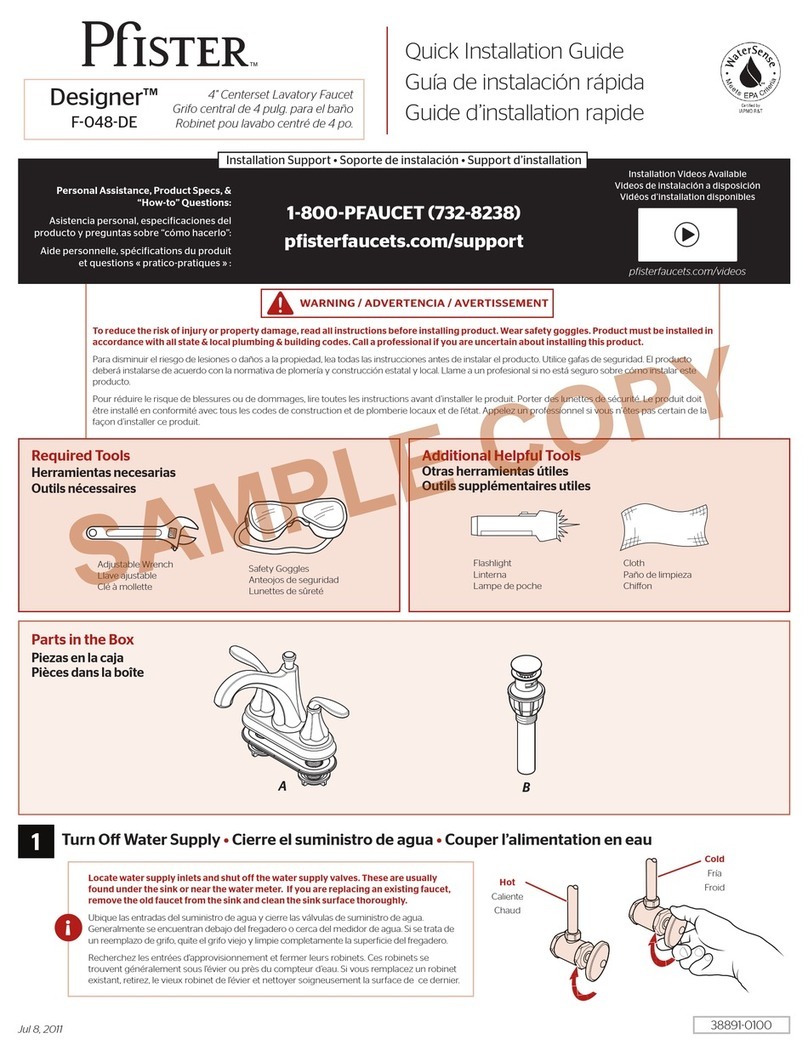
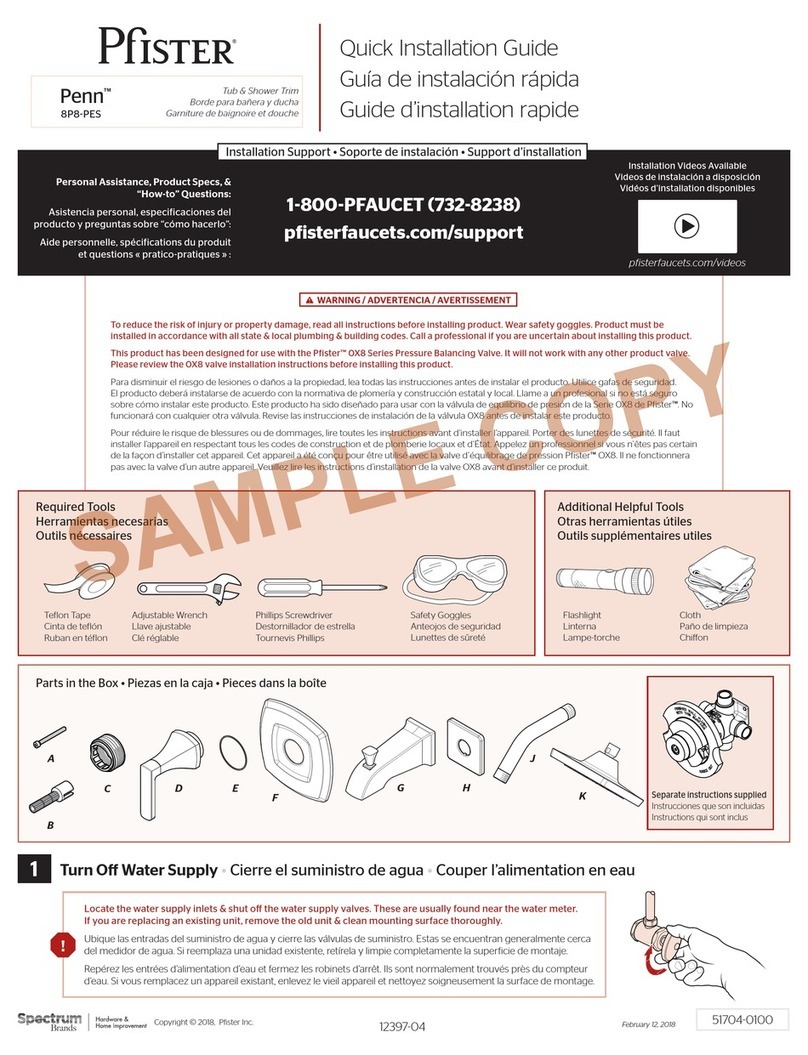
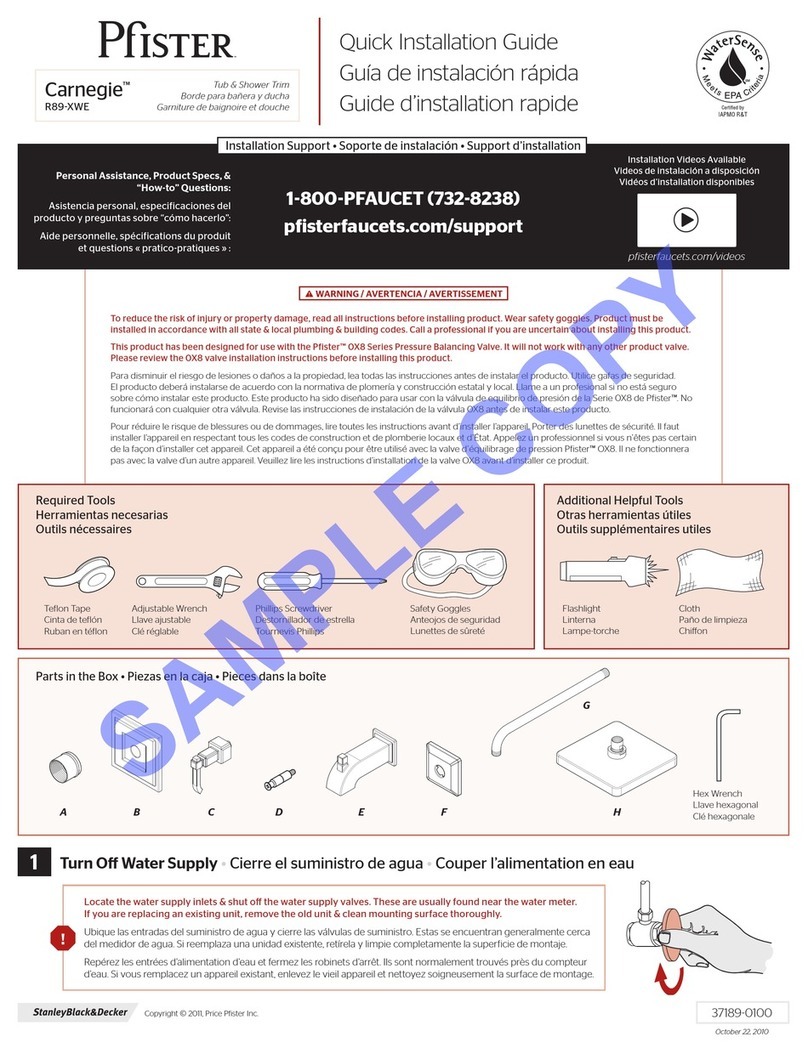
Required Tools
Herramientas necesarias
Outils nécessaires
Additional Helpful Tools
Otras herramientas útiles
Outils supplémentaires utiles
Telon Tape
Cinta de telón
Ruban en télon
Flashlight
Linterna
Lampe-torche
Cloth
Paño de limpieza
Chion
Parts in the Box • Piezas en la caja • Pieces dans la boîte
Turn O Water Supply •Cierre el suministro de agua •Couper l’alimentation en eau
1
Adjustable Wrench
Llave ajustable
Clé réglable
511660100
August 7, 2017
Installation Support • Soporte de instalación • Support d’installation
Installation Videos Available
Videos de instalación a disposición
Vidéos d’installation disponibles
pisterfaucets.com/videos
Safety Goggles
Anteojos de seguridad
Lunettes de sûreté
Quick Installation Guide
Guía de instalación rápida
Guide d’installation rapide
801WS2BD
Bedford™
To reduce the risk of injury or property damage, read all instructions before installing product. Wear safety goggles. Product must be
installed in accordance with all state & local plumbing & building codes. Call a professional if you are uncertain about installing this product.
Para disminuir el riesgo de lesiones o daños a la propiedad, lea todas las instrucciones antes de instalar el producto. Utilice gafas de seguridad. El
producto deberá instalarse de acuerdo con la normativa de plomería y construcción estatal y local. Llame a un profesional si no está seguro sobre
cómo instalar este producto.
Pour réduire le risque de blessures ou de dommages, lire toutes les instructions avant d’installer l’appareil. Porter des lunettes de sécurité. Il faut
installer l’appareil en respectant tous les codes de construction et de plomberie locaux et d’État. Appelez un professionnel si vous n’êtes pas certain
de la façon d’installer cet appareil.
WARNING / ADVERTENCIA / AVERTISSEMENT
Locate the water supply inlets & shut o the water supply valves. These are usually found near the water meter.
If you are replacing an existing unit, remove the old unit & clean mounting surface thoroughly.
Ubique las entradas del suministro de agua y cierre las válvulas de suministro. Estas se encuentran generalmente cerca
del medidor de agua. Si reemplaza una unidad existente, retírela y limpie completamente la supericie de montaje.
Repérez les entrées d’alimentation d’eau et fermez les robinets d’arrêt. Ils sont normalement trouvés près du compteur
d’eau. Si vous remplacez un appareil existant, enlevez le vieil appareil et nettoyez soigneusement la surface de montage.
Personal Assistance, Product Specs, &
“How-to” Questions:
Asistencia personal, especiicaciones del
producto y preguntas sobre “cómo hacerlo”:
Aide personnelle, spéciications du produit
et questions « pratico-pratiques » :
1800PFAUCET (7328238)
pisterfaucets.com/support
Copyright © 2017, Pister Inc. 1218201
Tub & Shower Trim
Borde para bañera y ducha
Garniture de baignoire et douche
Pipe Wrench
Llave de tubo
Clé à Tube
Propane Torch
Antorcha de Propano
Torche de Propane
Phillips Screwdriver
Destornillador de estrella
Tournevis Phillips
Plugs Not Included
Tapones no incluidos
Bouchons non inclus
A
B
DC
E (x3)
F (x3)
G (x3)
or
o
ou
H (x3)
J (x4)
K (x3)
L
SAMPLE COPY
2
2
No Parts Required for This Step
No se necesitan piezas para este paso
Aucune pièce nécessaire pour cette étape
Prepare for Installation
Preparación para la instalación
Préparez pour installer
No Tools Required for This Step
No se necesitan herramientas para este paso
Aucun outil n’est nécessaire pour cette étape
2B
2B
Valve Installation-Shallow Wall
Instalación de la válvula-Pared poco profunda
Installation de la vanne-Mur peu profond
Valve Installation-Deep Wall
Instalación de la válvula-Pared profunda
Installation de la vanne-Mur profond
2A Work Area Inspection
Inspección del área de trabajo
Contrôle de la zone de travail
2 11/32" MAX
(59.7 mm)
1 9/16" MAX
(40 mm)
1 3/4" DIA
(45 mm DIA)
25/32" (20 mm)
1 9/16" (39 mm)
1 3/4" DIA
(45 mm DIA)
11/4" DIA
(32 mm DIA)
13/4" DIA
(45 mm DIA)
3 Places
11/4" DIA
(32 mm DIA)
50"
(1270 mm)
4"
(102 mm)
8"
(203 mm)
6' 6"
(1981 mm)
8"
(203 mm)
FLOORSUELO-Étage
3
3A
Option1: Iron Pipe Installation
Opción 1: Instalación de Tubería de Hierro
Option1: Installation de Tuyaux de Fer
Option2: 1/2" Copper Pipe Installation
Opción 2: Instalación de Tubería de cobre de 1/2"
Opción 2: Installation de tuyau de cuivre de 1/2"
3Supply Connections
Conexiones de la fuente
Raccordements d'alimentation
Adjustable Wrench
Llave ajustable
Clé réglable
‡
‡
‡
Not Included
No Incluido
Non Inclus
Pipe Wrench
Llave de tubo
Clé à Tube
Propane Torch
Antorcha de Propano
Torche de Propane
3A 3B
A
Hot
Caliente
Chaud
Hot
Caliente
Chaud
Cold
Fría
Froid
Cold
Fría
Froid
A
4
4Pressure Testing the Valves
Prueba de Presións de Válvulas
Test de Pression de Valves
Turn to full ON position and check connections for leaks.
Turn to full OFF position and check for leaks from the outlets
Gire los vástagos de las válvulas a la posición completamente
abierta y revise todas las conexiones para ver si hay fugas. Gire
los vástagos de las válvulas a la posición cerrada y veriique que
no haya fugas de las salidas.
Faites tourner les tiges des robinets d'eau jusqu'à ce qu’elles
soient dans la position voulue et vériiez tous les raccords pour
vous assurer qu’ils ne fuient pas. Faites tourner les tiges des
robinets d’eau jusqu’à ce qu’elles soient fermées et vériiez si les
sorties ne fuient pas.
Open
Abierta
Ouverte
Open
Abierta
Ouverte
No Tools Required for This Step
No se necesitan herramientas para este paso
Aucun outil n’est nécessaire pour cette étape
Plugs Not Included
Tapones no incluidos
Bouchons non inclus
Remove slowly
Retire lentamente
Retirer lentement
4A
4C
4B
5
5
Telon Tape
Cinta de telón
Ruban en télon
Shower Arm and Spout Installation
Instalación del Brazo de Ducha y el Surtidor
Installation du Bas de Douche y le Bec
B
A2
C
J
D
5A 5B
BDJ
3
7
/8” to 4”
(98 to 102 mm)
C
6
7Turn On Water
Active el suministro de agua
Ouvrez l’eau
Turn on your water supply & check for any leaks.
Active el suministro de agua y revise si hay fugas.
Rétablissez l’alimentation en eau et vériiez s’il y a des fuites.
6
Telon Tape
Cinta de telón
Ruban en télon
Shower Flange and Handles Installation
Instalación de Rebordes y las Manijas
Installation du Brides et Poignée
K
J
E
F
G
H
Phillips Screwdriver
Destornillador de estrella
Tournevis Phillips
6A 6B
E (x3)
F (x3) H (x3) J (x3) K (x3)
G (x3)
or
o
ou
7
Flush and Install Showerhead
Enjuague y instalar Ducha
Vidangez et installez la Douchette
8A 8B
Allow full hot & full cold water to run for at
least 15 seconds each.
Deje correr el agua caliente y fría durante al menos
15 segundos cada una.
Permettez à l'eau chaude et l'eau froide de couler
au moins 15 secondes chacun.
15
sec
L
NOTE: Ensure the low restrictor is
inside the showerhead.
NOTA: cerciórese que el limitador
de lujo esté dentro del cabezal de
ducha.
REMARQUE : Assurez-vous que le
restricteur de débit est à l’intérieur
de la pomme de douche.
8
Telon Tape
Cinta de telón
Ruban en télon L
8
For Additional Installation Help:
Para la instalación adicionales de ayuda:
Pour aider à l’installation supplémentaires:
1800PFAUCET (7328238)
pisterfaucets.com
SAMPLE COPY

Other Pfister Bathroom Fixture manuals

Pfister Pasadena LF-048-PDCC User manual

Pfister

Pfister Pasadena LF-048-PDCC User manual

Pfister 0X6-050R User manual

Pfister

Pfister 0X6-050R User manual

Pfister Selia F-048-SL User manual

Pfister

Pfister Selia F-048-SL User manual

Pfister Deckard R89-1DA User manual

Pfister

Pfister Deckard R89-1DA User manual

Pfister Tenet LG49-TNTBG User manual

Pfister

Pfister Tenet LG49-TNTBG User manual

Pfister Avalon LG48-CB1 User manual

Pfister

Pfister Avalon LG48-CB1 User manual

Pfister Penn 8P8-PES User manual

Pfister

Pfister Penn 8P8-PES User manual

Pfister 16-40 User manual

Pfister

Pfister 16-40 User manual

Pfister Skye F-046-SY User manual

Pfister

Pfister Skye F-046-SY User manual

Pfister Designer F-048-DE User manual

Pfister

Pfister Designer F-048-DE User manual

Pfister Selia 0 8 Series User manual

Pfister

Pfister Selia 0 8 Series User manual

Pfister Portola RT6-4RPK User manual

Pfister

Pfister Portola RT6-4RPK User manual

Pfister Rhen R89-2RH User manual

Pfister

Pfister Rhen R89-2RH User manual

Pfister Bedford 807-WS2-BD User manual

Pfister

Pfister Bedford 807-WS2-BD User manual

Pfister Bedford 801-WS-BD User manual

Pfister

Pfister Bedford 801-WS-BD User manual

Pfister Tisbury LG6-2TB User manual

Pfister

Pfister Tisbury LG6-2TB User manual

Pfister Kelen RT6-5MF User manual

Pfister

Pfister Kelen RT6-5MF User manual

Pfister KENZO LG40-DF User manual

Pfister

Pfister KENZO LG40-DF User manual

Pfister 16 Series User manual

Pfister

Pfister 16 Series User manual

Pfister Avalon T49-CB0K User manual

Pfister

Pfister Avalon T49-CB0K User manual

Pfister Hanover 808 Series User manual

Pfister

Pfister Hanover 808 Series User manual

Pfister Shower Panel 016-651SP User manual

Pfister

Pfister Shower Panel 016-651SP User manual

Pfister Traditional RT6-1TF User manual

Pfister

Pfister Traditional RT6-1TF User manual

Pfister Avalon 49 Series User manual

Pfister

Pfister Avalon 49 Series User manual

Popular Bathroom Fixture manuals by other brands

Kohler Mira Sport Max J03G Installation and user guide

Kohler

Kohler Mira Sport Max J03G Installation and user guide

Moen 186117 Series installation guide

Moen

Moen 186117 Series installation guide

Hans Grohe Raindance Showerpipe 27235000 Instructions for use/assembly instructions

Hans Grohe

Hans Grohe Raindance Showerpipe 27235000 Instructions for use/assembly instructions

Signature Hardware ROUND SWIVEL BODY SPRAY 948942 Install

Signature Hardware

Signature Hardware ROUND SWIVEL BODY SPRAY 948942 Install

fine fixtures AC3TH installation manual

fine fixtures

fine fixtures AC3TH installation manual

LIXIL HP50 Series quick start guide

LIXIL

LIXIL HP50 Series quick start guide

KOLO ATOL PLUS installation manual

KOLO

KOLO ATOL PLUS installation manual

Hans Grohe PuraVida 15073000 Instructions for use/assembly instructions

Hans Grohe

Hans Grohe PuraVida 15073000 Instructions for use/assembly instructions

Toto TS111B8 Installation and owner's manual

Toto

Toto TS111B8 Installation and owner's manual

Kohler K-1158-H2 Homeowner's guide

Kohler

Kohler K-1158-H2 Homeowner's guide

Coram Showers OFFSET QUADRANT manual

Coram Showers

Coram Showers OFFSET QUADRANT manual

baliv DU-2010 manual

baliv

baliv DU-2010 manual

odass OD-1710 instruction manual

odass

odass OD-1710 instruction manual

Oxygenics Evolution Easy installation instructions

Oxygenics

Oxygenics Evolution Easy installation instructions

Bradley Express SS Series installation instructions

Bradley

Bradley Express SS Series installation instructions

Helvex TH-974 installation guide

Helvex

Helvex TH-974 installation guide

DURAVIT C.1 C15240 0090 Instructions for mounting and use

DURAVIT

DURAVIT C.1 C15240 0090 Instructions for mounting and use

Sunshower PURE SOLO manual

Sunshower

Sunshower PURE SOLO manual

manuals.online logo
manuals.online logoBrands
  • About & Mission
  • Contact us
  • Privacy Policy
  • Terms and Conditions

Copyright 2025 Manuals.Online. All Rights Reserved.