manuals.online logo
Brands
  1. Home
  2. •
  3. Brands
  4. •
  5. Philips
  6. •
  7. Alarm Clock
  8. •
  9. Philips HR5784/00 User manual

Philips HR5784/00 User manual

TIME SET
ALARM
ON/OFF
ALARM SET
ALARMTIME
AM
AM
8 MIN.
1
TIME SET
ALARM
ON/OFF
ALARM SET
ALARMTIME
8 MIN.
4
TIME SET
ALARM
ON/OFF
ALARM SET
ALARMTIME
8 MIN.
5
TIME SET
ALARM
ON/OFF
ALARM SET
ALARMTIME
8 MIN.
6
TIME SET
ALARM
ON/OFF
ALARM SET
ALARMTIME
8 MIN.
7
TIME SET
ALARM
ON/OFF
ALARM SET
ALARMTIME
8 MIN.
8
TIME SET
ALARM
ON/OFF
ALARM SET
ALARMTIME
8 MIN.
9
TIME SET
ALARM
ON/OFF
ALARM SET
ALARMTIME
8 MIN.
10
TIME SET
ALARM
ON/OFF
ALARM SET
ALARMTIME
8 MIN.
11
TIME SET
ALARM
ON/OFF
ALARM SET
ALARMTIME
8 MIN.
12
2 3
A
D E
H
C
F
B
G
ALARMTIME
HR 5784
4222 001 22612 ;
English
Important
• Please read the instructions and refer to the
illustrations before using the alarm clock.
• Do not allow the alarm clock to come into contact
with water.
General description (fig. 1)
ACover
BDisplay
CTime of day button
DAlarm time button
EAlarm on / off button
FSetting button (+ = scroll up; - = scroll down)
GSnooze / light button
HLid of battery compartment
Battery
This appliance works on one LR 03 (AAA 1.5 V) battery (not
included).
Please note that Philips batteries are recommended for
their long life and environmental-friendly properties.
- Open the battery compartment (fig. 2).
- Place the battery (note the + and - indications) (fig. 3).
- Close the battery compartment. (‘Click!’)
The travel alarm clock is now ready for use.
Replacing the battery
The battery needs replacement if symbol appears in
the display (right hand bottom corner).
Note: Batteries contain substances which may pollute the
environment. Please dispose of your old batteries at an
officially assigned place.
Setting
Time of day
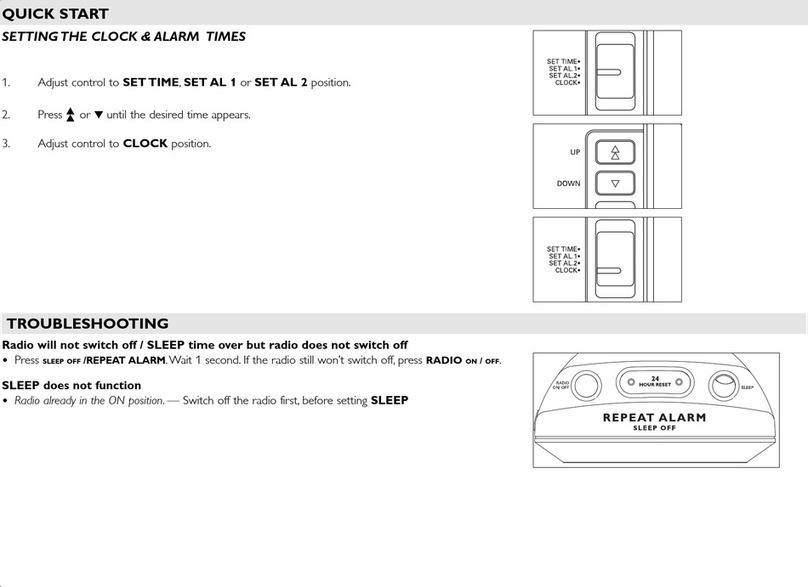
- Press the time of day button (C) and keep it pressed in for
a couple of seconds (fig. 4). The digits for time of day
reading in the display will start flashing.
- Press the setting button (F) (+ or - side) until the correct
time setting is obtained (fig. 5). Press and hold a button
for quick scrolling. Press momentarily a number of times
to achieve exact setting.
- Press the time of day button (C) again (fig. 4) to confirm
the setting.
Alarm time
- Press the alarm time button (D) and keep it pressed in for
a couple of seconds (fig. 6). The digits for alarm time
reading will start flashing
- Press the setting button (F) (+ or - side) as described for
“Setting the time of day” (fig. 7).
- Press the alarm time button (D) again (fig. 6) to confirm
the setting.
Switching Alarm function on / off
- Press the alarm on / off button (E). Symbol gin the
display will indicate that the alarm function is activated
(fig. 8).
- You can switch the alarm function off by pressing the
alarm on/off button (E) again (fig. 9). Symbol g
disappears.
How to stop the alarm sound
Choose from these possibilities:
• Press the snooze / light button “/8 min.” to stop
the sound for a period of 8 minutes (fig. 10). After this
period the sound will start again automatically.
• Press the alarm on / off button (E) (fig. 11) to switch off
the alarm sound. The alarm function is switched off and
symbol gdisappears.
However, if you wish the alarm to sound again on the
same time the following day, press the button again to
switch the alarm function on again. (Symbol g
reappears in the display.)
Display illumination
To enable you to read the information in the display in the
dark, the display is illuminated for 5 seconds when pressing
the snooze / light button (G) (fig. 12).
fl
Deutsch
Wichtig
• Lesen Sie bitte die Gebrauchsanweisung durch,
und sehen Sie sich dabei die Abbildungen an,
bevor Sie den Wecker in Gebrauch nehmen.
• Sorgen Sie dafür, daß kein Wasser in den Wecker
eindringt.
Allgemeine Beschreibung (Abb.1)
ADeckel
BAnzeigefeld
CDruckschalter für die Uhrzeit
DDruckschalter für die Weckfunktion
EEin-/Ausschalter für das Wecksignal
FSchalter für die Zeiteinstellung (+ = Vorlauf;
- = Rücklauf)
GSchalter "Beleuchtung/Weckwiederholung"
HBatteriefachdeckel
Batterie
Ihr Wecker benötigt eine 1,5 V-Batterie Type LR3
(= AAA "Penlight"). Sie ist nicht im Lieferumfang enthalten.
Wir empfehlen Ihnen Philips Alkaline-Batterien. Sie sind
umweltverträglich und von langer Betriebsdauer.
- Öffnen Sie das Batteriefach (Abb. 2).
- Legen Sie die Batterie ein (Abb. 3). Beachten Sie die
Markierungen + und -.
- Schließen Sie das Batteriefach ("Klick").
- Der Wecker läuft bei richtig eingelegter Batterie.
Batterie austauschen
Die Batterie muß ausgetauscht werden, sobald das
Symbol in der Anzeige unten rechts erscheint.
Batterien enthalten Substanzen, welche die Umwelt
gefährden können. Aachten Sie bitte darauf, daß sie nicht
in den normalen Hausmüll gelangen. Geben Sie sie bei
einer der offiziellen Sammelstellen ab.
Einstellung
Uhrzeit
- Halten Sie den Schalter für die Uhrzeit (C) einige
Sekunden gedrückt (Abb. 4). Die Ziffern in der Anzeige
beginnen zu blinken.
- Drücken Sie den Schalter für die Zeiteinstellung (F),
+ oder -, bis die augenblickliche Uhrzeit angezeigt wird
(Abb. 5). Halten Sie den Schalter gedrückt, läuft die
Anzeige schnell durch. Stellen Sie die genaue Zeit ein,
indem Sie die letzten Einstellungen durch einzelnes
Drücken vornehmen.
- Beenden Sie die Einstellung, indem Sie den Schalter (C)
(Abb. 4) nochmals drücken.
Weckzeit
- Halten Sie den Schalter für die Weckzeit (D) einige
Sekunden gedrückt (Abb. 6). Die Ziffern in der Anzeige
beginnen zu blinken.
- Drücken Sie den Schalter für die Zeiteinstellung (F), +
oder -, wie unter "Uhrzeit" beschrieben (Abb. 7).
- Beenden Sie die Einstellung, indem Sie den Schalter (D)
(Abb. 6) nochmals drücken.
Die Weckfunktion ein- und abstellen
- Drücken Sie den Ein-/Ausschalter für das Wecksignal (E).
Das Symbol gerscheint im Anzeigefeld, und zeigt an,
daß die Weckfunktion eingeschaltet ist (Abb. 8).
- Die Weckfunktion wird ausgeschaltet, indem Sie den Ein-
/Ausschalter (E) nochmals drücken (Abb. 9). Die Anzeige
gerlischt.
Abstellen des Wecksignals
Das Wecksignal läßt sich auf zweierlei Weise abstellen:
•Drücken Sie den Schalter Beleuchtung/
Weckwiederholung “/8 min.” (G), wenn das
Wecksignal abgestellt, aber nach 8 Minuten
automatisch wiederholt werden soll (Abb. 10). Die
Anzeige erscheint.
•Drücken Sie den Ein-/Ausschalter für das Wecksignal
(E) (Abb. 11), um das Wecksignal ganz abzustellen.
Soll das Wecksignal nach 24 Stunden wiederholt werden,
so vergessen Sie nicht, den Schalter (E) nochmals zu
drücken, damit die Weckfunktion wieder eingeschaltet
wird. Die Anzeige gerscheint wieder.
Beleuchtung des Anzeigefeldes
- Wenn Sie den Schalter "Beleuchtung/ Weckwieder-
holung" (G) drücken (Abb. 12), wird das Anzeigefeld für
5 Sekunden beleuchtet, und Sie können die Anzeigen
lesen.
fl
Nederlands
Belangrijk
• Bekijk de illustraties en lees de gebruiksaanwij-
zing voordat u de wekker in gebruik neemt.
• Zorg ervoor dat de wekker niet in contact komt
met water.
Algemene beschrijving (fig. 1)
ADeksel
BVenster
CKnop Kloktijd
DKnop Wektijd
EKnop Wekfunctie aan / uit
FInstelknop (+ = cijfers verspringen omhoog; - = dito
omlaag)
GSluimertoets / lichttoets
HDeksel van de batterijruimte
Batterij
Uw apparaat werkt op één LR 03 (AAA 1,5 V) batterij (niet
meegeleverd).
Philips batterijen worden aanbevolen wegens hun lange
levensduur en hun milieuvriendelijke eigenschappen.
- Open de batterijruimte (fig. 2).
- Zet de batterij op zijn plaats (let op de aanduidingen +
en -) (fig. 3).
- Sluit de batterijruimte. (‘Klik!’)
De reiswekker is nu klaar voor gebruik.
Batterij vervangen
De batterij moet worden vervangen wanneer symbool
in het venster verschijnt (rechts onder).
N.b. Batterijen bevatten stoffen die schadelijk kunnen
zijn voor het milieu. Lever daarom uw oude batterijen
in op een door de overheid daartoe aangewezen
plaats.
Instellen
Kloktijd
- Druk op knop Kloktijd (C) en houd deze enkele seconden
ingedrukt (fig. 4). De cijfers die in het venster de kloktijd
aangeven gaan nu knipperen.
- Druk op de instelknop (F) (+ of - kant) totdat de juiste
tijdsinstelling is bereikt (fig. 5). Houd de knop ingedrukt
om de cijfers snel te laten verspringen. Druk de knop een
aantal keren kort in om de instelling exact juist te krijgen.
- Druk nogmaals op knop Kloktijd (C) (fig. 4) om de
instelling vast te leggen.
Wektijd
- Druk op knop Wektijd (D) en houd deze enkele seconden
ingedrukt (fig. 6). De cijfers die in het venster de wektijd
aangeven gaan nu knipperen.
- Druk op de instelknop (F) (+ of - kant) zoals beschreven
voor het instellen van de kloktijd (fig. 7).
- Druk nogmaals op knop Wektijd (D) (fig. 6) om de
instelling vast te leggen.
Alarm functie aan / uit
- Druk op knop Wekfunctie aan / uit (E). Symbool gin het
venster geeft aan dat de wekfunctie is ingeschakeld
(fig. 8).
- U kunt de wekfunctie uitschakelen door de knop
Wekfunctie aan / uit (E) nogmaals in te drukken (fig. 9).
Symbool gverdwijnt dan.
Weksignaal stoppen
U kunt kiezen uit deze mogelijkheden:
• Druk op de Sluimertoets / lichttoets “/8 min.” om
het geluid voor een periode van 8 minuten te laten
stoppen (fig. 10).
Na deze periode begint het geluid automatisch opnieuw.
• Druk op knop Wekfunctie aan / uit (E) (fig. 11) om het
weksignaal uit te schakelen. De wekfunctie wordt dan
uitgeschakeld en symbool gverdwijnt.
Echter, als u wilt dat het weksignaal de volgende dag op
dezelfde tijd opnieuw klinkt, druk dan de knop nogmaals
in. U schakelt daarmee de wekfunctie weer in. (Symbool
gverschijnt opnieuw in het venster.)
Venster verlicht
Om in het donker de gegevens in de vensters te kunnen
aflezen, wordt dit gedurende 5 seconden verlicht als u op
Sluimertoets / lichttoets (G) drukt (fig. 12).
fl
TIME SET
ALARM
ON/OFF
ALARM SET
ALARMTIME
AM
AM
8 MIN.
1
TIME SET
ALARM
ON/OFF
ALARM SET
ALARMTIME
8 MIN.
4
TIME SET
ALARM
ON/OFF
ALARM SET
ALARMTIME
8 MIN.
5
TIME SET
ALARM
ON/OFF
ALARM SET
ALARMTIME
8 MIN.
6
TIME SET
ALARM
ON/OFF
ALARM SET
ALARMTIME
8 MIN.
7
TIME SET
ALARM
ON/OFF
ALARM SET
ALARMTIME
8 MIN.
8
TIME SET
ALARM
ON/OFF
ALARM SET
ALARMTIME
8 MIN.
9
TIME SET
ALARM
ON/OFF
ALARM SET
ALARMTIME
8 MIN.
10
TIME SET
ALARM
ON/OFF
ALARM SET
ALARMTIME
8 MIN.
11
TIME SET
ALARM
ON/OFF
ALARM SET
ALARMTIME
8 MIN.
12
2 3
A
D E
H
C
F
B
G
ALARMTIME
Español
Importante
•Antes de usar el Despertador, lean estas
instrucciones conjuntamente con las
ilustraciones.
•No permitan que el Despertador entre en contacto
con el agua.
Descripción general (fig. 1)
ATapa
BPantalla
CMando para ajustar la hora del día
DMando para ajustar la hora de alarma
EMando para conectar y desconectar la Alarma
FMando de ajuste (+ = hacia arriba ; - = hacia abajo)
GMando luz / repetición de alarma
HTapa del compartimiento de la pila
Pila
Su Despertador funciona con una pila LR03 (" AAA tipo
lápiz" de 1'5 Voltios)(No incluida).
Las pilas Philips son recomendables por su larga duración
y su respeto al Medio Ambiente.
- Abran el compartimiento de la pila (fig. 2).
- Coloquen la pila (tengan en cuenta las indicaciones
+ y -) (fig. 3).
- Cierren el compartimiento de la pila ("click").
- El Despertador de viaje está, ahora, listo para usar.
Cambio de la pila
La pila necesita ser cambiada si el símbolo aparece
en la pantalla (Esquina inferior derecha).
Nota : Las pilas contienen substancias que pueden
polucionar el Medio Ambiente.
Depositen su pilas gastadas en un lugar oficialmente
designado para ello.
Ajuste
Hora del día
- Presionen el mando para ajustar la hora del día (C)
manteniéndolo presionado durante varios segundos
(fig. 4). Los números de la hora del día que se ven en la
pantalla empezarán a parpadear.
- Presionen el mando de ajuste (F) (hacia + o -) hasta
obtener el ajuste correcto de la hora (fig. 5).
Mantengan presionado un mando para una búsqueda
rápida. Presionen momentáneamente varias veces para
alcanzar el ajuste exacto.
- Vuelvan a presionar el mando para ajustar la hora del día
(C) (fig. 4) para confirmar el ajuste.
Hora de la Alarma
- Presionen el mando para ajustar la hora de alarma (D)
manteniéndolo presionado durante varios segundos
(fig. 6). Los números de la hora de la alarma que se ven
en la pantalla empezarán a parpadear.
- Presionen el mando de ajuste (F) (hacia + o -) tal como
se describe en "Ajuste de la hora del día"
(fig. 7).
- Vuelvan a presionar el mando para ajustar la hora de la
alarma (D) (fig. 6) para confirmar el ajuste.
Puesta en marcha / Parada de la función Alarma
- Presionen el mando para conectar y desconectar la
alarma (E). El símbolo g en la pantalla indicará que la
función alarma está activada (fig. 8).
- Pueden desconectar la función alarma volviendo a
presionar el mando para conectar y desconectar la
alarma (E) (fig. 9). El símbolo gdesaparecerá.
Cómo parar el sonido de la alarma
Elijan entre estas posibilidades :
•Presionen el mando luz / repetición de alarma "/
8 min." para parar el sonido durante un período de
8 minutos (fig. 10). Después de ese período, el sonido
volverá a sonar automáticamente.
• Presionen el mando para conectar y desconectar la
alarma (E) (fig. 11) para desconectar definitivamente la
alarma.
La función alarma está desconectada y el símbolo
desaparecerá.
Sin embargo, si desean que la señal de alarma vuelva a
sonar a la misma hora el día siguiente, vuelvan a
presionar el mando para conectar la función alarma de
nuevo.
(El símbolo g reaparecerá en la pantalla).
Iluminación de la pantalla
Para hacer posible el leer la información de la pantalla en
la oscuridad, la pantalla se iluminará durante 5 segundos
cuando presionen el mando luz / repetición de alarma (G)
(fig. 12)
fl
º

This manual suits for next models
1

Other Philips Alarm Clock manuals

Philips HF3462/30 User manual

Philips

Philips HF3462/30 User manual

Philips AJ3232 User manual

Philips

Philips AJ3232 User manual

Philips AJ3121 User manual

Philips

Philips AJ3121 User manual

Philips AJ3230/79 User manual

Philips

Philips AJ3230/79 User manual

Philips DC390/11 User manual

Philips

Philips DC390/11 User manual

Philips HF3504 User manual

Philips

Philips HF3504 User manual

Philips HF3505 User manual

Philips

Philips HF3505 User manual

Philips HF367X series User manual

Philips

Philips HF367X series User manual

Philips AJ3122/61 User manual

Philips

Philips AJ3122/61 User manual

Philips HF3520/01 User manual

Philips

Philips HF3520/01 User manual

Philips AJ3915/79 User manual

Philips

Philips AJ3915/79 User manual

Philips AJ3122/77 User manual

Philips

Philips AJ3122/77 User manual

Philips AJ110 User manual

Philips

Philips AJ110 User manual

Philips DC290/12 User manual

Philips

Philips DC290/12 User manual

Philips AJ3977/00C User manual

Philips

Philips AJ3977/00C User manual

Philips HF3505/70 Technical manual

Philips

Philips HF3505/70 Technical manual

Philips AJ560/37 User manual

Philips

Philips AJ560/37 User manual

Philips AJ3112/12 User manual

Philips

Philips AJ3112/12 User manual

Philips HF3505 User manual

Philips

Philips HF3505 User manual

Philips HF3521 User manual

Philips

Philips HF3521 User manual

Philips HR5887/00 User manual

Philips

Philips HR5887/00 User manual

Philips AJ310/12 User manual

Philips

Philips AJ310/12 User manual

Philips AJ560 User manual

Philips

Philips AJ560 User manual

Philips AJ260/12 User manual

Philips

Philips AJ260/12 User manual

Popular Alarm Clock manuals by other brands

Eurochron EFW 750 operating instructions

Eurochron

Eurochron EFW 750 operating instructions

Peakeep MHP3112 instructions

Peakeep

Peakeep MHP3112 instructions

TFA 98.1040 instruction manual

TFA

TFA 98.1040 instruction manual

Auriol HG05686A-US-RX manual

Auriol

Auriol HG05686A-US-RX manual

Daewoo DCD-26 user manual

Daewoo

Daewoo DCD-26 user manual

TechniSat DIGITRADIO 50 SE manual

TechniSat

TechniSat DIGITRADIO 50 SE manual

Hama Duo operating instructions

Hama

Hama Duo operating instructions

Marathon C1126 user manual

Marathon

Marathon C1126 user manual

TESTO 608-H1 instruction manual

TESTO

TESTO 608-H1 instruction manual

Hannlomax HX-106CR instruction manual

Hannlomax

Hannlomax HX-106CR instruction manual

Hama RC 40 operating instructions

Hama

Hama RC 40 operating instructions

Adler Europe AD 1120 user manual

Adler Europe

Adler Europe AD 1120 user manual

LENCO CR-2400 instruction manual

LENCO

LENCO CR-2400 instruction manual

Echo PowerWake instructions

Echo

Echo PowerWake instructions

Hama Fashion Plus operating instructions

Hama

Hama Fashion Plus operating instructions

TFA 60.4523.01 operating instructions

TFA

TFA 60.4523.01 operating instructions

Woodize Lamina Simplon Basic Operation manual

Woodize

Woodize Lamina Simplon Basic Operation manual

Emerson CKS9051 owner's manual

Emerson

Emerson CKS9051 owner's manual

manuals.online logo
manuals.online logoBrands
  • About & Mission
  • Contact us
  • Privacy Policy
  • Terms and Conditions

Copyright 2025 Manuals.Online. All Rights Reserved.