Philips FC6125 User manual

Electric Sweeper
FC6125

2

3
1

4

FC6125
ENGLISH 6
DANSK 15
DEUTSCH 24
34
ESPAÑOL 45
SUOMI 55
FRANÇAIS 64
ITALIANO 74
NEDERLANDS 84
NORSK 94
PORTUGUÊS 103
SVENSKA 112
TÜRKÇE 121

6
General description (Fig. 1)
AUpper handle
BHanging slot
CTelescopic part of stick with length adjustment slide
DBottom part of stick
ELower handle
FDirt tray door slide
GPivoting hinge
HRoller brush
ITransparent front cover
JSweeper base
KDirt tray
LCharging base
MSocket for small plug
NSmall plug
OAdapter
POn/off button
QCharging light
RDirt tray release button
SRetainer
TBelt
URetainer release slide
VLid of battery pack compartment
WCutting groove
XWheels
Important
Read this user manual carefully before you use the appliance and save it
for future reference.
Check if the voltage indicated on the adapter corresponds to the
local mains voltage before you connect the appliance.
Do not use the appliance if the adapter, the cord, the charging
base or the appliance itself is damaged. If the adapter or charging base
is damaged, always have it replaced with one of the original type in
order to avoid a hazard.
-
-
ENGLISH

Keep the appliance out of the reach of children.
Never use the appliance and the charging base outdoors. Never use
the appliance on wet surfaces.
Never pick up water, liquids or wet food substances. Never pick up
ammable substances and do not pick up ashes until they are cold.
Never immerse the appliance and the charging base in water or any
other liquid, nor rinse them under the tap.
Do not use the appliance without the dirt tray or roller brush.
Always switch off the appliance after use, before you charge it and
before you connect or disconnect parts.
Unplug the appliance before you clean or maintain it.
Only charge the appliance with the adapter and/or charging base
supplied.
The adapter contains a transformer. Do not cut off the adapter to
replace it with another plug, as this causes a hazardous situation.
The adapter feels warm during charging.This is normal.
Always return the appliance to a service centre authorised by Philips
for examination or repair.
Do not stick your hands/ngers into the rotating roller brush to avoid
injuries.
This Philips appliance complies with all standards regarding
electromagnetic elds (EMF). If handled properly and according to the
instructions in this user manual, the appliance is safe to use based on
scientic evidence available today.
1 Rotate the lower handle 180° to the left or right (1).Then pull the
handle upwards until it is in upright position (2). (Fig. 2)
2 Charge the appliance for at least 16-18 hours before you use it for
the rst time (see chapter ‘Charging’).
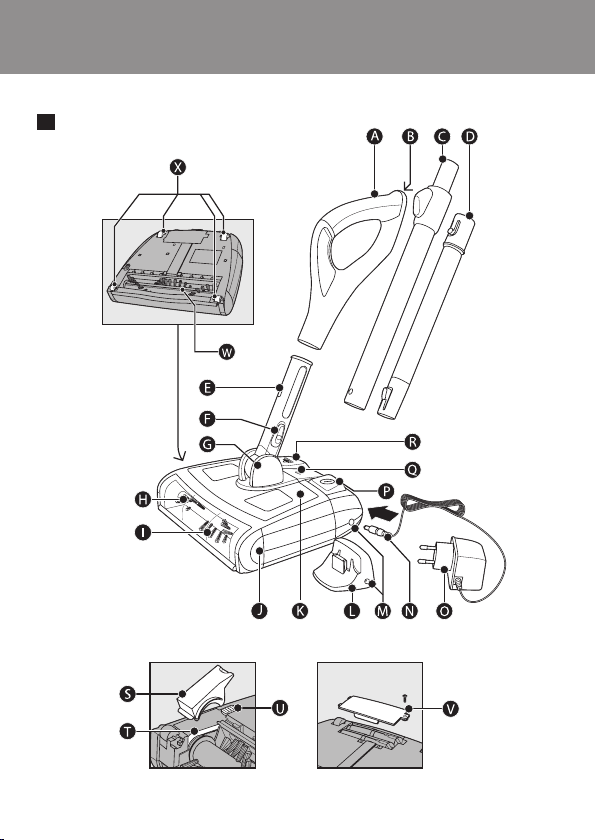
1 Connect the upper handle to the telescopic part of the stick.
-
-
-
-
-
-
-
-
-
-
-
-
ENGLISH 7

2 Connect the telescopic part of the stick to the bottom part of the
stick (‘click’). (Fig. 3)
3 Connect the stick to the lower handle of the sweeper base
(‘click’) (Fig. 4).
To remove the stick, press the button on the lower handle (1) and
pull the stick upwards (2). (Fig. 5)
Charging
You need to charge the appliance when the charging light ashes. Charge
the appliance for 16-18 hours.
Only charge the appliance when the battery pack is low to avoid
overcharging.
1 Switch off the appliance before you charge it.
2 Place the stick in upright position (‘click’) (Fig. 6).
3 Insert the small plug into the socket on the sweeper base (Fig. 7).
You can also use the charging base: insert the small plug into the charging
base and put the appliance on the charging base.
4 Insert the adapter into a wall socket.
The charging light is on continuously during charging and after the
battery is fully charged.The charging light goes out when you
disconnect the appliance from the mains.
Using the appliance
1 To unlock the stick from its storage position, put your foot on top
of the sweeper base to prevent it from tilting. Then pull the handle
towards you (‘click’). (Fig. 8)
Do not to put your foot on the on/off button or the dirt tray release
button.
2 Press the on/off button to switch on the appliance. (Fig. 9)
To switch off the appliance, press the on/off button again.
-
,
ENGLISH8

3 To adjust the length of the stick during use, press the slide on the
telescopic part (1). At the same time, move the top or bottom part
of the stick upwards or downwards (2) (Fig. 10).
4 To use the sweeper as a handheld appliance, remove the stick and
hold the sweeper by the lower handle. (Fig. 11)
For better grip, push the handle towards the front of the appliance until it
is at a 45-degree angle to the base (‘click’).
Cleaning
Never clean the appliance or any of its parts in water or in the
dishwasher.
Clean the appliance and its parts with a damp cloth.
1 Always pull the small plug out of the appliance or remove the
appliance from the charging base before you clean the appliance.
2 Clean the appliance with a damp cloth.
Emptying the dirt tray
1 Always empty the dirt tray after use.
2 Place the stick in upright position (‘click’) (Fig. 6).
3 Press the length adjustment slide (1) and slide the telescopic part
of the stick to the lowest position (2) (Fig. 12).
4 Press on the dirt tray release button (1) and lift the dirt tray out
of the sweeper base (2) (Fig. 13).
5 Hold the dirt tray over a dustbin.Then press the slide on the lower
handle downwards to open the dirt tray door and empty the dirt
tray (Fig. 14).
6 Place the dirt tray back into the sweeper base and push it down
into position. (Fig. 15)
The dirt tray door closes automatically when you put the dirt tray back
into the sweeper base (‘click’).
ENGLISH 9

1 Switch off the appliance before you clean the roller brush.
2 Remove the transparent front cover from the sweeper base. Grab
the bottom edge of the cover with both hands, pull it outwards (1)
and upwards (2) rmly until it is released from the slots (Fig. 16).
3 Rotate the roller brush until the cutting groove faces you. Use a
pair of scissors to cut the hairs, threads etc that have collected
around the roller brush (Fig. 17).
4 Remove uff, hairs and other dirt from the roller brush.
1 To remove the stick, press the button on the lower handle (1) and
pull the stick upwards (2) (Fig. 5).
2 Turn the sweeper base upside down, push the release slide in the
direction of the arrow (1) and remove the retainer (2) (Fig. 18).
3 Slip the belt off the end of the roller brush (1) and lift the brush
out of the base (2) (Fig. 19).
4 Remove uff, hairs and other dirt from the roller brush and the
groove.
1 Slip the belt over the ribbed end of the roller brush. Insert the
other end of the roller brush into the slot opposite the
belt (Fig. 20).
2 Insert the end of the roller brush with the belt into the other
slot. (Fig. 21)
Do not force the roller brush into the slot. Rotate the roller brush so
that the ridge on the side with the belt points upwards.
3 Put the retainer back into the slot (1) and slide the release slide to
the original position (‘click’) (2) (Fig. 22)
ENGLISH10

If the roller brush is not properly inserted, you cannot move the release
slide to locked position.
4 Reattach the transparent front cover to the sweeper base. Grab
the cover with both hands, push it downwards (1) and inwards (2)
rmly until it snaps back into the slots (‘click’). (Fig. 23)
Cleaning the wheels
1 Switch off the appliance.
2 Remove the transparent front cover from the sweeper base. Grab
the bottom edge of the cover with both hands, pull it outwards (1)
and upwards (2) rmly until it is released from the slots (Fig. 16).
3 Place the sweeper base upside down.
4 Insert a slotted screwdriver underneath one of the wheels. Rotate
the screwdriver to loosen the wheel and axle from the
groove (Fig. 24).
Do not place your hand on the wheel.
To prevent the wheel and axle from hitting you or others, do not put
your face close to the sweeper base and do not point it at other
persons.
5 Repeat steps 4 and 5 to remove the other wheels.
6 Remove uff, hairs and other dirt from the wheels,
axles and grooves.
7 Insert the axles into the wheels.
8 Put the wheels and the axles back into the grooves and press them
rmly into position (‘click’). (Fig. 25)
9 Reattach the transparent front cover into the sweeper base. Grab
the cover with both hands, push it downwards (1) and inwards (2)
rmly until it snaps back into the slots (‘click’). (Fig. 23)
ENGLISH 11

Storage
You can store the appliance in three ways:
1 To store the appliance in horizontal position, place it on the
charging base (Fig. 26).
Do not connect the charging base to the mains if the battery of the
appliance does not need to be recharged.
2 To store the appliance in vertical position, tilt the side of the
sweeper base with the roller brush towards the stick (‘click’). Then
park the appliance against a wall (Fig. 27).
3 To hang the appliance from the wall, tilt the side of the sweeper
base with the roller brush towards the stick (‘click’). Then hang the
appliance on a nail by the hanging slot in the back of the upper
handle (Fig. 28).
Environment
Do not throw away the appliance with the normal household waste
at the end of its life, but hand it in at an ofcial collection point for
recycling. By doing this, you help to preserve the
environment (Fig. 29).
If you intend not to use the appliance for a longer period of
time, remove the adapter from the wall socket to save energy.
Battery disposal
NiCd/NiMH batteries can be harmful to the environment and may
explode if exposed to high temperatures or re.
1 Remove the battery pack when you discard the appliance.
Do not throw away the battery pack with the normal household
waste, but hand it in at an ofcial collection point.
You can also take the appliance to a Philips service centre.The staff of
this centre will remove the battery pack for you and will dispose of it
in an environmentally safe way.
Make sure the appliance is switched off and disconnected from the
mains before you remove the battery pack.
-
-
-
-
ENGLISH12

Only remove the battery pack if it is completely empty.
2 Let the appliance run until it stops.
3 Undo the screws and remove the lid of the battery
compartment (Fig. 30).
4 Disconnect the terminals one by one and remove the battery
pack (Fig. 31).
If you need information or if you have a problem, please visit the Philips
website at www.philips.com or contact the Philips Customer Care
Centre in your country (you nd its phone number in the worldwide
guarantee leaet). If there is no Customer Care Centre in your country,
go to your local Philips dealer or contact the Service Department of
Philips Domestic Appliances and Personal Care BV.
Problem Possible cause Solution
The
appliance
does not
work.
You have not
charged the
appliance.
Charge the appliance (see chapter
‘Charging’).
You have not
inserted the
adapter properly
into the wall
socket.
Insert the adapter properly into
the wall socket.
ENGLISH 13

Problem Possible cause Solution
You have not
inserted the small
plug properly into
the appliance or
into the charging
base.
Insert the small plug properly into
the appliance or into the charging
base.
The
appliance
does not
pick up dirt
effectively.
The dirt tray is full. Empty the dirt tray (see chapter
‘Cleaning’).
The roller brush is
clogged.
Clean the roller brush (see chapter
‘Cleaning’).
The
appliance
has a short
operating
time.
The battery pack
has developed a
memory effect.
Discharge the battery pack
completely by letting the appliance
run until it stops.Then recharge
the battery pack for 16-19 hours.
Repeat this discharge-charge cycle
for 3-5 times.
Dirt escapes
from the
appliance.
The dirt tray is full. Empty the dirt tray (see chapter
‘Cleaning’).
The dirt tray door
is not locked
properly.
Make sure the dirt tray door is
locked before you place the dirt
tray back into the appliance (see
chapter ‘Cleaning’).
ENGLISH14

15
AØvre håndtag
BOphængningsskrog
CTeleskopisk del af stangen med knap til længdejustering
DNederste del af stang
ENederste håndtag
FLågeåbner til støvkammer
GDrejehængsel
HRullebørste
IGennemsigtigt frontdæksel
J Sweeper’ens basisenhed
KStøvkammer
LOpladeenhed
MLille strømstik
NLille stik
OAdapter
P On/Off-tast (tænd/sluk)
QOpladeindikator med lys
RKnap, der frigør støvkammeret
SLås
TRem
UKnap, der frigør låsen
VLåg til batterirum
WKlipperille
XHjul
Vigtigt
Læs denne brugervejledning omhyggeligt igennem, inden apparatet tages i
brug, og gem den til eventuel senere brug.
Før der sluttes strøm til apparatet, kontrolleres det, om
spændingsangivelsen på adapteren svarer til den lokale netspænding.
Brug ikke apparatet, hvis adapteren, ledningen, opladeenheden eller
selve apparatet er beskadiget. Hvis adapteren eller opladeenheden er
beskadiget, skal den altid udskiftes med en af den originale type for at
undgå enhver risiko ved efterfølgende brug af apparatet.
-
-
DANSK

Hold apparatet uden for børns rækkevidde.
Brug aldrig apparatet eller opladeenheden udendørs. Brug aldrig
apparatet på våde overader.
Opsug aldrig vand, væsker eller våde fødevarer. Opsug aldrig
brandbare substanser eller aske, før denne er helt kold.
Apparatet og opladeenheden må aldrig kommes i vand eller i anden
væske, og må aldrig skylles under vandhanen.
Brug ikke apparatet, hvis støvkammeret eller rullebørsten ikke er
påsat.
Sluk altid for apparatet efter brug, før du oplader det og før du sætter
dele på eller tager dele af.
Tag stikket ud af apparatet, før du rengør eller vedligeholder det.
Brug kun den medleverede adapter og/eller opladeenhed til
opladning af apparatet.
Adapteren indeholder en transformer. Adapteren må ikke klippes af
og udskiftes med et andet stik, da dette kan være meget risikabelt.
Adapteren føles varm under opladningen. Det er normalt.
Reparation og eftersyn af apparatet skal altid foretages på et
autoriseret Philips-serviceværksted
Stik aldrig dine hænder/ngre ind i den roterende rullebørste da
dette kan medføre skader.
Elektromagnetiske felter (EMF)
Dette Philips-apparat overholder alle standarder for elektromagnetiske
felter (EMF). Ved korrekt anvendelse og i overensstemmelse med
instruktionerne i denne brugsvejleding, er apparatet sikkert at anvende,
ifølge den videnskabelige viden, der er tilgængelig i dag.
1 Drej det nedre håndtag 180° til venstre eller højre (1).Træk
derefter håndtaget opad indtil det er i den opretstående stilling
(2). (g. 2)
2 Oplad apparatet i mindst 16-18 timer, inden det tages i brug første
gang (se afsnittet “Opladning”).
-
-
-
-
-
-
-
-
-
-
-
-
DANSK16

Klargøring
1 Sæt det øvre håndtag på stangens teleskopiske del.
2 Sæt stangens teleskopiske del på stangens nedre del (“klik”). (g. 3)
3 Sæt stangen på sweeperdelens nedre håndtag (“klik”) (g. 4).
For at fjerne stangen skal du trykke på knappen på det nedre håndtag
(1) og trække opad (2). (g. 5)
Opladning
Apparatet skal oplades, når opladeindikatoren blinker. Oplad apparatet i
16-18 timer.
Oplad kun apparatet, når batterispændingen er lav for at undgå
overopladning.
1 Sluk for apparatet, før du oplader det.
2 Sæt stangen i den opretstående stilling (“klik”) (g. 6).
3 Sæt det lille stik i kontakten på sweeperdelen (g. 7).
Du kan også bruge opladeenheden: sæt det lille stik i opladeenheden og
anbring apparatet på opladeenheden.
4 Sæt adapteren i en stikkontakt.
Opladeindikatoren lyser konstant under opladningen og efter at
batteriet er fuldt opladt. Opladeindikatoren slukker, når du tager
stikket ud af stikkontakten.
1 Stangen frigøres fra dens opbevaringsstilling, ved at du sætter din
fod oven på sweeperdelen, så du forhindrer den i at vippe. Træk
derefter håndtaget hen imod dig selv (“klik”). (g. 8)
Sæt ikke foden på on/off-knappen (tænd/sluk) eller på knappen der
frigør støvkammeret.
2 Tænd apparatet ved tryk på on/off-knappen. (g. 9)
Apparatet slukkes ved at trykke på on/off-knappen igen.
-
,
DANSK 17

3 Stangens længde kan justeres under brug ved at trykke på knappen
på den teleskopiske del (1). Før samtidig stangens øvre eller nedre
del opad eller nedad (2) (g. 10).
4 Hvis du vil bruge sweeperen som et håndholdt apparat, kan du
fjerne stangen og holde sweeperen i det nedre håndtag. (g. 11)
Du kan få et bedre greb ved at skubbe håndtaget mod apparatets forside,
indtil det står i en vinkel på 45 grader i forhold til apparatet (“klik”).
Rensning
Rengør aldrig apparatet eller nogle af dets dele i vand eller i
opvaskemaskinen.
Rengør apparatet og dets dele med en fugtig klud.
1 Træk altid det lille stik ud af apparatet eller fjern apparatet fra
opladeenheden, før du rengør apparatet.
2 Rengør apparatet med en fugtig klud.
Tømning af støvkammeret
1 Tøm altid støvkammeret efter brug.
2 Sæt stangen i den opretstående stilling (“klik”) (g. 6).
3 Tryk på længdejusteringsknappen (1) og lad stangens teleskopiske
del glide ned i den laveste stilling (2) (g. 12).
4 Tryk på knappen, der frigør støvkammeret (1) og løft
støvkammeret ud af sweeperen (2) (g. 13).
5 Hold støvkammeret over en affaldsspand. Tryk derefter på knappen
på det nedre håndtag nedad for at åbne lågen til støvkammeret og
tømme støvkammeret (g. 14).
6 Sæt støvkammeret tilbage i sweeperen og tryk det på
plads. (g. 15)
Støvkammerets låge lukker automatisk, når du sætter støvkammeret
tilbage i sweeperen (“klik”).
DANSK18

1 Sluk for apparatet før du rengør rullebørsten.
2 Fjern det gennemsigtige frontdæksel fra sweeperen. Tag fat i
dækslets bundkant med begge hænder, træk det med et fast greb
udad (1) og opad (2), indtil det frigøres fra holderne (g. 16).
3 Drej rullebørsten indtil klipperillen vender imod dig. Brug en saks
til at klippe de hår, tråde mm. over, der har samlet sig omkring
rullebørsten (g. 17).
4 Fjern fnug, hår og andet snavs fra rullebørsten.
1 For at fjerne stangen skal du trykke på knappen på det nedre
håndtag (1) og trække opad (2) (g. 5).
2 Vend bunden opad på sweeperen, tryk på frigørelses-knappen i
pilens retning (1) og fjern låsen (2) (g. 18).
3 Træk remmen af rullebørstens ende (1) og løft børsten ud af
sweeperen (2) (g. 19).
4 Fjern fnug, hår og andet snavs fra rullebørsten og rillen.
1 Træk remmen over rullebørstens ribbede ende. Indsæt
rullebørstens anden ende ind i holderen på den modsatte side af
remmen (g. 20).
2 Sæt den ende af rullebørsten, hvor remmen sidder ind i den anden
holder. (g. 21)
Tving ikke rullebørsten ned i holderen. Drej rullebørsten så forhøjning
på siden med remmen peger opad.
3 Sæt låsen tilbage i holderen (1) og skub frigørelsesknappen ind i
dens oprindelige stilling (“klik”) (2) (g. 22)
Hvis rullebørsten ikke er rigtigt på plads, kan du ikke føre
frigørelsesknappen til den låste stilling.
DANSK 19

4 Sæt det gennemsigtige frontdæksel tilbage på sweeperen. Tag fat i
dækslet med begge hænder og tryk med et fast greb nedad (1) og
indad (2), indtil den går på plads i holderne (“klik”’). (g. 23)
1 Sluk for apparatet.
2 Fjern det gennemsigtige frontdæksel fra sweeperen. Tag fat i
dækslets bundkant med begge hænder, træk det med et fast greb
udad (1) og opad (2), indtil det frigøres fra holderne (g. 16).
3 Læg sweeperen med bunden opad.
4 Før en ad skruetrækker ind under et af hjulene. Drej
skruetrækkeren for at løsne hjulet og akslen fra
fordybningen (g. 24).
Læg ikke din hånd på hjulet.
For at undgå, at du eller andre kan blive ramt af hjulet eller akslen, skal
du ikke gå tæt på sweeperen med dit ansigt, undlad også at rette det
imod andre personer.
5 Gentag trinene 4 og 5 for at tage de andre hjul af.
6 Fjern fnug, hår og andet snavs fra hjulene,
akslerne og fordybningerne.
7 Sæt akslerne på hjulene.
8 Sæt hjulene og akslerne tilbage i fordybningerne, og tryk dem på
plads med et fast tryk (“klik”). (g. 25)
9 Sæt det gennemsigtige frontdæksel på plads på sweeperen. Tag fat i
dækslet med begge hænder, tryk det med et fast greb nedad (1) og
indad (2), indtil det går ind i holderne med et “klik”. (g. 23)
DANSK20
Other manuals for FC6125
1
Table of contents
Languages:
Other Philips Blower manuals