Register your product and get support at CE120
EN Installation/Connection Guide
© 2008 Koninklijke Philips Electronics N.V.
All rights reserved.
English
These instructions are for a typical installation.
However, if your car has different requirements,
make the corresponding adjustment. If you have
any questions regarding installation kits, consult
your Philips car audio dealer.
Caution
This unit is designed for negative ground
(earth) 12V DC operation only.
Always install this unit in the car dashboard.
Other locations can be dangerous as the
rear of the unit heats up during use.
To avoid short-circuit: before you connect,
ensure that the ignition is off.
Ensure that you connect the yellow and red
power supply leads after all other leads are
connected.
Ensure that all loose leads are insulated with
electrical tape.
Ensure that the leads do not get caught
under screws orin parts that will move (e.g.
seat rail).
Ensure that all ground (earth) leads are run
to a common ground (earth) point.
Use only the supplied mounting hardware
for a safe and secure installation.
Improper fuses can cause damage or fire.
When you need to change the fuse, consult
a professional.
•
•
•
•
•
•
•
•
•
Note on the power supply lead (yellow)
When you connect other devices to this
unit, ensure that the rating of the car circuit
is higher than the total fuse value of all the
connected devices.
Notes on speaker connection
Never connect speaker wires to the metal
body or chassis of the car.
Never connect speaker wires with stripes to
one another.
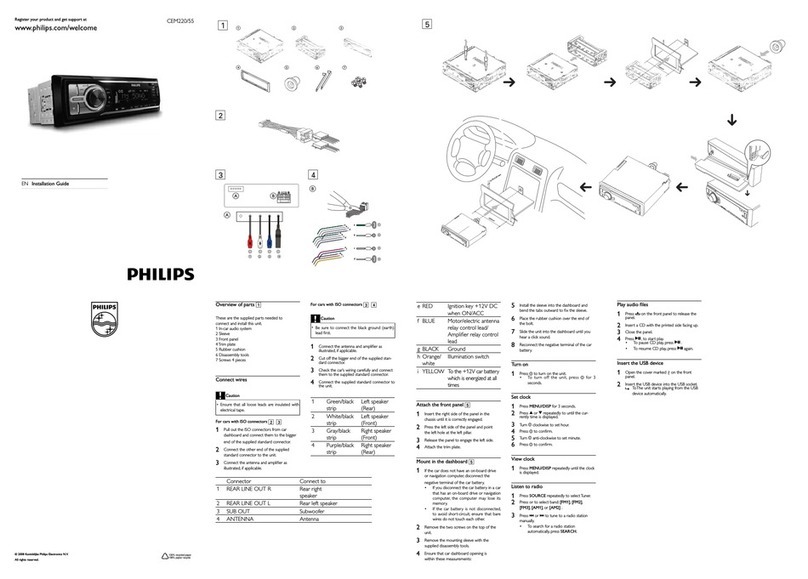
Overview of parts
These are the supplied parts needed to connect
and install this unit.
•
•
•
aCarry case with front panel stored inside
bTrim plate
cStandard connector
dDisassembly tool x 2 pcs
eRubber cushion
fScrew x 4 pcs
gMounting bolt
Connect wires: ISO connectors
Caution
Ensure that all loose leads are insulated with
electrical tape.
•
1Pull out the ISO connectors from car dash-
board and connect them to the bigger end
of the supplied standard connector.
2Connect the other end of the supplied
standard connector to the unit.
3Do the other connections, if applicable.
1Antenna To antenna
2Rear line out
(right)
To amplifier line
in (right)
3Rear line out
(left)
To amplifier line
in (left)
Connect wires: without ISO
connectors
Caution
Ensure that all loose leads are insulated with
electrical tape.
•
1Cut off the bigger end of the supplied
standard connector.
2Check the car’s wiring carefully and connect
them to the supplied standard connector.
1Black To a metal surface of the
car
First connect the black
ground (earth) lead, then
connect the yellow and red
power supply leads.
2Blue To the electric antenna
control lead or power
supply lead of the antenna
booster
If there is no electric an-
tenna or antenna booster,
or it is manually operated
telescopic antenna, it is not
necessary to connect this
lead.
3Yellow To the +12V car battery
which is energized at all
times.
4Pink To telephone mute termi-
nal (if any).
5Red To the +12V power termi-
nal which is energized in
the accessory (ACC) posi-
tion of the ignition switch
If there is no accessory po-
sition, connect to the +12V
car battery terminal that
is always live. Be sure to
connect the black ground
(earth) lead to a metal
surface of the car first.
6Green/
black
strip
Left speaker (Rear)
7White/
black
strip
Left speaker (Front)
8Gray/
black
strip
Right speaker (Front)
9Purple/
black
strip
Right speaker (Rear)
3Connect the supplied standard connector to
the unit.
4Do the other connections, if applicable.
1Antenna To antenna
2Rear line out
(right)
To amplifier
line in (right)
3Rear line out
(left)
To amplifier
line in (left)
Attach the front panel
1Attach the trim plate.
2Insert the left side of the panel in the chassis
until it is correctly engaged.
3Press the right side of the panel until it is
locked into place.
Mount into the dashboard
1Ensure that car dashboard opening is within
these measurements:
If the car dashboard is bigger, the sup-
plied mounting sleeve is not suitable for
the car. Remove the mounting sleeve
with the removal keys and consult a
professional for advice.
2If the car does not have an on-board drive
or navigation computer, disconnect the nega-
tive terminal of the car attery.
If you disconnect the car battery in
a car that has an on-board drive or
navigation computer, the computer may
lost its memory.
If the car battery is not disconnected,
to avoid short-circuit, ensure that bare
wires do not touch each other.
3Connect the supplied mounting bolt to the
unit.
4Place the supplied rubber cushion over the
end of the mounting bolt.
5Slide the unit into the dashboard until you
hear a click sound.
•
•
•
6Reconnect the negative terminal of the car
battery.
Detach the front panel
You can detach the front panel to deter theft.
1Press to release the panel.
2Pull the panel towards you to detach it from
the chassis.
3Store the panel in the supplied carry case to
protect it from dirt or damage.
Replace fuse
If there is no power, the fuse may broke and need
to be replaced.
1Detach the front panel and take out the unit.
(see ‘Remove the unit’ on page 23)
2Check the electric connection.
3Buy a fuse that matches the voltage of the
damaged fuse (15A)
4Replace the fuse.
If the fuse is broken again after replacement, there
might have internal malfunction. In such case,
consult your Philips dealer.
Remove the unit
To repair or replace the unit, remove it from the
dashboard.
1Detach the front panel.
2Pull out the unit by using the removal keys.
a
c
f
g
d
e
b
12a
2b
123
1
3
2
4
5
6
7
8
9
