a
c
f
d
e
b
12a
2b
1
2
3
4
5
6
7
8
FRONT LINE OUT L
FRONT LINE OUT R
REAR LINE OUT L
REAR LINE OUT R
PARKING
SUB OUT
ANTENNA
CAMERA
VIDEO OUT 1
VIDEO OUT 2
CAMERA IN
Register your product and get support at CED320
© 2008 Koninklijke Philips Electronics N.V.
All rights reserved.
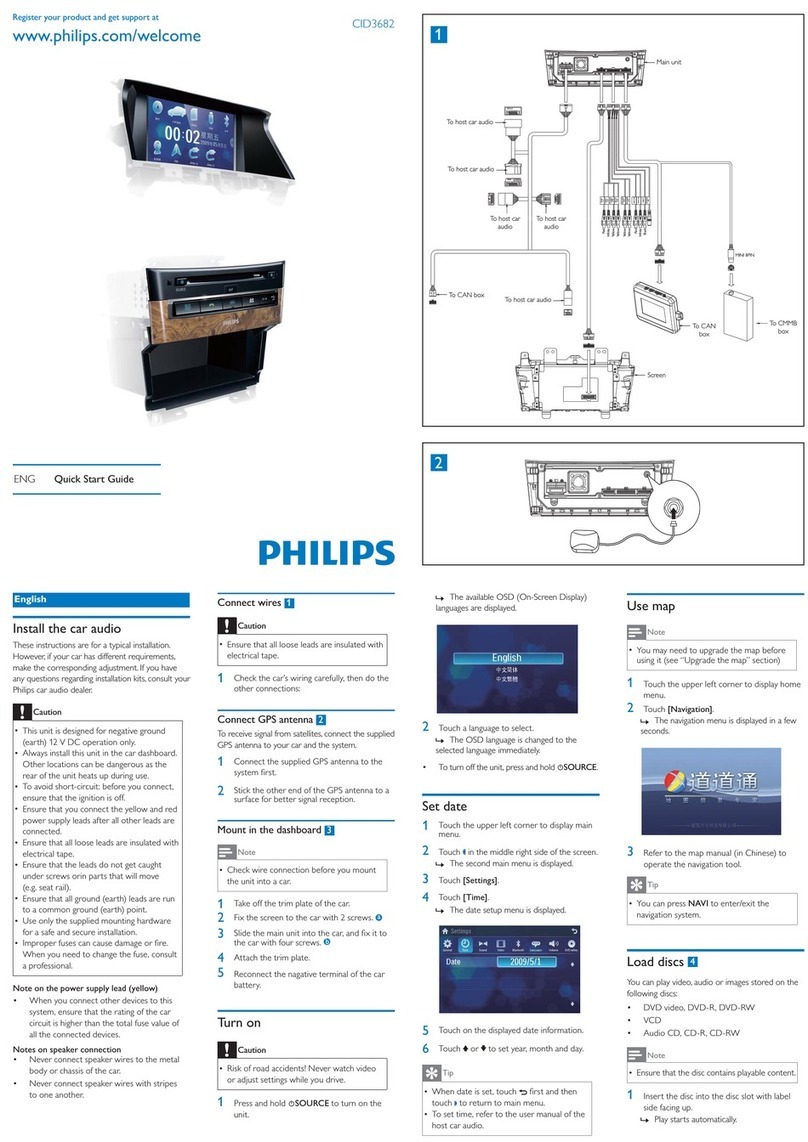
ENG Quick Start Guide
English
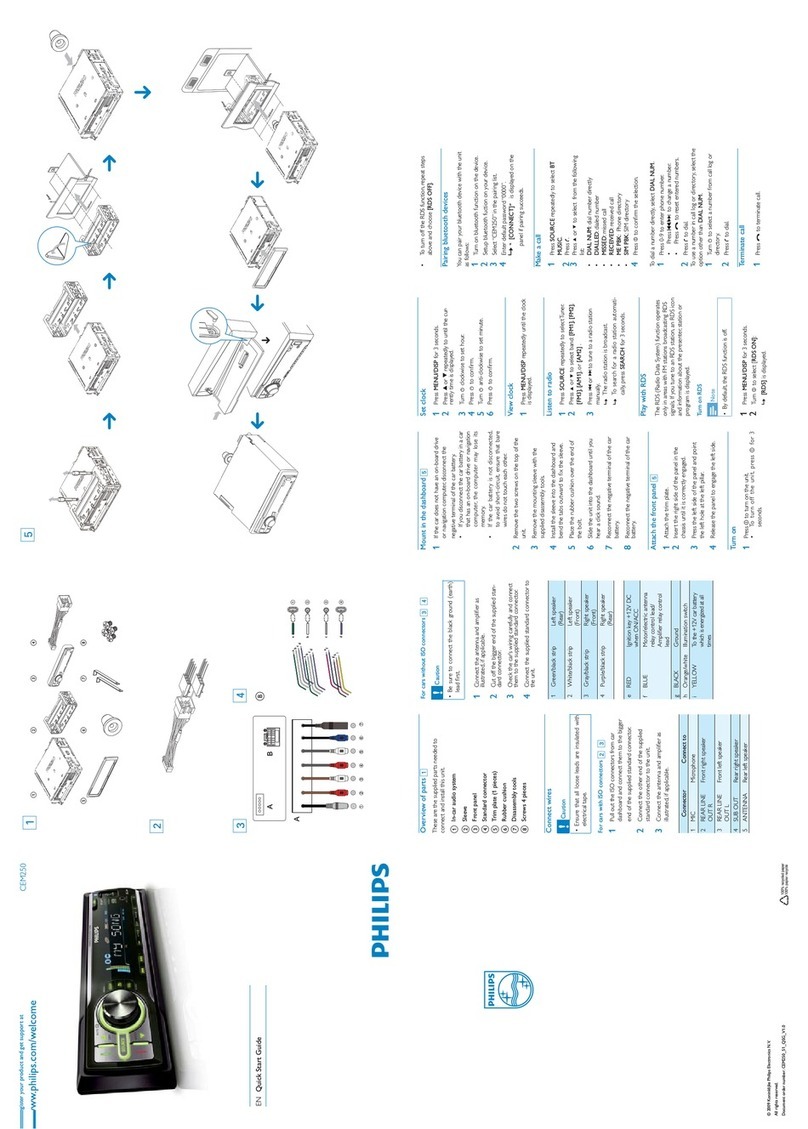
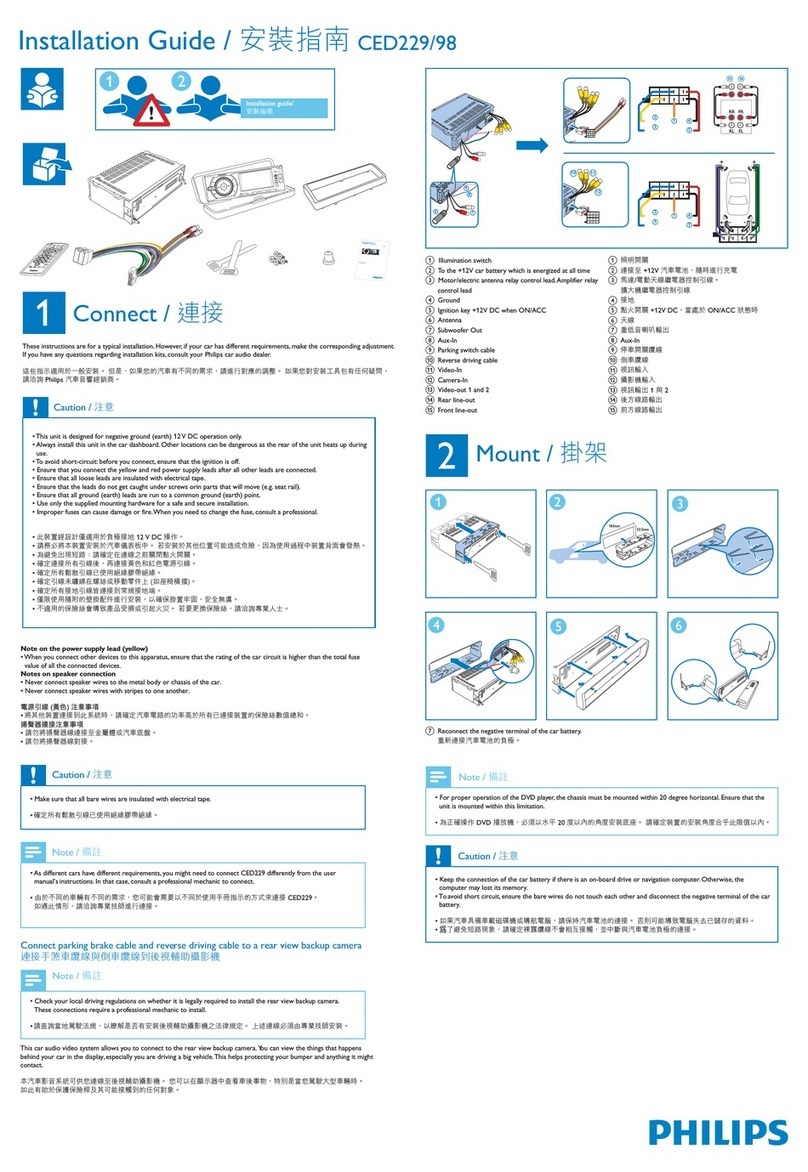
Overview of parts
These are the supplierd parts needed to connect
and install this unit.
a Carry case with front panel stored inside
b Trim plate
c Standard connector
d Rubber cushion
e Removal keys x 2 pcs
f Screw x 4 pcs
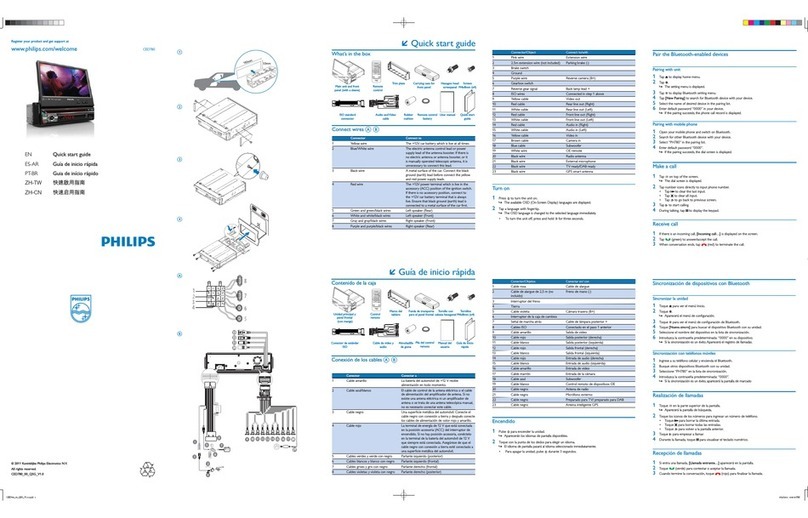
Connect wires: ISO connectors
1Pull out the ISO connectors from the car
dashboard and connect them to the bigger
end of the supplied standard connector.
2Connect the other end of supplied standard
connector to the unit.
3Do the other connections, if applicable.
Connect wires: without ISO
connectors
1Cut off the bigger end of the supplied stan-
dard connector.
2Check the car’s wiring carefully, then connect
them to the standard connector.
Connector Connect to
1Black wire A metal surface of the car
First connect the black ground
(earth) lead, then connect the
yellow and red power supply
leads.
2Yellow wire The +12V car battery which
is live at all times.
3Orange/
white wire
Illumination switch
4Red wire The +12V power terminal
which is live in the accessory
(ACC) position of the ignition
switch
If there is no accessory posi-
tion, connect to the +12V car
battery terminal that is always
live. Be sure to connect the
black ground (earth) lead to a
metal surface of the car first.
5Green and
green/black
wires
Left speaker (Rear)
6White and
white/black
wires
Left speaker (Front)
7Gray and
gray/black
wires
Right speaker (Front)
8Purple and
purple/
black wires
Right speaker (Rear)
3 Connect the supplied standard connector to
the unit.
4Do the other connections, if applicable.
Connect parking brake cable
Connect reverse driving cable
Attach the front panel
1Attach the trim plate.
2Insert the left side of the panel in the chassis
until it is correctly engaged.
3Press the right side of the panel until the
mechanism locks it into place.
4Close the front panel.
Mount in the dashboard
Note
For proper operation of the DVD player, the
chassis must be mounted within 20 degree
horizontal. Ensure that the unit is mounted
within this limitation.
Check wire connection before you mount
the unit into a car.
If preset radio stations are lost when the
ignition key is turned OFF and then back
ON, reconnect the red leads crosswise to
the yellow ones.
•
•
•
1If the car does not have an on-board drive or
navigation computer, disconnect the negative
terminal of the car attery.
If you disconnect the car battery in
a car that has an on-board drive or
navigation computer, the computer may
lost its memory.
If the car battery is not disconnected,
to avoid short-circuit, ensure that bare
wires do not touch each other.
2Ensure that car dashboard opening is within
these measurements:
3Remove the two transport screws on the
top of the unit.
•
•
4Remove the mounting sleeve with the
removal keys.
5Install the sleeve into the dashboard and
bend the tabs outward to fix the sleeve.
If the unit is not fixed by sleeve but by
the supplied screws, skip this step.
6Place the rubber cushion over the end of the
bolt.
7Slide the unit into the dashboard until a click
sound is heard.
8Reconnect the negative terminal of the car
battery.
Detach the front panel
The front panel can be detached and taken with
you to deter theft.
Note
Before installing the unit, detach the front
panel.
•
1 Press
to release the panel.
2Open the panel, then push the right side
panel toward the left side to disengage it
from the chassis.
3Take off the panel and store it in the supplied
carry case to protect it from dirt or damage.
Turn on
1 Press the knob to turn on the unit.
The unit plays the last listened program:
DVD,Tuner, USB or SD/MMC Card (if there is
USB device or SD/MMC card connected).
To turn off the unit, press the knob for
more than 2 seconds.
When the unit is idle for over 5 minutes, it
goes to standby mode and displays screen
saver.
•
»
•
•
Set clock
1 Press MENU.
2Press the navigation buttons to select [SET-
TINGS], then press SEL on the remote
control.
3 Select [SYSTEM], then press .
4 Select [TIME MODE], then press .
The time mode options are displayed:
[12 HOUR MODE]
[24 HOUR MODE]
5 Sselect a mode, then press SEL.
6 Press to return to previous menu and
select [TIME ADJUST], then press .
7Press or to enter clock, then press SEL.
Tune to a radio station
1Press SOURCE to select Tuner.
2 Press or to select band.
[FM] or [AM] is displayed.
3Press or to tune to a radio station
manually.
To search for radio station automatically,
press or for 3 seconds.
Play discs
1Press to open the front panel.
2 Insert the disc into the disc slot with label
side facing up.
Play resumes from the point where it was
last stopped.
3To remove the disc, press the button.
When the disc is ejected, the unit switches
to TUNER mode automatically.
4Close the front panel.
After a few seconds, the screen turns on.
For video discs, if a menu appears: press
or to select an item, then press to start
play.
»
»
»
»
•
»
»
»
»
For discs that contain MP3s, WMAs, or
JPEGs: , press or to select a folder/track/
picture, then press to star t play.
Insert USB device
1Slide down the USB socket cover.
2Insert the USB device into the USB socket.
The unit starts playing from the USB
device automatically.
Insert SD/MMC card
1Press to open the front panel.
2 Insert the SD or MMC card into the card
slot.
The unit starts playing from the SD/MMC
card automatically.
»
»
»
CED320 QSG_Eng.indd 1CED320 QSG_Eng.indd 1 2008-11-5 17:47:402008-11-5 17:47:40
