Philips HD2136 User manual
www.philips.com/welcome
Registeryour product get support at www.philips.com/welcome
Registeryour product get support at
User manual Warranty
q
r
n
o
p
|
{
z
s
t
u
a
b
c
d
f
e
g
l
k
h
m
j
i
y
w
x
v
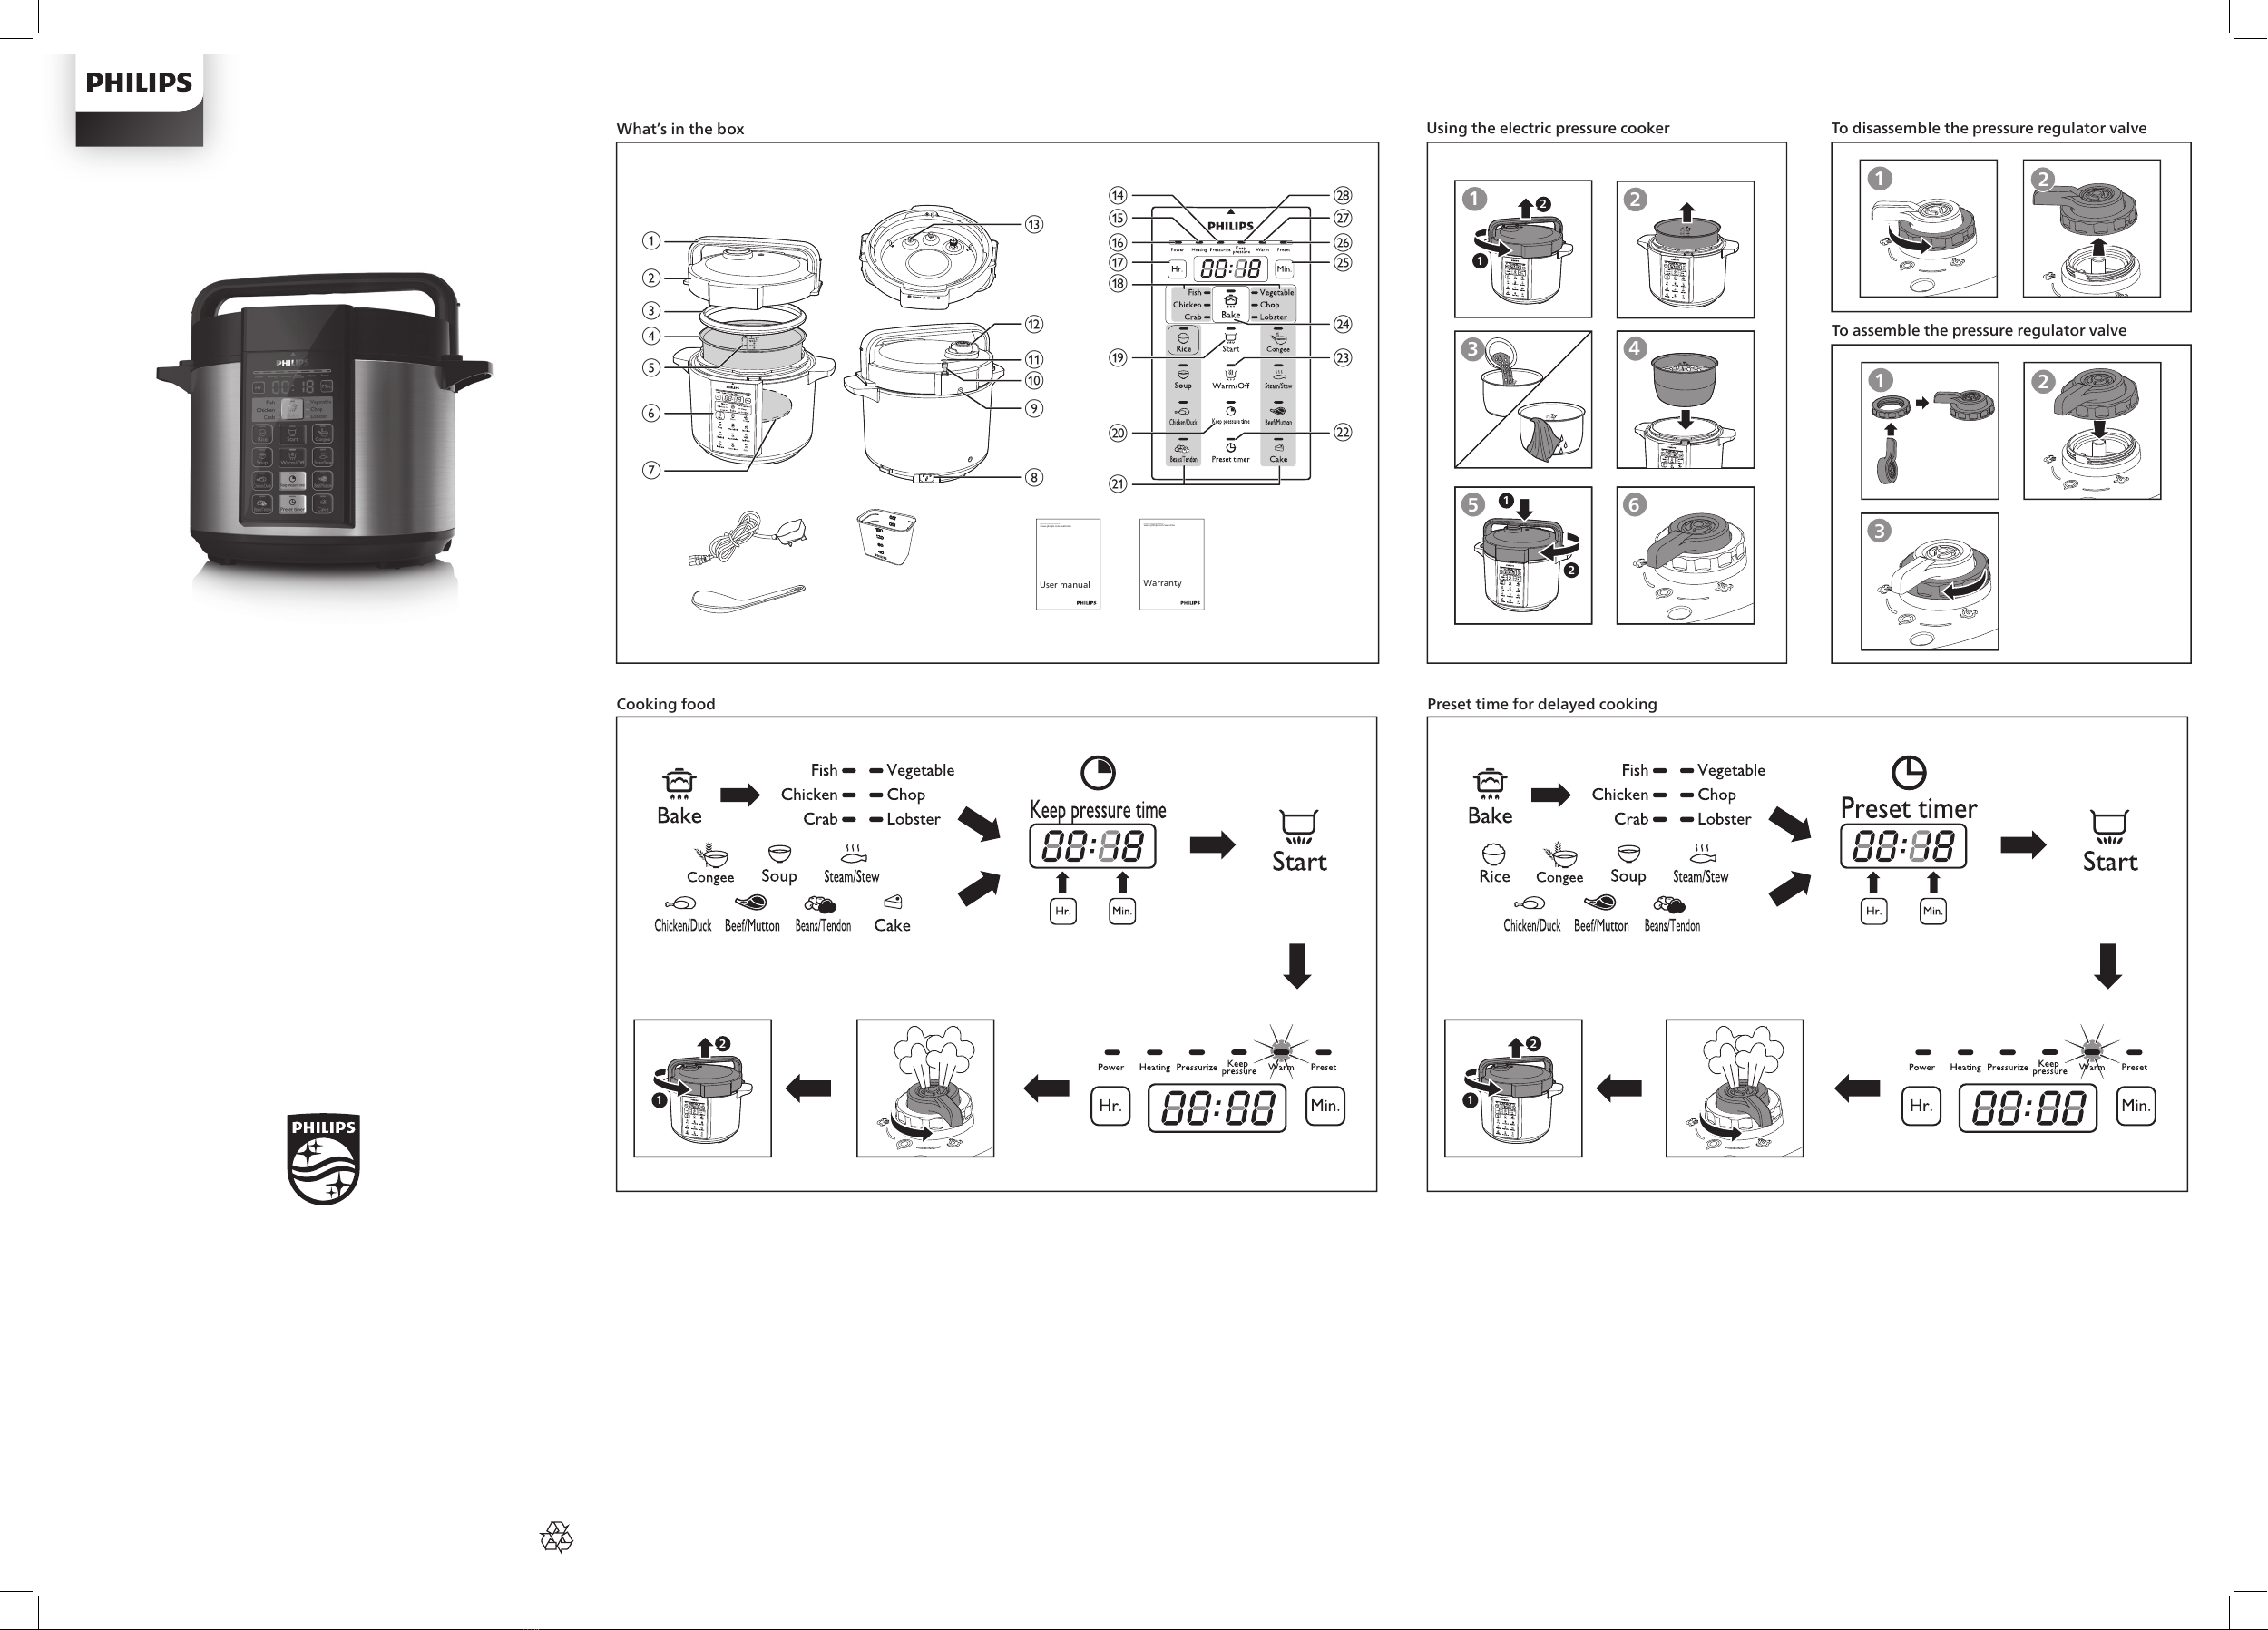
What’s in the box Using the electric pressure cooker
Cooking food Preset time for delayed cooking
To disassemble the pressure regulator valve
1
3
2
4
5 6
1
2
1
2
12
To assemble the pressure regulator valve
12
3
1
2
1
2
© 2022 Philips Domestic Appliances Holding B.V.
All rights reserved.
6608.000.0694.5 (01/04/2022)
User manual
HD2136

1 Your All In One Cooker
Congratulations on your purchase, and welcome to Philips!
To fully benet from the support that Philips oers, register your product at
www.philips.com/welcome.
2 What’s in the box
All In One Cooker main unit Rice&Soup ladle
Measuring cup User manual
Warranty card Power cord
Overview
aLid handle hPower socket
bTop lid iLocking pin
cSealing ring jFloater
dInner pot kFloating valve
eWater level indication lPressure regulator valve
fControl Panel mSafety valve
gHeating element
Controls Overview
nPressurize indicator vPreset timer button
oHeating indicator wWarm/O button
pPower indicator xBake button
qHour button yMinute button
rBaking functions zPreset indicator
sStart button {Warm indicator
tKeep pressure time button |Keep pressure indicator
uPressure cooking functions
Before rst use
1 Remove all packaging materials from the appliance.
2 Take out all the accessories from the inner pot.
3 Clean the parts of the All In One Cooker thoroughly before using it for
the rst time (see chapter "Cleaning").
Note
• Make sure all parts are completely dry before you start using the All In
One Cooker.
3 Using the All In One Cooker
Before using the All In One Cooker to cook food, you need to follow below
preparations:
1 Hold the lid handle and turn it anti-clockwise until the top lid cannot
move any more, then lift up the top lid.
2 Take out the inner pot from the All In One Cooker and put the pre-
washed food in the inner pot.
3 Wipe the outside of the inner pot dry and put it back into the All In One
Cooker.
4 Place the top lid onto the All In One Cooker and turn it clockwise. You
will hear a “click” sound when the top lid is properly locked.
5 Turn the pressure control valve to the sealed position ( ).
Note
• Make sure the sealing ring is properly assembled around the inside of
the top lid.
• Make sure the pressure regulator valve and oating valve are clean and
not blocked.
• Make sure the outside of the inner pot is dry and clean, and that there is
no foreign residue on the heating element or the magnetic switch.
• Make sure the inner pot is in proper contact with the heating element.
Cooking food
Note
• Do not ll the inner pot with less than 1/3 or more than 2/3 full of food
and liquid.
• For food that expands during cooking, do not ll the inner pot with
more than 1/2 full of food and liquid.
• For rice cooking, follow the water level indications on the inside of the
inner pot. You can adjust the water level for dierent types of rice and
your own preference. Do not exceed the quantities indicated on the
inside of the inner pot.
• Make sure the oater falls down before cooking.
1 Follow the preparation steps in “Using the All In One Cooker”.
2 Put the plug in the power socket.
3 Press the desired cooking function button or the baking button ( ) to
choose a cooking mode.
» The selected cooking mode indicator ashes.
» The default pressure keeping time is displayed on the screen.
4 If you want to set a dierent pressure keeping time, press the keep
pressure time button ( ).
» The pressure keeping time ashes on the screen.
5 Press the hour button ( ) to set the hour unit and the minute button
( ) to set the minute unit.
6 Press the start button ( ) and the All In One Cooker starts working in
the selected mode.
7 When the All In One Cooker reaches the working pressure, the keep
pressure ( ) indicator lights up.
» The All In One Cooker enters pressure keeping mode.
8 When the pressure keeping time has elapsed, the All In One Cooker
automatically switches to keep warm mode.
9 Turn the pressure regulator to the vent ( ) position.
» The All In One Cooker starts releasing pressure.
» The oater drops when the pressure is released suciently.
10 Hold the top lid handle and turn the lid anti-clockwise until it cannot
move any more, then lift it up.
Note
• When cooking soup or viscous liquid, do not release pressure by turning
the pressure regulator to the steam vent position, otherwise liquid
might spurt from the pressure regulator valve. Wait until the pressure is
naturally released and the oating valve has dropped to open the top lid.
• The pressure keeping timer will start counting when the working
pressure is reached.
• After the cooking is nished and the pressure is released, unplug the All
In One Cooker to turn o the keep warm function or when not in use.
Tip
• You can adjust the pressure keeping time for dierent types of food
according to your preference. Pressure keeping time is not adjustable
for rice cooking function ( ).
• If the cooking mode is selected by the baking button ( ), you can
cook food without adding water in the inner pot. Make sure to turn the
pressure regulator valve to the bake ( ) position.
Preset time for delayed cooking
You can preset the delayed cooking time for dierent cooking functions.
The preset timer is available up to 24hours, but is not applicable to the cake
baking function ( ).
1 Follow the preparation steps in “Using the All In One Cooker”.
2 Choose the desired cooking mode, then press the preset timer button
( ).
3 Press the hour button ( ) and minute button ( ) to choose the
preset time.
4 Once the preset time is set, press the start button ( ) to enter preset
mode.
5 When the preset time has elapsed, the All In One Cooker starts working
automatically.
6 When the cooking is nished, the rice cooker switches to keep warm
mode automatically, and the keep warm function light will be on.
Note
• Do not exceed the volume indicated nor exceed the maximum water
level indicated in the inner pot, as this may cause the All In One Cooker
to overow.
Adjustable pressure keeping time range
Cooking function Default pressure
keeping time (minute)
Adjustable pressure
keeping time (minute)
Fish ( ) 15 15-59
Chicken ( ) 18 18-59
Crab ( ) 20 20-59
Vegetable ( ) 3 1-59
Chop ( ) 23 20-59
Lobster ( ) 20 20-59
Rice ( ) 14 N/A
Soup ( ) 20 20-59
Chicken/Duck ( ) 15 12-59
Beans/Tendon ( ) 30 25-59
Congee ( ) 13 1-59
Steam/Stew ( ) 20 5-59
Beef/Mutton ( ) 30 30-59
Cake ( ) 45 45-59
Assembling and disassembling the pressure regulator
Caution
• Do not disassemble the pressure regulator during cooking. Always
unplug the All In One Cooker and wait until the pressure has been
released suciently.
To disassemble the pressure regulator:
1 Turn the lower screw anticlockwise until it becomes loose.
2 Pull it up and take out the pressure regulator.
To assemble the pressure regulator:
1 Assemble the lower screw back to the regulator.
2 Make sure the regulator points at the sealed position and put it back to
the steam valve.
3 Turn the screw clockwise until it is fastened.
4 Specifications
Model Number HD2136
Rated power output 900W
Rated capacity 5.0L
Diameter 22cm
Warm keeping temperature 60-80°C
Note
• Always unplug the appliance if not used for a longer period.
5 Cleaning and Maintenance
Note
• Unplug the All In One Cooker before starting to clean it.
• Wait until the All In One Cooker has cooled down suciently before
cleaning it.
Interior
Inside of the outer lid and the main body:
•Wipe with wrung out and damp cloth.
•Make sure to remove all the food residues stuck to the All In One
Cooker.
Heating element:
•Wipe with wrung out and damp cloth.
•Remove food residues with wrung out and damp cloth or
toothpicks.
Sealing ring:
•Soak in warm water and clean with sponge.
Exterior
Surface of the outer lid and outside of the main body:
•Wipe with a cloth damped with soap water.
•Only use soft and dry cloth to wipe the control panel.
•Make sure to remove all the food residues around the pressure
regulator valve and oating valve.
Pressure control valve and oating valve:
•Disassemble the pressure regulator, soak it in warm water, and
clean with sponge.
•Remove food residues in the pressure regulator valve and oating
valve with toothpicks.
Accessories
Rice&Soup ladle and inner pot:
•Soak in hot water and clean with sponge.
6 Recycling
Do not throw away the product with the normal household waste at the end
of its life, but hand it in at an ocial collection point for recycling. By doing
this, you help to preserve the environment.
Follow your country's rules for the separate collection of electrical and
electronic products. Correct disposal helps prevent negative consequences
for the environment and human health.
7 Guarantee and service
If you need service or information, or if you have a problem, visit the Philips
website at www.philips.com or contact the Philips Customer Care Center
in your country. You can nd its phone number in the worldwide guarantee
leaet. If there is no Customer Care Center in your country, go to your local
Philips dealer.
8 Troubleshooting
If your All In One Cooker does not function properly or if the cooking quality
is insucient, consult the table below. If you are unable to solve the problem,
contact a Philips service center or the Consumer Care Center in your country.
Problem Solution
I have diculties
closing the top lid.
The sealing ring is not well assembled. Make sure
the sealing ring is well assembled around the
inside of the top lid.
The oater blocks the locking pin. Push down the
oater so that it does not block the locking pin.
I have diculties
opening the top lid
after the pressure is
released.
The oater has not dropped. Push the oater
down.
The food is not cooked.
Make sure that there is no foreign residue on the
heating element and the outside of the inner pot
before switching the All In One Cooker on.
The heating element is damaged, or the inner
pot is deformed. Take the cooker to your Philips
dealer or a service center authorized by Philips.
Air or steam leaks from
under the lid.
The sealing ring is not well assembled. Make sure
the sealing ring is well assembled around the
inside of the top lid.
There is food residue in the sealing ring. Make
sure the sealing ring is clean.
The top lid is not properly closed. Make sure the
top lid is properly closed.
The pressure level inside of the appliance is
abnormal. In this case the safety valve will be
releasing steam. Take the appliance to your
Philips dealer or a service center authorized by
Philips.
Air or steam leaks from
the oating valve.
There is food residue in the rubber ring of the
oating valve. Clean the rubber ring of the
oating valve.
The rubber ring of the oating valve is broken.
Replace the rubber ring.
The oater does not
rise after the appliance
starts pressurizing.
Make sure there is enough food and water in the
inner pot.
The top lid or the pressure regulator valve has
malfunction. Take the appliance to your Philips
dealer or a service center authorized by Philips.
E3 displays on the
screen.
The temperature inside the inner pot is too high.
Wait until it falls down to room temperature.
E1, E2, or E4 displays on
the screen.
The All In One Cooker has malfunction. Take the
appliance to a Philips dealer or a service center
authorised by Philips.
Other manuals for HD2136
5
Other Philips Cooker manuals

Philips
Philips HD4922/00 User manual

Philips
Philips HD4933/40 User manual

Philips
Philips HR1040/90 User manual

Philips
Philips HD4902 User manual

Philips
Philips HD4911 User manual

Philips
Philips HD4959 User manual

Philips
Philips HD4931 User manual

Philips
Philips HomeCooker HR1040 User manual

Philips
Philips HD2137 User manual

Philips
Philips HD4932 User manual


